
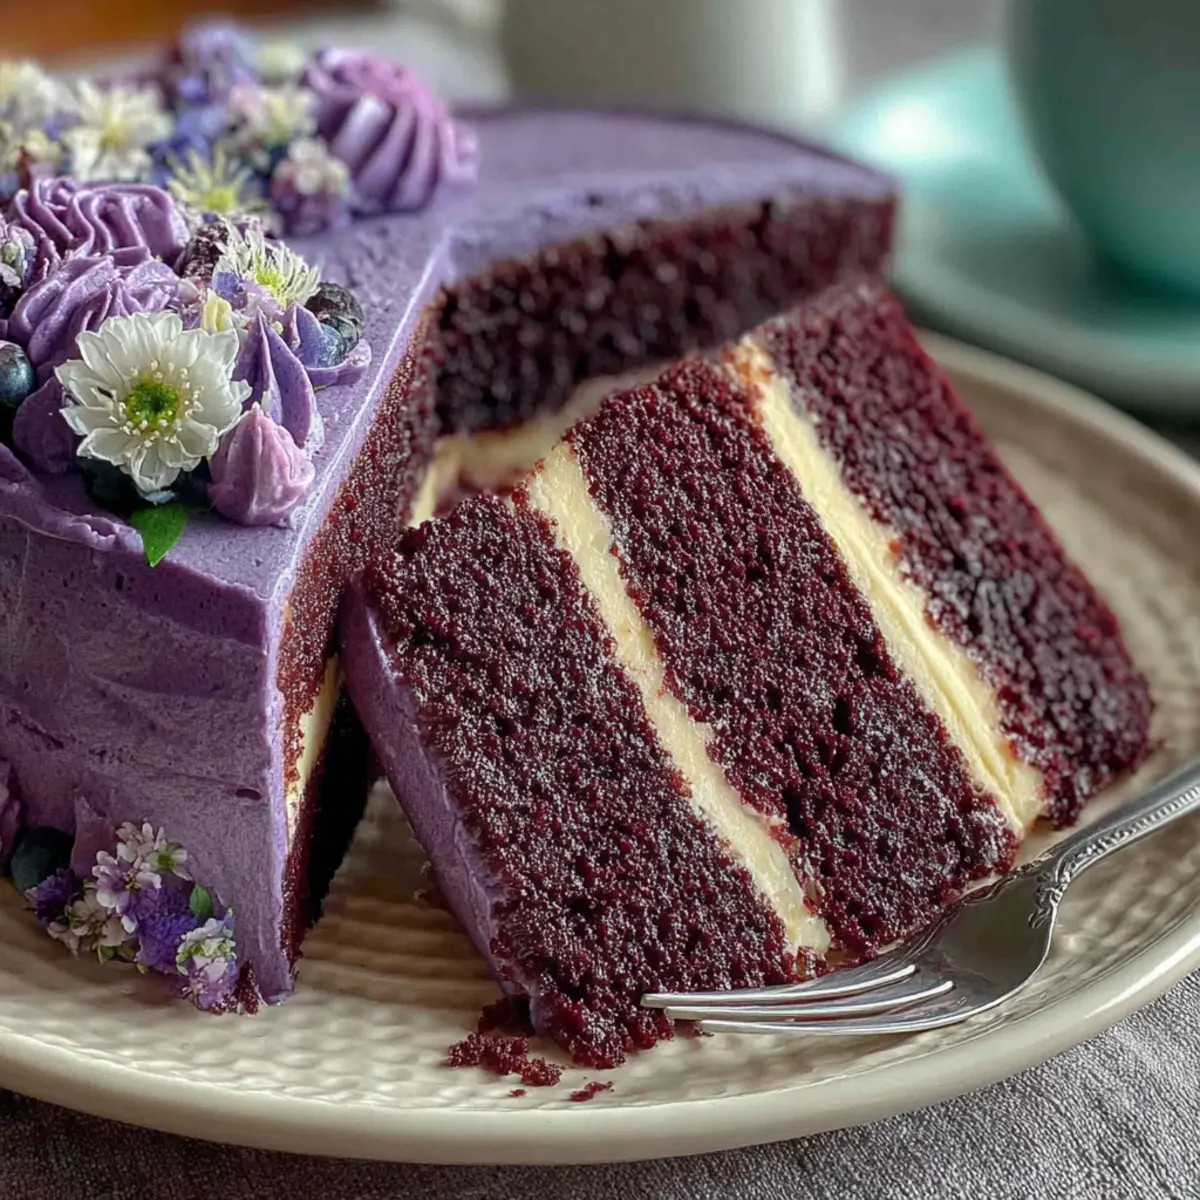
I can still picture the delight on my friends' faces the first time I unveiled my Purple Velvet Cake at a recent gathering. There’s something magical about that vibrant, deep purple hue, and when paired with a luscious white chocolate cream cheese frosting, it turns an ordinary dessert into an eye-catching centerpiece.
As I sliced into the moist, cocoa-infused layers, their excitement was palpable – a beautiful twist on the beloved red velvet that's both visually stunning and delectably rich. This cake isn't just about looks; it delivers an incredible flavor that has quickly earned a spot as a family favorite in my home.
The best part? It’s surprisingly easy to whip together, making it a perfect choice for both beginner bakers and seasoned pros looking to impress without the fuss. And don’t worry if gluten is a concern; I’ve got you covered with tips for a gluten-free adaptation. So, roll up your sleeves and join me in creating a dessert that’s sure to be the talk of any table!
Why is Purple Velvet Cake so popular?
Irresistible Flavor is at the heart of the Purple Velvet Cake’s popularity. This stunning dessert marries the rich, cocoa flavor of traditional velvet cakes with a unique, vibrant purple hue that excites the senses. Beyond its eye-catching color, the combination of moist cake layers and creamy white chocolate cream cheese frosting creates an indulgence that’s hard to resist.
Versatility is another key factor; this cake can effortlessly transition from a casual weeknight treat to a showstopper at festive gatherings. It's also easy to customize—for those avoiding gluten, adapting this recipe is a breeze! For more tips on transforming classic recipes, check out my guide on Gluten-Free Cooking.
Purple Velvet Cake Ingredients
• A delightful mix for the perfect cake!
For the Cake Layers
• All-purpose flour – Provides the structure that supports the cake's height.
• Unsweetened cocoa – Offers rich chocolate flavor and aids in achieving the cake's elegant color; remember, using more cocoa can mute the vibrant purple.
• Baking powder – Acts as a leavening agent for a fluffy texture.
• Baking soda – Another leavening agent that works in harmony with vinegar.
• Salt – Enhances and balances the flavors throughout the cake.
• Unsalted butter (softened) – Contributes to the cake's richness and tenderness.
• Granulated sugar – Delivers sweetness and moisture to the mix.
• Eggs (room temperature) – Adds richness and acts as a binder for all ingredients.
• Vanilla extract – Infuses a warm, inviting flavor into the batter.
• Buttermilk – Provides moisture and a slight tang, reacting beautifully with the baking soda.
• White vinegar – Ensures the cake rises nicely by reacting with the baking soda.
• Food coloring (pink, blue, and red) – Essential for achieving that striking purple hue; Wilton concentrated gel is recommended for best results.
For the Frosting
• White chocolate – Delivers a sweet and creamy flavor for a luscious frosting.
• Cream cheese (softened) – Adds tang and a velvety texture to the frosting.
• Unsalted butter (softened) – Enhances the richness and creaminess of the frosting.
• Vanilla extract – Complements the sweet flavors of the frosting wonderfully.
• Food coloring (pink, blue, and red) – Adjust to achieve the desired purple color for an appealing finish.
With these ingredients, you’re well on your way to creating a magnificent Purple Velvet Cake that is sure to dazzle and delight!
Step-by-Step Instructions for Purple Velvet Cake
- Preheat the Oven Begin by preheating your oven to 350°F (175°C). This initial step is essential for creating the perfect rise and texture in your Purple Velvet Cake. While the oven heats, prepare your baking pans by greasing them and lining the bottoms with parchment paper. Dusting them with cocoa powder will prevent sticking and add a subtle chocolate flavor to the cake.
- Sift the Dry Ingredients In a medium-sized bowl, sift together the all-purpose flour, unsweetened cocoa, baking powder, baking soda, and salt. This step ensures your dry ingredients are well combined and aerated, contributing to a fluffy cake texture. Sifting also helps prevent lumps, making your batter smooth and uniform.
- Cream the Butter In a stand mixer, beat the softened unsalted butter on medium speed until it turns light and fluffy, about 3-5 minutes. This crucial step adds air into the butter, ensuring a rich, tender crumb in your cake layers. Make sure to scrape down the sides of the bowl to incorporate all ingredients.
- Add the Sugar Gradually add the granulated sugar into the creamed butter, beating until the mixture is light and fluffy. This process helps dissolve the sugar and integrate it well with the butter, creating an even sweetness throughout the cake. The combination of sugar and butter also aids in creating a delightful texture.
- Incorporate the Eggs Add the eggs one at a time, mixing well after each addition. This step ensures proper emulsification, allowing the eggs to bind all the ingredients together effectively. Room temperature eggs mix more easily and create a smoother batter, contributing to a velvety texture in the final cake.
- Mix in the Vanilla Pour in the vanilla extract and mix until combined. This step enhances the overall flavor of your cake, providing a warm and inviting aroma that will fill your kitchen. Vanilla complements the cocoa flavor brilliantly, ensuring a deliciously harmonious taste.
- Combine Wet Ingredients In a separate measuring cup, combine the buttermilk, white vinegar, and food coloring. This mixture adds moisture and a slight tang to the cake while helping to achieve that vibrant purple hue. Since buttermilk reacts with baking soda to create lift, this combo is essential for a light cake.
- Alternate Mix Dry and Wet Ingredients Gradually alternate adding the sifted dry ingredients and the buttermilk mixture to the butter and sugar blend, starting and ending with the dry ingredients. Mix only until just combined to avoid overworking the batter, which can lead to a tough cake. Visualize a smooth, well-combined batter that’s slightly thick but not too dense.
- Pour Batter into Pans Evenly distribute the batter between the prepared cake pans and gently tap them on the counter to release any trapped air bubbles. Tapping helps to create a uniform rise and eliminates any large bubbles before baking, which could affect the cake's structure.
- Bake the Cake Place the pans in the preheated oven and bake for approximately 25 minutes. Keep an eye on the cakes; they should spring back when lightly pressed, and a toothpick inserted in the center should come out clean. This step is crucial in ensuring that your cakes are baked to perfection, resulting in a moist, fluffy texture.
- Cool the Cakes After baking, remove the cakes from the oven and let them cool in the pans for about 10 minutes. Then, carefully invert them onto cooling racks to cool completely. Cooling allows the cakes to set and retain their structure, which is vital when it comes to frosting.
- Melt the White Chocolate In a double boiler, melt the white chocolate, stirring until smooth, then let it cool slightly. This process enhances the creaminess of the frosting, ensuring a rich, decadent flavor. Make sure to keep an eye on the chocolate to avoid overheating.
- Make the Frosting In a bowl, cream together the softened cream cheese and unsalted butter until fluffy. Then, slowly mix in the cooled white chocolate and vanilla extract, blending until smooth and creamy. This rich frosting will compliment the moist cake layers perfectly while adding a delightful tang.
- Add Food Coloring to Frosting Adjust the color of the frosting by adding food coloring until the desired purple hue is achieved. This step adds that visually striking touch that will make your Purple Velvet Cake stand out. Mixing the color thoroughly ensures an even shade throughout the frosting.
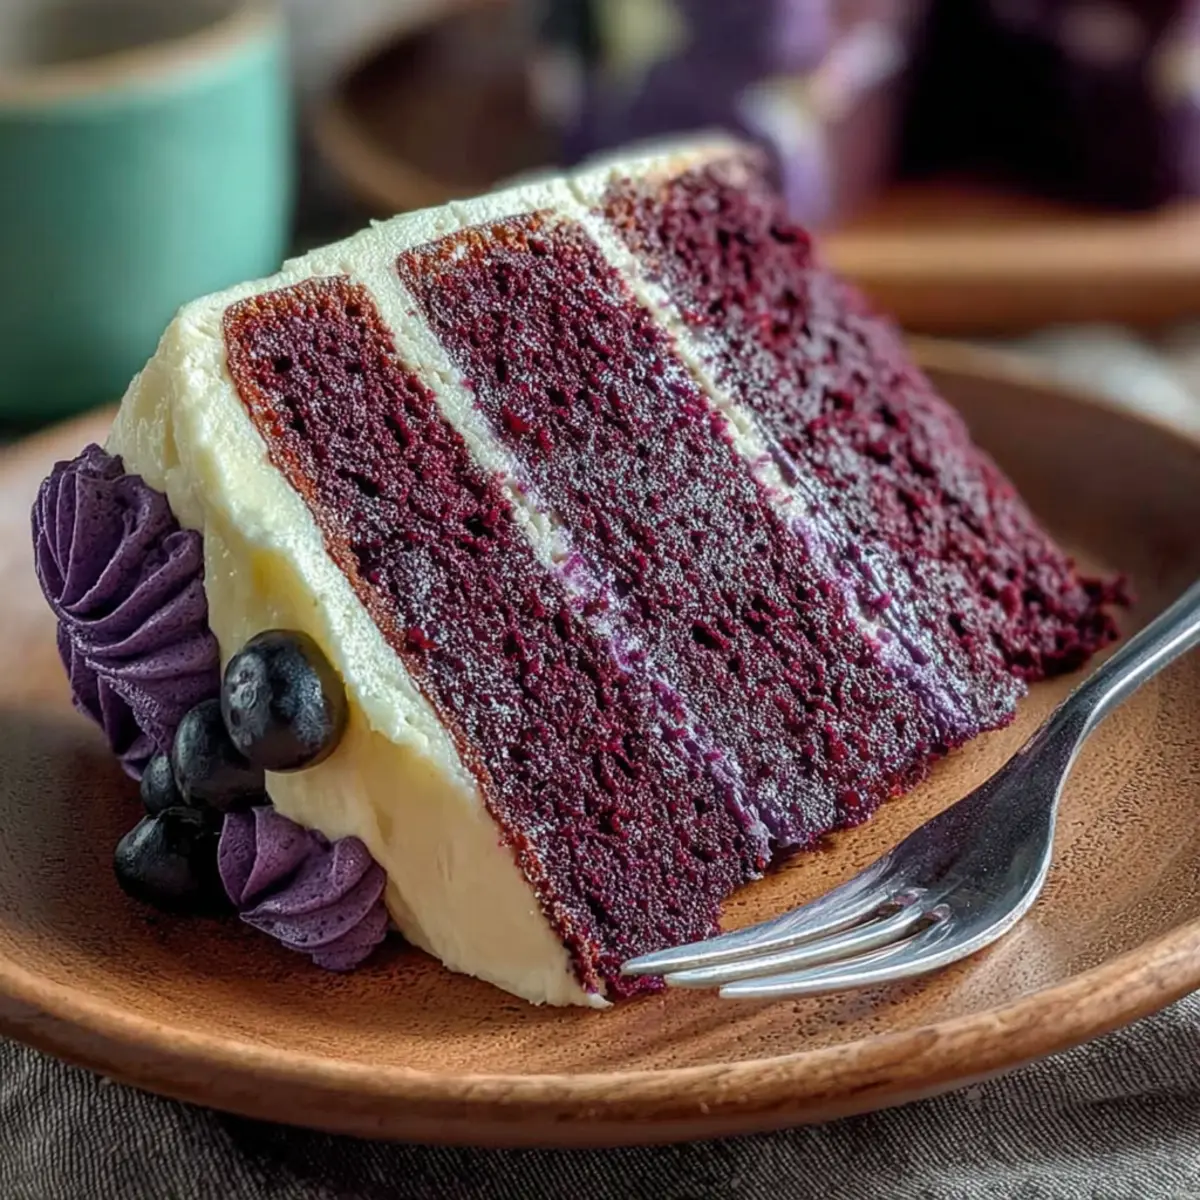
- Assemble and Frost the Cake Place one cake layer on a serving plate, spreading a generous amount of frosting on top. Add the second layer and repeat, then frost the sides and top of the cake for a beautifully finished look. This step transforms your cake into an eye-catching centerpiece, ready to impress your guests and family.
- Serve and Enjoy! Slice into your glorious Purple Velvet Cake and savor not just the beauty but the moist, velvety delight within. Each slice promises a burst of flavor and a visually appealing experience! Don't forget to share with loved ones—after all, dessert is best enjoyed together.
Step-by-Step Instructions for Purple Velvet Cake
- Preheat the Oven
Begin by preheating your oven to 350°F (175°C). This initial step is essential for creating the perfect rise and texture in your Purple Velvet Cake. While the oven heats, prepare your baking pans by greasing them and lining the bottoms with parchment paper. Dusting them with cocoa powder will prevent sticking and add a subtle chocolate flavor to the cake. - Sift the Dry Ingredients
In a medium-sized bowl, sift together the all-purpose flour, unsweetened cocoa, baking powder, baking soda, and salt. This step ensures your dry ingredients are well combined and aerated, contributing to a fluffy cake texture. Sifting also helps prevent lumps, making your batter smooth and uniform. - Cream the Butter
In a stand mixer, beat the softened unsalted butter on medium speed until it turns light and fluffy, about 3-5 minutes. This crucial step adds air into the butter, ensuring a rich, tender crumb in your cake layers. Make sure to scrape down the sides of the bowl to incorporate all ingredients. - Add the Sugar
Gradually add the granulated sugar into the creamed butter, beating until the mixture is light and fluffy. This process helps dissolve the sugar and integrate it well with the butter, creating an even sweetness throughout the cake. The combination of sugar and butter also aids in creating a delightful texture. - Incorporate the Eggs
Add the eggs one at a time, mixing well after each addition. This step ensures proper emulsification, allowing the eggs to bind all the ingredients together effectively. Room temperature eggs mix more easily and create a smoother batter, contributing to a velvety texture in the final cake. - Mix in the Vanilla
Pour in the vanilla extract and mix until combined. This step enhances the overall flavor of your cake, providing a warm and inviting aroma that will fill your kitchen. Vanilla complements the cocoa flavor brilliantly, ensuring a deliciously harmonious taste. - Combine Wet Ingredients
In a separate measuring cup, combine the buttermilk, white vinegar, and food coloring. This mixture adds moisture and a slight tang to the cake while helping to achieve that vibrant purple hue. Since buttermilk reacts with baking soda to create lift, this combo is essential for a light cake. - Alternate Mix Dry and Wet Ingredients
Gradually alternate adding the sifted dry ingredients and the buttermilk mixture to the butter and sugar blend, starting and ending with the dry ingredients. Mix only until just combined to avoid overworking the batter, which can lead to a tough cake. Visualize a smooth, well-combined batter that’s slightly thick but not too dense. - Pour Batter into Pans
Evenly distribute the batter between the prepared cake pans and gently tap them on the counter to release any trapped air bubbles. Tapping helps to create a uniform rise and eliminates any large bubbles before baking, which could affect the cake's structure. - Bake the Cake
Place the pans in the preheated oven and bake for approximately 25 minutes. Keep an eye on the cakes; they should spring back when lightly pressed, and a toothpick inserted in the center should come out clean. This step is crucial in ensuring that your cakes are baked to perfection, resulting in a moist, fluffy texture. - Cool the Cakes
After baking, remove the cakes from the oven and let them cool in the pans for about 10 minutes. Then, carefully invert them onto cooling racks to cool completely. Cooling allows the cakes to set and retain their structure, which is vital when it comes to frosting. - Melt the White Chocolate
In a double boiler, melt the white chocolate, stirring until smooth, then let it cool slightly. This process enhances the creaminess of the frosting, ensuring a rich, decadent flavor. Make sure to keep an eye on the chocolate to avoid overheating. - Make the Frosting
In a bowl, cream together the softened cream cheese and unsalted butter until fluffy. Then, slowly mix in the cooled white chocolate and vanilla extract, blending until smooth and creamy. This rich frosting will complement the moist cake layers perfectly while adding a delightful tang. - Add Food Coloring to Frosting
Adjust the color of the frosting by adding food coloring until the desired purple hue is achieved. This step adds that visually striking touch that will make your Purple Velvet Cake stand out. Mixing the color thoroughly ensures an even shade throughout the frosting. - Assemble and Frost the Cake
Place one cake layer on a serving plate, spreading a generous amount of frosting on top. Add the second layer and repeat, then frost the sides and top of the cake for a beautifully finished look. This step transforms your cake into an eye-catching centerpiece, ready to impress your guests and family. - Serve and Enjoy!
Slice into your glorious Purple Velvet Cake and savor not just the beauty but the moist, velvety delight within. Each slice promises a burst of flavor and a visually appealing experience! Don't forget to share with loved ones—after all, dessert is best enjoyed together.
Turn It Into A Party!
There's nothing quite like serving a stunning Purple Velvet Cake with White Chocolate Cream Cheese Frosting at a gathering! Its vibrant color and luscious flavor make it an absolute crowd-pleaser that will have everyone reaching for seconds! 😉 Perfect with chips or fresh fruit on the side, this cake is sure to be the star of your dessert table. A few tips if serving for a crowd:
- Create a Dessert Station! Set up a self-serve station with slices of the cake and toppings like extra frosting, chocolate shavings, or fresh berries! (It encourages interaction and excitement among your guests!)
- Make It Ahead of Time! Bake and frost your cake a day in advance; cover it with plastic wrap and refrigerate it! (This way, the flavors meld beautifully, saving you time on party day!)
- Adjust for Seasonal Celebrations! For festive occasions, consider adding seasonal flavors like cinnamon or nutmeg in the frosting! (A sprinkle of edible glitter can also add a magical touch!)
Get ready to delight your guests with this charming dessert experience! 🎉
What to Serve with Purple Velvet Cake?
Creating a breathtaking dessert is just the beginning; pairing it with the right sides can elevate your dining experience even more.
- Fresh Berries: The tartness of raspberries or strawberries brightens the rich flavor of the cake, adding a pop of freshness. A little drizzle of mint syrup can enhance this delightful combination even further.
- Vanilla Ice Cream: A scoop of creamy vanilla ice cream offers a classic contrast to the sweet, cocoa-rich layers, making every bite even more indulgent. The cool creaminess beautifully balances the cake's velvety texture.
- Chocolate Ganache: A warm pour of decadent chocolate ganache over each slice enriches the chocolate flavor while adding a luxurious touch. This indulgent pairing is sure to impress guests and elevate your dessert table.
- Mint Tea: The refreshing flavors of mint tea cleanse the palate and complement the cake's rich sweetness, making it a sophisticated drink choice. Consider serving it iced for a bright, revitalizing experience.
- Cream Cheese Mousse: This light and fluffy mousse mirrors the flavors of the frosting while offering a contrasting texture. Served alongside the cake, it invites a delightful interplay of flavors and creaminess.
- Dark Chocolate Shavings: Sprinkling dark chocolate shavings on top of each slice adds a gourmet touch. The slight bitterness of the dark chocolate balances the cake's sweetness perfectly, creating a harmonious dessert experience.
- Lemon Curd: The tanginess of lemon curd cuts through the richness of the cake, offering a surprising twist. This zesty element transforms a slice of cake into a delightful, layered treat.
Choosing the right accompaniments can make your Purple Velvet Cake even more of a standout, ensuring every bite is an adventure for the senses!
How to Store and Freeze Purple Velvet Cake
Fridge: Store your frosted Purple Velvet Cake in an airtight container in the refrigerator for up to 5 days. This keeps it fresh and tasty while the flavors meld together beautifully.
Freezer: For long-term storage, wrap individual slices tightly in plastic wrap, then place them in a freezer bag. They can be frozen for up to 3 months. Thaw in the fridge before serving.
Reheating: If you prefer your cake warmer, consider gently microwaving a slice for about 10-15 seconds. Ensure it’s not too hot to maintain the velvety texture.
Frosting Tip: Keep leftover frosting stored in the refrigerator for up to a week; it can be used to give your cake extra love when served!
Substitutions
Can't find a few of these ingredients? No problem! They can easily be replaced with the suggestions below:
- All-purpose flour: Replace it with gluten-free all-purpose flour. (Make sure it contains xanthan gum for the perfect texture.)
- Unsweetened cocoa: Replace it with dark chocolate cocoa powder. (This adds a richer chocolate flavor while keeping the vibrant color.)
- Buttermilk: Replace it with 1 cup of milk mixed with 1 tablespoon of lemon juice or vinegar. (Let it sit for 5-10 minutes for a perfect substitute.)
- White vinegar: Replace it with apple cider vinegar. (It works just as well for the baking reaction!)
- White chocolate: Replace it with semi-sweet chocolate. (Melted, it will still create a deliciously sweet frosting.)
Purple Velvet Cake Recipe FAQs
What flavor is purple velvet cake?
Purple velvet cake primarily tastes like a deliciously moist chocolate cake, similar to red velvet but with a hint of cocoa. The white chocolate cream cheese frosting adds a creamy, sweet finish that complements the chocolate notes beautifully.
How to make purple color in cake?
To achieve the stunning purple color in your Purple Velvet Cake, use a blend of food coloring—try Wilton concentrated gels for the best results! Mix about 46 drops of pink, 8 drops of blue, and just a drop of red until you reach your desired shade. Add this mixture to your buttermilk, and ensure it's well-blended before incorporating it into the cake batter.
How should I store my leftover Purple Velvet Cake?
Store your frosted Purple Velvet Cake in an airtight container in the refrigerator for up to 5 days. This keeps it moist and allows the flavors to meld together beautifully. If you need to store it longer, consider freezing it! Wrap individual slices tightly in plastic wrap and place them in a freezer bag, where they can last for up to 3 months.
Can purple velvet cake be made gluten-free?
Absolutely! To make a gluten-free version of Purple Velvet Cake, simply substitute the all-purpose flour with a 1:1 gluten-free blend. Be sure to check that your cocoa powder is gluten-free as well, and consider adding a little extra baking powder to help with the rise! Enjoying this beautiful cake without gluten is totally achievable.
What if my cake layers dome in the oven?
If your Purple Velvet Cake layers dome while baking, it may be due to your oven temperature being too high or overmixing the batter. Always ensure your oven is preheated properly, and mix just until combined when adding wet and dry ingredients. If doming happens, simply level the cakes with a knife or cake leveler once they've cooled.
How to know when the cake is properly baked?
To check if your Purple Velvet Cake is done, insert a toothpick into the center of the cake layers. If it comes out clean or with a few moist crumbs, your cake is ready. Another tip is to gently press the top—if it springs back, it’s baked to perfection!
Remember, every little step counts in creating this magnificent Purple Velvet Cake! Enjoy baking!

Irresistibly Purple Velvet Cake with Creamy White Chocolate Frosting
Ingredients
Method
- Preheat the Oven: Begin by preheating your oven to 350°F (175°C). Prepare your baking pans by greasing them and lining the bottoms with parchment paper.
- Sift the Dry Ingredients: In a medium-sized bowl, sift together the all-purpose flour, unsweetened cocoa, baking powder, baking soda, and salt.
- Cream the Butter: In a stand mixer, beat the softened unsalted butter on medium speed until it turns light and fluffy, about 3-5 minutes.
- Add the Sugar: Gradually add the granulated sugar into the creamed butter, beating until the mixture is light and fluffy.
- Incorporate the Eggs: Add the eggs one at a time, mixing well after each addition.
- Mix in the Vanilla: Pour in the vanilla extract and mix until combined.
- Combine Wet Ingredients: In a separate measuring cup, combine the buttermilk, white vinegar, and food coloring.
- Alternate Mix Dry and Wet Ingredients: Gradually alternate adding the sifted dry ingredients and the buttermilk mixture to the butter and sugar blend.
- Pour Batter into Pans: Evenly distribute the batter between the prepared cake pans and gently tap them on the counter.
- Bake the Cake: Place the pans in the preheated oven and bake for approximately 25 minutes.
- Cool the Cakes: After baking, remove the cakes from the oven and let them cool in the pans for about 10 minutes.
- Melt the White Chocolate: In a double boiler, melt the white chocolate, stirring until smooth, then let it cool slightly.
- Make the Frosting: In a bowl, cream together the softened cream cheese and unsalted butter until fluffy. Mix in the cooled white chocolate and vanilla extract.
- Add Food Coloring to Frosting: Adjust the color of the frosting by adding food coloring until the desired purple hue is achieved.
- Assemble and Frost the Cake: Place one cake layer on a serving plate, spreading a generous amount of frosting on top. Repeat with the second layer.
- Serve and Enjoy! Slice into your glorious Purple Velvet Cake and savor the moist, velvety delight.
Nutrition
Notes
- Store your frosted Purple Velvet Cake in an airtight container in the refrigerator for up to 5 days.
- For long-term storage, wrap individual slices tightly in plastic wrap and freeze for up to 3 months.
- Microwave a slice for about 10-15 seconds if you prefer it warm.
- Keep leftover frosting stored in the refrigerator for up to a week.


Leave a Reply