RecipeCrown

Easy & Delicious Recipes

  • Home
  • Breakfast
  • Main Dishes
  • Dessert
  • About
  • Contact
You are here: Home / Archives for grace bellamy

Decadent Oreo Cheesecake That’ll Wow Your Guests

August 29, 2025 by grace bellamy Leave a Comment

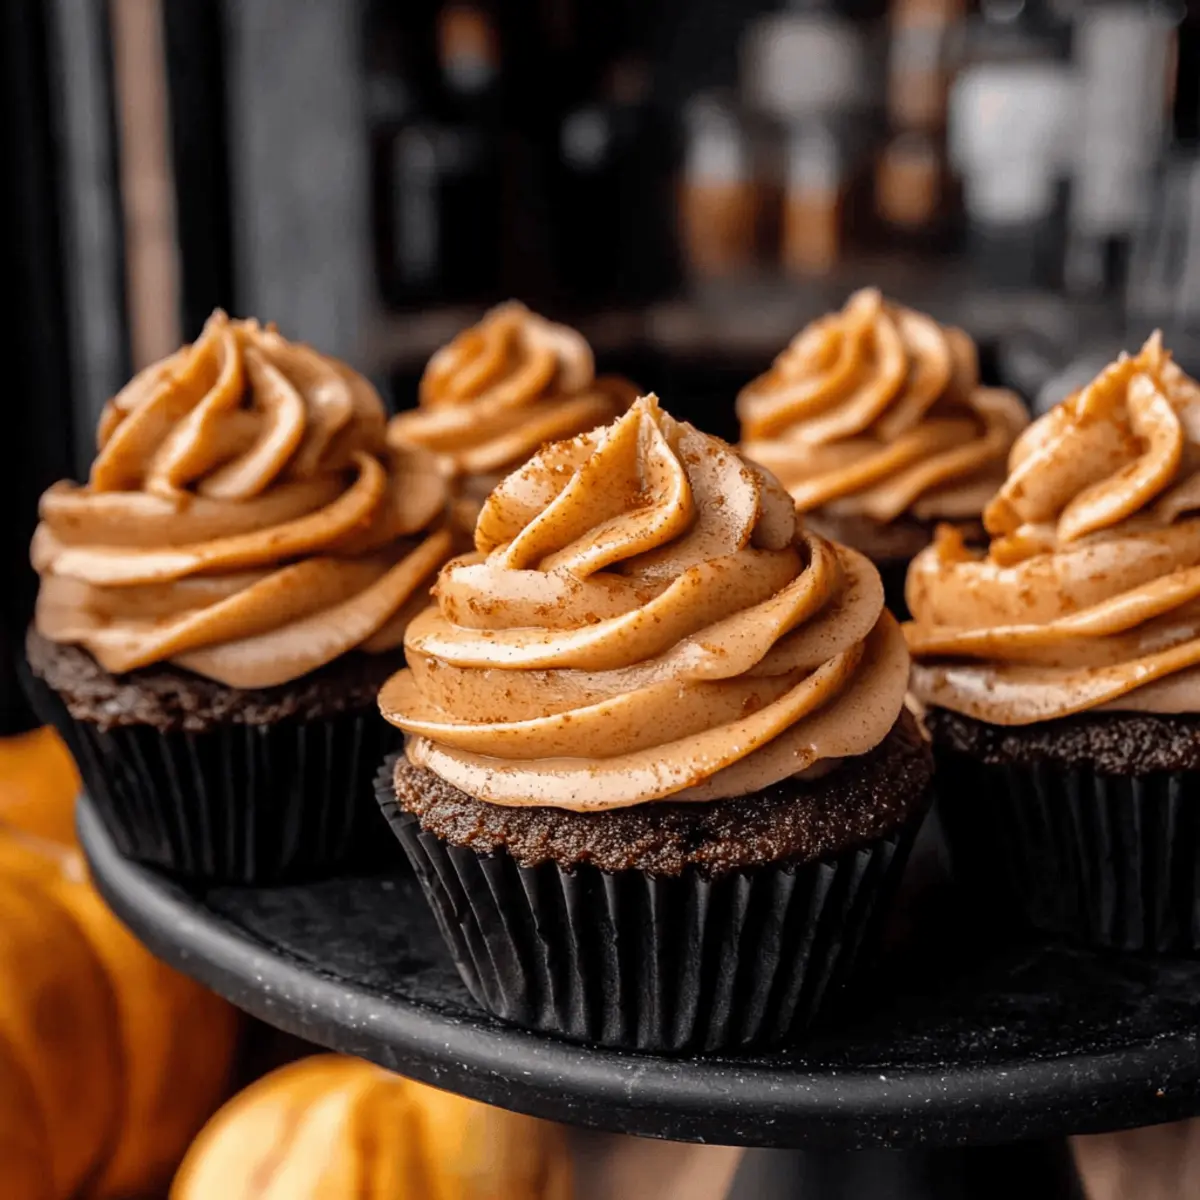
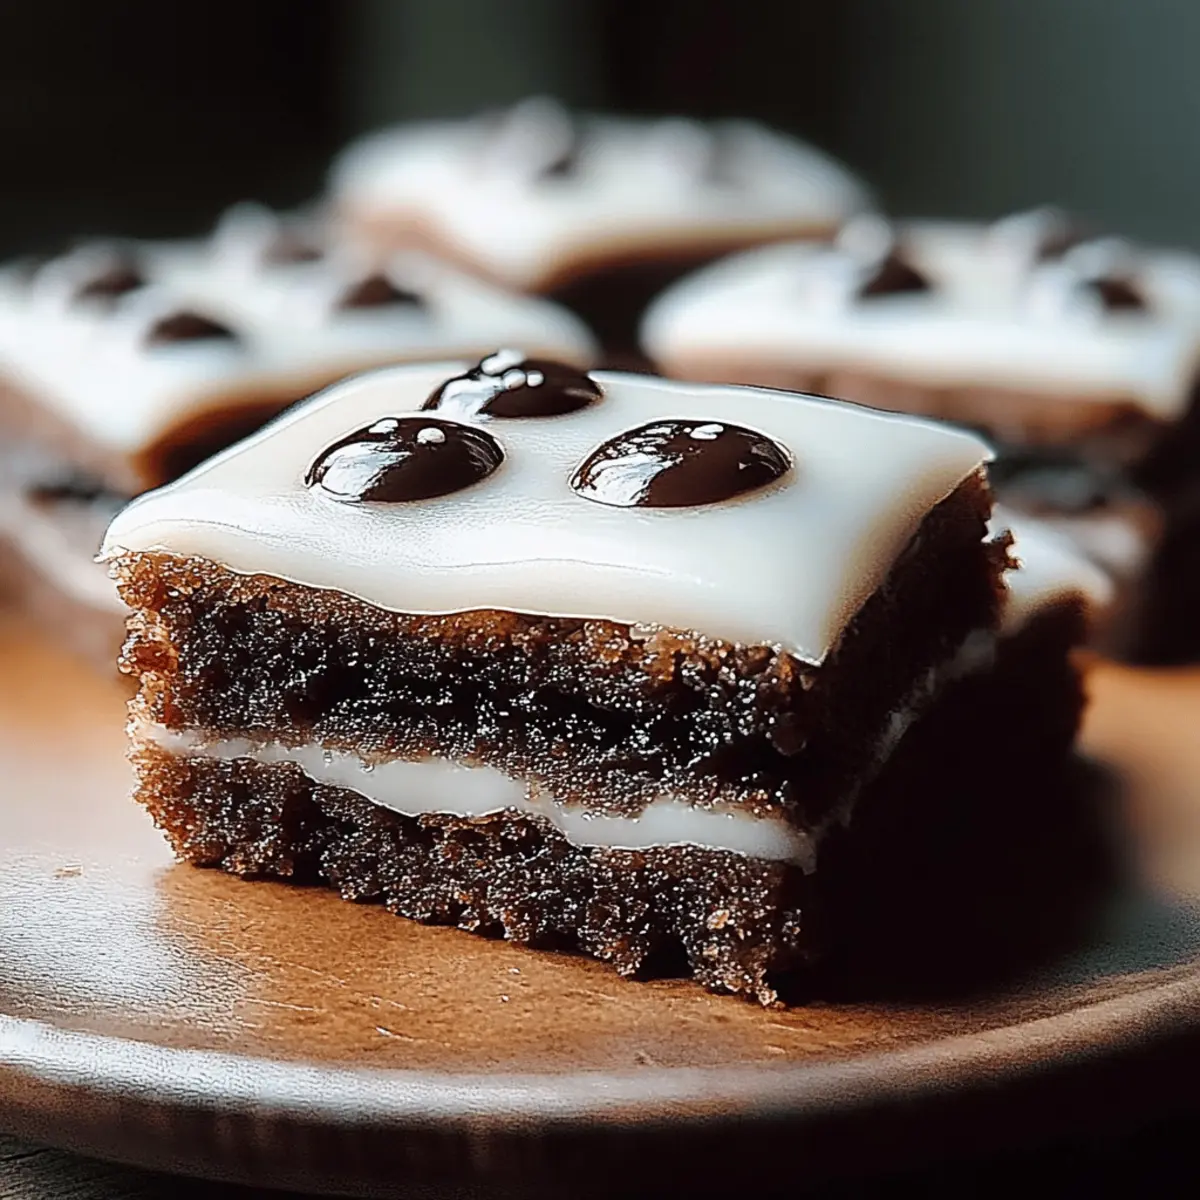
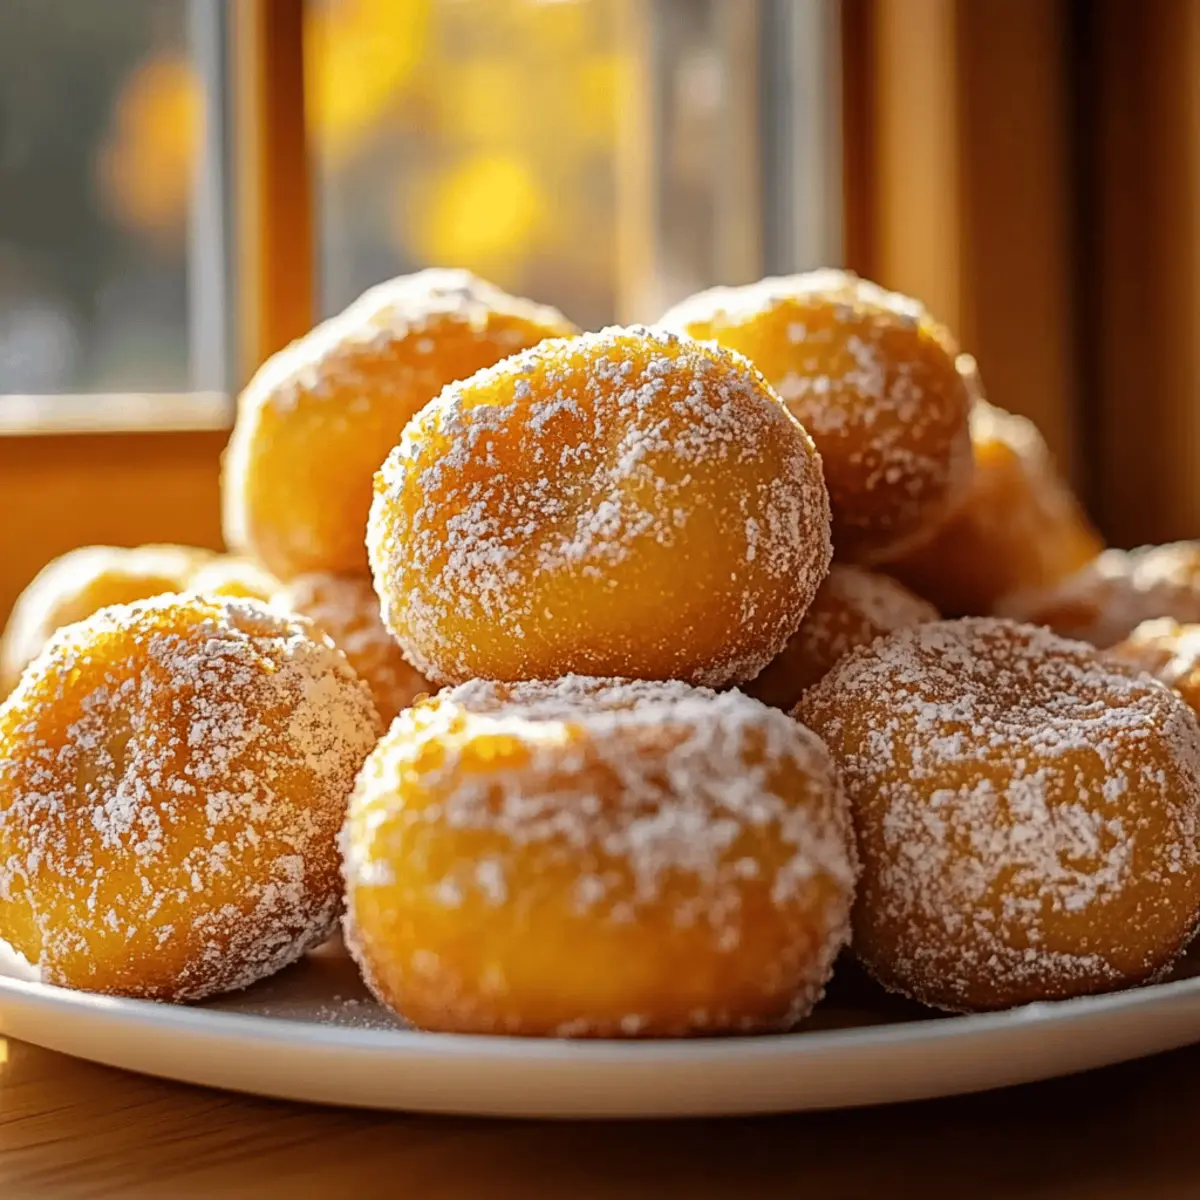
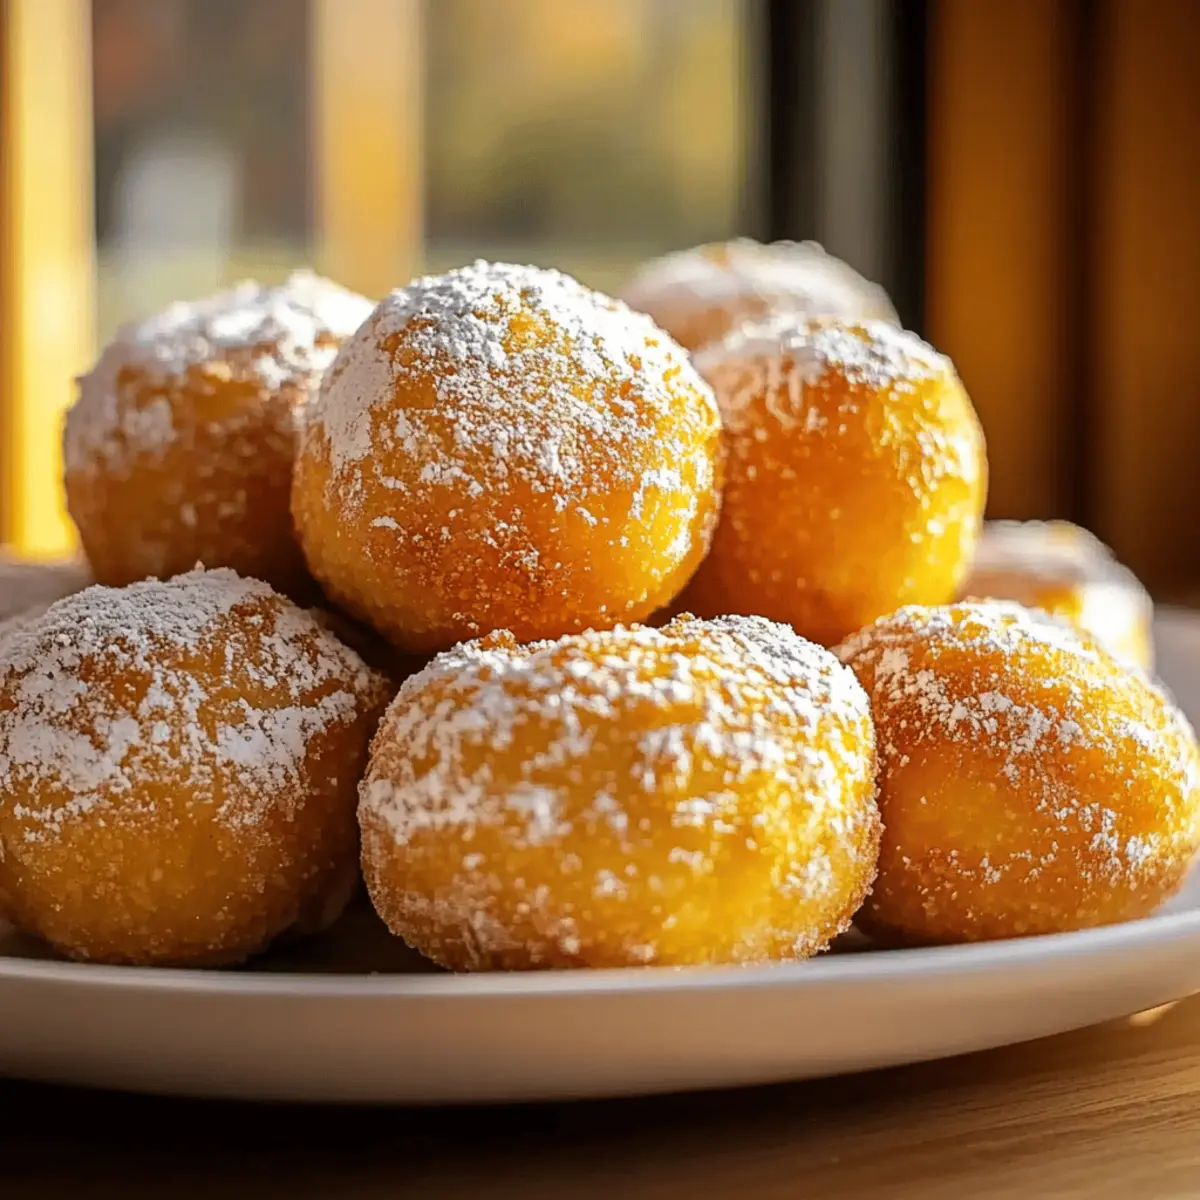
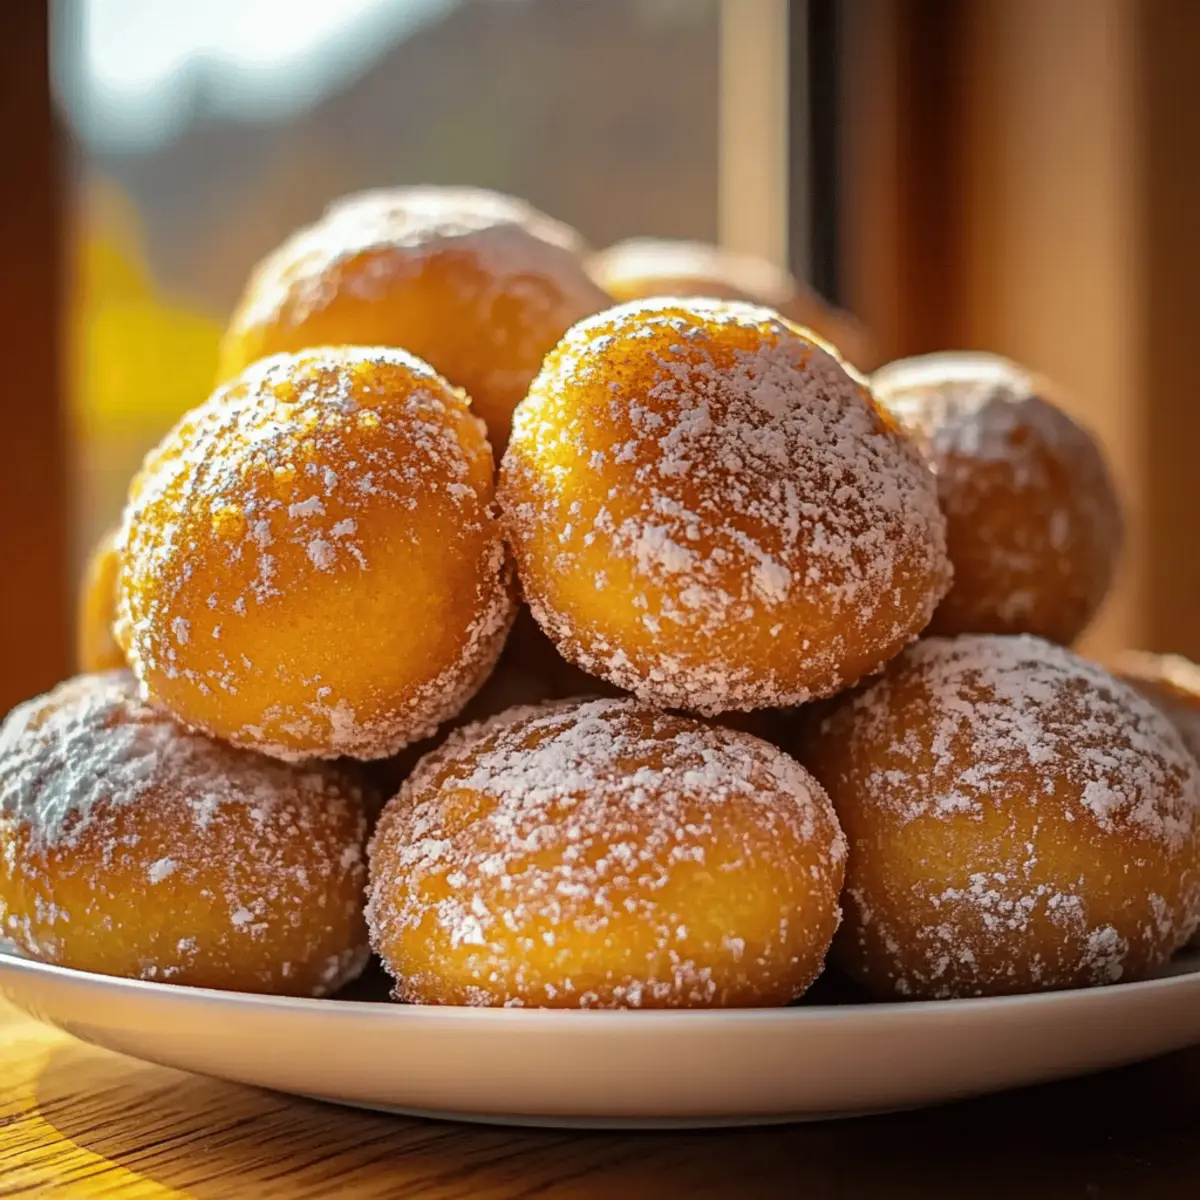
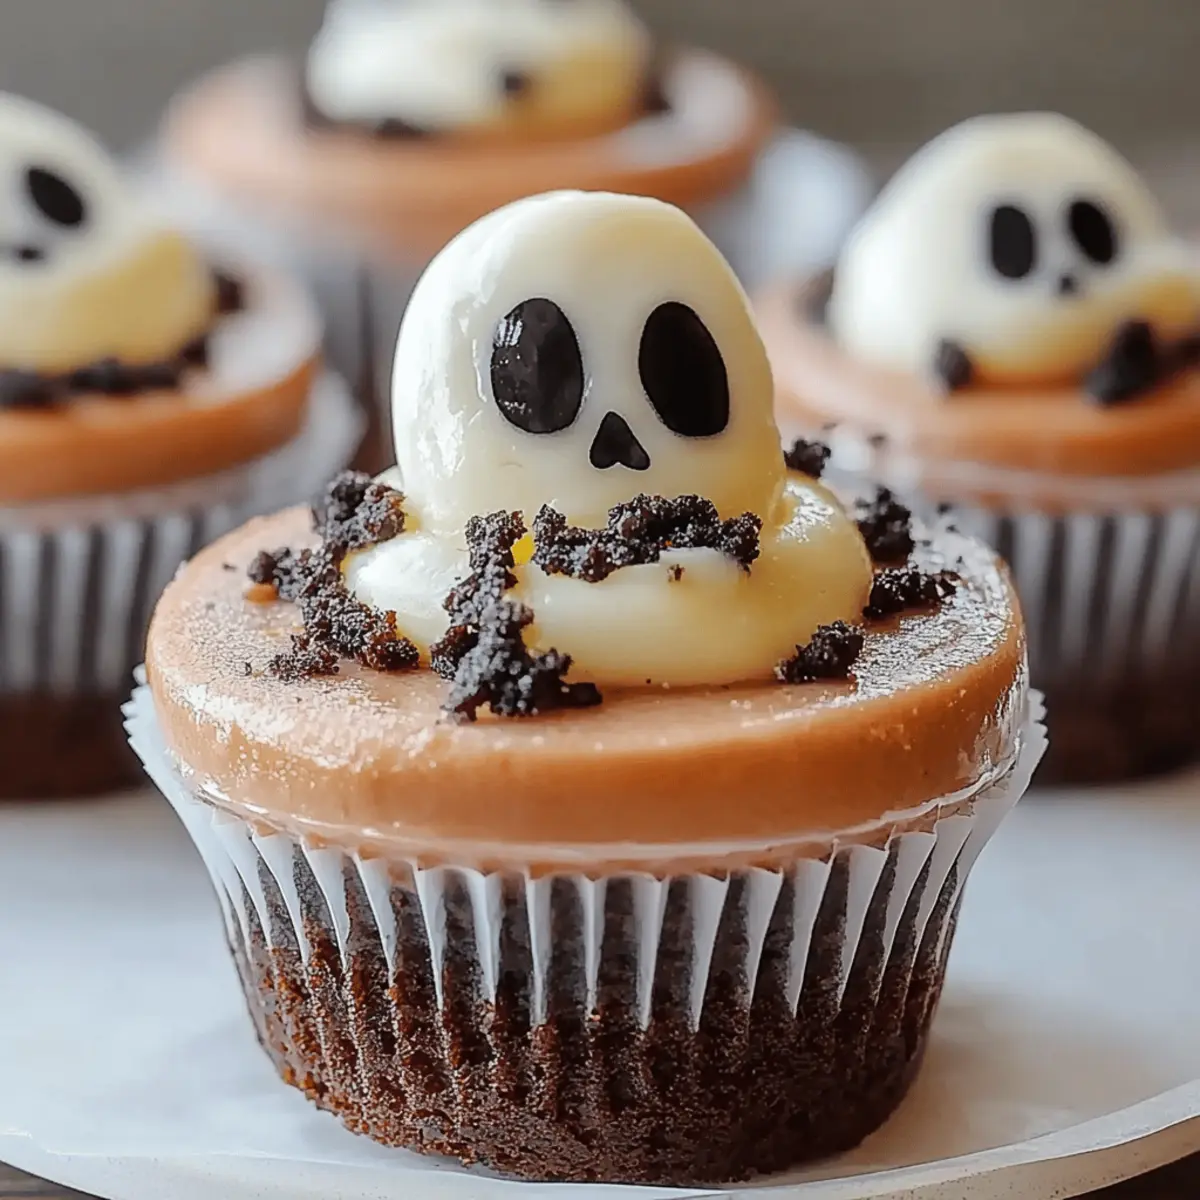
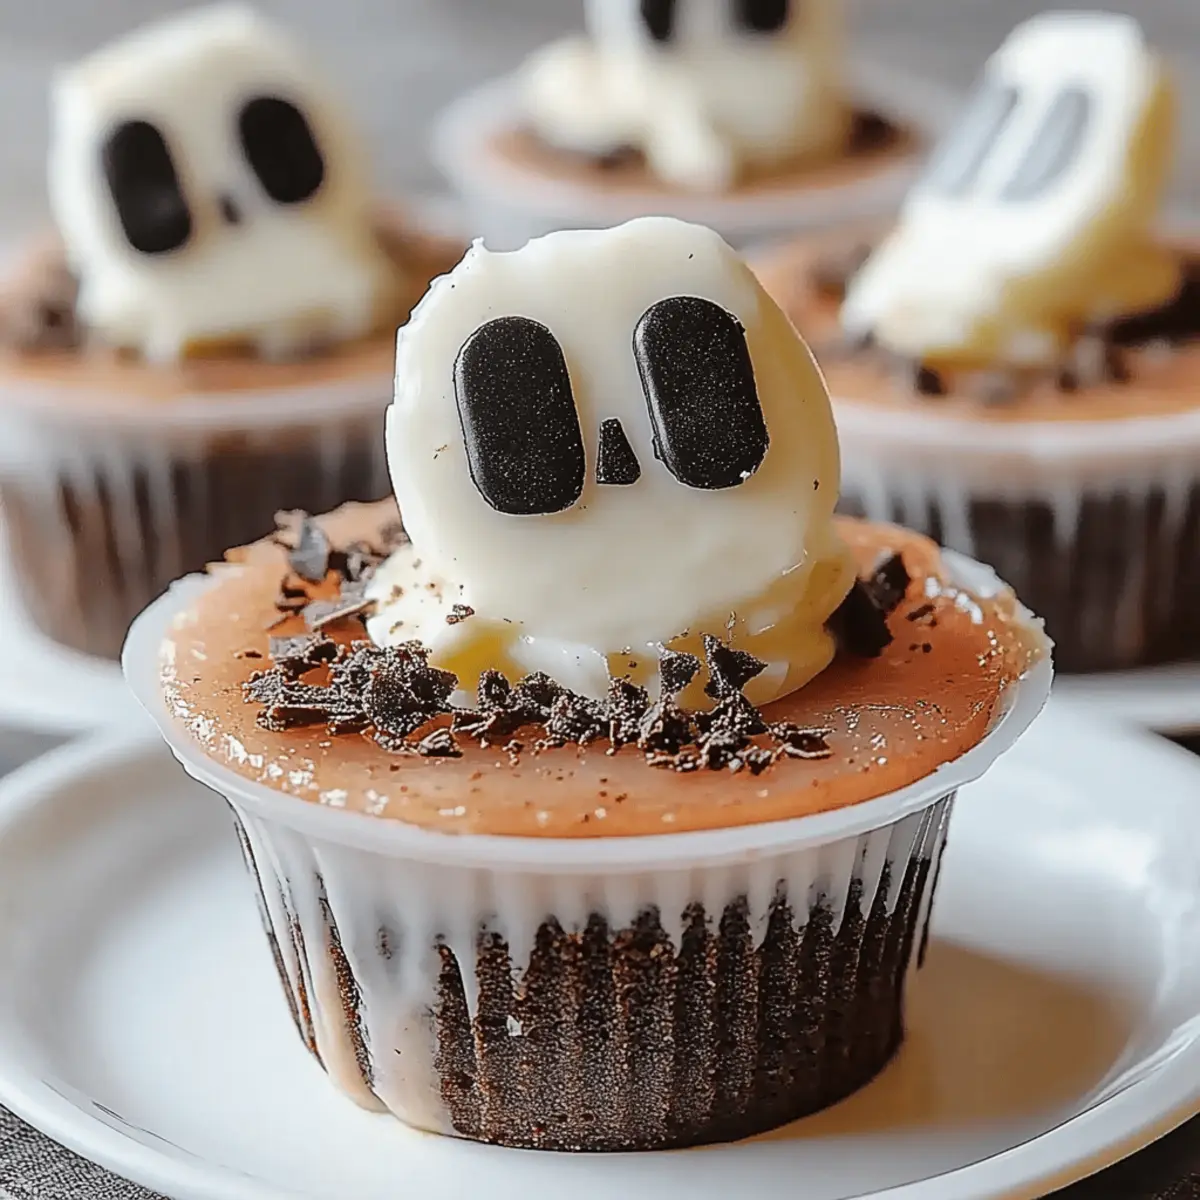
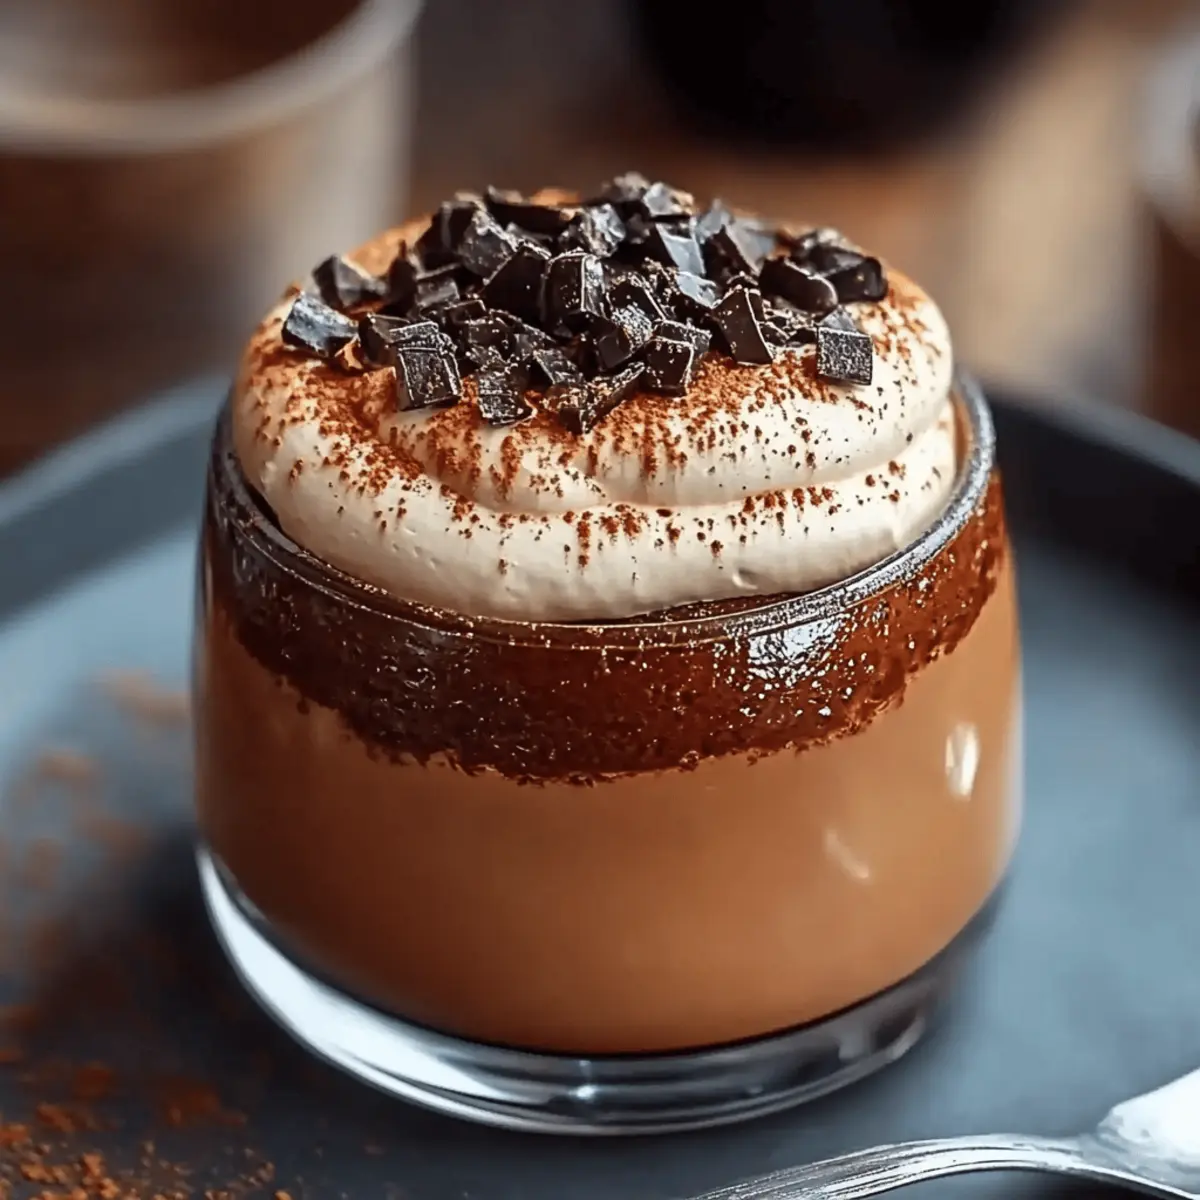
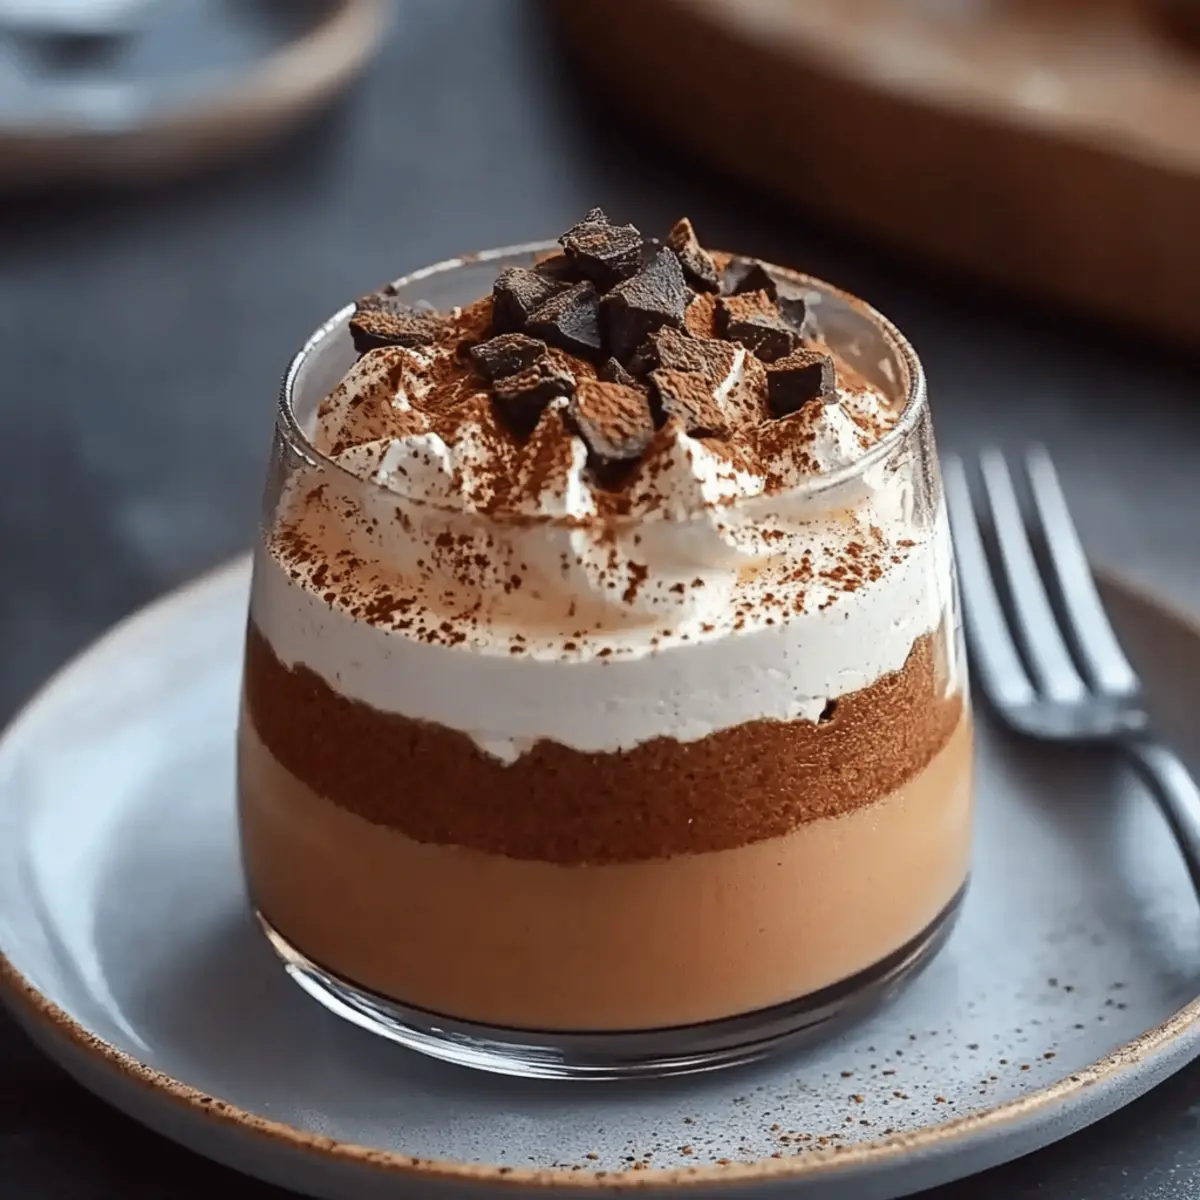
Have you ever felt that little tingle of excitement, the one that whispers you’re about to create something truly special in the kitchen? That’s exactly how I feel every time I make this Oreo Cheesecake. With its creamy texture and a playful crunch from those beloved Oreo cookies, this dessert is sure to charm anyone who takes a bite. Not only is this recipe a crowd-pleaser, but it also allows you to swap out fast food for a homemade masterpiece that friends and family will rave about. Plus, the delightful chocolate ganache drizzled on top adds a touch of elegance that transforms any occasion into a celebration. Are you ready to indulge in a slice of this creamy creation? Let’s dive into the world of Oreo Cheesecake together!

Oreo Cheesecake

Why is this Oreo Cheesecake irresistible?

Decadent Flavor: This Oreo Cheesecake is a dessert lover’s dream, featuring a rich, creamy filling that’s perfectly balanced with the delightful crunch of Oreos.

Crowd-Pleaser: Perfect for gatherings, this cheesecake is sure to impress your guests, making it a go-to choice for parties and celebrations.

Simple Process: With straightforward steps, even novice bakers can create this delightful treat without stress.

Elegant Touch: The luscious chocolate ganache drizzle elevates this dessert, turning it into a stunning centerpiece for any table.

Make-Ahead: Prep it in advance! This cheesecake requires chilling, allowing you to enjoy quality time with loved ones instead of being stuck in the kitchen.

Get ready to fall in love with homemade desserts like this one and ditch the fast food!

Oreo Cheesecake Ingredients

Get ready to whip up an irresistible treat!

For the Crust
• Oreo cookies, crushed – 2 ½ cups for a deliciously crunchy base.
• Unsalted butter, melted – 1/3 cup helps bind the crust perfectly together.

For the Filling
• Cream cheese, softened – 24 ounces ensures a smooth and creamy cheesecake.
• Granulated sugar – 3/4 cup balances the richness with just the right sweetness.
• Large eggs – 3 provide structure and a light texture to the filling.
• Sour cream – 1 cup adds a luscious creaminess and a hint of tang.
• Vanilla extract – 1 teaspoon enhances the overall flavor beautifully.
• Salt – 1/4 teaspoon intensifies the sweetness and depth of flavor.

For the Add-Ins
• Oreo cookies, chopped – 1 1/2 cups folded into the batter for added texture.
• Chocolate chips – 1 cup gives a delightful chocolatey flavor and richness.

For the Ganache
• Heavy cream – 1/2 cup helps create a silky, decadent chocolate topping.

Now you’re all set for crafting the perfect Oreo Cheesecake!

Step‑by‑Step Instructions for Oreo Cheesecake

Step 1: Prepare the Pan
Preheat your oven to 350°F (175°C). While it warms, line the bottom of a 7-inch springform pan with parchment paper to prevent sticking. Then, double-wrap the outside of the pan with heavy-duty aluminum foil, ensuring it’s secure to prevent water leaks during the baking process.

Step 2: Make the Crust
Crush 2 ½ cups of Oreo cookies in a food processor or by placing them in a sealed bag and using a rolling pin. Mix the crushed Oreos with 1/3 cup of melted unsalted butter until the texture resembles wet sand. Press this mixture evenly into the bottom and slightly up the sides of the prepared pan. Bake for 8–10 minutes until firm, then set aside and reduce the oven temperature to 325°F (163°C).

Step 3: Prepare the Cheesecake Filling
In a stand mixer or using a hand mixer, beat together 24 ounces of softened cream cheese, 3 large eggs, 3/4 cup of granulated sugar, 1 cup of sour cream, 1 teaspoon of vanilla extract, and 1/4 teaspoon of salt on medium-high speed. Mix until the mixture is smooth and creamy, pausing to scrape down the bowl halfway through. Lower the speed to mix for an additional 1–2 minutes to eliminate large air bubbles.

Step 4: Fold in the Oreos
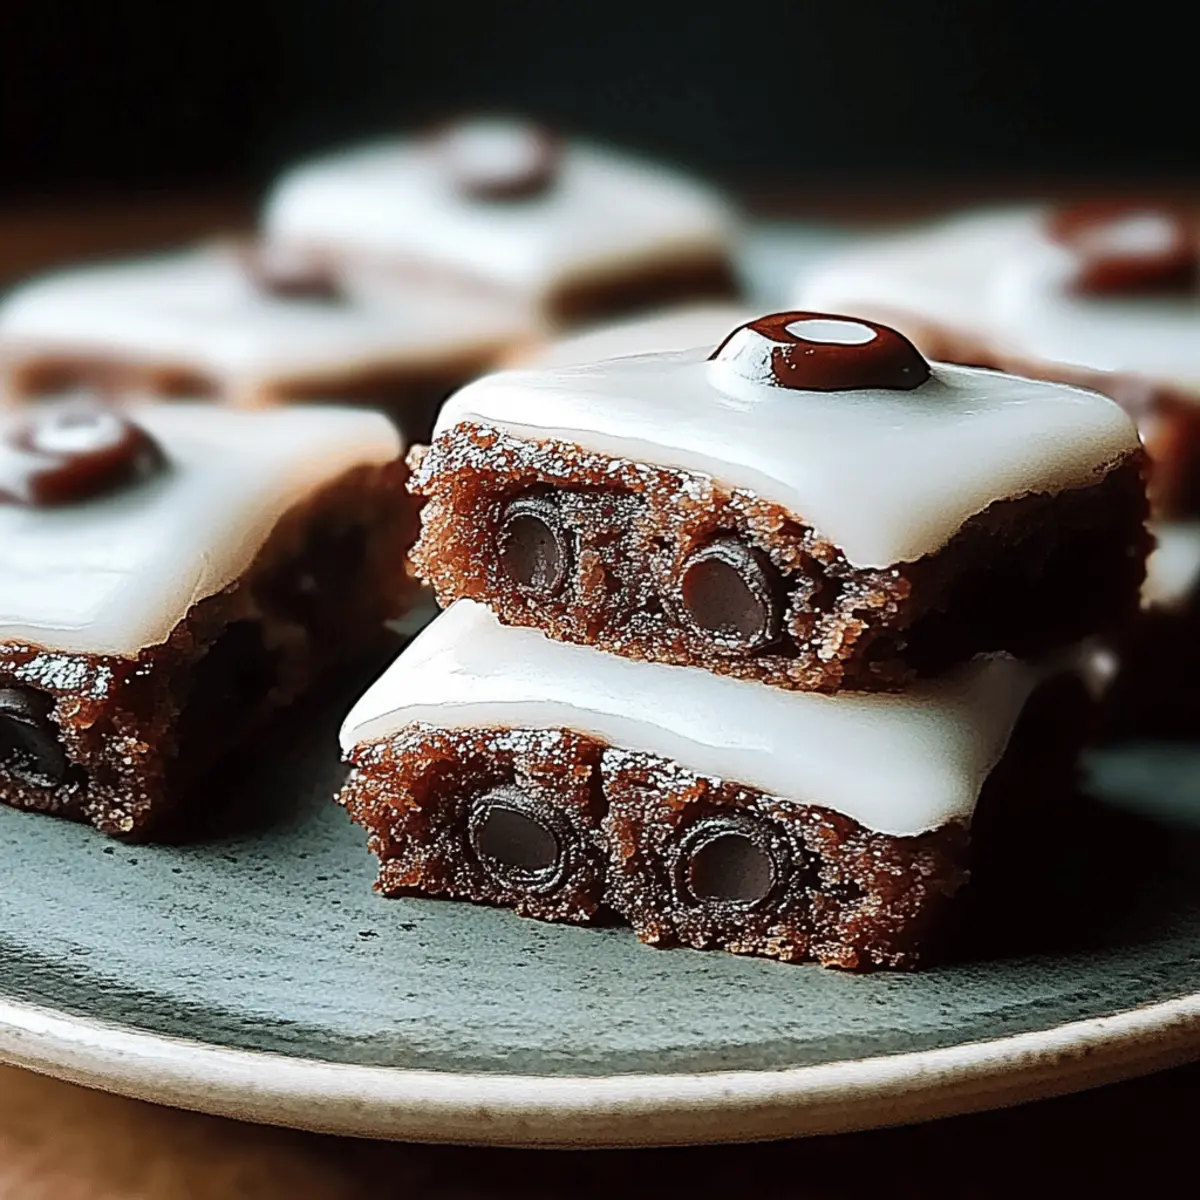
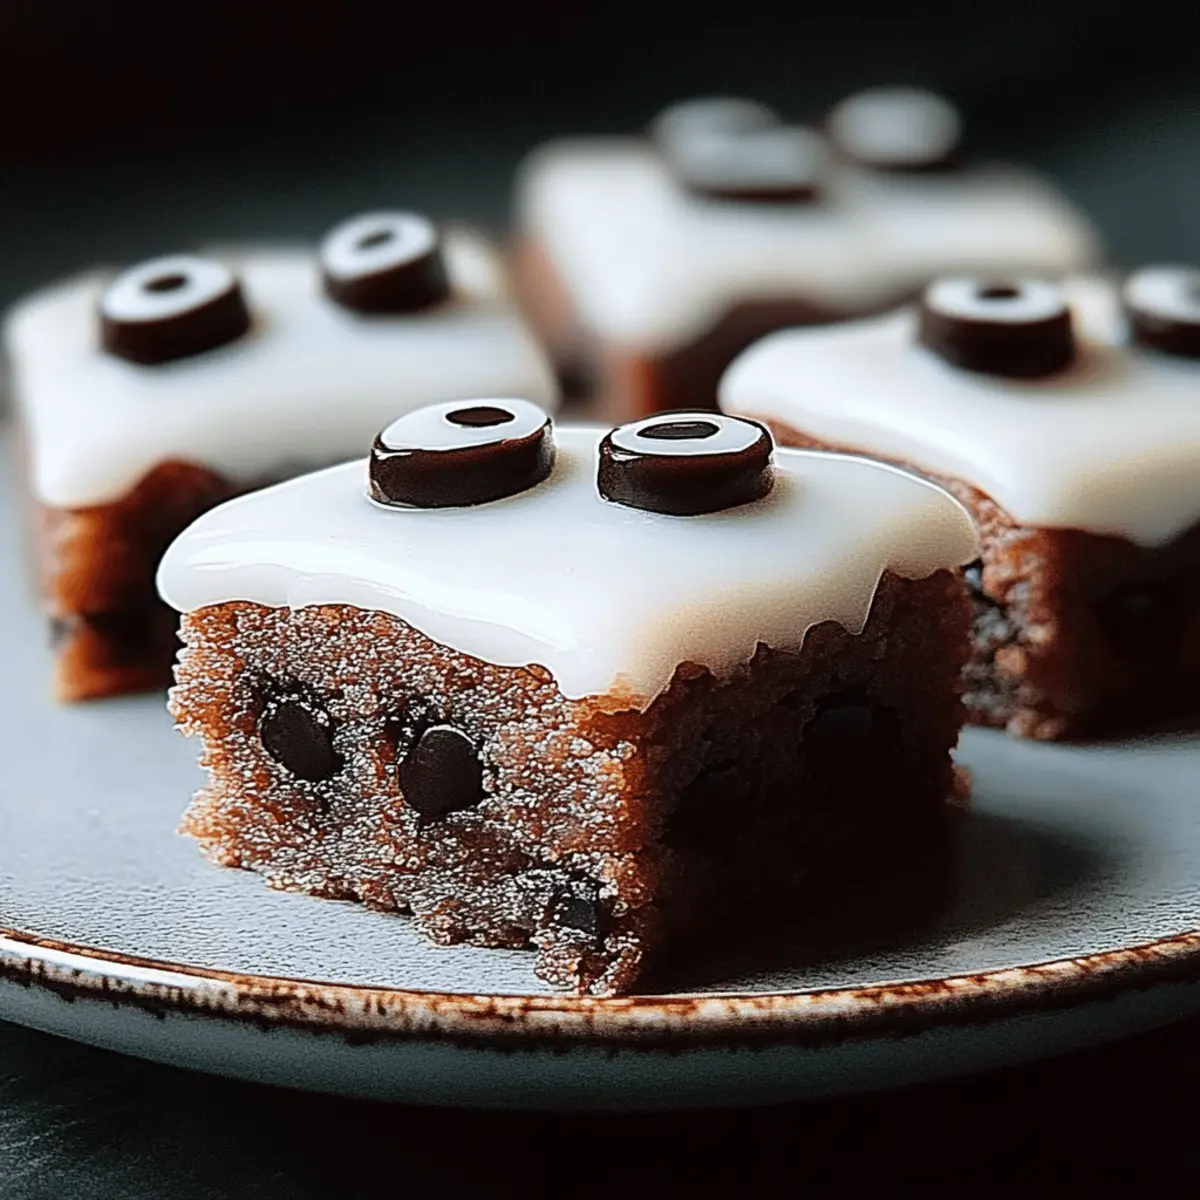
Gently fold in 1 1/2 cups of chopped Oreo cookies into the creamy cheesecake batter until they are evenly distributed. This will add a delightful texture to your Oreo Cheesecake, ensuring each bite has a wonderful crunch alongside the smooth filling.

Step 5: Combine Crust and Filling
Pour the cheesecake batter into the crust you’ve prepared. To eliminate any trapped air bubbles, gently tap the pan on the counter. Place the springform pan in a larger roasting dish and carefully add hot water into the dish until it reaches halfway up the sides of the springform pan. Bake at 325°F (163°C) for approximately 75 minutes, or until the edges are set and the center is slightly jiggly.

Step 6: Cool the Cheesecake
Once baking is complete, turn off the oven but leave the door slightly ajar. Allow the cheesecake to cool in this warm environment for about an hour. This gradual cooling helps prevent cracks from forming on the surface of your delicious Oreo Cheesecake.

Step 7: Chill the Cheesecake
Carefully remove the springform pan from the water bath and discard the foil. Let the cheesecake cool at room temperature. Once cooled, cover it loosely with plastic wrap and refrigerate for at least four hours or ideally overnight to let the flavors meld beautifully.

Step 8: Prepare the Ganache
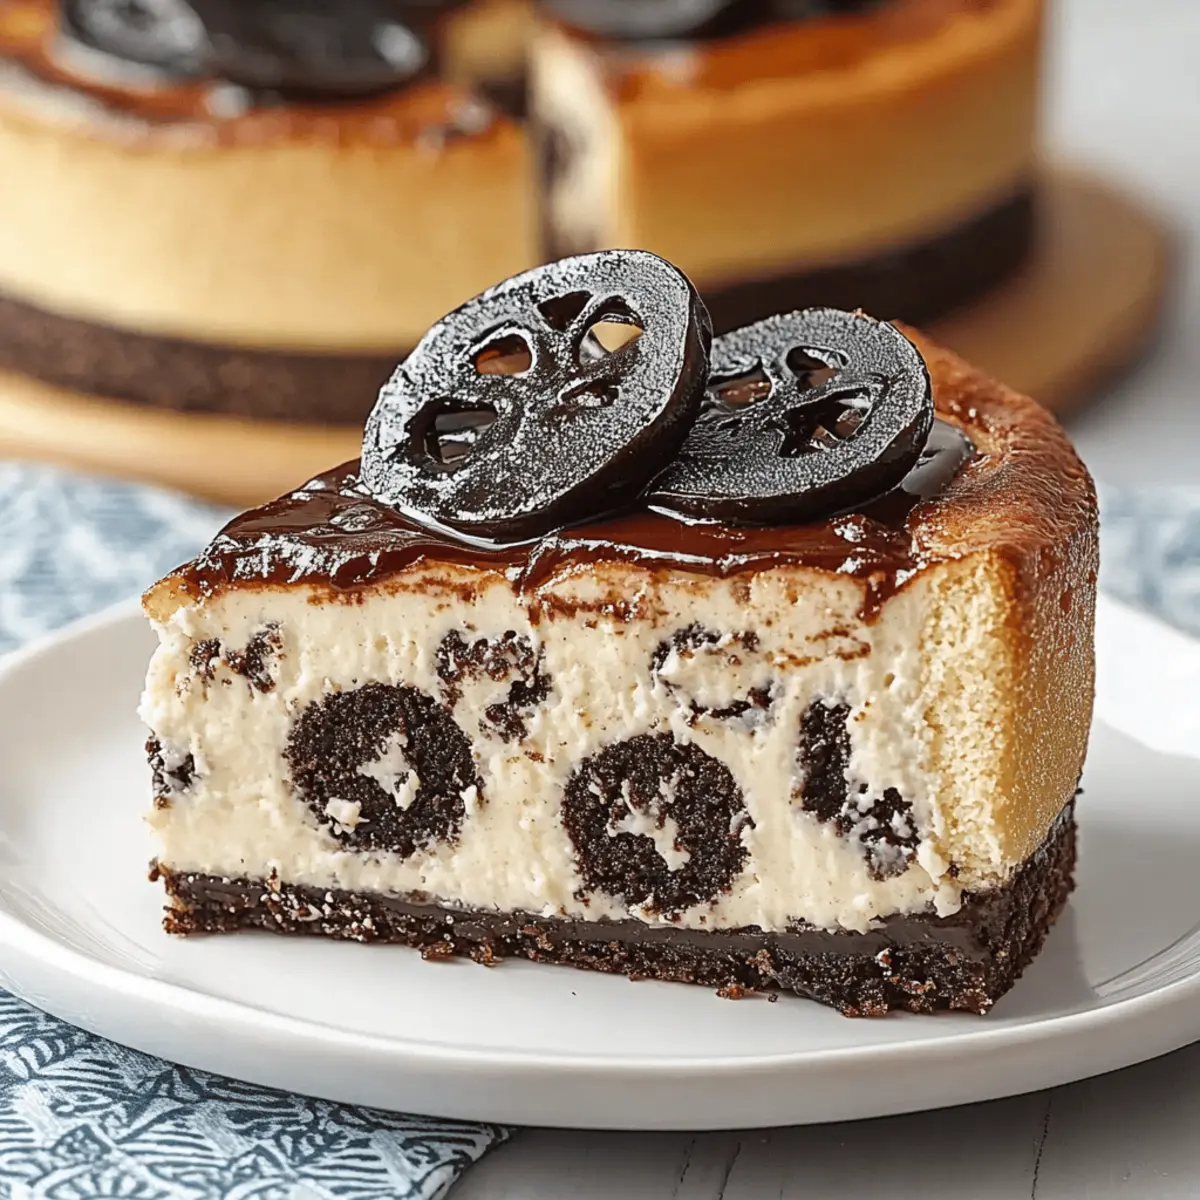
To create a rich chocolate ganache, gently melt 1 cup of chocolate chips with 1/2 cup of heavy cream in a double boiler or in the microwave using short intervals. Stir between each interval until the mixture is silky smooth. Pour this decadent ganache over the cooled cheesecake, tilting the pan gently to spread it evenly.

Step 9: Garnish and Serve
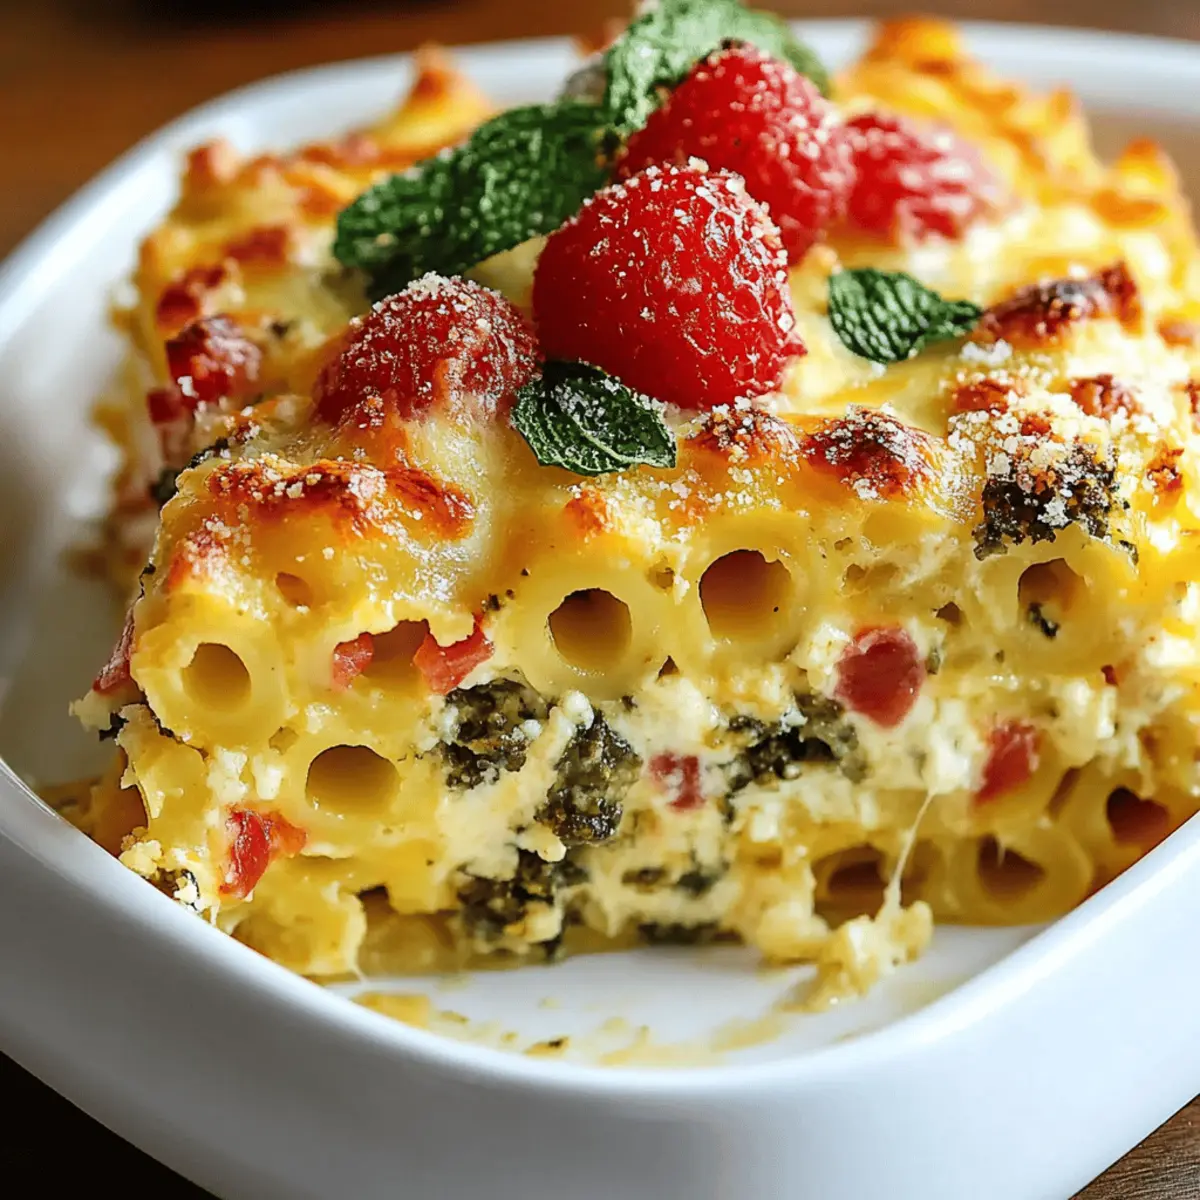
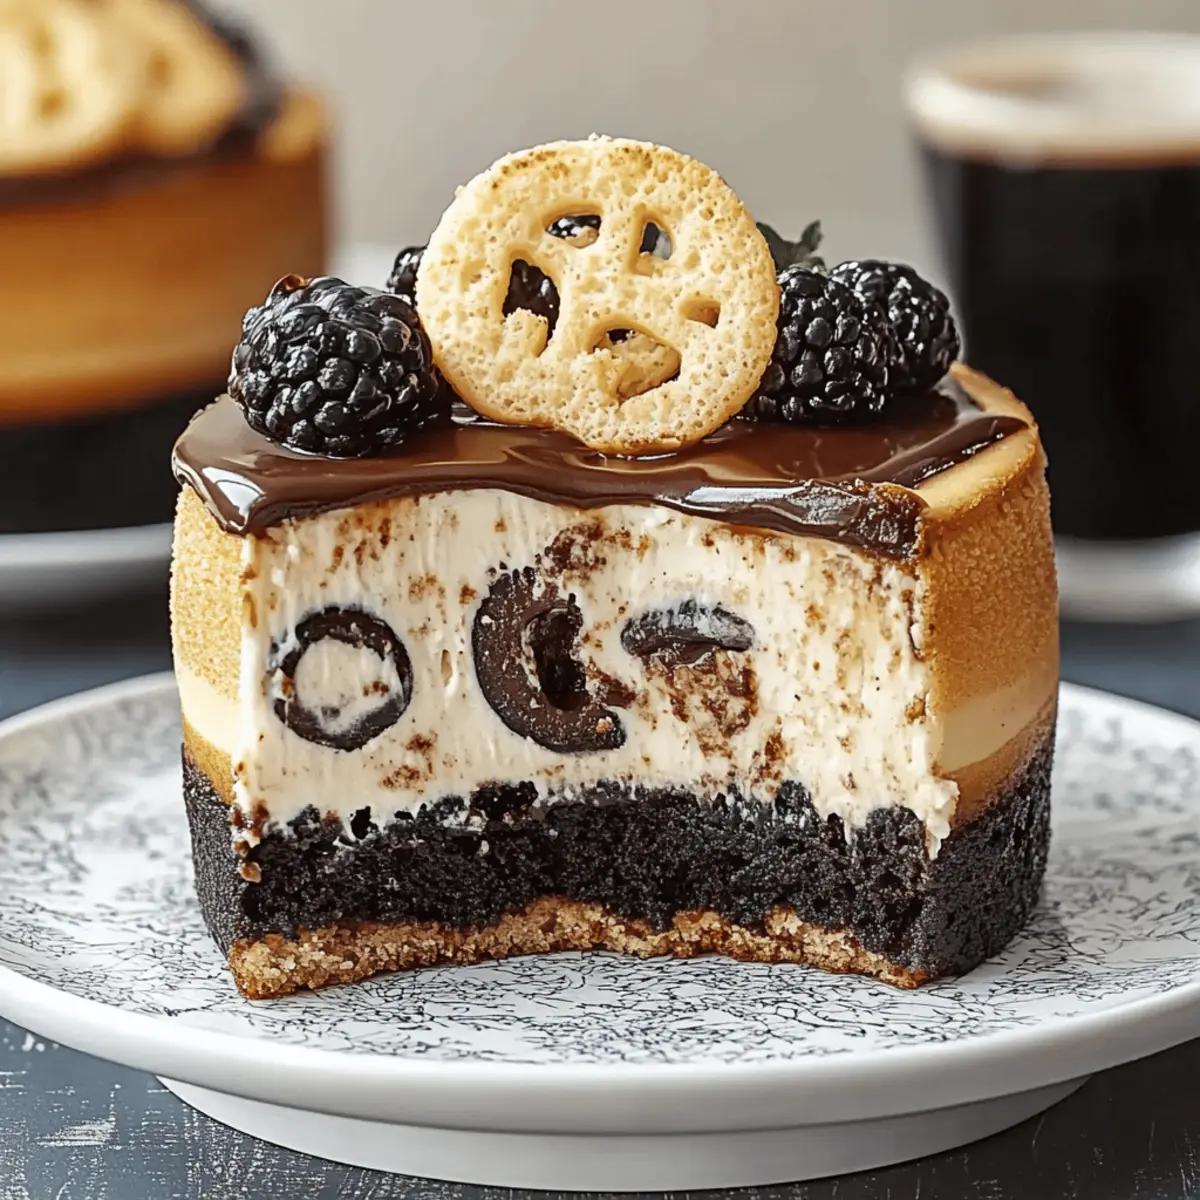
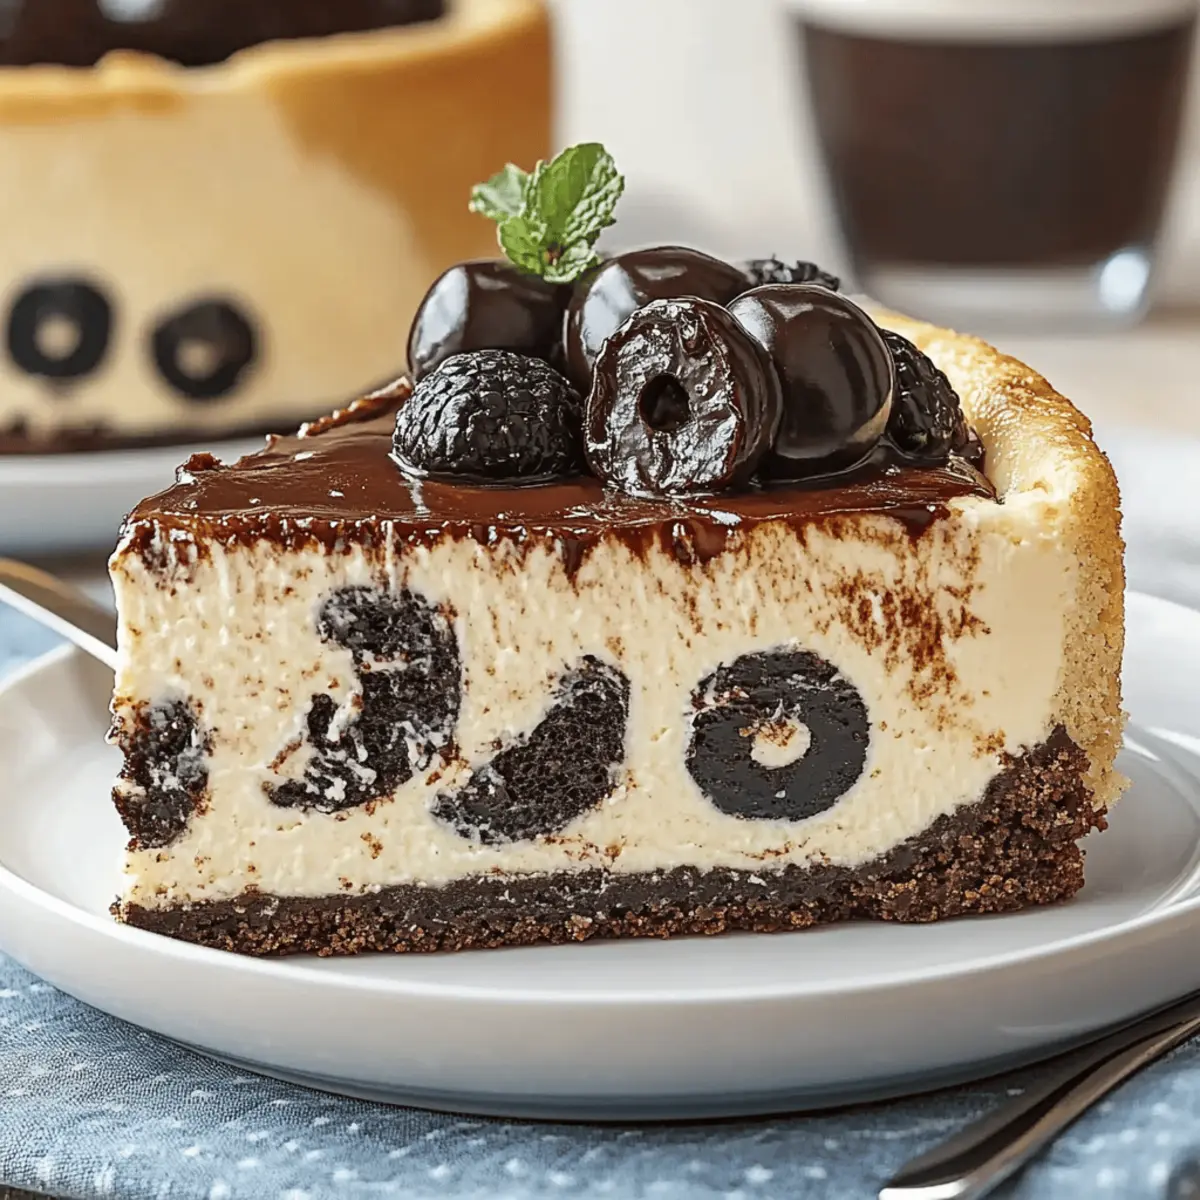
If desired, top your stunning Oreo Cheesecake with whipped cream and halved Oreos for an elegant touch. When ready to serve, use a thin knife dipped in hot water and wiped dry between cuts to slice through the cheesecake effortlessly. Serve chilled and watch as your guests adore this homemade masterpiece!

Oreo Cheesecake

Make Ahead Options

These delightful Oreo Cheesecake layers are perfect for busy weeknights or special occasions! You can prepare the crust and cheesecake filling up to 24 hours in advance. Simply make the crust and fill it with the cheesecake batter, then cover the pan tightly and refrigerate. When you’re ready to bake, allow the batter to sit at room temperature for about 15 minutes before placing it in the oven for a more even bake. After baking and cooling, chill your cheesecake for at least four hours (or overnight) for the best flavor. The key to maintaining quality is ensuring the cheesecake remains covered to keep it moist, so it stays just as delicious as when freshly made. This way, you can savor a homemade treat without the last-minute rush!

What to Serve with Oreo Cheesecake

Imagine the perfect ending to your decadent dessert, elevating your dining experience to new heights.

  • Fresh Berries: A medley of strawberries, raspberries, and blueberries adds a burst of color and tangy freshness to balance the rich cheesecake.
  • Chocolate Drizzle: A warm chocolate drizzle complements the ganache and enhances the overall chocolate experience in every divine bite.
  • Coffee: A hot cup of coffee harmonizes with the creamy sweetness and offers a wonderful contrast that brings out the flavors beautifully.
  • Vanilla Ice Cream: A scoop of creamy vanilla ice cream is the ultimate indulgence, providing a deliciously cold contrast to the richness of the Oreo Cheesecake.
  • Mint Leaves: Fresh mint leaves sprinkled on top provide a refreshing touch that brightens the palate after each bite of cheesecake.
  • Whipped Cream: A generous dollop of fluffy whipped cream not only adds elegance but also lightens the dessert, making it irresistible.
  • Lemon Sorbet: For a refreshing palate cleanser, serve lemon sorbet on the side. Its citrusy zing perfectly balances the cheesecake’s richness.
  • Dessert Wine: A sweet dessert wine, like Moscato, pairs beautifully, enhancing the flavors without overpowering the delightful dessert.
  • Crunchy Nuts: Chopped walnuts or pecans sprinkled on top add a delightful crunch that enhances the texture and flavor profile of your cheesecake.

How to Store and Freeze Oreo Cheesecake

Room Temperature: Keep your Oreo Cheesecake at room temperature for up to 2 hours, but be aware that it may start to lose its creamy texture if left out too long.

Fridge: Store leftovers in the fridge for up to 5 days, covered with plastic wrap or foil to maintain freshness and prevent drying out.

Freezer: Freeze your Oreo Cheesecake for up to 3 months. Wrap it tightly in plastic wrap and aluminum foil to protect it from freezer burn before storing it.

Reheating: Thaw frozen cheesecake in the fridge overnight before serving. Enjoy it chilled, as this dessert is best served cold for optimal flavor and texture.

Expert Tips for Oreo Cheesecake

Baking Temperature: Ensure your oven is properly calibrated before baking at 325°F for the best texture and to avoid cracks in the cheesecake.

Water Bath Caution: When placing the springform pan in the water bath, double-check that the foil is secure to prevent water from seeping in and ruining your crust.

Cream Cheese Softened: Always use softened cream cheese to achieve a smooth filling. If it’s too cold, your batter can become lumpy, affecting the creamy texture of your Oreo Cheesecake.

Chilling Time: Don’t rush the chilling process! Allow your cheesecake to refrigerate for at least four hours or overnight for the flavors to meld perfectly.

Slice with Care: For perfect slices, heat your knife in hot water and dry it between cuts. This trick keeps your Oreo Cheesecake looking pristine by preventing it from sticking.

Oreo Cheesecake Variations & Substitutions

Feel free to adapt this Oreo Cheesecake recipe to cater to your cravings, dietary needs, and flavor preferences!

  • Gluten-Free: Use gluten-free Oreo cookies instead of regular ones for a cheesecake that everyone can enjoy.
  • Nutty Addition: Fold in 1/2 cup of finely chopped nuts, like walnuts or pecans, for a delightful crunch and depth of flavor.
  • Cheesecake Swirl: Add a layer of cream cheese frosting on top before the chocolate ganache for a luscious swirl that elevates your dessert.
  • Minty Fresh: Blend in 1 teaspoon of peppermint extract to give your cheesecake a refreshing minty twist—perfect for the holidays!
  • Vegan Version: Swap cream cheese for vegan cream cheese and replace eggs with flaxseed meal for a delicious plant-based cake.
  • Chocolate Overload: Use chocolate-flavored Oreos and 1/2 cup of cocoa powder in the filling for an even richer chocolate experience.
  • Fruit Topping: Top your Oreo Cheesecake with fresh berries or a homemade berry compote for a fruity, tart balance to the rich chocolate.
  • Spicy Kick: Add a pinch of cayenne pepper or cinnamon to the batter for an unexpected flavor boost that warms the palate.

Each of these variations can transform your Oreo Cheesecake into a unique delight, making it even more beloved by your friends and family. If you’re looking for new flavor inspirations, try pairing it with a refreshing fruit compote or consider a light whipped cream topping as a complement. Enjoy experimenting and making this unforgettable dessert your own!

Oreo Cheesecake

Oreo Cheesecake Recipe FAQs

How do I know if my cream cheese is ripe enough to use?
Absolutely! For the best Oreo Cheesecake, your cream cheese should be softened to room temperature. This usually takes about 30-60 minutes. You can achieve this faster by cutting it into chunks. It’s ready when it’s easy to spread and free of lumps.

How can I store leftover Oreo Cheesecake?
Very important! Your Oreo Cheesecake can be stored in the refrigerator for up to 5 days. Make sure to cover it well with plastic wrap or aluminum foil to keep it fresh and prevent it from absorbing any odors from the fridge.

Can I freeze my Oreo Cheesecake? If so, how?
Of course! You can freeze your cheesecake for up to 3 months. Here’s how: First, wrap the cheesecake tightly in plastic wrap, ensuring there are no exposed areas. Next, place it in an airtight container or wrap it in aluminum foil for extra protection against freezer burn. When you’re ready to enjoy it, thaw it overnight in the fridge before serving.

My cheesecake cracked during baking. What went wrong?
Oh no! Cracks can happen for a few reasons. Make sure your oven temperature is accurately calibrated at 325°F. Additionally, using a water bath helps regulate temperature during baking, and cracking often occurs if the batter has too many air bubbles, so mixing on low speed after beating can help remove those bubbles.

Is this Oreo Cheesecake safe for people with allergies?
Great question! This recipe contains dairy and gluten from the cream cheese, sour cream, and Oreo cookies. If you have allergies, consider using gluten-free Oreo cookies and alternative cream cheese options to adapt the recipe to your dietary needs. Always check labels to ensure safety for those with allergies.

Can I make this recipe in advance for a party?
Absolutely! This Oreo Cheesecake is perfect for make-ahead. You can prepare and chill it the day before your gathering, allowing the flavors to meld beautifully. Just be sure to cover it well in the fridge!

Decadent Oreo Cheesecake That’ll Wow Your Guests

This Oreo Cheesecake is a creamy and crunchy dessert that will wow your guests at any gathering.

  • Springform pan
  • Food Processor
  • Double boiler
  • Mixer
  • Roasting dish

For the Crust

  • 2.5 cups Oreo cookies, crushed
  • 1/3 cup Unsalted butter, melted

For the Filling

  • 24 ounces Cream cheese, softened
  • 0.75 cup Granulated sugar
  • 3 large Eggs
  • 1 cup Sour cream
  • 1 teaspoon Vanilla extract
  • 0.25 teaspoon Salt

For the Add-Ins

  • 1.5 cups Oreo cookies, chopped
  • 1 cup Chocolate chips

For the Ganache

  • 0.5 cup Heavy cream

Step-by-Step Instructions

  1. Preheat your oven to 350°F (175°C). Line the bottom of a 7-inch springform pan with parchment paper and wrap the outside with aluminum foil.
  2. Crush the Oreo cookies and mix with melted butter. Press into the bottom of the prepared pan and bake for 8-10 minutes.
  3. In a mixer, beat cream cheese, eggs, sugar, sour cream, vanilla, and salt until smooth.
  4. Fold chopped Oreos into the cheesecake batter.
  5. Pour the batter into the crust, tap the pan to remove air bubbles, and bake at 325°F (163°C) for about 75 minutes.
  6. Turn off the oven, leave the door ajar, and allow the cheesecake to cool for about an hour.
  7. Cool at room temperature, then refrigerate for at least four hours or overnight.
  8. Melt chocolate chips and heavy cream to create ganache, pour over cooled cheesecake.
  9. Garnish with whipped cream and halved Oreos if desired, then slice and serve chilled.

Ensure to chill the cheesecake for optimal flavor and texture. Use softened cream cheese for a smooth filling.

Dessert
American
cheesecake, chocolate ganache, dessert, homemade, Oreo Cheesecake, party dessert

Filed Under: Dessert

Hearty French Chicken Casserole a la Normande Family Feast

August 29, 2025 by grace bellamy Leave a Comment

As the warm aroma of chicken and apples fills the kitchen, I can’t help but let out a little sigh of bliss. Nothing says comfort quite like a French Chicken Casserole a la Normande! This dish, infused with a splash of apple cider and rich cream, transforms humble ingredients into a cozy masterpiece that truly warms the spirit. One of the best parts? It’s easy to prepare and can effortlessly impress both family and guests alike. Imagine serving this rustic, one-pot wonder complete with tender chicken and caramelized apples, all bubbling away in a heavenly sauce—a perfect centerpiece for any gathering. Ready to elevate your dinner game? Let’s dive into this delightful recipe and discover how to create a dining experience that keeps everyone coming back for seconds! What’s your favorite comfort food that brings to mind sweet memories?

French Chicken Casserole a la Normande

Why is this casserole so irresistible?

Simplicity, You’ll love how easy it is to bring together wholesome ingredients with minimal effort.

Flavor Explosion! The delightful mix of chicken, apples, and rich dry cider creates a uniquely comforting taste that will have everyone raving.

Versatile Winner: Perfect for family dinners or cozy gatherings, this dish adapts beautifully to any occasion.

Time-Saving Delight: With just 10 minutes of prep, you can pop it in the oven and enjoy time with loved ones while it cooks!

Crowd-Pleasing Hearty Meal: This wholesome casserole guarantees to impress your guests and makes for exceptional leftovers.

Don’t forget to explore how this one-pot wonder can become your new go-to recipe!

French Chicken Casserole a la Normande Ingredients

For the Dish
• Olive oil – a splash is perfect for browning the chicken and adds beautiful flavor.
• Chicken thighs and legs – tender cuts that keep the casserole juicy and delicious.
• Salt – essential for enhancing the overall flavor of the dish.
• Shallots – their mild sweetness pairs perfectly with the richness of the casserole.
• Celery – adds freshness and a subtle crunch in every bite.
• Thyme sprigs – infuse the casserole with an earthy aroma that elevates the dish.
• Garlic – a must-have, bringing a fragrant foundation to the flavor profile.
• Bacon lardons – crispy bites of bacon offer a savory depth that enriches the dish.
• Brandy or whiskey – deglazing the pan with this adds dimension and complexity.

For the Sauce
• Flour – helps thicken the sauce and gives it a creamy texture.
• Chicken stock – the base that ties all the flavors together, ensuring a rich taste.
• Hard dry apple cider – brings a delightful sweetness that complements the chicken beautifully.
• Apples – their caramelized goodness adds a lovely contrast to the savory elements.
• Double cream/heavy cream – for a luxuriously rich finish that makes every bite unforgettable.

Dive into making this French Chicken Casserole a la Normande and let your kitchen fill with joyous aromas that bring everyone together!

Step‑by‑Step Instructions for French Chicken Casserole a la Normande

Step 1: Preheat the Oven
Begin by preheating your oven to 180°C/350°F. This temperature is essential for ensuring that the French Chicken Casserole a la Normande cooks evenly. While the oven warms up, gather all your ingredients and equipment for a smooth cooking experience.

Step 2: Prepare the Chicken
Pat dry the chicken thighs and legs with a paper towel to ensure a nice browning later. Season all sides generously with salt. This simple step enhances the flavors of the chicken, making it a delicious centerpiece for your casserole.

Step 3: Brown the Chicken
In a large casserole dish, heat 1 tablespoon of olive oil over medium-high heat. Once the oil shimmers, add the chicken in batches, browning each piece for about 5-7 minutes until golden brown. Once browned, remove the chicken, and set it aside on a platter.

Step 4: Cook the Bacon
Discard most of the chicken fat or save it for another use, leaving about a tablespoon in the pan. Add the bacon lardons and cook over medium heat until they’re crispy and the fat is rendered, roughly 5 minutes. Once done, transfer the bacon to the same platter as the chicken.

Step 5: Sauté the Vegetables
In the same pan, add the diced shallots, celery, and 2 sprigs of thyme. Cook these over low heat for about 5-7 minutes until softened and fragrant. Then, add the minced garlic, cooking for another 30 seconds until it’s aromatic without browning.

Step 6: Deglaze the Pan
Pour in 2 tablespoons of brandy or whiskey, scraping up any browned bits from the bottom of the pan. Allow the alcohol to cook off for about 2 minutes, which adds depth and flavor to the French Chicken Casserole a la Normande.

Step 7: Create the Sauce
Stir in 2 tablespoons of flour, mixing until it forms a paste. Gradually add in 85 ml of chicken stock, stirring continuously until the mixture thickens. Once achieved, incorporate 400 ml of hard dry apple cider and stir well to combine all the ingredients.

Step 8: Combine and Boil
Return the browned chicken and crispy bacon back into the casserole dish, along with the remaining thyme sprigs. Bring the mixture to a gentle boil, allowing all those lovely flavors to meld together, contributing to the heart of this casserole.

Step 9: Bake Covered
Cover the casserole dish with a lid or foil, and bake it in the preheated oven for 30 minutes. This initial covered baking ensures the chicken stays moist, soaking up the delicious sauce.

Step 10: Finish Baking Uncovered
After 30 minutes, uncover the casserole and continue baking for another 30 minutes. This step allows the sauce to reduce and intensify in flavor, creating that wonderful comforting essence that defines the French Chicken Casserole a la Normande.

Step 11: Fry the Apples
While the casserole is baking, heat up reserved chicken fat or butter in a skillet over medium heat. Add the apple wedges and fry them until golden brown, about 5 minutes. Be sure to keep an eye on them to avoid burning, as they add a delightful sweetness to the dish.

Step 12: Add Cream and Serve
Once the casserole is out of the oven, stir in 125 ml of heavy cream, allowing it to blend into the rich sauce. Return it to the oven uncovered for another 20 minutes. Finally, fold in your beautifully fried apple wedges before serving this comforting dish.

French Chicken Casserole a la Normande

French Chicken Casserole a la Normande Variations

Feel free to play around with this recipe to create your perfect French Chicken Casserole a la Normande experience!

  • Dairy-Free: Substitute the heavy cream with coconut cream or cashew cream for a rich, dairy-free alternative.

  • Gluten-Free: Use a gluten-free flour blend for thickening the sauce. This allows everyone to enjoy this comforting dish without worry.

  • Veggie Boost: Add chopped carrots and bell peppers for extra color and nutrients, making the dish even more vibrant and healthful!

  • Apple Variety: Experiment with different apple types, like Granny Smith for tartness or Honeycrisp for sweetness, to customize the flavor profile to your liking.

  • Herb Swap: Try fresh rosemary or sage instead of thyme to introduce a delightful twist, giving the casserole a whole new aromatic character.

  • Spicy Kick: Add a pinch of red pepper flakes or diced jalapeños to the pan for a heat-infused layer that complements the apple’s sweetness beautifully.

  • Flavor Infusion: Marinate the chicken in a blend of apple cider and herbs overnight to deepen the flavor and create a more complex taste experience.

  • One-Pot Wonder: If you’re in the mood for simplicity, consider making this dish in a slow cooker. Just cook on low for 6 hours for a tender, fall-apart meal everyone will adore.

We can’t wait for you to try these adaptations! Don’t forget to explore how this one-pot wonder can become your new go-to recipe! You can also check out how to elevate your meals with seasonal sides that perfectly complement this savory casserole!

Helpful Tricks for French Chicken Casserole a la Normande

Perfect Browning: Ensure your chicken is patted dry and seasoned well with salt before browning to achieve that golden crust and flavorful base.

Deglaze Carefully: When adding brandy or whiskey, scrape the pan thoroughly to capture all those flavorful bits—this is essential for your French Chicken Casserole a la Normande’s rich taste!

Thicken Wisely: Stir the flour in slowly, making sure it forms a paste before adding liquids. This helps prevent lumps and creates a silky sauce.

Don’t Rush the Bake: Covering the casserole at first keeps the chicken juicy. Uncovering later helps concentrate flavors—timing is key!

Fry Those Apples: Watch the apple wedges closely while frying. If they burn, they’ll turn bitter, and we want them to add a touch of sweetness, not bitterness!

Make Ahead Options

Preparing the French Chicken Casserole a la Normande ahead of time is a fantastic way to streamline your weeknight dinner! You can season and brown the chicken, as well as sauté the vegetables, up to 24 hours in advance. Simply store the browned chicken and sautéed mixture in airtight containers in the refrigerator to maintain freshness. When ready to complete the dish, just combine everything in your casserole dish, prepare the sauce, and bake as directed—adding an additional 5-10 minutes to the cooking time to ensure it’s heated through. This way, you can enjoy the same comforting flavors while saving time for what truly matters—gathering around the table with loved ones!

What to Serve with French Chicken Casserole a la Normande

As the rich, creamy, and apple-infused aroma wafts through your kitchen, consider these delightful pairings to elevate your meal.

  • Crusty Bread: A warm loaf is perfect for soaking up the savory sauce, making every bite even more enjoyable.

  • Green Salad: A light mix of greens with a zesty vinaigrette adds freshness and balances the dish’s richness for a wholesome meal.

  • Buttery Mashed Potatoes: Creamy mash complements the casserole while providing a comforting texture that feels like a warm hug.

  • Roasted Vegetables: Seasoned carrots, Brussels sprouts, or root veggies enhance the meal with their natural sweetness and a satisfying crunch.

  • Savory Rice Pilaf: Fluffy rice with herbs provides a gentle base, allowing the casserole’s flavors to shine through beautifully.

  • Apple Crisp: End the meal with this classic dessert that mirrors the casserole’s apple component, bringing a sweet finish to your feast.

  • Light White Wine: A chilled bottle of Chardonnay or Sauvignon Blanc pairs beautifully, enhancing the apple and herb notes in the casserole.

  • Sparkling Water: Refreshing and effervescent, it cleanses the palate, making every bite of your French Chicken Casserole a la Normande a reason to savor.

How to Store and Freeze French Chicken Casserole a la Normande

Fridge: Store leftovers in an airtight container for up to 3 days. Allow the casserole to cool completely before sealing to prevent condensation.

Freezer: Freeze in a tightly wrapped container or freezer bag for up to 3 months. Portion it out for easy reheating later.

Reheating: Thaw overnight in the fridge and reheat gently in the oven at 180°C/350°F for about 20-30 minutes, ensuring it’s heated through.

Leftover Tips: If you have extra apple wedges, save them separately and add them fresh when reheating your French Chicken Casserole a la Normande for added texture.

French Chicken Casserole a la Normande

French Chicken Casserole a la Normande Recipe FAQs

What apples are best for this casserole?
You should choose firm apples like Granny Smith or Honeycrisp. These varieties hold their shape during cooking and provide a lovely balance of sweetness and tartness that complements the rich flavors of the French Chicken Casserole a la Normande.

How should I store the leftovers?
Absolutely! Allow the casserole to cool completely before transferring it to an airtight container. It can be stored in the refrigerator for up to 3 days. To prevent sogginess, I recommend covering it loosely with foil rather than sealing it tightly right away.

Can I freeze the French Chicken Casserole a la Normande?
Yes, you can freeze it! After the casserole has completely cooled, portion it into freezer-safe containers or bags. Be sure to remove as much air as possible for up to 3 months of storage. When you’re ready to enjoy it again, just thaw it overnight in the fridge before reheating.

What if my casserole turns out too dry?
If the casserole feels dry after baking, there’s no need to worry! You can stir in a little extra chicken stock or cream when reheating to add moisture back in. Additionally, consider covering it with foil for the first part of the baking process in the future to maintain moisture.

Are there any dietary considerations for this dish?
For gluten-free options, you can substitute the flour with a gluten-free flour blend or cornstarch, but remember to adjust the quantity. For those with dairy allergies, using a dairy-free cream alternative can yield fantastic results without compromising the dish’s integrity. Just ensure any ingredients meet your dietary needs.

How long does it take to reheat leftovers?
To reheat, preheat your oven to 180°C/350°F. Place the casserole in an oven-safe dish and cover it loosely with foil. Reheat for about 20-30 minutes or until heated through. Alternatively, you could microwave it in portions, but I find that the oven helps retain the casserole’s texture best!

Hearty French Chicken Casserole a la Normande Family Feast

Experience comfort with this French Chicken Casserole a la Normande, blending chicken, apples, and cream for a delightful family meal.

  • Casserole dish
  • skillet
  • Oven

For the Dish

  • 1 tablespoon olive oil (for browning the chicken)
  • 4 pieces chicken thighs and legs (tender cuts)
  • 1 teaspoon salt (for flavor enhancement)
  • 2 pieces shallots (diced)
  • 2 sticks celery (diced)
  • 3 sprigs thyme (fresh)
  • 2 cloves garlic (minced)
  • 100 grams bacon lardons (crispy bites)
  • 2 tablespoons brandy or whiskey (for deglazing)

For the Sauce

  • 2 tablespoons flour (to thicken the sauce)
  • 500 ml chicken stock (for the sauce base)
  • 400 ml hard dry apple cider (for sweetness)
  • 2 pieces apples (caramelized for garnish)
  • 125 ml double cream/heavy cream (for richness)

Cooking Steps

  1. Preheat your oven to 180°C/350°F.
  2. Pat dry the chicken thighs and legs and season with salt.
  3. In a large casserole dish, heat olive oil and brown the chicken for about 5-7 minutes. Remove and set aside.
  4. Cook the bacon lardons in the same pan until crispy, then transfer to the platter with the chicken.
  5. Sauté diced shallots, celery, and thyme for 5-7 minutes until softened, then add minced garlic for another 30 seconds.
  6. Deglaze the pan with brandy or whiskey, scraping up browned bits and cook for 2 minutes.
  7. Stir in flour to create a paste, then gradually add chicken stock, stirring until thickened. Incorporate apple cider.
  8. Return the chicken and bacon to the casserole, bringing the mixture to a gentle boil.
  9. Cover the casserole and bake for 30 minutes.
  10. Uncover and bake for another 30 minutes to reduce and intensify flavors.
  11. Fry apple wedges in reserved chicken fat or butter until golden brown.
  12. Stir in heavy cream into the casserole after baking, return to the oven uncovered for 20 minutes, and fold in fried apples before serving.

For best results, ensure the chicken is well-patted dry before browning and avoid rushing the baking process to achieve juicy chicken and concentrated flavors.

Main Dishes
French
casserole, comfort food, Easy Recipe, Family Meal, French Chicken Casserole a la Normande, one-pot dish

Filed Under: Main Dishes

Savor Every Bite of Chicken Sausage and Broccoli Orzo Delight

August 29, 2025 by grace bellamy Leave a Comment

As I stir a bubbling pot on the stove, a warm, savory aroma dances through my kitchen, making it impossible to resist. Enter Chicken Sausage and Broccoli Orzo—a delightful meal that turns an ordinary weeknight into something special without breaking a sweat. With just 30 minutes from start to finish, this recipe is a lifesaver for anyone looking to swap takeout for wholesome homemade goodness. Packed with protein and vibrant greens, it’s not only satisfying but also a fantastic way to sneak in some healthy veggies. Imagine filling your bowl with creamy orzo hugged by everything you love—let’s dive into this comforting dish that’s perfect for feeding the whole family! Are you ready to whip up something delicious?

Chicken Sausage and Broccoli Orzo

Why is Chicken Sausage and Broccoli Orzo a Must-Try?

Simplicity: This recipe is incredibly easy to follow, making it perfect for beginners and busy home cooks alike. You’ll find that it only takes 30 minutes from prep to plate!

Pack a Nutritional Punch: With protein-rich chicken sausage and vibrant broccoli, this creamy orzo dish is not just tasty; it’s also packed with nutrients that support a healthy lifestyle.

One-Pot Wonder: Save on cleanup with this one-pot meal that brings all the flavors together beautifully, keeping your kitchen neat and tidy.

Comfort in Every Bite: Combining the creamy texture of orzo with hearty sausage and fresh greens creates a delightful comfort food that will please any crowd. Perfect alongside some crusty bread or a crisp salad, discover how to elevate your weeknight dinner.

Endless Versatility: Feel free to customize this dish with your favorite vegetables or spices. It’s a great way to use up leftovers or seasonal produce! If you’re interested in more quick dinner ideas, check out my collection of easy weeknight recipes.

Chicken Sausage and Broccoli Orzo Ingredients

Here’s what you’ll need to create this comforting dish bursting with flavor and nutrition!

For the Orzo:
• 2 cups orzo pasta – The base of this dish that absorbs all the delicious flavors!
• 4 cups chicken broth – Adds depth and richness; feel free to use low-sodium for a healthier option.

For the Sausage and Veggies:
• 1 pound chicken sausage, sliced – Packed with protein; you can substitute with turkey sausage for a lighter version.
• 2 cups broccoli florets – Fresh broccoli adds a wonderful crunch and vibrant color; you could also try asparagus for a change!
• 3 cloves garlic, minced – Enhances the overall flavor; don’t be shy, it’s the heart of this dish!

For Flavoring:
• 1 tablespoon olive oil – Used to sauté the sausage and veggies, imparting a luscious taste.
• 1 teaspoon Italian seasoning – A delightful blend that elevates the dish; adjust to your spice preference.
• Salt and pepper to taste – Essential for enhancing flavors; remember to taste before serving!

For the Finish:
• 1/2 cup grated Parmesan cheese – Creates a creamy, cheesy finish; substitute with nutritional yeast for a dairy-free version.
• 2 tablespoons fresh parsley, chopped (for garnish) – Adds a fresh, vibrant touch for an inviting presentation!

Now you’re all set to make your own Chicken Sausage and Broccoli Orzo! Let the cooking begin!

Step‑by‑Step Instructions for Chicken Sausage and Broccoli Orzo

Step 1: Heat the Oil
In a large pot, warm 1 tablespoon of olive oil over medium heat. Allow the oil to shimmer gently, indicating it’s ready for cooking. This initial step sets the stage for enhancing the deep flavors of your Chicken Sausage and Broccoli Orzo, preparing your kitchen for the delicious aroma to come.

Step 2: Brown the Sausage
Next, add 1 pound of sliced chicken sausage to the pot. Sauté for about 5–7 minutes until the sausages are golden brown and slightly crispy around the edges. Stir occasionally to ensure even cooking and to infuse the oil with the rich flavors of the sausage, creating a savory base for your dish.

Step 3: Sauté the Garlic
Add 3 cloves of minced garlic to the pot and cook for 1 minute until fragrant. Stir continuously to prevent the garlic from burning, which could create a bitter taste. This step enhances the Chicken Sausage and Broccoli Orzo, filling your kitchen with a warm and inviting aroma as the garlic releases its essential oils.

Step 4: Add the Broccoli
Stir in 2 cups of broccoli florets and cook for an additional 2–3 minutes. You want the florets to turn bright green while starting to soften a bit, adding a beautiful color and texture to your dish. The gentle heat helps maintain their vibrant hue, keeping your Chicken Sausage and Broccoli Orzo visually appealing.

Step 5: Incorporate the Orzo and Broth
Add 2 cups of orzo pasta, along with 4 cups of chicken broth, 1 teaspoon of Italian seasoning, salt, and pepper to taste. Increase the heat to bring this mixture to a vigorous boil, allowing the flavors to meld together beautifully. The bubbling liquid will signal that it’s time to move on to the next stage of your cooking adventure.

Step 6: Simmer the Dish
Once boiling, reduce the heat to a gentle simmer, cover the pot, and let it cook for 10-12 minutes. Stir occasionally to prevent the orzo from sticking to the pot. You’ll know it’s done when the orzo is tender and has absorbed most of the broth, forming a creamy base that perfectly complements the Chicken Sausage and Broccoli.

Step 7: Add the Cheese
Remove the pot from heat and stir in ½ cup of grated Parmesan cheese. Continue stirring until the cheese is melted and evenly incorporated, creating a rich and creamy texture throughout your Chicken Sausage and Broccoli Orzo. This indulgent touch elevates the dish, making it even more comforting and delicious.

Step 8: Garnish and Serve
Divide your Chicken Sausage and Broccoli Orzo into serving bowls and garnish with 2 tablespoons of freshly chopped parsley. This final touch adds a pop of color and freshness, inviting your family and friends to dig into this delightful meal. Serve hot, and watch as they savor every comforting bite!

Chicken Sausage and Broccoli Orzo

Expert Tips for Chicken Sausage and Broccoli Orzo

Perfect Pasta Consistency: Avoid overcooking the orzo by stirring occasionally while it simmers, ensuring it absorbs just enough broth for a creamy texture.

Flavor Boost: Don’t hesitate to customize the Italian seasoning with your own herbs or spices; fresh basil or oregano can elevate your Chicken Sausage and Broccoli Orzo even more!

Sausage Variations: If you prefer a different flavor, use spicy chicken sausage or turkey sausage to add a kick. Just keep an eye on the cooking time to prevent overcooking.

Veggie Swaps: Experiment with seasonal veggies like spinach, zucchini, or peas for variety; they’ll all create a delightful medley in your dish.

Storage Savvy: Leftovers can be stored in an airtight container in the fridge for up to 3 days; simply reheat in the microwave and enjoy!

Make Ahead Options

These Chicken Sausage and Broccoli Orzo is perfect for busy weeknights! You can prepare the orzo and sausage mixture up to 3 days in advance. To do this, cook the orzo according to the recipe, but stop before adding the cheese. Allow it to cool completely, then refrigerate it in an airtight container. The broccoli can also be prepped ahead; just blanch it and add it to the mixture when you cook. When ready to serve, simply heat the mixture on the stove, stirring in the grated Parmesan cheese until melted. This method ensures your dish remains just as delicious, saving you precious time without sacrificing flavor.

What to Serve with Chicken Sausage and Broccoli Orzo

Imagine a table adorned with colors and flavors, celebrating the essence of homemade comforts alongside your delicious orzo dish.

  • Garlic Bread: This crispy, buttery companion adds a crunchy texture to your meal, perfect for scooping every last bit of creamy orzo.
  • Caesar Salad: The crisp romaine, creamy dressing, and sharp Parmesan cheese complement the richness of the orzo beautifully.
  • Roasted Vegetables: Toss seasonal veggies like carrots and bell peppers for a colorful side that enhances nutrition and flavor with subtle caramelization.
  • Lemon-Water: A refreshing drink that balances the dish’s richness, a splash of lemon brightens your meal and adds a zesty kick.
  • Herbed Quinoa: A delicious protein-packed side that brings a nutty flavor, pairing perfectly with the savory chicken sausage.
  • Tiramisu: End on a sweet note! This light yet decadent dessert will charm everyone and round off your meal splendidly with a touch of elegance.
  • Steamed Asparagus: Crisp-tender asparagus adds vibrant color and a fresh crunch, enhancing the meal without overwhelming the senses.
  • Spinach Salad: Mixed with strawberries and a light vinaigrette, this salad provides a refreshing contrast to the hearty orzo dish.
  • Sparkling Water: For a fizzy and fun drink option, sparkling water with slices of lime makes your meal feel extra special.

How to Store and Freeze Chicken Sausage and Broccoli Orzo

Fridge: Store leftovers in an airtight container for up to 3 days. This dish stays flavorful and can be quickly reheated when you’re craving comfort food.

Freezer: For long-term storage, freeze in portion-sized containers for up to 2 months. When ready to enjoy, thaw overnight in the fridge and reheat thoroughly.

Reheating: To reheat, microwave in 30-second intervals, stirring in between, until hot. You may want to add a splash of chicken broth to revive the creamy texture.

Organizing Tips: Label containers with the date and contents for easy access in your freezer. This Chicken Sausage and Broccoli Orzo will be a delightful meal waiting for you!

Chicken Sausage and Broccoli Orzo Variations

Feel free to personalize your Chicken Sausage and Broccoli Orzo with these delicious twists that ignite your culinary creativity!

  • Gluten-Free: Substitute orzo with gluten-free pasta to enjoy this dish without the gluten.
  • Spicy Kick: Use spicy chicken sausage or add red pepper flakes for a fiery flavor that warms the soul.
  • Creamy Upgrade: Mix in cream cheese or a splash of heavy cream for an even richer, creamier finish.
  • Veggie Medley: Swap broccoli for a vibrant mix of seasonal veggies like bell peppers and snap peas for extra crunch.
  • Herb Garden Fresh: Experiment with fresh herbs like basil or thyme instead of Italian seasoning to brighten the dish.
  • Nut-Free Flavor: Replace Parmesan with a nut-based cheese or leave it out for a dairy-free delight without sacrificing taste.
  • Zesty Citrus: Squeeze in fresh lemon juice before serving to add a zesty brightness that highlights the flavors beautifully.
  • Protein Boost: Toss in some chickpeas or cannellini beans for an extra protein dimension that pairs perfectly with the creamy orzo.

With these variations, your Chicken Sausage and Broccoli Orzo will never be boring!

Chicken Sausage and Broccoli Orzo

Chicken Sausage and Broccoli Orzo Recipe FAQs

How do I select the perfect broccoli for my orzo?
Absolutely! When choosing broccoli, look for small, tight florets with a rich green color and no dark spots. The stems should be firm, not wilted, and the leaves should be fresh. If you spot any yellowing or signs of wilting, it’s best to pass and choose a fresher bunch.

What are the best storage methods for leftovers?
Very! Store any leftover Chicken Sausage and Broccoli Orzo in an airtight container in the fridge for up to 3 days. Ensure it’s cooled down to room temperature before sealing to maintain freshness. Reheat in the microwave, giving it a gentle stir in between to ensure even heating.

Can I freeze Chicken Sausage and Broccoli Orzo?
Certainly! To freeze, divide the orzo into portion-sized containers. Allow it to cool completely, then seal tightly to avoid freezer burn. It can be stored in the freezer for up to 2 months. When you’re ready to enjoy it, simply thaw overnight in the fridge, then reheat with a splash of chicken broth to restore its creamy texture.

What should I do if my orzo is too sticky or mushy?
Don’t worry, it happens to the best of us! If your orzo turns out sticky or mushy, try adding a bit of chicken broth and gently stirring it in over low heat. Another option is to incorporate a small amount of olive oil to help separate the grains. For future batches, ensure to stir occasionally while cooking and avoid overcooking the orzo.

Any dietary considerations I should be aware of?
Of course! If anyone in your family has gluten sensitivities, you can replace the orzo with gluten-free pasta alternatives. For dairy allergies, substitute Parmesan cheese with nutritional yeast, which will give it a cheesy flavor without dairy. Always double-check labels for chicken sausage if there are specific dietary restrictions.

How can I customize this recipe based on my preferences?
Endless possibilities! Feel free to experiment by adding seasonal vegetables like spinach or bell peppers for extra nutrition. Additionally, you might try different types of sausage, such as spicy or Italian chicken sausage, to play with the flavor profile. The more the merrier! Don’t hesitate to innovate!

Savor Every Bite of Chicken Sausage and Broccoli Orzo Delight

A quick and delicious Chicken Sausage and Broccoli Orzo recipe packed with protein and vibrant greens for a comforting family meal.

  • Large Pot

For the Orzo

  • 2 cups orzo pasta (The base of this dish that absorbs all the delicious flavors!)
  • 4 cups chicken broth (Adds depth and richness; use low-sodium for a healthier option.)

For the Sausage and Veggies

  • 1 pound chicken sausage, sliced (Packed with protein; can substitute with turkey sausage.)
  • 2 cups broccoli florets (Fresh broccoli adds a wonderful crunch; can try asparagus.)
  • 3 cloves garlic, minced (Enhances the overall flavor.)

For Flavoring

  • 1 tablespoon olive oil (Used to sauté the sausage and veggies.)
  • 1 teaspoon Italian seasoning (A delightful blend that elevates the dish.)
  • Salt and pepper to taste (Essential for enhancing flavors.)

For the Finish

  • 1/2 cup grated Parmesan cheese (Creates a creamy, cheesy finish; substitute with nutritional yeast for dairy-free.)
  • 2 tablespoons fresh parsley, chopped (For garnish.)

Step-by-Step Instructions

  1. In a large pot, warm 1 tablespoon of olive oil over medium heat.
  2. Add 1 pound of sliced chicken sausage to the pot. Sauté for about 5–7 minutes until golden brown.
  3. Add 3 cloves of minced garlic to the pot and cook for 1 minute until fragrant.
  4. Stir in 2 cups of broccoli florets and cook for an additional 2–3 minutes until bright green.
  5. Add 2 cups of orzo pasta, 4 cups of chicken broth, 1 teaspoon of Italian seasoning, salt, and pepper to taste. Bring to a vigorous boil.
  6. Reduce the heat to a gentle simmer, cover the pot, and let it cook for 10-12 minutes.
  7. Remove the pot from heat and stir in 1/2 cup of grated Parmesan cheese until melted.
  8. Divide into serving bowls and garnish with 2 tablespoons of freshly chopped parsley.

Leftovers can be stored in an airtight container in the fridge for up to 3 days. For long-term storage, freeze in portion-sized containers for up to 2 months. When ready, thaw overnight in the fridge and reheat thoroughly.

Main Dishes
Italian
broccoli, Chicken Sausage, one pot meal, Orzo, quick dinner

Filed Under: Main Dishes

Decadent Chocolate Pumpkin Cupcakes for Fall Bliss

August 29, 2025 by grace bellamy Leave a Comment

As I opened my pantry, the vibrant orange cans of pumpkin caught my eye, instantly sparking a memory of cozy fall afternoons and the irresistible smell of baking. That’s when I decided it was time to whip up a batch of Chocolate Pumpkin Cupcakes, the perfect blend of rich chocolate and warm pumpkin spice that feels like a hug in dessert form. These delightful cupcakes not only bring comfort and nostalgia but are also quick to prepare, making them an ideal choice for gatherings or a sweet treat on a busy weeknight. Plus, they’re a fantastic way to sneak in some wholesome pumpkin goodness without compromising on indulgence. Curious about how to make these irresistible cupcakes that will have everyone asking for seconds? Let’s dive in!

Chocolate Pumpkin Cupcakes

Why Are Chocolate Pumpkin Cupcakes a Must-Try?

Decadent flavors collide in every bite, where rich chocolate meets the warmth of pumpkin spice, creating an irresistible treat. Quick and easy to whip up, you’ll have a batch ready in under an hour—perfect for busy weeknights or unexpected guests. Crowd-pleasing delights that please both chocolate lovers and pumpkin enthusiasts alike! Wholesome goodness is packed inside, allowing you to enjoy a dessert that feels indulgent while sneaking in nutritious pumpkin puree. Plus, these cupcakes make for an exceptional addition to your fall dessert spread or a fun twist at any gathering!

Ingredients

Chocolate Pumpkin Cupcake Ingredients

• Here’s what you need to whip up these delightful treats!

For the Cupcake Batter

  • Unsalted butter – 1/4 cup (56 g), softened, for a rich, moist texture.
  • Granulated white sugar – 3/4 cup (150 g), to sweeten the chocolate goodness.
  • Egg – 1, at room temperature, to help bind the ingredients together.
  • Egg yolk – 1, at room temperature, adds extra creaminess to the batter.
  • Vanilla extract – 1 tsp, for a touch of warmth and aroma.
  • Whole milk – 1/4 cup (60 ml), at room temperature, to keep the batter moist.
  • Sour cream – 1/4 cup (62 g), at room temperature, ensures a tender crumb.
  • Canned pumpkin puree – 1/2 cup (122 g), Libby’s canned pumpkin, to create the perfect pumpkin flavor.
  • All-purpose flour – 1 cup (125 g), sifted, to form the structure of the cupcakes.
  • Black cocoa powder – 1/4 cup + 2 tbsp (30 g), sifted, for that deep chocolate flavor.
  • Pumpkin pie spice – 2 1/2 tsp, bringing a warm, fragrant kick that complements the pumpkin.
  • Baking powder – 1/2 tsp, to help the cupcakes rise.
  • Baking soda – 1/2 tsp, needed for leavening the batter.
  • Salt – 1/4 tsp, enhances flavors and balances sweetness.

For the Frosting

  • Canned pumpkin puree – 1/2 cup (122 g), dried to 1/4 cup (45 g), will intensify the pumpkin flavor.
  • Unsalted butter – 1 cup (224 g), softened, for a rich, creamy frosting.
  • Cream cheese – 4 oz (113 g), cold, adds tanginess and creaminess to the frosting.
  • Pumpkin pie spice – 2 tsp, to tie in that seasonal flavor throughout.
  • Powdered sugar – 3 cups (390 g), sifted, to achieve the perfect sweetness and texture for frosting.

With this simple list of ingredients, you’ll be on your way to creating irresistible Chocolate Pumpkin Cupcakes that combine seasonal flavors with chocolatey bliss!

Step‑by‑Step Instructions for Chocolate Pumpkin Cupcakes

Step 1: Preheat the Oven
Begin by preheating your oven to 350°F (175°C) and prepare a standard cupcake pan by lining it with 12 cupcake liners. This step is essential for achieving that perfectly baked texture in your Chocolate Pumpkin Cupcakes, allowing them to rise beautifully as they bake.

Step 2: Cream Butter and Sugar
In a large mixing bowl, use an electric mixer to cream together the softened unsalted butter and granulated sugar for about 1-2 minutes, until the mixture becomes light and fluffy. The transformation should be visually noticeable; the color should lighten significantly, which indicates the sugar has fully incorporated.

Step 3: Add Eggs and Vanilla
Next, add the egg, egg yolk, and vanilla extract to your butter-sugar mixture. Mix on medium speed for about 1 minute until everything is pale in color and smooth. This step infuses your chocolate pumpkin batter with rich flavors and helps create a velvety texture.

Step 4: Incorporate Wet Ingredients
Now, it’s time to mix in the whole milk, sour cream, and 1/2 cup of canned pumpkin puree. Stir gently until just combined, ensuring that all the wet ingredients are fully incorporated for an even distribution of flavor throughout the batter, giving your cupcakes that delightful moistness.

Step 5: Combine Dry Ingredients
In a separate small bowl, whisk together the sifted all-purpose flour, black cocoa powder, pumpkin pie spice, baking powder, baking soda, and salt. Make sure no clumps remain. This mixture adds not only flavor but also the structure needed for your Chocolate Pumpkin Cupcakes to rise properly.

Step 6: Blend Wet and Dry Ingredients
Gradually add the dry ingredients to the wet mixture, mixing just until the batter is smooth and combined. Take care not to overmix; it’s important to maintain the batter’s aeration for fluffy cupcakes. You’ll know it’s ready when it’s uniform but still thick.

Step 7: Fill the Cupcake Liners
Evenly divide the batter among the cupcake liners, filling each about three-quarters full. This ensures that each cupcake has room to rise and won’t overflow in the oven, keeping the chocolate-pumpkin goodness intact.

Step 8: Bake the Cupcakes
Place your filled cupcake pan in the preheated oven and bake for 17-19 minutes. To check for doneness, insert a toothpick into the center of one cupcake; it should come out clean without any wet batter clinging to it. This step is crucial for achieving that perfect moist but not raw cupcake texture.

Step 9: Cool the Cupcakes
Once baked, remove the pan from the oven and allow the cupcakes to cool in the pan for about 5 minutes. Then, carefully transfer them to a cooling rack to cool completely. This cooling stage prevents sogginess and allows the flavors to settle, making your Chocolate Pumpkin Cupcakes even more delightful.

Step 10: Prepare Dried Pumpkin
While the cupcakes cool, spread 1/2 cup of canned pumpkin puree onto a plate. Use paper towels to dab and absorb the excess liquid until it measures about 1/4 cup. This step intensifies the pumpkin flavor for the frosting, ensuring it’s rich without being too wet.

Step 11: Beat the Butter
In a medium-sized bowl, beat the softened butter on high speed until it becomes pale in color and fluffy, approximately 5-10 minutes. This aeration is key for creating a light and creamy frosting that perfectly complements your Chocolate Pumpkin Cupcakes.

Step 12: Add Cream Cheese
Next, add the cold cream cheese to the fluffy butter and mix just until combined. Be cautious not to overbeat at this stage; you want a smooth mixture that enhances the flavor without losing its airy texture.

Step 13: Mix in Pumpkin and Spice
Incorporate the prepared dried pumpkin and pumpkin pie spice into the butter-cream cheese mixture. Blend until fully combined, ensuring that the seasonal flavors are well-distributed throughout your frosting for an irresistible taste in every bite.

Step 14: Gradually Add Sugar
Slowly add the sifted powdered sugar to your frosting mixture, mixing on low speed until it’s combined. Then increase the speed for 1-2 minutes until the frosting is fluffy. This technique builds a sweet and creamy topping, perfect for each cupcake’s rich chocolate and pumpkin flavor.

Step 15: Pipe the Frosting
Once the cupcakes are completely cooled, transfer the frosting into a piping bag fitted with a decorative tip. This step allows you to create beautiful swirls on top of your Chocolate Pumpkin Cupcakes, adding an appealing finish that will wow your guests.

Step 16: Frost and Serve
Finally, pipe a generous amount of frosting onto each cupcake, creating a delightful swirl. Your Chocolate Pumpkin Cupcakes are now ready to be served, radiating warmth and sweetness that’s perfect for any gathering or cozy night in!

Chocolate Pumpkin Cupcakes

Chocolate Pumpkin Cupcakes Variations

Feel free to explore these delightful twists—your creativity in the kitchen always makes meals more memorable!

  • Gluten-Free: Substitute all-purpose flour with a gluten-free flour blend for a delicious alternative that everyone can enjoy.
  • Dairy-Free: Use coconut oil instead of butter and almond milk in place of whole milk to make these treats suitable for dairy-free diets.
  • Spicy Kick: Add a pinch of cayenne pepper or chili powder to the batter for an unexpected heat that perfectly complements the sweetness.
  • Nutty Flavor: Incorporate 1/2 cup of finely chopped walnuts or pecans into the batter for added texture and a nutty crunch in each bite.
  • Chocolate Chips: Fold in 1/2 cup of semi-sweet or dark chocolate chips for an extra chocolatey burst that chocolate lovers will adore!
  • Pumpkin Spice Latte: Enhance the batter by adding 1/2 cup of strong brewed coffee for a cozy coffee flavor and added depth.

Transforming your cupcakes is not just about substitutions, but about enhancing your delightful creations! Just like exploring new flavors in a Pumpkin Spice Latte, every variation brings a unique layer of comfort and joy.

Expert Tips for Chocolate Pumpkin Cupcakes

  • Room Temperature Ingredients: Always start with room temperature butter, eggs, and dairy. This results in a smoother batter and evenly baked Chocolate Pumpkin Cupcakes.
  • Sift Your Dry Ingredients: Sifting flour, cocoa, and spices helps prevent clumping, ensuring a consistent texture in your cupcakes and a light, fluffy finish.
  • Don’t Overmix the Batter: Mix until just combined to avoid dense cupcakes. Overmixing can create tough cupcakes instead of the desired light and airy texture.
  • Check for Doneness: Insert a toothpick into the center of a cupcake. It should come out clean or with a few crumbs, not wet batter. This ensures perfect baking.
  • Cool Completely: Allow the cupcakes to cool fully before frosting. If they are warm, the frosting will melt and slide off, ruining the presentation of your delicious Chocolate Pumpkin Cupcakes!

How to Store and Freeze Chocolate Pumpkin Cupcakes

Room Temperature: Store unfrosted cupcakes at room temperature for up to 2 days in an airtight container to maintain their moisture and freshness.

Fridge: If frosted, keep Chocolate Pumpkin Cupcakes in the fridge for up to 5 days in an airtight container to prevent the frosting from melting and maintain flavors.

Freezer: Freeze unfrosted cupcakes for up to 3 months. Wrap each cupcake in plastic wrap and place them in an airtight zip-lock bag for protection against freezer burn.

Reheating: To enjoy frozen cupcakes, thaw in the fridge overnight. Reheat briefly in the microwave (about 10-15 seconds) for a warm, delightful experience!

What to Serve with Chocolate Pumpkin Cupcakes?

Indulging in these delightful treats is just the beginning; let’s create a full, cozy experience that warms your heart!

  • Cinnamon Sugar Donuts: These soft, sugary bites pair perfectly with the pumpkin spice in the cupcakes, making for an extra cozy dessert spread.
  • Apple Cider: A cup of warm apple cider adds a sweet and tangy touch that complements the rich chocolate and pumpkin flavor beautifully.
  • Whipped Cream: Light and airy, a dollop of whipped cream atop each cupcake balances the richness and makes every bite delightful.
  • Pumpkin Ice Cream: Creamy pumpkin ice cream brings out the flavors even more, creating a harmonious dessert experience that screams fall.
  • Chai Tea Latte: The warming spices of a chai latte will enhance the cozy vibes while pairing perfectly with the rich flavors of chocolate and pumpkin.
  • Caramel Drizzle: A rich caramel sauce drizzled over the cupcakes adds a sweet, buttery note, intensifying the overall indulgence of your dessert.
  • Hazelnut Coffee: The nutty tones of hazelnut coffee seamlessly accentuate the chocolate and pumpkin, creating a café-like experience at home.

These serving suggestions ensure you create a delightful atmosphere full of flavor and warmth, perfect for sharing with family and friends!

Make Ahead Options

Making Chocolate Pumpkin Cupcakes ahead of time is a fantastic way to save precious hours on busy days! You can prepare the cupcake batter up to 24 hours in advance; simply mix it and store it in an airtight container in the refrigerator. For the frosting, whip it up and refrigerate it for up to 3 days—make sure to let it come to room temperature and rebeat before piping for that fluffy texture. When you’re ready to bake, fill your cupcake liners with the chilled batter and bake as directed. These steps ensure that your cupcakes remain just as delicious and moist as if they were freshly made!

Chocolate Pumpkin Cupcakes

Chocolate Pumpkin Cupcakes Recipe FAQs

How do I choose ripe pumpkin for this recipe?
Absolutely! For the best flavor in your Chocolate Pumpkin Cupcakes, opt for canned pumpkin puree like Libby’s, which has a rich, sweet taste and even texture. If using fresh pumpkin, look for one that’s heavy for its size and has a firm skin, avoiding any with dark spots or softness.

How should I store my Chocolate Pumpkin Cupcakes?
Store your unfrosted Chocolate Pumpkin Cupcakes at room temperature for up to 2 days in an airtight container to maintain their delicious moisture. If they’ve been frosted, place them in the fridge for up to 5 days. Use a container that seals tightly to keep that scrumptious frosting intact!

Can I freeze Chocolate Pumpkin Cupcakes?
Very! You can freeze unfrosted Chocolate Pumpkin Cupcakes for up to 3 months. To do this, wrap each cupcake individually in plastic wrap, making sure to remove as much air as possible. Then, place them in an airtight zip-lock bag to prevent freezer burn. Just remember to thaw them overnight in the fridge before enjoying!

What should I do if my cupcakes are too dense?
If your Chocolate Pumpkin Cupcakes turn out dense, it’s often due to overmixing the batter. Next time, mix your batter just until combined for a lighter texture. Also, ensure your baking powder and baking soda are fresh; expired leavening agents can cause your cupcakes to rise poorly, leading to a denser end product.

Are these cupcakes suitable for those with dietary restrictions?
Yes! If you’re concerned about allergies, this recipe contains common allergens like eggs and dairy. For a dairy-free version, you can substitute with plant-based butter and dairy-free cream cheese. Be mindful of egg substitutes like flaxseed meal or applesauce to maintain moisture, though the texture might vary slightly.

Decadent Chocolate Pumpkin Cupcakes for Fall Bliss

These Chocolate Pumpkin Cupcakes blend rich chocolate and warm pumpkin spice, perfect for any fall gathering.

  • Cupcake pan
  • Electric mixer
  • Mixing bowls
  • piping bag

For the Cupcake Batter

  • 1/4 cup Unsalted butter (softened)
  • 3/4 cup Granulated white sugar
  • 1 large Egg (at room temperature)
  • 1 large Egg yolk (at room temperature)
  • 1 tsp Vanilla extract
  • 1/4 cup Whole milk (at room temperature)
  • 1/4 cup Sour cream (at room temperature)
  • 1/2 cup Canned pumpkin puree (Libby’s canned pumpkin)
  • 1 cup All-purpose flour (sifted)
  • 1/4 cup + 2 tbsp Black cocoa powder (sifted)
  • 2 1/2 tsp Pumpkin pie spice
  • 1/2 tsp Baking powder
  • 1/2 tsp Baking soda
  • 1/4 tsp Salt

For the Frosting

  • 1/2 cup Canned pumpkin puree (dried to 1/4 cup)
  • 1 cup Unsalted butter (softened)
  • 4 oz Cream cheese (cold)
  • 2 tsp Pumpkin pie spice
  • 3 cups Powdered sugar (sifted)

Preparation

  1. Preheat your oven to 350°F (175°C) and line a standard cupcake pan with 12 cupcake liners.
  2. Cream together the softened unsalted butter and granulated sugar for about 1-2 minutes until light and fluffy.
  3. Add the egg, egg yolk, and vanilla extract to the mixture, mixing until pale and smooth.
  4. Mix in the whole milk, sour cream, and 1/2 cup of canned pumpkin puree until just combined.
  5. In a separate bowl, whisk together the flour, cocoa powder, pumpkin pie spice, baking powder, baking soda, and salt.
  6. Gradually add the dry ingredients to the wet mixture, mixing until smooth.
  7. Evenly fill the cupcake liners, about three-quarters full.
  8. Bake for 17-19 minutes, checking for doneness with a toothpick.
  9. Cool the cupcakes in the pan for 5 minutes before transferring to a cooling rack.
  10. Prepare the dried pumpkin by absorbing excess liquid, measuring to about 1/4 cup.
  11. Beat softened butter until pale and fluffy, then add cream cheese and mix until combined.
  12. Incorporate the dried pumpkin and pumpkin pie spice into the butter-cream cheese mixture.
  13. Gradually add sifted powdered sugar, mixing until fluffy.
  14. Transfer the frosting to a piping bag and pipe onto cooled cupcakes.
  15. Serve your Chocolate Pumpkin Cupcakes and enjoy!

Use room temperature ingredients for best results. Do not overmix the batter or the cupcakes may become dense.

Dessert
American
baking, chocolate, Chocolate Pumpkin Cupcakes, cupcakes, Fall dessert, Pumpkin Spice

Filed Under: Dessert

Creamy Sun-Dried Tomato Chicken Orzo for Cozy Nights In

August 29, 2025 by grace bellamy Leave a Comment

As I stirred the vibrant mix of sun-dried tomatoes and orzo in my kitchen, the aroma wafted through the air, instantly transporting me to a sun-soaked Italian terrace. This is the magic of Creamy Sun-Dried Tomato Chicken Orzo—a dish that brings comfort and a taste of adventure right to your dinner table. With just 30 minutes of your time, you can whip up this flavorful delight that’s not only a true crowd-pleaser but also a breeze to prepare. Imagine a creamy, dreamy concoction that combines tender chicken and fresh spinach, nestled in perfectly cooked orzo. It’s a delightful chapter for your weeknight meals that will leave everyone asking for seconds. Ready to dive into this culinary journey? Let’s get cooking!

Creamy Sun-Dried Tomato Chicken Orzo

Why is this recipe a must-try?

Simplicity at its finest: This Creamy Sun-Dried Tomato Chicken Orzo can be ready in just 30 minutes, perfect for busy weeknights!

Flavor Explosion: The creamy sauce, combined with rich sun-dried tomatoes and tender chicken, creates an unforgettable taste experience that is sure to impress.

Nutrient-Rich: Packed with protein and greens, it’s a nutritious dish that will keep you fueled and satisfied, making it a great choice for healthy meals.

Versatile and adaptable: Feel free to substitute ingredients based on your preferences; you can easily customize it with seasonal vegetables or different proteins.

Crowd-Pleaser: Whether it’s a family dinner or a cozy gathering with friends, this dish will have everyone raving about your cooking skills! If you’re looking to add some exciting variations, check out fun twists on classic orzo dishes for inspiration.

Creamy Sun-Dried Tomato Chicken Orzo Ingredients

For the Chicken
• Chicken breast tenderloins – a juicy base for this dish that cooks quickly and absorbs flavors beautifully.
• Olive oil – essential for searing the chicken to a golden brown, enhancing the overall taste.
• Paprika – adds a warm, subtle smokiness to your chicken.
• Italian seasoning – this blend brings an aromatic touch, making every bite delicious.
• Salt – elevates all the flavors in the dish.
• Black pepper – adds just the right amount of spice.

For the Orzo Base
• Olive oil – a second drizzle helps sauté the garlic to perfection, releasing its fragrant aroma.
• Garlic, minced – infuses the orzo with a savory punch that enhances the entire dish.
• Sun-dried tomatoes, chopped – these tangy morsels bring a burst of flavor that pairs beautifully with the creaminess.
• Orzo, uncooked – the star pasta that absorbs the chicken stock and flavors.
• Chicken stock – provides a rich backdrop of taste and makes the orzo shine.
• Salt – a touch for seasoning while cooking the pasta.

For Creaminess and Nutrition
• Fresh spinach – a vibrant addition that wilts perfectly into the dish for added nutrition.
• Heavy cream – brings a silky richness that ties all elements together harmoniously.
• Dried basil – a fragrant herb that adds depth to the dish.
• Red pepper flakes – a hint of heat to awaken your taste buds.
• Grated parmesan – finishing this dish with a delightful cheesy note.

This Creamy Sun-Dried Tomato Chicken Orzo is not just a recipe; it’s an invitation to enjoy a delicious and satisfying meal that brings comfort to any dining table!

Step‑by‑Step Instructions for Creamy Sun-Dried Tomato Chicken Orzo

Step 1: Sear the Chicken
In a non-stick skillet over medium-high heat, warm 2 tablespoons of olive oil until shimmering. Season the chicken breast tenderloins with paprika, Italian seasoning, salt, and black pepper for a vibrant flavor. Add the chicken to the skillet and sear for about 3-5 minutes per side, until golden brown and cooked through. Remove the chicken from the skillet and set aside on a plate.

Step 2: Sauté the Garlic
In the same skillet, lower the heat slightly and add 1 tablespoon of olive oil. Once hot, stir in 5 cloves of minced garlic and sauté for around 30 seconds, just until fragrant. Keep an eye on the garlic to prevent burning, as you want just the right amount of flavor to infuse into your dish.

Step 3: Cook the Sun-Dried Tomatoes and Orzo
Next, add the chopped sun-dried tomatoes to the skillet, letting them cook for a minute to enhance their flavors. Then, stir in 1 cup of uncooked orzo, mixing well to coat it with the flavorful oil and garlic. This is an essential step for the Creamy Sun-Dried Tomato Chicken Orzo to absorb all the essence.

Step 4: Simmer the Orzo
Pour in 2 cups of chicken stock, then add ¼ teaspoon of salt. Increase the heat to bring the mixture to a simmer, stirring occasionally. Cook for about 10 minutes, watching as the orzo swells and becomes tender while absorbing the savory broth. The mixture should be slightly creamy when done.

Step 5: Incorporate the Spinach
Once the orzo is tender, add 4 ounces of fresh spinach to the skillet. Give it a gentle stir, allowing the heat to wilt the spinach, which should take 1-2 minutes. This adds a fresh, vibrant color and nutrition to the Creamy Sun-Dried Tomato Chicken Orzo.

Step 6: Mix in the Cream and Chicken
Now, it’s time to stir in ½ cup of heavy cream, 1 tablespoon dried basil, and a pinch of red pepper flakes for that perfect warmth. Return the reserved chicken to the skillet, mixing everything together thoroughly. Cook for an additional 2-3 minutes until warmed through and creamy.

Step 7: Finish with Parmesan
To complete your dish, turn off the heat and stir in 2 tablespoons of grated parmesan cheese until melted and creamy. This adds a delightful cheesy richness to the Creamy Sun-Dried Tomato Chicken Orzo. Serve hot and enjoy the comforting flavors that come together beautifully!

Creamy Sun-Dried Tomato Chicken Orzo

Expert Tips for Creamy Sun-Dried Tomato Chicken Orzo

  • Choose Tender Chicken: Opt for chicken breast tenderloins for a quick cook time and tender bites. Overcooking can lead to dryness, so keep an eye on it!

  • Garlic Timing: Sauté garlic just until fragrant to avoid bitterness. It should only take about 30 seconds; your nose will tell you when it’s perfect!

  • Perfect Orzo Texture: Stir the orzo occasionally as it simmers. This prevents sticking and ensures even cooking. Rinse and drain if necessary before adding to keep it fluffy!

  • Cream Variation: For a lighter version of your Creamy Sun-Dried Tomato Chicken Orzo, consider using half-and-half instead of heavy cream. Adjust seasoning as necessary to maintain flavors.

  • Spinach Swap: Fresh spinach wilts beautifully, but other leafy greens like kale can also work. Just ensure they are cooked until tender for the best texture and flavor.

Make Ahead Options

These Creamy Sun-Dried Tomato Chicken Orzo are perfect for busy home cooks looking to save time during the week! You can marinate the chicken with the spices (paprika, Italian seasoning, salt, and black pepper) up to 24 hours in advance; this not only enhances the flavor but helps to lock in moisture. Additionally, the orzo can be prepped by sautéing the garlic and sun-dried tomatoes ahead of time—just refrigerate for up to 3 days. When you’re ready to serve, simply reheat the mixture, add the chicken stock, orzo, and spinach, and stir in the heavy cream and parmesan at the last minute for that fresh, creamy finish. This way, you’ll achieve restaurant-quality results with minimal effort!

How to Store and Freeze Creamy Sun-Dried Tomato Chicken Orzo

Fridge: Store leftovers in an airtight container for up to 3 days. Ensure it’s cooled before refrigerating to maintain freshness.

Freezer: For longer storage, freeze in freezer-safe containers for up to 2 months. Remember to leave some space in the container as the orzo may expand during freezing.

Reheating: Thaw in the fridge overnight and reheat on the stovetop over low heat, adding a splash of chicken stock or cream for creaminess. Stir gently to combine.

Room Temperature: Avoid leaving Creamy Sun-Dried Tomato Chicken Orzo out for more than 2 hours to prevent food safety issues.

Creamy Sun-Dried Tomato Chicken Orzo Variations

Feel free to explore these delightful twists on your Creamy Sun-Dried Tomato Chicken Orzo to make it your own!

  • Dairy-Free: Use coconut cream instead of heavy cream for a subtle sweetness and a rich texture that’s plant-based.

  • Vegetarian: Swap chicken with grilled mushrooms or chickpeas, ensuring hearty bites with every forkful. This substitution brings an earthy flavor that complements the sun-dried tomatoes perfectly.

  • Pasta Alternatives: Try using quinoa or farro instead of orzo for an interesting texture and a nutritious twist that’s full of fiber.

  • Spicy Kick: Add extra red pepper flakes or diced jalapeños to the mix for a heat level that can wake up the taste buds. Spice lovers will adore this fiery enhancement!

  • Herb Infusion: Experiment with fresh herbs like cilantro or parsley instead of dried basil, giving your dish a bright, fresh aroma that’s sure to impress.

  • Chicken Variations: Substitute the chicken tenderloins with shrimp or scallops for a delicious seafood twist, adding a layer of sophistication to your meal. The delicate flavors will pair beautifully with the creamy sauce.

  • Add Veggies: Toss in seasonal vegetables like zucchini or bell peppers for added color and nutrients, creating a vibrant meal that’s just as tasty as it is good for you.

  • Nutty Flavor: Incorporate toasted pine nuts or walnuts at the end for a crunchy texture that contrasts the creaminess beautifully. The nutty flavor will elevate this dish to new heights.

Let your creativity shine with these variations, or check out fun twists on classic orzo dishes for even more ideas!

What to Serve with Creamy Sun-Dried Tomato Chicken Orzo

Prepare to elevate your dining experience with delightful accompaniments that perfectly balance flavors and textures!

  • Garlic Bread: The buttery, crispy exterior pairs beautifully with the creamy orzo, making it irresistible for soaking up every last bite.
  • Caesar Salad: Crisp romaine lettuce, crunchy croutons, and a tangy dressing provide a refreshing contrast to the richness of the orzo.

Indulge in the contrast of textures with each mouthful. Toss in some cherry tomatoes and shaved parmesan to brighten the salad.

  • Roasted Vegetables: A medley of seasonal veggies, like zucchini, bell peppers, and carrots, enhances your plate with vibrant colors and earthy flavors.

The caramelization adds sweetness, complementing the savory notes of the dish while contributing essential nutrients.

  • Herb-Infused Rice: Fluffy rice infused with herbs can serve as a comforting base without overshadowing the rich flavor of the chicken orzo.

Its subtle taste highlights the main dish while offering a textured contrast.

  • Chilled White Wine: A crisp Sauvignon Blanc or a light Pinot Grigio brings a refreshing acidity that cuts through the creamy sauce, enhancing the overall dining experience.
  • Lemon Sorbet: A light and zesty dessert like lemon sorbet serves as a refreshing palate cleanser after the rich orzo, leaving your taste buds invigorated.

These pairings will create a delightful meal experience that will leave you and your loved ones raving about your culinary skills!

Creamy Sun-Dried Tomato Chicken Orzo

Creamy Sun-Dried Tomato Chicken Orzo Recipe FAQs

What should I look for when selecting sun-dried tomatoes?
When choosing sun-dried tomatoes, look for those that are plump and tender rather than overly dry or shriveled. If possible, choose ones packed in oil for added flavor and moisture. Check the color; vibrant red indicates freshness.

How do I store leftover Creamy Sun-Dried Tomato Chicken Orzo?
Store leftovers in an airtight container in the refrigerator for up to 3 days. Make sure to let the orzo cool to room temperature before sealing it to preserve its texture and flavor. Reheat gently on the stove, adding a touch of cream or stock to revive the creaminess.

Can I freeze Creamy Sun-Dried Tomato Chicken Orzo?
Absolutely! To freeze, let your orzo cool completely, then portion it into freezer-safe containers. It can be stored for up to 2 months. Make sure to leave some space in the container for expansion. When you’re ready to enjoy it, thaw in the fridge overnight and reheat gently on the stovetop.

What if my orzo is too sticky?
If your orzo clumps together, it may have been overcooked or not stirred enough during simmering. For the next time, try stirring occasionally while it cooks to keep it fluffy. If it’s already sticky, a splash of warm chicken stock or water can help loosen it up when reheating.

Is this recipe suitable for my gluten-free diet?
If you’re following a gluten-free diet, you can swap regular orzo for gluten-free orzo or any gluten-free pasta of your choice. Just keep an eye on cooking times, as gluten-free pasta may require different cooking durations.

Can dogs eat sun-dried tomatoes?
It’s best to avoid giving sun-dried tomatoes to dogs as they can be salty and sometimes flavored with seasonings that may not be safe for pets. Always consult your veterinarian if you’re unsure about including any human food in your dog’s diet.

Creamy Sun-Dried Tomato Chicken Orzo for Cozy Nights In

Creamy Sun-Dried Tomato Chicken Orzo is a flavorful dish that combines tender chicken, fresh spinach, and perfectly cooked orzo, perfect for cozy nights in.

  • Non-stick skillet

For the Chicken

  • 1 pound chicken breast tenderloins (a juicy base for this dish that cooks quickly and absorbs flavors beautifully)
  • 2 tablespoons olive oil (essential for searing the chicken to a golden brown)
  • 1 teaspoon paprika (adds a warm, subtle smokiness to your chicken)
  • 1 teaspoon Italian seasoning (this blend brings an aromatic touch)
  • 1 teaspoon salt (elevates all the flavors in the dish)
  • 1/2 teaspoon black pepper (adds just the right amount of spice)

For the Orzo Base

  • 1 tablespoon olive oil (helps sauté the garlic to perfection)
  • 5 cloves garlic, minced (infuses the orzo with a savory punch)
  • 1/2 cup sun-dried tomatoes, chopped (brings a burst of tangy flavor)
  • 1 cup orzo, uncooked (the star pasta)
  • 2 cups chicken stock (provides a rich backdrop of taste)
  • 1/4 teaspoon salt (for seasoning while cooking the pasta)

For Creaminess and Nutrition

  • 4 ounces fresh spinach (a vibrant addition for added nutrition)
  • 1/2 cup heavy cream (brings a silky richness)
  • 1 tablespoon dried basil (adds depth to the dish)
  • 1 teaspoon red pepper flakes (adds a hint of heat)
  • 2 tablespoons grated parmesan (finishing with a delightful cheesy note)

Step-by-Step Instructions

  1. Warm 2 tablespoons of olive oil over medium-high heat. Season the chicken with paprika, Italian seasoning, salt, and black pepper. Add the chicken to the skillet and sear for about 3-5 minutes per side until cooked. Remove and set aside.
  2. Lower the heat and add 1 tablespoon of olive oil. Once hot, stir in 5 cloves of minced garlic and sauté for around 30 seconds until fragrant.
  3. Add chopped sun-dried tomatoes to the skillet and cook for 1 minute. Then stir in 1 cup of uncooked orzo and mix well.
  4. Pour in 2 cups of chicken stock and add 1/4 teaspoon of salt. Increase heat to simmer and cook for about 10 minutes until the orzo is tender.
  5. Add 4 ounces of fresh spinach to the skillet and gently stir to wilt it for 1-2 minutes.
  6. Stir in 1/2 cup of heavy cream, 1 tablespoon of dried basil, and a pinch of red pepper flakes. Return the chicken to the skillet and mix well. Cook for an additional 2-3 minutes until warmed through.
  7. Turn off the heat and stir in 2 tablespoons of grated parmesan cheese until melted and creamy. Serve hot.

This recipe is adaptable; feel free to substitute ingredients based on your preferences. Store leftovers in an airtight container for up to 3 days.

Main Dishes
Italian
chicken, comfort food, Creamy Sun-Dried Tomato Chicken Orzo, easy weeknight meal, Healthy, Orzo

Filed Under: Main Dishes

Creamy Kielbasa Broccoli Skillet: A Cozy Family Favorite

August 29, 2025 by grace bellamy Leave a Comment

In the midst of a busy week, when dinner plans feel more burdensome than exciting, I reached for a recipe that offers both ease and warmth—my Creamy Kielbasa Broccoli Skillet. This dish has quickly become a staple in my home, perfectly balancing hearty kielbasa with the vibrant crunch of broccoli, all enveloped in a luscious cheese sauce. Not only is it a breeze to whip together in just 30 minutes, but its comforting allure makes it a guaranteed crowd-pleaser for family and friends alike. Plus, the leftovers are a dream—simply pop them in the fridge for a delicious lunch the next day. Ready to dive into this comforting skillet wonder? Let’s get cooking!

Creamy Kielbasa Broccoli Skillet

Why will you adore this dish?

Simplicity shines through in this recipe, making it perfect for busy weeknights! Hearty kielbasa paired with fresh broccoli offers a delightful balance of flavors that make every bite satisfying. Creamy cheese sauce wraps around the dish, turning it into a warm, comforting meal that everyone will love. Quick to prepare, this skillet comes together in just 30 minutes, leaving you more time to enjoy with family. For a well-rounded experience, serve it alongside a fresh green salad or some garlic bread for a complete dinner that will keep everyone coming back for seconds!

Creamy Kielbasa Broccoli Skillet Ingredients

• These ingredients come together for a delightful dish!

For the Pasta and Broccoli

  • Penne pasta – adds a delightful chew and holds the creamy sauce beautifully.
  • Fresh broccoli florets – brings vibrant color and a healthy crunch that balances the richness.

For the Kielbasa

  • Kielbasa sausage – provides a hearty, smoky flavor, perfect for a cozy meal.

For the Creamy Sauce

  • Whole milk – creates a rich and smooth base for the cheese sauce.
  • Shredded mild cheddar cheese – melts perfectly into the sauce for that creamy indulgence.
  • Unsalted butter – enhances flavor and helps create a rich, luscious sauce.
  • Onion – adds a sweet, aromatic base that brings depth to the dish.
  • Minced garlic – infuses a wonderful savory note that elevates the overall flavor.

Seasonings

  • Salt – to enhance all the flavors beautifully.
  • Pepper – adds a touch of warmth and spice to the dish.

Step‑by‑Step Instructions for Creamy Kielbasa Broccoli Skillet

Step 1: Cook Pasta and Broccoli
Bring a large pot of salted water to a boil and cook 8 ounces of penne pasta following the package instructions, about 10-12 minutes. In the last 2 minutes of cooking, add 2 cups of fresh broccoli florets to the pot. Drain the pasta and broccoli together, allowing them to steam dry for a minute before setting aside.

Step 2: Brown the Kielbasa
In a large skillet, melt 2 tablespoons of unsalted butter over medium heat. Once the butter is bubbling, add 13.9 ounces of sliced kielbasa and cook for about 5 minutes, stirring occasionally until the sausage turns lightly browned and begins to caramelize. This step adds depth of flavor to your creamy kielbasa broccoli skillet.

Step 3: Sauté Onion and Garlic
Add 1 small diced yellow onion and 1 teaspoon of minced garlic to the skillet with the kielbasa. Continue cooking for an additional 2-3 minutes, stirring frequently, until the onion is soft and fragrant. This aromatic base enhances the overall flavor profile of the dish, setting the stage for a delicious creamy sauce.

Step 4: Prepare the Creamy Sauce
In a small bowl, whisk together 1 1/2 cups of whole milk and a tablespoon of cornstarch until well combined. Pour this mixture into the skillet, bringing it to a gentle simmer over medium heat. Stir constantly for 3-5 minutes, until the sauce thickens slightly and coats the back of a spoon, forming a luscious base for your creamy kielbasa broccoli skillet.

Step 5: Incorporate the Cheese
Reduce the heat to low and gradually mix in 1 1/2 cups of shredded mild cheddar cheese, stirring until fully melted and the sauce is smooth and creamy. This step is crucial, as the melted cheese enriches the sauce, creating a comforting texture that perfectly envelops the pasta and broccoli.

Step 6: Combine and Serve
Add the drained penne pasta and broccoli to the skillet, tossing gently until everything is evenly coated in the creamy sauce. Season with salt and pepper to taste, ensuring every bite is bursting with flavor. Serve hot, garnished with fresh parsley if desired, to bring your Creamy Kielbasa Broccoli Skillet to the table in a delightful presentation.

Creamy Kielbasa Broccoli Skillet

What to Serve with Creamy Kielbasa Broccoli Skillet

Looking to elevate your hearty meal into a full feast? Let’s explore the perfect accompaniments that will delight your senses.

  • Garlic Bread: The crunchy, buttery goodness of garlic bread makes for a delightful contrast to the creamy texture, perfect for sopping up sauce.

  • Fresh Green Salad: A crisp, vibrant salad will cut through the richness of the skillet dish, adding freshness and balance to your meal. Toss in some cherry tomatoes, cucumbers, and a light vinaigrette for zing!

  • Roasted Potatoes: Golden, crispy roasted potatoes offer a satisfying crunch and complement the smokiness of the kielbasa so well. Season them with herbs for an extra flavor boost.

  • Steamed Asparagus: This elegant vegetable pairs wonderfully with the meal, providing a bright green pop of color and a tender, yet crisp, texture, enhancing the dining experience.

  • Creamy Coleslaw: For a cool and crunchy side, creamy coleslaw brings a delightful contrast and serves as a perfect complement to the rich flavors of the kielbasa and cheese.

  • Sparkling Lemonade: Refresh your palate with a glass of sparkling lemonade. The zestiness cleanses the taste buds, making each bite of the Creamy Kielbasa Broccoli Skillet even more enjoyable.

Storage Tips for Creamy Kielbasa Broccoli Skillet

  • Fridge: Leftovers can be stored in an airtight container for up to 3-4 days. This keeps the Creamy Kielbasa Broccoli Skillet fresh and ready for quick reheating.
  • Freezer: For longer storage, freeze in an airtight container for up to 2 months. Let it cool completely before freezing to prevent ice crystals.
  • Reheating: To reheat, warm in a skillet over medium heat, adding a splash of milk if needed to regain creaminess, or microwave in short bursts until heated through.

Expert Tips for Creamy Kielbasa Broccoli Skillet

  • Pasta Perfection: Always cook the penne pasta until al dente; it will finish cooking in the sauce and prevent mushiness.
  • Veggie Crunch: Avoid overcooking the broccoli. Add it in the last two minutes of pasta cooking to maintain its vibrant color and crisp texture.
  • Sauce Thickening: Stir the milk and cornstarch mixture continuously while simmering to ensure a smooth, creamy sauce in your Creamy Kielbasa Broccoli Skillet.
  • Cheese Quality: Use freshly shredded cheddar cheese instead of pre-shredded for a creamier melt and better flavor.
  • Leftover Love: When storing leftovers, place them in an airtight container and reheat gently to maintain the texture of the sauce and veggies.

Make Ahead Options

These Creamy Kielbasa Broccoli Skillet ingredients are perfect for meal prep, saving you time on busy nights! You can prepare the pasta and broccoli mixture up to 3 days in advance; simply cook, drain, and store it in an airtight container in the refrigerator. The kielbasa and cream sauce can also be made ahead—just follow steps 2 through 5 and refrigerate the sauce separately. When you’re ready to serve, reheat the skillet over medium heat, adding the pre-cooked pasta and broccoli to the warmed sauce, stirring until everything is heated through and just as delicious as when first made. This makes your weeknight dinners effortless and nourishing!

Creamy Kielbasa Broccoli Skillet Variations

Feel free to play with this recipe and create your perfect twist on the creamy delight!

  • Gluten-Free: Substitute penne pasta with your favorite gluten-free pasta. Cook to package directions for a wholesome, satisfying meal.

  • Spicy Kick: Add a pinch of red pepper flakes or diced jalapeños for a fiery flavor that warms up each bite. The heat beautifully complements the creamy sauce!

  • Vegetarian Option: Swap the kielbasa for plant-based sausage or chickpeas for a hearty vegetarian dish. You won’t miss the meat with this satisfying alternative!

  • Cheese Swap: Use sharp cheddar or pepper jack cheese for a bolder taste or even try goat cheese for a tangy twist. These can elevate the creaminess to new heights!

  • Extra Veggies: Toss in some bell peppers, spinach, or peas for added color, flavor, and nutrition. Each veggie brings something delightful to the skillet!

  • Creamy Alternative: Replace whole milk with half-and-half or heavy cream for a richer sauce that’s truly indulgent. It feels like a luxurious treat any night of the week!

  • Herb Infusion: Stir in fresh herbs like thyme, basil, or parsley for a fragrant twist. These will brighten the flavors and add a lovely aromatic layer.

If you’re searching for more inspiration, check out my tips for Expert Tips for Creamy Kielbasa Broccoli Skillet or consider other Serving Suggestions for a well-rounded meal! Enjoy your culinary journey!

Creamy Kielbasa Broccoli Skillet

Creamy Kielbasa Broccoli Skillet Recipe FAQs

How do I choose the right broccoli for this recipe?
Absolutely! When selecting broccoli, look for florets that are bright green and tightly packed. Avoid any that have yellowing or dark spots all over, as these indicate overripeness. Fresh broccoli should feel firm to the touch, with a slightly floret-like aroma.

How should I store my leftover Creamy Kielbasa Broccoli Skillet?
Leftovers can be easily stored! Simply place them in an airtight container in the refrigerator for up to 3-4 days. Be sure to let the dish cool completely before sealing it. When you’re ready to enjoy the leftovers, you can reheat them in a skillet over medium heat or in the microwave.

Can I freeze the Creamy Kielbasa Broccoli Skillet?
Very much so! To freeze this dish, let it cool completely, then transfer it to an airtight container or a freezer-safe zip-top bag. Ensure to remove as much air as possible to prevent freezer burn. You can keep it frozen for up to 2 months. When reheating, thaw in the fridge overnight and then reheat gently on the stovetop for the best texture.

What if my sauce doesn’t thicken properly?
No worries! If your sauce isn’t thickening as expected, you can create a quick fix. In a small bowl, mix equal parts cornstarch and cold water to make a slurry. Gradually stir this into your simmering sauce, allowing it to cook for another minute. Keep stirring until it reaches your desired thickness.

Are there any dietary considerations I should be aware of when making this dish?
Certainly! If you’re making the Creamy Kielbasa Broccoli Skillet for anyone with dietary restrictions, consider using gluten-free pasta and checking that your kielbasa is free from gluten and allergens. For a lighter option, you could also substitute whole milk with almond or cashew milk, but keep in mind it may alter the creaminess and flavor slightly. Always check labels for hidden allergens.

Creamy Kielbasa Broccoli Skillet: A Cozy Family Favorite

Creamy Kielbasa Broccoli Skillet combines hearty kielbasa and vibrant broccoli in a luscious cheese sauce, making dinner simple and satisfying.

  • Large Pot
  • large skillet
  • small bowl

For the Pasta and Broccoli

  • 8 ounces penne pasta (adds a delightful chew and holds the creamy sauce beautifully)
  • 2 cups fresh broccoli florets (brings vibrant color and a healthy crunch)

For the Kielbasa

  • 13.9 ounces kielbasa sausage (provides a hearty, smoky flavor)

For the Creamy Sauce

  • 1.5 cups whole milk (creates a rich and smooth base)
  • 1.5 cups shredded mild cheddar cheese (melts perfectly into the sauce for that creamy indulgence)
  • 2 tablespoons unsalted butter (enhances flavor and helps create a rich sauce)
  • 1 small yellow onion (adds a sweet, aromatic base)
  • 1 teaspoon minced garlic (infuses a wonderful savory note)

Seasonings

  • 1 teaspoon salt (to enhance all the flavors beautifully)
  • 1 teaspoon pepper (adds a touch of warmth)

Step-by-Step Instructions

  1. Bring a large pot of salted water to a boil and cook 8 ounces of penne pasta for 10-12 minutes. In the last 2 minutes, add 2 cups of fresh broccoli florets. Drain and set aside.
  2. In a large skillet, melt 2 tablespoons of unsalted butter over medium heat. Add 13.9 ounces of sliced kielbasa and brown for about 5 minutes.
  3. Add 1 small diced yellow onion and 1 teaspoon of minced garlic to the skillet. Cook for an additional 2-3 minutes until the onion is soft.
  4. In a small bowl, whisk together 1.5 cups of whole milk and 1 tablespoon of cornstarch. Pour into the skillet and simmer, stirring for 3-5 minutes until slightly thickened.
  5. Reduce heat to low, mix in 1.5 cups of shredded mild cheddar cheese, stirring until melted and smooth.
  6. Add the drained penne pasta and broccoli to the skillet, toss gently to coat in sauce. Season with salt and pepper to taste, and serve hot.

For best results, avoid overcooking the ingredients and use freshly shredded cheese for a creamier texture.

Main Dishes
American
30 minute meal, comfort food, Creamy Kielbasa Broccoli Skillet, easy dinner, Family Meal

Filed Under: Main Dishes

Savory Colorado Green Chili That Will Warm Your Soul

August 29, 2025 by grace bellamy Leave a Comment

Every time I take a spoonful of Colorado Green Chili, I’m transported back to a sun-soaked autumn day, where the fiery warmth dances on my palate and spreads comfort throughout. This isn’t just any chili; it’s a celebration of rich flavors, featuring tender pork roast and vibrant roasted green chilis that tell a story of family gatherings and heartfelt meals. What’s more, this hearty dish is not only a showstopper at dinner parties but also keeps well in the freezer, making it a lifesaver on busy weeknights. With easy-to-follow steps, you’ll find that making Colorado Green Chili is a satisfying journey that wraps you in warmth with every bite. Are you ready to dive into this comforting recipe? Let’s get cooking!

Colorado Green Chili

Why is Colorado Green Chili a Must-Try?

Unforgettable flavor: The rich combination of roasted green chilis and savory pork creates a taste that is both bold and comforting.

Crowd-pleaser: Perfect for family gatherings, this dish keeps everyone asking for seconds and even thirds!

Meal prep friendly: Make a big batch and freeze leftovers for easy weeknight dinners—just reheat and enjoy!

Easy to make: With minimal hands-on time, you can enjoy the cozy aroma wafting through your kitchen without spending all day cooking.

Cultural delight: Dive into the heart of Southwestern cuisine with each spoonful—the essence of Colorado captured in a bowl!

So, ready to add some warmth to your table? Don’t forget to check out our guide on freezing chili for the best storage tips!

Colorado Green Chili Ingredients

Here’s everything you need for a soul-warming pot of Colorado Green Chili!

For the Chili
• 2 cups roasted and chopped green chilis – These add a smoky flavor and the perfect amount of heat!
• 2-3 pounds pork roast, shoulder or butt – This cut is ideal for tenderness and flavor after slow cooking.
• 2 tablespoons olive oil – Use this for a rich sauté that enhances the dish’s base.
• 1 teaspoon salt – A key seasoning that brings out all the flavors.
• 1 teaspoon pepper – This adds just the right amount of spice.
• 2 teaspoons minced garlic – Fresh garlic infuses an aromatic essence into the chili.
• 1 yellow onion, diced – Sautéed onion adds sweetness and depth to the chili.

For the Broth
• 7 cups chicken broth, divided – Rich chicken broth provides a savory base for the chili.
• 1 ½ cups tomatillo salsa (salsa verde) – This brings a tangy twist that complements the green chilis beautifully.

For the Seasoning
• 1 tablespoon cumin – Cumin adds an earthy flavor, making the chili even more flavorful.
• ½ teaspoon Mexican oregano – A fragrant herb that gives a taste of the Southwest.
• 1 pinch ground cloves – Adds warmth and complexity to every bite.

For the Veggies
• 2 large potatoes, peeled and cubed – They thicken the chili and absorb all the delicious flavors.

For Serving
• 1 lime, juiced – A splash of lime brightens the flavors right before serving.
• Masa flour, for thickening – Use this to get that perfect hearty consistency for your chili.

Now that you have all the ingredients for your Colorado Green Chili, let’s get started on this delightful culinary adventure!

Step‑by‑Step Instructions for Colorado Green Chili

Step 1: Heat the Base
In a large pot, heat 2 tablespoons of olive oil over medium heat. Allow the oil to shimmer before adding 1 diced yellow onion and 2 teaspoons of minced garlic. Sauté the mixture for about 5 minutes, or until the onion becomes translucent, filling your kitchen with a delightful aroma that sets the tone for your Colorado Green Chili.

Step 2: Brown the Pork
Season 2-3 pounds of pork roast with 1 teaspoon of salt and 1 teaspoon of pepper. Add the pork to the pot, letting it sear for about 5-7 minutes per side, turning until all sides are nicely browned. This step is crucial for locking in the flavors, so keep an eye out for that golden-brown color.

Step 3: Combine Ingredients
Once the pork is evenly browned, pour in 7 cups of chicken broth and 1 ½ cups of tomatillo salsa. Add 1 tablespoon of cumin, ½ teaspoon of Mexican oregano, and a pinch of ground cloves. Lastly, toss in 2 large potatoes, peeled and cubed. Stir well to combine, allowing the vibrant colors and fragrant spices to dance together.

Step 4: Simmer the Chili
Bring the mixture to a boil over high heat, then reduce the heat to low and cover the pot. Let it simmer for about 3 hours, stirring occasionally, until the pork is fork-tender and deeply infused with the chili’s flavors. This slow cooking process is what makes your Colorado Green Chili truly special.

Step 5: Shred the Pork
After 3 hours, carefully remove the pork from the pot. Use two forks to shred the meat into bite-sized pieces. Return the shredded pork back into the pot, stirring it through the chili to mix all those delicious flavors together seamlessly.

Step 6: Thicken the Chili
To achieve the perfect consistency for your Colorado Green Chili, adjust the thickness by adding masa flour. Sprinkle in some flour and stir well, letting it simmer for an additional 10-15 minutes. Watch closely as the chili thickens beautifully, transforming into a hearty dish perfect for any occasion.

Step 7: Add Final Touches
Before serving, squeeze in the juice of 1 lime to brighten up the flavors. Give your chili one last stir to ensure every spoonful bursts with zest and warmth. Now your Colorado Green Chili is ready to warm hearts and bellies alike!

Colorado Green Chili

Expert Tips for Colorado Green Chili

  • Ingredient Quality: Use fresh, high-quality green chilis for the best flavor. Roasting them ensures a bold taste that makes your Colorado Green Chili unforgettable.

  • Perfect Pork: For tender results, opt for pork shoulder or butt. This marbled cut breaks down beautifully during the long simmer, enriching the chili’s overall flavor.

  • Avoid Overcooking: Don’t rush the simmering phase! Allowing the pork to cook for a full 3 hours helps to tenderize the meat and meld the flavors perfectly.

  • Thickening Tips: When adding masa flour, sprinkle it gradually and stir well to prevent lumps. This will give your chili a smooth, hearty texture.

  • Taste Adjustments: Before serving, taste and adjust seasonings as needed. A spoonful of additional lime juice can brighten the flavors tremendously!

  • Storage Know-How: If you have leftovers, cool the Colorado Green Chili completely before freezing. Use airtight containers to keep it fresh for busy nights ahead.

How to Store and Freeze Colorado Green Chili

Fridge: Store your Colorado Green Chili in an airtight container for up to 3 days, keeping it cool and fresh for quick reheating.

Freezer: For longer storage, portion the chili into freezer-safe containers or bags, and it can last for up to 3 months. Don’t forget to label!

Thawing: Thaw in the refrigerator overnight before reheating. For a quicker method, you can use the microwave on the defrost setting.

Reheating: Reheat on the stove over medium heat, stirring occasionally, until heated through. Add a splash of chicken broth if it’s too thick after freezing!

Colorado Green Chili Variations & Substitutions

Feel free to get creative with this beloved dish and make it your own!

  • Slow Cooker: Adapt this recipe for the slow cooker by cooking on low for 6-8 hours for fall-apart tender pork.
  • Spicy Twist: Add diced jalapeños for an extra heat kick, perfect for those who love a little fire in their chili! A touch more heat can ignite the taste buds beautifully.
  • Beef Option: Substitute the pork with chuck roast for a beefy version that still touts rich and fulfilling flavor.
  • Vegetarian Delight: Use a mix of hearty mushrooms and beans instead of meat for a flavorful, plant-based alternative. It keeps the soul-warming essence while being meat-free.
  • Cilantro Garnish: Top your chili with fresh cilantro for a burst of color and fresh flavor, enhancing the overall experience.
  • Corny Goodness: Stir in some frozen corn during the last 30 minutes of cooking for a sweet and juicy addition that adds great texture.
  • Seasonal Veggies: Incorporate seasonal vegetables like zucchini or bell peppers for extra nutrition and color. These veggies will soak up the flavors beautifully, enhancing every spoonful.
  • Cashew Cream: For a creamy finish, drizzle over some homemade or store-bought cashew cream to elevate the richness without dairy.

Embrace these variations to make your Colorado Green Chili truly unique! And if you’re curious about what else pairs well with your chili, consider serving it alongside some cornbread or a fresh salad.

What to Serve with Colorado Green Chili

There’s nothing quite like building the perfect meal around a bowl of this savory chili, where flavors combine and comfort reigns.

  • Warm Cornbread: This classic pairing adds a sweet crumbly texture, perfect for dipping into the hearty chili. It’s a match made in comfort food heaven!

  • Cilantro Lime Rice: Adding a bright, zesty contrast, the fragrant rice enhances the dish, absorbing the bold flavors beautifully. It’s an easy side that brings freshness to each bite.

  • Guacamole: Creamy and rich, homemade guacamole balances the dish’s spice. Scooping it up with tortilla chips creates a delightful crunchy texture.

  • Cheddar Cheese: Sprinkle some sharp cheddar on top of your chili for an extra layer of flavor. Melting cheese creates a creamy richness that elevates every spoonful!

  • Tortilla Chips: Crispy and salty, they add a satisfying crunch. Serve them alongside your chili for a fun and interactive dining experience.

  • Pickled Jalapeños: For those who crave more heat, these tangy toppings bring a spicy punch, making each bowl an exciting adventure.

  • Lime Wedges: Fresh lime wedges brighten the flavors when squeezed over your chili. A little acidity goes a long way in enhancing the overall taste!

  • Pineapple Salsa: This sweet and spicy salsa complements the chili’s warmth, adding a refreshing twist. It’s a delightful way to explore new flavor profiles.

  • Mexican Street Corn: Grilled corn drizzled with lime, mayonnaise, and cheese offers a wonderfully sweet-corn flavor that pairs perfectly with your Colorado Green Chili.

  • Doctored-Up Sour Cream: A dollop of sour cream swirled in provides a creamy contrast that balances the chili’s heat—comfort in a bowl!

Make Ahead Options

These Colorado Green Chili options are perfect for busy home cooks who want to save time amidst hectic schedules! You can prepare the entire chili up to 24 hours in advance by following the initial cooking steps and letting it chill before storing it in the refrigerator. To maintain quality, make sure to let it cool completely before transferring it to an airtight container. When ready to serve, simply reheat the chili on the stove, adding a splash of chicken broth if needed to restore its consistency. Lastly, stir in the lime juice just before serving for a fresh burst of flavor. Enjoy the convenience of having a hearty meal ready to go!

Colorado Green Chili

Colorado Green Chili Recipe FAQs

What kind of green chilis should I use?
Absolutely! When selecting green chilis for Colorado Green Chili, go for fresh, roasted, and chopped varieties. You can use Hatch chilis or Anaheim chilis for a milder option, or jalapeños for more heat. Make sure there are no dark spots or blemishes, as this indicates ripeness and tenderness.

How do I store leftovers of Colorado Green Chili?
Very! To store your Colorado Green Chili, let it cool completely and transfer it to an airtight container. It will last in the fridge for up to 3 days. If you’re planning to keep it longer, consider freezing it in individual portions for quick, hassle-free meals later on!

Can Colorado Green Chili be frozen?
Of course! To freeze Colorado Green Chili, allow it to cool completely, then portion it into freezer-safe containers or zip-top bags. Be sure to label them with the date, as it can be frozen for up to 3 months. Remember, it’s best to reheat it slowly on the stovetop after thawing for optimal taste.

What if my Colorado Green Chili is too runny?
If you find your chili a bit too watery after cooking, don’t worry! You can easily thicken it by mixing about 2 tablespoons of masa flour with a small amount of water to make a slurry. Stir this into your chili and simmer for an additional 15 minutes until it thickens to your desired consistency.

Is Colorado Green Chili pet-friendly?
Not necessarily! While the main ingredients like pork and potatoes may be safe for pets, the chilis, salt, and spices can be harmful. It’s best to keep Colorado Green Chili away from pets as they can cause digestive issues. Always consult your vet for safe food options.

How can I adjust the spice level in Colorado Green Chili?
Very easily! To adjust the spice level, you can control the types and amounts of green chilis you use. Start with mild varieties and add jalapeños if you want more heat. You can also add a pinch of cayenne pepper or chili flakes towards the end of cooking for an extra kick. Just taste as you go!

Savory Colorado Green Chili That Will Warm Your Soul

This comforting Colorado Green Chili features tender pork and roasted green chilis, perfect for family gatherings.

  • Large Pot

For the Chili

  • 2 cups roasted and chopped green chilis (These add a smoky flavor and the perfect amount of heat!)
  • 2-3 pounds pork roast, shoulder or butt (Ideal for tenderness and flavor.)
  • 2 tablespoons olive oil (For a rich sauté.)
  • 1 teaspoon salt (Key seasoning.)
  • 1 teaspoon pepper (Adds spice.)
  • 2 teaspoons minced garlic (Infuses aroma.)

For the Broth

  • 7 cups chicken broth, divided (Provides savory base.)
  • 1.5 cups tomatillo salsa (salsa verde) (Brings tangy twist.)

For the Seasoning

  • 1 tablespoon cumin (Earthy flavor.)
  • 0.5 teaspoon Mexican oregano (Fragrant herb.)
  • 1 pinch ground cloves (Adds warmth.)

For the Veggies

  • 2 large potatoes, peeled and cubed (Thicken chili.)

For Serving

  • Masa flour for thickening (Achieves perfect consistency.)

Step-by-Step Instructions

  1. In a large pot, heat 2 tablespoons of olive oil over medium heat. Sauté 1 diced yellow onion and 2 teaspoons of minced garlic for about 5 minutes until the onion is translucent.
  2. Season 2-3 pounds of pork roast with 1 teaspoon of salt and 1 teaspoon of pepper. Add the pork to the pot and sear for about 5-7 minutes per side.
  3. Pour in 7 cups of chicken broth and 1 ½ cups of tomatillo salsa. Add 1 tablespoon of cumin, ½ teaspoon of Mexican oregano, a pinch of ground cloves, and 2 large cubed potatoes. Stir well.
  4. Bring to a boil, then reduce heat to low and cover. Let it simmer for about 3 hours, stirring occasionally.
  5. Remove the pork after 3 hours and shred using two forks. Return the shredded pork to the pot.
  6. Adjust thickness by adding masa flour. Stir and let it simmer for an additional 10-15 minutes.
  7. Before serving, squeeze in the juice of 1 lime and stir well before serving.

Use fresh, high-quality green chilis for the best flavor. Store chili in an airtight container for up to 3 days or freeze for up to 3 months.

Main Dishes
Southwestern
Chili Recipe, Colorado Green Chili, comfort food, Freezable Meals, hearty dish, Pork Chili

Filed Under: Main Dishes

Mediterranean Vegetable Pasta Bake: Comfort in Every Bite

August 29, 2025 by grace bellamy Leave a Comment

As I flipped through my recipe book, I was struck by the vibrant colors and fresh aromas of Mediterranean cuisine, evoking memories of sunny afternoons spent in lively markets. If you’re craving a comforting meal that’s both hearty and healthy, look no further than this Mediterranean Vegetable Pasta Bake. With just the right balance of roasted vegetables, zesty pesto, and gooey mozzarella, this dish is sure to be a crowd-pleaser and is a fantastic way to sneak more veggies into your weeknight dinners. What’s even better? It’s easy to throw together and makes for delicious leftovers, perfect for meal prep. Ready to transform your kitchen into a Mediterranean getaway? Let’s dive into this delightful recipe together!

Mediterranean Vegetable Pasta Bake

Why is this pasta bake irresistible?

Flavor Explosion: Each bite of this Mediterranean Vegetable Pasta Bake bursts with fresh flavors from roasted veggies and aromatic basil.

Easy Preparation: The recipe is designed for effortless cooking, making it perfect for busy weeknights.

Healthy Twist: Packed with nutrient-rich vegetables, this dish is your go-to for guilt-free comfort food.

Crowd-Pleasing Appeal: Whether it’s a family dinner or a potluck, this bake is sure to impress. Find some inspiration in our meal prep ideas for fuss-free serving!

Make-Ahead Magic: You can assemble it in advance, allowing you to enjoy a home-cooked meal even on your busiest days.

Mediterranean Vegetable Pasta Bake Ingredients

For the Pasta and Vegetables

  • 400 g pasta – Rigatoni or penne works best for holding onto the sauce!
  • 2 bell peppers – Chopped for a sweet, crunchy element in every bite.
  • 1 aubergine – Adds a creamy texture and earthy flavor to the bake.
  • 1 courgette – Light and tender, it complements the other veggies wonderfully.
  • 1 onion – Chopped to give depth and sweetness to the dish.
  • 500 g cherry tomatoes – Bursting with juiciness, they enhance the overall flavor.
  • 400 g chopped tomatoes – Forms a rich base for the pasta bake.
  • 3 cloves garlic – Minced for that delightful aromatic kick.
  • Fresh basil – A handful brings a fresh and fragrant touch.

For Seasoning and Toppings

  • Olive oil – Drizzle to help roast the veggies to perfection.
  • Salt – To taste, it enhances all the flavors beautifully.
  • Pepper – A touch of spice to balance the sweetness of the vegetables.
  • 200 g mozzarella cheese – Chunks or slices melting into gooey deliciousness.
  • 100 g pesto – Dollops throughout add a burst of herbal richness.
  • 50 g grated Parmesan cheese – For a savory finish that ties everything together.

Optional Add-ons

  • Reserved pasta cooking water – 4–6 tablespoons can help sauce and pasta marry perfectly.

This Mediterranean Vegetable Pasta Bake is brimming with delicious and fresh ingredients, making it a perfect recipe to enjoy wholesome comfort food in every bite!

Step‑by‑Step Instructions for Mediterranean Vegetable Pasta Bake

Step 1: Preheat the Oven
Start by preheating your oven to 190°C (170°C Fan) or Gas Mark 5. This will ensure your Mediterranean Vegetable Pasta Bake will cook evenly and develop a golden crust on top. As the oven heats up, prepare your roasting tin or deep baking dish for the next step.

Step 2: Prepare the Vegetables
In the prepared roasting tin, combine your chopped bell peppers, aubergine, courgette, and onion. Drizzle the vegetables with olive oil and season them generously with salt and pepper. Toss everything together until the veggies are well coated, then spread them out evenly in the dish, ready for roasting.

Step 3: Roast the Vegetables
Place the roasting tin in the preheated oven and roast the vegetables for 45 minutes. Make sure to turn them twice during cooking so they become tender and take on a lovely golden brown color. This roasting process enhances the flavors and prepares them for the Mediterranean Vegetable Pasta Bake.

Step 4: Add Tomatoes and Garlic
Once the vegetables are perfectly roasted, take the tin out of the oven and add the cherry tomatoes, chopped tomatoes, minced garlic, and fresh basil. Stir the mixture well to combine all the flavors. Return the roasting tin to the oven and cook for an additional 10–15 minutes, allowing the tomatoes to soften and mingle with the roasted veggies.

Step 5: Cook the Pasta
While the vegetables are finishing up in the oven, bring a large pot of salted water to a boil. Cook your pasta (rigatoni or penne) according to the package instructions until al dente, usually about 8-10 minutes. Keep an eye on it to ensure it doesn’t overcook, as the pasta will finish baking in the oven later.

Step 6: Reserve Pasta Water
Before draining the pasta, reserve about 4–6 tablespoons of the starchy cooking water. This water can help create a luscious sauce that binds the pasta with the roasted vegetables more beautifully in the Mediterranean Vegetable Pasta Bake.

Step 7: Combine Pasta and Vegetables
Once drained, add the cooked pasta to the roasting tin filled with the roasted vegetable mixture. Gently stir everything together, incorporating the reserved pasta cooking water only if the mixture seems too dry. This step is key in ensuring your pasta bake is moist and flavorful.

Step 8: Add Cheese and Pesto
Fold in the chunks or slices of mozzarella cheese, along with dollops of pesto, throughout the pasta and vegetable mixture. This will add creaminess and herby richness to your Mediterranean Vegetable Pasta Bake, ensuring every bite is packed with delicious flavors.

Step 9: Top with Parmesan
Sprinkle the grated Parmesan cheese evenly over the top of the pasta bake. This cheesy layer will help create a beautiful, golden crust as it bakes in the oven. The combination of mozzarella and parmesan offers a wonderful texture and flavor contrast that is simply irresistible.

Step 10: Bake Again
Return the Mediterranean Vegetable Pasta Bake to the oven for another 10 minutes. Bake until the cheese is melted, bubbling, and golden brown. The smell of roasting vegetables and melting cheese will fill your kitchen and entice everyone around!

Step 11: Cool and Serve
Once out of the oven, allow the pasta bake to cool slightly for about 5-10 minutes before serving. This resting time helps the dish set a bit more and makes it easier to serve. The Mediterranean Vegetable Pasta Bake is now ready to bring joy to your table!

Mediterranean Vegetable Pasta Bake

Mediterranean Vegetable Pasta Bake Variations

Feel free to get creative and tailor this recipe to your taste buds with these delightful twists and swaps!

  • Gluten-Free: Substitute regular pasta with gluten-free options like brown rice or chickpea pasta for a delightful alternative.
  • Spicy Kick: Add red pepper flakes or diced jalapeños to the vegetables before roasting to spice things up a bit.
  • Cheesy Upgrade: Mix in fontina or gouda for a different cheese experience; their melting qualities add a lovely depth.

For a more indulgent experience, consider folding in some ricotta for a creamy, luxurious touch that pairs beautifully with the roasted flavors. It’s a delectable surprise that takes the dish to another level.

  • Veggie Boost: Replace any of the vegetables with seasonal options like spinach or broccoli for various textures and nutrients.
  • Herb Twist: Use fresh oregano or thyme instead of basil for a different herbal profile; these herbs blend beautifully with Mediterranean ingredients.
  • Vegan-Friendly: Swap mozzarella for vegan cheese and use nutritional yeast instead of parmesan; the flavors will still shine through!

With all these possibilities, your Mediterranean Vegetable Pasta Bake can be a new adventure each time! Balancing flavors makes this dish versatile, allowing for a world of tastes to explore. Consider pairing it with a crisp green salad dressed with lemon vinaigrette to brighten up your meal, or you can find more ideas in our meal prep tips for easier weeknight dinners!

What to Serve with Mediterranean Vegetable Pasta Bake

Elevate your Mediterranean dining experience with these delightful side dishes and accompaniments that complement this hearty bake perfectly.

  • Crisp Green Salad: A refreshing salad with mixed greens tossed in a lemon vinaigrette adds brightness and balances the richness of the pasta bake. The crunch of the veggies brings a pleasant contrast to the soft textures of the bake.

  • Garlic Bread: Warm, buttery garlic bread is a fabulous pairing, perfect for soaking up any delicious sauce left on your plate. Its crispy exterior and soft, flavorful inside can elevate your meal to a comforting feast.

  • Roasted Lemon Potatoes: The zesty flavor of roasted lemon potatoes complements the Mediterranean theme beautifully, providing a crispy contrast to the pasta’s softness. The bright flavors echo the fresh ingredients in the bake, creating a harmonious dining experience.

  • Grilled Asparagus: Lightly seasoned and grilled asparagus serves as an elegant side, adding a vibrant pop of color and freshness. Its tender crunch offers a delightful textural component alongside the pasta bake.

  • Herbed Couscous: Fluffy couscous with fresh herbs can add a pleasant lightness to your meal, harmonizing with the Mediterranean flavors. Its subtle nuttiness pairs well with the roasted veggies, making for a satisfying combination.

  • Chilled White Wine: A crisp glass of Sauvignon Blanc or Pinot Grigio provides the perfect refreshing sip to balance the richness of the dish. The acidity of the wine complements the tomato-based sauce beautifully.

  • Tiramisu: For dessert, a creamy tiramisu offers a sweet finish to your meal. The coffee and mascarpone layers create a delightful contrast to the savory components of the main dish.

Make Ahead Options

These Mediterranean Vegetable Pasta Bake components are perfect for meal prep, allowing you to save time on busy weeknights! You can prep the roasted vegetable mixture up to 24 hours in advance and store it in the refrigerator, ensuring the flavors meld beautifully. Simply roast the veggies as instructed and combine with tomatoes and garlic, then let cool before covering tightly. When you’re ready to bake, cook the pasta, and mix it with the cooled vegetable mixture, adding the mozzarella and pesto just before topping with Parmesan. This method guarantees a delicious, hassle-free dinner that feels just as fresh and vibrant!

Expert Tips for Mediterranean Vegetable Pasta Bake

Perfect Veggie Roasting: Ensure even roasting by spreading the vegetables in a single layer on the pan; overcrowding can lead to steaming instead of browning.

Get Creative with Cheese: Feel free to mix cheeses! Adding ricotta or feta alongside mozzarella can elevate the flavors in your Mediterranean Vegetable Pasta Bake.

Pasta Perfection: Don’t overcook the pasta! Aim for al dente, as it will continue to cook while baking, ensuring a delightful texture throughout.

Flavor Boost: Adjust the seasoning to your taste by experimenting with herbs like oregano or thyme, enhancing the Mediterranean flair of your bake.

Moisture Control: If your bake seems dry after adding ingredients, stir in a little reserved pasta cooking water to keep it moist and flavorful without excess liquid.

How to Store and Freeze Mediterranean Vegetable Pasta Bake

Fridge: Store leftovers in an airtight container for up to 3 days. Allow the dish to cool completely before sealing it to maintain freshness.

Freezer: This Mediterranean Vegetable Pasta Bake freezes beautifully! Wrap it tightly in aluminum foil or plastic wrap for up to 3 months without sacrificing flavor.

Reheating: To reheat, simply bake uncovered at 350°F (175°C) for 20-25 minutes until heated through and the cheese is bubbly. Alternatively, warm it in the microwave in 1-minute intervals until hot.

Make-Ahead: Assemble the pasta bake up to 24 hours in advance, cover, and refrigerate. When you’re ready, just pop it in the oven for a comforting, home-cooked meal!

Mediterranean Vegetable Pasta Bake

Mediterranean Vegetable Pasta Bake Recipe FAQs

What kind of pasta should I use for the Mediterranean Vegetable Pasta Bake?
I recommend using rigatoni or penne for this recipe as their shapes hold the sauce perfectly, ensuring every bite is packed with flavor. You can also experiment with whole grain or gluten-free varieties if desired!

How do I store leftovers of this pasta bake?
Store any leftovers in an airtight container in the fridge for up to 3 days. To maintain its deliciousness, make sure it cools completely before sealing. Enjoy the convenience of quick meals without compromising taste!

Can I freeze Mediterranean Vegetable Pasta Bake?
Absolutely! This dish freezes beautifully. Just wrap it tightly in aluminum foil or plastic wrap and keep it in the freezer for up to 3 months. When you’re ready to enjoy it, thaw overnight in the fridge, then reheat at 350°F (175°C) for 20-25 minutes until hot and bubbly.

What should I do if my pasta bake seems dry after baking?
No worries! If you find that your Mediterranean Vegetable Pasta Bake appears dry, simply stir in a few tablespoons of the reserved pasta cooking water before baking. This starchy water helps to create a luscious sauce, binding the pasta and veggies together beautifully.

Are there any dietary considerations I should be aware of?
Yes, keep in mind that this dish contains dairy due to the mozzarella and Parmesan cheese. If you have lactose intolerance or are making this for someone with a dairy allergy, consider using dairy-free cheese alternatives or just omit the cheese altogether. This pasta bake can still be tasty and satisfying without it!

Mediterranean Vegetable Pasta Bake: Comfort in Every Bite

Enjoy a comforting Mediterranean Vegetable Pasta Bake packed with fresh flavors and roasted veggies.

  • Oven
  • Roasting tin
  • Large Pot

For the Pasta and Vegetables

  • 400 g pasta (Rigatoni or penne works best.)
  • 2 bell peppers (Chopped.)
  • 1 aubergine
  • 1 courgette
  • 1 onion (Chopped.)
  • 500 g cherry tomatoes (Bursts with juiciness.)
  • 400 g chopped tomatoes
  • 3 cloves garlic (Minced.)
  • fresh basil (A handful.)

For Seasoning and Toppings

  • olive oil (Drizzle.)
  • salt (To taste.)
  • pepper (To taste.)
  • 200 g mozzarella cheese (Chunks or slices.)
  • 100 g pesto (Dollops throughout.)
  • 50 g grated Parmesan cheese

Optional Add-ons

  • 4-6 tablespoons reserved pasta cooking water (Helps sauce and pasta marry perfectly.)

Step-by-Step Instructions

  1. Preheat the oven to 190°C (170°C Fan) or Gas Mark 5.
  2. Combine chopped bell peppers, aubergine, courgette, and onion in a roating tin. Drizzle with olive oil and season with salt and pepper, toss well.
  3. Roast vegetables in the preheated oven for 45 minutes, turning twice during cooking.
  4. Add cherry tomatoes, chopped tomatoes, minced garlic, and fresh basil to the roasted vegetables and cook for an additional 10-15 minutes.
  5. Cook the pasta according to package instructions in salted water until al dente, about 8-10 minutes.
  6. Reserve 4-6 tablespoons of pasta cooking water before draining.
  7. Add the cooked pasta to the roasted vegetable mixture and stir gently, adding reserved pasta water if needed.
  8. Fold in mozzarella cheese and pesto throughout the mixture.
  9. Sprinkle grated Parmesan cheese evenly on top.
  10. Bake again for 10 minutes until cheese is melted and golden brown.
  11. Allow to cool for 5-10 minutes before serving.

This dish is perfect for meal prep and delicious as leftovers.

Main Dishes
Mediterranean
comfort food, healthy dinner, meal prep, Mediterranean Vegetable Pasta Bake, pasta bake, vegetable bake

Filed Under: Main Dishes

Savor the Simplicity of Sheet Pan Sausage & Veggies

August 29, 2025 by grace bellamy Leave a Comment

As I opened my fridge one evening, a colorful array of vegetables greeted me, begging to be transformed into something delicious. That’s when I decided to whip up a comforting Sheet Pan Sausage & Veggies dish that not only sings with vibrant flavors but also makes weeknight cooking a breeze. With just 15 minutes of prep time, this all-in-one meal is packed with smoky Italian sausage, fresh bell peppers, and tender broccoli, making it a perfect crowd-pleaser for family or friends. Plus, the leftovers are just as tasty, rewarding you with effortless lunches throughout the week. Ready to experience the joy of simple, wholesome cooking? Let’s dive in!

Sheet Pan Sausage & Veggies

Why Choose Sheet Pan Cooking?

Simplicity at its finest: Only 15 minutes of prep means you can dedicate more time to enjoying your meal.

Flavor explosion: The combination of smoky Italian sausage and fresh vegetables creates a dish that’s bursting with taste in every bite.

Minimal cleanup: Everything cooks on a single sheet pan, making post-dinner cleanup a breeze—perfect for busy weeknights!

Crowd-pleaser: This dish is a surefire hit, appealing to everyone at the table, whether it’s family or guests.

Versatile: Feel free to swap in your favorite vegetables or even try it with chicken for a delicious twist!

Meal prep-friendly: Leftovers are fantastic for lunches, making your life easier all week long. Enjoy the benefits of wholesome home-cooked comfort that fits perfectly into your busy lifestyle!

Sheet Pan Sausage & Veggies Ingredients

Get ready to savor every bite of this delightful dish!

For the Sausage

  • Italian sausage – choose sweet or spicy for a flavor tailored to your taste!

For the Veggies

  • Bell peppers – add vibrant color and sweetness to the dish.
  • Red onion – for a rich, caramelized tang during roasting.
  • Broccoli florets – they add a nice crunch and are packed with nutrients.
  • Zucchini – a tender addition that soaks up all the delicious seasonings.
  • Baby potatoes – they create heartiness to make this a complete meal.

For the Seasoning

  • Olive oil – helps to crisp up the sausages and veggies while adding flavor.
  • Garlic powder – a must-have for that aromatic, rich taste.
  • Onion powder – enhances the dish’s overall flavor profile beautifully.
  • Paprika – adds a subtle smokiness that complements the sausage perfectly.
  • Salt and pepper – essential for balancing and enhancing all the flavors.

For Garnishing

  • Fresh parsley (optional) – a pop of fresh color and flavor at the end!

This Sheet Pan Sausage & Veggies recipe is a fantastic way to enjoy a wholesome meal without the fuss!

Step‑by‑Step Instructions for Sheet Pan Sausage & Veggies

Step 1: Preheat Your Oven
Begin by preheating your oven to 400°F (200°C). This ensures that your Sheet Pan Sausage & Veggies roast evenly and get that perfect caramelization. While the oven warms up, gather your ingredients to make the next steps even smoother.

Step 2: Prepare the Vegetables
Wash and chop all the colorful vegetables, including bell peppers, red onion, broccoli, zucchini, and baby potatoes. Once chopped, place them into a large mixing bowl. Their vibrant colors will make the dish not only delicious but visually appealing as well.

Step 3: Cut the Sausage
Next, slice the Italian sausage into bite-sized pieces, adding them to the bowl with the veggies. This will help the sausage cook quickly and evenly, allowing all the flavors to meld beautifully together in your Sheet Pan Sausage & Veggies.

Step 4: Season the Mixture
Drizzle the olive oil over the sausage and vegetables in the bowl. Then, sprinkle with garlic powder, onion powder, paprika, salt, and pepper. Toss everything thoroughly to ensure each piece is evenly coated with that flavorful seasoning.

Step 5: Arrange on the Sheet Pan
Spread the vibrant mixture of seasoned sausage and vegetables in a single layer on a large sheet pan. This will promote even cooking and encourage those lovely caramelized edges we all crave in a hearty dish like Sheet Pan Sausage & Veggies.

Step 6: Bake to Perfection
Place the sheet pan in the preheated oven and bake for 30-35 minutes. Keep an eye on the veggies and sausage, stirring halfway through to enhance even cooking. The dish is ready when the sausage is browned, and the vegetables are tender with slight caramelization.

Step 7: Garnish and Serve
Once baked, remove the sheet pan from the oven and sprinkle with fresh parsley for a delightful pop of color and flavor. Allow the dish to cool for a few minutes, then serve warm, enjoying the delicious aroma and wholesome goodness of your freshly made Sheet Pan Sausage & Veggies.

Sheet Pan Sausage & Veggies

Make Ahead Options

These Sheet Pan Sausage & Veggies are perfect for meal prep enthusiasts looking to save time on busy weeknights! You can chop and combine all the vegetables with the sausage up to 24 hours in advance; simply refrigerate them in an airtight container to maintain freshness. To prevent browning and keep everything vibrant, consider drizzling a bit of olive oil over the veggies before refrigerating. When you’re ready to cook, spread the mixture on your sheet pan, drizzle with the remaining olive oil, and season as directed just before popping it into the oven. You’ll enjoy the same delicious flavors with minimal effort, making dinner a breeze!

How to Store and Freeze Sheet Pan Sausage & Veggies

Fridge: Store leftovers in an airtight container for up to 3 days. This keeps your Sheet Pan Sausage & Veggies fresh and ready for quick meals.

Freezer: For longer storage, freeze the cooled dish in an airtight container for up to 3 months. Portion it out for easy meal prep.

Reheating: To enjoy, thaw overnight in the fridge, then reheat in the oven at 350°F (175°C) for about 10-15 minutes to restore that delightful texture.

Storing Tips: For optimal freshness, separate any components that may lose texture when frozen, such as potatoes, before freezing together.

Sheet Pan Sausage & Veggies Variations

Feel free to get creative and make this dish your own with these easy twists!

  • Dairy-Free: Simply omit any cheese; the dish is already packed with flavors without added dairy.
  • Spicy Kick: Use hot Italian sausage or a sprinkle of red pepper flakes to heat things up.
  • Sweet Tooth: Add sliced sweet potatoes instead of baby potatoes for a hint of sweetness that balances perfectly with the savory sausage.
  • Herb Infusion: Incorporate fresh herbs such as thyme or rosemary into the mix before roasting for an aromatic twist.
  • Rainbow Veggies: Swap in seasonal veggies like asparagus, carrots, or eggplant to add a rainbow of flavors and textures.

Experimenting is half the fun! You can even try variations like adding mustard or balsamic glaze for a tangy flair on the finished product. Whatever changes you choose, they’ll certainly bring your Sheet Pan Sausage & Veggies to the next level of deliciousness!

What to Serve with Sheet Pan Sausage & Veggies

Elevate your weeknight dinner with these delightful pairings that bring additional flavors and textures to your meal.

  • Creamy Polenta: Its buttery, smooth texture beautifully contrasts the hearty sausage and roasted veggies while soaking up all the delicious juices.

  • Garlic Bread: The crunchy, golden-brown bread pairs perfectly for mopping up any leftover sauce, creating a satisfying experience that everyone will love.

  • Caprese Salad: Fresh mozzarella, tomatoes, and basil add a bright, refreshing taste to balance the rich flavors of the sheet pan dish.

  • Roasted Asparagus: The tender-crisp bites of asparagus complement the meal with their earthy tones and vibrant color, enhancing the overall presentation.

  • Red Wine: A glass of medium-bodied red wine, like Chianti, will harmonize beautifully with the sausage’s richness, adding depth to your dining experience.

  • Apple Crisp: End your meal on a sweet note with this comforting dessert. The warm, spiced apples and crunchy topping contrast nicely with the savory main course, leaving everyone satisfied and happy.

Enjoy these pairings for a delicious, well-rounded feast that celebrates the joy of home-cooked meals!

Expert Tips for Sheet Pan Sausage & Veggies

• Prep Ahead: Chop your vegetables the night before to save time. This makes weeknight cooking even easier and quicker.

• Evenly Cut: Ensure that all veggies and sausage pieces are roughly the same size for consistent cooking. Uneven sizes can lead to some portions being undercooked.

• Layering Matters: Arrange the sausage and veggies in a single layer on the sheet pan. Crowding them will result in steaming instead of roasting, preventing that delightful caramelization.

• Don’t Skip Stirring: Be sure to stir halfway through the baking time. This promotes even cooking and brings out all the flavors in your Sheet Pan Sausage & Veggies.

• Experiment: Don’t hesitate to swap in your favorite vegetables or even proteins. Think carrots, asparagus, or chicken for an exciting variation that keeps things fresh!

• Store Wisely: Leftovers keep well in an airtight container for up to 3 days. Reheat gently in the oven or on the stovetop to maintain texture.

Sheet Pan Sausage & Veggies

Sheet Pan Sausage & Veggies Recipe FAQs

How do I choose the right vegetables for this recipe?
Absolutely! For a colorful and delicious dish, look for firm bell peppers without dark spots and vibrant green broccoli. Choose zucchini that feels heavy for its size and has smooth skin. Fresh vegetables not only taste better but also provide a beautiful presentation!

How long can I store the leftovers?
I recommend storing any leftovers in an airtight container in the fridge for up to 3 days. This helps maintain their fresh flavor. Just be sure to reheat gently to avoid overcooking the veggies!

Can I freeze Sheet Pan Sausage & Veggies?
Yes! Allow the dish to cool completely, then transfer it to an airtight container or freezer bag. You can freeze it for up to 3 months. For best results, I often separate the sausage and potatoes from more delicate vegetables, like zucchini and bell peppers, to prevent unwanted texture changes during freezing.

What should I do if my veggies come out soggy?
Very! If your veggies aren’t as crispy as you’d like, ensure they are spread out in a single layer on the sheet pan. If they are crowded, they’ll steam instead of roast. Stirring halfway through cooking is also crucial for even browning and crispiness!

Are there any dietary considerations for this dish?
Yes, it’s wise to check ingredient labels especially for the sausage, as different brands may contain allergens like gluten or dairy. For those avoiding pork, chicken or turkey sausage are excellent alternatives, offering a similar flavor profile.

How can I customize the seasoning for different preferences?
The more the merrier! If you prefer a spicier kick, try adding red pepper flakes to your seasoning mix. Alternatively, for a milder flavor profile, keep the seasonings simple with just salt and pepper. You can also experiment with herbs like rosemary or thyme for added depth!

Savor the Simplicity of Sheet Pan Sausage & Veggies

This Sheet Pan Sausage & Veggies dish is a quick, flavorful meal combining smoky sausage and colorful vegetables, perfect for weeknight dinners.

  • large sheet pan
  • Mixing Bowl
  • Knife
  • cutting board

For the Sausage

  • 1 pound Italian sausage (sweet or spicy, as preferred)

For the Veggies

  • 2 cups bell peppers (chopped)
  • 1 cup red onion (chopped)
  • 2 cups broccoli florets (chopped)
  • 1 medium zucchini (sliced)
  • 1 pound baby potatoes (halved)

For the Seasoning

  • 2 tablespoons olive oil
  • 1 teaspoon garlic powder
  • 1 teaspoon onion powder
  • 1 teaspoon paprika
  • 1 teaspoon salt
  • 1 teaspoon pepper

For Garnishing

  • 2 tablespoons fresh parsley (optional)

Instructions

  1. Preheat your oven to 400°F (200°C).
  2. Wash and chop all the vegetables including bell peppers, red onion, broccoli, zucchini, and baby potatoes. Place them into a large mixing bowl.
  3. Slice the Italian sausage into bite-sized pieces and add them to the bowl with the veggies.
  4. Drizzle the olive oil over the mixture. Then sprinkle with garlic powder, onion powder, paprika, salt, and pepper. Toss everything thoroughly to coat.
  5. Spread the seasoned sausage and vegetables in a single layer on the sheet pan.
  6. Place the sheet pan in the oven and bake for 30-35 minutes, stirring halfway through.
  7. Once baked, remove from the oven and sprinkle with fresh parsley, then serve warm.

Chop vegetables ahead of time for quicker preparation. Store leftovers in an airtight container for up to 3 days.

Main Dishes
Italian
easy dinner, meal prep, one pan, Sausage, sheet pan, veggies

Filed Under: Main Dishes

Heavenly Apple Pie Cake That Will Steal Your Heart

August 29, 2025 by grace bellamy Leave a Comment

There I was, in my cozy kitchen, surrounded by the intoxicating aroma of crisp apples mingling with warm spices. That’s when I decided to bring a delightful twist to classic comfort food by whipping up a Jamie Oliver Apple Pie Cake. This dessert not only bridges the gap between cake and pie but also comes together in just over an hour—perfect for those busy evenings when homemade meals are still a priority. With layers of tender cake embracing sweet, spiced apples, it’s bound to become a crowd-pleaser that even your toughest critics will rave about. Want to surprise your friends or simply treat yourself? Let’s dive into this delicious recipe that transforms ordinary ingredients into something truly special!

Apple Pie Cake

Why is this Apple Pie Cake irresistible?

Deliciously Unique: This Apple Pie Cake brings a creative twist to classic dessert, merging the comforting flavors of apple pie with the fluffy texture of cake.

Easy Preparation: With just a 20-minute prep time, you can whisk up this delightful treat without any fuss, perfect for both novice and seasoned bakers alike.

Crowd-Pleasing Delight: With its rich, spiced flavor, this cake is sure to impress at gatherings, making it a fantastic centerpiece for birthdays or family dinners.

Versatile Serving Options: Whether served warm with a dusting of powdered sugar or paired with a scoop of ice cream, this cake transforms into an indulgent dessert fit for any occasion.

Timeless Comfort: There’s something so heartwarming about a sweet, homemade treat that evokes nostalgia. This cake will transport you back to childhood and warm your heart with every bite.

By following this straightforward recipe, you can create a tantalizing dessert that combines the best of both worlds—it’s sure to become a staple in your kitchen.

Apple Pie Cake Ingredients

For the Apple Filling
• 4 cups sliced apples – use a mix of sweet and tart apples for a balanced flavor.
• 1/2 cup brown sugar – enhances the caramelization and adds a rich sweetness.
• 1 teaspoon vanilla extract – elevates the aroma and flavor of the apples.
• 1 tablespoon lemon juice – brightens the flavor and keeps apples from browning.
• 1/2 teaspoon nutmeg – adds warmth and depth to the filling.

For the Cake Batter
• 1/2 cup softened butter – creates a tender and rich cake base.
• 1 cup granulated sugar – provides sweetness and affects the cake’s texture.
• 2 large eggs – bind the ingredients together and add moisture.
• 2 cups all-purpose flour – forms the structure of the cake.
• 1 tablespoon baking powder – helps the cake rise and achieve a light texture.
• 1 teaspoon ground cinnamon – complements the apple filling beautifully.
• 1/2 teaspoon salt – balances the flavors for a well-rounded taste.
• 1 cup milk – adds moisture and richness to the cake batter.

This Apple Pie Cake wonderfully combines layers of flavor and texture, making it a delightful dessert to share and enjoy!

Step‑by‑Step Instructions for Apple Pie Cake

Step 1: Preheat the Oven
Begin by preheating your oven to 350°F (175°C). This temperature is essential for baking the Apple Pie Cake evenly, ensuring a golden-brown top and a fluffy interior. While the oven warms up, gather your baking equipment, including a mixing bowl and a 9×13-inch baking dish to prepare for the delightful layers ahead.

Step 2: Prepare the Apple Filling
In a large mixing bowl, combine the 4 cups of sliced apples, ½ cup of brown sugar, 1 teaspoon of vanilla extract, 1 tablespoon of lemon juice, and ½ teaspoon of nutmeg. Toss everything together until the apples are fully coated with the sweet, spiced mixture. This step adds depth to your filling and allows it to sit and get even more flavorful while you work on the cake batter.

Step 3: Cream the Butter and Sugar
In a separate bowl, cream together ½ cup of softened butter and 1 cup of granulated sugar using a hand mixer or whisk. Beat for about 3–5 minutes until the mixture becomes light and fluffy. This aeration will help your Apple Pie Cake rise and achieve that luscious texture. Ensure to scrape down the sides of the bowl to incorporate all the ingredients well.

Step 4: Incorporate the Eggs
Add the 2 large eggs to your butter and sugar mixture, one at a time, mixing thoroughly after each addition. This integration is crucial for a moist cake, blending the ingredients until the mixture is smooth and uniform. Let the rich aroma fill your kitchen as you prepare for the next step.

Step 5: Combine Dry Ingredients
In a different bowl, whisk together 2 cups of all-purpose flour, 1 tablespoon of baking powder, 1 teaspoon of ground cinnamon, and ½ teaspoon of salt. This step ensures even distribution of the leavening agent and spices, contributing to the lovely rise and flavor profile of your Apple Pie Cake as you prepare to mix everything together.

Step 6: Mix Wet and Dry Ingredients
Gradually add the dry ingredient mix to the butter mixture, alternating with 1 cup of milk, starting and ending with flour. Mix on low speed until just combined; avoid overworking the batter to keep it tender. This careful blending creates a smooth batter ready to embrace the apples and create those gorgeous layers.

Step 7: Layer the Cake Batter
Grease your prepared 9×13-inch baking dish with butter or cooking spray. Pour half of the cake batter into the dish, spreading it evenly across the bottom. This layer serves as a cozy foundation for the spiced apple filling, ensuring that every bite of the Apple Pie Cake bursts with flavor.

Step 8: Add the Apple Filling
Carefully layer the coated apple mixture over the initial cake batter. Spread it out evenly to ensure that the sweet, juicy apples will melt into every slice of your cake. This step enhances the moistness and adds a beautiful fruity layer that perfectly melds with the cake.

Step 9: Top with Remaining Batter
Pour the remaining cake batter over the apple layer, using a spatula to smooth it out gently. This final layer ensures that the cake envelops the filling, allowing those delicious apples to bake into the cake, creating a delightful contrast between tender cake and tender fruit.

Step 10: Bake the Cake
Place the dish in your preheated oven and bake for 45–50 minutes. Check for doneness by inserting a toothpick into the center; it should come out clean, and the top should be a beautiful golden brown. The aroma of your Apple Pie Cake will fill your home, inviting everyone to gather around for a slice.

Step 11: Cool and Serve
Once baked, allow the cake to cool slightly in the pan for about 10 minutes. Then, carefully transfer it to a wire rack to cool completely, which helps it set and makes it easier to slice. Enjoy your Apple Pie Cake at room temperature or warm, savoring the irresistible flavors in every bite.

Apple Pie Cake

What to Serve with Jamie Oliver Apple Pie Cake

Indulging in a slice of warm, spiced goodness opens a world of delightful pairings that enhance your dessert experience.

  • Vanilla Ice Cream: The rich, creamy texture of vanilla ice cream contrasts beautifully with the warm cake, adding a luscious, cool element.

  • Whipped Cream: Light and fluffy, a dollop of whipped cream elevates your Apple Pie Cake and brings a touch of elegance to every slice.

  • Caramel Sauce: Drizzling caramel over the cake introduces a sweet, buttery flavor that complements the spiced apples perfectly, creating a sinfully indulgent treat.

  • Chai Tea: The warm spices in chai tea resonate with the flavors in your Apple Pie Cake, making it a comforting beverage for an afternoon treat.

  • Spiced Cider: A warm mug of spiced cider enhances the autumnal feel, creating a nostalgic experience that connects you to cozy gatherings.

  • Candied Pecans: Adding a sprinkle of candied pecans offers a delightful crunch that contrasts with the soft cake, enriching each bite with texture and flavor.

  • Fruit Salad: A fresh fruit salad with citrus notes brightens the palate between bites of cake, balancing sweetness with a burst of freshness and acidity.

  • Coffee: A robust cup of coffee pairs perfectly, cutting through the sweet richness of the cake and elevating the dessert experience.

Make Ahead Options

These scrumptious Apple Pie Cakes are perfect for busy home cooks looking to save time! You can prepare the apple filling and cake batter separately up to 24 hours in advance; simply refrigerate the apple mixture after tossing it with the brown sugar and spices, and cover the cake batter in an airtight container. To keep the flavors fresh, do not combine the layers until you’re ready to bake. When it’s time to serve, layer the apple filling in the baking dish with the batter and bake as directed. This way, you’ll enjoy a homemade dessert with minimal effort, just as delicious as if you made it fresh!

Apple Pie Cake Variations & Substitutions

Feel free to explore these delightful twists that will elevate your Apple Pie Cake and make it uniquely yours!

  • Gluten-Free: Substitute all-purpose flour with a 1:1 gluten-free baking blend for a gluten-free version that everyone can enjoy.

  • Dairy-Free: Replace milk with almond milk or coconut milk and use dairy-free butter to cater to lactose sensitivities.

  • Vegan: Swap eggs for flax eggs (1 tablespoon ground flaxseed mixed with 3 tablespoons water per egg) and choose plant-based butter for a completely vegan delight.

  • Nutty Delight: Add 1/2 cup chopped walnuts or pecans to the apple filling for extra crunch and richness. The nuts add a delightful contrast to the soft, gooey apples.

  • Spiced Up: Mix in 1/4 teaspoon of ground ginger or even a pinch of cayenne to the cake batter for a gentle kick that warms the taste buds. Trust me, it adds an exciting twist!

  • Fruit Variations: Replace apples with peaches or pears for a seasonal twist that brings a new flavor profile. Each fruit introduces its own charm, perfect for any occasion.

  • Caramel Drizzle: After baking, drizzle warm caramel sauce on top for an indulgent finish. This sweet addition transforms your cake into a luxurious treat that’s hard to resist.

  • Ice Cream Pairing: Serve each slice with a scoop of vanilla or cinnamon ice cream on the side. The melting ice cream adds a creamy touch and elevates this dessert to a whole new level.

Enjoy making your Apple Pie Cake undeniably special, and don’t hesitate to let your creativity flow! If you’re interested in more comforting desserts, check out this recipe for a delightful Cinnamon Roll Cake that your family will love.

How to Store and Freeze Apple Pie Cake

Room Temperature: Allow the cake to cool completely, then cover it tightly with plastic wrap or aluminum foil for storage. It will stay fresh for up to 3 days at room temperature.

Fridge: For longer storage, keep the Apple Pie Cake in the fridge for up to 1 week. Ensure it’s wrapped securely to prevent drying out and absorb any fridge odors.

Freezer: To freeze, slice the cake if desired, then wrap portions in plastic wrap and place them in an airtight container. It can last for up to 3 months in the freezer.

Reheating: Thaw frozen slices in the refrigerator or at room temperature. Reheat in the microwave for 20-30 seconds when you’re ready to enjoy a slice of your delicious Apple Pie Cake!

Expert Tips for Apple Pie Cake

  • Apple Selection: Choose a mix of tart and sweet apples like Granny Smith and Honeycrisp for balanced flavor and texture in your Apple Pie Cake.

  • Avoid Soggy Bottom: Make sure to toss the apples with brown sugar and lemon juice well; letting them sit too long can release excess moisture, potentially making the cake soggy.

  • Cream Properly: When creaming the butter and sugar, aim for a light and fluffy texture—this aeration is key for a tender, cake-like consistency in your Apple Pie Cake.

  • Mixing Technique: Incorporate the dry ingredients gently and avoid overmixing. This preserves the cake’s lightness and prevents it from becoming dense.

  • Cool Before Serving: Let the cake cool for at least 10 minutes before transferring it to a wire rack. This step helps ensure cleaner slices and enhances flavors as it sets.

Apple Pie Cake

Jamie Oliver Apple Pie Cake Recipe FAQs

What types of apples should I use for the Apple Pie Cake?
Absolutely! For the best flavor and texture, I recommend using a blend of sweet and tart apples, such as Granny Smith and Honeycrisp. The tartness of Granny Smith complements the sweetness of Honeycrisp beautifully, resulting in a balanced filling that enhances the overall cake.

How should I store my Apple Pie Cake?
To keep your Apple Pie Cake fresh, allow it to cool completely. Then, cover it tightly with plastic wrap or aluminum foil. It can be stored at room temperature for up to 3 days. If you’d like it to last longer, refrigerate it for up to 1 week—just make sure to wrap it securely to prevent it from drying out.

Can I freeze Apple Pie Cake?
Yes! To freeze your Apple Pie Cake, slice it into portions if desired. Wrap the individual pieces tightly in plastic wrap, then place them in an airtight container. This method ensures that it stays fresh for up to 3 months. When ready to enjoy, thaw the slices in the refrigerator or let them sit at room temperature for a few hours.

What should I do if the cake is too dense?
If your Apple Pie Cake turns out denser than expected, it might be due to overmixing the batter or compacting the flour while measuring. For next time, gently combine wet and dry ingredients until just mixed to avoid developing too much gluten. Using the right mixing technique will keep your cake light and fluffy!

Is this recipe suitable for those with allergies?
Very! However, be cautious if you have food allergies. This Apple Pie Cake contains eggs, dairy, and gluten. For egg-free or dairy-free versions, consider using egg substitutes (like applesauce or flaxseed meal) and dairy-free milk options. Always double-check labels for any additional ingredients to ensure safety for allergies.

How do I know when my cake is done baking?
To check the doneness of your Apple Pie Cake, insert a toothpick into the center of the cake. It should come out clean or with only a few crumbs attached. You’ll also want to look for a golden brown top. If the top is browning too quickly, consider covering it lightly with foil while continuing to bake until fully cooked.

Heavenly Apple Pie Cake That Will Steal Your Heart

This Apple Pie Cake beautifully combines the comforting flavors of apple pie with the fluffy texture of cake.

  • Mixing Bowl
  • 9×13-inch baking dish
  • hand mixer

For the Apple Filling

  • 4 cups sliced apples (use a mix of sweet and tart apples for a balanced flavor)
  • 0.5 cups brown sugar (enhances the caramelization and adds a rich sweetness)
  • 1 teaspoon vanilla extract (elevates the aroma and flavor of the apples)
  • 1 tablespoon lemon juice (brightens the flavor and keeps apples from browning)
  • 0.5 teaspoon nutmeg (adds warmth and depth to the filling)

For the Cake Batter

  • 0.5 cups softened butter (creates a tender and rich cake base)
  • 1 cups granulated sugar (provides sweetness and affects the cake’s texture)
  • 2 large eggs (bind the ingredients together and add moisture)
  • 2 cups all-purpose flour (forms the structure of the cake)
  • 1 tablespoon baking powder (helps the cake rise and achieve a light texture)
  • 1 teaspoon ground cinnamon (complements the apple filling beautifully)
  • 0.5 teaspoon salt (balances the flavors for a well-rounded taste)
  • 1 cups milk (adds moisture and richness to the cake batter)

Step-by-Step Instructions

  1. Preheat your oven to 350°F (175°C).
  2. In a large mixing bowl, combine the sliced apples, brown sugar, vanilla extract, lemon juice, and nutmeg. Toss to coat.
  3. In a separate bowl, cream together the softened butter and granulated sugar until light and fluffy.
  4. Add the eggs one at a time, mixing thoroughly after each addition.
  5. In another bowl, whisk together the flour, baking powder, cinnamon, and salt.
  6. Gradually add the dry ingredients to the butter mixture, alternating with the milk.
  7. Grease your baking dish and pour half of the cake batter into it.
  8. Layer the apple mixture over the initial cake batter.
  9. Pour the remaining cake batter over the apple layer.
  10. Bake for 45-50 minutes until golden brown and a toothpick comes out clean.
  11. Allow the cake to cool in the pan for 10 minutes, then transfer to a wire rack to cool completely.

Choose a mix of tart and sweet apples like Granny Smith and Honeycrisp for balanced flavor. Letting the apples sit with brown sugar can prevent sogginess.

Dessert
American
Apple Pie Cake, baking, comfort food, crowd-pleaser, Delicious, dessert

Filed Under: Dessert

Hearty Vegan Mushroom Bourguignon for Cozy Nights

August 29, 2025 by grace bellamy Leave a Comment

There’s something magical about a hearty meal that instantly transports you to a cozy French bistro, don’t you think? This Vegan Mushroom Bourguignon is my go-to comfort dish, seamlessly blending texture and taste while being entirely plant-based. Not only is it a perfect crowd-pleaser for dinner parties, but it also makes a fabulous weeknight treat when you’re craving something satisfying yet effortless. The rich flavors of cremini and dried porcini mushrooms are elevated by a splash of red wine, creating a sauce that clings beautifully to fluffy mashed potatoes or your favorite pasta. Plus, the preparation is surprisingly quick, letting you enjoy a restaurant-worthy experience without the fuss. Are you ready to dive into a bowl of pure, warm goodness?

Vegan Mushroom Bourguignon

Is This Your New Favorite Comfort Food?

Hearty warmth: This Vegan Mushroom Bourguignon is like a hug in a bowl, perfect for those cozy nights. Rich, deep flavors emerge from a blend of fresh and dried mushrooms, complemented by a robust red wine sauce. Quick prep time means you can whip up this delightful dish in just 30 minutes, allowing you more time to relax. Versatile pairing options like fluffy vegan mashed potatoes or pasta ensure this meal fits any occasion. Plus, it’s a fantastic way to impress guests, showcasing your culinary skills without the hassle. Enjoy a taste of the bistro right at home!

Vegan Mushroom Bourguignon Ingredients

• Get ready to savor every bite!

For the Mushrooms

  • Dried porcini mushrooms – these add an intense umami flavor that elevates the dish.
  • Sliced cremini mushrooms – fresh cremini provide a lovely texture and depth.

For the Base

  • Extra virgin olive oil – for sautéing, bringing richness to the dish.
  • Yellow onion – finely chopped for a sweet foundation in flavor.
  • Finely chopped carrot – adds color and a subtle sweetness to balance the savory notes.
  • Red bell pepper – a vibrant addition for crunch and a hint of sweetness.
  • Garlic cloves – minced for aromatic depth that infuses the sauce.

For the Seasonings

  • Dried thyme – complements the mushrooms with earthy notes.
  • Dried oregano – adds a refreshing herbal touch to the sauce.
  • Tomato paste – thickens the sauce while enhancing the overall flavor profile.

For the Sauce

  • Full-bodied red wine – such as cabernet for a rich, flavorful base (great for your Vegan Mushroom Bourguignon!).
  • Vegan butter – enriches the sauce with creaminess that is plant-based.
  • Flour – such as garbanzo bean or all-purpose flour, thickens the sauce to perfection.

For Serving

  • Easy vegan mashed potatoes – or swap with 16 ounces of your favorite pasta for serving.
  • Salt and pepper – to taste, ensuring you get the perfect seasoning.
  • Fresh chopped chives – for a bright, finishing touch that adds freshness.

Step‑by‑Step Instructions for Vegan Mushroom Bourguignon

Step 1: Rehydrate the Porcini Mushrooms
In a measuring cup, combine one cup of hot water with the dried porcini mushrooms and set it aside to let them rehydrate for about 15 minutes. This will enhance their rich, umami flavor, prepping them for your Vegan Mushroom Bourguignon. You’ll know they’re ready when they are plump and have absorbed all the water.

Step 2: Sauté the Base Vegetables
In a large pot, heat one tablespoon of olive oil over low to medium heat. Add the finely chopped onion, carrot, and red bell pepper, then sauté for about 3 minutes until the onion becomes translucent. This fragrant base is essential for creating depth in your Vegan Mushroom Bourguignon.

Step 3: Add Fresh Mushrooms and Spices
Stir in the sliced cremini mushrooms, minced garlic, dried thyme, and oregano into the pot. Continue cooking for 7-10 minutes, allowing the mushrooms to release their juices and become tender. The mixture should look glossy and aromatic before moving on to the next step.

Step 4: Incorporate the Porcini Mushrooms
Carefully remove the rehydrated porcini from the measuring cup while reserving the liquid. Discard any tough pieces and finely chop the soft mushrooms. Stir the chopped porcini and 2 tablespoons of tomato paste into the pot, cooking for another 3 minutes to blend all the flavors harmoniously.

Step 5: Deglaze with Wine
Pour in one cup of full-bodied red wine along with the reserved porcini mushroom liquid, avoiding any gritty bits from the bottom. Increase the heat to bring the mixture to a gentle boil, then reduce to a simmer. Cook for about 10 minutes, or until the sauce has reduced by half and thickened slightly.

Step 6: Thicken the Sauce
In a small bowl, mash together the vegan butter and flour until you achieve a crumb-like texture. Stir this mixture into the pot while continuously stirring to ensure a smooth consistency. Allow it to cook for an additional few minutes, watching as your Vegan Mushroom Bourguignon thickens and becomes rich.

Step 7: Final Seasoning and Serve
Taste your Vegan Mushroom Bourguignon and season with salt and pepper to your liking before serving. Dish up this heartwarming meal alongside fluffy vegan mashed potatoes or pasta, garnished with fresh chopped chives for brightness. Enjoy this comforting dish as it warms your soul!

Vegan Mushroom Bourguignon

Make Ahead Options

This Vegan Mushroom Bourguignon is perfect for meal prep enthusiasts! You can chop the vegetables (onion, carrot, and bell pepper) and store them in the refrigerator for up to 3 days ahead of time. Additionally, you can rehydrate the porcini mushrooms and combine them with the tomato paste, storing this mixture together in the fridge for up to 24 hours. When you’re ready to serve, simply sauté the prepped veggies, add the fresh cremini and other components as instructed, and simmer until thickened to ensure your dish is just as delicious. This thoughtful prep keeps your cooking stress-free and allows you to enjoy quality homemade comfort food without the rush!

Vegan Mushroom Bourguignon Variations

Feel free to transform this dish into something uniquely yours, bringing even more joy to your kitchen!

  • Gluten-Free: Substitute all-purpose flour with almond flour or a gluten-free blend to thicken the sauce.
  • Extra Veggies: Add diced zucchini or spinach for an extra burst of color and nutrients. They’ll add freshness and a pleasant crunch!
  • Spicy Kick: Toss in a pinch of red pepper flakes to bring a touch of heat that beautifully contrasts the rich flavors.
  • Herb Twist: Experiment with fresh herbs like rosemary or parsley in place of dried thyme and oregano, creating a vibrant aromatic experience.
  • Creamy Luxury: Stir in a splash of coconut cream or cashew cream at the end for a velvety texture and delightful creaminess.
  • Mushroom Medley: Mix different types of mushrooms such as shiitake, portobello, or button for a complex and layered mushroom flavor.
  • Smoke & Spice: Use smoked paprika in place of regular to impart a warm, smoky flavor that plays nicely with the wine.
  • Savory Depth: Add a tablespoon of soy sauce or tamari for an umami boost that enriches the depth of your Vegan Mushroom Bourguignon.

With these variations, you can keep your meals exciting and tailor them to suit your family’s preferences or dietary needs! Try pairing it with my easy vegan mashed potatoes or serve it over your favorite pasta to satisfy every craving.

How to Store and Freeze Vegan Mushroom Bourguignon

Fridge: Store your Vegan Mushroom Bourguignon in an airtight container for up to 3 days. This allows the flavors to meld beautifully, making it even tastier for leftovers!

Freezer: If you want to enjoy this dish later, freeze the Vegan Mushroom Bourguignon in a freezer-safe container for up to 3 months. Just make sure to cool it completely before freezing to preserve the texture.

Reheating: To reheat, thaw in the refrigerator overnight, then gently warm on the stovetop over low heat, adding a splash of vegetable broth or water if necessary to achieve the desired consistency.

Serving Suggestions: When ready to serve, pair it with freshly made mashed potatoes or pasta. Garnish with chives and perhaps an extra drizzle of olive oil for a touch of brightness!

Expert Tips for Vegan Mushroom Bourguignon

  • Perfecting Umami Flavor: Use high-quality dried porcini mushrooms; they elevate the umami profile in your Vegan Mushroom Bourguignon significantly.

  • Sauté Temp Control: Cook your base vegetables over low to medium heat to avoid burning, which can create unpleasant bitterness in the sauce.

  • Wine Selection Matters: Opt for a full-bodied red wine like cabernet; it deepens the flavor. Avoid cooking with wine you wouldn’t drink!

  • Avoid Gritty Sauce: When adding the rehydrated porcini mushroom liquid, carefully strain it to eliminate any gritty bits that might ruin the texture.

  • Thickening Tips: Ensure the butter and flour mixture is well-mashed to achieve a smooth sauce. Adding it gradually helps prevent clumps in your Vegan Mushroom Bourguignon.

What to Serve with Vegan Mushroom Bourguignon

Elevate your dining experience with delightful pairings that complement the warm, rich flavors of this dish.

  • Creamy Mashed Potatoes: These fluffy potatoes add a comforting element, perfectly soaking up the savory sauce for every satisfying bite.

  • Crusty French Bread: A warm loaf of crusty bread offers the ideal touch for dipping into the luscious sauce, enhancing the overall experience.

  • Crisp Green Salad: A fresh salad with vibrant greens and a light vinaigrette balances the hearty mushrooms, offering a refreshing contrast.

  • Roasted Brussels Sprouts: These add a wonderful crunch and slight caramelization, creating a delightful harmony against the softness of the mushrooms.

  • Red Wine: Pour a glass of the same robust red wine used in the dish—it enhances the flavors and makes for a cohesive dining experience.

  • Herbed Rice: Fluffy rice with a hint of herbs can soak up the rich sauce, ensuring a delicious bite with every forkful.

  • Vegan Chocolate Mousse: For dessert, a light chocolate mousse offers a sweet finale, leaving a memorable impression after the savory main course.

Vegan Mushroom Bourguignon

Vegan Mushroom Bourguignon Recipe FAQs

How do I choose the right mushrooms for this dish?
Absolutely! For the best flavor, select fresh cremini mushrooms for their hearty texture, while high-quality dried porcini mushrooms add a wonderful umami note. Look for porcini that are plump and fragrant, with no dark spots.

How long can I store my Vegan Mushroom Bourguignon?
You can store your Vegan Mushroom Bourguignon in an airtight container in the refrigerator for up to 3 days. This resting period allows the flavors to deepen and improve, making leftovers even more delicious!

Can I freeze Vegan Mushroom Bourguignon?
Yes, definitely! To freeze, allow the dish to cool completely, then transfer it to a freezer-safe container. It can be frozen for up to 3 months. Be sure to label your container with the date for reference. When you’re ready to enjoy it again, simply thaw overnight in the fridge and reheat on the stovetop with a little vegetable broth or water.

What should I do if the sauce is too thin?
If your sauce isn’t thick enough, don’t worry! You can easily fix it by making a slurry with 1 tablespoon of flour and a couple of tablespoons of water, mixing them until smooth. Stir this mixture into the bubbling sauce and allow it to cook for another few minutes until it thickens.

Is this dish suitable for people with dietary restrictions?
Very! This Vegan Mushroom Bourguignon is entirely plant-based, making it suitable for vegans and vegetarians. If you have gluten allergies, substitute the all-purpose flour with a gluten-free flour blend or cornstarch mixed with water as a thickener. However, always double-check that your broth and other ingredients are gluten-free as well!

Is it safe for pets?
While this dish is delicious for humans, it’s not suitable for pets. Ingredients like garlic and onion can be harmful to dogs and cats, so it’s important to avoid sharing any portion of your Vegan Mushroom Bourguignon with them. Keep their diet in mind while enjoying this hearty meal!

Hearty Vegan Mushroom Bourguignon for Cozy Nights

This Vegan Mushroom Bourguignon is a comforting dish filled with rich flavors, perfect for cozy nights.

  • Large Pot
  • measuring cup
  • small bowl

For the Mushrooms

  • 1 cup Dried porcini mushrooms (these add an intense umami flavor)
  • 8 ounces Sliced cremini mushrooms (fresh cremini provide texture and depth)

For the Base

  • 1 tablespoon Extra virgin olive oil (for sautéing)
  • 1 medium Yellow onion (finely chopped)
  • 1 medium Finely chopped carrot (adds color and sweetness)
  • 1 medium Red bell pepper (adds crunch and sweetness)
  • 4 cloves Garlic cloves (minced for aromatic depth)

For the Seasonings

  • 1 teaspoon Dried thyme (complements earthy notes)
  • 1 teaspoon Dried oregano (adds a herbal touch)
  • 2 tablespoons Tomato paste (thickens sauce and enhances flavor)

For the Sauce

  • 1 cup Full-bodied red wine (such as cabernet)
  • 2 tablespoons Vegan butter (adds creaminess)
  • 2 tablespoons Flour (for thickening the sauce)

For Serving

  • 16 ounces Easy vegan mashed potatoes (or your favorite pasta)
  • to taste Salt (for seasoning)
  • to taste Pepper (for seasoning)
  • 2 tablespoons Fresh chopped chives (for garnish)

Step-by-Step Instructions

  1. Rehydrate the porcini mushrooms in a cup of hot water for about 15 minutes.
  2. Sauté the base vegetables (onion, carrot, and red bell pepper) in olive oil for about 3 minutes.
  3. Add sliced cremini mushrooms, minced garlic, thyme, and oregano, and cook for 7-10 minutes.
  4. Incorporate the chopped porcini mushrooms and tomato paste, cooking for another 3 minutes.
  5. Deglaze with the red wine and reserved porcini liquid, simmering for about 10 minutes.
  6. Thicken the sauce by stirring in a mixture of vegan butter and flour.
  7. Season with salt and pepper to taste before serving with mashed potatoes or pasta.

Store leftovers in an airtight container for up to 3 days or freeze for up to 3 months.

Main Dishes
French
Bourguignon, comfort food, hearty, Mushroom, Plant-Based, Vegan

Filed Under: Main Dishes

BBQ Chicken & Roasted Sweet Potato Bowls for Cozy Nights

August 29, 2025 by grace bellamy Leave a Comment

As I pulled my favorite baking dish from the cupboard, the anticipation of a delicious, homemade meal filled the air. Today, I’m excited to share my BBQ Chicken & Roasted Sweet Potato Bowls—a vibrant, hearty dish that’s perfect for busy weeknights. In just 45 minutes, you can serve a meal that is not only bursting with flavors but also packed with protein and nutritious veggies. This recipe truly shines with its easy prep and cleanup, making it a favorite for anyone looking to ditch fast food and enjoy a wholesome dinner at home. Plus, your family will love the sweet and smoky dance of flavors! Are you ready to bring some warmth and comfort to your kitchen?

BBQ Chicken & Roasted Sweet Potato Bowls

Why is this recipe a must-try?

Simplicity shines through in this recipe, requiring just one pan and simple prep steps, allowing you to relax while dinner cooks. Flavor-packed BBQ sauce complements the tender chicken and roasted veggies, delivering a satisfying meal everyone will love. Healthy yet indulgent, it’s loaded with protein and fiber from sweet potatoes and broccoli. Versatile enough to customize with your favorite seasonings or add-ins, this dish fits every palate. Enjoy a cozy dinner ready in just 45 minutes while leaving behind the fast food routine for good!

BBQ Chicken & Roasted Sweet Potato Bowls Ingredients

For the Sweet Potatoes
• 2 medium sweet potatoes – packed with vitamins and natural sweetness, these are the perfect base for your bowl.
• 1 large yellow onion – adds a savory depth that beautifully complements the sweetness of the potatoes.
• 1 Tablespoon olive oil – helps to achieve that perfect roasted texture and enhances flavor.
• 1/4 teaspoon salt (divided) – balance the flavors; remember, a little salt goes a long way!
• 1/2 teaspoon garlic powder – infuses a warm, savory richness into the dish.
• 1/2 teaspoon chipotle powder or chili powder – provides a smoky kick that perfectly complements the BBQ sauce.

For the Chicken and Broccoli
• 1 medium head broccoli – a nutritious green that adds vibrant color and crunch to your bowls.
• 1 Tablespoon olive oil – ensures the broccoli and chicken roast beautifully without sticking.
• 1/4 teaspoon salt – enhances the natural flavors of your chicken and veggies.
• 1 pound boneless skinless chicken breasts – the star of the show, tender and juicy when cooked just right.
• 1/2 cup BBQ sauce (divided) – this is what makes your BBQ Chicken & Roasted Sweet Potato Bowls truly unforgettable!

Dive into this delicious meal and let every bite transport you to cozy family dinners!

Step‑by‑Step Instructions for BBQ Chicken & Roasted Sweet Potato Bowls

Step 1: Preheat the Oven
Begin by preheating your oven to 400°F (200°C). This is crucial to ensure your BBQ Chicken & Roasted Sweet Potato Bowls cook evenly and become perfectly tender. While the oven is warming up, gather all your ingredients and prepare your baking sheet with parchment paper for easy cleanup.

Step 2: Prepare the Sweet Potatoes and Onions
Peel and chop the sweet potatoes into 1/2-inch chunks, and chop the onion into 1-inch pieces. Spread the sweet potatoes and onions evenly on the prepared baking sheet, creating a colorful base for your bowl. The vibrant colors will not only be appetizing but also visually delightful once roasted.

Step 3: Season and Roast the Vegetables
In a large bowl, toss the sweet potatoes and onions with 1 tablespoon of olive oil, 1/4 teaspoon of salt, garlic powder, and chipotle powder until thoroughly coated. Place the sheet pan in the preheated oven and roast the mixture for about 20 minutes, turning halfway through, until the vegetables are tender and slightly caramelized.

Step 4: Add Broccoli and Chicken
After the sweet potatoes have roasted, remove the pan from the oven and push the vegetables to one side. Add the chopped broccoli to the other side, tossing it with a drizzle of olive oil and a pinch of salt. Nestle the chicken breasts amongst the veggies, then brush the chicken with 1/4 cup of BBQ sauce, ensuring even coverage.

Step 5: Bake Until Cooked Through
Return the pan to the oven and bake for an additional 15-20 minutes. The chicken should reach an internal temperature of 165°F (75°C), and the broccoli will turn bright green and crisp-tender. Keep an eye on the chicken towards the end to avoid overcooking.

Step 6: Shred the Chicken
Once baked, remove the pan from the oven and let it cool slightly. Use two forks to shred the chicken, allowing the BBQ sauce to mix in beautifully. The chicken will be juicy and fragrant, perfectly complementing the roasted sweet potatoes and broccoli.

Step 7: Assemble Your Bowls
Finally, divide the shredded chicken, roasted sweet potatoes, onions, and broccoli into three bowls. This will create a visually appealing presentation for your BBQ Chicken & Roasted Sweet Potato Bowls. Serve immediately while everything is warm, and enjoy a nutritious and delicious meal that your family will love!

BBQ Chicken & Roasted Sweet Potato Bowls

BBQ Chicken & Roasted Sweet Potato Bowls Variations

Feel free to make this dish your own by exploring these exciting twists and swaps that enhance flavor and accommodate different diets!

  • Dairy-Free: Substitute BBQ sauce with a dairy-free version or make your own with vinegar, molasses, and spices.
  • Spicy Kick: Enhance the heat by incorporating diced jalapeños into the mix or adding more chipotle powder to the sweet potatoes.
  • Vegetarian: Swap chicken for chickpeas or diced firm tofu, seasoning them with BBQ sauce and roasting until golden.
  • Extra Crunch: Add a sprinkle of pistachios or walnuts on top for delightful texture and a nutty flavor boost!
  • Different Veggies: Switch up the broccoli for your favorite seasonal greens, such as green beans or asparagus, for a fresh touch.
  • Sweet Twist: Toss in a handful of dried cranberries or raisins before serving for a burst of sweetness that contrasts beautifully with savory components.
  • Grain Bowl: Serve over a bed of fluffy quinoa or brown rice to turn your bowl into a heartier meal. It’s filling and nutritious!
  • Citrus Zing: Squeeze fresh lemon or lime juice over the finished bowls for a refreshing zest that brightens the overall flavor.

With these variations, you’ll never get bored of your BBQ Chicken & Roasted Sweet Potato Bowls! And for even more meal inspiration, don’t forget to check out my guide on how to store and freeze your meals for later enjoyment. Enjoy getting creative in your kitchen!

Expert Tips for BBQ Chicken & Roasted Sweet Potato Bowls

  • Perfectly Roasted Veggies: Ensure even roasting by cutting sweet potatoes and onions into similar sizes. This way, they cook uniformly and achieve that sought-after caramelization.

  • Juicy Chicken: Use a meat thermometer to check that your chicken reaches 165°F for perfectly cooked, juicy meat. Overcooking can lead to dryness, so keep an eye on it!

  • Flavor Boost: Feel free to experiment with different spices! A pinch of smoked paprika or Italian herbs can elevate your BBQ Chicken & Roasted Sweet Potato Bowls to the next level.

  • Meal Prep Friendly: Assemble the ingredients ahead of time and store them in the fridge. This dish can save you time during busy weeknights, making it a go-to when you’re short on time!

  • Customize Your Bowls: Add in your favorite seasonal vegetables or grains like quinoa for added texture and nutrition. You can make this recipe uniquely yours!

How to Store and Freeze BBQ Chicken & Roasted Sweet Potato Bowls

Fridge: Store leftovers in an airtight container for up to 3 days. Reheat gently in the microwave or on the stovetop, adding a splash of water to keep the chicken moist.

Freezer: Freeze portions in freezer-safe containers for up to 2 months. Allow to cool completely before freezing to maintain quality.

Reheating: Thaw in the refrigerator overnight before reheating in the microwave or oven until heated through. Enjoy the same delicious flavors of your BBQ Chicken & Roasted Sweet Potato Bowls!

Airtight Tips: To prevent freezer burn, wrap the container tightly with plastic wrap before sealing the lid.

What to Serve with BBQ Chicken & Roasted Sweet Potato Bowls

Imagine the warmth of home-cooked flavors mingling with fresh sides to elevate your meal experience.

  • Creamy Garlic Mashed Potatoes: The rich and buttery texture of mashed potatoes offers a delightful contrast to the sweet and smoky bowls.
  • Fresh Garden Salad: A crisp salad with mixed greens, cherry tomatoes, and a light vinaigrette adds a refreshing crunch that complements the hearty bowls.
  • Crispy Brussels Sprouts: The nutty flavor and crispy leaves enhance the dish’s textural variety and bring a satisfying crunch to every bite.
  • Sweet Cornbread Muffins: These tender muffins, with their slightly sweet flavor, make a perfect sidekick that balances out the spiciness of the BBQ sauce.
  • Zesty Coleslaw: A tangy coleslaw with a hint of sweetness brings a cool, tangy flavor that perfectly contrasts the warm, smoky elements of the dish.
  • Grilled Pineapple Skewers: The juicy sweetness of grilled pineapple adds a tropical twist, harmonizing beautifully with the savory chicken and sweet potatoes.
  • Sparkling Lemonade: Refreshing and light, a glass of bubbly lemonade brightens your meal and complements the rich flavors of the BBQ Chicken & Roasted Sweet Potato Bowls.
  • Chocolate Chip Cookies: End your meal on a sweet note with warm, gooey cookies that provide a delightful, nostalgic finish to any cozy dinner.

Make Ahead Options

Preparing your BBQ Chicken & Roasted Sweet Potato Bowls in advance is a joyful way to save time during your busy week! You can chop the sweet potatoes and onions and store them in an airtight container in the refrigerator up to 24 hours ahead. Additionally, the chicken can be marinated in BBQ sauce for up to 3 days while sitting in the fridge, enhancing its flavor without compromising quality. When you’re ready to cook, just toss the veggies with olive oil and seasonings before roasting. Finally, bake everything together as directed, and you’ll have a delicious meal on the table with minimal effort and maximum taste!

BBQ Chicken & Roasted Sweet Potato Bowls

BBQ Chicken & Roasted Sweet Potato Bowls Recipe FAQs

How do I choose the right sweet potatoes?
Absolutely! When selecting sweet potatoes, look for ones that are firm with smooth, unblemished skin. Avoid any that have dark spots or are soft to the touch, which can indicate spoilage. The sweeter and more vibrant the color, the better your dish will taste!

What is the best way to store leftover BBQ Chicken & Roasted Sweet Potato Bowls?
Very simple! Store the leftovers in an airtight container in the fridge for up to 3 days. When you’re ready to enjoy them again, reheat gently in the microwave or on the stovetop. For best results, add a splash of water to keep the chicken moist and flavorful, just like when it was freshly made!

Can I freeze my BBQ Chicken & Roasted Sweet Potato Bowls?
Of course! To freeze, allow the bowls to cool completely, then portion them into freezer-safe containers. They can be stored in the freezer for up to 2 months. To prevent freezer burn, wrap the container tightly with plastic wrap before sealing the lid. When you’re ready to eat, thaw in the fridge overnight, then reheat in the microwave or oven until warmed through.

What should I do if my chicken turns out dry after baking?
Very occasionally, chicken can dry out if overcooked. To prevent this, use a meat thermometer to ensure the internal temperature reaches 165°F. If you find yourself with dry chicken, try shredding it and mixing it with extra BBQ sauce to bring back moisture and flavor. The chicken will absorb the sauce, making it delicious and tender again!

What if I or someone in my family has food allergies?
You can easily customize your BBQ Chicken & Roasted Sweet Potato Bowls! If you’re avoiding certain ingredients, like garlic or specific spices, simply substitute them or omit them altogether. For any severe allergies, always carefully check labels, especially on sauces like BBQ to ensure they fit your dietary needs. You can also consult your doctor or a nutritionist for tailored advice!

Can I add other vegetables to the recipe?
Absolutely! The more, the merrier! Feel free to toss in your favorite seasonal vegetables such as bell peppers, carrots, or zucchini along with the sweet potatoes and broccoli. This not only adds variety but also increases the nutritional value of your meal. It’s all about personal preference—make it your own!

BBQ Chicken & Roasted Sweet Potato Bowls for Cozy Nights

Delicious BBQ Chicken & Roasted Sweet Potato Bowls, a flavorful and nutritious option for busy weeknights.

  • Baking Sheet
  • parchment paper
  • large bowl
  • Meat Thermometer

For the Sweet Potatoes

  • 2 medium sweet potatoes (packed with vitamins and natural sweetness)
  • 1 large yellow onion (adds savory depth)
  • 1 Tablespoon olive oil (helps achieve perfect roasted texture)
  • 1/4 teaspoon salt (divided)
  • 1/2 teaspoon garlic powder (infuses savory richness)
  • 1/2 teaspoon chipotle powder or chili powder (provides smoky kick)

For the Chicken and Broccoli

  • 1 medium head broccoli (adds vibrant color and crunch)
  • 1 Tablespoon olive oil (ensures roast quality)
  • 1/4 teaspoon salt
  • 1 pound boneless skinless chicken breasts (the star of the dish)
  • 1/2 cup BBQ sauce (divided, for flavor)

Step-by-Step Instructions

  1. Preheat your oven to 400°F (200°C). Gather all your ingredients and prepare your baking sheet with parchment paper.
  2. Peel and chop the sweet potatoes into 1/2-inch chunks, and chop the onion into 1-inch pieces. Spread evenly on the baking sheet.
  3. Toss sweet potatoes and onions with olive oil, salt, garlic powder, and chipotle powder. Roast for about 20 minutes.
  4. Push roasted vegetables to the side, add chopped broccoli, drizzle with olive oil and salt, and nestle chicken breasts among the veggies. Brush chicken with BBQ sauce.
  5. Return to the oven and bake for an additional 15-20 minutes until chicken is cooked through and broccoli is crisp-tender.
  6. Remove from oven, let cool slightly, then shred the chicken with forks, mixing with BBQ sauce.
  7. Divide the shredded chicken, roasted sweet potatoes, onions, and broccoli into bowls. Serve immediately.

Customize your bowls with additional vegetables or grains like quinoa for enhanced nutrition.

Main Dishes
American
BBQ Chicken, Family Meal, Healthy Recipe, quick dinner, Roasted Sweet Potatoes

Filed Under: Main Dishes

Savory Moroccan Chicken Stew That Warms the Soul

August 28, 2025 by grace bellamy Leave a Comment

The first whiff of spiced chicken simmering away wafts through my kitchen, instantly transporting me to the vibrant streets of Marrakech. My twist on a classic Moroccan Chicken Stew balances aromatic spices and tender chicken, creating a dish that is as comforting as it is exotic. This vibrant stew is not just a feast for the senses; it also packs a nutritious punch with chickpeas and apricots, making it an ideal choice for busy weeknights or intimate gatherings. With just one pot required and a total prep time of under 15 minutes, you can enjoy this flavorful meal without the fuss. Are you ready to dive into this culinary adventure and impress your loved ones?

Moroccan Chicken Stew

Why is This Moroccan Chicken Stew Special?

Aromatic Spices: This Moroccan Chicken Stew is a symphony of warm spices, creating a deeply satisfying aroma that will make your kitchen feel inviting.

One-Pot Wonder: Less mess, more flavor! This recipe minimizes cleanup and maximizes taste, making it perfect for busy weekdays.

Nutrient-Packed: Loaded with protein from chicken and fiber from chickpeas, it’s a healthy option that doesn’t skimp on flavor.

Versatile Serving Options: Pair it with fluffy couscous or rice for a hearty meal, or serve it over a fresh salad for a lighter twist.

Crowd-Pleaser: Impress family and friends alike with this exotic dish that brings a taste of North Africa to your table!

Moroccan Chicken Stew Ingredients

• Get ready for a flavorful journey!

For the Chicken

  • Chicken thighs – bone-in and skinless for tender, juicy bites.

For the Aromatics

  • Olive oil – provides a rich base and enhances the flavors.
  • Onion – finely chopped to release its sweetness when sautéed.
  • Garlic – minced for a punch of aromatic flavor.

For the Spices

  • Ground cumin – gives an earthy depth with a hint of warmth.
  • Ground coriander – adds a citrusy flavor profile that balances the dish.
  • Ground ginger – brings a zesty touch and aids digestion.
  • Ground cinnamon – contributes warmth and sweetness to the stew.
  • Cayenne pepper (optional) – a kick of heat for those who like it spicy.
  • Turmeric – a bright, golden spice with anti-inflammatory benefits.

For the Base

  • Diced tomatoes – provide a rich, tangy liquid that enriches the stew.
  • Chicken broth – for depth of flavor and added moisture.
  • Cooked chickpeas – a protein-rich addition that makes the stew hearty.

For the Sweetness

  • Dried apricots – add natural sweetness and a chewy texture that contrasts beautifully.

For the Garnish

  • Green olives – provide brininess that complements the other flavors.
  • Salt and freshly ground black pepper – to taste, enhancing every bite.
  • Fresh cilantro or parsley – chopped for a bright, fresh finish.

For Serving

  • Cooked couscous or rice – the perfect vessel for soaking up this rich Moroccan Chicken Stew!

Step‑by‑Step Instructions for Moroccan Chicken Stew

Step 1: Sauté the Aromatics
Begin by heating 2 tablespoons of olive oil in a large pot or Dutch oven over medium heat. Once the oil shimmers, add 1 finely chopped large onion and sauté for about 5 minutes, stirring frequently, until the onion is translucent and tender. The fragrant aroma of the sautéing onions will set a warm tone for your Moroccan Chicken Stew.

Step 2: Add the Spices
Next, introduce 3 minced garlic cloves, 1 teaspoon of ground cumin, 1 teaspoon of ground coriander, 1/2 teaspoon of ground ginger, 1/2 teaspoon of ground cinnamon, cayenne pepper (if desired), and 1 teaspoon of turmeric to the pot. Stir constantly for about 1-2 minutes until the spices are aromatic and lightly toasted, intensifying the flavors of your stew.

Step 3: Brown the Chicken
Increase the heat to medium-high and add 2 lbs of bone-in, skinless chicken thighs to the pot. Season generously with salt and freshly ground black pepper. Sear the chicken for about 4-5 minutes per side until it is golden brown and well-caramelized, sealing in the juices and flavor of the Moroccan Chicken Stew.

Step 4: Combine the Base Ingredients
Pour in 1 can of diced tomatoes (with juices), 2 cups of chicken broth, 1 cup of cooked chickpeas, and 1/2 cup of chopped dried apricots. Stir well to mix all the ingredients together, bringing the mixture to a rolling boil. This combination creates a rich and inviting base for your stew.

Step 5: Let it Simmer
Reduce the heat to low and cover the pot with a lid, allowing the stew to simmer gently for about 30-40 minutes. Check for doneness; the chicken should be tender and fully cooked, yielding easily to the touch and infused with the wonderful spices and ingredients.

Step 6: Add the Finishing Touches
After simmering, incorporate 1/4 cup of sliced green olives into the Moroccan Chicken Stew, stirring well to combine. Taste the stew and adjust seasoning with additional salt and pepper as needed. The olives will add a delightful brininess, complementing the sweetness of the apricots.

Step 7: Serve and Garnish
When ready to serve, spoon the Moroccan Chicken Stew over pots of fluffy cooked couscous or rice, allowing for a hearty meal. Garnish with fresh chopped cilantro or parsley for a burst of color and fresh flavor that brightens this already vibrant dish.

Moroccan Chicken Stew

Make Ahead Options

These Moroccan Chicken Stew preparations are perfect for busy home cooks looking to save time during the week! You can chop the onion, mince the garlic, and measure out the spices up to 3 days in advance, storing them in the refrigerator in airtight containers to preserve their freshness. Additionally, you can brown the chicken thighs and prepare the base of the stew (including the tomatoes, broth, chickpeas, and apricots) up to 24 hours ahead of time; simply let it cool and refrigerate. When you’re ready to serve, reheat the stew on low until warmed through, stir in the green olives, and serve over freshly cooked couscous or rice. This way, you’ll enjoy a flavorful meal with minimal effort!

Expert Tips for Moroccan Chicken Stew

Cook Chicken Evenly: Ensure chicken thighs are uniform in size for even cooking. This helps in achieving that tender texture essential to the Moroccan Chicken Stew.

Sauté Spices Well: Don’t rush the toasting of spices; this step enhances their flavors, making your stew more aromatic and delicious.

Simmer Gently: Keep the heat low during simmering to maintain tender chicken and prevent the stew from sticking to the bottom.

Adjust Sweetness: Taste while cooking! If your stew feels too sweet, a pinch of salt can help balance the flavors beautifully.

Experiment with Ingredients: Feel free to add vegetables like carrots or bell peppers. They will add extra nutrients and color without compromising the essence of your Moroccan Chicken Stew.

How to Store and Freeze Moroccan Chicken Stew

Fridge: Store your Moroccan Chicken Stew in an airtight container for up to 3 days. Allow it to cool before sealing to maintain flavor and freshness.

Freezer: Freeze the stew in individual portions in airtight bags or containers for up to 3 months. Make sure to label with the date for easy reference.

Reheating: Thaw overnight in the fridge and reheat on the stovetop over low heat, stirring occasionally. Add a splash of chicken broth if needed to restore creaminess.

Tip: Always allow the Moroccan Chicken Stew to cool completely before freezing to prevent ice crystals from forming, ensuring the best quality upon reheating.

What to Serve with Moroccan Chicken Stew

The rich, spiced aroma of your stew fills the air, inviting you to create a complete dining experience.

  • Fluffy Couscous: Light and airy, couscous absorbs the savory sauce beautifully, making every bite a delight.

  • Garlic Bread: Perfect for soaking up those delicious juices, garlic bread adds a crunchy texture that complements the stew’s warmth.

  • Tzatziki Sauce: The cool, creamy yogurt sauce provides a refreshing contrast, balancing the spices in the Moroccan Chicken Stew.

  • Spinach Salad: A fresh spinach salad with lemon vinaigrette adds a bright, zesty note that pairs well with the stew’s cozy flavors.

  • Roasted Vegetables: Carrots, zucchini, and bell peppers drizzled with olive oil enhance the meal with a caramelized sweetness that matches the apricots.

  • Minted Yogurt Drink: A cool, minty drink refreshes your palate and adds a hint of brightness, complementing the dish’s richness.

  • Almond Cake: This moist dessert, with its nutty flavor, serves as a delightful ending to your Moroccan-inspired meal.

  • Pita Bread: Soft and warm, pita is perfect for scooping the stew, adding a fun, interactive element to your dining experience.

  • Herbed Rice: Infused with fresh herbs, this side dish not only enhances flavor but also looks lovely against the vibrant stew.

Moroccan Chicken Stew Variations

Feel free to explore these tasty twists that will make your Moroccan Chicken Stew uniquely yours!

  • Dairy-Free: Substitute chicken broth with vegetable broth for a lighter, dairy-free option.
  • Spicy Kick: Add fresh chopped jalapeños or a dash of harissa for a fiery flavor boost that adds great depth.
  • Vegetarian Option: Replace chicken with hearty vegetables like zucchini and eggplant, plus increase chickpeas for protein.
  • Fruit Lovers: Toss in raisins or dates along with the apricots for an extra layer of sweet, chewy goodness.
  • Nutty Crunch: Sprinkle toasted almonds or pistachios on top before serving for a delightful crunch and nutty flavor.
  • Coconut Essence: Swap out chicken broth for coconut milk to create a creamy, tropical version of the stew.
  • Herb Infusion: Experiment with fresh herbs like mint or dill to surprise your palate and add a fresh herbaceous note.
  • Flavorful Broth: For a deeper flavor, consider using homemade chicken broth, which elevates the stew to a whole new level.

With these simple modifications, you can take your Moroccan Chicken Stew to delicious new heights while catering to your personal taste preferences!

Moroccan Chicken Stew

Moroccan Chicken Stew Recipe FAQs

What kind of chicken is best for this Moroccan Chicken Stew?
I recommend using bone-in, skinless chicken thighs for a juicy and flavorful stew. This cut holds up beautifully during cooking and becomes wonderfully tender—perfect for absorbing all those rich spices!

How should I store the Moroccan Chicken Stew?
Store it in an airtight container in the fridge for up to 3 days. Let it cool completely before sealing to help maintain its flavors and freshness. It’s such a comforting dish that you’ll want to enjoy it again!

Can I freeze leftover Moroccan Chicken Stew?
Absolutely! To freeze, portion the stew into airtight bags or containers, making sure to label them with the date. It can last up to 3 months in the freezer. When you’re ready, simply thaw overnight in the fridge and reheat on the stovetop, adding a splash of chicken broth to maintain creaminess and avoid drying out.

What can I do if my stew is too spicy?
If you find the stew has more heat than you prefer, a great trick is to add a dollop of yogurt or a splash of cream just before serving. These will help mellow the spice and add a lovely creaminess to each bite!

Are there any dietary considerations for this Moroccan Chicken Stew?
If you’re serving anyone with food allergies or dietary restrictions, check for the ingredients. The stew contains chicken, chickpeas, spices, and olives, so ensure none of your guests are allergic to these. You could easily adapt this recipe to be vegetarian by omitting the chicken and using vegetable broth instead.

Savory Moroccan Chicken Stew That Warms the Soul

This Moroccan Chicken Stew is a comforting and exotic dish filled with aromatic spices, chickpeas, and apricots.

  • large pot or Dutch oven

For the Chicken

  • 2 lbs bone-in, skinless chicken thighs

For the Aromatics

  • 2 tablespoons olive oil
  • 1 large finely chopped onion
  • 3 cloves minced garlic

For the Spices

  • 1 teaspoon ground cumin
  • 1 teaspoon ground coriander
  • 1/2 teaspoon ground ginger
  • 1/2 teaspoon ground cinnamon
  • 1 teaspoon turmeric
  • cayenne pepper (optional) (for heat)

For the Base

  • 1 can diced tomatoes (with juices)
  • 2 cups chicken broth
  • 1 cup cooked chickpeas
  • 1/2 cup chopped dried apricots

For the Garnish

  • 1/4 cup sliced green olives
  • salt and freshly ground black pepper (to taste)
  • fresh cilantro or parsley (chopped)

For Serving

  • cooked couscous or rice (for serving)

Step-by-Step Instructions

  1. Heat 2 tablespoons of olive oil in a large pot or Dutch oven over medium heat. Add 1 finely chopped large onion and sauté for about 5 minutes until translucent.
  2. Add 3 minced garlic cloves, 1 teaspoon of ground cumin, 1 teaspoon of ground coriander, 1/2 teaspoon of ground ginger, 1/2 teaspoon of ground cinnamon, cayenne pepper if desired, and 1 teaspoon of turmeric. Stir for 1-2 minutes until aromatic.
  3. Increase heat to medium-high and add 2 lbs of chicken thighs. Season with salt and pepper. Sear for 4-5 minutes per side until golden brown.
  4. Pour in 1 can of diced tomatoes, 2 cups of chicken broth, 1 cup of cooked chickpeas, and 1/2 cup of chopped dried apricots. Stir and bring to a boil.
  5. Reduce heat to low and cover, letting simmer for 30-40 minutes until chicken is tender.
  6. Stir in 1/4 cup of sliced green olives, adjusting seasoning with salt and pepper as needed.
  7. Serve over couscous or rice, garnished with fresh chopped cilantro or parsley.

Ensure chicken thighs are uniform in size for even cooking. Don’t rush the toasting of spices; this enhances their flavors and makes your stew more aromatic.

Main Dishes
Moroccan
chicken stew, comfort food, exotic dish, healthy dinner, Moroccan Chicken Stew, one pot meal

Filed Under: Main Dishes

Savory High-Protein Vegetable Soup for Cozy Nights

August 28, 2025 by grace bellamy Leave a Comment

As the chilly breeze whispers through my kitchen window, I find myself reaching for my favorite pot, ready to create something warm and satisfying. Enter my High-Protein Vegetable Soup, a vibrant medley of wholesome ingredients that transforms a dreary winter day into a cozy culinary delight. Packed with protein from lentils, chickpeas, and black beans, this soup not only nourishes the body but also warms the soul. Plus, it’s incredibly simple to prepare—a perfect antidote to fast food fatigue! Each spoonful overflows with colorful veggies and the fresh zing of lemon juice, promising a delightful balance of taste and health in every bite. So, who’s ready to warm up with a bowlful of goodness?

High-Protein Vegetable Soup

Why is this soup a must-try?

Warmth and Comfort: This savory High-Protein Vegetable Soup offers an inviting hug in a bowl, perfect for any chilly evening.

Packed with Protein: With lentils, chickpeas, and black beans, each serving delivers 15 grams of protein, making it a powerhouse meal.

Vibrant and Colorful: You’ll love the eye-catching blend of vegetables, from kale to vibrant carrots, serving both beauty and nutrition.

Quick and Easy: In just 55 minutes, you can whip up a comforting meal that beats any fast food option, providing a homemade taste with minimal effort.

Customizable Delight: Feel free to experiment with your favorite veggies or spices, tailoring the soup to suit your palate and making every bowl uniquely yours!

So grab your favorite pot and dive into this delightful recipe. You can check out my guide on how to make healthy soups for more inspiration!

High-Protein Vegetable Soup Ingredients

• Get ready to savor each spoonful!

For the Soup Base
• Olive oil – Adds a rich flavor and helps sauté the veggies to perfection.
• Onion – Provides a sweet and savory base that enhances the overall taste.
• Garlic – Infuses the soup with a wonderful aroma and boosts the health benefits.

For the Vegetables
• Carrots – Adds natural sweetness and vibrant color to your soup.
• Celery – Contributes a satisfying crunch and aromatic flavor.
• Red bell pepper – Brings a lovely sweetness and a pop of color to the mix.
• Kale – Packed with nutrients, it adds a delightful texture and earthy flavor.
• Green beans – Offers a fresh taste and a bit of crunch to keep it interesting.
• Frozen peas – Easy to use and adds a burst of sweetness to each spoonful.

For the Protein
• Dried lentils – A fantastic source of plant-based protein, making this soup hearty.
• Chickpeas – Also high in protein, they add a creamy texture to the soup.
• Black beans – Boosts the protein content, making this a nutritious bowl.

For Seasoning
• Dried thyme – Adds a warm, earthy flavor that complements the soup perfectly.
• Dried basil – Provides a hint of sweetness and aromatic essence.
• Salt and pepper – Essential for enhancing all the flavors and seasoning to taste.

For Garnishing
• Fresh lemon juice – Brightens the flavors and adds a refreshing zing to the soup.
• Fresh parsley – Sprinkles on top for a splash of color and a fresh flavor boost.

This high-protein vegetable soup is not only nourishing and delightful but also invites you to get creative in the kitchen!

Step‑by‑Step Instructions for High-Protein Vegetable Soup

Step 1: Sauté Aromatics
In a large pot, heat 1 tablespoon of olive oil over medium heat. Once the oil shimmers, add 1 medium chopped onion and 2 minced cloves of garlic. Sauté for 3-4 minutes, stirring occasionally, until the onion becomes translucent and fragrant, setting a flavorful base for your High-Protein Vegetable Soup.

Step 2: Add Vegetables
Next, incorporate 2 diced carrots, 2 diced celery stalks, and 1 diced red bell pepper into the pot. Continue sautéing for another 5 minutes, stirring frequently, until the vegetables start to soften and release their colors, enhancing the overall appeal of your soup.

Step 3: Incorporate Broth and Lentils
Pour in 6 cups of vegetable broth, followed by 1 cup of rinsed and drained dried lentils. Increase the heat to high, bringing the mixture to a boil. Once boiling, reduce the heat to low, cover, and let it simmer for approximately 15 minutes, allowing the lentils to cook and absorb all the delightful flavors.

Step 4: Mix in Beans and Herbs
Add in the 1 can of drained chickpeas and 1 can of drained black beans, along with 1 teaspoon each of dried thyme and dried basil, plus salt and pepper to taste. Stir thoroughly and let the soup simmer for another 10 minutes, allowing the legumes to meld with the other flavors in your hearty High-Protein Vegetable Soup.

Step 5: Stir in Greens and Finish Cooking
Now, gently stir in 2 cups of chopped kale, 1 cup of trimmed and cut green beans, and 1 cup of frozen peas. Allow the soup to cook for an additional 5-7 minutes, until the vegetables are tender and the lentils have softened completely, enriching your soup with vibrant textures and colors.

Step 6: Add Freshness
Remove the pot from heat and stir in 2 tablespoons of fresh lemon juice and 1/4 cup of chopped fresh parsley. This brightens the flavors, giving your High-Protein Vegetable Soup a delightful zing that balances the hearty ingredients perfectly.

Step 7: Taste and Adjust
Before serving, taste the soup and adjust the seasoning with additional salt or pepper, if desired. This final touch ensures that every bowl is bursting with the perfect flavor balance, ready to bring warmth and comfort to your table.

Step 8: Serve Hot
Ladle your soup into bowls and garnish with additional fresh parsley if you like. Serve hot, enjoying the cozy embrace of your homemade High-Protein Vegetable Soup, a nourishing delight for any chilly evening.

High-Protein Vegetable Soup

How to Store and Freeze High-Protein Vegetable Soup

Fridge: Store leftovers in an airtight container for up to 4-5 days; make sure it’s completely cooled down before sealing.

Freezer: Freeze portions in airtight containers or freezer bags for up to 3 months. Make sure to leave space for expansion as the soup freezes.

Reheating: Thaw overnight in the fridge when ready to enjoy again. Reheat on the stovetop over low heat, stirring occasionally, until heated through.

Refreshing: Add a splash of fresh lemon juice or a handful of fresh parsley when reheating to revive the flavors in your High-Protein Vegetable Soup!

Tips for the Best High-Protein Vegetable Soup

Use Fresh Ingredients: Fresh vegetables yield better flavor and texture, so opt for crisp, seasonal produce whenever possible for your soup.

Avoid Overcooking Lentils: Lentils should be tender but not mushy. Keep an eye on them during simmering to ensure they keep their form in your High-Protein Vegetable Soup.

Season Generously: Don’t shy away from adding salt and pepper. Taste as you go and adjust seasoning for a flavorful soup that suits your palate perfectly.

Customize Your Greens: Feel free to swap in different greens like spinach or chard. Just remember to add them towards the end of cooking to preserve their color and nutrients.

Store Properly: If making in advance, store the soup in airtight containers. It holds up well in the fridge for about 4-5 days and also freezes beautifully for quick meals later.

Garnish for Flair: A sprinkle of fresh parsley or a squeeze of lemon juice right before serving elevates the flavors, making your High-Protein Vegetable Soup look as good as it tastes!

High-Protein Vegetable Soup Variations

Feel free to take this recipe and make it your own, using flavors and textures that delight your taste buds!

  • Dairy-Free: Swap out any dairy-based garnishes, like cream or cheese, for a rich drizzle of olive oil or a sprinkle of nutritional yeast instead for flavor.
  • Spicy Kick: Add diced jalapeños or a pinch of cayenne pepper to the soup while it simmers to give it a warming heat that elevates every bite. Spice lovers will rejoice!
  • Quinoa Twist: Substitute lentils with cooked quinoa for a nutty flavor and an extra texture variation, turning your soup into an intriguing and hearty meal.
  • Herbal Infusion: Try using fresh herbs like basil or cilantro for a vibrant flavor boost. Toss them in just before serving to enhance the aroma and presentation.
  • Root Veggie Medley: Switch out the carrots for parsnips or sweet potatoes for a sweeter twist that adds both flavor and a hint of earthiness to the soup.
  • Canned Veggies Option: If you’re short on time, use canned vegetables like corn or mixed veggies to speed up preparation without compromising on taste.
  • Protein Boost: Toss in some cubed tofu or tempeh for an additional protein punch, making this nourishing soup even heartier and satisfying.
  • Citrusy Zest: Enhance the lemon juice with a bit of orange zest for a surprising citrus flavor that brightens your High-Protein Vegetable Soup with a refreshing twist.

Let your culinary creativity shine, and savor the delightful variations that cater to your unique preferences! If you’re eager for more ideas, check out my tips on how to make homemade soups, where you’ll discover even more scrumptious ways to personalize each bowl!

Make Ahead Options

These High-Protein Vegetable Soup ingredients make it a fantastic option for meal prep! You can chop all your vegetables (onion, carrots, celery, and bell pepper) up to 24 hours in advance and store them in an airtight container in the refrigerator to keep them fresh. The lentils and beans can also be pre-measured and mixed ahead of time, ready to throw into the pot. When you’re ready to enjoy your soup, simply sauté the aromatics, add your prepped veggies, broth, and remaining ingredients, then finish cooking as directed. This way, you’ll have a comforting and nourishing meal ready in no time—just as delicious as when freshly made!

What to Serve with High-Protein Vegetable Soup

Dive into a symphony of flavor and warmth that perfectly complements your comforting bowl of soup.

  • Crusty Bread: A warm, crusty loaf is perfect for dipping, bringing an irresistible texture that enhances each comforting sip.
  • Garlic Toast: Crispy, buttery bread topped with garlicky goodness adds a savory crunch, pairing excellently with the soup’s freshness.
  • Quinoa Salad: This light, protein-packed salad offers a refreshing contrast, balancing the warm, hearty soup with its cool, crisp ingredients.
  • Roasted Vegetables: Seasonal roasted veggies bring a caramelized sweetness that beautifully complements the earthy flavors in your High-Protein Vegetable Soup.
  • Simple Green Salad: Tossed greens with a light vinaigrette provide a vibrant, crunchy side that brightens up your cozy meal.
  • Sourdough Rolls: These tangy rolls are delightful for scooping up soup, while their unique flavor adds an exciting twist to the experience.
  • Herbal Tea: A warm cup of herbal tea offers a soothing finish, enhancing the comforting vibe of your soup dinner.
  • Dark Chocolate: For a sweet ending, a few pieces of quality dark chocolate bring a luxurious touch that satisfies your craving for something rich.

High-Protein Vegetable Soup

High-Protein Vegetable Soup Recipe FAQs

How do I choose the best vegetables for this soup?
Absolutely! Opt for fresh, vibrant vegetables for a delicious flavor. Look for firm carrots with smooth skin, crisp celery, and bell peppers that are shiny and unblemished. If you’re using kale, make sure its leaves are bright green without any dark spots or wilting.

How long can I store the High-Protein Vegetable Soup?
You can store the soup in an airtight container in the fridge for about 4-5 days. Make sure to let it cool completely before sealing it up to keep it fresh. If you’re not going to eat it within that timeframe, consider freezing it for later!

Can I freeze the soup for later use? If so, how?
Absolutely! To freeze, pour the cooled soup into airtight containers or sturdy freezer bags, leaving some space at the top for expansion—this is crucial! It can be stored for up to 3 months. When ready to enjoy, thaw it overnight in the fridge and reheat on the stovetop over low heat.

What should I do if the lentils are overcooked?
If your lentils turn mushy, don’t worry too much! For next time, ensure you’re simmering only until they’re tender, around 15 minutes. If it’s already too late, try blending a portion of the soup for a creamy texture or add additional chopped vegetables to create a bit more texture in the soup, which will help counter the overcooked lentils.

Is this soup suitable for people with allergies?
Very! This High-Protein Vegetable Soup is naturally vegan and gluten-free, making it an excellent option for many dietary needs. However, always check the ingredient labels for canned items like chickpeas and black beans to ensure they’re produced in allergen-free facilities if allergies are a concern. Also, be cautious with seasonings; some may contain allergens.

Can I add other proteins to this soup?
The more the merrier! If you’re looking to increase the protein content further, consider adding cooked chicken or turkey as it pairs well with the existing flavors. Just make sure to add it at the end to allow it to heat through without overcooking. You can also mix in some tofu or tempeh for a plant-based boost—it works wonderfully!

Savory High-Protein Vegetable Soup for Cozy Nights

This High-Protein Vegetable Soup is a nourishing delight, packed with lentils, chickpeas, and vibrant veggies. Perfect for cozy nights!

  • Large Pot

For the Soup Base

  • 1 tablespoon Olive oil (Adds rich flavor)
  • 1 medium Onion (Chopped)
  • 2 cloves Garlic (Minced)

For the Vegetables

  • 2 medium Carrots (Diced)
  • 2 stalks Celery (Diced)
  • 1 medium Red bell pepper (Diced)
  • 2 cups Kale (Chopped)
  • 1 cup Green beans (Trimmed and cut)
  • 1 cup Frozen peas

For the Protein

  • 1 cup Dried lentils (Rinsed and drained)
  • 1 can Chickpeas (Drained)
  • 1 can Black beans (Drained)

For Seasoning

  • 1 teaspoon Dried thyme
  • 1 teaspoon Dried basil
  • Salt (To taste)
  • Pepper (To taste)

For Garnishing

  • 2 tablespoons Fresh lemon juice
  • 1/4 cup Fresh parsley (Chopped)

Step‑by‑Step Instructions

  1. In a large pot, heat olive oil over medium heat. Add chopped onion and minced garlic. Sauté for 3-4 minutes until onion is translucent.
  2. Incorporate diced carrots, celery, and red bell pepper. Sauté for another 5 minutes until vegetables soften.
  3. Pour in vegetable broth and dried lentils. Bring to a boil, then reduce heat and simmer for 15 minutes.
  4. Add drained chickpeas, black beans, thyme, basil, salt, and pepper. Simmer for another 10 minutes.
  5. Stir in chopped kale, green beans, and frozen peas. Cook for an additional 5-7 minutes until vegetables are tender.
  6. Remove from heat and stir in fresh lemon juice and chopped parsley.
  7. Taste and adjust seasoning with additional salt or pepper if needed.
  8. Ladle soup into bowls and garnish with additional parsley. Serve hot.

This High-Protein Vegetable Soup is customizable. Feel free to swap veggies or add spices as per your taste.

Main Dishes
American
comfort food, Cozy Meal, Healthy Soup, High-Protein Vegetable Soup, vegetable soup, Winter Soup

Filed Under: Main Dishes

Irresistibly Creamy Baked Cheddar Mac-and-Cheese Delight

August 28, 2025 by grace bellamy Leave a Comment

As I stood in my kitchen, the savory aroma of melting cheese wafted through the air, taking me back to childhood dinners spent around the table. This Creamy Baked Cheddar Mac-and-Cheese is more than just comfort food—it’s a warm embrace after a long day. With a blend of sharp cheddar cheese and rich cream, this dish comes together in under an hour and guarantees smiles from family and friends alike. Plus, it’s incredibly forgiving; whether you’re hosting a dinner party or just need a cozy night in, this versatile recipe is your go-to solution. Curious about how to elevate your macaroni and cheese game to the next level? Let’s dive into the creamy goodness!

Creamy Baked Cheddar Mac-and-Cheese

Why is this mac-and-cheese unforgettable?

Indulgent Creaminess: There’s nothing quite like the rich, velvety texture of Creamy Baked Cheddar Mac-and-Cheese that envelops each bite, making every spoonful pure bliss.

Quick and Easy: With just 50 minutes from start to finish, you can whip up this delightful dish any night of the week!

Crowd-Pleasing Classic: This recipe brings smiles to faces big and small, making it a perfect choice for gatherings or cozy family dinners.

Flexibility to Customize: You can easily adapt this dish by adding your favorite ingredients, like crispy bacon or sautéed vegetables. Don’t forget to check out my tips on perfecting cheesy pasta!

Bold Flavor Profile: The blend of sharp cheddar and spices like smoked paprika adds a unique depth that elevates traditional mac-and-cheese to new heights.

Creamy Baked Cheddar Mac-and-Cheese Ingredients

For the Pasta
• Elbow macaroni – 12 ounces, as the perfect shape for trapping that delicious sauce!

For the Cheese Sauce
• Sharp cheddar cheese – 4 cups, divided; use a mix of aged cheddar for extra flavor!
• Whole milk – 2 cups, ensures a creamy consistency in your sauce.
• Heavy cream – 1 cup, adds extra richness that transforms this dish into a comfort classic.
• Unsalted butter – 1/4 cup, for a rich base of flavor in your roux.
• All-purpose flour – 1/4 cup, to thicken the cheese sauce perfectly.

Seasoning and Flavoring
• Salt – 1 teaspoon, brings out the flavors of the cheese and pasta.
• Freshly ground black pepper – 1/2 teaspoon, adds a subtle warmth that complements the dish.
• Dry mustard powder – 1/2 teaspoon, gives a delightful tang and depth to the flavor.
• Smoked paprika – 1/4 teaspoon, introduces a hint of smokiness that elevates the dish.

For the Topping
• Breadcrumbs (optional) – 1/4 cup, for that added crunch and texture contrast on top!

This delicious Creamy Baked Cheddar Mac-and-Cheese is ready to come together, promising a delightful experience for everyone at your table!

Step‑by‑Step Instructions for Creamy Baked Cheddar Mac-and-Cheese

Step 1: Preheat the Oven
Begin by preheating your oven to 350°F (175°C). While it warms up, take a moment to lightly grease a 9×13 inch baking dish with butter to prevent sticking. This step ensures your Creamy Baked Cheddar Mac-and-Cheese will slide right out when it’s done, making for easy serving.

Step 2: Cook the Pasta
In a large pot of boiling salted water, cook the elbow macaroni according to package directions, but be sure to drain it while it’s still slightly al dente—this will enhance the texture of your dish. Once cooked, drain the pasta and set it aside, as you’ll soon incorporate it into the creamy sauce.

Step 3: Make the Roux
In a large saucepan, melt the unsalted butter over medium heat. After it melts, whisk in the flour, cooking for about 1-2 minutes until bubbly but not browned; this creates a roux that will thicken your cheese sauce. Be sure to keep whisking to achieve a smooth consistency.

Step 4: Add the Dairy
Slowly begin adding the whole milk to the roux while whisking continuously to prevent lumps. Next, introduce the heavy cream, stirring until the mixture becomes smooth and slightly thickens, which should take around 3-5 minutes. This creamy base is the foundation of your Creamy Baked Cheddar Mac-and-Cheese.

Step 5: Season the Sauce
Once your sauce is thickened, stir in the salt, black pepper, dry mustard powder, and smoked paprika. Whisk everything together until evenly combined, allowing the spices to add a punch of flavor that elevates your dish. This stage is crucial for achieving that rich taste you’re aiming for.

Step 6: Incorporate the Cheese
Gradually add in 3 cups of the shredded sharp cheddar cheese to the saucepan, stirring well until the cheese melts and the sauce is irresistibly creamy. This cheesy goodness is what makes your Creamy Baked Cheddar Mac-and-Cheese truly special, ensuring every bite is packed with flavor.

Step 7: Combine the Macaroni and Cheese Sauce
Add the cooked macaroni to your cheese sauce, stirring gently to coat every piece of pasta evenly. Make sure each elbow has a good amount of that luscious texture, as this will contribute to the overall enjoyment of the dish when baked.

Step 8: Transfer to Baking Dish
Pour the macaroni and cheese mixture into your prepared baking dish, spreading it out evenly. Take the remaining 1 cup of shredded cheddar cheese and sprinkle it generously over the top. This will create a beautifully cheesy crust once baked, making your Creamy Baked Cheddar Mac-and-Cheese even more appealing.

Step 9: Add Breadcrumb Topping
If you opted for a crunchy topping, sprinkle the breadcrumbs evenly over the cheese layer. This layer will add a delightful texture contrast, providing a satisfying crunch for your guests to enjoy alongside the creamy goodness.

Step 10: Bake to Perfection
Slide the baking dish into your preheated oven and bake for 20-25 minutes. Look for the cheese to become bubbly and the top to turn a lovely golden brown, indicating that your Creamy Baked Cheddar Mac-and-Cheese is perfectly done and ready to serve.

Step 11: Let it Rest
Once out of the oven, allow your mac-and-cheese to cool for a few minutes before serving. This resting period lets the cheese sauce set slightly, making it easier to serve up hearty portions of this delicious classic.

Creamy Baked Cheddar Mac-and-Cheese

Creamy Baked Cheddar Mac-and-Cheese Variations

Feel free to mix and match these delightful twists to make the recipe your own!

  • Veggie Boost: Add sautéed spinach, mushrooms, or broccoli for a healthy twist that enhances flavor and adds nutrition.

  • Bacon Lovers: Incorporate crispy bacon bits into the pasta mixture for an irresistible smoky flavor that pairs beautifully with cheese. A simple delight!

  • Gluten-Free: Substitute elbow macaroni with gluten-free pasta to create a dish that’s inclusive without sacrificing taste or texture. Everyone deserves comfort food!

  • Spicy Kick: Sprinkle in red pepper flakes or diced jalapeños for a zesty heat that’ll excite your taste buds. Just a hint of spice makes everything nice!

  • Cream Cheese Addition: Mix in a few ounces of cream cheese with the cheddar for an ultra-creamy consistency that’s rich and delicious. It’s a creamy hug in a dish!

  • Herbed Variation: Add fresh herbs like thyme, parsley, or chives for a burst of freshness that elevates the dish. These green accents are a lovely visual and flavor enhancement.

  • Different Cheese: Swap some cheddar with Gruyère or mozzarella for a different flavor profile and texture. Experimenting with cheeses opens up new tasty horizons!

  • Nutty Crunch: Top with crushed nuts like almonds or pecans instead of breadcrumbs for a crunchy alternative that brings a surprising depth to the dish. A moment of unexpected joy in every bite!

How to Store and Freeze Creamy Baked Cheddar Mac-and-Cheese

Fridge: Store any leftover Creamy Baked Cheddar Mac-and-Cheese in an airtight container in the refrigerator for up to 3 days. Reheat in the microwave or oven until warmed through.

Freezer: Freeze portions of the baked mac-and-cheese in freezer-safe containers or bags for up to 3 months. Thaw overnight in the fridge before reheating.

Reheating: To reheat from the fridge, microwave in 30-second intervals until hot, or bake at 350°F (180°C) for about 15-20 minutes, covering with foil to prevent drying.

Serving Tips: For best texture upon reheating, add a splash of milk to the dish before warming; it helps bring back creaminess!

Make Ahead Options

These Creamy Baked Cheddar Mac-and-Cheese are perfect for meal prep enthusiasts! You can prepare the cheese sauce and cooked macaroni up to 24 hours in advance. Just make the sauce, mix it with the pasta, and then transfer it into your baking dish without adding the final cheese topping. Cover tightly with plastic wrap and refrigerate. When you’re ready to bake, simply take it out, sprinkle on the remaining cheese, and bake as directed—this will ensure the dish is just as delicious and fresh. If you need to prep even further ahead, you can freeze the assembled mac-and-cheese for up to 3 months! Just thaw in the refrigerator overnight before baking. This makes weeknight dinners a breeze!

What to Serve with Creamy Baked Cheddar Mac-and-Cheese

As you savor each creamy bite of this mac-and-cheese, let’s explore delightful additions that will round out the meal beautifully.

  • Garlicky Green Beans: These tender beans with a hint of garlic add a fresh and vibrant contrast to the rich mac-and-cheese.

  • Crispy Bacon-Wrapped Brussels Sprouts: The salty crunch of bacon complements the creaminess perfectly, bringing a delightful twist to your dinner plate.

  • Tangy Coleslaw: A zesty coleslaw topped with a light vinaigrette cuts through the richness, providing a bright and crunchy side that everyone will love.

  • Roasted Veggies: A medley of seasonal veggies adds earthy flavors and colors to your meal, enhancing the overall experience with balanced nutrition.

  • Buttery Corn on the Cob: Sweet, juicy corn slathered in butter brings a classic touch to your table, making it the perfect companion for your mac-and-cheese.

  • Chilled White Wine: A crisp, chilled Sauvignon Blanc or Chardonnay harmonizes the dish with its refreshing acidity, making every bite even more enjoyable.

  • Chocolate Chip Cookies: End on a sweet note with warm cookies; the gooey chocolate perfectly pairs with the creamy overlay of your mac-and-cheese, leaving guests craving more!

Expert Tips for Creamy Baked Cheddar Mac-and-Cheese

Perfectly Cooked Pasta: Ensure your elbow macaroni is cooked al dente; it will absorb some sauce as it bakes, keeping the pasta from becoming mushy.

Cheese Varieties: Experiment with a blend of cheeses; mixing sharp cheddar with Gruyère or fontina can add more depth and flavor to your Creamy Baked Cheddar Mac-and-Cheese.

Avoid Lumpy Sauce: Whisk continuously while adding the milk to your roux. This helps prevent lumps, ensuring a silky smooth cheese sauce.

Test Doneness: Keep an eye on the baking time; the cheese should be bubbly and golden brown. Use a toothpick to check if the mixture is hot throughout.

Resting Time: Let the baked mac-and-cheese sit for a few minutes before serving. This makes it easier to scoop and helps meld the flavors perfectly!

Creamy Baked Cheddar Mac-and-Cheese

Creamy Baked Cheddar Mac-and-Cheese Recipe FAQs

How do I choose the best cheese for my mac-and-cheese?
Absolutely! For the creamiest Creamy Baked Cheddar Mac-and-Cheese, I recommend using sharp cheddar for its bold flavor. Mixing in cheeses like Gruyère or fontina can also give an incredible depth. Always opt for freshly shredded cheese, as pre-shredded varieties often contain anti-caking agents that can affect creaminess.

What’s the best way to store leftover mac-and-cheese?
Very simple! Store any leftover Creamy Baked Cheddar Mac-and-Cheese in an airtight container in the refrigerator, and enjoy it within 3 days. Just make sure it’s cooled down before sealing, as this helps prevent condensation and keeps it fresh.

Can I freeze mac-and-cheese, and how?
Absolutely! To freeze your Creamy Baked Cheddar Mac-and-Cheese, let it cool completely before transferring it to freezer-safe containers or bags. It should stay fresh for up to 3 months. When you’re ready to enjoy it, simply thaw it overnight in the fridge, then reheat until warm throughout.

What should I do if my cheese sauce turned lumpy?
Don’t worry! If your cheese sauce goes lumpy, it’s usually due to adding cheese too quickly or not whisking enough while adding milk. To fix it, try blending the sauce with an immersion blender until smooth. Just be sure to continuously whisk when you make your roux and add dairy to prevent it from happening next time.

Are there any dietary considerations I should take into account?
Absolutely! If you’re cooking for someone with lactose intolerance, consider using lactose-free milk and cheddar cheese. Additionally, for a gluten-free option, swap the all-purpose flour with a gluten-free flour blend. Always double-check labels for any allergies, especially for those who may be sensitive to dairy or certain cheese ingredients.

How can I achieve a crispy topping on my mac-and-cheese?
Very easily! For a crunchy topping, sprinkle breadcrumbs over the mac-and-cheese before baking. You can also mix the breadcrumbs with a little melted butter for extra flavor and crispness. Bake as directed, and you’ll have a delicious crunch on top to contrast with the creamy goodness below!

Irresistibly Creamy Baked Cheddar Mac-and-Cheese Delight

This Creamy Baked Cheddar Mac-and-Cheese is the ultimate comfort food, with indulgent flavors that guarantee smiles from family and friends.

  • 9×13-inch baking dish
  • Large Pot
  • Large Saucepan
  • Whisk

For the Pasta

  • 12 ounces elbow macaroni (perfect shape for trapping sauce)

For the Cheese Sauce

  • 4 cups sharp cheddar cheese (divided; mix of aged cheddar for extra flavor)
  • 2 cups whole milk (ensures creamy consistency)
  • 1 cup heavy cream (adds extra richness)
  • 1/4 cup unsalted butter (rich base of flavor for roux)
  • 1/4 cup all-purpose flour (to thicken the cheese sauce)

Seasoning and Flavoring

  • 1 teaspoon salt (brings out flavors of cheese and pasta)
  • 1/2 teaspoon freshly ground black pepper (adds subtle warmth)
  • 1/2 teaspoon dry mustard powder (adds delightful tang)
  • 1/4 teaspoon smoked paprika (introduces hint of smokiness)

For the Topping

  • 1/4 cup breadcrumbs (optional for added crunch)

Step‑by‑Step Instructions

  1. Preheat your oven to 350°F (175°C) and lightly grease a 9×13 inch baking dish with butter.
  2. In a large pot of boiling salted water, cook the elbow macaroni until slightly al dente. Drain and set aside.
  3. In a large saucepan, melt the unsalted butter over medium heat. Whisk in the flour and cook for 1-2 minutes to create a roux.
  4. Slowly add the whole milk to the roux while whisking continuously, then introduce the heavy cream, stirring until smooth and slightly thickened.
  5. Stir in the salt, black pepper, dry mustard powder, and smoked paprika until evenly combined.
  6. Gradually add 3 cups of shredded sharp cheddar cheese to the saucepan, stirring until melted and the sauce is creamy.
  7. Add the cooked macaroni to the cheese sauce, stirring gently to coat evenly.
  8. Pour the macaroni and cheese mixture into the prepared baking dish and sprinkle the remaining 1 cup of cheddar cheese over the top.
  9. If using breadcrumbs, sprinkle them evenly over the cheese layer.
  10. Bake for 20-25 minutes until bubbly and golden brown.
  11. Let it rest for a few minutes before serving to allow the cheese sauce to set.

For best texture upon reheating, add a splash of milk to the dish before warming to bring back creaminess.

Main Dishes
American
baked pasta, cheesy pasta, comfort food, Creamy Baked Cheddar Mac-and-Cheese, family recipe

Filed Under: Main Dishes

Rustic Sweet Baked Strawberry Pie for Cozy Moments at Home

August 28, 2025 by grace bellamy Leave a Comment

As I pulled the pie from the oven, a wave of nostalgia washed over me—a reminder of summer afternoons spent in my grandmother’s kitchen. This Rustic Sweet Baked Strawberry Pie isn’t just a dessert; it’s a heartfelt experience that transforms simple ingredients into a celebration of sweetness and warmth. With juicy, fresh strawberries shining brightly through a golden crust, this recipe captures the essence of homemade goodness. What I love most is how quick the prep time is, making it a perfect choice for entertaining friends or indulging in a cozy family dessert. Plus, it’s a crowd-pleaser that can turn any meal into a special occasion! You won’t believe how a scoop of vanilla ice cream elevates each slice into pure bliss. Are you ready to dive into the delightful world of baking? Let’s create some sweet memories together!

Rustic Sweet Baked Strawberry Pie

Why is this pie so irresistible?

Heartwarming flavors: This Rustic Sweet Baked Strawberry Pie brings back fond memories of family gatherings and summer picnics. Quick prep time makes it perfect for last-minute dessert needs—your friends will think you spent all day baking! Versatility shines through; serve it as a delightful dessert, or enjoy it at breakfast with a dollop of yogurt. Gorgeous presentation: Its golden crust and vibrant strawberry filling will dazzle any dinner table. For an extra touch, consider pairing a slice with homemade whipped cream or even a scoop of ice cream, just like my grandma did!

Rustic Sweet Baked Strawberry Pie Ingredients

For the Pie Crust
• All-purpose flour – 2 ½ cups to create a tender and flaky crust.
• Granulated sugar – 1 tbsp for a hint of sweetness in the dough.
• Salt – 1 tsp to enhance the overall flavor balance.
• Unsalted butter – 1 cup, chilled and cubed for a rich, buttery flavor.
• Ice water – 6-8 tbsp helps bind the ingredients without warming the butter.

For the Strawberry Filling
• Fresh strawberries – 4 cups, hulled and halved, for that beautiful, juicy filling.
• Granulated sugar – ¾ cup; adjust depending on the sweetness of your berries.
• Corn starch – 3 tbsp to thicken the filling and keep it from being runny.
• Freshly squeezed lemon juice – 1 tbsp brightens the flavors of the strawberries.
• Vanilla extract – 1 tsp adds a delightful warmth to the filling.

For Assembling
• Unsalted butter – 1 tbsp, cut into small pieces to dot the pie filling for extra richness.
• Egg – 1 beaten, for a golden egg wash on the crust.
• Turbinado sugar – 1 tbsp (optional) for a delightful crunch on top.

This Rustic Sweet Baked Strawberry Pie can transform any day into a special occasion with its delightful flavors!

Step‑by‑Step Instructions for Rustic Sweet Baked Strawberry Pie

Step 1: Prepare the Pie Crust
In a large bowl, combine 2 ½ cups of all-purpose flour, 1 tablespoon of granulated sugar, and 1 teaspoon of salt. Add 1 cup of chilled, cubed unsalted butter, using a pastry cutter or your fingers to blend until the mixture resembles coarse crumbs, about 5–7 minutes.

Step 2: Form the Dough
Gradually add 6–8 tablespoons of ice water, one tablespoon at a time, mixing gently with a fork until the dough begins to hold together. You want a soft, yet manageable dough that doesn’t stick excessively. Once formed, divide the dough into two discs, wrap each in plastic wrap, and refrigerate for at least 1 hour.

Step 3: Preheat the Oven
While your dough chills, preheat your oven to 375°F (190°C). This ensures that your Rustic Sweet Baked Strawberry Pie bakes evenly and develops a beautifully golden crust. Gather your ingredients for the filling to streamline the process once the dough is ready.

Step 4: Mix the Strawberry Filling
In a large mixing bowl, combine 4 cups of hulled and halved fresh strawberries with ¾ cup of granulated sugar, 3 tablespoons of corn starch, 1 tablespoon of freshly squeezed lemon juice, and 1 teaspoon of vanilla extract. Stir gently for a few minutes until the strawberries are well-coated and start to release their juices.

Step 5: Roll Out the Crust
Take one of the chilled dough discs and roll it out on a floured surface to fit your pie pan. You’re aiming for about 1/8-inch thickness. Carefully transfer the rolled crust into the pan, pressing it snugly into the edges to avoid cracking.

Step 6: Fill the Pie
Pour the strawberry filling into the crust, making sure to distribute it evenly. Dot the filling with small pieces of 1 tablespoon of unsalted butter for added richness. This will enhance the flavor as it bakes, making every bite of your Rustic Sweet Baked Strawberry Pie delectable.

Step 7: Add the Top Crust
Roll out the second disc of dough and lay it over the strawberry filling. Trim any excess dough hanging over the edges of the pie, leaving about 1 inch, and then crimp the edges to seal the pie securely. This prevents any filling from leaking during baking.

Step 8: Vent the Pie
Using a sharp knife, cut slits into the top of the pie for venting. These slits allow steam to escape during baking, giving you that perfectly baked Rustic Sweet Baked Strawberry Pie. Arrange the slits in a fun pattern for an attractive finish.

Step 9: Apply the Egg Wash
Brush the dough generously with 1 beaten egg for a shiny, golden crust. If desired, sprinkle 1 tablespoon of turbinado sugar on top for a delightful crunch. The sweetness and texture it adds will elevate the appearance and flavor of your pie.

Step 10: Bake the Pie
Place your pie on a baking sheet to catch any drips, and bake in the preheated oven for 45–55 minutes. You’ll know it’s ready when the crust turns a beautiful golden brown and the filling bubbles up through the slits.

Step 11: Cool Before Serving
Once baked, remove the pie from the oven and let it cool on a wire rack for at least 30 minutes. This cooling period allows the filling to set, making your Rustic Sweet Baked Strawberry Pie easier to slice and serve. Enjoy it warm or at room temperature!

Rustic Sweet Baked Strawberry Pie

Rustic Sweet Baked Strawberry Pie Customizations

Embrace your creativity by personalizing this pie recipe to suit your taste and dietary needs!

  • Gluten-Free Base: Replace all-purpose flour with a gluten-free flour blend for a pie crust everyone can enjoy. A simple swap can open up new possibilities!
  • Berry Mix: Feel free to substitute some strawberries with blueberries or raspberries for a mixed berry pie that bursts with flavor. Each berry offers a distinct sweetness that elevates the dish!
  • Sweetener Swap: Use honey or maple syrup in place of granulated sugar for a natural sweetness profile. Not only does this enhance the flavor, but it also provides a touch of warmth.
  • Add a Spice: Sprinkle in a pinch of cinnamon or nutmeg to the strawberry filling for a cozy, spiced flavor that adds an aromatic twist. Your kitchen will smell heavenly as it bakes!
  • Coconut Oil: Substitute unsalted butter with coconut oil for a dairy-free, vegan version. The subtle coconut flavor offers a unique, tropical flair that you won’t forget.
  • Zesty Upgrade: Enhance the brightness by adding lime zest to the filling along with the lemon juice. This twist can amplify the pie’s freshness and make it truly memorable!
  • Heat Booster: Add a pinch of cayenne pepper to the strawberry filling for a surprising kick. This spicy twist complements the sweetness beautifully.
  • Crust Variations: Experiment with a crumble topping instead of a top crust for added texture. A simple mix of oats, brown sugar, and butter creates a delightful crunch that everyone will love!

Each variation offers a fresh take that can turn this Rustic Sweet Baked Strawberry Pie into a new family favorite. Enjoy the journey of creating your own sweet memories together!

Make Ahead Options

These Rustic Sweet Baked Strawberry Pies are perfect for meal prep enthusiasts! You can prepare the pie crust up to 3 days in advance. Simply follow the pie crust instructions until the dough is formed, wrap it in plastic wrap, and refrigerate. The strawberry filling can be prepared up to 24 hours ahead; store it in an airtight container in the refrigerator to maintain freshness. When you’re ready to bake, simply roll out the chilled crust, assemble your pie, and bake as directed. This way, you can enjoy homemade goodness with minimal last-minute effort, and your pie will taste just as delicious!

What to Serve with Rustic Sweet Baked Strawberry Pie

There’s nothing quite like finishing a meal with a slice of pie, especially when paired with complementary flavors and textures.

  • Vanilla Ice Cream: A classic pairing that adds a creamy contrast to the sweet, juicy filling while keeping it refreshingly cool.
  • Whipped Cream: Light and fluffy, it enhances the pie’s flavors without overpowering them, making each bite heavenly.
  • Mint-infused Tea: The herbal notes cleanse the palate beautifully, elevating the strawberry flavors and bringing a soothing finish to your meal.
  • Lemon Slices: A tangy accompaniment, they brighten each bite and add a refreshing zest that complements the sweetness of the strawberries.
  • Cheese Platter: Think of tangy goat cheese or rich brie; the creaminess balances out the pie’s sweetness and adds savory depth to the experience.
  • Shortbread Cookies: Their buttery crunch pairs deliciously with the soft, luscious pie, creating a delightful contrast in textures while enhancing the indulgence.
  • Fresh Fruit Salad: A medley of seasonal fruits introduces freshness and a burst of color that harmonizes beautifully with the pie’s flavors.
  • Sparkling Rosé: A bubbly and slightly sweet wine enhances the celebration vibe, making your dessert feel like a very special occasion.

Expert Tips for Rustic Sweet Baked Strawberry Pie

Chill Your Ingredients: Always use cold butter and water for the dough. This helps create a flaky crust by preventing the butter from melting into the flour.

Don’t Overmix: When combining your crust ingredients, mix just until the dough holds together. Overmixing can result in a tough pie crust instead of a tender one.

Taste Your Berries: Adjust the amount of sugar in the filling based on the sweetness of your strawberries. Fresh, peak-season berries might need less sugar for the perfect balance in your Rustic Sweet Baked Strawberry Pie.

Be Generous with the Butter: Dotting the filling with butter enhances the flavor, so don’t skimp! It helps elevate the richness of each bite.

Use a Baking Sheet: Place the pie on a baking sheet to catch any potential spills while baking. This will save you from a messy oven cleanup and allow for even heat circulation.

How to Store and Freeze Rustic Sweet Baked Strawberry Pie

Room Temperature: Allow the pie to cool completely, then cover it with a clean kitchen towel. It can be stored at room temperature for up to 2 days.

Fridge: For longer storage, keep the pie in an airtight container in the refrigerator. It will stay fresh for up to 4 days, ensuring you can enjoy its delightful goodness!

Freezer: You can freeze the Rustic Sweet Baked Strawberry Pie for up to 3 months. Wrap it tightly in plastic wrap and aluminum foil to avoid freezer burn.

Reheating: To enjoy your pie warm, reheat it in a preheated oven at 350°F (175°C) for about 15–20 minutes. This helps restore its delightful crispness.

Rustic Sweet Baked Strawberry Pie

Rustic Sweet Baked Strawberry Pie Recipe FAQs

How do I choose the best strawberries for my pie?
Select fresh strawberries that are bright red, plump, and free of dark spots or blemishes. The best berries are fragrant and firm to the touch. If they’re overly soft or have dark spots all over, they may be overripe or starting to spoil. Aim for ripe strawberries with a sweet aroma, as they will provide the best flavor for your Rustic Sweet Baked Strawberry Pie!

How should I store leftover pie?
After cooling completely, cover your Rustic Sweet Baked Strawberry Pie with a clean kitchen towel and store it at room temperature for up to 2 days. Alternatively, place it in an airtight container in the refrigerator, where it will last for up to 4 days. This way, you can savor those delightful strawberry flavors even after the pie has been baked!

Can I freeze my Strawberry Pie?
Absolutely! To freeze your Rustic Sweet Baked Strawberry Pie, allow it to cool completely first. Wrap it tightly in plastic wrap followed by aluminum foil to prevent freezer burn. It can be frozen for up to 3 months. When you’re ready to enjoy it, thaw overnight in the fridge and then reheat in a preheated oven at 350°F (175°C) for 15–20 minutes for that fresh-out-of-the-oven taste!

What should I do if my pie crust is too tough?
If your crust turns out tough, it’s usually due to overmixing or using warm ingredients. To prevent this, mix the dough just until it holds together and always use chilled butter and ice water. If you find yourself with a tough crust, try rolling it out gently or consider serving it with a little extra whipped cream on the side to soften the texture!

Is this pie suitable for those with dietary restrictions?
The Rustic Sweet Baked Strawberry Pie contains dairy from butter and egg, making it unsuitable for those with dairy allergies. However, you can easily substitute non-dairy butter and replace the egg with an egg wash alternative, such as almond milk or a mix of flour and water for a golden crust. Always check for nut allergies based on your ingredient selections!

Can I use frozen strawberries instead?
Very much! If fresh strawberries aren’t available, you can substitute them with frozen strawberries. Make sure to thaw and drain them thoroughly to prevent excess moisture from making the filling runny. You might want to add a bit more corn starch to help thicken the filling if using frozen berries in your Rustic Sweet Baked Strawberry Pie. Enjoy the deliciousness!

Rustic Sweet Baked Strawberry Pie for Cozy Moments at Home

Experience the nostalgia and delight of a Rustic Sweet Baked Strawberry Pie, perfect for summer desserts.

  • Mixing Bowl
  • Pie pan
  • Rolling Pin
  • Pastry cutter

For the Pie Crust

  • 2.5 cups All-purpose flour (to create a tender and flaky crust)
  • 1 tbsp Granulated sugar (for a hint of sweetness in the dough)
  • 1 tsp Salt (to enhance the overall flavor balance)
  • 1 cup Unsalted butter (chilled and cubed for a rich, buttery flavor)
  • 6-8 tbsp Ice water (helps bind the ingredients without warming the butter)

For the Strawberry Filling

  • 4 cups Fresh strawberries (hulled and halved for that beautiful, juicy filling)
  • 0.75 cup Granulated sugar (adjust depending on the sweetness of your berries)
  • 3 tbsp Corn starch (to thicken the filling and keep it from being runny)
  • 1 tbsp Freshly squeezed lemon juice (brightens the flavors of the strawberries)
  • 1 tsp Vanilla extract (adds a delightful warmth to the filling)

For Assembling

  • 1 tbsp Unsalted butter (cut into small pieces to dot the pie filling for extra richness)
  • 1 each Egg (beaten for a golden egg wash on the crust)
  • 1 tbsp Turbinado sugar (optional for a delightful crunch on top)

Step-by-Step Instructions

  1. In a large bowl, combine 2 ½ cups of all-purpose flour, 1 tablespoon of granulated sugar, and 1 teaspoon of salt. Add 1 cup of chilled, cubed unsalted butter, using a pastry cutter or your fingers to blend until the mixture resembles coarse crumbs, about 5–7 minutes.
  2. Gradually add 6–8 tablespoons of ice water, one tablespoon at a time, mixing gently with a fork until the dough begins to hold together. Once formed, divide the dough into two discs, wrap each in plastic wrap, and refrigerate for at least 1 hour.
  3. While your dough chills, preheat your oven to 375°F (190°C). Gather your ingredients for the filling.
  4. In a large mixing bowl, combine 4 cups of hulled and halved fresh strawberries with ¾ cup of granulated sugar, 3 tablespoons of corn starch, 1 tablespoon of freshly squeezed lemon juice, and 1 teaspoon of vanilla extract. Stir gently until the strawberries are well-coated.
  5. Roll out one of the chilled dough discs on a floured surface to fit your pie pan, aiming for about 1/8-inch thickness. Transfer the rolled crust into the pan, pressing it snugly into the edges.
  6. Pour the strawberry filling into the crust, distributing it evenly. Dot the filling with pieces of 1 tablespoon of unsalted butter.
  7. Roll out the second disc of dough and lay it over the filling. Trim any excess dough and crimp the edges to seal the pie.
  8. Cut slits into the top of the pie for venting.
  9. Brush the dough with 1 beaten egg for a shiny crust, and sprinkle 1 tablespoon of turbinado sugar if desired.
  10. Place the pie on a baking sheet and bake for 45–55 minutes, until the crust is golden brown and the filling bubbles up.
  11. Once baked, cool the pie on a wire rack for at least 30 minutes before slicing.

Chill your ingredients and don’t overmix the dough for best results.

Dessert
American
baked pie, comfort food, dessert, homemade pie, Rustic Sweet Baked Strawberry Pie, strawberry pie

Filed Under: Dessert

Savory Cold Teriyaki Noodles Salad for a Refreshing Bite

August 28, 2025 by grace bellamy Leave a Comment

The sun was setting over my kitchen window as I tossed together colorful vegetables, the vibrant hues reminding me that a good meal can brighten even the dullest days. Today, I’m thrilled to share my simple yet refreshing Cold Teriyaki Noodles Salad, perfect for those who crave something light yet satisfying. With just a quick 15 minutes of prep time, you’ll have a beautiful dish that’s not only a crowd-pleaser but also a healthy alternative to fast food. Imagine delightful soba noodles mingling with crisp snap peas, sweet red bell peppers, and the perfect umami dressing that ties it all together. Whether you’re enjoying a quiet dinner or entertaining friends, this dish will have everyone asking for seconds! What’s your favorite way to spice up a salad?

Cold Teriyaki Noodles Salad

Why is this salad a must-try?

Simplicity at its core: With only 15 minutes of prep, you can whip up this delicious Cold Teriyaki Noodles Salad without breaking a sweat. Bursting with flavor: The umami-rich dressing combined with fresh vegetables creates an explosion of taste in every bite. Versatile options: Add your favorite protein like chicken, tofu, or shrimp to customize it further! Eye-catching and colorful: This dish is as visually appealing as it is tasty, making it perfect for gatherings. Health-conscious alternative: Packed with nutritious ingredients, it’s a satisfying choice that beats takeout any day!

Cold Teriyaki Noodles Salad Ingredients

• Get ready to whip up a delightful dish!

For the Noodles

  • Soba noodles or rice noodles – Either option works perfectly for a delicious base in this Cold Teriyaki Noodles Salad.

For the Vegetables

  • Shredded carrots – Adds a crunchy texture and a bright pop of color.
  • Red bell pepper – Sweet and crisp, this ingredient brings a lovely freshness to your salad.
  • Snap peas – Their tender crispness elevates the dish with a delightful snap.
  • Chopped green onions – Adds a mild onion flavor that complements the other veggies.

For the Dressing

  • Soy sauce – A key ingredient that gives the salad its rich umami flavor.
  • Teriyaki sauce – Enhances the sweetness and depth of the overall dressing.
  • Rice vinegar – Provides a contrasting tanginess that balances the flavors.
  • Sesame oil – Adds a warm, nutty aroma to your dressing.
  • Honey or maple syrup – A touch of sweetness to round out the savory elements.
  • Freshly grated ginger – Brings a vibrant zing that brightens up every bite.

For the Garnish

  • Toasted sesame seeds – Adds a crunchy texture and nutty flavor to finish off your salad.
  • Chopped fresh cilantro – Provides a fresh, herbaceous note that elevates the salad.

Optional Protein

  • Cooked chicken, tofu, or shrimp – Toss in these for a satisfying boost to your Cold Teriyaki Noodles Salad!

Step‑by‑Step Instructions for Cold Teriyaki Noodles Salad

Step 1: Cook the Noodles
Begin by cooking the soba or rice noodles according to package instructions, usually about 4-5 minutes in boiling water. Once tender but still slightly firm, drain the noodles and rinse them under cold water to stop the cooking process. This helps them retain their texture. Set the cooled noodles aside in a large mixing bowl, ready to mingle with fresh ingredients.

Step 2: Prepare the Vegetables
In the same large mixing bowl, combine the shredded carrots, thinly sliced red bell pepper, snap peas, and chopped green onions. Use your hands or a sturdy spatula to toss them together gently, ensuring the vibrant colors and textures are nicely mixed. This salad will be a feast for the eyes as well as the palate, so make it cheerful and inviting!

Step 3: Mix the Dressing
In a small bowl, whisk together the soy sauce, teriyaki sauce, rice vinegar, sesame oil, honey (or maple syrup), and freshly grated ginger. Blend these ingredients until well combined to create a rich, umami-packed dressing. The aromas will be fragrant and enticing, setting the stage for the delicious flavors in your Cold Teriyaki Noodles Salad.

Step 4: Combine Dressing and Vegetables
Pour the dressing over the mixed vegetables in your large bowl. Using a wooden spoon or spatula, toss everything together thoroughly to ensure that all the vegetables are well-coated with the dressing. This step brings out the vibrant flavors of the salad, making each bite more delicious and satisfying.

Step 5: Add the Noodles
Now it’s time to introduce the cooked and cooled noodles to your vibrant vegetable mixture. Gently fold the noodles into the salad using a spatula, being careful not to break them apart. Continue mixing until every ingredient is evenly coated in the flavorful dressing, transforming it into a beautiful Cold Teriyaki Noodles Salad that is ready to impress.

Step 6: Garnish and Finish
Sprinkle the toasted sesame seeds and chopped fresh cilantro over the top of your salad. Using a light hand, give everything a gentle toss to integrate these garnishes without losing the textures of your ingredients. The sesame seeds will provide a delightful crunch, while the cilantro adds a fresh, aromatic note to your Cold Teriyaki Noodles Salad.

Step 7: Add Protein (Optional)
If desired, now is the perfect moment to incorporate cooked chicken, tofu, or shrimp for a hearty touch. Simply fold your choice of protein into the salad, mixing gently to keep everything intact. This optional step turns your salad into a more substantial meal, ideal for satisfying hungry family members or guests.

Step 8: Serve
Transfer your beautiful Cold Teriyaki Noodles Salad to a serving platter or portion it into individual bowls. If you prefer, you can refrigerate it for about an hour to allow the flavors to meld together even more. Whether served immediately or after a chill in the fridge, this salad promises a refreshing and tasty experience that everyone will love.

Cold Teriyaki Noodles Salad

Cold Teriyaki Noodles Salad Variations

Feel free to make this delightful Cold Teriyaki Noodles Salad your own with these exciting twists tailored for every palate!

  • Gluten-Free: Swap soba noodles for rice noodles or spiralized zucchini. This keeps the dish delicious and approachable for gluten sensitivities.

  • Spicy Kick: Stir in some Sriracha or red pepper flakes to your dressing for an extra zing that will ignite your taste buds.

  • Crunchy Textures: Toss in chopped cashews or peanuts for a delightful crunch that contrasts beautifully with the smooth noodles and vegetables.

  • Herbaceous Twist: Instead of cilantro, experiment with chopped basil or mint for a refreshing herbal note that adds vibrancy to the dish.

  • Thai Inspiration: Incorporate some sliced Thai chili peppers and substitute the soy sauce with tamari for a unique Thai flavor profile.

  • Creamy Finish: Drizzle some creamy tahini or peanut butter over the top just before serving for an indulgent richness that complements the dressing.

  • Protein-Packed: For a heartier meal, add grilled chicken marinated in lemon and garlic or crispy tofu for a satisfying vegetarian option.

  • Savory Additions: Mix in sautéed mushrooms or roasted red peppers for a gourmet twist that adds depth and umami to your salad.

These variations not only make the Cold Teriyaki Noodles Salad a versatile delight but also invite you to bring your creativity to the table. Enjoy experimenting with flavors and remember to check out some delicious sides like Japanese Cucumber Salad or some spicy Asian Chicken Skewers to complete your meal!

How to Store and Freeze Cold Teriyaki Noodles Salad

Fridge: Store your Cold Teriyaki Noodles Salad in an airtight container for up to 3 days. The flavors will deepen, making it even tastier as it sits.

Freezer: While it’s best fresh, any leftover salad can be frozen for up to 1 month. However, avoid freezing vegetables like snap peas as they may become mushy upon thawing.

Reheating: If you’ve added protein, heat it separately before serving to enhance flavor. This salad is best enjoyed cold, so consider a quick chill for an amazing refreshing bite!

Serving suggestion: Fresh or after chilling, ensure to toss gently before serving to reinvigorate those lovely flavors and textures!

Expert Tips for Cold Teriyaki Noodles Salad

  • Proper Noodle Cooking: Ensure the soba or rice noodles are cooked just until tender, then rinse them under cold water. This prevents them from becoming mushy in your Cold Teriyaki Noodles Salad.

  • Flavor Infusion: Allow the salad to rest in the refrigerator for at least one hour. This helps the flavors meld beautifully, enhancing the overall taste profile.

  • Veggie Variations: Feel free to swap out vegetables based on what you have on hand. Zucchini, cucumbers, or even shredded cabbage can add a refreshing twist to your Cold Teriyaki Noodles Salad.

  • Protein Add-ins: If adding protein, ensure it’s cooked and seasoned properly. This will elevate the dish without competing with the salad’s overall flavor.

  • Garnish with Care: When adding toasted sesame seeds and cilantro, be gentle. You want to enhance your Cold Teriyaki Noodles Salad without overpowering its delicate crunch.

  • Taste Test: Before serving, always taste your dressing and adjust sweetness or tanginess according to your preference. This ensures that each bite is just right!

Make Ahead Options

These Cold Teriyaki Noodles Salad components are perfect for meal prep, saving you precious time during busy weeknights! You can prepare the vegetables (shredded carrots, sliced red bell pepper, snap peas, and green onions) up to 3 days in advance. Store them in an airtight container in the refrigerator to maintain freshness. Additionally, you can whisk the dressing ingredients together and refrigerate it for up to 5 days. When you’re ready to serve, simply cook the noodles and combine everything in a large bowl. Toss the salad with the dressing and enjoy restaurant-quality results at home with minimal effort!

What to Serve with Cold Teriyaki Noodles Salad

The perfect complement to your refreshing salad awaits, inviting you to create an unforgettable meal.

  • Grilled Chicken Skewers: Juicy and savory, they add a heartiness that balances the salad’s freshness beautifully. Perfect for those who crave protein!

  • Crispy Spring Rolls: These crunchy delights provide a satisfying texture, while their dipping sauce enhances the umami flavors found in your Cold Teriyaki Noodles Salad.

  • Sesame Roasted Broccoli: Tossed in sesame oil, this dish mirrors the nutty flavors in your salad, elevating your meal with a deliciously crunchy side.

  • Miso Soup: Light and comforting, a warm bowl of miso soup complements the salad perfectly, creating a harmonious balance between hot and cold.

  • Coconut Mango Sticky Rice: A sweet and creamy dessert that contrasts the salad’s savory profile while adding a tropical flair to your dining experience.

  • Chilled Green Tea: Refreshing and light, this drink pairs well with the zingy flavors of the salad, making it a lovely choice for any meal.

Each pairing invites you to explore textures and flavors, crafting a dining experience filled with joy and connection. Enjoy your meal!

Cold Teriyaki Noodles Salad

Cold Teriyaki Noodles Salad Recipe FAQs

How do I choose the best vegetables for this salad?
Absolutely! When selecting vegetables for your Cold Teriyaki Noodles Salad, look for vibrant, fresh produce. Choose carrots that are firm without dark spots, snap peas that are bright green, and red bell peppers that feel heavy for their size. Fresh ingredients are key to elevating the flavor and texture of your dish. If you have other veggies on hand, feel free to get creative!

How should I store my Cold Teriyaki Noodles Salad?
Store your salad in an airtight container in the refrigerator for up to 3 days. The flavors will continue to blend beautifully, enhancing the taste. Make sure to give it a gentle toss before serving to refresh those flavors!

Can I freeze the Cold Teriyaki Noodles Salad?
While it’s best enjoyed fresh, you can freeze leftover salad for up to 1 month. Keep in mind that the texture of snap peas may become mushy upon thawing, so it’s best to freeze only the noodles and dressing, which can be added back to freshly prepared vegetables after thawing.

What can I do if the noodles become mushy?
Very! If your noodles turn mushy, it’s usually due to overcooking. To avoid this, cook the noodles just until tender, then rinse them under cold water immediately. This stops the cooking process and helps them maintain their texture. If they still turn out mushy, consider using a fresh batch of noodles next time!

Is this salad suitable for those with dietary restrictions?
The Cold Teriyaki Noodles Salad is quite versatile! If you have allergies, you can easily substitute soy sauce with a gluten-free option or use tamari. For those avoiding honey, maple syrup is a great alternative. Just be mindful of any proteins you add; ensure they suit your guests’ dietary needs. Enjoy customizing it to suit everyone at the table!

Can this salad be made vegan?
Absolutely! This salad is inherently plant-based if you skip the optional protein. Simply use maple syrup instead of honey in the dressing, and you’ll have a delightful vegan Cold Teriyaki Noodles Salad that everyone will enjoy!

Savory Cold Teriyaki Noodles Salad for a Refreshing Bite

Enjoy a refreshing Cold Teriyaki Noodles Salad, bursting with colorful vegetables and umami flavors, perfect for light meals or gatherings.

  • large mixing bowl
  • small bowl
  • wooden spoon or spatula

For the Noodles

  • 8 oz soba noodles or rice noodles (Either option works for this salad.)

For the Vegetables

  • 1 cup shredded carrots (Adds crunchy texture.)
  • 1 cup red bell pepper (Thinly sliced, adds freshness.)
  • 1 cup snap peas (Tender and crisp.)
  • 1 4 chopped green onions (Mild onion flavor.)

For the Dressing

  • 1/4 cup soy sauce (Key ingredient for umami flavor.)
  • 1/4 cup teriyaki sauce (Enhances sweetness.)
  • 2 tbsp rice vinegar (Provides tanginess.)
  • 1 tbsp sesame oil (Adds a nutty aroma.)
  • 1 tbsp honey or maple syrup
  • 1 tbsp freshly grated ginger (Brightens up the flavor.)

For the Garnish

  • 2 tbsp toasted sesame seeds (Adds crunch.)
  • 1/4 cup chopped fresh cilantro (Herbaceous note.)

Optional Protein

  • 1 cup cooked chicken, tofu, or shrimp (For added protein.)

Step-by-Step Instructions

  1. Cook the soba or rice noodles according to package instructions, about 4-5 minutes in boiling water. Drain and rinse under cold water.
  2. In a large mixing bowl, combine the shredded carrots, red bell pepper, snap peas, and chopped green onions. Toss gently.
  3. In a small bowl, whisk together soy sauce, teriyaki sauce, rice vinegar, sesame oil, honey (or maple syrup), and freshly grated ginger.
  4. Pour the dressing over the mixed vegetables and toss well until coated.
  5. Fold in the cooled noodles gently, ensuring everything is combined.
  6. Sprinkle toasted sesame seeds and chopped cilantro on top, and give a gentle toss.
  7. Optional: Fold in cooked chicken, tofu, or shrimp for added heartiness.
  8. Serve immediately or refrigerate for an hour to meld flavors.

The flavors deepen as the salad sits. Perfect for meal prep and gatherings.

Salad
Japanese
cold teriyaki noodles salad, Easy Recipe, healthy meal, quick salad, refreshing salad, vegetable salad

Filed Under: salad

Irresistibly Creamy Cheesy Orange Pasta You’ll Love

August 28, 2025 by grace bellamy Leave a Comment

As I stood in my kitchen, zesting a vibrant orange, a wave of excitement washed over me. It’s amazing how one simple fruit can elevate your dishes to new heights! Enter my Cheesy Orange Pasta—a delightful combination of rich, creamy cheese and the unexpected brightness of fresh orange. This dish not only whips up in just 30 minutes, but it also doubles as a crowd-pleaser that can transform any weeknight dinner into a memorable feast. With its cheery color and tantalizing flavors, it’s a cozy comfort food that doesn’t compromise on creativity. Are you ready to impress your taste buds and those of your loved ones? Let’s dive into this delicious culinary adventure together!

Cheesy Orange Pasta

Why is Cheesy Orange Pasta a Must-Try?

Creamy Delight: The combination of cheddar and Parmesan creates an incredibly rich and savory sauce.
Bright & Zesty: Orange juice and zest infuse a fresh, citrusy flavor, taking comfort food to a whole new level.
Quick & Easy: Perfect for busy weeknights, it takes just 30 minutes from prep to plate!
Versatile Dish: Pair it with grilled chicken or roasted veggies for a complete meal that suits everyone’s tastes.
Crowd-Pleasing Option: Whether it’s family dinner or a gathering with friends, this dish is sure to impress and leave everyone asking for seconds!

Cheesy Orange Pasta Ingredients

• Prepare to be amazed by the unique flavors in this dish!

For the Pasta
• 250 g pasta – Penne or farfalle work best for holding the creamy sauce.

For the Sauce
• 1 tablespoon olive oil – A splash of flavor to sauté your garlic beautifully.
• 1 medium orange – Zest it for a burst of freshness and juice for the surprise tang.
• 3 cloves garlic – Minced for that fragrant kick in your sauce.
• 100 ml heavy cream – Adds a luscious creaminess that makes this Cheesy Orange Pasta irresistible.
• 150 g cheddar cheese – Grated for rich, melty goodness.
• 50 g Parmesan cheese – Grated to enrich the flavor profile with a nutty note.
• Salt and pepper – Season to taste for better flavor enhancement.

For the Garnish
• Fresh basil leaves – Adds a pop of color and fresh herbiness (optional).
• Grated orange zest – A lovely finishing touch that brightens the dish (optional).

Step‑by‑Step Instructions for Cheesy Orange Pasta

Step 1: Cook the Pasta
In a large pot, bring salted water to a rolling boil. Add 250 g of penne or farfalle pasta and cook according to package directions until al dente, usually about 10-12 minutes. Drain the pasta, reserving 1/4 cup of the cooking water, and set it aside while you prepare the sauce.

Step 2: Sauté the Garlic
In a large skillet, heat 1 tablespoon of olive oil over medium heat. Once the oil shimmers, add 3 cloves of minced garlic and sauté for about 1 minute until fragrant and lightly golden. Be careful not to let the garlic burn, as this will affect the flavor of your delicious Cheesy Orange Pasta.

Step 3: Add Orange Juice and Zest
Next, pour in the zest and juice of 1 medium orange, stirring well to combine with the garlic. Allow the mixture to simmer gently for about 2 minutes, which will help meld the flavors and refresh your kitchen with a citrus aroma. This step adds that bright, zesty component to your sauce.

Step 4: Stir in the Cream
Pour 100 ml of heavy cream into the skillet, stirring constantly to incorporate it with the orange mixture. Allow this blend to simmer for another 2-3 minutes until it slightly thickens and becomes creamy. The sauce should have a rich, velvety texture that coats the back of a spoon, enhancing your Cheesy Orange Pasta.

Step 5: Add the Cheeses
Gradually incorporate 150 g of grated cheddar cheese and 50 g of grated Parmesan cheese into the skillet. Stir continuously until both cheeses are completely melted and the sauce is smooth and creamy. The mixture should start to bubble gently, creating a luscious amalgamation that defines your comforting Cheesy Orange Pasta.

Step 6: Season the Sauce
Taste your creamy orange sauce and season with salt and pepper to your liking. This step is crucial, as it elevates the flavors and balances the delightful richness of the cheeses with the zestiness of the orange. Set the sauce aside for a moment while you prepare to combine it with the pasta.

Step 7: Combine Pasta with Sauce
Add the drained pasta to the skillet with the luscious orange cheese sauce, tossing gently to ensure the pasta is evenly coated. If the sauce appears too thick, gradually add a bit of the reserved pasta water until you achieve your desired consistency, making the Cheesy Orange Pasta perfectly creamy and delightful.

Step 8: Plate and Garnish
Transfer the Cheesy Orange Pasta to serving bowls while it’s still warm. For a beautiful finishing touch, garnish each bowl with fresh basil leaves and a sprinkle of grated orange zest if desired. The color and freshness will not only beautify the dish but also enhance the overall flavor profile.

Step 9: Serve Immediately
Serve your Cheesy Orange Pasta immediately while it’s hot and comforting. The combination of creamy cheese, zesty orange, and perfectly cooked pasta will surely warm your heart and impress your guests. Enjoy the delicious experience that this unique dish brings to your table!

Cheesy Orange Pasta

Cheesy Orange Pasta Variations

Feel free to get creative and make this Cheesy Orange Pasta your own—each twist brings new memories and flavors!

  • Gluten-Free: Substitute regular pasta with gluten-free penne or farfalle for a delightful and inclusive meal. You won’t miss a beat with this swap!
  • Vegan Delight: Replace the heavy cream with coconut cream and use a vegan cheese blend for a plant-based version that’s just as creamy and satisfying.
  • Spicy Kick: Add a pinch of red pepper flakes or a dash of hot sauce to the sauce for a subtle heat that pairs beautifully with the citrus.
  • Herb-Infused: Toss in fresh herbs like thyme or dill for a fragrant twist that complements the orange’s brightness and adds another layer of depth.
  • Protein Boost: Stir in cooked shrimp or grilled chicken to make the dish heartier. It adds not only protein but also an exciting texture contrast.
  • Crunchy Topping: Consider topping your Cheesy Orange Pasta with toasted breadcrumbs or crushed nuts before serving for an unexpected crunch and nutty flavor.
  • Creamy Mushroom: Sauté some sliced mushrooms with the garlic to add an earthy richness that balances the citrus and cheese flavors beautifully.
  • Zesty Swap: Experiment with lemon or lime juice instead of orange for a fresh citrus alternative that gives the dish a totally different zing!

These variations are sure to keep your dinners exciting! For a vegetable boost, you might enjoy serving this dish alongside roasted veggies or a fresh green salad for a balanced meal. Happy cooking!

Make Ahead Options

These Cheesy Orange Pasta are perfect for meal prepping and can save you valuable time during a busy week! You can prepare the sauce (steps 2-6) up to 3 days in advance; simply refrigerate it in an airtight container to maintain its rich flavors. Additionally, cook the pasta up to 24 hours ahead and store it tossed with a little olive oil to prevent sticking. When ready to serve, reheat the sauce gently in a skillet, combine it with the pasta, and add a splash of reserved pasta water if necessary for creaminess. This way, you’ll have a delicious and comforting meal ready to enjoy in no time!

What to Serve with Cheesy Orange Pasta

As you savor the creamy, citrusy delight of this dish, consider these perfect accompaniments to create a well-rounded meal that dazzles the senses.

  • Garlic Bread: The crunchy, buttery toast complements the creamy texture, perfect for scooping up every last bite of the Cheesy Orange Pasta.
  • Fresh Mixed Salad: Crisp greens and vibrant veggies add a refreshing contrast, balancing the richness of the pasta and enlivening your plate.
  • Roasted Vegetables: A medley of caramelized zucchini, bell peppers, and carrots enhances flavors and provides a delightful oven-roasted aroma that pairs beautifully.
  • Grilled Chicken: Tender, seasoned chicken brings protein to the meal, making it heartier and satisfying, while also soaking up the orange sauce vibes.
  • Lemonade or Sparkling Water: A refreshing drink with a hint of citrus offers a delightful contrast, cleansing the palate between each creamy bite.
  • Chocolate Mousse: End your meal on a sweet note with a light, rich chocolate mousse that provides a luxurious finish to the zesty flavors of the pasta.

Tips for the Best Cheesy Orange Pasta

  • Pasta Choice: Opt for penne or farfalle to catch the luscious orange cheese sauce perfectly. Avoid thin spaghetti which may not hold the sauce well.
  • Cheese Quality: Use freshly grated cheddar and Parmesan for the best melt and flavor. Pre-shredded cheeses often contain anti-caking agents that can affect creaminess.
  • Zest at the End: Always add orange zest just before serving. This keeps the citrus flavor bright and fresh, amplifying the taste of your Cheesy Orange Pasta.
  • Don’t Overcook Garlic: Sauté garlic just enough to become fragrant. Overcooking will result in a bitter taste, dulling your delicious sauce.
  • Adjust Consistency: If your sauce becomes too thick, gently stir in the reserved pasta water gradually until you reach the desired creaminess.
  • Garnish for Flair: Fresh basil and extra orange zest not only elevate presentation but also enhance the flavor. Don’t skip this step for that restaurant-quality touch!

How to Store and Freeze Cheesy Orange Pasta

Fridge: Store leftovers in an airtight container for up to 3 days. Reheat gently in the microwave or on the stovetop, adding a splash of cream or pasta water if needed.

Freezer: For longer storage, freeze the Cheesy Orange Pasta in a freezer-safe container for up to 2 months. Thaw in the fridge overnight before reheating.

Reheating: When ready to enjoy, reheat gently over low heat, stirring occasionally. Adding a little extra cream or reserved pasta water can help restore the creamy texture.

Serving Tips: For the best flavor, enjoy the pasta freshly made, but if you have leftovers, these storage tips will keep your Cheesy Orange Pasta delightful!

Cheesy Orange Pasta

Cheesy Orange Pasta Recipe FAQs

What type of pasta works best for Cheesy Orange Pasta?
Absolutely! For the best results, I recommend using penne or farfalle pasta. These shapes have ridges and a sturdy structure that holds onto the creamy orange sauce perfectly, ensuring every bite is full of flavor.

How should I store leftover Cheesy Orange Pasta?
Store any leftovers in an airtight container in the fridge for up to 3 days. When you’re ready to eat, gently reheat in the microwave or on the stovetop, adding a splash of cream or reserved pasta water if needed to restore that delicious creaminess.

Can I freeze Cheesy Orange Pasta?
Certainly! If you want to keep some for later, just transfer it to a freezer-safe container, and it will last for up to 2 months. When you’re ready to enjoy it again, thaw it in the fridge overnight. For reheating, do so over low heat, stirring occasionally. Add a little extra cream or reserved pasta water to help bring back that silky texture!

What should I do if my sauce is too thick?
If your sauce turns out to be too thick, don’t worry! Simply add a small amount of the reserved pasta cooking water or a splash of cream while gently stirring over low heat to help adjust the consistency. This will bring your Cheesy Orange Pasta back to that luscious, creamy state!

Are there any dietary considerations for this recipe?
It’s great to be mindful of dietary needs! If you’re preparing this dish for someone with dairy allergies, consider using lactose-free cream and cheese alternatives. Additionally, you can swap out the pasta for a gluten-free option, like chickpea pasta, making this delectable meal accessible for everyone at your table!

Irresistibly Creamy Cheesy Orange Pasta You’ll Love

Cheesy Orange Pasta combines rich cheese and fresh orange for a delightful dish that’s sure to impress.

  • Large Pot
  • large skillet
  • Measuring Spoons
  • Measuring Cups

For the Pasta

  • 250 g pasta (Penne or farfalle work best)

For the Sauce

  • 1 tablespoon olive oil (for sautéing garlic)
  • 1 medium orange (zested and juiced)
  • 3 cloves garlic (minced)
  • 100 ml heavy cream (for creaminess)
  • 150 g cheddar cheese (grated)
  • 50 g Parmesan cheese (grated)
  • Salt (to taste)
  • Pepper (to taste)

For the Garnish

  • Fresh basil leaves (optional)
  • Grated orange zest (optional)

Cooking Instructions

  1. In a large pot, bring salted water to a rolling boil. Add the pasta and cook according to package directions until al dente, usually about 10-12 minutes. Drain the pasta, reserving 1/4 cup of the cooking water, and set aside.
  2. In a large skillet, heat olive oil over medium heat. Add minced garlic and sauté for about 1 minute until fragrant and lightly golden.
  3. Pour in the zest and juice of the orange, stirring well to combine with the garlic. Allow the mixture to simmer gently for about 2 minutes.
  4. Pour in the heavy cream, stirring constantly. Allow this blend to simmer for another 2-3 minutes until it slightly thickens.
  5. Gradually incorporate the grated cheddar and Parmesan cheese into the skillet, stirring until melted and smooth.
  6. Taste the sauce and season with salt and pepper. Set the sauce aside.
  7. Add the drained pasta to the skillet and toss gently to coat the pasta in the sauce. Adjust the consistency with reserved pasta water as needed.
  8. Transfer the pasta to serving bowls and garnish with fresh basil leaves and grated orange zest if desired.
  9. Serve the Cheesy Orange Pasta immediately while it’s warm.

For best results, use freshly grated cheese and serve immediately.

Main Dishes
Italian
Cheesy Orange Pasta, comfort food, creamy pasta, crowd-pleaser, quick meal

Filed Under: Main Dishes

Mediterranean Ground Beef Stir Fry for a Flavorful Dinner

August 28, 2025 by grace bellamy Leave a Comment

As the sun sets over the coast, the vibrant colors of a Mediterranean market flood my memory—lush green zucchinis, juicy red tomatoes, and the irresistible aroma of garlic wafting through the air. That’s precisely the feeling I channel when whipping up my Mediterranean Ground Beef Stir Fry. Not only does this dish come together in just 35 minutes, making it perfect for busy weeknights, but it’s also a delightful twist that features fresh veggies and a sprinkle of feta, transforming humble ground beef into a culinary adventure. This recipe is a go-to for anyone craving a hearty, homemade meal that steers clear of the fast food trap. Ready to dive into a plate full of sunshine and flavor? Let’s get cooking!

Mediterranean Ground Beef Stir Fry

Why is Mediterranean Ground Beef Stir Fry a Must-Try?

Quick and Easy: This dish whips up in just 35 minutes, making it a weeknight hero for your busy schedule.
Flavor Explosion: The harmonious blend of spices and fresh ingredients brings a burst of Mediterranean flavors to your plate.
Veggie-Loaded Goodness: Packed with colorful vegetables, it’s not only wholesome but also visually stunning!
Versatile Serving Options: Enjoy it with rice, quinoa, or couscous, adapting to any personal preferences.
Crowd-Pleasing Delight: This recipe is perfect for gatherings—who can resist that crumbly feta and rich ground beef combination?
If you want more quick meal ideas, check out our other easy stir fry recipes for inspiration!

Mediterranean Ground Beef Stir Fry Ingredients

Discover the fresh flavors that await in this delightful dish!

For the Stir Fry
• 1 pound ground beef – lean options create a healthier yet satisfying meal.
• 2 tablespoons olive oil – lends a rich depth of flavor to the dish.
• 1 medium onion, chopped – adds a sweet, aromatic base to the stir fry.
• 2 cloves garlic, minced – enhances the Mediterranean essence with every bite.
• 1 red bell pepper, sliced – brings vibrant color and sweetness to the mix.
• 1 zucchini, sliced – adds moisture and a subtle freshness to balance flavors.
• 1 cup cherry tomatoes, halved – bursts with juiciness and bright acidity.

For the Spices
• 1 teaspoon dried oregano – infuses a classic Mediterranean aroma into the dish.
• 1 teaspoon ground cumin – introduces a warm, earthy flavor that complements beef.
• ½ teaspoon paprika – offers a mild smokiness to elevate the taste.
• ¼ teaspoon red pepper flakes – optional but perfect for a touch of heat.
• Salt and black pepper to taste – essential for bringing out the richness of ingredients.

For the Finish
• ¼ cup pitted Kalamata olives, sliced – adds a salty, briny bite that enhances depth.
• 2 tablespoons fresh parsley, chopped – brightens the dish with freshness and color.
• 1 tablespoon lemon juice – a splash of acidity to invigorate the flavors.
• ½ cup feta cheese, crumbled – a creamy, tangy finish that ties all flavors together.

Embrace the lively taste of the Mediterranean Ground Beef Stir Fry in your home!

Step‑by‑Step Instructions for Mediterranean Ground Beef Stir Fry

Step 1: Sauté the Aromatics
Heat 2 tablespoons of olive oil in a large skillet over medium heat. Once the oil shimmers, add the chopped onion and sauté for about 3–5 minutes until it becomes translucent and fragrant. This initial step creates a flavorful base for your Mediterranean Ground Beef Stir Fry. Ensure to stir occasionally to avoid browning.

Step 2: Add Garlic
After the onion is softened, stir in 2 cloves of minced garlic. Cook for an additional minute, stirring constantly to prevent the garlic from burning. You’ll know it’s ready when it releases a lovely aroma that fills the kitchen, mingling perfectly with the onions and setting the stage for the savory main ingredients to follow.

Step 3: Brown the Ground Beef
Add 1 pound of ground beef to the skillet, breaking it up with a wooden spoon as it cooks. Continue to sauté for about 6–8 minutes or until the beef is fully browned and no longer pink. Drain any excess fat if necessary, keeping the rich flavor in your Mediterranean Ground Beef Stir Fry, while making sure it doesn’t become too greasy.

Step 4: Incorporate Vegetables
Toss in the sliced red bell pepper and zucchini into the skillet, cooking for about 5 minutes until they start to soften and brighten in color. Stir occasionally to ensure even cooking. This step not only adds vibrant hues to your dish but also provides a delightful crunch that contrasts beautifully with the tender beef.

Step 5: Spice It Up
Now, it’s time to elevate your Mediterranean Ground Beef Stir Fry! Add the halved cherry tomatoes, 1 teaspoon dried oregano, 1 teaspoon ground cumin, ½ teaspoon paprika, and optional ¼ teaspoon red pepper flakes. Season with salt and black pepper to taste. Stir well and cook for an additional 3–4 minutes, allowing the spices to meld and the tomatoes to release their juices.

Step 6: Finishing Touches
Stir in the sliced Kalamata olives and chopped fresh parsley, mixing thoroughly to combine all the flavors in the skillet. Remove the pan from heat, ensuring everything is well-incorporated and vibrant. This is the moment where your delightful Mediterranean Ground Beef Stir Fry really comes together.

Step 7: Add Lemon and Feta
To brighten the flavors, drizzle 1 tablespoon of lemon juice over the stir fry, followed by a generous sprinkle of ½ cup crumbled feta cheese. Gently stir to mix in the feta, allowing its creaminess to complement the other ingredients. The tangy cheese adds the perfect finishing touch to this quick and scrumptious dish.

Step 8: Serve and Enjoy
Your Mediterranean Ground Beef Stir Fry is now ready to be savored! Serve hot, ladled generously over rice, quinoa, or couscous. Watch as your family digs in, delighting in the vibrant flavors and fresh ingredients of this easy-to-make, home-cooked meal!

Mediterranean Ground Beef Stir Fry

What to Serve with Mediterranean Ground Beef Stir Fry

Savor the symphony of flavors by pairing delightful sides that enhance your Mediterranean feast.

  • Fluffy Rice: A classic companion that absorbs the delicious juices, creating a comforting bite with every forkful.

  • Quinoa Salad: Nutty quinoa tossed with cucumbers and lemon vinaigrette adds a refreshing, healthy twist to your meal.

  • Crispy Garlic Bread: A crunchy, buttery side that’s perfect for soaking up the vibrant sauce—your guests won’t be able to resist!

  • Tzatziki Sauce: This cool, creamy yogurt dip infused with cucumber and herbs adds a refreshing contrast to the rich beef stir fry.

  • Sautéed Spinach: Lightly seasoned and cooked until just wilted, it integrates a nutrient-packed green element that’s flavorful yet delicate.

  • Roasted Vegetables: Caramelized seasonal veggies like carrots and bell peppers bring out natural sweetness, complementing the savory meat perfectly.

  • Lemonade or Iced Tea: A refreshing drink that balances the rich flavors and cuts through the savory notes of the stir fry.

Bring warmth and joy to your table by pairing your Mediterranean Ground Beef Stir Fry with these delightful sides!

Make Ahead Options

These Mediterranean Ground Beef Stir Fry components are perfect for meal prep! You can chop your vegetables (onion, red bell pepper, zucchini, and cherry tomatoes) and store them in the refrigerator for up to 3 days in an airtight container to maintain their freshness. Additionally, you can cook the ground beef mixture ahead of time and refrigerate it for up to 24 hours; just be sure to let it cool completely before storing. When you’re ready to serve, reheat the beef mixture in a skillet, then quickly add in the remaining ingredients like olives, parsley, lemon juice, and feta. This way, you’ll save precious time during busy weeknights, and the final dish will still be just as delicious!

How to Store and Freeze Mediterranean Ground Beef Stir Fry

Fridge: Store any leftover Mediterranean Ground Beef Stir Fry in an airtight container in the fridge for up to 3 days. This allows the flavors to meld beautifully!

Freezer: To freeze, portion the stir fry into freezer-safe bags or containers, squeezing out as much air as possible. It can last for up to 3 months, making it perfect for meal prep.

Reheating: When you’re ready to enjoy your stir fry again, reheat it on the stovetop over medium heat until heated through, or microwave in short bursts for about 2–3 minutes, stirring in between.

Thawing: If frozen, thaw in the fridge overnight before reheating for best results. This ensures a delightful dining experience that’s just as tasty as when freshly made!

Mediterranean Ground Beef Stir Fry Variations

Feel free to get creative with the Mediterranean Ground Beef Stir Fry—there’s so much you can do to make it your own!

  • Dairy-Free: Swap the feta cheese for a creamy avocado or a dairy-free cheese alternative for a lighter twist.
    Imagine the creaminess from mashed avocado incorporating into the stir fry, giving it a fresh, buttery note.

  • Spicy Kick: Increase the red pepper flakes or add fresh jalapeños to bring the heat.
    A touch of spice can transform the dish into a fiery feast, perfect if you love that extra surprise in every bite!

  • Herb-Infused: Experiment with fresh basil or mint instead of parsley for a vibrant herbal finish.
    These herbs add a unique flavor that elevates your Mediterranean experience with a refreshing essence.

  • Protein-Packed: Substitute ground beef with turkey or chickpeas for a lighter yet equally satisfying option.
    Chickpeas not only provide protein, but they also add a delightful texture that makes each forkful enjoyable.

  • Extra Veggie Boost: Add in spinach, kale, or broccoli for an even heartier dish loaded with nutrients.
    These additions not only enhance the health factor but also add a gorgeous splash of green to your stir fry.

  • Quinoa Base: Instead of serving on rice or couscous, try it atop a bed of fluffy quinoa for unique texture.
    Quinoa absorbs flavors beautifully and adds a nutty richness that complements your Mediterranean flavors perfectly.

  • Zesty Lemon Twist: Double the lemon juice for a brighter, tangier finish that adds zest to every bite.
    More lemon can sometimes be the magic touch you didn’t know you needed—it brings everything to life!

If you’d like to explore more delicious stir fry ideas, check out our tempting vegetarian stir fry recipes or discover fresh variations in our easy dinner recipes section!

Tips for the Best Mediterranean Ground Beef Stir Fry

Quality Beef Matters: Use lean ground beef for a tender, flavorful stir fry; fatty meat can make the dish greasy and less enjoyable.

Don’t Rush the Veggies: Give the bell pepper and zucchini time to soften; this enhances sweetness and adds to the overall flavor profile of your Mediterranean Ground Beef Stir Fry.

Balance the Salty and Sour: Adjust seasoning with olives and lemon juice—taste as you go! Too much olives or lemon might overwhelm the other flavors.

Mix It Up: Feel free to substitute or add other veggies like spinach or eggplant for variety; it keeps the meal fresh and inviting!

Garnish Wisely: Add feta just before serving to retain its creamy texture—this contrast is what makes this dish truly unforgettable.

Leftovers Love: Refrigerate any leftovers for up to three days; the flavors develop even more, making for a great next-day lunch!

Mediterranean Ground Beef Stir Fry

Mediterranean Ground Beef Stir Fry Recipe FAQs

What should I look for when selecting ground beef for this stir fry?
Absolutely! Look for lean ground beef with a fat content around 80% to 90%. This ensures a tender texture without excessive grease. Check for bright red color and avoid any packages with dark spots or a sour smell. Freshness is key for a delightful Mediterranean Ground Beef Stir Fry!

How should I store leftovers of this stir fry?
Leftover Mediterranean Ground Beef Stir Fry can be stored in an airtight container in the fridge for up to 3 days. Make sure to allow the dish to cool down before sealing it to maintain freshness. When ready to enjoy, reheat on the stovetop or microwave until steaming hot!

Can I freeze Mediterranean Ground Beef Stir Fry?
Yes, you can! To freeze, portion the stir fry into freezer-safe bags or containers, removing as much air as possible. It’s best used within 3 months. When you’re ready to enjoy it again, thaw in the fridge overnight and then reheat on the stove or microwave for a quick meal!

What if my stir fry turns out too watery?
No worries! If your Mediterranean Ground Beef Stir Fry is watery, it might be due to overcooked vegetables releasing too much moisture or excess fat from the beef. You can remedy this by simmering it on medium heat for a few more minutes to evaporate the excess liquid. For a thicker consistency next time, you can also consider adding a tablespoon of cornstarch mixed with water towards the end of cooking.

How can I accommodate dietary restrictions, like gluten intolerance?
Very! This Mediterranean Ground Beef Stir Fry is naturally gluten-free; just make sure to check that your ingredients—like olives and seasonings—are gluten-free. Serve it over quinoa instead of traditional couscous, and you’ll have a safe, delicious dinner that everyone can enjoy!

Can I add other vegetables if I want to mix it up?
The more the merrier! Feel free to experiment with vegetables like spinach, mushrooms, or even eggplant. Just make sure to adjust cooking times accordingly. For instance, add spinach right at the end to wilt it perfectly. This way, you keep the vibrant flavors while customizing the dish to your family’s taste!

Mediterranean Ground Beef Stir Fry for a Flavorful Dinner

A quick and delicious Mediterranean Ground Beef Stir Fry that combines fresh veggies and spices for a vibrant weeknight meal.

  • large skillet

For the Stir Fry

  • 1 pound ground beef (lean)
  • 2 tablespoons olive oil (for sautéing)
  • 1 medium onion (chopped)
  • 2 cloves garlic (minced)
  • 1 medium red bell pepper (sliced)
  • 1 medium zucchini (sliced)
  • 1 cup cherry tomatoes (halved)

For the Spices

  • 1 teaspoon dried oregano
  • 1 teaspoon ground cumin
  • 0.5 teaspoon paprika
  • 0.25 teaspoon red pepper flakes (optional)
  • salt (to taste)
  • black pepper (to taste)

For the Finish

  • 0.25 cup pitted Kalamata olives (sliced)
  • 2 tablespoons fresh parsley (chopped)
  • 1 tablespoon lemon juice
  • 0.5 cup feta cheese (crumbled)

Cooking Instructions

  1. Heat 2 tablespoons of olive oil in a large skillet over medium heat. Add the chopped onion and sauté for about 3-5 minutes until translucent.
  2. Stir in 2 cloves of minced garlic and cook for an additional minute until fragrant.
  3. Add 1 pound of ground beef, breaking it up as it cooks. Sauté for 6-8 minutes until fully browned.
  4. Add sliced red bell pepper and zucchini, cooking for about 5 minutes until they start to soften.
  5. Stir in halved cherry tomatoes, dried oregano, ground cumin, paprika, red pepper flakes, salt, and black pepper. Cook for an additional 3-4 minutes.
  6. Mix in Kalamata olives and fresh parsley, then remove from heat.
  7. Drizzle 1 tablespoon of lemon juice over the stir fry, then add crumbled feta cheese. Stir gently to combine.
  8. Serve hot, ladled over rice, quinoa, or couscous.

For best results, use lean ground beef and fresh vegetables. Adjust seasoning to personal preference.

Main Dishes
Mediterranean
easy dinner, healthy stir fry, Mediterranean Ground Beef Stir Fry, quick meal, Weeknight Dinner

Filed Under: Main Dishes

Savory Keto Philly Cheesesteak Roll Ups You’ll Crave

August 28, 2025 by grace bellamy Leave a Comment

As I leaned over the stovetop, the savory aroma of sautéing vegetables enveloped me like a warm hug, instantly transporting me to my favorite corner deli. Today, I’m sharing my delicious Keto Philly Cheesesteak Roll Ups—a perfect blend of tender roast beef, vibrant peppers, and gooey provolone that brings all the classic flavors in a low-carb package. Not only does this recipe allow you to indulge without the guilt, but it also makes for a quick and satisfying meal that’s bound to impress whether it’s a weeknight treat or a casual gathering. Who can resist a roll that promises both comfort and convenience? Ready to whip up something remarkable that will have everyone asking for seconds? Let’s get started!

Keto Philly Cheesesteak Roll Ups

What makes these roll ups a crowd favorite?

Simplicity at Its Finest: With just 15 minutes of prep and another 15 for cooking, you can savor a gourmet meal without spending hours in the kitchen.

Savory Flavor Explosion: The combination of tender roast beef, vibrant bell peppers, and creamy provolone cheese creates a rich, satisfying flavor that’s hard to resist.

Keto-Friendly Choice: These roll ups fit perfectly into your low-carb lifestyle, offering a delicious alternative to traditional sandwiches.

Versatile Delight: Great for a cozy family dinner, meal prep for the week, or serving as an appetizer for guests—you can’t go wrong!

Meal Prep Champion: These roll ups are easy to batch-cook, making them a smart and efficient addition to your weekly menu. Want more easy ideas? Check out simple keto recipes.

Keto Philly Cheesesteak Roll Ups Ingredients

Here’s everything you need to bring these delicious Keto Philly Cheesesteak Roll Ups to life!

For the Filling

  • Olive oil – a healthy fat that helps sauté the vegetables and beef perfectly.
  • Thinly sliced roast beef – tender meat that gives these roll ups their classic Philly flavor.
  • Green bell pepper – adds a pop of color and a fresh crunch to the rolls.
  • Onion – brings sweetness and depth when sautéed with the other ingredients.
  • Sliced mushrooms – enhances the umami flavor, making the filling extra savory.
  • Garlic powder – for that aromatic touch that amplifies all the flavors.
  • Salt and pepper – essential seasonings to taste; always adjust according to your preference.

For the Cheese Wraps

  • Provolone cheese – the star ingredient that melts beautifully around the filling, adding creaminess and richness.

Enjoy creating these delightful Keto Philly Cheesesteak Roll Ups—it’s bound to become your next favorite recipe!

Step‑by‑Step Instructions for Keto Philly Cheesesteak Roll Ups

Step 1: Preheat Your Oven
Begin by preheating your oven to 350°F (175°C). This step is crucial, as it ensures your Keto Philly Cheesesteak Roll Ups cook thoroughly after assembly. While the oven warms up, gather your ingredients and equipment, making sure everything is within reach for smooth preparation.

Step 2: Sauté the Vegetables
In a large skillet, heat 1 tablespoon of olive oil over medium heat. Once the oil is shimmering, add the thinly sliced green bell pepper, onion, and mushrooms. Sauté these colorful vegetables for about 5 minutes, stirring occasionally, until they soften and the onion becomes translucent, releasing their sweet aroma that will fill your kitchen.

Step 3: Incorporate the Roast Beef
Next, add the thinly sliced roast beef to the skillet with the sautéed vegetables. Sprinkle in 1 teaspoon of garlic powder and season with salt and pepper to taste. Stir the mixture well and continue cooking for another 3-5 minutes. The beef should be heated through, and the veggies should be tender—a perfect harmonious blend of savory ingredients for your roll-ups.

Step 4: Assemble the Roll Ups
Lay out the 8 slices of provolone cheese on a flat surface. Spoon a generous portion of the beef and vegetable mixture onto each slice, ensuring even distribution for balanced flavor in every bite. The gooey provolone will act as a delicious wrapper that melds beautifully with the savory filling.

Step 5: Roll Them Up
Carefully roll each provolone slice around the filling, starting from one end and tucking it tightly. Place each roll-up seam-side down in a baking dish, ensuring they stay put during baking. This step creates delightful little bundles, perfect for slipping into your mouth, full of delicious Keto Philly Cheesesteak flavors.

Step 6: Bake the Roll Ups
Once all the roll-ups are assembled in the baking dish, transfer it to your preheated oven. Bake for 10 minutes or until the provolone cheese melts beautifully and becomes bubbly, transforming into a lovely golden hue that promises a melty, cheesy experience in every bite.

Step 7: Let Them Rest
After baking, remove the dish from the oven and let the Keto Philly Cheesesteak Roll Ups sit for a few minutes to cool slightly. This resting time allows the cheese to set a bit and makes them easier to handle. The aromas will be irresistible, making it hard to wait for that first delicious bite!

Keto Philly Cheesesteak Roll Ups

What to Serve with Keto Philly Cheesesteak Roll Ups

Pair your delicious roll ups with these perfect accompaniments for a well-rounded meal bursting with flavors!

  • Crispy Lettuce Salad: A fresh, crunchy salad with vibrant greens pairs beautifully with the savory roll ups, balancing textures and flavors.

  • Garlic Butter Green Beans: These tender green beans sautéed in garlic butter bring a delightful crunch and richness, enhancing the overall dining experience.

  • Zucchini Fries: Crispy zucchini fries offer a satisfying side with a hint of sweetness, perfectly complementing the hearty taste of the roll ups.

  • Creamy Avocado Dip: A smooth avocado dip adds a creamy, refreshing contrast that will make each bite feel luxurious, inviting everyone to dig in.

  • Spicy Pickles: The tangy crunch of spicy pickles adds a zesty kick, heightening the flavors of your Keto Philly Cheesesteak Roll Ups in an unexpected way.

  • Cauliflower Mac and Cheese: This low-carb twist on a classic comfort food provides a rich, creamy side that’s undeniably satisfying next to the cheesy roll ups.

  • Chilled Sparkling Water: Elevate your meal with a refreshing glass of chilled sparkling water infused with citrus, cleansing the palate between bites of your savory roll ups.

For dessert, consider serving a light berry salad topped with whipped cream—it’s a sweet note to end your meal on a high!

Make Ahead Options

These Keto Philly Cheesesteak Roll Ups are ideal for busy home cooks looking to save time during hectic weekdays! To prep in advance, you can sauté the vegetable and beef mixture up to 3 days ahead and refrigerate it in an airtight container. This way, all the flavors meld beautifully, making it irresistibly savory when ready to use. On the day you plan to serve, simply reheat the filling gently in a skillet before assembling the roll-ups with the provolone cheese. Bake as directed, and you’ll enjoy delicious, restaurant-quality results with minimal effort, perfectly suited for meal prep enthusiasts!

How to Store and Freeze Keto Philly Cheesesteak Roll Ups

Fridge: Store leftover Keto Philly Cheesesteak Roll Ups in an airtight container in the fridge for up to 3 days. Reheat in the oven or microwave until warmed through.

Freezer: Place the assembled roll ups in a single layer on a baking sheet and freeze until firm. Once frozen, transfer to a resealable bag, where they can last for up to 3 months.

Reheating: For the best texture, reheat frozen roll ups in the oven at 350°F (175°C) for about 15-20 minutes, until heated through, or microwave on medium until warm.

Wrap Properly: When freezing, ensure the roll ups are tightly wrapped in plastic wrap before placing them in the bag to prevent freezer burn and preserve flavor.

Keto Philly Cheesesteak Roll Ups Variations

Feel free to mix things up and make these roll ups your own delicious creation!

  • Low-Carb Veggie Swap: Replace the provolone with sliced zucchini for a lighter option with a fresh crunch. You won’t miss the cheese with all that flavor!

  • Spicy Kick: Add sliced jalapeños or a sprinkle of crushed red pepper in the filling for a fiery twist. These roll ups will heat things up, making them utterly addicting!

  • Mushroom Lovers: Double the mushroom content and try a variety such as portobello or shiitake for an umami explosion. The earthiness adds depth that complements the beef beautifully.

  • Dairy-Free Delight: Swap the provolone for a dairy-free cheese alternative or use avocado slices for creaminess without the guilt. Enjoy a rich texture that everyone can savor!

  • Herb Infusion: Enhance the flavor by adding fresh herbs like thyme or parsley to the beef and veggie mixture. The aromatic aroma will elevate your roll ups to another level!

  • Add Some Crunch: Toss in chopped bell peppers or sunflower seeds as a filling ingredient for an unexpected crunch in every bite. It’s a delightful surprise that adds a new texture!

  • Savory Sauce: Drizzle a sweet and tangy sauce like sugar-free barbecue or even sriracha for the adventurous eater. It provides a fun flavor boost that will have your taste buds dancing.

  • Wrap it Up: Try replacing provolone with low-carb tortillas for a wrap version. These roll ups become perfect for on-the-go meals, keeping you satisfied without the carbs.

Get creative and experiment with your own favorites! These roll ups are just the beginning—be sure to check out other low-carb meals I have baked for you. Your kitchen is your canvas—have fun with it!

Expert Tips for Keto Philly Cheesesteak Roll Ups

Prep the Veggies First: Ensure all your vegetables are sliced and ready before you heat the skillet. This helps prevent overcooking and keeps your textures just right.

Choose Quality Beef: Go for the best thinly sliced roast beef available—it elevates the flavors of your Keto Philly Cheesesteak Roll Ups, making every bite memorable.

Don’t Skip the Resting Time: Allow the roll ups to sit for a few minutes after baking. This helps the cheese set and makes serving much easier!

Spice It Up: Feel free to add your favorite seasonings or even a pinch of red pepper flakes to the beef and vegetable mixture for an extra kick.

Watch the Baking Time: Keep an eye on the baking process, as ovens can vary. You want that perfect bubbly provolone without burning!

Use Leftover Filling: If you have extra beef and vegetable filling, mix it into salads or pasta for another easy meal option!

Keto Philly Cheesesteak Roll Ups

Keto Philly Cheesesteak Roll Ups Recipe FAQs

What type of roast beef should I use for the roll ups?
Absolutely! For the best results, I recommend choosing high-quality thinly sliced roast beef, preferably from your local deli or butcher. Look for cuts that are tender and flavorful, such as top round or ribeye. This will enhance the overall flavor of your Keto Philly Cheesesteak Roll Ups and create that mouthwatering experience you’re after.

How should I store leftover roll ups?
After enjoying your roll ups, store any leftovers in an airtight container in the fridge. They will stay fresh for up to 3 days. When you’re ready for a quick meal, simply reheat them in the oven at 350°F (175°C) for about 10 minutes, or microwave them on medium until they’re warmed through. This way, you’ll enjoy that cheesy goodness again without any hassle!

Can I freeze Keto Philly Cheesesteak Roll Ups?
Very! To freeze your roll ups, first assemble them but avoid baking. Place the assembled roll ups in a single layer on a baking sheet and freeze until firm for about 1-2 hours. Once solid, transfer them to a resealable freezer bag, ensuring you squeeze out as much air as possible to prevent freezer burn. They can last up to 3 months in the freezer. When ready to enjoy, bake them directly from frozen at 350°F (175°C) for about 20-25 minutes until hot and bubbly.

What should I do if my roll ups are not as flavorful as I’d like?
If your roll ups are missing that flavor punch, consider giving your filling an extra boost! You can try adding more garlic powder or incorporating Worcestershire sauce for a savory depth. Additionally, sprinkle some fresh herbs like parsley or add a dash of hot sauce before rolling them up. A little sprinkle of salt and pepper can make a significant impact too, so don’t forget to taste as you go!

Are these roll ups suitable for special dietary restrictions?
Absolutely! These Keto Philly Cheesesteak Roll Ups are gluten-free and low-carb, making them perfect for those on a keto diet. However, if you’re concerned about dairy allergies, you can substitute provolone cheese with a dairy-free cheese alternative that melts well. Always check labels to ensure the ingredients suit your dietary needs. And while this recipe is fantastic for adults, keep in mind that if you’re serving young children or pets, avoid any added spices or ingredients that may not be suitable for them.

How can I incorporate veggies into these roll ups?
To increase the veggie content, feel free to mix in your choice of vegetables! Spinach, zucchini or even a splash of diced tomatoes can complement the existing flavors beautifully. Just make sure to sauté any added vegetables until tender before mixing them with the beef. This not only enhances nutrition, but also adds vibrant colors and flavors to your Keto Philly Cheesesteak Roll Ups!

Savory Keto Philly Cheesesteak Roll Ups You’ll Crave

Delicious Keto Philly Cheesesteak Roll Ups made with tender roast beef and gooey provolone cheese that delivers classic flavors in a low-carb package.

  • Oven
  • skillet
  • Baking Dish
  • cutting board
  • Knife

Filling

  • 1 tablespoon Olive oil (For sautéing)
  • 8 ounces Thinly sliced roast beef (Classic Philly flavor)
  • 1 medium Green bell pepper (Thinly sliced)
  • 1 medium Onion (Thinly sliced)
  • 1 cup Sliced mushrooms
  • 1 teaspoon Garlic powder (For flavor)
  • to taste Salt
  • to taste Pepper

Cheese Wraps

  • 8 slices Provolone cheese (For wrapping the filling)

Preparation Steps

  1. Preheat your oven to 350°F (175°C).
  2. In a large skillet, heat 1 tablespoon of olive oil over medium heat. Add the green bell pepper, onion, and mushrooms. Sauté for about 5 minutes until softened.
  3. Add the thinly sliced roast beef to the skillet, along with garlic powder, salt, and pepper. Cook for another 3-5 minutes until heated through.
  4. Lay out the provolone cheese slices and spoon the beef and vegetable mixture onto each slice.
  5. Roll each provolone slice tightly around the filling and place seam-side down in a baking dish.
  6. Bake for 10 minutes or until the provolone cheese is melted and bubbly.
  7. Let the roll ups rest for a few minutes before serving.

These roll ups are great for meal prep and can be stored in the fridge for up to 3 days or frozen for up to 3 months.

Main Dishes
American
dinner, Keto, Low-Carb, meal prep, Philly Cheesesteak, Roll Ups

Filed Under: Main Dishes

Savory Thai Chicken Satay with Creamy Peanut Sauce Delight

August 28, 2025 by grace bellamy Leave a Comment

As I flipped through my recipe collection, a sudden craving struck me like a bolt of lightning: the fresh, aromatic flavors of Thai Chicken Satay with Peanut Sauce. This dish is the ultimate comfort food with a twist, perfectly balancing savory marinated chicken with creamy, rich peanut sauce. What I adore about this recipe is how quickly it comes together, making it a delightful crowd-pleaser for both busy weeknights and gatherings with friends. Plus, those satisfying skewers can be grilled or broiled, ensuring versatility for any kitchen setup. If you’re tired of takeout and yearning for something homemade that’s both healthy and mouthwatering, you’re in the right place. Are you ready to embark on this tasty journey to Thailand right from your own kitchen?

Thai Chicken Satay with Peanut Sauce

Why is Thai Chicken Satay special?

Flavor Explosion: The blend of savory chicken and creamy peanut sauce creates a harmonious fusion that explodes with taste in every bite.

Quick Prep: With just 30 minutes of marinating and a cook time of 10-15 minutes, this dish is ideal for busy evenings or unexpected guests.

Versatile Cooking: Grill or broil? You choose! This flexibility ensures you can whip up this dish no matter the weather or your kitchen setup.

Crowd-Pleasing Appeal: Perfect for gatherings, these skewers are both fun to eat and visually appealing—making them a hit among friends and family!

Healthier Choice: Say goodbye to fast food and enjoy a homemade meal that’s not only delicious but also nutritious. Serve with fresh veggies for a complete meal! Enhance your experience by pairing it with iced tea or a light Thai beer for a refreshing touch!

Thai Chicken Satay Ingredients

Ready to elevate your home cooking?

For the Chicken Marinade

  • 1 lb boneless chicken thighs (or breasts) – Thighs are juicier, but breasts work too for a leaner option.
  • 2 tablespoons soy sauce – Adds a savory depth that boosts the meat’s flavor.
  • 1 tablespoon brown sugar – Balances the soy sauce with a hint of sweetness.
  • 2 tablespoons coconut milk – Gives a creamy texture and a subtle tropical vibe.
  • 1 tablespoon curry powder – Infuses the chicken with aromatic spices for that authentic taste.
  • 1 tablespoon minced garlic – Adds a fragrant kick that complements the chicken beautifully.
  • 1 tablespoon lime juice – Brightens the dish with a fresh, zesty note.
  • Skewers (bamboo or metal) – If using bamboo, soak them in water to prevent burning.

For the Peanut Sauce

  • ½ cup creamy peanut butter – The star of the show, delivering richness and flavor.
  • 2 tablespoons soy sauce – Enhances the nutty taste and adds depth to the sauce.
  • 2 tablespoons lime juice – Balances the richness with a tangy kick.
  • 1 tablespoon honey – Provides a touch of sweetness to round out the sauce.
  • 1 teaspoon minced garlic – Offers an extra layer of flavor to this delightful dip.
  • ½ cup coconut milk – Smooths out the sauce and adds a lovely creaminess.
  • 1 teaspoon chili paste (optional) – For those who love a spicy kick, this is your secret weapon!

Get ready to indulge in this delightful Thai Chicken Satay with Peanut Sauce!

Step‑by‑Step Instructions for Thai Chicken Satay with Peanut Sauce

Step 1: Prepare the Chicken
Begin by cutting the boneless chicken thighs into thin strips or bite-sized pieces, ensuring uniform sizes for even cooking. This should take about 5 minutes. Next, in a mixing bowl, whisk together the soy sauce, brown sugar, coconut milk, curry powder, minced garlic, and lime juice. Add the chicken pieces to the marinade, making sure they are thoroughly coated. Cover the bowl and let it marinate in the refrigerator for at least 30 minutes.

Step 2: Soak the Skewers
If you are using bamboo skewers, now is the time to soak them in water for at least 15 minutes. This prevents them from burning while grilling. Meanwhile, prepare your cooking area by gathering all necessary equipment, such as a grill or broiler, and ensure your workspace is clean and organized for the next steps.

Step 3: Make the Peanut Sauce
In a small saucepan, combine the creamy peanut butter, soy sauce, lime juice, honey, minced garlic, and coconut milk. Place the saucepan over medium heat and stir continuously until the sauce is smooth and heated through, which should take about 5 minutes. For those who enjoy a bit of heat, add the chili paste to the sauce, mixing well to incorporate it.

Step 4: Assemble the Skewers
Once the chicken is marinated, begin threading the pieces onto the soaked skewers. Leave some space between each piece—this helps them cook evenly and get that beautiful char. Aim to use about 3-4 pieces of chicken per skewer. Set the skewers aside on a plate, ready for cooking.

Step 5: Cook the Chicken Skewers
Preheat your grill to medium-high heat or broil in your oven. If grilling, place the skewers on the grill grates. Cook for about 4-5 minutes on each side, watching carefully for a nice char and doneness. If broiling, lay the skewers flat on a baking sheet and broil for the same timeframe, flipping halfway through until the chicken is cooked through and well-marked.

Step 6: Rest and Garnish the Skewers
After grilling or broiling, carefully remove the skewers from the heat. Let them rest for a few minutes—this helps the juices redistribute and keeps the chicken tender. For a colorful and flavorful twist, sprinkle the cooked skewers with sesame seeds or chopped cilantro just before serving.

Step 7: Serve with Peanut Sauce
Plate the delicious Thai Chicken Satay alongside a small bowl of the creamy peanut sauce for dipping. This pairing not only enhances the flavors but also brings a delightful presentation to your meal. Optionally, add fresh vegetables like cucumber and bell peppers to provide a crunchy contrast, completing this tasty dish.

Thai Chicken Satay with Peanut Sauce

What to Serve with Thai Chicken Satay with Peanut Sauce

Indulging in a dish as vibrant and flavorful as Thai Chicken Satay can inspire you to create a truly memorable meal experience.

  • Crispy Fresh Veggies: Perfectly sliced cucumbers, carrots, and bell peppers add a refreshing crunch that beautifully contrasts the savory satay.
  • Fluffy Jasmine Rice: The light fragrance and delicate texture of jasmine rice soak up the rich peanut sauce, enhancing every bite.
  • Sweet Coconut Rice: This subtly sweet dish pairs wonderfully, complementing the savory flavors while adding a lovely tropical twist to your meal.
  • Thai Cucumber Salad: The tangy, refreshing taste of this salad cuts through the richness of the satay and adds vibrant colors to your plate.
  • Chilled Iced Tea: A glass of refreshing iced tea balances the spices and brings a cool reprieve, especially on warm days.
  • Light Thai Beer: Crisp and mildly flavored, a light Thai beer complements the nutty and savory notes of the satay perfectly, enhancing your dining experience.

Thai Chicken Satay Variations & Substitutions

Feel free to personalize this dish and make it your own with these delightful variations!

  • Gluten-Free: Substitute soy sauce with tamari for a gluten-free option that brings the same rich flavor.
    A simple swap that ensures everyone can enjoy this delicious dish without worry.

  • Spicy Kick: Add extra chili paste or fresh chopped chilies to both the marinade and peanut sauce for a fiery twist.
    This is perfect for spice lovers who crave that extra heat in their meals!

  • Nut-Free: Use sunbutter or tahini instead of peanut butter for a nut-free creamy sauce alternative.
    Your taste buds will still experience the smooth richness without the nuts!

  • Vegetarian Delight: Replace chicken with firm tofu or portobello mushrooms, marinated and grilled to perfection.
    This variation brings the same wonderful flavors while being plant-based, making it perfect for veggie lovers!

  • Coconut-Free: Swap coconut milk with almond milk or oat milk for a lighter, dairy-free creamy experience.
    The sauce will maintain its lusciousness while catering to those avoiding coconut!

  • Herb Boost: Incorporate fresh herbs like Thai basil or mint in the marinade for an aromatic layer of flavor.
    Just a handful will elevate this dish to something unforgettable!

  • Tropical Twist: Add pineapple chunks to the skewers for a sweet and savory combination that screams summer.
    Just imagine the delightful fusion of flavors bringing a tropical vibe to your dinner table!

  • Sweet Variations: Mix in a tablespoon of maple syrup or agave in the peanut sauce for an extra hint of sweetness.
    This subtle addition makes each bite sweeter, delightful for those with a sweet tooth!

Pair these variations with fresh vegetables like crunchy cucumbers or vibrant bell peppers for a well-rounded meal. And for a refreshing drink, don’t forget about a chilled glass of iced tea or a light Thai beer to complement your dining experience!

Tips for the Best Thai Chicken Satay

  • Chicken Choice: Use boneless chicken thighs for juiciness; breasts work, but they may dry out quicker.

  • Marinating Time: Don’t skip the 30-minute marination! It infuses the chicken with flavor and ensures a tender bite.

  • Soak Those Skewers: Always soak bamboo skewers for at least 15 minutes before grilling to prevent burning and ensure even cooking.

  • Even Cooking: Space the chicken pieces evenly on skewers to allow for proper airflow and uniform cooking.

  • Perfect Heat: Grill or broil on medium-high heat; this achieves a nice char without drying out the chicken.

  • Dipping Delight: Serve the skewers with plenty of creamy peanut sauce for dipping—it’s the best part of your Thai Chicken Satay!

Make Ahead Options

These Thai Chicken Satay with Peanut Sauce are perfect for meal prep enthusiasts! You can marinate the chicken in the flavorful mixture up to 24 hours in advance, which enhances the taste without sacrificing quality. Just be sure to keep it refrigerated in an airtight container. You can also prepare the peanut sauce ahead of time and store it in the fridge for up to 3 days; this allows the flavors to meld beautifully. When you’re ready to serve, simply thread the marinated chicken onto skewers and grill or broil as directed. This way, you’ll enjoy restaurant-quality results with minimal effort during your busy weeknights!

Storage Tips for Thai Chicken Satay with Peanut Sauce

Fridge: Store leftover Thai Chicken Satay in an airtight container for up to 3 days. This keeps the chicken moist and flavorful.

Freezer: For longer storage, freeze the cooked skewers individually wrapped in plastic wrap, then place them in a freezer bag. They’ll last for up to 2 months.

Thawing: To enjoy your frozen chicken satay, thaw in the refrigerator overnight before reheating. This ensures even heating and preserves texture.

Reheating: Gently reheat the skewers in the oven or on the grill until warmed through, ensuring you don’t dry them out. Serve with leftover peanut sauce for a delicious meal!

Thai Chicken Satay with Peanut Sauce

Thai Chicken Satay with Peanut Sauce Recipe FAQs

How do I choose the best chicken for Thai Chicken Satay?
Absolutely! I recommend using boneless chicken thighs for a juicier finish, but boneless chicken breasts can work if you prefer a leaner option. Look for thighs that are plump and well-marbled for optimal flavor. If purchasing from the store, avoid any with dark spots or off smells, as these indicate less freshness.

What’s the best way to store leftover Thai Chicken Satay?
For sure! Store any leftover Thai Chicken Satay in an airtight container in the refrigerator for up to 3 days. This helps preserve the juicy texture and flavors. If you want to save it for longer, I often recommend freezing them.

How do I freeze Thai Chicken Satay?
Very! To freeze, wrap individual cooked skewers tightly in plastic wrap and then place them in a freezer bag or container. This method prevents freezer burn and will keep them good for up to 2 months. When you’re ready to eat, just thaw in the refrigerator overnight, then reheat gently in the oven or grill until warmed through.

What if my chicken is dry after cooking?
That can happen, but don’t worry! If your chicken ends up dry, ensure you’re cooking it on medium-high heat. Also, leave the chicken to rest after grilling—this redistributes the juices. Marinating for the full 30 minutes is also crucial for flavor and moisture, so don’t rush the process!

Can pets eat Thai Chicken Satay?
It’s important to be cautious! While plain cooked chicken is safe for pets in small amounts, avoid giving them the skewers or any seasoned pieces. Ingredients like soy sauce and lime can be harmful to dog and cat tummies. Always check with your vet if you’re not sure!

Is Thai Chicken Satay suitable for people with nut allergies?
Definitely not! Since the peanut sauce is a key component, I recommend substituting creamy peanut butter with tahini or sunflower butter for those with nut allergies. Adjust the flavors as needed by adding lime juice and a hint of sweetness to keep that yummy balance!

Savory Thai Chicken Satay with Creamy Peanut Sauce Delight

Delight in the flavors of Thai Chicken Satay with Peanut Sauce, a dish that’s quick to prepare and perfect for any occasion.

  • grill
  • Mixing Bowl
  • small saucepan
  • Skewers

For the Chicken Marinade

  • 1 lb boneless chicken thighs (or breasts)
  • 2 tablespoons soy sauce (adds savory depth)
  • 1 tablespoon brown sugar (balances primarily with sweetness)
  • 2 tablespoons coconut milk (for creamy texture)
  • 1 tablespoon curry powder (infuses aromatic spices)
  • 1 tablespoon minced garlic (adds fragrant kick)
  • 1 tablespoon lime juice (brightens the dish)
  • Skewers (bamboo or metal; soak bamboo)

For the Peanut Sauce

  • ½ cup creamy peanut butter (the star ingredient)
  • 2 tablespoons soy sauce (enhances nutty taste)
  • 2 tablespoons lime juice (balances richness)
  • 1 tablespoon honey (adds touch of sweetness)
  • 1 teaspoon minced garlic (extra flavor layer)
  • ½ cup coconut milk (adds creaminess)
  • 1 teaspoon chili paste (optional for spice)

Cooking Instructions

  1. Prepare the chicken by cutting it into thin strips and marinating it with soy sauce, brown sugar, coconut milk, curry powder, minced garlic, and lime juice for at least 30 minutes.
  2. Soak bamboo skewers in water for at least 15 minutes to prevent burning.
  3. Make the peanut sauce by combining peanut butter, soy sauce, lime juice, honey, minced garlic, and coconut milk in a saucepan and heating until smooth.
  4. Assemble skewers with marinated chicken pieces, threading 3-4 pieces per skewer.
  5. Grill or broil skewers on medium-high heat for 4-5 minutes on each side until cooked through.
  6. Let skewers rest for a few minutes before garnishing and serving.
  7. Plate the skewers with a side of peanut sauce for dipping.

Use boneless chicken thighs for the juiciest results. Always soak bamboo skewers before grilling.

Appetizer
Thai
grilled chicken, healthy dinner, Peanut Sauce, quick meal, Skewers, Thai Chicken Satay

Filed Under: Appetizer

Cheesy Broccoli Tater Tots: A Fun Twist on Comfort Food

August 28, 2025 by grace bellamy Leave a Comment

As I stood in my kitchen, a wave of inspiration hit me when I noticed a lonely bunch of broccoli sitting in the fridge, begging for attention. That’s when I decided to whip up a batch of Cheesy Broccoli Tater Tots, an irresistible twist on a classic favorite! This recipe not only makes veggies fun and enjoyable but also serves as a fantastic snack or side for the whole family. With just 35 minutes from start to finish, these golden bites are quick to prepare and leave you with minimal clean-up—perfect for busy weeknights. Plus, they’re a healthier alternative to store-bought options, leading you away from that fast-food temptation. Ready to give a delicious makeover to your broccoli? Let’s dive into the steps and transform those florets into a crispy, cheesy delight!

Cheesy Broccoli Tater Tots

Why are Cheesy Broccoli Tater Tots special?

Fun, Flavorful Twist: These Cheesy Broccoli Tater Tots turn a simple veggie into a deliciously crispy snack that even the pickiest eaters will love.

Healthy Indulgence: Made with wholesome ingredients, they’re a guilt-free treat that satisfies your cravings without the fast food guilt.

Quick and Easy: With only 10 minutes of prep and 25 minutes of baking, you can have these tasty bites ready in no time, making them ideal for hectic weeknights.

Crowd-Pleasing Appeal: Whether served as an appetizer or a side dish, these tots are sure to impress guests and family alike. Pair them with ketchup or ranch dressing for an extra kick!

Versatile Serving Options: Enjoy them as a side with your favorite main dish, or serve them as a delightful snack at gatherings. Chef-approved and kid-friendly!

Cheesy Broccoli Tater Tots Ingredients

• For the Tater Tots

  • Broccoli florets – Use fresh or frozen to keep it convenient and nutrient-rich.
  • Shredded cheddar cheese – Adds that delightful gooeyness, making these tater tots irresistible!
  • Whole wheat breadcrumbs – A healthier alternative to regular breadcrumbs, giving your tots a crispy texture.
  • Large eggs – Act as a binding agent, helping the tots hold their shape during baking.
  • Garlic powder – Infuses a subtle yet delicious flavor that enhances the overall taste.
  • Salt – A pinch to elevate all the flavors harmoniously.
  • Black pepper – Adds a touch of spice without overpowering the cheesy goodness.

Now that you have your ingredients laid out, are you ready to savor the magic of Cheesy Broccoli Tater Tots? Let’s get cooking!

Step‑by‑Step Instructions for Cheesy Broccoli Tater Tots

Step 1: Preheat and Prepare
Begin by preheating your oven to 400°F (200°C). While the oven warms up, line a baking sheet with parchment paper to prevent sticking. This will ensure your Cheesy Broccoli Tater Tots come out perfectly crisp and golden. Using parchment also makes for easy cleanup once you’re done.

Step 2: Cook the Broccoli
Take your broccoli florets and steam or microwave them until tender, which should take about 5 minutes. If microwaving, place the florets in a microwave-safe bowl with a little water and cover it. Once done, let them cool slightly before chopping them into small pieces. This step is crucial for mixing seamlessly into the tater tots.

Step 3: Mix the Ingredients
In a large mixing bowl, combine the steamed broccoli with the shredded cheddar cheese, whole wheat breadcrumbs, eggs, garlic powder, salt, and black pepper. Stir everything together until fully blended; the mixture should be thick enough to hold its shape. This fusion of flavors is what will make your Cheesy Broccoli Tater Tots so deliciously irresistible.

Step 4: Shape the Tater Tots
With your mixture ready, use your hands to form small balls, about the size of a tablespoon, and place them on the parchment-lined baking sheet. Make sure to leave some space between each tot to allow for even cooking and browning. You should have roughly 12 tots that are ready to bake and become golden delights!

Step 5: Bake to Perfection
Slide the baking sheet into the preheated oven and bake the tater tots for 20-25 minutes. Keep an eye on them; they should turn golden brown and crispy on the outside. This baking step transforms your mixture into delightful Cheesy Broccoli Tater Tots that are both crispy and cheesy—a true comfort food!

Step 6: Serve and Enjoy
Once they are golden and crispy, take the baking sheet out of the oven and let the Cheesy Broccoli Tater Tots cool for a few minutes. Serve them warm alongside your favorite dipping sauce, such as ketchup or ranch dressing. These delicious bites make for an exciting snack or a fantastic side dish for any meal!

Cheesy Broccoli Tater Tots

What to Serve with Cheesy Broccoli Tater Tots

Transform your tater tots into a delightful meal with these delicious pairings!

  • Creamy Mashed Potatoes: The buttery smoothness of mashed potatoes complements the crispy texture of tater tots, creating a comforting dish. You can mix in garlic or herbs for an extra flavor boost.

  • Zesty Carrot and Cucumber Salad: A refreshing crunch from fresh veggies balances the richness of the cheesy tots. Toss with a light vinaigrette to brighten up your plate!

  • Kid-Friendly Chicken Strips: Bite-sized chicken strips offer a protein-packed addition that pairs wonderfully with your tater tots. Serve with honey mustard for some sweet and savory goodness.

  • Savory Quinoa Pilaf: This nutty, hearty side introduces a wholesome touch to your meal. Quinoa adds a lovely texture contrast while complementing the cabbage with fresh herbs.

  • Classic Tomato Soup: A warm bowl of tomato soup rounds out your meal, perfect for dipping those golden tater tots! The acidity of the soup beautifully cuts through the richness of cheese.

  • Crisp Apple Slices with Cinnamon Sugar: For a sweet treat, pair your tots with sliced apples dusted with cinnamon sugar. This simple addition offers a delightful contrast of flavors and textures.

  • Sweet Potato Fries: The subtle sweetness of sweet potato fries pairs excellently with cheesy avidity of your tater tots. The contrasting colors also make for an attractive plate!

  • Craft Beer: A cold, hoppy craft beer enhances the flavors of your meal perfectly. The bitterness of the beer contrasts with the richness of the cheesy tots.

  • Chocolate Chip Cookies: End on a sweet note with fresh-baked chocolate chip cookies. Their gooeyness is the perfect dessert to follow a crispy savory dish!

Make Ahead Options

These Cheesy Broccoli Tater Tots are a fantastic option for meal prep! You can prepare the tater tot mixture up to 24 hours in advance—simply mix the steamed broccoli, cheddar cheese, breadcrumbs, eggs, garlic powder, salt, and pepper as instructed and refrigerate the mixture in an airtight container. This not only saves time but also allows the flavors to meld beautifully. When you’re ready to serve, just scoop and shape the mixture into balls, then bake as directed for 20-25 minutes. To maintain their quality, ensure they are well-sealed in the fridge to prevent drying out. Enjoy fresh, easy snacks that your whole family will love!

Expert Tips for Cheesy Broccoli Tater Tots

  • Broccoli Selection: Choose younger, bright-green broccoli florets for the best flavor and texture. Avoid yellowing florets, as they can taste bitter.

  • Avoid Overmixing: When combining your ingredients, mix just until everything is combined. Overmixing can lead to dense tots, rather than light and crispy Cheesy Broccoli Tater Tots.

  • Perfect Baking Shape: Keep your tots uniform in size to ensure even baking. Each tot should be roughly the same diameter to achieve that beautiful golden-brown color.

  • Space Them Out: Place the tots with enough space on the baking sheet to allow air circulation. Overcrowding can result in soft or soggy edges instead of crispy ones.

  • Experiment with Cheese: Feel free to swap in different types of cheese! Try mozzarella for a milder flavor or pepper jack for a spicy kick in your Cheesy Broccoli Tater Tots.

  • Cooling Time Matters: Let the tots cool for a few minutes after baking—they’ll firm up and become even more delightful to bite into!

How to Store and Freeze Cheesy Broccoli Tater Tots

Room Temperature: Tater tots are best enjoyed fresh, but can be kept at room temperature for up to 2 hours after baking. Make sure to cover them loosely with foil to prevent them from drying out.

Fridge: Store leftovers in an airtight container in the fridge for up to 3 days. This keeps your Cheesy Broccoli Tater Tots fresh and ready for a quick snack or side dish.

Freezer: For longer storage, freeze the cooled tater tots in a single layer on a baking sheet, then transfer to a freezer bag for up to 3 months. This ensures they retain their texture and flavor.

Reheating: To reheat, bake from frozen at 400°F (200°C) for about 15-20 minutes until heated through and crispy. Enjoy your delicious Cheesy Broccoli Tater Tots again!

Cheesy Broccoli Tater Tots Variations

Feel free to get creative and tailor these Cheesy Broccoli Tater Tots to suit your taste buds and dietary needs!

  • Gluten-Free: Substitute whole wheat breadcrumbs with gluten-free breadcrumbs or almond flour for a gluten-free delight. They will turn out just as crispy!

  • Vegan: Replace eggs with flaxseed meal (1 tablespoon flaxseed mixed with 2.5 tablespoons water) to bind the mixture. Serve with a mustard dip for an extra punch!

  • Cheese Lovers: Experiment with different cheeses such as mozzarella for a gooey texture or pepper jack for a spicy kick that adds excitement with every bite.

  • Herb-Infused: Stir in fresh herbs like chopped parsley or basil to elevate the flavor profile. A sprinkle of fresh herbs adds a pop of color and freshness to your tater tots.

  • Spicy Twist: Add a pinch of cayenne pepper or some crushed red pepper flakes to the mixture for a zesty kick. The heat complements the cheesy goodness beautifully, making them irresistible!

  • Veggie Boost: Mix in finely chopped bell peppers, spinach, or carrots for added color and nutrition. More veggies mean more flavor, and the tots stay just as delightful!

  • Baked vs. Fried: For a crispy finish, try pan-frying them in a little oil instead of baking. Just be sure to watch them carefully to avoid any burning!

  • Dipping Options: Serve with an array of sauces like spicy sriracha mayo or tangy yogurt dip. You might even consider a balsamic glaze for a sophisticated touch on your tater tots!

With these variations, your Cheesy Broccoli Tater Tots can become even more exciting and inventive. Whether for a family dinner or a fun gathering, there’s a twist for everyone!

Cheesy Broccoli Tater Tots

Cheesy Broccoli Tater Tots Recipe FAQs

How do I choose the right broccoli for the Cheesy Broccoli Tater Tots?
Absolutely! When selecting broccoli, look for bright green florets that are firm and compact. Avoid broccoli with yellowing or dark spots, as these can indicate spoilage and a bitter taste. Fresh broccoli not only enhances the flavor but also adds vibrant color to your tater tots.

How should I store leftover Cheesy Broccoli Tater Tots?
Very simply! Place your leftover tater tots in an airtight container and keep them in the refrigerator, where they can last up to 3 days. This way, you can easily enjoy them again as a quick snack or side dish. Make sure to let them cool completely before storing to maintain their crispiness.

Can I freeze Cheesy Broccoli Tater Tots?
Absolutely! To freeze your tater tots, first let them cool completely after baking. Then lay them in a single layer on a baking sheet and freeze them for about an hour. Once frozen, transfer them to a freezer bag or airtight container, and they’ll keep well for up to 3 months. Whenever you’re ready to enjoy them again, just bake straight from frozen at 400°F (200°C) for about 15-20 minutes until they’re hot and crispy.

What should I do if my tater tots are mushy after baking?
If your Cheesy Broccoli Tater Tots turn out mushy, don’t worry, it happens! This can often be fixed with a couple of tweaks next time. First, ensure your broccoli is well-drained and not waterlogged before mixing. You can also try adding a little more breadcrumbs for texture or baking them a bit longer to achieve that perfect crispiness. Making sure each tot is spaced properly on the baking sheet helps too—airflow is key for crunch!

Are Cheesy Broccoli Tater Tots suitable for those with allergies?
Definitely! While this recipe contains common allergens like eggs and cheese, you can easily modify it. For a dairy-free version, swap the cheddar cheese for a non-dairy alternative, and use a flaxseed mixture (1 tablespoon ground flaxseed mixed with 2.5 tablespoons water) instead of eggs to bind the ingredients. Always double-check labels if you’re cooking for someone with food allergies!

What should I serve with Cheesy Broccoli Tater Tots?
The more the merrier! These tasty tater tots are incredibly versatile. They pair beautifully with a variety of dips like ketchup or ranch dressing for a classic touch. You can also serve them alongside your favorite main dish, like chicken nuggets or veggie burgers, for a fun meal idea that delights the whole family.

Cheesy Broccoli Tater Tots: A Fun Twist on Comfort Food

Cheesy Broccoli Tater Tots are a delicious twist on a classic favorite, making veggies enjoyable for the whole family.

  • Oven
  • Baking Sheet
  • Mixing Bowl
  • parchment paper

For the Tater Tots

  • 2 cups Broccoli florets (Use fresh or frozen)
  • 1 cup Shredded cheddar cheese (Adds delightful gooeyness)
  • 1 cup Whole wheat breadcrumbs (Healthier alternative)
  • 2 large Eggs (Binding agent)
  • 1 teaspoon Garlic powder (For flavor)
  • 1/2 teaspoon Salt (To elevate flavors)
  • 1/2 teaspoon Black pepper (Adds a touch of spice)

Step-by-Step Instructions

  1. Preheat the oven to 400°F (200°C) and line a baking sheet with parchment paper.
  2. Steam or microwave broccoli florets until tender, about 5 minutes. Cool and chop into small pieces.
  3. Combine broccoli, cheddar cheese, breadcrumbs, eggs, garlic powder, salt, and black pepper in a mixing bowl.
  4. Form the mixture into small balls, about the size of a tablespoon, and place them on the baking sheet.
  5. Bake for 20-25 minutes until golden brown and crispy.
  6. Let cool for a few minutes and serve warm with dipping sauce.

Serve with ketchup or ranch dressing for added flavor.

Side Dishes
American
appetizers, Cheesy Broccoli Tater Tots, comfort food, healthy snacks, quick meals, vegetable recipes

Filed Under: Side Dishes

Irresistibly Chewy German Chocolate Cookies You’ll Adore

August 27, 2025 by grace bellamy Leave a Comment

As I sifted through my pantry, the sweet aroma of chocolate lingered in the air, igniting a playful craving. That’s when I decided to whip up a batch of German Chocolate Cookies, an indulgent treat that brings together rich chocolate, nutty pecans, and a hint of tropical coconut. Not only are these cookies incredibly simple to make, with a prep time that won’t consume your entire afternoon, but they’re also perfect for those coffee catch-ups or surprise visits from friends. Plus, they can easily be packaged for gifting or freezing, ensuring that deliciousness is always within reach. Are you ready to transform your kitchen into a delightful bakery? Let’s dive into this sweet adventure together!

German Chocolate Cookies

Why Are These Cookies So Special?

Deliciously Unique: The combination of chocolate, coconut, and pecans in these German Chocolate Cookies creates a flavor profile that’s both indulgent and nostalgic.

Quick and Easy: With only 10-12 minutes of bake time, you’ll have warm, fresh cookies ready in no time—perfect for satisfying sudden sweet cravings!

Crowd-Pleasing Treat: Whether it’s a cozy family gathering or a surprise visit from friends, these cookies are sure to delight everyone.

Perfect for Gifting: Pack them up in a cute box or jar, and you’ve got an impressive homemade gift that everyone will love.

Fun Variations: Don’t hesitate to swap in your favorite nuts or add a bit of sea salt on top for an extra flavor kick! If you want to explore more delightful treats, check out my classic chocolate chip cookie recipe.

German Chocolate Cookies Ingredients

For the Cookie Dough

  • All-purpose flour – this forms the base of your cookies for that perfect chewy texture!
  • Baking soda – it helps the cookies rise and gives them a lovely soft bite.
  • Salt – a pinch enhances the sweetness and balances the flavors.
  • Unsalted butter – softened, it adds richness and moisture to your cookies.
  • Granulated sugar – this sweetens your cookies and contributes to a light texture.
  • Packed brown sugar – brings in a deep caramel flavor and adds humidity to each bite.
  • Large egg – binds the ingredients, ensuring your cookies hold together perfectly.
  • Vanilla extract – adds a warm, inviting aroma that makes them irresistible.

For the Mix-Ins

  • Sweetened shredded coconut – brings a tropical twist, enhancing the delectable flavor profile of these German Chocolate Cookies.
  • Chopped pecans – adds a delightful crunch and nutty richness that pairs beautifully with chocolate.
  • Chocolate chunks – because more chocolate is always better; they melt beautifully and give gooey bites!

Get ready to bake these delightful treats and enjoy each sweet moment!

Step‑by‑Step Instructions for German Chocolate Cookies

Step 1: Preheat the Oven
Begin your baking adventure by preheating the oven to 350°F (175°C). This ensures that your German Chocolate Cookies will bake evenly and achieve that perfect chewy texture. While the oven warms up, you can gather your ingredients and equipment, setting the stage for an irresistible treat.

Step 2: Combine Dry Ingredients
In a medium bowl, whisk together 1 cup of all-purpose flour, 1/2 teaspoon of baking soda, and 1/4 teaspoon of salt. This mixture creates the base for your German Chocolate Cookies, ensuring they rise beautifully. As you whisk, take in the inviting aroma; it’s a sure sign that deliciousness is on the way!

Step 3: Cream Butter and Sugars
In a separate large bowl, cream together 1/2 cup of softened unsalted butter, 1/2 cup of granulated sugar, and 1/2 cup of packed brown sugar until the mixture is smooth and fluffy. This process usually takes about 2-3 minutes with an electric mixer, and the texture will become light and airy—a crucial step for achieving delightful cookies.

Step 4: Add Egg and Vanilla
Beat in 1 large egg and 1 teaspoon of vanilla extract to the buttery sugar mixture until fully incorporated. The egg binds the ingredients while the vanilla adds a warm, inviting aroma to your German Chocolate Cookies. This step should take another minute, creating a luscious mixture that’s hard to resist!

Step 5: Mix Dry and Wet Ingredients
Gradually add the dry ingredient mixture to the wet ingredients, mixing until just combined. Avoid overmixing to keep your cookies tender and soft. The dough should begin to come together beautifully, filled with the promise of delightful chocolate and nutty bites ahead.

Step 6: Fold in the Goodies
Gently fold in 1 cup of sweetened shredded coconut, 1/2 cup of chopped pecans, and 1 cup of chocolate chunks using a spatula. This step adds texture and flavor to your German Chocolate Cookies, making each bite packed with sweet coconut, rich pecans, and gooey chocolate goodness.

Step 7: Prepare for Baking
Using a tablespoon, drop rounded dollops of dough onto a baking sheet lined with parchment paper, spacing them about 2 inches apart. As you work, admire the vibrant mix of ingredients—these cookies are sure to be a hit! The dough should be soft but hold its shape well.

Step 8: Bake the Cookies
Place the baking sheet in the preheated oven and bake for 10-12 minutes. Keep an eye on them; the edges should be lightly golden while the centers remain soft. This is when the delightful aroma fills your kitchen, signaling that your German Chocolate Cookies are close to perfection.

Step 9: Cool the Cookies
Once baked, allow the cookies to cool on the baking sheet for about 5 minutes, which helps them firm up. Then, transfer them to a wire rack to cool completely. Enjoy the transformation as they settle into the ultimate gooey, chewy delights!

German Chocolate Cookies

How to Store and Freeze German Chocolate Cookies

Room Temperature: Store your German Chocolate Cookies in an airtight container at room temperature for up to 3 days. This keeps them soft and chewy while preventing them from drying out.

Fridge: If you want them to last a bit longer, you can refrigerate your cookies in an airtight container for up to 1 week. Just let them sit at room temperature before enjoying for that fresh-baked feel.

Freezer: To freeze, place cookies in a single layer on a baking sheet to flash freeze, then transfer to a freezer-safe bag or container. They’ll maintain their taste for up to 3 months.

Reheating: When you’re ready to dive into those frozen delights, reheat in the microwave for about 10-15 seconds or in a preheated oven at 350°F (175°C) for 5-7 minutes. Enjoy each warm, gooey bite!

Expert Tips for German Chocolate Cookies

Don’t Overmix: When combining the wet and dry ingredients, mix until just combined. Overmixing can lead to tough cookies.

Use Room Temperature Ingredients: Ensure your butter and egg are at room temperature for better incorporation and a smoother cookie dough.

Chill Dough for Chewiness: If you prefer even chewier cookies, chill the dough for 30 minutes before baking. This enhances flavor and texture.

Check Doneness: Cookies should be lightly golden on the edges and soft in the center, which ensures that your German Chocolate Cookies remain deliciously chewy.

Be Generous with Toppings: Feel free to add more chocolate chunks or nuts than the recipe calls for; it elevates the flavor and makes each bite even more satisfying!

What to Serve with German Chocolate Cookies

Savor the moment as you indulge in these sweet delights, elevating your gathering or cozy night in with delightful pairings.

  • Milk: This classic accompaniment complements the rich chocolate and nutty flavors, creating a comforting experience.

  • Coffee: A warm cup of coffee amplifies the cookies’ sweetness, making for the perfect afternoon treat.

  • Ice Cream: Serve a scoop of vanilla or coconut ice cream alongside your cookies for a yummy à la mode twist. The cold creaminess perfectly balances the chewy texture.

  • Fresh Berries: Juicy, tart berries like raspberries or strawberries provide a refreshing contrast, cutting through the richness of the cookies.

  • Chocolate Milkshake: This indulgent treat enhances the chocolate notes of your cookies while adding a fun, nostalgic vibe to your dessert experience.

  • Nutty Granola: A handful of crunchy granola on the side echoes the pecans in the cookies and adds a delightful texture contrast.

  • Tea: A cozy herbal or chai tea warms the palate, intertwining beautifully with the cookies’ comforting flavors.

  • Caramel Sauce: Drizzling some caramel over your cookies adds an extra layer of sweet decadence that’s simply irresistible.

  • Coconut Flavored Beverage: A cold coconut drink highlights the tropical notes in your cookies, enhancing every bite with creamy goodness.

German Chocolate Cookies Variations

Feel free to explore and personalize your German Chocolate Cookies for a taste that’s uniquely yours!

  • Nut-Free: Swap chopped pecans with sunflower seeds or omit them entirely for a nut-free version.
  • Dairy-Free: Use vegan butter and dairy-free chocolate chunks to create a deliciously inclusive treat that everyone can enjoy.
  • Gluten-Free: Substitute all-purpose flour with a 1:1 gluten-free flour blend to keep the cookies tender and moist without the gluten.
  • Flavor Twist: Add a splash of almond extract in place of vanilla for a delightful nutty aroma that complements the chocolate beautifully.

For an added layer of flavor, consider folding in 1/2 teaspoon of instant coffee granules. This will enhance the chocolate’s richness, giving your cookies a delightful depth that’s worth savoring!

  • Coconut Alternative: Switch out sweetened shredded coconut for toasted coconut flakes for a deeper flavor and slightly different texture. The extra crunch is divine!

If you want a spice kick, sprinkle in a dash of cinnamon or cayenne pepper to warm things up. This unexpected twist can elevate the complexity of your cookies, making them truly memorable.

  • Higher Chocolate Ratio: Feel free to increase the amount of chocolate chunks to 1.5 cups for those who can’t resist the allure of extra chocolatey goodness. It’s a chocolate lover’s dream!

Discover the world of delicious possibilities as you bake! For different textures and flavors, check out my take on chewy oatmeal cookies or venture into other realms with my spiced pumpkin cookies. Enjoy your sweet exploration!

Make Ahead Options

These German Chocolate Cookies are perfect for meal prep enthusiasts! You can prepare the cookie dough up to 24 hours in advance by mixing all the ingredients and storing the dough in an airtight container in the refrigerator. For best results, it’s key to refrigerate the dough because it helps the flavors meld and enhances the chewy texture. You can also scoop the dough onto the baking sheet, cover it tightly, and refrigerate it for easier baking later. When you’re ready to bake, simply take it out, let it sit at room temperature for 15 minutes, then bake as directed. This way, you’ll enjoy fresh, delicious cookies with minimal effort, even on the busiest days!

German Chocolate Cookies

German Chocolate Cookies Recipe FAQs

How do I know if my coconut is fresh enough for the German Chocolate Cookies?
Absolutely! For the best results, choose sweetened shredded coconut that is soft and fluffy, without any dark spots or signs of moisture. Fresh coconut will have a sweet aroma, while coconut that has gone bad might smell sour or musty. Always check the expiration date to ensure you’re using the freshest ingredients.

What is the best way to store my German Chocolate Cookies?
You should store your German Chocolate Cookies in an airtight container at room temperature for up to 3 days. If you want to keep them fresher longer, place them in the refrigerator for up to 1 week. Just remember to let them sit at room temperature for a few minutes to regain their delightful softness before indulging.

Can I freeze my German Chocolate Cookies?
Yes, you can definitely freeze these cookies! To do so, start by placing them in a single layer on a baking sheet and flash freeze them for about 1 hour. Once they’re firm, transfer them to a freezer-safe bag or container. They’ll stay delicious for up to 3 months. When you’re ready to enjoy, simply reheat them in the microwave for 10-15 seconds or in a preheated oven at 350°F (175°C) for 5-7 minutes.

What if my cookie dough seems too dry?
Very! If you find that your cookie dough is dry or crumbly, it may be due to over-measuring your flour. I recommend using a kitchen scale if possible. If you don’t have one, try this: spoon the flour lightly into your measuring cup without packing it down, and level it off with a knife. If the dough is still dry, add a tablespoon of milk or water to bring it together, mixing until just combined.

Are there any dietary considerations I should be aware of when making German Chocolate Cookies?
It’s always best to check! These cookies contain gluten, dairy, and nuts, which may not be suitable for individuals with allergies or intolerances. If you need substitutes, you can use gluten-free flour and dairy-free butter alternatives. For nut-free options, feel free to replace the pecans with seeds or simply leave them out. Always consult dietary professionals if you’re unsure about specific ingredients!

Irresistibly Chewy German Chocolate Cookies You’ll Adore

These German Chocolate Cookies combine rich chocolate, nutty pecans, and coconut for an indulgent treat.

  • Mixing bowls
  • Electric mixer
  • Baking Sheet
  • parchment paper
  • spatula

For the Cookie Dough

  • 1 cup all-purpose flour (this forms the base of your cookies for that perfect chewy texture!)
  • 1/2 teaspoon baking soda (it helps the cookies rise and gives them a lovely soft bite.)
  • 1/4 teaspoon salt (a pinch enhances the sweetness and balances the flavors.)
  • 1/2 cup unsalted butter (softened, it adds richness and moisture to your cookies.)
  • 1/2 cup granulated sugar (this sweetens your cookies and contributes to a light texture.)
  • 1/2 cup packed brown sugar (brings in a deep caramel flavor and adds humidity to each bite.)
  • 1 large egg (binds the ingredients, ensuring your cookies hold together perfectly.)
  • 1 teaspoon vanilla extract (adds a warm, inviting aroma that makes them irresistible.)

For the Mix-Ins

  • 1 cup sweetened shredded coconut (brings a tropical twist, enhancing the delectable flavor profile.)
  • 1/2 cup chopped pecans (adds a delightful crunch and nutty richness that pairs beautifully with chocolate.)
  • 1 cup chocolate chunks (because more chocolate is always better; they melt beautifully.)

Step-by-Step Instructions

  1. Preheat the oven to 350°F (175°C).
  2. In a medium bowl, whisk together the flour, baking soda, and salt.
  3. In a large bowl, cream together the butter, granulated sugar, and brown sugar until smooth and fluffy.
  4. Beat in the egg and vanilla extract until fully incorporated.
  5. Gradually add the dry ingredient mixture to the wet ingredients, mixing until just combined.
  6. Gently fold in the shredded coconut, chopped pecans, and chocolate chunks using a spatula.
  7. Drop rounded dollops of dough onto a baking sheet lined with parchment paper, spacing them about 2 inches apart.
  8. Bake for 10-12 minutes until the edges are lightly golden and the centers remain soft.
  9. Allow the cookies to cool on the baking sheet for 5 minutes, then transfer to a wire rack to cool completely.

Chill the dough for 30 minutes before baking for even chewier cookies.

Dessert
German
baking, chocolate, cookies, dessert, German Chocolate Cookies

Filed Under: Dessert

Ultimate Philly Cheese Steak Sloppy Joes for Comfort Food Lovers

August 27, 2025 by grace bellamy Leave a Comment

As I stood in my kitchen, the rich aroma of sautéing onions and mushrooms flooded my senses, instantly transporting me to a bustling Philly street corner. Today, I’m thrilled to share my take on Philly Cheese Steak Sloppy Joes—a fun and hearty twist on two classic favorites. This recipe not only brings the famous flavors of the iconic sandwich to your dinner table, but it also allows for quick prep time, making it a perfect choice for busy weeknights. Packed with savory ground beef, melty provolone cheese, and a medley of veggies, these sloppy joes are a guaranteed crowd-pleaser, sure to satisfy even the pickiest eaters. Are you ready to elevate your comfort food game? Let’s dive into this scrumptious journey together!

Philly Cheese Steak Sloppy Joes

Why not try these sloppy joes tonight?

Unique Flavor Fusion: The Philly Cheese Steak Sloppy Joes masterfully combine the rich, savory essence of a cheesesteak with the comforting heartiness of sloppy joes.

Quick and Easy Preparation: With just a few simple steps, you can create a satisfying meal in under 30 minutes, perfect for those busy weeknights when time is of the essence.

Crowd-Pleasing Comfort Food: Serve these delicious sandwiches at your next gathering and watch them disappear as friends and family rave about the incredible flavors.

Customizable Goodness: Feel free to experiment with additional toppings like jalapeños or avocado for an extra twist. Plus, you can easily customize the recipe for dietary preferences or ingredient availability.

The combo of gooey provolone and hearty beef creates an irresistible dish that makes dinner feel special. Don’t forget to check out my other comfort food recipes, like homemade mac and cheese or classic beef tacos, to keep your meal lineup exciting!

Philly Cheese Steak Sloppy Joes Ingredients

• Get ready to savor every bite with these key ingredients!

For the Filling
• 1 lb ground beef – choose lean ground beef for a balanced flavor and texture.
• 1 tbsp butter – adds richness and depth to the sautéed vegetables.
• 1 medium onion, chopped – caramelizes beautifully, enhancing the savory taste.
• 1 bell pepper, chopped – contributes sweetness and vibrant color to the dish.
• 1 cup mushrooms, chopped – adds umami and a meaty texture, complementing the beef.
• 1 cup beef broth – provides moisture and enhances the beefy flavor profile.
• 1 tbsp cornstarch – thickens the mixture for a hearty consistency.
• 1/2 cup ketchup – offers sweetness and a classic touch to the sloppy joe sauce.
• 1 tbsp Worcestershire sauce – elevates the savory flavor with its unique tangy depth.
• Salt, to taste – highlights and balances all the flavors.
• Pepper, to taste – adds a welcome spice that livens up every bite.
• 1 cup provolone cheese, chopped – melts beautifully for that rich, cheesy finish.
• 4 brioche buns, toasted – the perfect foundation for these flavorful sloppy joes.

With these simple yet delicious ingredients, you’re all set to create memorable Philly Cheese Steak Sloppy Joes that your family will love!

Step‑by‑Step Instructions for Philly Cheese Steak Sloppy Joes

Step 1: Brown the Beef
Heat a cast iron skillet over medium-high heat. Add the ground beef and let it sear without stirring for about 3–4 minutes until it forms a deep brown crust. As you stir, look for crispy edges that indicate it’s starting to caramelize. This step brings rich flavors to your Philly Cheese Steak Sloppy Joes.

Step 2: Set Aside the Beef
Once about half of the beef is caramelized, remove it from the skillet and set it aside on a plate. This will allow the beef to rest while you cook the vegetables, preserving its juiciness and flavor. Keep the skillet ready for an aromatic addition to your sloppy joe filling.

Step 3: Sauté the Veggies
In the same skillet, melt 1 tablespoon of butter over medium heat. Add the chopped onions, bell pepper, and mushrooms, allowing them to cook undisturbed for 1–2 minutes to deepen the caramelization. Stir them occasionally for another 3–4 minutes until they’re soft and golden, filling your kitchen with amazing aromas that are essential for these Philly Cheese Steak Sloppy Joes.

Step 4: Combine Beef and Veggies
Return the browned ground beef to the skillet, mixing it in with the sautéed vegetables. Ensure all the flavors meld together beautifully. This is the heart of your Philly Cheese Steak Sloppy Joes, so make sure it’s well combined for maximum flavor.

Step 5: Add Broth and Thicken
In a small bowl, whisk together 1 cup of beef broth and 1 tablespoon of cornstarch until smooth. Pour this mixture into the skillet along with 1/2 cup of ketchup, 1 tablespoon of Worcestershire sauce, salt, and pepper to taste. Stir everything well and let it simmer for 3–5 minutes until thickened and saucy, creating that luscious filling essential for your sloppy joes.

Step 6: Melt the Cheese
Turn off the heat and stir in 1 cup of chopped provolone cheese until it melts into a creamy consistency. Ensure the mixture becomes thick and cheesy, rather than soupy, adding that signature comfort to your Philly Cheese Steak Sloppy Joes.

Step 7: Assemble the Sloppy Joes
Spoon the hot beef and cheese mixture generously onto toasted brioche buns. The crispy exterior of the buns contrasts beautifully with the rich filling, making each bite a delightful experience. Serve these scrumptious Philly Cheese Steak Sloppy Joes while hot, ready to share with family or friends.

Philly Cheese Steak Sloppy Joes

Philly Cheese Steak Sloppy Joes Variations

Feel free to personalize your Philly Cheese Steak Sloppy Joes with these delightful twists!

  • Spicy Kick: Add diced jalapeños or a splash of hot sauce for an extra layer of heat that will excite your taste buds.
    For a flavor experience that hits all the right notes, toss in some sliced jalapeños right with your veggies. The hint of spice balances beautifully with the gooey cheese!

  • Veggie-Loaded: Substitute beef with 1 lb of your favorite plant-based ground meat or lentils for a delicious vegetarian option.
    Feel free to add in extra veggies like zucchini and spinach for added texture and nutrition without compromising that hearty feeling!

  • Creamy Addition: Mix in 1/2 cup of cream cheese or a dollop of sour cream for an extra creamy and velvety filling.
    This variation will elevate the richness of your dish, making every bite feel indulgent and comforting, especially loved by cheesy goodness fans.

  • Herb Infusion: Sprinkle in fresh herbs like thyme or parsley for a refreshing contrast and aromatic flair to the filling.
    These herbs add freshness that brightens the flavors, making these sloppy joes a perfect spring or summer dish!

  • Cheese Experiment: Swap provolone with gooey mozzarella or sharp cheddar for a completely different cheesy experience.
    Each cheese brings its own unique flavor profile, giving you the freedom to play with textures and tastes.

  • Toppings Galore: Pile on additional toppings like avocado, crispy bacon bits, or even coleslaw for crunch and richness.
    Some crunchy coleslaw on top adds an exciting texture to your sandwiches and can balance the richness of the beef and cheese beautifully.

  • Savory Sauce Mix: Experiment with BBQ sauce replace ketchup for a smoky, sweet flavor twist that will surprise your guests.
    This variation brings a whole new vibe to the classic sloppy joes, ensuring they’re bursting with layers of flavor that keep everyone coming back for more!

Enjoy the journey of customizing your Philly Cheese Steak Sloppy Joes! You might discover a new family favorite along the way! And if you’re still looking for more comfort food ideas, don’t miss my delicious homemade mac and cheese or classic beef tacos that everyone will love!

Make Ahead Options

These Philly Cheese Steak Sloppy Joes are perfect for meal prep enthusiasts! You can sauté the onions, bell peppers, and mushrooms and store them in an airtight container in the refrigerator for up to 3 days. Additionally, you can brown the ground beef and mix it with the prepped veggies. To maintain their quality, ensure everything is cooled before refrigerating. When you’re ready to serve, simply reheat the mixture in a skillet, stir in the beef broth, ketchup, Worcestershire sauce, and provolone cheese until melted, then spoon it onto toasted brioche buns. This way, you’ll enjoy the same delicious flavor with minimal effort, making your busy weeknights a breeze!

What to Serve with Philly Cheese Steak Sloppy Joes

Looking to create the perfect dinner around your delightful creation?

  • Crispy French Fries: The warm, crispy fries provide a satisfying crunch that perfectly complements the cheesy richness of the sloppy joes. Dip them in your favorite ketchup for an extra indulgence.

  • Classic Coleslaw: This refreshing side brings a zesty crunch that balances the savory flavors of the sloppy joes, while offering a creamy texture that enhances each bite.

  • Garlic Butter Corn: Sweet, buttery corn on the cob adds a touch of sweetness that pairs magically with the savory, hearty filling, making your meal even more comforting.

  • Pickle Chips: A tangy crunch of pickle chips contrasts nicely with the gooeyness of the sloppy joe, brightening up the whole meal experience. A must for every savory bite!

  • Roasted Veggies: Colorful roasted vegetables, like bell peppers, zucchini, and carrots, offer a nutritious, vibrant contrast while harmonizing flavors with the hearty beef filling.

  • Iced Lemonade: A refreshing glass of iced lemonade cuts through the richness of the sloppy joes, providing a bright and citrusy contrast that uplifts your dining experience.

  • Chocolate Brownies: Finish off your meal on a sweet note with fudgy brownies. Their rich chocolate flavor is the perfect treat after the savory delight of the sloppy joes.

  • Brewed Iced Tea: A chilled glass of unsweetened iced tea makes for a classic pairing that refreshes without overpowering the delightful flavors of the sloppy joe.

How to Store and Freeze Philly Cheese Steak Sloppy Joes

Room Temperature: Keep any leftover Philly Cheese Steak Sloppy Joes at room temperature for no more than 2 hours to ensure food safety and freshness.

Fridge: Store your leftovers in an airtight container in the fridge for up to 3 days. Reheat gently on the stove or in the microwave, adding a splash of broth if needed.

Freezer: For longer storage, freeze the filling in a freezer-safe container for up to 3 months. To thaw, place it in the fridge overnight before reheating.

Reheating: When ready to enjoy again, reheat on the stovetop over medium heat, stirring occasionally until heated through. Serve on fresh toasted brioche buns for the ultimate comfort food experience!

Expert Tips for Philly Cheese Steak Sloppy Joes

Browning the Beef: Ensure your ground beef develops a nice crust by not stirring it too soon. This deep browning enhances the flavor of your Philly Cheese Steak Sloppy Joes.

Veggie Caramelization: Allow the onions and peppers to sit undisturbed for a couple of minutes before stirring. This helps achieve a beautiful caramelization that adds depth to your dish.

Cheese Selection: Use high-quality provolone cheese for the best melting experience. Avoid pre-shredded cheese as it may contain anti-caking agents that prevent it from melting smoothly.

Check Consistency: If your mixture turns out too soupy, let it simmer longer to thicken or add a bit more cornstarch. The perfect Philly Cheese Steak Sloppy Joes should be thick and cheesy, not runny.

Bun Choice: Toast your brioche buns just before serving to maintain their crispness. A good bun will hold up against the juicy filling without getting soggy.

Philly Cheese Steak Sloppy Joes

Philly Cheese Steak Sloppy Joes Recipe FAQs

What type of ground beef should I use?
I recommend using lean ground beef, ideally around 80% lean, for a balanced flavor without too much grease. This allows the rich flavors of the other ingredients to shine through, while still providing that satisfying beefy taste.

How long can I store leftovers in the fridge?
Your leftover Philly Cheese Steak Sloppy Joes can be safely stored in an airtight container in the fridge for up to 3 days. Just make sure to let them cool to room temperature before placing them in the fridge to maintain freshness!

Can I freeze the filling, and how should I do it?
Absolutely! To freeze the filling, allow it to cool completely before transferring it to a freezer-safe container. It can be stored for up to 3 months. When you’re ready to enjoy again, just thaw it in the fridge overnight, then reheat it on the stovetop over medium heat, stirring occasionally until warmed through.

How can I adjust the recipe for dietary restrictions?
If you’re looking to accommodate specific dietary needs, you can swap the ground beef for ground turkey or even a plant-based meat alternative for a lighter option. Additionally, choose gluten-free buns if you’re avoiding gluten, and ensure other ingredients like Worcestershire sauce are gluten-free as well.

What if my Sloppy Joes turn out too soupy?
No worries! If your filling ends up too soupy, simply let it simmer on low heat for an additional 3–5 minutes to thicken. Alternatively, you can mix a little more cornstarch with a splash of broth in a separate bowl until smooth and add it to the pot, stirring until you achieve the desired thickness.

How should I store the cooked sloppy joe mixture?
Once the sloppy joe mixture has cooled, store it in an airtight container in the fridge for up to 3 days. If you’re preparing ahead of time, keep the toasted buns separate until serving to maintain their crispiness!

Ultimate Philly Cheese Steak Sloppy Joes for Comfort Food Lovers

This Philly Cheese Steak Sloppy Joe recipe combines the savory essence of cheesesteak with the heartiness of sloppy joes, creating a satisfying meal.

  • Cast-iron skillet

For the Filling

  • 1 lb ground beef (choose lean ground beef for a balanced flavor and texture)
  • 1 tbsp butter (adds richness and depth to the sautéed vegetables)
  • 1 medium onion, chopped (caramelizes beautifully, enhancing the savory taste)
  • 1 medium bell pepper, chopped (contributes sweetness and vibrant color to the dish)
  • 1 cup mushrooms, chopped (adds umami and a meaty texture, complementing the beef)
  • 1 cup beef broth (provides moisture and enhances the beefy flavor profile)
  • 1 tbsp cornstarch (thickens the mixture for a hearty consistency)
  • 1/2 cup ketchup (offers sweetness and a classic touch to the sloppy joe sauce)
  • 1 tbsp Worcestershire sauce (elevates the savory flavor with its unique tangy depth)
  • to taste Salt (highlights and balances all the flavors)
  • to taste Pepper (adds a welcome spice that livens up every bite)
  • 1 cup provolone cheese, chopped (melts beautifully for that rich, cheesy finish)
  • 4 brioche buns toasted (the perfect foundation for these flavorful sloppy joes)

Step-by-Step Instructions for Philly Cheese Steak Sloppy Joes

  1. Heat a cast iron skillet over medium-high heat. Add the ground beef and let it sear without stirring for about 3–4 minutes until it forms a deep brown crust.
  2. Once about half of the beef is caramelized, remove it from the skillet and set it aside on a plate.
  3. In the same skillet, melt 1 tablespoon of butter over medium heat. Add the chopped onions, bell pepper, and mushrooms, stirring occasionally until they’re soft and golden.
  4. Return the browned ground beef to the skillet, mixing it in with the sautéed vegetables.
  5. In a small bowl, whisk together 1 cup of beef broth and 1 tablespoon of cornstarch until smooth. Pour this mixture into the skillet along with 1/2 cup of ketchup, 1 tablespoon of Worcestershire sauce, salt, and pepper.
  6. Turn off the heat and stir in 1 cup of chopped provolone cheese until it melts into a creamy consistency.
  7. Spoon the hot beef and cheese mixture generously onto toasted brioche buns and serve while hot.

Feel free to experiment with additional toppings like jalapeños or avocado for an extra twist.

Sandwiches
American
comfort food, easy weeknight dinners, ground beef recipes, Philly Cheese Steak Sloppy Joes, quick meals, sandwiches

Filed Under: Sandwiches

Savory Garlic Parmesan Chicken Meatloaf for Cozy Nights

August 27, 2025 by grace bellamy Leave a Comment

As the aroma of savory garlic wafts through my kitchen, I can’t help but smile at the surprise waiting in the oven. This Garlic Parmesan Chicken Meatloaf is a delightful twist on a classic, bringing comfort food into the modern age. It’s a nutritious option that doesn’t skimp on flavor, perfect for those busy weeknights when you crave something homemade but need to keep it quick. With just 15 minutes of prep time and a side of your favorite veggies, this meatloaf will not only feed the family but might just become a new favorite. Are you ready to rekindle your love for meal prep with this irresistible dish?

Garlic Parmesan Chicken Meatloaf

Why is this meatloaf so special?

Unique Flavor: The addition of garlic and Parmesan cheese elevates this meatloaf from average to extraordinary, making it a memorable dish.

Quick Prep: With just 15 minutes to whip it together, it’s a lifesaver for busy weeknights.

Healthy Twist: Using ground chicken offers a leaner alternative while retaining that satisfying comfort food essence.

Crowd-Pleasing: Perfect for family dinners or when entertaining friends—everyone will ask for seconds!

Versatile Side Options: Pair it with your favorite veggies or a fresh salad for a complete meal. Check out my easy side dishes to complement this hearty dish!

Garlic Parmesan Chicken Meatloaf Ingredients

Here’s everything you need to create this delightful dish:

For the Meatloaf

  • Ground chicken – a lean protein choice that keeps this meatloaf light yet satisfying.
  • Parmesan cheese, grated – adds a rich, savory depth that pairs perfectly with garlic.
  • Breadcrumbs – helps bind the mixture together for a tender texture.
  • Garlic, minced – infuses the meatloaf with a delightful aromatic flavor.
  • Egg, beaten – acts as a binder, ensuring the loaf holds its shape during baking.
  • Onion, finely chopped – contributes sweetness and moisture for an enhanced taste.
  • Salt – enhances all the flavors beautifully.
  • Black pepper – adds a subtle heat to balance the savory elements.
  • Fresh parsley, chopped – gives a pop of color and fresh herbaceous flavor.
  • Italian seasoning – brings a blend of herbs that perfectly complements the other ingredients.
  • Worcestershire sauce – adds depth and complexity to the meatloaf, enriching the overall flavor.

Now that you have the essential ingredients listed, gather them up, and let’s get cooking on this scrumptious Garlic Parmesan Chicken Meatloaf!

Step‑by‑Step Instructions for Garlic Parmesan Chicken Meatloaf

Step 1: Preheat the Oven
Begin by preheating your oven to 375°F (190°C). This is an important step to ensure your Garlic Parmesan Chicken Meatloaf cooks evenly and reaches the perfect texture. While the oven warms up, you can start preparing the meatloaf mixture, allowing for efficient use of your time.

Step 2: Mix the Ingredients
In a large mixing bowl, combine 1 pound of ground chicken, ½ cup of grated Parmesan cheese, ¼ cup of breadcrumbs, 2 minced garlic cloves, and ¼ cup of finely chopped onion. Add a beaten egg, ½ teaspoon of salt, ¼ teaspoon of black pepper, ¼ cup of chopped fresh parsley, ½ teaspoon of Italian seasoning, and 1 tablespoon of Worcestershire sauce. Mix thoroughly using your hands or a fork until all ingredients are well combined, creating a flavorful blend.

Step 3: Shape the Meatloaf
Once your mixture is ready, shape it into a loaf form with your hands or a spatula. Place the formed meatloaf in a baking dish or on a lined baking sheet, making sure it’s evenly shaped to promote even cooking. The loaf should be approximately 8 inches long and 3 inches wide for optimal baking results.

Step 4: Bake the Meatloaf
Slide the Garlic Parmesan Chicken Meatloaf into the preheated oven and bake for 45 to 50 minutes. You’ll know it’s done when the internal temperature reaches 165°F (74°C). As it bakes, the kitchen will fill with a wonderful savory aroma that makes waiting all the more worthwhile!

Step 5: Rest Before Serving
After baking, remove the meatloaf from the oven and allow it to rest for about 10 minutes. This resting period helps retain the juices, making the meatloaf tender and easier to slice. Once rested, you can cut it into slices and serve with your favorite sides for a comforting meal.

Garlic Parmesan Chicken Meatloaf

Make Ahead Options

These Garlic Parmesan Chicken Meatloaf are perfect for meal prep enthusiasts! You can prepare the meatloaf mixture and shape it into a loaf up to 24 hours in advance. To do this, simply combine all the ingredients in a bowl, shape it into a loaf, and wrap it tightly in plastic wrap before refrigerating. This method helps to lock in flavors and maintain quality. When you’re ready to cook, remove it from the refrigerator, place it in a baking dish, and bake as directed, adding a few extra minutes if it’s still cold from the fridge. You’ll end up with a delectable dish that’s just as delicious as if you made it fresh!

Helpful Tricks for Garlic Parmesan Chicken Meatloaf

  • Moisture Control: Avoid overmixing the meatloaf mixture; it can lead to a dense texture. Just mix until combined for fluffy results.

  • Temperature Check: Always use a meat thermometer to ensure your Garlic Parmesan Chicken Meatloaf reaches the safe internal temperature of 165°F (74°C).

  • Resting Period: Resist the temptation to slice right away! Letting the meatloaf rest for 10 minutes allows juices to redistribute, enhancing the flavor.

  • Add Veggies: For extra nutrition, consider folding in finely chopped spinach or bell peppers into the meat mixture; it boosts flavor and adds color.

  • Freezing Tip: Leftovers can be frozen! Slice and wrap individual servings tightly, then reheat when cravings strike for a quick meal.

How to Store and Freeze Garlic Parmesan Chicken Meatloaf

Room Temperature: Garlic Parmesan Chicken Meatloaf can be kept at room temperature for up to 2 hours. Be sure to cover it to prevent it from drying out.

Fridge: Store leftover meatloaf in an airtight container in the refrigerator for up to 3 days. Reheat individual slices in the microwave or oven for best results.

Freezer: For longer storage, wrap slices of the meatloaf tightly in plastic wrap, then foil, and freeze for up to 3 months. Thaw in the fridge overnight before reheating.

Reheating: To reheat, place the thawed Garlic Parmesan Chicken Meatloaf slices in a preheated oven at 350°F (175°C) for about 15-20 minutes or until heated through.

Garlic Parmesan Chicken Meatloaf Variations

Feel free to explore these delightful variations and make this dish your own, adding your unique touch of flavor!

  • Gluten-Free: Substitute breadcrumbs with gluten-free oats or ground almond flour for a lighter alternative.
    A bit of experimentation can yield fantastic results, ensuring everyone can join in on the deliciousness!

  • Spicy Kick: Incorporate 1 teaspoon of crushed red pepper flakes or a dash of hot sauce for a zesty flair.
    This simple addition can transform your meatloaf into a dish bursting with warmth and personality.

  • Veggie-Loaded: Add 1 cup of finely chopped spinach or grated zucchini to the mixture for extra nutrition.
    Not only does this enhance the meatloaf’s moistness, but it also sneaks in some vibrant veggies that kids will love!

  • Herb-Infused: Swap the parsley for fresh basil or cilantro for a refreshing twist on flavor.
    Herbs can uplift the whole dish and bring a fresh aroma that tantalizes the senses.

  • Cheesy Surprise: Fold in 1/2 cup of shredded mozzarella for added creaminess and a melt-in-your-mouth experience.
    Imagine that gooey, cheesy goodness with each bite—perfect for cheese lovers!

  • Savory Marinara: Top your meatloaf with marinara sauce before baking to infuse it with rich Italian flavors.
    This topping not only enhances flavor but also creates a beautiful presentation that’s sure to impress.

  • Sweet Glaze: Brush a mix of balsamic vinegar and honey over the meatloaf for a subtle sweet glaze.
    This balancing act of sweetness and savoriness can completely elevate your dining experience.

  • Air Fryer Option: Cook it in an air fryer at 350°F (175°C) for about 30-35 minutes for a crispy exterior.
    It’s a quick and healthy cooking method that will leave you with a beautifully browned meatloaf!

If you’re looking to make this meal even more memorable, consider serving it alongside my easy side dishes that perfectly complement these flavors!

What to Serve with Garlic Parmesan Chicken Meatloaf

As you savor each generous slice of this savory meatloaf, consider pairing it with delightful sides that will elevate your meal even further.

  • Creamy Mashed Potatoes: Their buttery richness complements the flavorful meatloaf, adding a classic comfort food touch. Think fluffy potatoes topped with a sprinkle of parsley for color.

  • Roasted Vegetables: A medley of seasonal veggies roasted to caramelized perfection not only brightens the plate but also adds a nutritious crunch. Carrots, zucchini, and bell peppers work beautifully together.

  • Garlicky Green Beans: Sautéed in olive oil with a touch of garlic, these green beans offer a fresh, zesty contrast to the meatloaf’s savory depth. It’s a winning duo that satisfies.

  • Caesar Salad: Crisp romaine lettuce paired with creamy dressing and crunchy croutons provide a refreshing balance, cutting through the richness of the meatloaf while adding a nice crunch.

  • Savory Quinoa Salad: Fluffy quinoa with diced cucumbers, cherry tomatoes, and a lemon vinaigrette brings bright flavors and textures that harmonize brilliantly with the meatloaf.

  • Herbed Rice Pilaf: This fragrant rice dish, infused with herbs and mild seasoning, not only fills you up but also works well with the meatloaf’s robust flavors.

  • Homemade Garlic Bread: Crisp on the outside and warm on the inside, garlic bread is irresistibly good for soaking up juices. It adds a welcome crispy texture that everyone will love.

  • Chardonnay or Merlot: A glass of chilled Chardonnay or a fruit-forward Merlot can be the perfect finishing touch, enhancing the flavors of the meal while complementing your dining experience.

Garlic Parmesan Chicken Meatloaf

Garlic Parmesan Chicken Meatloaf Recipe FAQs

What type of ground chicken should I use?
Absolutely! I recommend using lean ground chicken for the best flavor and texture. Look for meat that is 93% lean or higher to ensure your meatloaf is light but still juicy. If you can find ground chicken with a bit of dark meat, that can add extra flavor and moisture too!

How should I store leftover meatloaf?
Very simply! Store leftover Garlic Parmesan Chicken Meatloaf in an airtight container in the refrigerator. It will stay fresh for up to 3 days. When you’re ready to enjoy the leftovers, just reheat individual slices in the microwave or in a preheated oven until warmed through.

Can I freeze Garlic Parmesan Chicken Meatloaf?
Of course! To freeze, slice the meatloaf into portions, then wrap each slice tightly in plastic wrap followed by aluminum foil. This method helps prevent freezer burn, allowing you to enjoy your meatloaf for up to 3 months. When you’re ready to eat, just thaw in the fridge overnight and reheat, following the recommended reheating instructions.

What can I do if my meatloaf is too dry?
If you find that your Garlic Parmesan Chicken Meatloaf has turned out dry, don’t worry! This can sometimes happen if it’s overcooked. To remedy this, you can drizzle a bit of chicken broth or gravy over the slices before reheating to add moisture. Also, consider mixing in some finely chopped vegetables, like bell peppers or carrots, in the next batch for added moisture and nutrition.

Can my pets eat Garlic Parmesan Chicken Meatloaf?
While it’s tempting to share, avoid giving your pets Garlic Parmesan Chicken Meatloaf. Ingredients like garlic and onion are toxic to dogs and cats. If you want to include them during meal prep, consider cooking a separate batch without these ingredients for your furry friends—maybe some plain chicken for a special treat!

Savory Garlic Parmesan Chicken Meatloaf for Cozy Nights

This Garlic Parmesan Chicken Meatloaf brings a nutritious twist to a classic dish, perfect for busy weeknights.

  • Oven
  • Mixing Bowl
  • Baking Dish
  • Meat Thermometer

For the Meatloaf

  • 1 pound Ground chicken (a lean protein choice)
  • 0.5 cup Parmesan cheese, grated (adds richness)
  • 0.25 cup Breadcrumbs (helps bind the mixture)
  • 2 cloves Garlic, minced (infuses flavor)
  • 1 large Egg, beaten (acts as a binder)
  • 0.25 cup Onion, finely chopped (contributes sweetness)
  • 0.5 teaspoon Salt (enhances flavor)
  • 0.25 teaspoon Black pepper (adds subtle heat)
  • 0.25 cup Fresh parsley, chopped (adds color and flavor)
  • 0.5 teaspoon Italian seasoning (complements the dish)
  • 1 tablespoon Worcestershire sauce (adds depth)

Step-by-Step Instructions

  1. Preheat your oven to 375°F (190°C).
  2. In a large mixing bowl, combine all the ingredients until well mixed.
  3. Shape the mixture into a loaf and place it in a baking dish.
  4. Bake for 45 to 50 minutes or until the internal temperature reaches 165°F (74°C).
  5. Let the meatloaf rest for about 10 minutes before slicing and serving.

Avoid overmixing the meatloaf mixture for a fluffy texture. Always check the internal temperature for safety.

Main Dishes
American
chicken, comfort food, garlic, Garlic Parmesan Chicken Meatloaf, meatloaf, Parmesan

Filed Under: Main Dishes

Irresistibly Creamy Butternut Squash Soup with Coconut Milk

August 27, 2025 by grace bellamy Leave a Comment

As I stood in my kitchen, the earthy aroma of roasting butternut squash filled the air, transporting me to autumn farmers’ markets overflowing with seasonal gems. This Creamy Butternut Squash Soup with Coconut Milk is my go-to comfort dish, blending rich flavors with a delightful creaminess that warms the soul. Not only is it a breeze to whip up—ready in just 45 minutes—but it also features the luxurious touch of coconut milk, making it a crowd-pleaser for dinner parties or cozy nights in. Plus, it’s a wonderful way to sneak in some extra nutrients without sacrificing taste. Curious about how this vibrant soup can elevate your next meal? Let’s dive into the details!

Creamy Butternut Squash Soup with Coconut Milk

What makes this soup so special?

Creamy, luxurious texture: The addition of full-fat coconut milk creates a velvety finish that elevates this dish beyond ordinary soups.
Nutritious and wholesome: Packed with vitamins and fiber from the butternut squash, it’s a guilt-free way to indulge your taste buds.
Quick and easy: With a total time of just 45 minutes, this recipe is perfect for busy weeknights when you crave comfort without the fuss.
Adaptable flavors: Feel free to spice it up with your favorite herbs or a dash of chili for an extra kick. For more versatile dishes that offer bold flavors, check out our Easy Vegetable Soup.
Impressive crowd-pleaser: Serve it at your next gathering, and watch your guests rave about this delightful bowl of warmth.

Creamy Butternut Squash Soup Ingredients

• Gather these delightful ingredients to create your Creamy Butternut Squash Soup with Coconut Milk.

For the Soup

  • Butternut squash – peel and dice it for a naturally sweet base.
  • Full-fat coconut milk – adds a rich, creamy texture that comforts the soul.
  • Medium onion – finely chopped, it brings a lovely sweetness when sautéed.
  • Garlic – minced for a fragrant kick that enhances the flavors.
  • Vegetable broth – use low-sodium for a healthier option while providing depth.
  • Fresh ginger – grated, it introduces a warm, zesty note to balance the sweetness.
  • Salt and pepper – adjust to taste, elevating the overall flavor profile.
  • Olive oil – perfect for roasting, it caramelizes the squash beautifully.

Feel free to let your creativity flow as you whip up this heartwarming dish!

Step‑by‑Step Instructions for Creamy Butternut Squash Soup with Coconut Milk

Step 1: Preheat and Roast the Squash
Begin by preheating your oven to 400°F (200°C). On a baking sheet, toss the peeled and diced butternut squash with a drizzle of olive oil, salt, and pepper. Spread the squash out in a single layer and roast for about 25-30 minutes, or until it is fork-tender and lightly caramelized, bringing out its natural sweetness.

Step 2: Sauté the Aromatics
In a large pot, heat a splash of olive oil over medium heat. Add the chopped onion and sauté for about 5 minutes, or until it becomes translucent and fragrant. Stir in the minced garlic and grated ginger, cooking for another minute until aromatic. This step lays the flavorful foundation for your Creamy Butternut Squash Soup with Coconut Milk.

Step 3: Combine Ingredients for Simmering
Once the butternut squash is roasted, add it to the pot with the sautéed onion, garlic, and ginger. Pour in the vegetable broth and stir in the full-fat coconut milk, blending the flavors. Bring the mixture to a gentle simmer over medium heat, letting it bubble softly while infusing the ingredients together for about 10 minutes.

Step 4: Blend the Soup Until Smooth
Using an immersion blender, carefully blend the soup until it reaches a velvety smooth texture. If you’re using a stand blender, let the soup cool slightly, then blend in batches to avoid splatter. The final result should be a creamy consistency that is both comforting and indulgent—a hallmark of the Creamy Butternut Squash Soup with Coconut Milk.

Step 5: Season and Serve
After blending, taste your soup and season it with salt and pepper to your preference. If desired, you can also add a splash of extra coconut milk for a richer flavor. Serve the soup warm, garnishing each bowl with a drizzle of coconut milk or freshly chopped herbs to elevate the presentation and taste.

Creamy Butternut Squash Soup with Coconut Milk

How to Store and Freeze Creamy Butternut Squash Soup with Coconut Milk

Fridge: Keep your soup in an airtight container in the fridge for up to 3 days. Reheat gently on the stovetop or microwave, stirring occasionally.

Freezer: This soup freezes wonderfully! Portion it into freezer-safe containers, leaving some space for expansion. It will last up to 3 months in the freezer.

Thawing: For best results, thaw overnight in the refrigerator before reheating. If you’re in a hurry, you can use the microwave on the defrost setting.

Reheating: Always reheat your Creamy Butternut Squash Soup with Coconut Milk on low heat, stirring frequently until steaming hot. Add a splash of coconut milk to restore creaminess if desired.

Expert Tips for Creamy Butternut Squash Soup

  • Perfect Roasting: Ensure even cooking by spreading the butternut squash in a single layer on the baking sheet. This enhances caramelization, giving your soup richer flavors.

  • Aromatics Matter: Let the onion, garlic, and ginger sauté until fragrant before adding the squash. This step builds a flavorful base for your Creamy Butternut Squash Soup with Coconut Milk.

  • Blend Wisely: For the smoothest texture, blend the soup until completely silky. If using a stand blender, cool the soup slightly and blend in batches to prevent splatters.

  • Season to Taste: Always taste and adjust the seasoning at the end. Adding a little more salt or pepper after blending can really enhance the flavors and depth of the soup.

  • Garnish with Flair: Elevate your presentation with a swirl of coconut milk or a sprinkle of fresh herbs like cilantro or parsley—this adds visual appeal and fresh notes to your dish.

  • Storage Tips: This soup freezes beautifully! Store leftovers in an airtight container, and reheat gently for a cozy meal later on.

Make Ahead Options

Preparing your Creamy Butternut Squash Soup with Coconut Milk ahead of time is a fantastic way to save time during busy weeknights! You can roast the butternut squash and sauté the aromatics up to 24 hours in advance—simply store them in an airtight container in the refrigerator. When you’re ready to enjoy the soup, combine the roasted squash, sautéed ingredients, vegetable broth, and coconut milk in a pot and let it come to a gentle simmer. Blend until smooth and season to taste before serving. This not only enhances the flavors but allows you to enjoy a comforting bowl of soup with minimal effort on a hectic day. Just remember, for the best quality, consume within 3 days for that fresh, delicious taste!

Creamy Butternut Squash Soup Variations

Feel free to get creative and tailor this soup to your taste buds with these delightful variations!

  • Dairy-Free: Use a plant-based milk alternative like almond or oat milk for a creamy yet dairy-free option.
    A simple swap can open up new flavor profiles. It maintains the soup’s rich texture while catering to dietary needs.

  • Spicy Kick: Add a teaspoon of red pepper flakes or a diced jalapeño for some heat.
    This variation brings an exciting punch to the soup, balancing the sweetness of the squash with spicy notes.

  • Herb-Infused: Stir in fresh herbs like thyme or rosemary during the simmering process.
    These herbs add a layer of aromatic depth, enhancing the overall flavor profile beautifully.

  • Roasted Garlic: Instead of fresh garlic, roast a whole head of garlic and blend it into the soup.
    This mellows the garlic flavor and creates a sweeter, more complex taste that pairs wonderfully with butternut squash.

  • Texture Boost: For added crunch, top the soup with roasted pumpkin seeds or croutons just before serving.
    This fresh texture contrast elevates your dining experience, bringing a delightful surprise to each spoonful.

  • Citrusy Twist: A squeeze of fresh lime or lemon juice adds brightness and balances the sweetness.
    Citrus notes can elevate the flavors, creating a refreshing finish that invigorates each bite.

  • Nutty Flavor: Drizzle with a little tahini or almond butter before serving for a nutty undertone.
    This adds a unique creaminess and an earthy flavor that complements the squash beautifully.

  • Creamy Alternative: Swap half of the coconut milk with cashew cream for extra richness.
    This enhances the creaminess while adding a subtle nutty flavor, making every spoonful a luxurious treat.

What to Serve with Creamy Butternut Squash Soup with Coconut Milk

Warm up your table with a selection of delightful pairings that complete your meal experience.

  • Crusty Bread: Perfect for dipping, the crispy exterior and soft inside of a fresh loaf enhance the soup’s creamy richness.
  • Garlic Breadsticks: These tender breadsticks not only provide a nice crunch but also add a savory touch that complements the soup’s sweetness.
  • Mixed Green Salad: A light and refreshing salad with a zesty vinaigrette balances the richness of the soup beautifully. The crisp textures contrast wonderfully with the creamy soup.
  • Roasted Chickpeas: Adding a crunchy element, these provide plant-based protein and a satisfying texture that’s perfect for snacking alongside your soup.
  • Coconut Rice: Creamy coconut rice creates a delightful combination, echoing the coconut notes in your soup while adding a comforting base.
  • Herbal Iced Tea: A refreshing herbal iced tea can cleanse the palate between bites, enhancing your overall dining experience with its light flavors.
  • Apple Crisp: For dessert, a warm apple crisp with a scoop of vanilla ice cream offers a sweet end to your meal, complementing the warm spices in the soup perfectly.
  • Spiced Pear Tart: Its gentle sweetness and subtle spices create a lovely harmony with the flavors of the creamy soup, adding a touch of elegance to your meal.

Creamy Butternut Squash Soup with Coconut Milk

Creamy Butternut Squash Soup with Coconut Milk Recipe FAQs

How do I choose the best butternut squash?
Absolutely! Look for butternut squashes that feel heavy for their size, with a smooth, beige skin. Avoid any with soft spots or blemishes. A ripe squash will have a matte finish rather than a shiny one, indicating it’s ready for cooking.

How long can I store leftover Creamy Butternut Squash Soup with Coconut Milk in the fridge?
You can store your delicious soup in an airtight container in the refrigerator for up to 3 days. When reheating, do so gently on the stovetop or in the microwave, stirring occasionally to maintain that lovely creamy texture.

Can I freeze this soup? If so, how?
Yes, this soup freezes beautifully! To freeze, portion it into freezer-safe containers, leaving about an inch of space at the top for expansion during freezing. It will stay fresh for up to 3 months. When you’re ready to enjoy it, thaw overnight in the refrigerator or use the microwave on the defrost setting.

What should I do if my soup is too thick after blending?
Don’t worry! If your soup is too thick for your liking, simply stir in a bit more vegetable broth or water until you reach your desired consistency. Remember to bring it back to a gentle simmer and adjust your seasonings afterward, as you may need to taste and add a little more salt or pepper.

Are there any dietary considerations I should keep in mind?
Definitely! This soup is plant-based and gluten-free, making it suitable for many diets. However, if you have a nut allergy, make sure to check that the vegetable broth you use doesn’t contain any allergens. Also, if you’re serving this soup to pets, keep them away from any added ingredients like salt or seasonings that can be harmful to them.

Can I modify the flavor of this soup?
Very much so! Feel free to customize the flavors by adding spices like nutmeg or cayenne for warmth, or even incorporating different herbs such as thyme or rosemary. It’s all about making it your own and enjoying that delightful creamy butternut squash soup with coconut milk!

Irresistibly Creamy Butternut Squash Soup with Coconut Milk

This Creamy Butternut Squash Soup with Coconut Milk is a comforting dish that blends rich flavors with a creamy texture.

  • Oven
  • Large Pot
  • Immersion blender

For the Soup

  • 1 large Butternut squash (peeled and diced)
  • 1 can Full-fat coconut milk
  • 1 medium Onion (finely chopped)
  • 2 cloves Garlic (minced)
  • 4 cups Vegetable broth (low-sodium)
  • 1 tablespoon Fresh ginger (grated)
  • to taste Salt
  • to taste Pepper
  • 2 tablespoons Olive oil

Step-by-Step Instructions

  1. Preheat your oven to 400°F (200°C). Toss the butternut squash with olive oil, salt, and pepper. Spread in a single layer and roast for 25-30 minutes until fork-tender.
  2. In a large pot, heat a splash of olive oil over medium heat. Add the chopped onion and sauté for about 5 minutes until translucent. Stir in the minced garlic and grated ginger, and cook for another minute.
  3. Add the roasted butternut squash to the pot with the sautéed onion, garlic, and ginger. Pour in the vegetable broth and full-fat coconut milk, bringing to a gentle simmer for about 10 minutes.
  4. Blend the soup using an immersion blender until smooth. If using a stand blender, allow to cool slightly before blending in batches.
  5. Taste the soup and season with salt and pepper as preferred. Serve warm, garnishing with a drizzle of coconut milk or fresh herbs.

This soup freezes beautifully! Store leftovers in an airtight container and reheat gently for a cozy meal later on.

Appetizer
American
Autumn Soup, Coconut Milk Soup, comfort food, Creamy Butternut Squash Soup, Healthy Soup, Vegetarian Recipe

Filed Under: Appetizer

Delicious Mini Rice Cakes with Nut Butter to Satisfy Cravings

August 27, 2025 by grace bellamy Leave a Comment

As I rummaged through my pantry last week, I stumbled upon a hidden treasure—mini rice cakes. These crunchy delights sparked a craving for something light yet satisfying, leading me to create my favorite snack: Mini Rice Cakes with Nut Butter. This recipe is an absolute game-changer when you’re pressed for time but still want to enjoy a wholesome treat. With just 10 minutes of prep and no cooking required, it’s perfect for anyone seeking a quick, yet nourishing bite that also serves as a great pick-me-up. Plus, the combination of nut butter and banana makes for a crowd-pleaser that even the little ones will love. Curious to know how to whip these up in a flash? Let’s dive right in!

Mini Rice Cakes with Nut Butter

Why are Mini Rice Cakes a Must-Try?

Simplicity at Its Best: With just four ingredients and no cooking required, these mini rice cakes come together in mere minutes, making them an ideal choice for busy days or quick snacks.

Nutritious and Delicious: Packed with healthy fats from nut butter and natural sweetness from bananas, this recipe provides a guilt-free indulgence that satisfies cravings without the heavy calories of fast food.

Endless Customization: Feel free to experiment with different nut butters or toppings! Try adding chia seeds, sliced strawberries, or even a sprinkle of cinnamon for extra flavor.

Fun for Everyone: A hit among both adults and kids, these mini rice cakes offer a fun and interactive snack option. Get the family involved—let them customize their own cakes!

Perfect for Meal Prep: Quick and easy to store, you can whip up a batch and keep them in the fridge for up to three days. They’re ready whenever you need a tasty pick-me-up!

Mini Rice Cakes with Nut Butter Ingredients

• Here’s what you’ll need to create your delightful snack:

For the Rice Cakes

  • Mini rice cakes – These crunchy bases are perfect for holding your toppings and providing texture.

For the Nut Butter

  • Nut butter (almond, peanut, or cashew) – Choose your favorite variety for a creamy, rich layer that not only adds flavor but also healthy fats.

For the Topping

  • Medium banana – Sliced bananas add natural sweetness and gooeyness to complement the nut butter.

For the Drizzle

  • Honey or agave syrup – A drizzle of either sweetener enhances the flavor, making the mini rice cakes with nut butter even more irresistible!

Step‑by‑Step Instructions for Mini Rice Cakes with Nut Butter

Step 1: Gather Your Ingredients
Start by laying out all your ingredients on the countertop for your Mini Rice Cakes with Nut Butter. You’ll need 4 mini rice cakes, your choice of nut butter, a medium banana, and honey or agave syrup. Having everything ready will make the assembly smooth and quick.

Step 2: Spread the Nut Butter
Take one mini rice cake and place it on a clean plate. Using a butter knife or a small spatula, spread 1 tablespoon of your favorite nut butter evenly across the surface of the rice cake. Ensure the nut butter reaches the edges for maximum flavor. Repeat this step for all four rice cakes.

Step 3: Add Sliced Bananas
Once each rice cake is generously coated with nut butter, take your banana and slice it into thin rounds. Arrange the banana slices on top of the nut butter, placing them closely together for a delightful layer. This adds natural sweetness and a creamy texture to your Mini Rice Cakes with Nut Butter.

Step 4: Drizzle with Sweetness
To elevate the flavors, take your honey or agave syrup and gently drizzle about half a teaspoon over each rice cake. The sweet topping will beautifully contrast the richness of the nut butter and the bananas, making each bite irresistible.

Step 5: Serve Immediately
Finally, arrange your Mini Rice Cakes with Nut Butter on a colorful plate to inspire presentation. Serve them right away while they are fresh and crunchy; this snack is best enjoyed immediately for that perfect texture!

Mini Rice Cakes with Nut Butter

Storage Tips for Mini Rice Cakes with Nut Butter

Fridge: Keep any leftover mini rice cakes with nut butter in an airtight container in the fridge for up to three days to maintain freshness and crunchiness.

Room Temperature: It’s best to avoid storing them at room temperature, as the nut butter may start to soften and the rice cakes can lose their delightful crunch.

Reheating: If you prefer your mini rice cakes warm, briefly microwave them for about 10 seconds, but note that the crunch will diminish—enjoy them fresh when possible!

Assembly Tip: For pre-assembly, it’s best to store the mini rice cakes separately from the banana and sweetener. Just top them fresh when you’re ready to enjoy!

Make Ahead Options

These Mini Rice Cakes with Nut Butter are perfect for those busy days when you need a quick snack ready to go! You can prepare the rice cakes by spreading the nut butter on each one and arranging the banana slices up to 24 hours in advance. Just cover them tightly with plastic wrap or place them in an airtight container in the refrigerator to maintain freshness. Drizzle the honey or agave syrup just before serving to prevent sogginess. When you’re ready to enjoy, simply grab your prepped cakes and add that final touch of sweetness for a delicious snack that saves you time without compromising taste!

Mini Rice Cakes with Nut Butter Variations

Feel free to let your creativity shine and customize these mini rice cakes to suit your tastes!

  • Dairy-Free: Swap honey for maple syrup for a completely vegan-friendly option that offers a rich sweetness.
  • Nut-Free: Use sunflower seed butter or tahini for an allergy-friendly twist that packs a flavorful punch without the nuts.
  • Protein Boost: Add a sprinkle of your favorite protein powder to the nut butter, making each bite even more nutritious and satisfying.
  • Fruity Upgrade: Top with sliced strawberries or apples for an extra layer of flavor and freshness that complements the nut butter beautifully.
  • Crunch Factor: Mix in some granola or nuts for a delightful crunch that takes the texture to a whole new level. It’s like adding tiny treasures to each bite!
  • Spiced Delight: Sprinkle a dash of cinnamon or nutmeg on top for a warming flavor that adds depth and character to your healthy snack.
  • Chocolate Lovers: Drizzle melted dark chocolate over the bananas for a more indulgent treat that satisfies sweet cravings while maintaining a balance of nutrition.
  • Savory Twist: Try adding a sprinkle of sea salt on top for a sweet-salty combo or swap the banana for avocado slices for a unique taste experience.

And don’t forget—these mini rice cakes pair perfectly with a cup of your favorite herbal tea or a refreshing smoothie. Want more delicious ideas? Check out my tips on how to create a fun and nutritious snack platter with different toppings or explore more fun ways to enjoy nut butters.

What to Serve with Mini Rice Cakes with Nut Butter?

Picture yourself after a long day, craving a light yet satisfying meal that won’t weigh you down. These delightful bites are just the start of a fantastic spread!

  • Fresh Fruit Salad: A vibrant mix of seasonal fruits adds a burst of color and juicy sweetness, balancing the creaminess of the nut butter.

  • Greek Yogurt Parfait: Layer creamy Greek yogurt with granola and berries for a protein-packed dessert that offers a delightful contrast in texture.

  • Crispy Veggie Sticks: Crunchy carrot, cucumber, or bell pepper sticks provide a refreshing crunch, making them perfect to nibble on alongside your rice cakes.

  • Herbed Quinoa Salad: A light quinoa salad with fresh herbs and lemon dressing complements the flavors with nutritious grains that add depth to your meal.

  • Homemade Smoothie: Whip up a refreshing smoothie with spinach, banana, and almond milk for a quick drink that harmonizes beautifully with the nutty flavors.

  • Dark Chocolate Squares: For a touch of indulgence, pair your meal with a piece of rich dark chocolate—its bittersweet flavor enhances the sweetness of the rice cakes.

  • Chia Seed Pudding: A creamy, nutrient-dense chia pudding makes for a wonderful, healthy dessert option while providing a satisfying texture that rounds out the meal.

Expert Tips for Mini Rice Cakes with Nut Butter

  • Choose the Right Nut Butter: Select a nut butter that you love; almond, peanut, or cashew all work well. This choice greatly influences the overall flavor!

  • Banana Freshness: Use ripe bananas for the best natural sweetness and texture. Overripe bananas can become mushy, making your mini rice cakes less appealing.

  • Even Spreading: Ensure your nut butter is spread evenly on each rice cake to avoid sogginess in spots and achieve a delicious balance of flavors.

  • Customize Your Toppings: Experiment with different toppings, like berries or seeds, to keep things exciting. Just be cautious with the amounts—too many toppings can overwhelm the rice cake.

  • Serving Suggestions: Arrange the mini rice cakes on a colorful platter to make them visually appealing when serving. This adds a touch of excitement and enhances the dining experience!

  • Storage Tips: If you have leftovers, store them in an airtight container in the fridge for up to three days—this helps maintain the crunchiness of your mini rice cakes with nut butter.

Mini Rice Cakes with Nut Butter

Mini Rice Cakes with Nut Butter Recipe FAQs

What should I look for when choosing bananas?
Absolutely! When selecting bananas, aim for those that are slightly speckled with brown spots—this indicates ripeness and sweetness. Avoid bananas with dark spots all over, as they may be overly ripe and mushy, which is not ideal for topping your mini rice cakes.

How should I store leftover mini rice cakes?
The more the merrier! Store your leftover mini rice cakes in an airtight container in the fridge for up to three days. This helps retain their crunchiness. If made in advance, keep the banana and sweetener separate until you’re ready to enjoy them for the best texture.

Can I freeze mini rice cakes with nut butter?
Very! While it’s not recommended to freeze the finished mini rice cakes, you can freeze the plain rice cakes for up to 3 months. To do this, place them in a freezer-safe bag, removing as much air as possible, and seal. When ready to enjoy, simply thaw them in the fridge and then top with nut butter and banana fresh!

What should I do if my nut butter becomes too thick?
No worries! If your nut butter is too thick for spreading, gently warm it in the microwave for about 15-20 seconds. This should make it easier to spread without losing flavor. Stir well to ensure a smooth consistency before topping your rice cakes.

Are there any allergy considerations for this recipe?
Absolutely! If you or anyone you are serving has nut allergies, consider using sunflower seed butter or soy nut butter as an alternative. Both options provide a delightful taste and still keep the recipe deliciously creamy. Always double-check ingredient labels to ensure safety.

Delicious Mini Rice Cakes with Nut Butter to Satisfy Cravings

Mini Rice Cakes with Nut Butter are a quick, satisfying snack combining healthy nut butter and banana for a delicious treat.

  • Butter knife or small spatula
  • Clean plate

For the Rice Cakes

  • 4 pieces Mini rice cakes (Crunchy bases for toppings)

For the Nut Butter

  • 1 tablespoon Nut butter (almond, peanut, or cashew) (Choose your favorite variety)

For the Topping

  • 1 medium Banana (Sliced for sweetness)

For the Drizzle

  • 0.5 teaspoon Honey or agave syrup (To enhance flavor)

Step-by-Step Instructions

  1. Gather all your ingredients: mini rice cakes, nut butter, banana, and honey or agave syrup.
  2. Spread 1 tablespoon of nut butter evenly across each mini rice cake.
  3. Slice the banana into thin rounds and arrange on top of the nut butter.
  4. Drizzle about half a teaspoon of honey or agave syrup over each rice cake.
  5. Serve immediately on a colorful plate to enjoy fresh and crunchy.

Store leftovers in an airtight container in the fridge for up to three days. Best enjoyed fresh.

Snack
Easy Treat, Healthy Snack, Mini Rice Cakes, Nut Butter, quick recipe

Filed Under: Dessert

Delicious Mini Pita Pockets with Hummus for Quick Snacking

August 27, 2025 by grace bellamy Leave a Comment

While rummaging through my pantry one afternoon, I stumbled upon a stash of mini whole wheat pitas. My mind immediately lit up with the idea of whipping up some delightful Mini Pita Pockets with Hummus! In just 13 minutes, you can enjoy these vibrant, nutritious pockets filled with fresh veggies, creamy hummus, and tangy feta—perfect for a quick lunch or an impressive snack for guests. Not only are they incredibly easy to make, but they’re also a fantastic way to incorporate more fruits and vegetables into your day. Each bite is a fresh reminder that healthy eating doesn’t have to be boring. Curious how to assemble these beauties? Let’s dive into the recipe!

Mini Pita Pockets with Hummus

Why are Mini Pita Pockets a Must Try?

Quick Assembly: You’ll be amazed at how effortlessly these mini pita pockets come together. With just 10 minutes of prep, you can create a healthy snack or meal that looks and tastes gourmet.

Flavor Explosion: The combo of creamy hummus, fresh veggies, and tangy feta makes each bite a delightful experience. It’s a flavor medley that keeps your taste buds dancing!

Versatile Choices: Feel free to get creative with your fillings! Swap out the veggies for your favorites or try different hummus varieties for new flavor twists.

Healthy Appeal: Each pocket is packed with nutrients, making these a guilt-free choice for any time of day. Plus, kids love them—perfect for getting little ones to enjoy healthy eating without the fuss!

Crowd Pleaser: Whether serving at parties or indulging during a solo lunch, these mini pita pockets are a surefire way to impress your guests. Don’t forget to check out other fun ways to enjoy hummus like in this delightful dip.

Mini Pita Pockets with Hummus Ingredients

For the Pockets
• Mini whole wheat pitas – These soft pitas are the perfect vessel for holding all your delicious fillings!

For the Filling
• Hummus – Any variety you love will add a creamy, flavorful base packed with nutrients.
• Cucumber – Thinly sliced for a refreshing crunch that complements the rich hummus.
• Cherry tomatoes – Halved to bring a burst of sweetness and juiciness to each bite.
• Feta cheese – Crumbled to add a tangy, salty kick that elevates the flavor of your Mini Pita Pockets with Hummus.
• Fresh baby spinach – A handful adds vibrant color and important vitamins.

These ingredients make assembling your Mini Pita Pockets a fun and nutritious experience! Enjoy!

Step‑by‑Step Instructions for Mini Pita Pockets with Hummus

Step 1: Prepare the Ingredients
Start by gathering all your ingredients on a clean countertop. Rinse the cucumber and cherry tomatoes under cold water, ensuring they’re fresh. Slice the cucumber thinly, aiming for about 1/8-inch rounds, and halve the cherry tomatoes. This vibrant, colorful prep sets the stage for your delightful Mini Pita Pockets with Hummus!

Step 2: Toast the Pitas
In a dry skillet, heat over medium heat and place the mini whole wheat pitas in the pan. Toast them for approximately 30 seconds on each side, just until they’re warm and slightly crisp but still soft. Keep an eye out for a light golden color; this is a perfect cue to remove them from the skillet and avoid burnt edges!

Step 3: Fill the Pitas
Once your pitas are lightly toasted and pliable, gently open each mini pita using your fingers. Scoop a generous dollop of hummus into the pocket, spreading it evenly along the inside. The creamy hummus not only adds flavor to your Mini Pita Pockets but also helps to hold the fillings in place—making for a satisfying bite!

Step 4: Layer the Fresh Veggies
Now it’s time to add those fresh, vibrant veggies! Start layering in the thinly sliced cucumbers, halved cherry tomatoes, crumbled feta cheese, and a handful of fresh baby spinach. The goal here is to create a colorful and nutritious filling that will delight your senses with each bite of the Mini Pita Pockets with Hummus.

Step 5: Close and Serve
Carefully close each mini pita pocket, pressing gently to secure the fillings inside. Serve them immediately while still warm for the best taste experience. These Mini Pita Pockets with Hummus are best enjoyed fresh, so gather your loved ones around and relish the joy of sharing a healthy, delicious snack!

Mini Pita Pockets with Hummus

Expert Tips for Mini Pita Pockets with Hummus

Fresh Ingredients: Always use fresh veggies and high-quality hummus for the best flavor in your Mini Pita Pockets. Quality ingredients make a noticeable difference!

Toast Carefully: Toast the pitas just until warm, not crispy. Over-toasting can make them difficult to open without tearing.

Assemble Last Minute: For the freshest taste, assemble the pockets just before serving. This keeps the veggies crunchy and the pita soft.

Experiment with Fillings: Don’t hesitate to swap or add ingredients to the filling! Avocados, roasted peppers, or even grilled chicken make excellent additions.

Storage Tip: If you have leftovers, store the fillings and pitas separately in airtight containers. This ensures quality for later enjoyment.

How to Store and Freeze Mini Pita Pockets with Hummus

Fridge: Store leftover mini pita pockets in an airtight container for up to 3 days. Keep the veggies separate to maintain their crunch.

Freezer: You can freeze the filled mini pitas for up to 1 month, but it’s best to freeze the pitas and fillings separately to avoid sogginess.

Reheating: When ready to enjoy, microwave the pitas for about 15-20 seconds to warm them up. If frozen, it’s best to thaw them in the fridge overnight before reheating.

Assembly: For the freshest taste experience, assemble the mini pita pockets with hummus just before serving. This will help preserve the vibrant flavors and textures!

Mini Pita Pockets with Hummus Variations

Feel free to elevate your Mini Pita Pockets with Hummus by trying out these fun and flavorful variations!

  • Veggie Boost: Add roasted red peppers or shredded carrots for a delightful textural crunch and a pop of flavor.
    These colorful additions make your pockets even more vibrant and nutritious.

  • Spicy Kick: Incorporate sliced jalapeños or a dash of hot sauce for a zesty heat that wakes up your taste buds.
    Spice lovers will appreciate this fiery twist on the classic!

  • Protein Power: Toss in cooked quinoa or chickpeas for an extra protein punch that keeps you full and satisfied.
    This is a wonderful way to make your snack even heartier!

  • Dairy-Free: Use cashew or tahini-based hummus for a creamy, dairy-free alternative that still packs a flavorful punch.
    This swap keeps the creamy goodness while accommodating dietary preferences!

  • Herb Infusion: Mix in fresh herbs like parsley or mint to give your pockets a refreshing twist.
    These herbs add vibrant flavors that elevate the overall experience.

  • Greek Style: Swap feta for a dollop of tzatziki sauce to bring in that classic Mediterranean flavor profile.
    This variation offers a cool and tangy contrast to the fillings!

  • Crunchy Twist: Add sunflower seeds or walnuts for an unexpected crunch that enhances both flavor and texture.
    A little crunch goes a long way in keeping your palate interested!

  • Flavorful Pita: Try using flavored pita bread, such as garlic or spinach, to instantly change up the taste of your pockets.
    This small change can lead to a big flavor impact, giving you different taste adventures!

Explore these variations to make your Mini Pita Pockets with Hummus even more exciting for every palate! And remember, the sky’s the limit when it comes to customizing your delicious creations!

Make Ahead Options

These Mini Pita Pockets with Hummus are fantastic for meal prep, allowing you to enjoy quick and healthy snacks throughout the week! You can prepare the filling—sliced cucumbers, halved cherry tomatoes, crumbled feta, and baby spinach—up to 3 days in advance. Simply store them in an airtight container in the refrigerator to maintain their freshness and prevent wilting. The hummus can also be pre-portioned into small containers for easy access. When you’re ready to serve, warm the mini pitas in a skillet for about 30 seconds on each side, then simply fill with the prepped ingredients. This way, you’ll have delicious and satisfying Mini Pita Pockets with Hummus ready in minutes!

What to Serve with Mini Pita Pockets with Hummus?

Create a delightful meal that complements these vibrant, nutritious pockets with fresh and flavorful sides.

  • Crispy Kale Chips: The crunchy texture pairs beautifully with the soft mini pitas, adding a satisfying bite while still keeping things healthy.
  • Mediterranean Quinoa Salad: Light and zesty, this salad brimming with flavors enhances the Middle Eastern vibe of your meal.
  • Roasted Red Pepper Dip: This smoky dip adds depth and a touch of sweetness, elevating your snacking experience alongside the hummus.
  • Feta and Olive Platter: Enjoy a simple yet elegant cheese board that brings a variety of tastes to your table, perfect for sharing.
  • Chilled Gazpacho: A refreshing, raw vegetable soup that offers a vibrant contrast to the warm mini pitas for a well-rounded meal.
  • Fruit Skewers: Bright, juicy pieces of seasonal fruit provide a sweet finish and contrast the savory flavors of your pita pockets.
  • Sparkling Water with Mint: This refreshing drink cleanses the palate effectively, making each bite of your mini pita pockets even more enjoyable.
  • Lemon Sorbet: As a light and refreshing dessert, it rounds out the meal with a sweet, citrusy flavor that hints at summer bliss.

Mini Pita Pockets with Hummus

Mini Pita Pockets with Hummus Recipe FAQs

How do I choose the best cucumbers for my Mini Pita Pockets?
Absolutely! Look for cucumbers that are firm, unblemished, and have a vibrant green color. Avoid those with yellowing or dark spots, as they may be overripe and have a watery texture. It’s always best to opt for organic cucumbers if possible, as they tend to have better flavor and fewer pesticides.

How long can I store leftover Mini Pita Pockets in the fridge?
You can store leftover mini pita pockets in an airtight container in the fridge for up to 3 days. Make sure to keep the pitas and fillings separated to ensure that the veggies stay crunchy and fresh. When you’re ready to enjoy them, a quick zap in the microwave for about 15-20 seconds can revive their deliciousness!

Can I freeze Mini Pita Pockets? If so, how?
Absolutely! To freeze your mini pita pockets, it’s best to freeze the pitas and fillings separately. Place the pitas in a freezer-safe bag, removing as much air as possible, and they can stay fresh for up to 1 month. For the fillings, store them in an airtight container or a separate freezer bag. When you’re ready to enjoy, simply thaw the fillings in the fridge overnight, then reheat the pitas in the microwave for about 15-20 seconds.

What should I do if my pitas tear while opening them?
Very common! If your pitas tear, don’t worry. Just use some tortilla or lettuce leaves as an alternative wrap for your fillings—this will actually create a fun, fresh way to enjoy the same delicious taste of your Mini Pita Pockets with Hummus without losing any flavor. You can also try warming your pitas for a shorter period or using a gentler touch when opening them next time!

Are Mini Pita Pockets suitable for kids?
Yes, indeed! They are a fantastic option for kids, as they can pick their favorite fillings and enjoy a hands-on meal. Be mindful of any allergies, especially to dairy since feta cheese is involved. If you’re serving these to young children, you might want to try a cheese alternative or leave it out completely.

What are some other filling ideas for my Mini Pita Pockets?
The more the merrier! Feel free to get creative with your fillings. You can include roasted red peppers, avocado, grilled chicken, or even chickpeas for added protein. Fresh herbs like cilantro or basil can also elevate the flavor profile. Experiment with different hummus varieties too—spicy hummus, roasted garlic, or even beet hummus can make your Mini Pita Pockets a unique and delightful experience every time!

Delicious Mini Pita Pockets with Hummus for Quick Snacking

Mini Pita Pockets with Hummus are quick, healthy, and delicious, filled with fresh veggies and creamy hummus.

  • skillet

For the Pockets

  • 4 pieces Mini whole wheat pitas

For the Filling

  • 1 cup Hummus (Any variety you love)
  • 1 medium Cucumber (Thinly sliced)
  • 1 cup Cherry tomatoes (Halved)
  • 1/2 cup Feta cheese (Crumble)
  • 1 cups Fresh baby spinach (A handful)

Step-by-Step Instructions

  1. Gather all your ingredients, rinse the cucumber and cherry tomatoes, slice the cucumber thinly, and halve the cherry tomatoes.
  2. In a dry skillet, heat over medium and toast the mini whole wheat pitas for about 30 seconds on each side until warm and slightly crisp.
  3. Gently open each mini pita and scoop a generous dollop of hummus inside.
  4. Layer in the sliced cucumbers, halved cherry tomatoes, crumbled feta cheese, and fresh baby spinach.
  5. Close each mini pita pocket and serve immediately while warm.

Assemble just before serving for the best taste experience. Store leftovers in airtight containers, keeping veggies separate.

Sandwiches
Mediterranean
Healthy Snack, Hummus, Mini Pita Pockets, quick lunch, Vegetarian

Filed Under: Sandwiches

Mummy Brownies: Spooktacular Treats for Halloween Fun!

August 27, 2025 by grace bellamy Leave a Comment

As I was dusting off my fall decorations, an idea struck me: why not bring the Halloween spirit into my kitchen? Enter Mummy Brownies, the spooktacular dessert that’s as easy to whip up as it is to devour. These delightful treats are not only a crowd-pleaser but also a wonderful way to get everyone involved in a bit of holiday fun! With just 15 minutes of prep, you can create fudgy brownies that are perfect for parties or cozy family movie nights. Topped with a simple white icing that mimics mummy wrappings, you’ll be surprised by how something so festive can come together so quickly. Ready to bake some magic and impress your loved ones? Let’s unmask the secrets to these adorable Mummy Brownies!

Mummy Brownies

Why are Mummy Brownies a must-try?

Irresistible fudginess: Each bite of these brownies is a chewy delight, perfect for anyone who loves a rich dessert.

Quick and easy: With just 15 minutes of prep time, you can whip up a batch of Mummy Brownies that are ready for the oven!

Festive fun: The spooky decoration makes them a hit for Halloween parties, bringing an instant cheer to your gatherings.

Family involvement: Get the kids involved in creating their own mummy designs—it’s a great bonding activity!

Versatile treats: Perfectly pair these brownies with ice cream for a double dessert experience or serve them at any celebration.

With these delicious Mummy Brownies, you can elevate your dessert game and create unforgettable memories. For more festive ideas, check out my Halloween Dessert Collection.

Mummy Brownies Ingredients

• Create delicious Mummy Brownies with these simple ingredients!

For the Brownie Batter

  • Unsweetened cocoa powder – Gives these brownies their rich, chocolatey flavor.
  • Granulated sugar – Sweetens the brownies and balances the cocoa’s bitterness.
  • All-purpose flour – Provides structure, making the brownies perfectly chewy.
  • Large eggs – Binds the ingredients together and adds moisture for fudginess.
  • Unsalted butter (melted) – Adds a rich flavor and enhances the brownie texture.

For the Decoration

  • White icing – Used to create the mummy’s wrapping, adding a spooky touch!

Get ready to impress with these Mummy Brownies, where each bite is a delightful treat!

Step-by-Step Instructions for Mummy Brownies

Step 1: Preheat and Prepare
Begin by preheating your oven to 350°F (175°C). While the oven heats up, take a moment to grease a baking pan or line it with parchment paper for easy removal later. This step ensures that your Mummy Brownies come out perfectly every time without sticking to the pan.

Step 2: Mix the Dry Ingredients
In a large mixing bowl, whisk together 1 cup of unsweetened cocoa powder, 1 cup of granulated sugar, 1 cup of all-purpose flour, and a pinch of salt. The mixture should become smooth and uniform, with no lumps remaining. This blend will create the base of your rich brownies, so make sure it’s well combined before moving on.

Step 3: Prepare the Wet Ingredients
In a separate bowl, melt 1/2 cup of unsalted butter and allow it to cool slightly. Once cooled, mix in 2 large eggs using a whisk until the mixture is smooth and fully blended. This will create a luscious wet base that adds moisture and richness, essential for your Mummy Brownies.

Step 4: Combine and Stir
Gently fold the wet mixture into the dry ingredients until just combined. Be careful not to overmix; this helps maintain the fudginess that makes Mummy Brownies so delightful. The batter should appear thick and lusciously chocolatey, ready to be spread into the baking pan.

Step 5: Bake the Brownies
Pour the brownie batter into the prepared baking pan, spreading it evenly for consistent baking. Place the pan in the preheated oven and bake for 25-30 minutes. Keep an eye on the brownies—look for a toothpick inserted in the center to come out with a few moist crumbs, signaling they are perfectly baked.

Step 6: Cool and Decorate
Once baked, remove the pan from the oven and allow the brownies to cool in the pan for about 10-15 minutes. After cooling, carefully cut the brownies into squares. Use white icing to create zigzag patterns on top, mimicking the wrappings of mummies, and finish by adding candies for adorable eyes to complete your festive Mummy Brownies!

Mummy Brownies

What to Serve with Mummy Brownies?

Indulging in a cozy baking session has never felt so delightful, especially when paired with a few scrumptious additions.

  • Vanilla Ice Cream: A scoop of creamy vanilla ice cream adds a luscious contrast to the fudgy texture, creating a delectable experience.
    When the warm brownies melt the ice cream slightly, every bite becomes a delightful blend of flavors.

  • Fresh Berries: Bright and tangy berries, like raspberries or strawberries, provide a refreshing pop that balances the sweetness of the brownies.
    Their natural acidity cuts through the rich chocolate, enhancing the overall taste.

  • Chocolate Sauce: Drizzling warm chocolate sauce over the brownies intensifies their chocolate flavor and creates an extra layer of indulgence.
    It’s a simple way to elevate your dessert into an unforgettable treat.

  • Whipped Cream: Light and airy whipped cream brings a delightful contrast to the rich brownies, adding a smooth finish with every forkful.
    Consider adding a sprinkle of cocoa powder for a charming touch.

  • Mint Tea: A cup of soothing mint tea complements the chocolatey richness, refreshing your palate and creating a balanced dessert experience.
    The fragrant aroma enhances dessert enjoyment, perfect for winding down after a meal.

  • Caramel Sauce: Drizzling caramel sauce adds a deliciously sweet layer that brings harmony and warmth to those rich, fudgy brownies.
    It’s a match made in dessert heaven that’s sure to please every sweet tooth.

  • Milk: A classic pairing, a glass of cold milk provides a refreshing contrast against the richness of the Mummy Brownies.
    It’s the ultimate childhood staple that enhances the nostalgic experience.

  • Coffee: A warm cup of coffee or espresso elevates the chocolate flavor while enhancing your senses with its bold aroma.
    The slight bitterness contrasts beautifully, making each brownie taste even more delightful.

Enjoy crafting the perfect dessert experience with these pairings!

How to Store and Freeze Mummy Brownies

Room Temperature: Store leftover Mummy Brownies in an airtight container at room temperature for up to 3 days to keep them fresh and moist.

Fridge: If you want to extend their shelf life, you can refrigerate them for up to a week. Just be sure to wrap them tightly to avoid drying out.

Freezer: For longer storage, freeze Mummy Brownies in a well-sealed container for up to 3 months. Let them thaw at room temperature before enjoying.

Reheating: To reheat, pop them in the microwave for 10-15 seconds or warm them in an oven at 350°F (175°C) for a few minutes until just warmed through.

Mummy Brownies Variations & Substitutions

Feel free to get creative and customize your Mummy Brownies with these fun twists that will elevate their flavor and flair!

  • Gluten-Free: Substitute all-purpose flour with a 1:1 gluten-free blend for a delicious gluten-free treat. Your brownies will still be fudgy and delightful!

  • Vegan: Swap eggs for flaxseed meal (1 tablespoon ground flaxseed + 3 tablespoons water per egg) and use vegan butter. You won’t miss the eggs one bit!

  • Nutty Touch: Add 1/2 cup of chopped walnuts or pecans to the batter for a delightful crunch. The added texture complements the fudginess beautifully!

  • Peppermint Twist: Mix in 1 teaspoon of peppermint extract into your batter for a festive, seasonal flavor. This adds a refreshing touch to your Halloween-themed treats!

  • Spicy Kick: Incorporate 1/2 teaspoon of cayenne pepper or chili powder into the dry ingredients for a unique heat that surprises with every bite. Who said Halloween treats couldn’t be a little fiery?

  • Dairy-Free: Replace unsalted butter with coconut oil or a dairy-free butter alternative for a rich, buttery flavor without the dairy. This swap keeps your brownies indulgent yet accessible!

  • Gourmet Toppings: Instead of white icing, drizzle dark chocolate icing or caramel sauce for a richer finish. You’ll elevate the dessert while keeping that spooky charm intact!

  • Berry Goodness: Fold in a handful of mini chocolate chips or freeze-dried raspberries into the batter before baking. These additions bring bursts of flavor in each fudgy square!

With these delightful variations, you can personalize your Mummy Brownies to fit every dietary preference and impress everyone at your Halloween gathering. For more creative ideas, don’t forget to check out my Halloween Dessert Collection for more spooktacular treats!

Tips for the Best Mummy Brownies

  • Don’t Overmix: Gently combine the wet and dry ingredients until just blended. Overmixing can lead to dry brownies, losing that fudgy texture.

  • Correct Baking Time: Keep an eye on the baking time; check with a toothpick around 25 minutes. Remove them while moist for a fudgy finish!

  • Icing Tips: Allow the brownies to cool completely before icing. This prevents the icing from sliding off and helps achieve the perfect mummy look.

  • Customize Your Mummies: Use different candies for the eyes—try chocolate chips, M&M’s, or even gummy worms for a fun twist!

  • Storage Matters: Store leftover Mummy Brownies in an airtight container at room temperature for up to 3 days to keep them fresh and delicious.

With these tips, you’re well on your way to baking the best Mummy Brownies that will delight all your family and friends!

Make Ahead Options

These Mummy Brownies are perfect for meal prep, allowing you to enjoy the festive fun without the last-minute rush! You can prepare the brownie batter up to 24 hours in advance by mixing the dry ingredients and storing them in an airtight container. Additionally, you can melt the butter and mix it with the eggs, storing this mixture in the fridge until ready to bake. When you’re ready to serve, simply combine the wet and dry ingredients, pour the batter into the pan, and bake as directed. This way, you’ll have delicious Mummy Brownies that taste just as fresh and fudgy, saving you time on busy days!

Mummy Brownies

Mummy Brownies Recipe FAQs

What kind of cocoa powder should I use for Mummy Brownies?
Absolutely! For the richest flavor, I recommend using unsweetened cocoa powder. It gives the brownies their deep chocolate essence without adding extra sweetness. If you prefer a more intense chocolate flavor, you could even use Dutch-processed cocoa, but just be aware it may result in a slightly different texture.

How should I store leftover Mummy Brownies?
To keep your Mummy Brownies fresh, store them in an airtight container at room temperature for up to 3 days. If you want them to last a bit longer, refrigerate them for up to a week, making sure they’re tightly wrapped to avoid drying out. They should remain delightfully chewy and fudgy!

Can I freeze Mummy Brownies?
Yes, you can freeze Mummy Brownies! To do this, cut them into squares once cooled and place them in a well-sealed container or wrap them individually in plastic wrap and then foil. They can be frozen for up to 3 months. When you’re ready to enjoy them, simply let them thaw at room temperature for a couple of hours, or microwave them for 10-15 seconds for a quick treat!

What if my brownies turn out too cakey?
Very! If your brownies are more cakey than fudgy, it could be due to overmixing the batter or baking it for too long. Remember to combine the wet and dry ingredients just until mixed, and start checking for doneness at 25 minutes. If your brownies have already baked too long, consider serving them warm with ice cream—it’ll add a delicious creaminess!

Are there any dietary considerations for pets?
Definitely keep in mind that chocolate is toxic to dogs and other pets! If you’re planning to share your Mummy Brownies with family and friends, be sure to keep them out of reach of pets or simply make a pet-friendly treat to enjoy together. Always prioritize safety for your furry friends!

Mummy Brownies: Spooktacular Treats for Halloween Fun!

Mummy Brownies are a spooky dessert that brings fun and flavor to Halloween celebrations.

  • Mixing Bowl
  • Whisk
  • baking pan

For the Brownie Batter

  • 1 cup unsweetened cocoa powder (Gives these brownies their rich, chocolatey flavor.)
  • 1 cup granulated sugar (Sweetens the brownies and balances the cocoa’s bitterness.)
  • 1 cup all-purpose flour (Provides structure, making the brownies perfectly chewy.)
  • 2 large eggs (Binds the ingredients together and adds moisture for fudginess.)
  • 0.5 cup unsalted butter (melted) (Adds a rich flavor and enhances the brownie texture.)

For the Decoration

  • 1 cup white icing (Used to create the mummy’s wrapping, adding a spooky touch!)

Step-by-Step Instructions for Mummy Brownies

  1. Preheat your oven to 350°F (175°C) and grease a baking pan or line it with parchment paper.
  2. In a large mixing bowl, whisk together the cocoa powder, granulated sugar, all-purpose flour, and a pinch of salt.
  3. In a separate bowl, melt the butter and mix in the eggs until smooth.
  4. Gently fold the wet mixture into the dry ingredients until just combined.
  5. Pour the brownie batter into the prepared baking pan and bake for 25-30 minutes.
  6. Allow the brownies to cool for 10-15 minutes, then cut into squares and decorate with white icing.

For optimal results, avoid overmixing and check baking time with a toothpick.

Dessert
American
chocolate brownies, easy baking, family fun, Halloween Treats, Mummy Brownies, spooky desserts

Filed Under: Dessert

Irresistibly Soft Baked Pumpkin Donut Holes You’ll Love

August 27, 2025 by grace bellamy Leave a Comment

As the crisp autumn air sweeps in, I find myself gravitating towards cozy flavors that not only warm the heart but also ignite the senses. Enter my favorite fall indulgence: Baked Pumpkin Donut Holes. These delightful bites are not just a treat; they make for a quick and easy dessert that even the busiest home chefs can whip up in under 30 minutes. With the irresistible combination of pumpkin puree and fragrant spices, they’re a crowd-pleaser that everyone will adore. Plus, they’re healthier than traditional fried donuts, allowing you to enjoy the season’s sweetness without the guilt. Are you ready to fill your kitchen with the comforting aroma of autumn? Let’s dive into this scrumptious recipe together!

Baked Pumpkin Donut Holes

Why Are These Donut Holes Irresistible?

Soft, Fluffy Texture: The magic of pumpkin puree ensures each bite is melt-in-your-mouth soft, making these Baked Pumpkin Donut Holes a dream for dessert lovers.

Time-Saving Delight: With a total time of just 22 minutes, you can easily satisfy your sweet tooth without spending hours in the kitchen.

Versatile Treat: Serve them warmed for breakfast, or as a cozy afternoon snack — the choice is yours!

Guilt-Free Indulgence: Lower in calories compared to their fried counterparts, you can indulge without the guilt.

Aromatic Spice Blend: The warm spices of cinnamon, nutmeg, and ginger create an inviting aroma that fills your kitchen with the essence of fall.

Ready to elevate your snacking game? These Baked Pumpkin Donut Holes are sure to become your new favorite!

Baked Pumpkin Donut Holes Ingredients

For the Batter
• Pumpkin puree – adds natural sweetness and moisture that makes these donut holes irresistibly soft.
• All-purpose flour – the base for your batter; be sure to measure accurately for the best texture.
• Granulated sugar – sweetens the treat; feel free to adjust based on your preference.
• Brown sugar – provides a hint of caramel flavor and helps to keep the donut holes moist.
• Baking powder – gives a nice rise and fluffy texture.
• Baking soda – acts as a leavening agent; essential for that perfect lift.
• Salt – enhances all the flavors, bringing balance to the sweetness.
• Ground cinnamon – the quintessential fall spice that creates a warm, homey aroma.
• Ground nutmeg – adds a nutty depth, perfectly complementing the pumpkin flavor.
• Ground ginger – offers a zingy warmth that perfectly rounds out the spice blend.
• Large eggs – bind the ingredients together and contribute to the fluffy texture.
• Vegetable oil or melted butter – adds richness and moisture; use whichever you prefer!
• Milk – assists in achieving the perfect consistency in your batter.

For Coating
• Granulated sugar – coats the warm donut holes for a delightful sweetness.
• Ground cinnamon – gives an extra layer of fall flavor in the coating to enhance every bite.

Dive into making these Baked Pumpkin Donut Holes and experience the cozy flavors of fall!

Step‑by‑Step Instructions for Baked Pumpkin Donut Holes

Step 1: Preheat the Oven and Prepare the Pan
Begin by preheating your oven to 350°F (175°C). While it heats, grab your donut hole pan and generously grease it with cooking spray or butter to prevent sticking. This is essential for a smooth release later! Keep your pan ready to fill as soon as the batter is prepared.

Step 2: Mix the Dry Ingredients
In a large mixing bowl, whisk together the 1 ½ cups of all-purpose flour, 1 teaspoon baking powder, ½ teaspoon baking soda, ½ teaspoon salt, and the warm spices: 1 teaspoon ground cinnamon, ½ teaspoon ground nutmeg, and ½ teaspoon ground ginger. Ensure these are well combined and aerated, creating a beautiful aroma that will remind you of fall!

Step 3: Combine the Wet Ingredients
In a separate bowl, mix 1 cup of pumpkin puree, ½ cup granulated sugar, ¼ cup packed brown sugar, 2 large eggs, ⅓ cup vegetable oil, and ¼ cup milk. Stir until everything is blended smoothly, creating a vibrant and inviting mixture. This lovely combination is the heart of your Baked Pumpkin Donut Holes!

Step 4: Combine Wet and Dry Ingredients
Carefully pour the wet mixture into the bowl of dry ingredients. Stir gently until just combined; remember, a few lumps are perfectly fine! Overmixing can lead to dense donut holes, so embrace that soft texture that pumpkin provides. You should see a gorgeous, thick batter forming; it’s already looking delicious!

Step 5: Fill the Donut Hole Pan
Using a spoon or a piping bag, fill each cavity of your prepared donut hole pan about ⅔ full with the batter. This allows enough room for them to rise beautifully without overflowing. Make sure you go ahead and smooth the tops out for an even finish, so they bake evenly.

Step 6: Bake to Perfection
Place your filled donut hole pan in the preheated oven. Bake for 10-12 minutes, or until a toothpick inserted into the center comes out clean. Keep an eye on them; they should be lightly golden on top and spring back when touched. Your kitchen will soon fill with the comforting scent of baked goodies!

Step 7: Cool and Coat with Sugar
Once baked, remove the pan from the oven and let the donut holes cool for about 5 minutes. This short cooling time helps them firm up. Next, prepare a mixture of ¼ cup granulated sugar and 1 teaspoon ground cinnamon in a bowl. Roll each donut hole in this sweet coating while they’re still warm, adding an extra layer of deliciousness!

Step 8: Serve or Store
These delectable Baked Pumpkin Donut Holes are best enjoyed warm, fresh out of the oven! Serve them immediately for a delightful treat, or store them in an airtight container for up to 3 days. Look forward to indulging in these soft, fall-inspired bites anytime you need a little sweetness!

Baked Pumpkin Donut Holes

Expert Tips for Baked Pumpkin Donut Holes

Avoid Overmixing: Mixing too much can lead to dense donut holes. Stir gently and embrace a few lumps for a lighter treat.

Use Fresh Spices: For the best flavor, use fresh ground spices. They pack more punch and enhance the warmth of your Baked Pumpkin Donut Holes.

Don’t Skip the Grease: Make sure to generously grease your donut hole pan. This prevents sticking and ensures your sweet creations pop out easily.

Check Doneness Early: Ovens can vary, so check your donut holes a minute or two early to avoid overbaking. You want them lightly golden and fluffy!

Coat While Warm: Rolling the donut holes in sugar while they’re still warm helps the coating stick better, enhancing that delightful sweetness in every bite.

Make Ahead Options

These Baked Pumpkin Donut Holes are perfect for busy home cooks seeking to save time without sacrificing flavor! You can prepare the batter up to 24 hours in advance; simply mix the wet and dry ingredients, cover the bowl tightly, and refrigerate until you’re ready to bake. This keeps the batter fresh and ensures the spices maintain their aromatic qualities. When you’re ready to enjoy, just spoon the batter into your greased donut hole pan and bake as directed. For optimal texture, it’s best to bake them fresh on the day you plan to serve. Enjoy these cozy treats with minimal effort on your busy mornings!

Baked Pumpkin Donut Holes Variations

Feel free to customize these delightful bites to match your taste preferences and dietary needs!

  • Gluten-Free: Swap out all-purpose flour for a 1:1 gluten-free baking blend for a similar texture without the gluten.

  • Sugar-Free: Use erythritol or a stevia-based sweetener to reduce sugar content while still keeping the sweetness in check.

  • Dairy-Free: Substitute almond milk or coconut milk for regular milk, and choose vegetable oil instead of butter for a dairy-free treat.

  • Extra Spices: Add a pinch of cloves or cardamom to the batter for an exciting flavor twist that will awaken your taste buds.

  • Chocolate Chip Delight: Fold in ½ cup of dairy-free or regular chocolate chips to the batter for a delightful chocolatey surprise in every bite.

  • Nutty Crunch: Mix in ½ cup of chopped walnuts or pecans for a satisfying crunch that complements the soft texture of the donut holes.

  • Maple Coating: Instead of rolling in sugar and cinnamon, brush the warm donut holes with maple syrup and then roll them in cinnamon for a sweet twist.

  • Spicy Kick: Add a dash of cayenne pepper or chili powder to the batter for a fun and unexpected heat that pairs surprisingly well with pumpkin!

These playful variations will keep you excited and ensure there’s a perfect Baked Pumpkin Donut Hole for everyone to enjoy!

What to Serve with Baked Pumpkin Donut Holes

As you indulge in these delightful treats, consider the perfect accompaniments that will elevate your autumn snacking experience.

  • Creamy Hot Chocolate: The rich, velvety texture beautifully complements the soft donut holes, providing a warming drink as the crisp weather sets in. Snuggle up with a blanket and enjoy the cozy combination!

  • Vanilla Yogurt Parfait: Layered with seasonal fruits and granola, this refreshing option brings a delightful crunch that contrasts perfectly with the tender sweetness of the donut holes. It’s a lovely way to start your day!

  • Spiced Chai Latte: The warming spices of chai enhance the flavors of the pumpkin donut holes, creating an aromatic and comforting pairing that invites you to linger a little longer over your snacks.

  • Maple Glazed Apples: Sautéed in maple syrup, these apples add a fruity sweetness that balances the rich flavors of the donut holes, making for a heartwarming autumn treat.

  • Whipped Cream Cheese Dip: A creamy dip adds a luscious texture that pairs beautifully with the sweet donut holes. It’s a delightful blend of flavors that will have your guests reaching for more.

  • Cranberry Tea: This subtly tart beverage offers a refreshing contrast to the sweet and spiced donut holes, making it an ideal sip for those chillier afternoons.

These accompaniments will transform your Baked Pumpkin Donut Holes into a memorable, flavor-filled feast!

How to Store and Freeze Baked Pumpkin Donut Holes

Room Temperature: Store the Baked Pumpkin Donut Holes in an airtight container at room temperature for up to 3 days. Enjoying them fresh is the best, but they will last for a cozy few days.

Fridge: If you prefer longer storage, place the donut holes in the fridge for up to a week. Be sure to keep them in an airtight container to prevent them from drying out.

Freezer: For future indulgence, freeze the donut holes in a single layer on a baking sheet, then transfer to a freezer-safe bag for up to 3 months. Thaw at room temperature before enjoying or warm them gently in the oven.

Reheating: To enjoy the donut holes warm, simply reheat them in the oven at 350°F (175°C) for about 5-7 minutes, bringing back their delightful softness and flavor.

Baked Pumpkin Donut Holes

Baked Pumpkin Donut Holes Recipe FAQs

How do I select the best pumpkin puree?
Absolutely! When choosing pumpkin puree, look for a brand that lists only pumpkin as the ingredient, avoiding those with added sugars or preservatives. If you prefer making it from scratch, select a medium-sized sugar pumpkin, roast it, scoop out the flesh, and puree it in a blender until smooth.

How long can I store Baked Pumpkin Donut Holes?
For the best tasting experience, store your Baked Pumpkin Donut Holes in an airtight container at room temperature for up to 3 days. If you need a bit more time, simply move them to the refrigerator, where they should stay fresh for up to a week. Just remember to keep them sealed tightly to retain their moisture and softness!

Can I freeze Baked Pumpkin Donut Holes?
Very much so! To freeze your Baked Pumpkin Donut Holes, first let them cool completely. Then, place them in a single layer on a baking sheet and freeze until solid. Once frozen, transfer them to a freezer-safe bag and store for up to 3 months. To enjoy, simply thaw at room temperature or reheat in the oven at 350°F (175°C) for about 5-7 minutes for that warm, fresh taste.

What should I do if my donut holes are too dense?
If your Baked Pumpkin Donut Holes turned out denser than expected, the likely culprit is overmixing. When combining wet and dry ingredients, mix just until combined. Another takeaway is to ensure your leavening agents, such as baking powder and baking soda, are fresh; expired ingredients can affect texture.

Are Baked Pumpkin Donut Holes suitable for those with food allergies?
Certainly! If you’re accommodating dietary restrictions, you can easily adapt this recipe. For a gluten-free version, substitute all-purpose flour with a 1:1 gluten-free flour blend. To make it dairy-free, opt for a non-dairy milk alternative and use dairy-free butter. Always check labels for potential allergens.

How should I prevent the donut holes from sticking to the pan?
To ensure a perfect release, generously grease your donut hole pan with butter or cooking spray before filling it with batter. You can also lightly dust the greased pans with flour, tapping out the excess. This step will create a non-stick surface, allowing your Baked Pumpkin Donut Holes to pop out easily after baking.

Irresistibly Soft Baked Pumpkin Donut Holes You’ll Love

Delight in these Baked Pumpkin Donut Holes, a quick and easy dessert bursting with cozy autumn flavors.

  • Donut hole pan
  • Mixing bowls
  • Whisk
  • Spoon or piping bag

For the Batter

  • 1 cup pumpkin puree
  • 1.5 cups all-purpose flour
  • 0.5 cups granulated sugar
  • 0.25 cups packed brown sugar
  • 1 teaspoon baking powder
  • 0.5 teaspoon baking soda
  • 0.5 teaspoon salt
  • 1 teaspoon ground cinnamon
  • 0.5 teaspoon ground nutmeg
  • 0.5 teaspoon ground ginger
  • 2 large eggs
  • 0.33 cups vegetable oil or melted butter
  • 0.25 cups milk

For Coating

  • 0.25 cups granulated sugar
  • 1 teaspoon ground cinnamon

Step‑by‑Step Instructions

  1. Preheat your oven to 350°F (175°C) and grease your donut hole pan.
  2. In a large bowl, whisk together the dry ingredients: flour, baking powder, baking soda, salt, cinnamon, nutmeg, and ginger.
  3. In a separate bowl, mix together the wet ingredients: pumpkin puree, granulated sugar, brown sugar, eggs, vegetable oil, and milk until smooth.
  4. Pour the wet mixture into the dry ingredients and stir gently until just combined.
  5. Fill each cavity of the greased donut hole pan about ⅔ full with the batter.
  6. Bake for 10-12 minutes, or until a toothpick inserted comes out clean.
  7. Let the donut holes cool for about 5 minutes before rolling them in a mixture of sugar and ground cinnamon.
  8. Serve warm or store in an airtight container for up to 3 days.

For best results, avoid overmixing the batter and coat the donut holes while they are still warm.

Dessert
American
Baked Pumpkin Donut Holes, Cozy Flavors, Donut Holes, easy dessert, Fall Treat, Pumpkin Dessert

Filed Under: Dessert

Delicious Crunchy Apple Sandwich with Granola & Yogurt Snack

August 27, 2025 by grace bellamy Leave a Comment

As I stood in my kitchen, the vibrant colors of Fuji apples caught my eye, inspiring a delightful little idea. This Crunchy Apple Sandwich with Granola & Yogurt Snack is a perfect way to enjoy the wholesome goodness of fresh fruit while indulging in a bit of crunch. In just 10 minutes, you can whip up a satisfying snack that’s not only incredibly easy to make, but also a fantastic option for those hot afternoons when you crave something refreshing. The creamy Greek yogurt and nutty granola pair beautifully with the crisp apple slices, creating a combination that’s as pleasing to the palate as it is to the eyes. Plus, it’s a guilt-free treat that leaves you feeling energized! Curious about how to put this simple yet delicious snack together? Let’s dive in!

Crunchy Apple Sandwich with Granola & Yogurt Snack

Why is this Apple Sandwich so special?

Quick and effortless: With only 10 minutes of preparation, you’ll have a delicious snack ready in no time.

Crisp and refreshing: The contrast of fresh apple slices with creamy yogurt and crunchy granola is simply delightful.

Customizable toppings: Feel free to switch up the granola or add different fruits to suit your taste.

Nutritious goodness: Packed with fiber and protein, this snack is a wholesome choice that will keep you satisfied.

Great for meal prep: Make a batch in advance for an easy grab-and-go treat throughout the week! You can pair these sandwiches with your favorite Greek yogurt options for an added flavor boost.

Crunchy Apple Sandwich Ingredients

Discover all the components you’ll need to create this delightful Crunchy Apple Sandwich with Granola & Yogurt Snack!

For the Sandwich

  • Fuji or Honeycrisp apples – these varieties add a natural sweetness and perfect crunch.
  • Greek yogurt – offers creaminess and protein to make the sandwich satisfying.

For the Crunch

  • Granola – look for a mix with nuts and seeds for added texture and flavor.
  • Honey or maple syrup – drizzle for a touch of sweetness to enhance the overall taste.

Enjoy crafting this easy, nutritious treat that bursts with flavor!

Step‑by‑Step Instructions for Crunchy Apple Sandwich with Granola & Yogurt Snack

Step 1: Prepare the Apples
Begin by thoroughly washing 2 medium Fuji or Honeycrisp apples under cool running water. Once clean, slice each apple horizontally into half-inch thick rounds, ensuring they are uniform for even layering. Carefully remove any seeds or core remnants from each slice, which will make your crunchy apple sandwich not only delicious but safe to enjoy.

Step 2: Spread the Yogurt
Take a generous scoop of plain or flavored Greek yogurt and spread it evenly over one side of an apple slice. Using a butter knife or a small spatula will help create a nice, smooth layer. Make sure the yogurt is visible along the edges of the apple, as this will support the granola and flavors in your Crunchy Apple Sandwich.

Step 3: Add the Granola
Sprinkle a half cup of your favorite granola evenly over the yogurt-covered apple slice. Choose granola that contains nuts and seeds for added texture and flavor. The granola should create a sweet and crunchy layer that complements the creamy yogurt. Take a moment to appreciate how the layers come together to form a satisfying base for your sandwich.

Step 4: Drizzle with Sweetness
Finish off the granola layer by drizzling a tablespoon of honey or maple syrup across it. This not only adds a touch of sweetness but also enhances the flavors, making this Crunchy Apple Sandwich even more delightful. The syrup should glisten as it clings to the granola, providing visual appeal and a hint of delicious stickiness.

Step 5: Assemble the Sandwich
Place another apple slice gently on top of the granola layer, yogurt side down, to create a sandwich. Press down lightly to help the layers stick together, but be careful not to squish the apple. You’ll want to maintain that beautiful crunch as you bring this refreshing snack together.

Step 6: Serve Immediately
Your Crunchy Apple Sandwich with Granola & Yogurt Snack is ready to enjoy! To maintain maximum freshness and crunch, serve immediately. Take a moment to admire your creation and savor the satisfying texture before diving in. Each bite will offer a delightful combination of crisp apples, creamy yogurt, and crunchy granola.

Crunchy Apple Sandwich with Granola & Yogurt Snack

Tips for the Best Crunchy Apple Sandwich

  • Apple Selection: Choose Fuji or Honeycrisp apples for their sweetness and crisp texture. Avoid mushy apples that won’t provide the satisfying crunch you desire.

  • Yogurt Layer: Spread the yogurt generously, but not too thick. A well-distributed layer will keep everything intact without overwhelming the apple’s natural flavor.

  • Granola Choice: Opt for granola with nuts and seeds to add nutrition and crunch to your sandwich. Check the sugar content to ensure your snack remains healthy.

  • Drizzle Wisely: A light drizzle of honey or maple syrup complements the flavors perfectly. Too much can make the sandwich soggy, so go easy!

  • Assembly Matters: Assemble right before serving for maximum freshness. If prepared too early, the apples can lose their crunch, impacting the overall experience of your Crunchy Apple Sandwich with Granola & Yogurt Snack.

Crunchy Apple Sandwich Variations

Feel free to explore these mouthwatering twists on your Crunchy Apple Sandwich that will keep your taste buds excited!

  • Nut-Free: Swap granola with seeds like sunflower or pumpkin for crunch without nuts. Enjoy the same satisfying texture while making it safe for nut allergies.

  • Vegan Delight: Use coconut yogurt instead of Greek yogurt and maple syrup instead of honey for a completely plant-based snack. It’s a delightful way to enjoy this tasty treat.

  • Spicy Kick: Add a sprinkle of cayenne or cinnamon to the yogurt for a flavorful twist. A little bit of heat can elevate your crunchy creation to a whole new level!

  • Cheesy Surprise: Spread a layer of cream cheese alongside the yogurt for a creamy, tangy element. This variation adds a delightful richness and a pop of flavor.

  • Tropical Twist: Top your apple slices with coconut flakes and swap out the granola for a mix of dried fruit. This fruity twist will transport you to a sunny paradise with every bite.

  • Chocolate Indulgence: Drizzle a bit of melted dark chocolate over the granola for a decadent treat. The sweet and rich chocolate pairs beautifully with the crunchy apples and is perfect for a treat!

  • Superfood Boost: Mix chia seeds or hemp seeds into the yogurt for an extra nutrition kick. You’ll enhance the health benefits while enjoying those satisfying textures.

  • His & Her Preferences: Create a mix-and-match platter where each family member can customize their sandwiches with different fruits, nuts, or toppings. This way, everyone gets exactly what they desire!

These variations are just a starting point to inspire your culinary creativity. Feel free to experiment and find your perfect combination that delights you and your loved ones! Don’t forget to pair these sandwiches with your favorite Greek yogurt options for extra flavor!

Make Ahead Options

These Crunchy Apple Sandwiches with Granola & Yogurt Snack are an excellent choice for meal prep enthusiasts! You can slice the apples and prepare the yogurt and granola layers up to 24 hours in advance. Simply store the apple slices in an airtight container with a splash of lemon juice to prevent browning. When you’re ready to assemble, spread the yogurt on the apple slices, add granola, drizzle with honey or maple syrup, and then create your sandwich. This keeps the flavors fresh and ensures a satisfying crunch, making it a perfect option for busy weeknights or on-the-go treats! Enjoy the convenience of deliciousness, ready to serve in just minutes!

What to Serve with Crunchy Apple Sandwich with Granola & Yogurt Snack

Looking to create a complete, delightful meal with your irresistible homemade snacks?

  • Crispy Kale Chips: These add a savory contrast with their salty crunch, perfectly balancing the sweetness of the apple sandwich.

  • Fresh Fruit Salad: A medley of berries and citrus brings brightness, enhancing the refreshing feel of your crunchy apple sandwiches.

  • Creamy Avocado Toast: The smoothness of mashed avocado on toasted bread complements the crunch of the apple, creating a wholesome flavor profile.

  • Nutty Trail Mix: A handful of mixed nuts and dried fruits keeps the energy up and provides a lovely textural counterpoint to your sandwich’s crisp elements.

  • Herbal Iced Tea: A refreshing glass of mint or hibiscus iced tea is a wonderful pairing, cleansing the palate and bringing lightness to the meal.

  • Honey-Lemon Yogurt Dip: This smooth dip echoes the yogurt from the sandwiches, adding a tangy note when paired together for a delightful twist.

Pairing these elements pulls your delightful Crunchy Apple Sandwich with Granola & Yogurt Snack into a lovely meal, engaging all the senses!

Storage Tips for Crunchy Apple Sandwich with Granola & Yogurt Snack

Fridge: Keep your apple sandwiches in an airtight container in the fridge. They stay fresh for up to 24 hours, allowing you to enjoy their crunch and flavor.

Preparation Reminder: To maintain the best taste and texture, it’s ideal to assemble the sandwiches just before serving. If they’re made in advance, the apples may lose their crispness.

Reheating: While these sandwiches are best served cold, if you prefer a warm option, gently microwave for 10-15 seconds to slightly soften the yogurt without making the apples mushy.

Freezer: Freezing is not recommended for this Crunchy Apple Sandwich as the apples will become soggy upon thawing, compromising the delightful texture.

Crunchy Apple Sandwich with Granola & Yogurt Snack

Crunchy Apple Sandwich with Granola & Yogurt Recipe FAQs

How do I select the best apples for my sandwich?
Absolutely! I recommend choosing Fuji or Honeycrisp apples for their sweetness and crisp texture. Look for apples that are firm and without dark spots or blemishes. If they feel slightly heavy for their size, that’s a sign they’re fresh and juicy!

What’s the best way to store leftover apple sandwiches?
To keep your Crunchy Apple Sandwich with Granola & Yogurt Snack fresh, store it in an airtight container in the fridge. They will stay good for about 24 hours, but to enjoy the optimal crunchiness, it’s best to consume them right after assembling.

Can I freeze the apple sandwiches for later?
Freezing is not recommended for these apple sandwiches, as the apples will turn mushy upon thawing, ruining that delightful crunch. Instead, I suggest making them fresh whenever you’re in the mood for a tasty snack!

What if my apple slices start to brown before serving?
If you want to prevent your apple slices from browning, you can brush them lightly with lemon juice before assembling. This works wonders in preserving their vibrant color and freshness, keeping your Crunchy Apple Sandwich visually appealing!

Are there any dietary considerations I should know about?
Very! If you’re mindful of allergies, be cautious with the granola you choose, as it may contain nuts, gluten, or other allergens. For a dairy-free version, try using a plant-based yogurt alternative. It’s super customizable to fit most dietary needs!

Delicious Crunchy Apple Sandwich with Granola & Yogurt Snack

Enjoy this Crunchy Apple Sandwich with Granola & Yogurt Snack for a quick, refreshing treat packed with wholesome goodness.

  • Butter knife
  • Small spatula

For the Sandwich

  • 2 medium Fuji or Honeycrisp apples (these varieties add a natural sweetness and perfect crunch)
  • 1 cup Greek yogurt (offers creaminess and protein to make the sandwich satisfying)

For the Crunch

  • 1/2 cup Granola (look for a mix with nuts and seeds for added texture and flavor)
  • 1 tablespoon Honey or maple syrup (drizzle for a touch of sweetness to enhance the overall taste)

Step-by-Step Instructions

  1. Begin by thoroughly washing 2 medium Fuji or Honeycrisp apples under cool running water. Slice each apple horizontally into half-inch thick rounds, ensuring they are uniform for even layering.
  2. Spread a generous scoop of Greek yogurt evenly over one side of an apple slice.
  3. Sprinkle a half cup of your favorite granola evenly over the yogurt-covered apple slice.
  4. Drizzle a tablespoon of honey or maple syrup across the granola layer.
  5. Place another apple slice gently on top of the granola layer, yogurt side down, to create a sandwich.
  6. Serve immediately for maximum freshness and crunch.

Assemble right before serving to maintain the apple’s crunch. Store in an airtight container in the fridge for up to 24 hours.

Sandwiches
American
Crunchy Apple Sandwich, Easy Recipe, Fruit Snack, Granola Snack, Healthy Snack, Yogurt Snack

Filed Under: Souce

Spooky Graveyard Pudding Cookie Cups for Halloween Fun

August 27, 2025 by grace bellamy Leave a Comment

Walking through a vibrant autumn market, I stumbled upon a display of quirky treats just begging to be turned into something whimsical and fun. That’s when the idea for Graveyard Pudding Cookie Cups hit me! These delightful dessert cups are perfect for spicing up any gathering, whether it’s a Halloween party or just a cozy family night in. With just 20 minutes of prep and a mere 12 minutes in the oven, this recipe is a fan favorite for those who love to create memorable homemade delights. Not only are they a visual treat, but they also offer a playful twist on traditional pudding cups that everyone will enjoy. Ready to dig into some spooky sweetness? Let’s make these creative cookie cups together!

Graveyard Pudding Cookie Cups

Why Are Graveyard Cookie Cups So Fun?

Whimsical magic: These delightful Graveyard Pudding Cookie Cups bring a spooky twist to your dessert table, making them perfect for any Halloween celebration or cozy family gathering.

Quick prep: With just 20 minutes of prep time, you can whip up these fun treats without sacrificing time or effort.

Decadent layers: A luscious vanilla pudding filling tops a chewy chocolate chip cookie base, offering a sensational blend of flavors in every bite.

Creative topping: Adorned with gummy worms and candy eyeballs, these cookie cups not only taste fantastic but also provide a delightful surprise that will wow your guests.

Versatile fun: Customize them for any occasion! Swap the toppings to match seasonal events or even personalize them for birthdays. Everyone will love these eye-catching desserts!

Graveyard Pudding Cookie Cups Ingredients

Get ready to bake up some spooky fun with these delightful treats!

For the Cookie Cups

  • Chocolate chip cookie dough – 1 cup; the base of your cookie cups that offers a chewy, delightful bite.

For the Pudding Filling

  • Vanilla pudding mix – 2 cups; this adds a creamy and sweet layer to counterbalance the cookie base.
  • Whole milk – 2 cups; essential for making the pudding creamy, helping it achieve the perfect consistency.

For the Decoration

  • Gummy worms – 1 cup; a playful touch that enhances the spooky aesthetic of your Graveyard Pudding Cookie Cups.
  • Candy eyeballs – 1 cup; these add a fun and whimsical element that makes your treats even more eye-catching.

Step‑by‑Step Instructions for Graveyard Pudding Cookie Cups

Step 1: Preheat and Prepare
Start by preheating your oven to 350°F (175°C). While the oven heats up, take a muffin tin and line it with parchment paper, ensuring each cavity is ready for the cookie dough. This prep ensures that your Graveyard Pudding Cookie Cups will release easily after baking, setting you up for success.

Step 2: Shape the Cookie Cups
Next, take tablespoon-sized portions of your chocolate chip cookie dough and press them firmly into the lined muffin tin. Make sure to create a well in the center of each dough portion, which will hold the delicious pudding later on. This step is crucial for forming the cup shape that will be the foundation of your spooky dessert.

Step 3: Bake the Cookie Cups
Place the muffin tin in the preheated oven and bake for 10-12 minutes, or until the cookie edges are golden brown. Keep an eye on them, as the perfect doneness ensures a chewy texture. Once baked, remove the tin from the oven and allow the cookie cups to cool completely, allowing them to firm up further.

Step 4: Prepare the Pudding Filling
While your cookie cups cool, grab a mixing bowl and whisk together the vanilla pudding mix and whole milk. Continue whisking until the mixture thickens to a creamy consistency, following the package instructions. This rich filling will complement the cookie base of your Graveyard Pudding Cookie Cups beautifully.

Step 5: Fill the Cookie Cups
Once the cookie cups are completely cool, carefully fill each well with the prepared vanilla pudding. Heap the pudding generously to create a delightful mound in each cookie cup, ensuring that they are visually tempting and indulgent for everyone who will enjoy your spooky treats.

Step 6: Add the Finishing Touches
Now it’s time for the fun part! Decorate each filled cookie cup with gummy worms and candy eyeballs, creating a whimsical and eye-catching appearance. This playful decoration gives your Graveyard Pudding Cookie Cups the perfect Halloween flair, making them a delightful centerpiece for any gathering.

Graveyard Pudding Cookie Cups

Tips for the Best Graveyard Pudding Cookie Cups

  • Optimal Cooling Time: Allow your cookie cups to cool completely before adding the pudding. This prevents the filling from melting and keeps the cups sturdy.

  • Cookie Dough Consistency: Use chilled chocolate chip cookie dough for easier handling. It helps maintain their shape while baking and creates a better texture.

  • Pudding Texture: Whisk the pudding mixture until it’s thick, but be careful not to overmix. This can lead to a grainy texture, which isn’t ideal for your Graveyard Pudding Cookie Cups.

  • Fun Decorations: Get creative with toppings! Try adding crushed cookies or different gummy candies to match various themes beyond Halloween.

  • Avoid Over-Filling: While it’s tempting to heap on the pudding, don’t overfill the cookie cups. Leave a small space to avoid overflow, ensuring a clean presentation.

What to Serve with Graveyard Pudding Cookie Cups

These spooky treats are the perfect centerpiece for a delightful dessert table, setting the stage for a fun-filled gathering.

  • Charming Pumpkin Soup: This creamy soup adds a warm touch, complementing the sweetness of the pudding cups, perfect for cozy fall evenings.
  • Crunchy Garden Salad: A fresh salad with vibrant veggies balances the richness of the cookie cups, adding a light and refreshing contrast.
  • Festive Apple Cider: Serve this warm, spiced drink for a delightful beverage option that enhances the autumn flavor theme of your spooky celebration.
  • Chocolate Drizzle Brownies: Rich and fudgy, these brownies will satisfy the sweet tooth of any chocolate lover alongside the delightful cookie cups.
  • Mini Cornbread Muffins: These fluffy muffins offer a savory counterpoint that pairs nicely with the sweet and creamy elements of the dessert.
  • Caramel Popcorn: A crunchy, sweet snack that adds texture and fun, making it a great accompaniment to your whimsical treat display.
  • Candy Corn Parfait: Layering candy corn with whipped cream creates a whimsical dessert that mirrors the fun aesthetics of your cookie cups.
  • Spooky Float: A spooky root beer float will delight your guests, with creamy vanilla ice cream contrasting the fizzy drink, perfect for Halloween vibes!

Graveyard Pudding Cookie Cups Variations

Feel free to get creative and customize your Graveyard Pudding Cookie Cups for even more fun and deliciousness!

  • Dairy-Free: Use a non-dairy milk alternative and dairy-free pudding mix for a vegan treat that everyone can enjoy.
    This swap opens up a world of flavor and inclusivity, allowing even those with dietary restrictions to indulge in these spooky delights.

  • Nut Butter Twist: Replace some of the chocolate chip cookie dough with a creamy nut butter mixture for an unexpected flavor boost.
    The nutty undertones enhance the cookie’s richness, adding depth to your Halloween dessert that will impress family and friends alike.

  • Graham Cracker Crust: Use crushed graham crackers mixed with butter as the base instead of cookie dough for a delightful texture change.
    This twist not only provides a crunchy contrast but also adds a hint of sweetness that complements the pudding beautifully.

  • Chocolate Pudding Filling: Swap vanilla pudding for chocolate pudding for a double-chocolate spin that chocolate lovers will adore.
    Layering chocolate flavors creates a decadent experience, elevating your Graveyard Pudding Cookie Cups to a level of deliciousness that’s hard to resist.

  • Spicy Kick: Add a pinch of cayenne pepper or cinnamon to the pudding for a surprising warmth that balances the sweetness.
    This delightful twist adds a layer of complexity, making each bite a tantalizing adventure for your taste buds.

  • Fruit Medley: Top with fresh berries or bananas for a burst of freshness among all the fun!
    Fruit not only adds vibrant color but also a refreshing contrast to the rich cookie and pudding layers, making your treat both beautiful and delicious.

  • Customize Toppings: Use different Halloween-themed candies like gummy bats, candy corn, or crushed Oreos to make them seasonal fun!
    This variation elevates the celebratory aspect of the dessert, making it suitable for a wide range of occasions beyond just Halloween.

  • Layered Parfaits: Instead of cookie cups, turn the mixture into layered parfaits using a clear glass for a beautiful presentation.
    The visual appeal will wow your guests, and it allows everyone to scoop their own serving, enhancing the experience of enjoying these delicious treats together.

Explore these variations, and make your Graveyard Pudding Cookie Cups uniquely yours! For more festive inspiration, why not check out our Creative Topping Ideas for Pudding Cups or discover the Best Seasonal Desserts for Halloween?

How to Store and Freeze Graveyard Pudding Cookie Cups

Fridge: Keep your Graveyard Pudding Cookie Cups covered in an airtight container for up to 3 days. This helps maintain their freshness and prevents the filling from absorbing other odors.

Freezer: For longer storage, freeze the cookie cups before adding the pudding. They can be stored in a freezer-safe container for up to 2 months. Thaw in the fridge before filling them with pudding.

Reheating: If you’re freezing the cookie cups, they do not need reheating; simply fill and decorate once thawed. Enjoy cold or at room temperature for the best taste experience.

Make Ahead Options

These Graveyard Pudding Cookie Cups are perfect for busy home cooks who love easy meal prep! You can prepare the cookie cups up to 24 hours in advance by baking and cooling them, then storing them in an airtight container at room temperature. Additionally, the vanilla pudding filling can be whisked together and refrigerated for up to 3 days before assembly, ensuring it’s ready when you are (just remember to cover it tightly to prevent it from forming a skin). When it’s time to serve, simply fill each cooled cookie cup with the pudding, add your whimsical gummy worms and candy eyeballs, and watch them come to life! This prep-ahead approach saves you time while delivering delicious results that are just as delightful as fresh!

Graveyard Pudding Cookie Cups

Graveyard Pudding Cookie Cups Recipe FAQs

What type of chocolate chip cookie dough should I use?
Absolutely, you can use either store-bought or homemade chocolate chip cookie dough for your Graveyard Pudding Cookie Cups. If you’re going homemade, I recommend a traditional recipe that results in good chewiness. For store-bought, go for the kind that is pre-chilled, as it holds its shape better during baking.

How should I store Graveyard Pudding Cookie Cups?
To keep your Graveyard Pudding Cookie Cups fresh, store them in an airtight container in the refrigerator for up to 3 days. This method retains their delicious flavors while preventing the pudding from absorbing any other fridge odors. If you’ve decorated them with gummy worms and candy eyeballs, be aware that these may get a bit sticky over time.

Can I freeze these cookie cups?
Yes! For freezing, I recommend freezing the cookie cups before filling them with pudding. Place them in a freezer-safe container, and they will last up to 2 months. When you’re ready to serve, simply thaw the cookie cups in the fridge overnight, then fill with pudding and decorate just before serving to keep everything fresh and enjoyable.

What should I do if my cookie cups overflow while baking?
If your cookie cups overflow during baking, don’t fret! Simply allow them to cool, and then use a small spatula or knife to gently trim away any excess dough from the top. This will help maintain their cup shape and present them nicely when filled with pudding later on. It’s a common issue, and with a bit of patience, you can salvage them easily.

Are there any dietary considerations for these cookie cups?
Yes, if you’re making these for kids or guests with dietary restrictions, be mindful of allergies. The main allergens include gluten from the cookie dough, dairy from the pudding and milk, and gelatin often found in gummy candies. To adapt the recipe, consider using gluten-free cookie dough and dairy-free pudding options. Always check the labels to ensure they meet each guest’s needs.

Spooky Graveyard Pudding Cookie Cups for Halloween Fun

Delightful Graveyard Pudding Cookie Cups perfect for any Halloween celebration.

  • Muffin tin
  • Mixing Bowl
  • Whisk
  • parchment paper

For the Cookie Cups

  • 1 cup chocolate chip cookie dough (the base of your cookie cups that offers a chewy, delightful bite.)

For the Pudding Filling

  • 2 cups vanilla pudding mix (adds a creamy and sweet layer to counterbalance the cookie base.)
  • 2 cups whole milk (essential for making the pudding creamy.)

For the Decoration

  • 1 cup gummy worms (a playful touch that enhances the spooky aesthetic.)
  • 1 cup candy eyeballs (adds a fun and whimsical element.)

Preparation Steps

  1. Preheat your oven to 350°F (175°C) and line a muffin tin with parchment paper.
  2. Press tablespoon-sized portions of chocolate chip cookie dough into the muffin tin, creating a well in the center of each.
  3. Bake for 10-12 minutes or until the edges are golden brown. Cool completely.
  4. Whisk together vanilla pudding mix and whole milk until thickened.
  5. Fill the cooled cookie cups with the prepared vanilla pudding.
  6. Decorate each filled cookie cup with gummy worms and candy eyeballs.

Allow cookie cups to cool completely before adding pudding. Use chilled cookie dough for easy handling and a better texture. Be cautious not to overmix the pudding to avoid graininess. Get creative with toppings to match different themes and avoid over-filling the cookie cups for a clean presentation.

Dessert
American
cookie cups, fun desserts, Graveyard Pudding Cookie Cups, Halloween dessert, pudding cups, spooky treats

Filed Under: Dessert

Irresistible Raspberry Filled Almond Snowball Cookies Recipe

August 27, 2025 by grace bellamy Leave a Comment

As I stood in my kitchen, the sweet scent of baking cookies wafting through the air, a wave of nostalgia washed over me. Those moments spent crafting treats like Raspberry Filled Almond Snowball Cookies remind me of cozy afternoons with loved ones, where the ultimate goal was to create something utterly irresistible. These delightful cookies not only boast a unique combination of flavors—tangy raspberries wrapped in a tender almond exterior—but they also come together quickly, making them the ideal solution for anyone tired of fast food or cravings for homemade goodness. Plus, they look as enchanting as they taste, making them a perfect centerpiece for gifting or sharing during holidays. With every bite, you’ll be reminded of the joy that homemade treats can bring. What’s your favorite cookie memory that inspires your baking adventures?

Raspberry Filled Almond Snowball Cookies

Why Are These Cookies Simply Irresistible?

Delightful Filling: Each cookie is bursting with a tangy raspberry center that perfectly contrasts the sweet almond shell.

Quick to Make: With a straightforward process, you’ll have these cookies ready in no time, perfect for busy days when you crave homemade treats.

Visually Stunning: Their snowball appearance and vibrant filling make these cookies impressive for any gathering or special occasion.

Versatile Treat: Serve them as dessert, snacks, or even gifts—these cookies are sure to win hearts wherever they go!

Nostalgic Enjoyment: Baking these cookies will transport you back to cherished moments spent in the kitchen. Consider trying other delicious cookie recipes for more inspiration.

Bring a touch of magic to your baking with these Raspberry Filled Almond Snowball Cookies!

Raspberry Filled Almond Snowball Cookies Ingredients

• Get ready to indulge in these delightful treats!

For the Cookie Dough

  • Almond flour – a gluten-free option that gives these cookies a tender, nutty flavor.
  • Granulated sugar – sweetens the dough, balancing the tartness of the raspberry filling.
  • Unsalted butter – ensures your cookies are rich and melt-in-your-mouth delicious.
  • Egg – acts as a binding agent, keeping the cookies together beautifully.
  • Vanilla extract – adds a warm undertone that enhances the overall flavor profile.

For the Raspberry Filling

  • Fresh raspberries – use ripe berries for the best tangy flavor that’ll shine through.
  • Powdered sugar – sweetens the filling, making it irresistible while helping to thicken the mixture.

For Sugar Coating

  • Powdered sugar – dusts the cookies after baking, creating that signature snowball effect.

With these simple ingredients, you’ll create Raspberry Filled Almond Snowball Cookies that are sure to brighten your day and please your loved ones!

Step‑by‑Step Instructions for Raspberry Filled Almond Snowball Cookies

Step 1: Preheat the Oven
Begin by preheating your oven to 350°F (175°C). While the oven warms up, line a baking sheet with parchment paper to keep your cookies from sticking. The warm scent of baking should soon fill the air, setting the perfect tone for making these delectable Raspberry Filled Almond Snowball Cookies.

Step 2: Prepare the Dough
In a mixing bowl, cream together unsalted butter and granulated sugar until light and fluffy, about 3-5 minutes. Then, add in one egg and a splash of vanilla extract, mixing until well combined. The mixture should look smooth and pale, creating a light base for your cookies.

Step 3: Add the Dry Ingredients
Next, gently fold in the almond flour to the wet mixture. Stir until just combined, ensuring no dry patches remain, as this will enhance the overall consistency of the dough. The dough should be soft and slightly sticky, perfect for shaping the cookies that will encase the tangy raspberry filling.

Step 4: Make the Raspberry Filling
In a separate bowl, mash fresh raspberries and mix in powdered sugar until you achieve a thick, sweet filling. Take care to leave some small pieces of raspberry for texture. This vibrant mixture will provide a delightful contrast once wrapped in the almond dough for your Raspberry Filled Almond Snowball Cookies.

Step 5: Shape the Cookies
Scoop out a small amount of dough and flatten it in your palm, adding a teaspoon of raspberry filling in the center. Carefully fold the dough over the filling, rolling it into a ball. Place each cookie on your prepared baking sheet, allowing some space between them as they will spread slightly while baking.

Step 6: Bake the Cookies
Slide the baking sheet into your preheated oven and bake for about 12-15 minutes, or until the edges are lightly golden. Keep an eye on them; the cookies should remain pale but feel set to the touch. Once done, remove them from the oven and let them cool slightly on the baking sheet.

Step 7: Sugar Coating
Once the Raspberry Filled Almond Snowball Cookies have cooled for a few minutes, roll them in powdered sugar until fully coated. This will give them that signature snowball appearance, making them look as delightful as they taste. Allow the cookies to rest on a wire rack to set, ready for serving and sharing!

Raspberry Filled Almond Snowball Cookies

What to Serve with Raspberry Filled Almond Snowball Cookies?

Creating a delightful meal around these cookies can elevate your gathering, inviting smiles and warm memories.

  • Rich Hot Chocolate: A creamy, chocolatey drink pairs beautifully with the almond and raspberry flavors, creating a comforting experience.
  • Vanilla Ice Cream: The smooth, cold creaminess complements the warm cookies, making each bite a delightful contrast in temperatures.
  • Fresh Berries: A medley of ripe strawberries, blueberries, and raspberries adds a refreshing touch, enhancing the fruity notes of the filling.
  • Lemonade or Iced Tea: The tangy notes of lemonade or the refreshing quality of iced tea cleanse the palate, balancing the sweetness.
  • Cheese Platter: Soft cheeses like brie or tangy goat cheese can pair unexpectedly well, providing a creamy richness that contrasts the cookies’ sweetness.
  • Chocolate-Covered Strawberries: Luxurious, sweet, and tangy, these treats echo the almond and raspberry harmony while adding an elegant touch.
  • Coffee or Espresso: Rich, bold coffee or a shot of espresso enhances the cookie’s sweetness, making it a sophisticated option for afternoon gatherings.

These pairings will not only enhance your Raspberry Filled Almond Snowball Cookies but also create a warm and inviting atmosphere for everyone to enjoy!

Storage Tips for Raspberry Filled Almond Snowball Cookies

Room Temperature: Store in an airtight container and keep at room temperature for up to 3 days. This will maintain their delightful texture and flavor.

Fridge: If you want to extend freshness, place the cookies in the fridge for up to a week. Just make sure to let them warm to room temperature before serving for the best taste.

Freezer: For long-term storage, freeze the cookies in an airtight container or freezer bag for up to 3 months. Thaw at room temperature before enjoying your Raspberry Filled Almond Snowball Cookies again.

Reheating: If desired, you can reheat the cookies in a preheated oven at 300°F (150°C) for about 5-7 minutes. This will help restore their lovely soft texture!

Expert Tips for Raspberry Filled Almond Snowball Cookies

  • Cool the Dough: Allow the dough to chill in the fridge for about 30 minutes before shaping. This helps prevent spreading during baking.

  • Perfect Filling: Use fresh raspberries for the best flavor. If using frozen, ensure they’re thawed and well-drained to avoid excess moisture in your Raspberry Filled Almond Snowball Cookies.

  • Try Different Sugars: Experiment with both granulated and powdered sugar for the dough and filling. Each brings a different sweetness and texture to your cookies.

  • Watch the Baking Time: Keep a close eye on the cookies as they bake. Oven temperatures can vary, so check them a minute or two early to avoid overbaking.

  • Store Properly: To maintain freshness, store the cookies in an airtight container at room temperature. They’ll stay delightful for several days, ready for enjoyment!

Raspberry Filled Almond Snowball Cookies Variations

Feel free to get creative and make these cookies your own with these delightful twists!

  • Gluten-Free: Substitute almond flour with a gluten-free blend to keep the cookies just as soft and delectable.

  • Fruit Filling: Swap raspberries for other fruits like blueberries or chopped strawberries for a refreshing change. Each fruit brings its unique vibrancy and taste!

  • Chocolate Drizzle: Melt dark chocolate and drizzle over the cooled cookies for an elegant touch that pairs perfectly with the tangy filling. This addition creates a lovely visual and a rich taste contrast.

  • Nutty Crunch: Add crushed nuts such as hazelnuts or walnuts to the dough for extra texture and flavor; they’ll create a delightful crunch in every bite.

  • Lemon Zest: Add a teaspoon of lemon zest to the dough to enhance the flavor profile with a refreshing citrus note that brightens up the cookies beautifully.

  • Spiced Up: Introduce a hint of cinnamon or nutmeg to the dough for a warm, spiced version that will fill your kitchen with an inviting aroma!

  • Vegan Option: Replace butter with coconut oil and egg with flaxseed meal to make these cookies vegan-friendly while maintaining moisture and taste.

  • Peppery Fun: For those who like a bit of heat, add a pinch of cayenne pepper to the raspberry filling. The mild heat can create a surprising yet delightful balance with the sweetness!

These variations not only allow you to tailor the cookies to your taste but can awaken exciting memories of your own kitchen adventures. If you’re looking for more inspiration, don’t forget to check out other delightful cookie recipes like these classic Peanut Butter Blossoms or Chewy Chocolate Chip Cookies!

Make Ahead Options

These Raspberry Filled Almond Snowball Cookies are perfect for meal prep enthusiasts eager to save time during the week! You can prepare the dough up to 24 hours in advance and refrigerate it, which helps meld the flavors while keeping the cookies tender. Additionally, the raspberry filling can be made ahead and stored in an airtight container in the refrigerator for up to 3 days. When you’re ready to bake, simply shape the cookies with the chilled dough and filling, then follow the recipe instructions for baking. By prepping ahead and refrigerating, you’ll ensure that every bite is just as delicious, allowing you to enjoy fresh, homemade treats whenever the craving strikes!

Raspberry Filled Almond Snowball Cookies

Raspberry Filled Almond Snowball Cookies Recipe FAQs

How do I choose ripe raspberries for the filling?
Absolutely! When selecting raspberries, look for plump, firm berries that are evenly colored. Avoid those with dark spots or a mushy texture, as they tend to be overripe. The best raspberries will be fragrant and should feel slightly soft when gently pressed.

What’s the best way to store Raspberry Filled Almond Snowball Cookies?
For room temperature storage, place your cookies in an airtight container for up to 3 days. If you want to keep them a bit longer, you can store them in the fridge for up to a week. Just remember, they taste best when allowed to come to room temperature before enjoying!

Can I freeze these cookies, and how do I do it?
Definitely! To freeze your Raspberry Filled Almond Snowball Cookies, place them in a single layer on a baking sheet and freeze until solid. Then, transfer them to an airtight container or a freezer bag, separating layers with parchment paper, for up to 3 months. When you’re ready to enjoy, simply thaw them at room temperature—they’ll taste freshly baked!

What should I do if the dough is too sticky to shape?
Very! If you find that your dough is too sticky, try chilling it in the refrigerator for about 30 minutes. This little step can help firm it up and make it easier to work with. Additionally, consider dusting your hands and the work surface with a bit of almond flour to assist in shaping without sticking.

Are these cookies suitable for people with nut allergies?
While I highly recommend these delicious Raspberry Filled Almond Snowball Cookies for their unique taste, they’re not suitable for those with nut allergies due to almond flour and other almond sources in the recipe. As a substitute, you could use oat flour or a gluten-free blend, but the texture may differ somewhat. Always double-check with guests about allergies before serving!

Irresistible Raspberry Filled Almond Snowball Cookies Recipe

These Raspberry Filled Almond Snowball Cookies are a delightful treat with a tangy raspberry center and a sweet almond shell.

  • Mixing Bowl
  • Baking Sheet
  • parchment paper
  • wire rack

For the Cookie Dough

  • 2 cups almond flour (a gluten-free option)
  • 1 cup granulated sugar (balances the tartness)
  • 1 cup unsalted butter (rich and melt-in-your-mouth)
  • 1 large egg (binding agent)
  • 1 teaspoon vanilla extract (enhances flavor)

For the Raspberry Filling

  • 1 cup fresh raspberries (use ripe berries)
  • 1/2 cup powdered sugar (sweetens and thickens)

For Sugar Coating

  • 1 cup powdered sugar (for dusting)

Step‑by‑Step Instructions

  1. Preheat your oven to 350°F (175°C) and line a baking sheet with parchment paper.
  2. Cream together unsalted butter and granulated sugar until light and fluffy, about 3-5 minutes. Add in one egg and vanilla extract, mixing until well combined.
  3. Gently fold in the almond flour to the wet ingredients until just combined.
  4. In a separate bowl, mash fresh raspberries and mix in powdered sugar until thick.
  5. Scoop out a small amount of dough, flatten it, add a teaspoon of raspberry filling, and roll into a ball.
  6. Bake for about 12-15 minutes or until the edges are lightly golden. Let cool slightly.
  7. Roll the cookies in powdered sugar until fully coated and allow to rest on a wire rack.

Chill the dough for about 30 minutes before shaping to prevent spreading. Use fresh raspberries for best flavor and store cookies in an airtight container.

Dessert
American
almond cookies, baking, holiday baking, raspberry, snowball cookies, treats

Filed Under: Dessert

Deliciously Light Coffee Mousse for Instant Gourmet Bliss

August 27, 2025 by grace bellamy Leave a Comment

As the rich aroma of freshly brewed coffee wafts through my kitchen, I can’t help but think how special a light, airy coffee mousse can be. This delightful dessert isn’t just for expert chefs; it’s a 5-minute wonder that transforms your everyday coffee into a luscious treat! Whether you’re entertaining friends or simply craving a sweet pick-me-up, my Coffee Mousse offers a quick and easy way to indulge without fuss. Plus, it’s freezer-friendly, so you can whip up a batch ahead of time and surprise your guests! Are you ready to elevate your coffee game? Let’s dive into this luscious recipe together!

Coffee Mousse

Why is Coffee Mousse a Must-Try?

Light and Airy: This Coffee Mousse transforms a simple cup of coffee into a decadent dessert that feels like a gourmet treat.

Quick Prep: In just 5 minutes, you whisk together a few ingredients for a delightful foam that requires no baking.

Crowd-Pleaser: Whether it’s a dinner party or a casual get-together, this mousse will impress your guests. Just imagine their smiles as they indulge!

Versatile Toppings: Top it off with cocoa powder, chocolate curls, or even coffee beans for an extra kick—the choice is yours!

Freezer-Friendly: Make-ahead convenience means you can whip up a batch and store it for a sweet surprise later. Perfect for those evenings when time is tight!

Your next dessert adventure awaits with this luscious treat—join the ranks of dessert lovers who can’t get enough of this indulgence!

Coffee Mousse Ingredients

• Get ready to whip up a creamy delight!

For the Mousse

  • Heavy cream – this creates the light and fluffy texture that makes your Coffee Mousse feel luxurious.
  • Milk – helps create a smoother consistency; you can substitute almond or oat milk for a dairy-free version.
  • Cooled coffee – use your favorite brew to infuse a rich coffee flavor throughout the mousse.
  • Powdered sugar – adds just the right sweetness to balance the bitterness of the coffee.
  • Melted chocolate – deepens the flavor and adds a delightful richness; dark chocolate works wonderfully here.

Your journey to an irresistible Coffee Mousse starts here—gather these ingredients, and let the magic begin!

Step‑by‑Step Instructions for Coffee Mousse

Step 1: Beat the Cream
In a large, chilled mixing bowl, pour in 1 cup of heavy cream. With an electric mixer on medium speed, beat the cream for about 2-3 minutes until stiff peaks start to form; it should look thick and hold its shape. Once ready, set aside this fluffy cream, which will be the heart of your Coffee Mousse.

Step 2: Whisk the Base
In a separate large bowl, combine 1/2 cup milk, 1/2 cup cooled coffee, 1/3 cup powdered sugar, and 4 oz of melted chocolate. Use a whisk to blend these ingredients together for about 1-2 minutes until the mixture is smooth and creamy, ensuring there are no lumps. The rich coffee aroma will begin to fill your kitchen, making your taste buds tingle!

Step 3: Fold in the Cream
Carefully take the whipped cream you set aside and add it to the coffee-chocolate mixture in batches. Using a spatula, gently fold the whipped cream in for about 1-2 minutes until there are no visible streaks. The goal is to keep the mixture light and airy, resulting in a perfectly fluffy Coffee Mousse.

Step 4: Serve and Chill
Once the mousse mixture is well combined, divide it into serving glasses or bowls. Place them in the refrigerator to chill for at least 2 hours or until set. During this time, the flavors will meld beautifully, bringing the coffee and chocolate together into a decadent treat.

Step 5: Garnish and Enjoy
After chilling, remove the Coffee Mousse from the fridge. If desired, add a light dusting of cocoa powder, some chocolate curls, or even a few coffee beans on top for an elegant finish. Now, it’s time to savor your delightful creation!

Coffee Mousse

Make Ahead Options

These Coffee Mousse cups are perfect for busy home cooks looking to save time! You can prepare the mousse mixture up to 24 hours in advance; simply follow the instructions until Step 4, then cover the individual serving glasses and refrigerate them. This ensures the flavors develop beautifully while maintaining that delightful light texture. When you’re ready to serve, simply garnish with cocoa powder, chocolate curls, or coffee beans just before enjoying. By prepping ahead, you’ll create a show-stopping dessert without any last-minute stress, allowing you to indulge in restaurant-quality Coffee Mousse with minimal effort!

Expert Tips for Coffee Mousse

  • Chill Your Tools: Ensure your mixing bowl and beaters are chilled beforehand. This keeps the cream cold and helps achieve those perfect stiff peaks.

  • Quality Coffee Matters: Use freshly brewed, high-quality coffee for the best flavor. It dramatically enhances the overall richness of your Coffee Mousse.

  • Fold Gently: When incorporating the whipped cream, fold gently to maintain the lightness. Over-mixing can lead to a dense mousse instead of the airy texture you’re aiming for.

  • Check Chocolate Temperature: Let the melted chocolate cool slightly before mixing. Hot chocolate can deflate your whipped cream, while cooled chocolate maintains the mousse’s lightness.

  • Make Ahead: This Coffee Mousse can be prepared a day in advance. Just cover the serving glasses and keep them in the fridge, so you can enjoy it stress-free!

How to Store and Freeze Coffee Mousse

Fridge: Store any leftovers in an airtight container for up to 3 days. Keep in mind that the texture may change slightly over time, but it will still be delicious!

Freezer: For longer storage, freeze the mousse in individual portions for up to 2 months. Make sure to use airtight containers to prevent freezer burn.

Thawing: To enjoy frozen Coffee Mousse, transfer it to the fridge to thaw overnight. For a quicker option, let it sit at room temperature for about 30 minutes before serving.

Reheating: There’s no need to reheat the mousse; serve it chilled directly from the fridge or freezer for the best experience!

What to Serve with Coffee Mousse?

Elevate your dessert experience with delightful pairings that complement the luscious flavors of your creamy Coffee Mousse.

  • Chocolate Biscotti: The crunchy texture of biscotti adds a perfect contrast to the smooth mousse, making each bite a delightful experience. Dipping these in your coffee enhances the overall coffee flavor!

  • Whipped Cream Topping: Extra whipped cream brings added richness and a luxurious feel that enriches the mousse’s creamy texture. There’s nothing like a dollop of fluffiness to make it indulgent!

  • Fresh Berries: Tart raspberries or strawberries cut through the richness and add vibrant color. Their freshness will balance the sweetness, creating a well-rounded dessert experience.

  • Coffee-Infused Cocktails: A coffee martini or mocha-inspired drink enhances the coffee theme. The rich flavors in the drink echo those in the mousse for a harmonious pairing.

  • Almond Cookies: Their nutty flavor complements the chocolate and coffee wonderfully. These delicate cookies are perfect for nibbling alongside your decadent mousse—a match made in dessert heaven!

  • Dark Chocolate Shavings: Sprinkling dark chocolate on top intensifies the rich, chocolate notes in your mousse. The added crunch brings a delightful texture contrast that elevates the dessert.

  • Vanilla Ice Cream: A scoop of creamy vanilla ice cream provides a cooler sensation, harmonizing perfectly with the rich coffee flavors. This classic pairing is sure to impress!

  • Hazelnut Coffee: Serve your mousse with a cup of hazelnut-infused coffee to enhance the coffee experience. The nuttiness will complement the mousse perfectly, creating a luxurious finish.

These pairings not only enhance the Coffee Mousse but also craft a full-fledged dessert experience that’s sure to tantalize your taste buds!

Coffee Mousse Variations & Substitutions

Feel free to personalize your Coffee Mousse and make it truly your own with these delightful twists!

  • Dairy-Free: Substitute heavy cream with coconut cream and use almond or oat milk for a luscious, rich alternative.
    For those seeking a lighter option, coconut cream provides a wonderful creaminess without the dairy.

  • Sugar-Free: Use a sugar substitute like stevia or erythritol in place of powdered sugar to keep it sweet but guilt-free.
    Creating a sugar-free mousse doesn’t mean sacrificing flavor; it allows you to enjoy your treat while keeping health in check!

  • Decadently Dark: Opt for dark chocolate with a higher cocoa content for an intense chocolate flavor that complements the coffee beautifully.
    This variation adds depth and richness, creating an indulgent experience that chocolate lovers will adore.

  • Nutty Twist: Stir in some hazelnut or almond extract to elevate the flavor profile with a warm, nutty essence.
    Imagine that luscious coffee mousse enhanced with a hint of nutty goodness, making it even more delicious!

  • Spicy Kick: Add a pinch of cayenne pepper or cinnamon for an unexpected and delightful warmth in each bite.
    This spicy twist might just become your new favorite secret ingredient; it’s a great conversation starter, too!

  • Mocha Delight: Incorporate a tablespoon of cocoa powder into the coffee mixture for a chocolate-coffee combo everyone will love.
    There’s something irresistible about the fusion of mocha flavors; it’s the perfect way to enhance this classic dessert!

  • Cold Brew: Feel free to replace standard cooled coffee with cold brew for a smoother and less acidic coffee flavor.
    This switch provides a refreshing take, allowing the rich coffee taste to shine through while keeping it easy to make.

  • Fruity Finish: Top your finished mousse with fresh berries or serve it alongside a berry compote for a refreshing balance.
    The sweetness of berries contrasts beautifully with the rich, creamy mousse, making it an effortlessly elegant dessert choice.

With these variations, your Coffee Mousse can adapt to suit any mood or occasion—you can’t go wrong with this versatile treat! If you’re looking for more ways to dazzle your guests, consider pairing it with a splendid homemade tart or a refreshing sorbet.

Coffee Mousse

Coffee Mousse Recipe FAQs

What type of coffee should I use for the mousse?
Absolutely! I recommend using freshly brewed, high-quality coffee for the best flavor. The richness of a robust brew will significantly enhance your Coffee Mousse, making each bite a decadent experience.

How should I store leftover Coffee Mousse?
Store any leftovers in an airtight container in the fridge for up to 3 days. While the texture may alter slightly over time, it will still be wonderfully delicious! Just give it a gentle stir before serving if needed.

Can I freeze Coffee Mousse?
Yes, you can! To freeze your Coffee Mousse, divide it into individual portions in airtight containers and freeze for up to 2 months. For the best way to thaw, simply transfer the containers to the fridge overnight before serving.

What should I do if my mousse is too runny?
If your Coffee Mousse turns out runny, it may be due to under-whipped cream or the melted chocolate being too warm. Try refrigerating the mousse for an additional hour, which can help it set. Next time, ensure that your cream is whipped to stiff peaks and that the chocolate has cooled properly!

Is this Coffee Mousse safe for my pets?
Absolutely not! Ingredients in this mousse, particularly chocolate and caffeine, can be harmful to pets. Always keep your delicious Coffee Mousse safely out of reach from your furry friends! If you have concerns about allergies, please be sure to check the milk and chocolate components used.

Can I make this Coffee Mousse dairy-free?
Yes, you can easily modify this recipe to be dairy-free! Substitute the heavy cream with coconut cream and the milk with almond or oat milk. Using a dairy-free chocolate will also keep the dessert suitable for those with dairy sensitivities. Enjoy the same luscious texture and flavor without the dairy!

These are some of the most common queries about the delightful Coffee Mousse recipe. Happy cooking!

Deliciously Light Coffee Mousse for Instant Gourmet Bliss

Try this Coffee Mousse for a quick and delightful dessert experience, perfect for any occasion.

  • Electric mixer
  • Mixing Bowl
  • spatula
  • Serving glasses or bowls

For the Mousse

  • 1 cup heavy cream (for a light and fluffy texture)
  • 1/2 cup milk (substitute almond or oat milk for dairy-free version)
  • 1/2 cup cooled coffee (use your favorite brew)
  • 1/3 cup powdered sugar (for sweetness)
  • 4 oz melted chocolate (dark chocolate is preferable)

Step-by-Step Instructions

  1. In a large, chilled mixing bowl, beat 1 cup of heavy cream until stiff peaks form, about 2-3 minutes.
  2. In a separate bowl, whisk together 1/2 cup milk, 1/2 cup cooled coffee, 1/3 cup powdered sugar, and 4 oz melted chocolate until smooth.
  3. Fold the whipped cream into the coffee-chocolate mixture in batches until no streaks remain, maintaining its airy texture.
  4. Divide the mousse into serving glasses and refrigerate for at least 2 hours to set.
  5. Garnish with cocoa powder, chocolate curls, or coffee beans before serving.

For best results, chill your mixing tools and use quality coffee. This dessert can be made a day in advance and stored in the fridge.

Dessert
Gourmet
Coffee Mousse, dessert, easy dessert, Gourmet Treat, make-ahead, quick recipes

Filed Under: Dessert

Savory Slow Cooker BBQ Baby Back Ribs You’ll Crave

August 27, 2025 by grace bellamy Leave a Comment

As I stood in my kitchen, the smell of savory spices and rich BBQ sauce wafting through the air, I couldn’t help but feel like a culinary wizard. Nothing brings comfort to a dinner table quite like Slow Cooker BBQ Baby Back Ribs. This recipe not only allows for melt-in-your-mouth tenderness but also sets the stage for a hands-off cooking experience that leaves you free to tackle other tasks. Plus, it’s a fantastic way to impress friends and family with minimal effort! Whether you’re looking for a weekend dish to savor or a weekday delight without the fast-food fuss, these ribs promise to elevate your home cooking to new heights. Are you ready to dive into the deliciousness?

Slow Cooker BBQ Baby Back Ribs

Why are these ribs a must-try?

Tender, Fall-Off-The-Bone Goodness: Your family will rave about how tender and juicy these ribs turn out after hours in the slow cooker.

Effortless Cooking: Simply season, set, and forget! You can focus on other meal preparations while these babies cook to perfection.

Flavor Explosion: The combination of dry rub and your favorite BBQ sauce creates a rich, savory flavor profile that’s hard to beat.

Versatile Pairings: Serve them with coleslaw, baked beans, or cornbread for a complete meal that caters to various tastes.

Crowd-Pleasing Dish: Perfect for gatherings or a cozy family dinner, these Slow Cooker BBQ Baby Back Ribs will make you the BBQ hero of the day! Enhance the experience with a simple side dish like easy coleslaw or classic baked beans to complement the flavors.

Slow Cooker BBQ Baby Back Ribs Ingredients

• Get ready for a mouthwatering journey!

For the Ribs

  • 2 racks baby back ribs – choose the meatiest racks for the best texture and flavor.
  • 2 tablespoons dry rub seasoning – this adds a spicy kick to the ribs; feel free to mix spices for a custom blend.

For the BBQ Sauce

  • 1 cup BBQ sauce – customize with your favorite brand or homemade version for a personal touch.

These ingredients lay the foundation for creating unforgettable Slow Cooker BBQ Baby Back Ribs that will leave everyone at your table asking for seconds!

Step‑by‑Step Instructions for Slow Cooker BBQ Baby Back Ribs

Step 1: Season the Ribs
Begin by generously applying the dry rub seasoning all over the baby back ribs, ensuring an even coat for maximum flavor. Let the seasoned ribs sit for about 15 minutes, allowing the spices to seep in. This step is crucial for developing that savory depth in your Slow Cooker BBQ Baby Back Ribs.

Step 2: Place in Slow Cooker
Carefully place the seasoned baby back ribs into your slow cooker, stacking them upright if needed to fit. This arrangement allows for even cooking throughout. Cover the slow cooker with its lid and set it to cook on low for 6 to 8 hours. You’ll know the ribs are done when they are fork-tender and practically falling off the bone.

Step 3: Preheat the Broiler
After the slow cooking time is up, preheat your oven’s broiler to high. This step is essential for achieving a beautiful caramelized glaze on your ribs. While the broiler heats up, gently remove the ribs from the slow cooker and transfer them to a baking sheet lined with aluminum foil for easy cleanup.

Step 4: Brush with BBQ Sauce
Now it’s time to brush those delectable ribs! Using a basting brush, generously coat the ribs with your favorite BBQ sauce, covering all sides. This ensures that every bite is bursting with flavor. You’ll be amazed at how the sauce clings to the ribs, setting the stage for a delicious finish.

Step 5: Broil for Caramelization
Place the baking sheet with sauced ribs under the preheated broiler. Broil them for about 5 minutes, keeping a close eye on them to avoid burning. You’ll know they’re ready when the sauce becomes bubbly and slightly caramelized, adding a beautiful glaze that enhances the taste and presentation of your Slow Cooker BBQ Baby Back Ribs.

Slow Cooker BBQ Baby Back Ribs

How to Store and Freeze Slow Cooker BBQ Baby Back Ribs

Fridge: Store leftover ribs in an airtight container for up to 3 days to maintain their juicy flavor and tenderness.

Freezer: For long-term storage, wrap the ribs tightly in plastic wrap and aluminum foil, or place them in a freezer-safe bag, keeping for up to 3 months.

Reheating: To reheat, thaw overnight in the fridge, then warm them in the oven at 350°F (175°C) for about 15-20 minutes, brushing with extra BBQ sauce for added moisture.

Room Temperature: Avoid leaving ribs out at room temperature for more than 2 hours to ensure food safety and maintain quality.

Slow Cooker BBQ Baby Back Ribs Variations

Feel free to get creative with these ribs and make them your own with these delicious variations!

  • Spicy Twist: Add cayenne pepper or chili powder to your dry rub for an extra kick that your taste buds will love.

  • Honey Glaze: Drizzle honey over the ribs before broiling for a sweet and sticky finish that perfectly balances the savory BBQ sauce.

  • Herb-Infused: Incorporate fresh herbs like rosemary or thyme in the dry rub for an aromatic flavor that elevates the classic barbecue experience.

  • Smoky Flavor: Use smoked paprika or liquid smoke in your dry rub for that irresistible smoky flavor reminiscent of traditional BBQ joints.

  • Beer Braised: Swap out the BBQ sauce for your favorite stout or lager mixed with a bit of brown sugar for a uniquely delicious sauce that adds depth.

  • Garlic Lovers: Mince fresh garlic and mix it with the BBQ sauce before brushing it on the ribs for a zesty, aromatic kick that enhances every bite.

  • Asian Fusion: Brush the ribs with a blend of soy sauce, brown sugar, and ginger before broiling for an unexpected twist that brings a taste of the Orient to your dinner table.

  • Slow Cooker BBQ Baby Back Ribs with Peach Preserves: Mix peach preserves into the BBQ sauce for a fruity sweetness that plays beautifully with the savory flavors of the ribs.

These variations not only add excitement to your meal but also allow you to cater to different tastes around your dining table. Pair these delectable ribs with side dishes like classic baked beans or a refreshing easy coleslaw for a truly satisfying feast!

Make Ahead Options

These Slow Cooker BBQ Baby Back Ribs are a dream for meal prep enthusiasts! You can season the ribs with the dry rub up to 24 hours in advance, allowing the flavors to meld beautifully. Simply wrap the seasoned ribs tightly in plastic wrap and refrigerate them until you’re ready to cook. On the day of serving, place the ribs in the slow cooker and cook on low for 6 to 8 hours. To finish, broil the ribs with BBQ sauce for about 5 minutes to achieve that irresistible caramelized glaze. By prepping ahead, you’ll enjoy delicious, fall-off-the-bone ribs without the last-minute rush—perfect for busy weeknights or weekend gatherings!

Expert Tips for Slow Cooker BBQ Baby Back Ribs

  • Choose Quality Ribs: Always opt for the freshest baby back ribs. Look for those with good marbling, as this enhances flavor and tenderness.

  • Let the Rub Sit: After seasoning, let the ribs rest for at least 15 minutes. This allows the dry rub flavors to penetrate deeper for a more savory result.

  • Don’t Rush Cooking: Stick to the low and slow method for cooking—6 to 8 hours is essential. Rushing this step can lead to tough, chewy ribs.

  • Watch the Broiling: Keep a close eye while broiling; 5 minutes can quickly turn into burnt ribs. Caramelization adds flavor, but too much can spoil your dish.

  • Customize Your Sauce: Experiment with different BBQ sauces or add your favorite ingredients like honey or mustard for a personal touch. Your unique twist will elevate these Slow Cooker BBQ Baby Back Ribs!

What to Serve with Slow Cooker BBQ Baby Back Ribs

Gather everyone around the table, as these tender ribs deserve delightful companions to create a memorable meal experience.

  • Creamy Coleslaw: A cool, crunchy side that balances the richness of the ribs, providing a refreshing contrast that brightens each bite.

  • Classic Baked Beans: Their sweet and savory profile pairs beautifully, complementing the smoky flavors of the BBQ sauce while adding a hearty element.

  • Cornbread Muffins: Soft, buttery cornbread is the perfect vehicle for soaking up excess BBQ sauce, making every morsel extra indulgent.

  • Grilled Vegetables: Charred zucchini, bell peppers, and corn offer a vibrant, healthy contrast, adding color and nutrition to your plate.

  • Potato Salad: A creamy potato salad with herbs and mustard adds a comforting touch that resonates with the BBQ experience and enhances the meal.

  • Sparkling Lemonade: Quench your thirst with a bubbly, citrusy drink that uplifts the meal, balancing out the rich flavors of the ribs.

  • Apple Pie: For dessert, a warm slice of apple pie with vanilla ice cream provides a comforting, sweet finish that’s simply irresistible.

With these pairings, your Slow Cooker BBQ Baby Back Ribs will shine as the star of the meal, ensuring everyone leaves the table with satisfied smiles!

Slow Cooker BBQ Baby Back Ribs

Slow Cooker BBQ Baby Back Ribs Recipe FAQs

How do I choose the best ribs for this recipe?
Absolutely! When selecting baby back ribs, look for racks that are meaty with a good amount of marbling. The marbling indicates tender fat that will render during cooking, creating that juicy, melt-in-your-mouth texture. Additionally, avoid racks with dark spots all over, as this can indicate spoilage.

How long can I store leftovers in the fridge?
Very! You can keep your leftover Slow Cooker BBQ Baby Back Ribs stored in an airtight container for up to 3 days in the fridge. To maintain their deliciousness, make sure they are properly sealed to prevent them from drying out or absorbing other odors in your refrigerator.

Can I freeze my ribs, and how?
Certainly! To freeze your Slow Cooker BBQ Baby Back Ribs, first let them cool completely. Then, wrap the ribs tightly in plastic wrap and aluminum foil, or place them in a freezer-safe bag, squeezing out as much air as possible. They can be stored in the freezer for up to 3 months. When you’re ready to enjoy them again, thaw overnight in the fridge before reheating!

What if my ribs turn out tough?
Oh no! If your ribs are tough instead of fall-off-the-bone tender, it’s likely they didn’t cook long enough. When using a slow cooker, aim for 6 to 8 hours on low; patience is key! If they still seem tough after cooking, you can return them to the slow cooker with a splash of broth or BBQ sauce and continue cooking for an additional hour. It’s all about ensuring that the collagen in the meat breaks down properly for that heavenly tenderness.

Are there any dietary considerations I should keep in mind?
Certainly! If you’re cooking for friends or family with dietary restrictions, ensure to check for allergies related to ingredients in your dry rub and BBQ sauce. Many brands may contain allergens like gluten or nuts. Opt for gluten-free sauces or make your own if someone has gluten sensitivity. Always read labels or prepare your own to be safe and inclusive in your dinner gatherings!

Savory Slow Cooker BBQ Baby Back Ribs You’ll Crave

This Slow Cooker BBQ Baby Back Ribs recipe offers melt-in-your-mouth tenderness and rich BBQ flavor, perfect for impressing family and friends.

  • Slow Cooker
  • Baking Sheet
  • basting brush
  • Aluminum Foil

For the Ribs

  • 2 racks baby back ribs (choose the meatiest racks for best texture and flavor)
  • 2 tablespoons dry rub seasoning (adds a spicy kick; feel free to mix spices for a custom blend)

For the BBQ Sauce

  • 1 cup BBQ sauce (customize with your favorite brand or homemade version)

Step-by-Step Instructions

  1. Season the Ribs: Generously apply the dry rub seasoning all over the baby back ribs. Let sit for about 15 minutes.
  2. Place in Slow Cooker: Carefully place the seasoned ribs into the slow cooker, cover, and set to cook on low for 6 to 8 hours.
  3. Preheat the Broiler: After slow cooking, preheat your oven’s broiler to high. Transfer ribs to a baking sheet lined with aluminum foil.
  4. Brush with BBQ Sauce: Coat ribs with BBQ sauce using a basting brush.
  5. Broil for Caramelization: Place ribs under the broiler for about 5 minutes until the sauce is bubbly and slightly caramelized.

For best results, choose quality ribs and let the rub sit for at least 15 minutes. Be careful while broiling to avoid burning the ribs.

Main Dishes
American
Baby Back Ribs, BBQ, Easy Recipe, slow cooker, Tender

Filed Under: Main Dishes

Crispy Canned Salmon Patties That Will Wow Your Tastebuds

August 26, 2025 by grace bellamy Leave a Comment

“Did you know that a simple can of salmon can transform into a delightful weeknight dinner? My Canned Salmon Patties are a fantastic way to whip up something special without the fuss. In just 25 minutes, you can create crispy, protein-packed patties that are not only budget-friendly but also a family favorite. These little gems are perfect for busy weeknights, offering quick prep and delicious flavors that won’t disappoint. Plus, they’re versatile enough to dress up as a salmon burger or pair with a fresh salad. Ready to dive in and make your own? Let’s get cooking!”

Canned Salmon Patties

Why are Canned Salmon Patties a Must-Try?

Simplicity at its finest: With just 10 minutes of prep time, you can have a delicious meal ready in under 25 minutes.

Packed with flavor: The blend of Dijon mustard, lemon juice, and fresh veggies makes every bite burst with taste.

Versatile delight: Serve them as a quick weeknight dinner, or jazz them up for gatherings by making a salmon burger!

Health-conscious choice: At only 320 calories each, these patties offer a healthy dose of protein and are a great alternative to fast food options.

Crowd-pleaser: Even picky eaters will enjoy this dish, making it perfect for everyone—from kids to adults! Plus, if you want more easy seafood recipes, don’t forget to check out our other delicious options like Shrimp Tacos and Fish Tacos.

Canned Salmon Patties Ingredients

• Discover the simple ingredients behind these tasty bites.

For the Patties

  • Canned salmon – a key ingredient that adds fantastic flavor and protein to your Canned Salmon Patties.
  • Breadcrumbs – help bind the patties together while giving them a crunchy texture.
  • Onion – finely chopped, it adds sweetness and depth to the flavor profile.
  • Bell pepper – adds a pop of color and freshness; feel free to use any variety you love!
  • Large eggs – act as the binder to keep your patties perfectly together.
  • Dijon mustard – provides a tangy kick that elevates the overall taste.
  • Lemon juice – brightens the dish with a zesty flavor, enhancing the salmon’s taste.
  • Garlic powder – adds a little warmth and depth; fresh garlic can be used for a stronger flavor.
  • Salt – a must for enhancing all the flavors in this dish.
  • Black pepper – brings a mild heat to balance the dish.
  • Olive oil – essential for frying, providing a lovely crispiness to your patties.

Enjoy making these delightful Canned Salmon Patties that are sure to impress family and friends!

Step‑by‑Step Instructions for Canned Salmon Patties

Step 1: Prepare the Salmon
Begin by opening the can of salmon and draining it well. In a large mixing bowl, flake the salmon with a fork until it is broken up into smaller pieces, ensuring there are no large chunks left. Take a moment to admire the vibrant pink color, which is your first indication of the deliciousness to come.

Step 2: Mix the Ingredients
Add breadcrumbs, finely chopped onion, bell pepper, eggs, Dijon mustard, lemon juice, garlic powder, salt, and black pepper into the bowl with the salmon. Gently stir the mixture until everything is evenly combined and the ingredients are well coated. The texture should be sticky enough to hold together when shaped into patties.

Step 3: Shape the Patties
Once mixed, dampen your hands slightly to prevent sticking and scoop out portions of the salmon mixture. Shape each portion into patties approximately 2-3 inches in diameter, ensuring they are compact for better frying. Set the shaped patties aside on a plate, feeling proud of your creation so far.

Step 4: Heat the Skillet
In a large skillet, pour in the olive oil and begin heating it over medium-high heat. Allow the oil to heat until it shimmers, which usually takes about 2-3 minutes. This is the perfect temperature to achieve that crispy golden crust on your Canned Salmon Patties.

Step 5: Fry the Patties
Carefully place the shaped patties into the hot skillet, ensuring not to overcrowd them. Cook for approximately 4-5 minutes on each side, or until they develop a beautiful golden brown and crispy exterior. Use a spatula to gently flip them, watching for the satisfying crunch of perfectly fried patties.

Step 6: Drain Excess Oil
Once cooked, transfer the patties to a plate lined with paper towels to drain any excess oil. This step is crucial for maintaining crispiness while keeping your Canned Salmon Patties light and delicious. Take a moment to appreciate your culinary skills while they cool slightly before serving.

Canned Salmon Patties

What to Serve with Canned Salmon Patties?

Elevate your meal with delightful sides that balance flavors and textures, making your dinner truly memorable.

  • Creamy Mashed Potatoes: Smooth and buttery, these are the perfect comforting side that pairs beautifully with the crispy texture of the patties.

  • Fresh Garden Salad: Crisp greens and colorful veggies provide a refreshing contrast, adding a burst of freshness to each bite.

  • Roasted Vegetables: Seasoned to perfection, roasted carrots and broccoli bring out natural sweetness, complementing the savory patties wonderfully.

  • Sweet Potato Fries: Crispy and slightly sweet, they add a satisfying crunch that harmonizes with the indulgent flavors of the salmon.

Combining these sides will create a vibrant plate that the whole family will enjoy. Why not try a combination of the salad and fries for a delightful range of flavors?

  • Tartar Sauce: This classic dipping sauce enhances the patties with its tangy flavor, taking them to the next level of deliciousness.

  • Lemon Wedges: A squeeze of fresh lemon adds brightness, enhancing the savory flavors of the salmon patties and balancing richness.

  • Chilled White Wine: A crisp Sauvignon Blanc complements the meal perfectly, cutting through the richness and enhancing your dining experience.

  • Chocolate Chip Cookies: For dessert, these warm cookies provide a sweet finish, creating a delightful end to your homemade feast.

Expert Tips for Canned Salmon Patties

  • Freshness Matters: Use fresh ingredients, especially vegetables, to enhance the flavor of your Canned Salmon Patties. Fresh bell peppers and onions can make a big difference!

  • Avoid Overmixing: Gently mix the ingredients until they’re just combined. Overmixing can make your patties tough instead of tender and crispy.

  • Perfect Patty Size: Keep your patties about 2-3 inches in diameter and compact. This ensures they cook evenly and maintain their shape in the skillet.

  • Watch the Heat: Ensure your oil is hot before adding the patties, but avoid cooking on too high heat. This helps achieve a golden-brown crust while preventing a burnt exterior.

  • Quick Serving Tip: Serve your patties immediately for the best texture. If you need to keep them warm, place them on a baking tray in the oven at a low temperature until serving.

Canned Salmon Patties Variations

Feel free to let your creativity shine by customizing these patties in delightful and delicious ways!

  • Spicy Twist: Add 1-2 teaspoons of sriracha or your favorite hot sauce to the mix for a kick that will wake up your taste buds.

  • Herb-Infused: Mix in fresh herbs like dill, parsley, or cilantro for an aromatic refresh that elevates the patties’ flavor.

  • Cheesy Goodness: Fold in 1/4 cup of shredded cheese such as cheddar or feta before shaping the patties for a savory, melty surprise.

  • Grain-Free: Substitute breadcrumbs with crushed almond flour or coconut flour for a gluten-free option that still holds everything together beautifully.

  • Zesty Lemon-Pepper: Enhance the tang by adding zest from one lemon along with a touch more lemon juice for a refreshing citrus burst.

  • Veggie Boost: Incorporate finely grated zucchini or carrot for added moisture and sweetness, making the patties even more nutritious and colorful.

  • Mini Bites: Shape the mixture into smaller balls instead of patties for adorable appetizers perfect for parties or snacking.

  • Asian-Inspired: Use soy sauce instead of Dijon mustard and fold in sesame seeds for a unique flavor that pairs well with a soy dipping sauce or ponzu.

These simple variations will keep your Canned Salmon Patties exciting, so don’t hesitate to mix and match to find your own perfect combination!

Make Ahead Options

These Canned Salmon Patties are a fantastic choice for meal prep, allowing you to save time during busy weeknights! You can easily prepare the salmon mixture (without frying) and refrigerate it for up to 24 hours before cooking. Simply combine the drained and flaked salmon with breadcrumbs, chopped onion, bell pepper, eggs, Dijon mustard, lemon juice, garlic powder, salt, and pepper, then store it in an airtight container. When you’re ready to enjoy your patties, all you need to do is shape the mixture into patties and fry them as directed. This method ensures they’ll be just as delicious and crispy, making dinner a breeze!

How to Store and Freeze Canned Salmon Patties

Fridge: Store leftover Canned Salmon Patties in an airtight container and keep them in the refrigerator for up to 3 days to maintain freshness and flavor.

Freezer: For longer storage, place cooled patties between layers of parchment paper in a freezer-safe container. They can be frozen for up to 2 months.

Reheating: To reheat, warm the patties in a skillet over medium heat or bake them in an oven until heated through, ensuring they remain crispy on the outside.

Thawing: If frozen, thaw patties in the refrigerator overnight before reheating for best results.

Canned Salmon Patties

Canned Salmon Patties Recipe FAQs

How do I choose the best canned salmon?
Absolutely! When choosing canned salmon, look for options labeled “wild-caught” for the best flavor and nutritional benefits. Ensure the can is free from dents or rust, and check the expiration date. Opt for skinless and boneless varieties if you prefer a smoother texture, but don’t shy away from those with bones, as they add extra calcium.

How should I store leftover Canned Salmon Patties?
To keep your leftover Canned Salmon Patties fresh, store them in an airtight container in the refrigerator for up to 3 days. Just make sure they cool to room temperature first before sealing them. You can easily enjoy them with a salad or as a quick snack!

Can I freeze Canned Salmon Patties?
Yes! For freezing, allow your cooked patties to cool completely. Then, place them between layers of parchment paper in a freezer-safe container. This way, they won’t stick to each other. You can freeze them for up to 2 months, and when ready to eat, simply thaw in the refrigerator overnight and reheat in a skillet or oven until warmed through.

What should I do if my patties fall apart while frying?
Very common! If your patties fall apart while frying, it may be due to the mixture being too wet or not adequately binding. To troubleshoot, you can try adding a little more breadcrumbs to the mixture, or if they are too crumbly, another egg could help them hold together better. Forming the patties a bit tighter can also assist in keeping them intact while cooking.

Are Canned Salmon Patties safe for pets?
Yes, but with caution! While plain salmon can be a healthy treat for dogs, it’s important to ensure there are no bones and no added ingredients like onions or garlic, as these can be harmful to pets. I recommend giving them a small piece plain for a special snack, but consult with your vet if unsure about introducing new foods to your pet’s diet.

What can I do to make these patties gluten-free?
Absolutely! To make your Canned Salmon Patties gluten-free, simply substitute the regular breadcrumbs with gluten-free breadcrumbs or even crushed gluten-free crackers. Additionally, check that your Dijon mustard does not contain gluten as some brands may include it, ensuring all ingredients meet your dietary needs.

Crispy Canned Salmon Patties That Will Wow Your Tastebuds

Canned Salmon Patties are quick, budget-friendly, and packed with flavor, making them a perfect weeknight dinner option.

  • skillet
  • Mixing Bowl
  • spatula

For the Patties

  • 2 cans canned salmon (drained and flaked)
  • 1 cup breadcrumbs
  • 1 medium onion (finely chopped)
  • 1 medium bell pepper (finely chopped, any variety)
  • 2 large eggs
  • 2 tablespoons Dijon mustard
  • 1 tablespoon lemon juice (freshly squeezed)
  • 1 teaspoon garlic powder
  • 1 teaspoon salt
  • 1 teaspoon black pepper
  • 3 tablespoons olive oil (for frying)

Step-by-Step Instructions for Canned Salmon Patties

  1. Prepare the Salmon: Open the can of salmon and drain it well. Flake the salmon with a fork until broken into smaller pieces.
  2. Mix the Ingredients: In a large mixing bowl, add breadcrumbs, chopped onion, bell pepper, eggs, Dijon mustard, lemon juice, garlic powder, salt, and black pepper. Stir until evenly combined.
  3. Shape the Patties: Dampen your hands slightly, scoop portions of the mixture, and shape them into patties about 2-3 inches in diameter.
  4. Heat the Skillet: Heat olive oil in a large skillet over medium-high heat until it shimmers, about 2-3 minutes.
  5. Fry the Patties: Place patties into the hot skillet, cooking for about 4-5 minutes on each side until golden brown.
  6. Drain Excess Oil: Transfer cooked patties to a plate lined with paper towels to drain excess oil before serving.

Serve with side salads or as salmon burgers. For best texture, serve patties immediately after cooking.

Main Dishes
American
Canned Salmon Patties, easy dinner, family meals, healthy recipes, quick recipes, seafood

Filed Under: Main Dishes

Delicious Pumpkin Bread with Maple Glaze You’ll Crave

August 26, 2025 by grace bellamy Leave a Comment

As the leaves begin to change and the air crispens, there’s something magical about the sweet scent of warm Pumpkin Bread with Maple Glaze wafting through the kitchen. This recipe isn’t just a way to use up that pumpkin puree sitting in your pantry—it’s a cozy embrace in loaf form, perfect for those lazy autumn afternoons. With just 15 minutes of prep, you can whip up this delightful treat that’s as comforting as it is crowd-pleasing. And let’s be honest, the luscious maple glaze takes this classic recipe to a whole new level, making it a wonderful addition to brunch or an indulgent snack. So, why not take a break from the fast food frenzy and treat yourself to a homemade slice of heaven? What are you waiting for—grab your apron and let’s get baking!

Pumpkin Bread with Maple Glaze

Why is this pumpkin bread special?

Heavenly Aroma: The moment you start baking, your kitchen will be filled with the warm, inviting scent of spices and pumpkin.

Irresistible Glaze: Drizzling the luscious maple glaze not only adds sweetness but also brings an incredible shine, making every slice a showstopper.

Simple Ingredients: With pantry staples and just 15 minutes of prep, you can easily create this comforting treat without a fuss.

Perfect for Sharing: This recipe is ideal for get-togethers, and it’ll impress your friends and family at brunch or a cozy evening gathering.

Versatile Delight: Enjoy it warm with butter, topped with cream cheese, or even as a dessert with ice cream—your options are endless!

Unleash the magic of fall flavors by trying this delicious Pumpkin Bread with Maple Glaze; you won’t regret swapping fast food for this nourishing homemade delight!

Pumpkin Bread with Maple Glaze Ingredients

For the Bread
• Pumpkin puree – perfectly moistens the bread and gives it that delightful pumpkin flavor.
• All-purpose flour – the foundation for a light and fluffy texture.
• Granulated sugar – adds sweetness that beautifully complements the spices.
• Brown sugar – enhances the flavor with its rich, caramel notes.
• Baking powder – keeps the bread airy and helps it rise.
• Baking soda – boosts leavening, ensuring a soft crumb.
• Ground cinnamon – brings warmth and depth, quintessential for fall.
• Ground nutmeg – adds a hint of nuttiness, making the flavor profile more complex.
• Ground cloves – a little goes a long way in enhancing that cozy, spiced flavor.
• Salt – balances the sweetness and highlights the other flavors.
• Large eggs – bind the ingredients and contribute to the bread’s rich texture.
• Vegetable oil or melted butter – keeps the bread moist; use melted butter for a rich flavor.
• Vanilla extract – round off the sweet notes beautifully.

For the Maple Glaze
• Powdered sugar – creates a smooth and sweet glaze that pairs perfectly with pumpkin.
• Maple syrup – adds an authentic maple flavor that enhances the fall essence.
• Milk or cream – adjusts the consistency for a luscious finish; choose cream for extra richness.
• Vanilla extract – infuses the glaze with warmth and complements the pumpkin bread beautifully.

Get ready to savor this Pumpkin Bread with Maple Glaze—it’s an autumn delight that will have everyone asking for seconds!

Step‑by‑Step Instructions for Pumpkin Bread with Maple Glaze

Step 1: Preheat the Oven
Begin by preheating your oven to 350°F (175°C). While it heats, take a moment to grease a 9×5-inch loaf pan, ensuring that every nook is coated to prevent sticking. This will set the stage for your beautifully crafted Pumpkin Bread with Maple Glaze.

Step 2: Combine Dry Ingredients
In a large mixing bowl, whisk together the all-purpose flour, granulated sugar, brown sugar, baking powder, baking soda, ground cinnamon, nutmeg, cloves, and salt. This dry mixture should appear light and fluffy, inviting those warm spices to weave through each slice of your pumpkin bread.

Step 3: Mix Wet Ingredients
In another bowl, combine the pumpkin puree, large eggs, vegetable oil or melted butter, and vanilla extract. Stir these ingredients together until the mixture is smooth and combined, creating a vibrant base for your Pumpkin Bread with Maple Glaze that boasts rich flavor and moisture.

Step 4: Combine Wet and Dry Mixtures
Pour the wet mixture into the bowl of dry ingredients, gently folding them together with a spatula. Be careful not to overmix; you want to see a few small flour streaks remaining. This step should take a minute or two and will ensure a wonderfully tender loaf.

Step 5: Pour and Bake
Pour the batter into your prepared loaf pan, smoothing the top with a spatula for an even bake. Place it in the oven and bake for 60-70 minutes. The bread is ready when a toothpick inserted in the center emerges clean or with a few moist crumbs, signaling that it’s perfectly baked.

Step 6: Cool in the Pan
Once baking is complete, remove the bread from the oven and allow it to cool in the pan for 10-15 minutes. This step is crucial; it helps the pumpkin bread set and makes it easier to transfer without breaking. Keep an eye on the edges, which should pull away slightly from the pan.

Step 7: Transfer to Wire Rack
After cooling in the pan, gently transfer the loaf to a wire rack to cool completely. This will prevent the bottom from becoming soggy, allowing the pumpkin bread to maintain its delightful texture, ready for the delicious maple glaze that awaits.

Step 8: Make the Maple Glaze
In a small mixing bowl, whisk together powdered sugar, maple syrup, milk or cream, and vanilla extract until you achieve a smooth consistency. Adjust the thickness by adding more milk if needed. This luscious glaze will beautifully drape over your cooled Pumpkin Bread, enhancing its sweetness and visual appeal.

Step 9: Drizzle the Glaze
Once the bread has completely cooled, drizzles the maple glaze over the top. Use a spoon or a piping bag to create an enticing pattern. Let the glaze set for a few moments before slicing, allowing the flavors to meld perfectly in each bite of your delightful pumpkin bread.

Pumpkin Bread with Maple Glaze

Pumpkin Bread with Maple Glaze Variations

Feel free to make this delightful recipe your own with these fun and tasty tweaks that will ignite your creativity in the kitchen!

  • Gluten-Free: Substitute all-purpose flour with a 1:1 gluten-free blend for the same delightful texture. Enjoy everywhere you go!
  • Nutty Crunch: Add ½ cup of chopped walnuts or pecans to the batter for a satisfying crunch and added flavor. The nutty elements perfectly complement the spices in the bread.
  • Spice Level: Increase the spice kick by adding an extra ½ teaspoon of cinnamon or a dash of cayenne pepper for those who love a little heat with their sweet.
  • Chocolate Lovers: Fold in ½ cup of semi-sweet chocolate chips for a rich, decadent twist. They’ll make every slice utterly irresistible and perfect for special occasions!
  • Maple Alternative: Swap maple syrup for honey or agave nectar in the glaze to create a unique flavor that still shines. This brings a beautiful sweetness while keeping it cozy.
  • Vegan Option: Use flax eggs and unsweetened applesauce instead of eggs, and replace oil with coconut oil to maintain moisture and taste while catering to dietary preferences.
  • Bourbon Maple Glaze: Add 1 tablespoon of bourbon to the maple glaze for a hint of sophistication and warmth, elevating your pumpkin bread for a special gathering.
  • Dried Fruits: Incorporate ½ cup of raisins or dried cranberries for an added chewiness that pairs nicely with the moistness of the bread. They burst with flavor, adding a delicious surprise in every slice.

I hope you enjoy experimenting with these variations! If you love this twist on a classic favorite, you might also want to check out my recipe for Pumpkin Spice Muffins or explore more seasonal delights like Apple Cinnamon Bread to keep that home-baking spirit alive!

Make Ahead Options

These delightful Pumpkin Bread with Maple Glaze are perfect for meal prep enthusiasts! You can prepare the batter up to 24 hours in advance; simply mix the wet and dry ingredients but avoid baking it until you’re ready. This ensures maximum freshness and flavor. Additionally, you can bake the bread and store it at room temperature wrapped in plastic for up to 3 days. To maintain its moist texture, allow it to cool completely before wrapping. When you’re ready to enjoy, simply drizzle the glaze over the cooled bread before slicing. With these make-ahead tips, you can savor homemade pumpkin bread with minimal effort on busy weeknights!

Expert Tips for Pumpkin Bread with Maple Glaze

Avoid Overmixing: Stir the wet and dry ingredients until just combined to ensure a tender crumb; overmixing can lead to a dense texture.

Check Your Oven Temp: Always calibrate your oven before baking. An inaccurate temperature can lead to undercooking or burning your Pumpkin Bread with Maple Glaze.

Proper Cooling: Allow your bread to cool completely on a wire rack. This step enhances the texture, preventing sogginess on the bottom.

Use Fresh Spices: Freshly ground spices offer a stronger flavor. Make the most of your pumpkin bread by using quality, fresh ingredients.

Customize Glaze Thickness: Adjust the maple glaze’s consistency by adding more milk or powdered sugar, catering to your personal preference for sweetness!

What to Serve with Pumpkin Bread with Maple Glaze

Imagine the comforting aroma of your warm pumpkin bread wafting through the air, beckoning you to create a cozy meal experience.

  • Creamy Mashed Potatoes: This classic side dish offers a wonderful contrast with its richness, beautifully balancing the sweetness of the pumpkin bread.
  • Spiced Chai Tea: A warm cup of spiced chai complements the flavors of the pumpkin and spices, making it the perfect drink for a cozy afternoon.
  • Roasted Brussels Sprouts: Their slight bitterness and crispy texture add a punch to your meal, enhancing the sweetness of the bread in each bite.
  • Warm Apple Crisp: Top it with a scoop of vanilla ice cream, and you’ll have a warming dessert that harmonizes with the pumpkin’s delightful flavors.
  • Maple-Glazed Carrots: These sweet, tender carrots echo the maple glaze on your bread, creating a harmonious and enticing flavor profile.
  • Pumpkin Spice Latte: Enjoy this festive drink alongside your slice of pumpkin bread for an extra dose of fall flavor. The creaminess pairs beautifully with the bread’s warmth.
  • Classic Cream Cheese: Smear some on a slice for a luscious tang that perfectly offsets the sweetness of the pumpkin and the glaze, making each bite even more delightful.

How to Store and Freeze Pumpkin Bread with Maple Glaze

Room Temperature: Store your cooled pumpkin bread wrapped in plastic wrap at room temperature for up to 3 days. This keeps it moist and flavorful for a delightful snack anytime.

Fridge: To extend its freshness, refrigerate the bread in an airtight container for up to a week. Allow it to come to room temperature before enjoying for the best taste.

Freezer: For long-term storage, freeze slices of pumpkin bread wrapped in plastic wrap and then aluminum foil for up to three months. Thaw overnight in the fridge or at room temperature for a quick treat.

Reheating: Warm slices in the microwave for about 15-20 seconds or in a toaster oven for a few minutes, ensuring your pumpkin bread with maple glaze is deliciously cozy!

Pumpkin Bread with Maple Glaze

Pumpkin Bread with Maple Glaze Recipe FAQs

What type of pumpkin puree should I use?
Absolutely! Canned pumpkin puree is convenient and consistent, but if you’re feeling adventurous, you can roast fresh pumpkin. Use a sugar pumpkin for the best sweetness and texture; just cut it in half, bake until tender at 400°F (200°C), scoop out the flesh, and blend until smooth.

How can I store leftover pumpkin bread with maple glaze?
To keep your delicious pumpkin bread fresh, wrap it in plastic wrap and store it at room temperature for 3 days. For a longer shelf life, refrigerate it in an airtight container for up to a week. Don’t forget to let it come to room temperature before diving in for the full flavor experience!

Can I freeze pumpkin bread with maple glaze?
Very! Freezing is a great option. Wrap each slice in plastic wrap followed by aluminum foil, and place it in a freezer-safe bag or container. It will remain fresh for up to 3 months. When you’re ready to enjoy it, simply thaw overnight in the fridge or leave it at room temperature for a few hours.

Why did my pumpkin bread turn out dense?
The most common culprit for dense pumpkin bread is overmixing the batter. Ensure you mix the wet and dry ingredients just until combined—some small flour streaks are okay! Also, check your oven temperature to ensure it’s baking properly; an oven that’s too cool can leave the bread undercooked.

Is pumpkin bread suitable for people with nut allergies?
Absolutely! This pumpkin bread recipe does not include any nuts, making it suitable for those with nut allergies. However, always double-check your ingredients, especially if you’re using peanut butter or alternative flours that may contain nuts. Enjoy the comforting flavors without worry!

Delicious Pumpkin Bread with Maple Glaze You’ll Crave

Enjoy a warm, comforting homemade Pumpkin Bread with Maple Glaze that’s perfect for autumn afternoons.

  • Mixing bowls
  • loaf pan
  • Whisk
  • spatula

For the Bread

  • 1 cup Pumpkin puree (for moisture and flavor)
  • 2 cups All-purpose flour (for texture)
  • 1 cup Granulated sugar (adds sweetness)
  • 1/2 cup Brown sugar (for rich flavor)
  • 2 teaspoons Baking powder (for leavening)
  • 1 teaspoon Baking soda (for leavening)
  • 1 teaspoon Ground cinnamon (for warmth)
  • 1/2 teaspoon Ground nutmeg (for nuttiness)
  • 1/4 teaspoon Ground cloves (for cozy flavor)
  • 1 teaspoon Salt (to balance sweetness)
  • 2 large Large eggs (for binding)
  • 1/2 cup Vegetable oil or melted butter (for moisture)
  • 1 teaspoon Vanilla extract (to enhance sweetness)

For the Maple Glaze

  • 1 cup Powdered sugar (for sweetness)
  • 1/4 cup Maple syrup (for authentic flavor)
  • 2 tablespoons Milk or cream (for consistency)
  • 1 teaspoon Vanilla extract (to complement flavors)

Pumpkin Bread Instructions

  1. Preheat your oven to 350°F (175°C) and grease a 9×5-inch loaf pan.
  2. In a large mixing bowl, whisk together the all-purpose flour, granulated sugar, brown sugar, baking powder, baking soda, ground cinnamon, nutmeg, cloves, and salt.
  3. In another bowl, combine the pumpkin puree, large eggs, vegetable oil or melted butter, and vanilla extract until smooth.
  4. Pour the wet mixture into the dry ingredients, gently folding them together without overmixing.
  5. Pour the batter into the prepared loaf pan and bake for 60-70 minutes or until a toothpick comes out clean.
  6. Allow the bread to cool in the pan for 10-15 minutes before transferring it to a wire rack to cool completely.
  7. In a small bowl, whisk together powdered sugar, maple syrup, milk or cream, and vanilla extract until smooth.
  8. Drizzle the maple glaze over the cooled bread and let it set before slicing.

Ensure to allow the bread to cool completely on a wire rack for the best texture and storage.

Dessert
American
autumn, baking, cozy, dessert, Maple Glaze, Pumpkin Bread

Filed Under: Dessert

Spider Web Halloween Brownies That Haunt Your Taste Buds

August 26, 2025 by grace bellamy Leave a Comment

As the leaves turn and whispers of crisp air signal the arrival of fall, my kitchen transforms into a haven of seasonal delights. This year, I’m diving into the spirit of Halloween with a treat that’s as fun to make as it is to eat: Spider Web Halloween Brownies. These gooey chocolatey squares are not only a quick treat to whip up but also a showstopper that’s sure to impress friends and family at your next gathering. With a mere 15 minutes of prep time, you’ll create a delicious dessert that pairs a rich brownie base with a whimsical white chocolate spider web on top. Sweet, spooky, and oh-so-simple, these brownies are perfect for setting the mood for Halloween festivities. What do you think—it’s time to add a little magic to your baking, right?

Spider Web Halloween Brownies

Why Are These Brownies So Irresistible?

Ghoulishly Fun: With their spooky spider web design, these brownies delight not just the palate but also the imagination, making them a perfect Halloween treat.

Quick and Easy: You can whip up these delicious treats in just 15 minutes of prep; they’re a breeze even for beginner bakers.

Rich Chocolate Flavor: Each bite bursts with fudgy chocolate goodness, leaving you craving more!

Versatile Treat: Whether for a Halloween party or a cozy night in, these brownies fit seamlessly into any occasion.

Crowd-Pleasing Dessert: Everyone loves a sweet surprise, and these brownies are sure to please both kids and adults alike. Prepare to become the star of your next gathering! For similar festive ideas, check out my guide on Fall Desserts.

Spider Web Halloween Brownies Ingredients

For the Brownie Base
• Unsweetened cocoa powder – adds an intense chocolate flavor to the brownies.
• Granulated sugar – sweetens the batter beautifully and balances the cocoa’s bitterness.
• Unsalted butter – provides richness and helps achieve a fudgy texture.
• Large eggs – binds the ingredients together and contributes to a moist, airy structure.
• All-purpose flour – gives the brownies stability while keeping them chewy.

For the Spider Web Topping
• White chocolate chips – melt easily to create the creamy base for the web design.
• Black gel food coloring (optional) – adds a spooky touch to your topping and makes the design pop.

With these ingredients, you’re on your way to making the most delightful Spider Web Halloween Brownies!

Step‑by‑Step Instructions for Spider Web Halloween Brownies

Step 1: Preheat and Prepare
Begin by preheating your oven to 350°F (175°C). While that warms up, grease a baking pan or line it with parchment paper for easy brownie removal later. The goal here is to create a smooth baking surface that will help your Spider Web Halloween Brownies come out perfectly tender and delicious.

Step 2: Melt the Chocolate Mixture
In a medium saucepan, combine the unsalted butter, granulated sugar, and cocoa powder over low heat. Stir the mixture gently until everything melts together into a smooth, glossy texture—this should take about 5 minutes. Once blended, remove the saucepan from heat and let it cool slightly, ensuring it won’t cook the eggs when added.

Step 3: Whisk in the Eggs
After your chocolate mixture has cooled a bit, whisk in the large eggs one at a time. Make sure to blend well after each addition—this infuses essential air into your mixture, contributing to the brownies’ fudgy texture. Keep mixing until everything is combined and glossy, creating a rich brownie batter.

Step 4: Combine Dry Ingredients
In a separate bowl, sift together the all-purpose flour and a pinch of salt. Gradually fold this dry mixture into your chocolate mixture using a spatula. Be gentle to maintain the batter’s airy quality; stop mixing as soon as no flour streaks remain. This careful folding ensures your Spider Web Halloween Brownies keep that desired fudgy consistency.

Step 5: Bake the Brownies
Pour the batter into your prepared baking pan, spreading it evenly. Place the pan in the preheated oven and bake for 25 to 30 minutes, or until a toothpick inserted into the center comes out with a few moist crumbs clinging to it. The top should appear slightly set with a glossy sheen, indicating your brownies are nearly ready.

Step 6: Cooling the Brownies
Once baked, remove the pan from the oven and allow the brownies to cool in the pan for about 10-15 minutes. This cooling step helps them firm up slightly, making it easier for you to cut them into perfect squares once completely cooled. Enjoy the rich, chocolate aroma filling your kitchen while waiting!

Step 7: Prepare the Spider Web Topping
While the brownies cool, melt the white chocolate chips in a microwave-safe bowl. Heat in short 20-second intervals, stirring often until smooth. If you want to add a spooky touch, mix in a few drops of black gel food coloring until you achieve your desired shade. This will create your delightful spider web topping.

Step 8: Create the Spider Web Design
With the brownies cooled and the white chocolate ready, drizzle the melted chocolate over the brownies in a crisscross pattern to create the spider web design. Feel free to get creative with your lines! Aim for a design that’s both festive and fun, adding a lovely visual appeal to these Spider Web Halloween Brownies.

Spider Web Halloween Brownies

How to Store and Freeze Spider Web Halloween Brownies

Room Temperature: Store leftovers in an airtight container at room temperature for up to 3 days to maintain their fudgy texture and rich flavor.

Fridge: If you wish to keep them a bit longer, refrigerate for up to one week. Just be sure to cover them tightly to prevent drying out.

Freezer: For longer storage, wrap the brownies tightly in plastic wrap and freeze for up to 2 months. Thaw overnight in the fridge before enjoying.

Reheating: To bring back their deliciousness, warm individual pieces in the microwave for about 10-15 seconds, ensuring they’re still gooey and delightful!

Spider Web Halloween Brownies Variations

Get ready to personalize your baking adventure with scrumptious twists that will tantalize your taste buds!

  • Gluten-Free: Substitute all-purpose flour with a gluten-free blend for a delightful alternative that everyone can enjoy. Your brownies will still be just as fudgy and delicious!

  • Nutty Delight: Add 1/2 cup of chopped walnuts or pecans for a delightful crunch and added richness. The contrast between the chewy brownies and the nuts creates a wonderful texture that’s hard to resist.

  • Minty Fresh: Mix in 1/2 teaspoon of peppermint extract for a refreshing peppermint brownie twist. This will transform your treats into a timeless favorite that adds a festive feel and makes them deliciously decadent.

  • Spicy Kick: Want to heat things up? Add 1/4 teaspoon of cayenne pepper or chili powder into your brownie batter for a surprising yet delightful heat. It brings an unexpected depth of flavor that will surprise everyone at your Halloween gathering!

  • Dairy-Free: Swap the butter for coconut oil or an equivalent dairy-free butter substitute, and use dairy-free chocolate chips. The results will still be rich and satisfying while catering to dietary preferences.

  • Caramel Swirl: Drizzle some caramel sauce into your brownie batter before baking for a gooey and indulgent caramel surprise in each bite. The combination of chocolate and caramel will introduce a rich layer of sweetness that elevates these brownies!

  • Fruit Fusion: Add a 1/2 cup of mashed ripe bananas or applesauce to the batter for a subtle fruity flavor and extra moistness. The natural sweetness balances beautifully with the dark chocolate for a delightful treat that feels wholesome.

  • Halloween Sprinkles: Top your spider web with festive Halloween-themed sprinkles for an extra fun visual treat. These little colorful gems will not only look amazing but will bring a smile to both kids and adults alike!

Feel free to mix and match these variations to suit your taste or occasion. For more delicious ideas, dive into my collection of Spooky Treats, or discover the joys of Fall Baking to inspire your kitchen creativity!

Make Ahead Options

These Spider Web Halloween Brownies are a fantastic choice for meal prep, allowing you to enjoy their deliciousness while saving precious time! You can prepare the brownie base up to 24 hours in advance; simply mix the batter, pour it into the prepared pan, and cover it tightly. When you’re ready to bake, pop it in the oven directly from the fridge for fabulous results. The spider web topping can also be made ahead and stored in an airtight container at room temperature for up to 3 days. Just melt the white chocolate chips and mix in the black gel food coloring, then drizzle it over the cooled brownies right before serving for a fresh, stunning presentation! This way, you’ll have delightful treats on hand with minimal fuss!

What to Serve with Spider Web Halloween Brownies

Let the spirit of Halloween guide your meal planning, as you pair these spooky treats with delightful accompaniments that enhance their charming whimsy.

  • Vanilla Ice Cream: The creamy, cool sweetness of vanilla ice cream complements the rich chocolate brownies and adds a delightful contrast in temperature. A scoop next to these brownies makes every bite heavenly!

  • Pumpkin Spice Latte: This festive drink brings warmth and cozy autumn flavors, perfectly marrying the chocolatey decadence of brownies with hints of cinnamon and nutmeg. Every sip will remind you of the season!

  • Chocolate Dipped Strawberries: These fresh berries not only add a pop of color but also a juicy freshness that balances the brownies’ richness. The added chocolate creates a luxurious treat that pairs wonderfully with Halloween fun.

  • Spooky Fruit Medley: Mix together seasonal fruits like apple slices, pears, and figs for a colorful tray—this brightens the table and offers a refreshing contrast to your sweet brownies. Plus, a dash of honey enhances the natural sweetness!

  • Pumpkin Muffins: Their warm, spiced flavor echoes the season and pairs well with chocolate. These muffins can be served warm, making your Halloween gathering feel extra special.

  • Warm Cinnamon Apples: Stewed apples, lightly spiced and served warm, can bring a comforting sweetness that complements the fudginess of your brownies. They harmonize perfectly with your Halloween theme.

  • Hot Chocolate Bar: Set up a warm drink station where guests can indulge in rich hot cocoa, adding toppings like whipped cream, marshmallows, or festive sprinkles for an interactive experience that complements your lovely brownies.

  • Ghostly Meringues: These fluffy, light treats can arrange a charming dessert table while adding a whimsical touch. Their sweetness pairs beautifully with the deeper chocolate flavor of your brownies!

Helpful Tricks for Spider Web Halloween Brownies

Use Quality Chocolate: Always select high-quality cocoa powder and chocolate chips for richer flavor. It makes a noticeable difference in your brownies.

Check Baking Time: Avoid overbaking; check for doneness at 25 minutes. The toothpick should have a few moist crumbs for optimal fudginess.

Chill Before Cutting: Let the brownies cool fully before cutting; this helps achieve cleaner, more defined edges for your spider web design.

Perfect Topping Consistency: Ensure the melted white chocolate isn’t too hot; let it cool slightly to prevent it from running off the brownies.

Customize the Web: Don’t hesitate to experiment! Create different web patterns or use other colors of gel food coloring for a unique twist on your Spider Web Halloween Brownies.

Spider Web Halloween Brownies

Spider Web Halloween Brownies Recipe FAQs

How do I know if my ingredients are ripe or suitable for this recipe?
Absolutely! For this Spider Web Halloween Brownies recipe, ensure your unsweetened cocoa powder is fresh; it should have a vibrant chocolate aroma. The granulated sugar should be fine and free from clumps. As for the eggs, they should be as fresh as possible—check the packing date and use those that are within their expiration date for the best results. Lastly, your unsalted butter should be soft but not melted, complementing the rich chocolate mixture perfectly.

What’s the best way to store leftover brownies?
Very simple! Store your leftover Spider Web Halloween Brownies in an airtight container at room temperature for up to 3 days to maintain their delectable fudginess. If you have more than you can eat in that time, refrigerate them for up to one week. Just remember to seal them tightly to keep all that moist goodness from drying out!

Can I freeze the Spider Web Halloween Brownies for later?
Of course! To freeze your brownies, wrap them individually or as a whole tightly in plastic wrap, ensuring there are no air pockets. You can also place them in a freezer-safe container or a heavy-duty freezer bag. They’ll maintain their yummy flavor for up to 2 months! When you’re ready to enjoy, simply thaw them in the fridge overnight and enjoy that delightful taste again!

Why are my brownies too chewy or not fudgy enough?
It’s all about the baking time, my friend! If your brownies are too chewy, you might be overbaking them. Check for doneness at the 25-minute mark; they should come out with a few moist crumbs on the toothpick. For a fudgier texture, avoid any additional baking time. If they turn out too dry or tough next time, reduce the bake time slightly and trust your instincts!

Are there any dietary considerations I should be aware of?
Very importantly! If you’re sharing these with friends or family who have dietary restrictions, be sure to check for allergies. The Spider Web Halloween Brownies contain gluten (from flour) and dairy (from butter and chocolate). For a gluten-free option, you could substitute the all-purpose flour with a gluten-free blend. Always check your white chocolate for allergens if anyone is lactose intolerant or sensitive—plenty of dairy-free options are available. Enjoy making these treats safely!

Spider Web Halloween Brownies That Haunt Your Taste Buds

Enjoy these Spider Web Halloween Brownies, a fun and spooky treat perfect for your Halloween festivities!

  • Oven
  • Medium saucepan
  • baking pan
  • spatula
  • Whisk
  • Mixing bowls
  • Microwave-safe bowl

For the Brownie Base

  • 1 cup unsweetened cocoa powder
  • 2 cups granulated sugar
  • 1 cup unsalted butter (melted)
  • 4 large eggs
  • 1 cup all-purpose flour

For the Spider Web Topping

  • 1 cup white chocolate chips (melted)
  • black gel food coloring (optional)

Step-by-Step Instructions

  1. Preheat your oven to 350°F (175°C) and prepare a baking pan.
  2. Melt unsalted butter, granulated sugar, and cocoa powder in a medium saucepan over low heat until smooth.
  3. Whisk in the eggs one at a time ensuring mixture is glossy after each addition.
  4. Sift all-purpose flour and a pinch of salt in a separate bowl and gently fold into the chocolate mixture.
  5. Pour batter into the prepared pan and bake for 25 to 30 minutes.
  6. Let the brownies cool in the pan for about 10-15 minutes.
  7. Melt white chocolate chips in a microwave-safe bowl and mix in black gel food coloring if desired.
  8. Drizzle melted chocolate over brownies in a crisscross pattern to create the spider web design.

For cleaner cuts, allow the brownies to cool completely before slicing. Feel free to customize the web design as desired.

Dessert
American
brownies, chocolate desserts, dessert recipes, Easy Desserts, Halloween Treats, Spider Web Halloween Brownies

Filed Under: Dessert

Crescent Roll Witch Hats for a Spooky & Sweet Treat Night

August 26, 2025 by grace bellamy Leave a Comment

As I rummaged through the pantry, the idea struck me like a bolt of lightning: why not conjure up some delightful Crescent Roll Witch Hats? Perfect for a festive gathering or a cozy family night, these whimsical treats combine the ease of crescent roll dough with the magical sweetness of chocolate and candy corn. In just 25 minutes, you can transform simple ingredients into a crowd-pleaser that’ll have everyone reaching for seconds! Not only are they a fun twist on traditional Halloween goodies, but they also require minimal prep, making them an ideal choice for those busy weeknights. Ready to unleash your inner baker? Let’s get rolling with this charming recipe!

Crescent Roll Witch Hats

Why are Crescent Roll Witch Hats a must-try?

Simplicity makes these delightful treats incredibly easy to prepare – perfect for both seasoned chefs and kitchen novices alike. Irresistible sweetness comes from the combination of chocolate chips and candy corn, making them a hit with kids and adults. Versatile and fun, they’re not just for Halloween; enjoy them for parties or any festive occasion! Time-saving at just 25 minutes from start to finish, they fit perfectly into your busy schedule. Try pairing these treats with warm apple cider for a cozy fall treat. You won’t just love making these – your friends will love eating them!

Crescent Roll Witch Hats Ingredients

For the Batter
• Refrigerated crescent roll dough – perfect for creating flaky, delicious hats with minimal effort.
• Semi-sweet chocolate chips – these add a rich, melty sweetness that complements the dough beautifully.

For the Topping
• Candy corn – a fun and colorful touch that adds a whimsical flair to your Crescent Roll Witch Hats.
• Cooking spray – ensures your treats release easily from the baking sheet, preventing any sticky disasters!

Step‑by‑Step Instructions for Crescent Roll Witch Hats

Step 1: Preheat the Oven
Begin by preheating your oven to 375°F (190°C). While the oven warms up, grab a baking sheet and either line it with parchment paper or lightly spray it with cooking spray to prevent the crescent roll witch hats from sticking. This clever preparation sets the stage for a seamless baking experience.

Step 2: Prepare the Dough
Unroll the refrigerated crescent roll dough on a clean surface, separating it into triangles. Each triangle will form the base of your witch hats. Ensure the triangles are well-defined, as they will need to be rolled tightly around the chocolate filling. This step is vital for achieving the perfect shape when baking.

Step 3: Add the Chocolate Chips
At the wide end of each triangle, place a generous mound of semi-sweet chocolate chips. Be sure to spread them out a bit, leaving the edges clear for rolling. This ensures that every bite of your crescent roll witch hats is deliciously sweet and chocolatey, adding to their irresistible charm.

Step 4: Roll the Triangles
Starting from the wide end, carefully roll each triangle towards the pointy tip, shaping them into miniature hats. As you roll, pinch the seams tightly to secure the shape and prevent any chocolate from leaking out during baking. This step is essential for creating those adorable witch hats that everyone will love.

Step 5: Bake the Witch Hats
Place the rolled witch hats on the prepared baking sheet, evenly spaced apart to allow for puffing while baking. Slide the baking sheet into your preheated oven and bake for 12-15 minutes. Keep an eye on them, and look for a golden-brown color, indicating they’re perfectly baked and ready for the finishing touch.

Step 6: Add Candy Corn
Once your crescent roll witch hats are golden and fragrant, remove them from the oven and let them cool slightly for a couple of minutes. While they are still warm, gently press a piece of candy corn into the top of each hat. This whimsical addition not only adds a pop of color but also a sweet crunch that complements the melty chocolate inside.

Crescent Roll Witch Hats

Crescent Roll Witch Hats Variations

Get ready to unleash your creativity in the kitchen by personalizing these delightful treats with your favorite flavors and textures!

  • Nutty Twist: Add a handful of chopped nuts, like walnuts or pecans, with the chocolate chips for a satisfying crunch. Nuts offer a lovely contrast to the softness of the crescent roll!

  • Fruit Fillings: Swap chocolate chips for mini marshmallows and thinly sliced strawberries for a fruity surprise. The sweetness of strawberries pairs beautifully with the flaky dough, adding a burst of freshness!

  • Pumpkin Spice: For a fall-inspired treat, mix pumpkin pie spice with the chocolate chips. It’ll fill your kitchen with warm, comforting aromas that will enchant your senses!

  • Cheesecake Filling: Blend cream cheese with powdered sugar and vanilla for a delightful cheesecake center. This variation brings a creamy twist that balances perfectly with the crispy outer layer.

  • Gluten-Free Option: Replace regular crescent rolls with gluten-free dough for a delicious alternative. Everyone deserves a taste of these spooky delights, no matter their dietary needs!

  • Spicy Chocolate: Add a pinch of cayenne pepper to the chocolate chips for a surprising kick. The combination of sweet and spicy will tantalize adventurous taste buds!

  • Mini Versions: Make bite-sized versions by cutting the dough triangles in half and using fewer chocolate chips. These mini treats are perfect for party platters or gatherings, ensuring everyone can indulge!

  • Decorative Sprinkles: After adding candy corn, sprinkle colorful Halloween-themed candies or edible glitter on top for an extra festive touch. It’ll turn your Crescent Roll Witch Hats into a show-stopping dessert!

As you experiment with flavors and textures, keep in mind that these wonderful treats are not just for Halloween; enjoy them for parties or any celebration. Pair them with a cozy cup of hot chocolate or a warm spice latte for an unforgettable experience!

Expert Tips for Crescent Roll Witch Hats

  • Dough Temperature: Make sure your crescent roll dough is chilled before using; softer dough can lead to melting chocolate and poorly shaped hats.

  • Spacing Out: When placing your witch hats on the baking sheet, leave enough space between them to allow for puffing. This prevents them from sticking together during baking.

  • Perfect Roll: Roll each triangle tightly and pinch seams securely. Loose rolls can lead to chocolate oozing out, ruining the shape of your Crescent Roll Witch Hats.

  • Timing is Key: Keep an eye on your baking time; they can go from golden to overbaked quickly. Start checking around the 12-minute mark to ensure perfect results.

  • Warm Topping: For a better candy corn placement, press it on the witch hats while they are still warm. This makes them stick better and melt slightly for an even more delightful finish.

What to Serve with Crescent Roll Witch Hats?

Prepare to elevate your festive gathering with delightful accompaniments that will make your dessert experience truly unforgettable!

  • Warm Apple Cider: The cozy spices of apple cider create a comforting counterpoint to the sweet, chocolatey hats. It’s perfect for chilly evenings.

  • Spooky Fruit Platter: A mix of oranges, grapes, and sliced apples provide a fresh, light contrast to your rich treats. Add some ghost-shaped cheese for fun!

  • Pumpkin Spice Ice Cream: This creamy treat brings the flavors of fall into your dessert lineup, adding a sweet and chilly contrast to the warm witch hats.

  • Chocolate Dipped Pretzels: Their salty crunch pairs wonderfully with the sweetness of your crescent roll witch hats, offering balanced textures in every bite.

  • Ghostly Meringue Cookies: Light and airy, these cookies add an elegant touch to your dessert table and create a wonderful visual alongside the witch hats.

  • Decadent Hot Chocolate: Enhance the indulgence with a warm, rich cup of hot chocolate, making every bite even more delightful as the cold weather settles in.

Whether it’s a festive gathering or a cozy family night, these pairings promise to make your celebration as enchanting as your Crescent Roll Witch Hats!

Make Ahead Options

These delightful Crescent Roll Witch Hats are perfect for busy home cooks looking to save time! You can prepare the crescent roll triangles and store them in an airtight container in the refrigerator up to 24 hours ahead of baking. When ready to finish, simply add the chocolate chips and roll them into hats before baking. This ensures the dough remains fresh and flaky. If you’d like to get a head start on the assembly, you can also shape the hats and refrigerate them, but be sure to add the candy corn right after baking for the best quality. By prepping ahead, you’ll have these sweet treats ready for any surprise gathering with minimal effort!

How to Store and Freeze Crescent Roll Witch Hats

Room Temperature: Store any leftover Crescent Roll Witch Hats in an airtight container for up to 2 days. Enjoying them fresh is always best!

Fridge: If you need to keep them longer, refrigerate the hats in an airtight container for up to 5 days. Reheat them in the oven for a few minutes to restore crispiness.

Freezer: For longer storage, freeze the baked witch hats in a single layer, then transfer them to a freezer bag. They can be kept for up to 2 months. Thaw before reheating in the oven.

Reheating: When you’re ready to enjoy those treats again, preheat your oven to 350°F (175°C) and heat them for about 5-7 minutes. This will bring back their delightful crispness!

Crescent Roll Witch Hats

Crescent Roll Witch Hats Recipe FAQs

What type of crescent roll dough should I use?
Absolutely! I recommend using refrigerated crescent roll dough as it provides the perfect balance of flakiness and ease. Make sure it’s fresh, with no dark spots on the packaging, and check the expiration date to ensure the best results.

How should I store leftover Crescent Roll Witch Hats?
For best quality, store any leftovers in an airtight container at room temperature for up to 2 days. If you want to keep them longer, refrigerating them can extend their freshness to about 5 days. Just remember to reheat them in the oven for a few minutes to bring back that delightful crispiness!

Can I freeze the Crescent Roll Witch Hats?
The more, the merrier! You can freeze the baked witch hats for up to 2 months. To do this, place them in a single layer on a baking sheet to freeze initially. Once solid, transfer them to a freezer bag or airtight container. When you’re ready to enjoy them, simply thaw in the fridge, then reheat in the oven at 350°F (175°C) for about 5-7 minutes.

What if my chocolate chips are melting during the roll process?
Very! If your chocolate chips are melting while you’re rolling the triangles, it may be due to the dough being too warm. Try chilling the dough in the fridge for about 10-15 minutes before working with it, or work quickly during the rolling step to maintain the integrity of the dough.

Are there any dietary considerations to keep in mind for this recipe?
Absolutely! If you’re making these for a party, be aware of potential allergies. The Crescent Roll Witch Hats contain gluten and dairy. If you’re accommodating guests with gluten intolerance, consider using gluten-free crescent dough. Also, watch out for chocolate allergies; you can substitute with allergy-safe chocolate chips to ensure everyone can enjoy these festive treats!

How do I know when the witch hats are perfectly baked?
Look for a beautiful golden-brown color and a delightful aroma! Start checking around the 12-minute mark, and if they seem lightly golden and puffed up, it’s time to take them out of the oven. Trust your senses!

Crescent Roll Witch Hats for a Spooky & Sweet Treat Night

Delightful Crescent Roll Witch Hats are easy to prepare, sweetened with chocolate and candy corn – perfect for your Halloween festivities.

  • Oven
  • Baking Sheet
  • parchment paper
  • Cooking spray

For the Batter

  • 1 can Refrigerated crescent roll dough (Perfect for creating flaky hats)
  • 1 cup Semi-sweet chocolate chips (Adds a rich, melty sweetness)

For the Topping

  • 1 cup Candy corn (Adds a whimsical flair)
  • 1 tbsp Cooking spray (Prevents sticking)

Step-by-Step Instructions

  1. Preheat your oven to 375°F (190°C) and prepare a baking sheet.
  2. Unroll the crescent roll dough and separate it into triangles.
  3. Place a mound of chocolate chips at the wide end of each triangle.
  4. Roll each triangle from the wide end to the tip, pinching seams tightly.
  5. Place rolled hats on the baking sheet and bake for 12-15 minutes.
  6. Press a piece of candy corn into the top of each warm hat after baking.

For best results, ensure the dough is chilled and monitor baking time closely to avoid overbaking.

Dessert
American
candy corn, chocolate, Crescent Roll Witch Hats, easy recipes, Halloween Treats, Sweet Treats

Filed Under: Dessert

Cozy Up with Autumn Pumpkin Honey Bun Cake Bliss

August 26, 2025 by grace bellamy Leave a Comment

As autumn leaves begin their colorful dance, there’s something enchanting about the warmth of pumpkin-spiced treats wafting through the kitchen. One of my absolute favorites is this Autumn Pumpkin Honey Bun Cake, which effortlessly combines the cozy flavors of pumpkin and spices for a delightful experience. With a prep time of just 20 minutes, it’s perfect for those busy fall days, and the delicious swirl of honey and cinnamon makes it a guaranteed crowd-pleaser. Whether you’re hosting a cozy gathering or simply want to indulge in some homemade comfort, this cake is your go-to sweet surprise. Ready to bake something that’ll fill your home with that irresistible autumn aroma? Let’s dive in!

Autumn Pumpkin Honey Bun Cake

Why is this cake so irresistible?

Simplicity at its finest: With just 20 minutes of prep, you can indulge in a scrumptious treat that requires no elaborate skills.

Warm, Spiced Flavor: Pumpkin, cinnamon, nutmeg, and ginger create a symphony of autumn tastes that will make your taste buds sing.

Versatile Delight: Perfect for cozy family gatherings or a simple evening dessert, this cake is an instant crowd-pleaser that pairs seamlessly with whipped cream or ice cream.

Eye-Catching Swirl: The beautiful swirl of honey and sugar not only looks stunning but adds a delightful sweetness that everyone will love.

Time-Saving: Bake this in just 30-35 minutes, allowing you more time to enjoy the company of friends or family. If you’re keen on more pumpkin recipes, check out our delicious pumpkin spice muffins for another cozy treat!

Autumn Pumpkin Honey Bun Cake Ingredients

• The perfect blend for a deliciously spiced cake!

For the Cake

  • 2 cups all-purpose flour – All-purpose flour gives the cake a light texture perfect for any occasion.
  • 1 teaspoon baking powder – Helps the cake rise and achieve that delightful fluffiness.
  • 1 teaspoon baking soda – Essential for balancing the acidity in the pumpkin puree.
  • 1 teaspoon salt – Enhances the sweetness and gives a balanced flavor.
  • 2 teaspoons ground cinnamon – The warm spice that brings out all the cozy autumn vibes.
  • 1 teaspoon ground nutmeg – Adds a unique depth of flavor that complements the pumpkin beautifully.
  • 1 teaspoon ground ginger – A zesty kick that pairs wonderfully with the other spices.
  • 1 cup granulated sugar – Sweetens the cake and creates a soft crumb.
  • 1 cup packed brown sugar – Adds a rich, caramel-like flavor, enhancing the overall taste.
  • 1 cup pumpkin puree – The star of the show, providing moisture and a vibrant color.
  • 1 cup vegetable oil – Keeps the cake moist and tender.
  • 4 large eggs – Acts as a binding agent while contributing to the cake’s richness.
  • 1 teaspoon vanilla extract – Adds a sweet, aromatic essence that rounds out the flavors.

For the Swirl

  • 1 cup powdered sugar – Creates a sweet and creamy swirl that contrasts beautifully with the cake.
  • 2 tablespoons honey – This natural sweetener adds a deliciously floral note to the swirl.
  • 1 teaspoon ground cinnamon – Infuses the swirl with warmth and depth, enhancing the overall flavor profile.
  • 2 tablespoons milk – Used to achieve the perfect consistency for easy drizzling.

This Autumn Pumpkin Honey Bun Cake is sure to become a beloved addition to your fall baking repertoire!

Step‑by‑Step Instructions for Autumn Pumpkin Honey Bun Cake

Step 1: Preheat and Prepare Pan
Start by preheating your oven to 350°F (175°C). While it heats, take a moment to grease a 9×13-inch baking pan with butter or cooking spray to prevent sticking. You’ll want this ready for the delicious Autumn Pumpkin Honey Bun Cake batter, so get that pan set aside while you mix the dry ingredients.

Step 2: Mix Dry Ingredients
In a large mixing bowl, whisk together 2 cups of all-purpose flour, 1 teaspoon of baking powder, 1 teaspoon of baking soda, 1 teaspoon of salt, and your warm spices: 2 teaspoons of ground cinnamon, 1 teaspoon of ground nutmeg, and 1 teaspoon of ground ginger. This aromatic blend is the cornerstone of your cake, creating that irresistible autumn aroma that fills your kitchen.

Step 3: Combine Wet Ingredients
In another large bowl, mix together 1 cup of granulated sugar, 1 cup of packed brown sugar, and 1 cup of vegetable oil until the mixture is smooth and inviting. Slowly add in 4 large eggs, one at a time, mixing well after each addition. Finally, stir in 1 cup of pumpkin puree and 1 teaspoon of vanilla extract until all ingredients are creamy and fully incorporated.

Step 4: Combine Wet and Dry Ingredients
Gradually add your dry ingredient mixture to the wet mixture, gently folding them together until just combined. Be careful not to overmix, as this could affect the fluffy texture of your Autumn Pumpkin Honey Bun Cake. Once you see no dry flour clumps, you’re ready for the next delightful step!

Step 5: Make the Swirl Mixture
In a small bowl, prepare the swirl by combining 1 cup of powdered sugar, 2 tablespoons of honey, 1 teaspoon of ground cinnamon, and 2 tablespoons of milk. Mix until the ingredients form a smooth, drizzling consistency. This sweet swirl is what elevates your cake, adding a beautiful touch of flavor and aesthetics.

Step 6: Layer the Batter and Swirl
Pour half of the pumpkin batter into your prepared baking pan, spreading it evenly across the bottom. Drizzle half of the swirl mixture over this layer and use a knife to gently swirl it together. Next, pour the remaining batter on top and repeat with the remaining swirl mixture. This creates a delightful marbled effect in your cake.

Step 7: Bake the Cake
Place your cake in the preheated oven and bake for 30-35 minutes. You’ll know it’s ready when a toothpick inserted into the center comes out clean or with just a few moist crumbs. The warm, inviting aromas will fill your home as it bakes, making it hard to resist a sneak peek!

Step 8: Cool the Cake
After baking, allow the cake to cool in the pan for about 10-15 minutes until it’s set but still warm. Then, carefully transfer the cake to a wire rack to cool completely. This cooling period is essential, as it helps solidify the flavors and ensures the best texture for your Autumn Pumpkin Honey Bun Cake.

Autumn Pumpkin Honey Bun Cake

How to Store and Freeze Autumn Pumpkin Honey Bun Cake

Room Temperature: Store the cake in an airtight container for up to 3 days at room temperature. This keeps it moist and delicious without needing refrigeration.

Fridge: If you want your Autumn Pumpkin Honey Bun Cake to last longer, refrigerate it in an airtight container for up to a week. This will help retain its flavor and moisture.

Freezer: For longer storage, wrap the cake tightly in plastic wrap and then in aluminum foil before placing it in the freezer. It can last for up to 3 months.

Reheating: To enjoy your frozen cake, simply thaw it in the fridge overnight. Reheat individual slices in the microwave for about 15-20 seconds for that fresh-baked taste!

Make Ahead Options

These Autumn Pumpkin Honey Bun Cakes are perfect for meal prep enthusiasts! You can prepare the batter up to 24 hours in advance by mixing the wet and dry ingredients separately, then combining them just before baking. Additionally, you can make the swirl mixture ahead of time and store it in the refrigerator, ensuring it stays fresh and easy to use when you’re ready. When you’re ready to bake, simply pour the batter into the pan, drizzle the swirl on top, and bake as directed. This way, you’ll enjoy a delicious homemade cake with minimal effort, ensuring it’s just as delightful as if it were freshly made!

Autumn Pumpkin Honey Bun Cake Variations

Feel free to make this delightful cake your own with these fun variations and substitutions that will ignite your creativity in the kitchen!

  • Gluten-Free: Swap the all-purpose flour for a gluten-free blend to enjoy this cozy treat without the gluten.

  • Dairy-Free: Use almond milk or coconut milk instead of regular milk, and replace vegetable oil with melted coconut oil for a dairy-free version that’s equally delicious.

  • Egg-Free: To make it vegan, substitute eggs with 1/4 cup unsweetened applesauce or 1 tablespoon of flaxseed meal mixed with 2.5 tablespoons of water per egg.

  • Nutty Texture: Add 1/2 cup of chopped walnuts or pecans into the batter for a delightful crunch and added flavor that complements the spices beautifully.

  • Spiced Up: For a little heat, mix in 1/2 teaspoon of cayenne pepper or finely chopped jalapeños for a sweet-meets-spicy twist that’s sure to surprise!

  • Extra Sweetness: Drizzle extra honey on top or sprinkle chocolate chips or dried cranberries into the batter for a burst of flavor that pleases everyone in the family.

  • Chai Spice Mix: Replace the cinnamon, nutmeg, and ginger with 2 teaspoons of chai spice mix for a fragrant alternative that will transport your taste buds to a cozy tea shop.

  • Cream Cheese Swirl: For a decadent twist, mix 4 oz. of softened cream cheese into the swirl mixture for a rich, lactic flavor—perfect for those looking for an indulgent touch.

Dive into these variations to keep your baking fresh and exciting throughout the season, and don’t forget to try it alongside our scrumptious pumpkin spice muffins for a complete pumpkin celebration! Enjoy crafting your unique Autumn Pumpkin Honey Bun Cake experience.

Tips for the Best Autumn Pumpkin Honey Bun Cake

Don’t Overmix: Gently combine the wet and dry ingredients until just mixed. Overmixing can lead to a dense cake instead of the fluffy texture we all crave.

Swirl with Care: When creating the swirl, a gentle hand is key! Use a knife to lightly swirl the mixtures together without blending them completely for beautiful marbling.

Check for Doneness: Baking times can vary. Start checking for doneness a few minutes early by inserting a toothpick; it should come out clean or with a few moist crumbs for perfection.

Cool Completely: Allow the cake to cool properly on a wire rack after baking. This helps enhance flavors and prevents it from becoming soggy when serving.

Storage Secrets: Keep leftovers in an airtight container at room temperature for up to three days, or refrigerate to extend freshness. Enjoy your homemade Autumn Pumpkin Honey Bun Cake throughout the week!

What to Serve with Autumn Pumpkin Honey Bun Cake

As the fragrant aroma of pumpkin and spices wafts through your kitchen, consider these delightful pairings to create a cozy spread for any gathering.

  • Whipped Cream: A dollop of sweet, airy whipped cream adds a luxurious touch, balancing the cake’s rich spices and sweetness.
  • Vanilla Ice Cream: Creamy vanilla ice cream offers a cool contrast to the warm cake, making each bite a heavenly experience.
  • Spiced Chai Latte: The warm spices in this drink complement the flavors in the cake perfectly, creating a cozy pairing for chilly days.
  • Candied Pecans: Crunchy, sweet, and nutty, candied pecans provide a delightful texture that elevates each mouthful of cake.
  • Caramel Sauce: Drizzle some rich caramel sauce over a slice for an extra layer of sweetness that pairs beautifully with the spices.
  • Fall Fruit Salad: A medley of fresh apples, pears, and pomegranates adds a crisp, juicy contrast to the cake’s moist texture and earthy flavors.
  • Mulled Wine: This warm, spiced beverage enhances the autumnal theme, complimenting the cake’s flavors with its rich aromatic profile.
  • Pumpkin Spice Latte: A classic fall drink, it echoes the cake’s flavor, creating a comforting and festive pairing to enjoy together.
  • Maple Syrup: A drizzle of pure maple syrup enhances the cake’s sweetness and adds an unforgettable depth of flavor.

Autumn Pumpkin Honey Bun Cake

Autumn Pumpkin Honey Bun Cake Recipe FAQs

How do I choose the perfect pumpkin puree?
Absolutely! When selecting pumpkin puree, opt for 100% pure pumpkin in a can, which ensures consistency and flavor. If using fresh pumpkins, choose small pie pumpkins that are heavier for their size without dark spots, as these tend to be sweeter and contain less water.

What is the best way to store leftover Pumpkin Honey Bun Cake?
Store this delightful cake in an airtight container at room temperature for up to 3 days. If you prefer to keep it fresh for longer, refrigerate it in an airtight container for up to a week. This way, you can enjoy the Autumn Pumpkin Honey Bun Cake’s cozy flavors throughout the week!

Can I freeze the Autumn Pumpkin Honey Bun Cake?
Yes, definitely! To freeze your cake, first let it cool completely. Then, wrap it tightly in plastic wrap followed by aluminum foil, ensuring it’s airtight. It can stay frozen for up to 3 months. When you’re ready to enjoy it, simply thaw it in the fridge overnight and microwave individual slices for 15-20 seconds for that fresh-baked taste!

What if my cake isn’t rising as expected?
If your cake doesn’t rise, it could be due to expired baking powder or baking soda. Always check the expiration dates before use. Also, be sure to mix the dry ingredients thoroughly to ensure even distribution. If your batter is too thick, add a tablespoon of milk to help with consistency.

Are there any dietary considerations for this recipe?
Very! This recipe contains gluten (from the all-purpose flour) and eggs, which might not be suitable for those with allergies. For a gluten-free version, substitute the flour with a gluten-free baking blend. You can replace eggs with flaxseed meal or applesauce for an egg-free option while keeping the flavors intact!

How can I make the swirl mixture smoother?
To achieve a smooth swirl mixture, ensure your powdered sugar is sifted to remove any lumps before mixing it with honey and milk. If it’s too thick, a little extra milk can help you reach that perfect drizzling consistency. Remember, the smoother the mixture, the nicer the swirl will look on your cake!

Cozy Up with Autumn Pumpkin Honey Bun Cake Bliss

Enjoy the delightful flavors of Autumn Pumpkin Honey Bun Cake, a moist treat spiced with pumpkin and warm spices, perfect for fall gatherings.

  • 9×13-inch baking pan
  • Mixing bowls
  • Whisk
  • Knife

For the Cake

  • 2 cups all-purpose flour (Gives the cake a light texture.)
  • 1 teaspoon baking powder (Helps the cake rise.)
  • 1 teaspoon baking soda (Balances acidity in the pumpkin puree.)
  • 1 teaspoon salt (Enhances sweetness.)
  • 2 teaspoons ground cinnamon (Brings out cozy autumn vibes.)
  • 1 teaspoon ground nutmeg (Adds depth of flavor.)
  • 1 teaspoon ground ginger (Provides a zesty kick.)
  • 1 cup granulated sugar (Sweetens the cake.)
  • 1 cup packed brown sugar (Adds rich flavor.)
  • 1 cup pumpkin puree (Provides moisture and vibrant color.)
  • 1 cup vegetable oil (Keeps the cake moist.)
  • 4 large eggs (Acts as a binding agent.)
  • 1 teaspoon vanilla extract (Adds aromatic essence.)

For the Swirl

  • 1 cup powdered sugar (Creates a sweet creamy swirl.)
  • 2 tablespoons honey (Adds floral note.)
  • 1 teaspoon ground cinnamon (Infuses warmth.)
  • 2 tablespoons milk (Achieves drizzling consistency.)

Step‑by‑Step Instructions

  1. Preheat your oven to 350°F (175°C) and grease a 9×13-inch baking pan.
  2. In a large mixing bowl, whisk together the dry ingredients: flour, baking powder, baking soda, salt, cinnamon, nutmeg, and ginger.
  3. In another bowl, mix together the sugars and vegetable oil, then add in the eggs, pumpkin puree, and vanilla extract until smooth.
  4. Gradually add the dry mixture to the wet mixture, folding gently.
  5. Combine the swirl ingredients in a small bowl until smooth.
  6. Pour half of the batter into the prepared pan, drizzle half of the swirl on top, and gently swirl together. Repeat with remaining batter and swirl.
  7. Bake for 30-35 minutes or until a toothpick comes out clean.
  8. Allow to cool in the pan for 10-15 minutes before transferring to a wire rack.

Ensure to cool completely on a wire rack for best texture. Store leftovers in an airtight container.

Dessert
American
Autumn Dessert, Bun Cake, Cozy Baking, fall recipe, Honey Bun Cake, Pumpkin Cake

Filed Under: Dessert

Zesty Avocado Corn Salad With Grilled Shrimp Delight

August 26, 2025 by grace bellamy Leave a Comment

As I stood by the grill, the scent of smoky shrimp filled the air, instantly transporting me to sunlit summers spent with friends and family. This Avocado Corn Salad With Grilled Shrimp is my go-to for gathering those I love around the table, and it’s no wonder why! It offers a refreshing medley of flavors and textures, showcasing ripe avocados, sweet corn, and succulent shrimp. This dish comes together in just 30 minutes and is perfect for a light yet satisfying meal. Plus, it’s incredibly versatile—you can serve it as a stunning side to your favorite protein or as a hearty main dish on its own. Ready to elevate your salad game? Let’s dive in and create something unforgettable!

Avocado Corn Salad With Grilled Shrimp

Why is this salad a must-try?

Vibrant and fresh, this Avocado Corn Salad With Grilled Shrimp bursts with color and flavor, making it a feast for the eyes and taste buds alike. Quick to prepare, it takes just 30 minutes from start to finish, ideal for busy weeknights or impromptu gatherings. Healthy and nutrient-packed, the combination of shrimp, avocados, and veggies provides a wholesome meal that doesn’t skimp on taste. Versatile in nature, you can serve it alongside grilled chicken or enjoy it as a light main dish. Crowd-pleaser certified, this dish is perfect for sharing with family and friends, ensuring everyone leaves the table satisfied. Ready to whip up this salad? Don’t forget to check out our tips on serving suggestions for the perfect pairing!

Avocado Corn Salad With Grilled Shrimp Ingredients

For the Salad
• Ripe avocados – they provide a creamy texture and are rich in healthy fats.
• Fresh corn kernels – choose sweet, seasonal corn for the best flavor and crunch.
• Shrimp – make sure to peel and devein them for easy grilling and consumption.
• Red onion – finely chopped, it adds a zesty bite that complements the other flavors.
• Red bell pepper – diced for a sweet and colorful crunch in every bite.
• Cherry tomatoes – halved, they offer bursts of juicy sweetness throughout the salad.
• Fresh cilantro – chopped, it enhances the dish with bright, herbal notes.

For the Dressing
• Olive oil – provides a rich and smooth base for the dressing, enhancing all the flavors.
• Lime – freshly juiced (and zest reserved) adds a zesty kick that brightens the salad.
• Chili powder – imparts a warm, slightly spicy element that elevates the overall taste.
• Salt and pepper – season to taste for balanced flavor throughout the salad.

This Avocado Corn Salad With Grilled Shrimp is not just a dish—it’s an experience bursting with flavor! Enjoy crafting and savoring this delightful recipe!

Step‑by‑Step Instructions for Avocado Corn Salad With Grilled Shrimp

Step 1: Preheat the Grill
Begin by preheating your grill to a medium-high temperature (around 400°F). This ensures that your shrimp and corn will cook evenly and get that perfect charred flavor. While the grill heats up, gather a bowl for marinating the shrimp and all your ingredients nearby to streamline the cooking process.

Step 2: Prepare the Shrimp
In a mixing bowl, combine the peeled and deveined shrimp with olive oil, chili powder, salt, and pepper. Use your hands or a spoon to toss everything together until the shrimp are evenly coated in the marinade. Allow this to sit for about 5 minutes while the grill finishes heating, giving the flavors time to meld.

Step 3: Grill the Shrimp
Once the grill is hot, place the marinated shrimp on the grates. Grill them for approximately 2-3 minutes on each side, or until they are pink and opaque and have beautiful grill marks. Be sure to watch them closely to avoid overcooking. After cooking, remove the shrimp from the grill and set them aside to cool slightly.

Step 4: Prepare the Corn
If you’re using fresh corn, place the corn ears directly on the grill and cook for about 8-10 minutes, turning occasionally, until lightly charred. You’ll know it’s ready when the corn is tender and golden. After grilling, let the corn cool for a few minutes before cutting the kernels off the cob. If using canned corn, skip this step and move on.

Step 5: Combine the Ingredients
In a large mixing bowl, combine the diced avocados, grilled corn kernels, finely chopped red onion, diced red bell pepper, halved cherry tomatoes, and chopped cilantro. Gently mix these ingredients together, allowing their vibrant colors and flavors to blend beautifully without mashing the avocados.

Step 6: Make the Dressing
In a small bowl, whisk together the freshly squeezed lime juice, reserved lime zest, and a pinch of salt and pepper. This zesty dressing will enhance the flavors of your Avocado Corn Salad With Grilled Shrimp, so ensure it is well combined and adjust seasoning to your liking.

Step 7: Dress the Salad
Drizzle the zesty lime dressing over the salad mixture in the large bowl. Using a large spoon, toss everything gently to combine, ensuring all the ingredients are coated without damaging the avocados. The vibrant colors will combine beautifully, creating an appetizing and fresh look.

Step 8: Fold in the Shrimp
Now, gently fold the grilled shrimp into the salad, ensuring they are evenly distributed among the fresh ingredients. Be careful during this step to keep the shrimp intact while integrating them into the Avocado Corn Salad, creating a delightful medley of textures and flavors.

Step 9: Serve
Finally, transfer the carefully mixed salad to a serving bowl or platter. This Avocado Corn Salad With Grilled Shrimp is best enjoyed fresh, so serve it immediately, capturing that perfect blend of smoky shrimp and creamy avocados, and wow your guests with its bright presentation.

Avocado Corn Salad With Grilled Shrimp

Avocado Corn Salad With Grilled Shrimp Variations

Feel free to explore and customize this salad to fit your taste buds and dietary preferences!

  • Gluten-Free: This salad is naturally gluten-free, making it suitable for anyone with gluten sensitivities.
  • Spicy: Add diced jalapeños for a spicy kick that will elevate your salad experience.
  • Plant-Based: Substitute shrimp with grilled tofu or chickpeas for a plant-based delight that’s equally satisfying.

For a refreshing twist, try swapping in some roasted red peppers. Their sweetness and smoky flavor will create a delightful contrast against the creamy avocados.

  • Extra Crunch: Toss in toasted pumpkin seeds or sunflower seeds for a delightful crunch and a nutritious boost.
  • Citrusy Twist: Mix in some orange or grapefruit segments for a surprising burst of flavor that dances on the palate.
  • Herbaceous: Experiment with different herbs like mint or basil in place of cilantro, offering an unexpected aromatic twist to the dish.

As you mix and match these variations, don’t hesitate to get creative! Your personal touches will make this Avocado Corn Salad With Grilled Shrimp truly unique. Enjoy the playful exploration of flavors!

Make Ahead Options

These Avocado Corn Salad With Grilled Shrimp components are perfect for busy home cooks looking to save time during the week! You can grill the shrimp and corn up to 24 hours in advance; simply refrigerate them in an airtight container to maintain their freshness. For the salad base, prepare the diced avocados, chopped vegetables, and dressing, but hold off on mixing them until just before serving to keep the avocados vibrant and prevent browning. When you’re ready to enjoy your salad, combine all the prepped components, gently toss with the dressing, and fold in the shrimp for a quick, delicious meal that feels fresh and satisfying!

How to Store and Freeze Avocado Corn Salad With Grilled Shrimp

Fridge: Store leftover salad in an airtight container in the refrigerator for up to 1-2 days. The avocados may brown slightly, but it will still taste delicious!

Freezer: It’s best to avoid freezing this salad, as avocados and tomatoes can change texture once thawed. Enjoy fresh!

Reheating: If you’ve grilled extra shrimp, reheat them gently in a pan over low heat until warmed through, then fold them back into the salad.

Make-Ahead Tips: For an easy prep, grill the shrimp and corn ahead of time. Combine all other salad ingredients and dress right before serving to maintain freshness.

What to Serve with Avocado Corn Salad With Grilled Shrimp

Elevate your dining experience by mixing and matching these delightful pairings that complement the fresh flavors of your salad.

  • Crusty Bread: Perfect for sopping up the zesty dressing, a warm, crusty baguette brings a comforting, rustic touch to your meal.

  • Tortilla Chips: Their satisfying crunch and slight saltiness contrast beautifully with the creamy avocados and tender shrimp, making each bite exciting.

  • Cilantro Lime Rice: This fluffy side dish echoes the salad’s fresh flavors while adding a lovely texture to your meal.

  • Grilled Veggie Skewers: Colorful skewers filled with peppers, zucchini, and onion not only add vibrancy but a smoky element that harmonizes with the grilled shrimp.

  • Chilled White Wine: A refreshing Sauvignon Blanc is ideal; its crisp acidity balances the richness of the avocados and sweetness of the corn.

  • Mango Salsa: Sweet and tangy, this fruity salsa adds a burst of flavor, enhancing both the salad and your taste buds with each bite.

  • Lemonade or Iced Tea: A tangy lemonade or herbal iced tea provides a refreshing contrast, making your meal feel vibrant and summery.

  • Fruit Salad: A light, refreshing fruit salad with melons and berries will cleanse the palate and add a touch of sweetness that pairs perfectly with your dish.

  • Chocolate Mousse: For dessert, indulge in a light and airy chocolate mousse—its richness complements the light salad without overwhelming your taste buds.

Expert Tips for Avocado Corn Salad With Grilled Shrimp

• Perfectly Cooked Shrimp: Don’t overcook shrimp—grill until just pink. Overcooked shrimp can become rubbery and lose their succulent flavor.

• Fresh vs. Canned Corn: For the best taste and texture, use fresh corn kernels. If using canned corn, rinse and drain thoroughly to remove excess sodium.

• Avocado Care: Add the avocados last to maintain their shape. Gently toss to avoid mashing—nobody wants a guacamole surprise in their salad!

• Make It Zesty: For an extra kick, consider adding a pinch of cayenne pepper to your dressing. It elevates the flavor profile of the avocado corn salad with grilled shrimp beautifully.

• Chill Before Serving: Allow the salad to chill in the refrigerator for about 15 minutes after assembling. This melding of flavors makes every bite even more delightful!

Avocado Corn Salad With Grilled Shrimp

Avocado Corn Salad With Grilled Shrimp Recipe FAQs

How do I choose ripe avocados?
Absolutely! Look for avocados that are slightly soft to the touch but not mushy. If the skin is darker, it often indicates ripeness. If you have avocados that are too firm, leave them at room temperature for a day or two, then check again.

How long can I store the salad in the fridge?
Very! Leftover Avocado Corn Salad With Grilled Shrimp can be kept in an airtight container in the refrigerator for about 1-2 days. The avocados might brown a bit, but they’ll still taste amazing! To minimize browning, add a squeeze of lime juice over the top before storing.

Can I freeze this salad?
No, it’s best to avoid freezing this salad. The textures of the avocados and tomatoes can become mushy once thawed, compromising that lovely creamy bite we all adore. Enjoy it fresh instead!

What should I do if my shrimp is overcooked?
If you find yourself in a pinch and the shrimp is overcooked, don’t fret! You can still salvage the situation. Consider making a zesty shrimp dip by mixing the overcooked shrimp with some cream cheese, lime juice, and seasoning. Serve it with chips or crackers for a lovely appetizer!

Are there any dietary considerations for this salad?
Absolutely! This salad is naturally gluten-free and packed with wholesome ingredients. However, if you have seafood allergies, it’s best to substitute the shrimp with grilled chicken or chickpeas for a delightful protein alternative. Always check for any personal food sensitivities when serving others.

Can I prep this salad ahead of time for a gathering?
Yes! To make things easier, grill the shrimp and corn in advance and store them separately in the refrigerator. Chop your veggies and prepare the dressing a few hours before serving. Just assemble everything right before your guests arrive to keep that fresh taste!

Zesty Avocado Corn Salad With Grilled Shrimp Delight

This Avocado Corn Salad With Grilled Shrimp is a refreshing dish bursting with flavors, perfect for gatherings.

  • grill
  • Mixing Bowl
  • small bowl
  • large mixing bowl
  • spoon

For the Salad

  • 2 medium ripe avocados (provide a creamy texture)
  • 1 cup fresh corn kernels (choose sweet, seasonal corn)
  • 1 pound shrimp (peeled and deveined)
  • 1/2 cup red onion (finely chopped)
  • 1 medium red bell pepper (diced)
  • 1 cup cherry tomatoes (halved)
  • 1/4 cup fresh cilantro (chopped)

For the Dressing

  • 3 tablespoons olive oil (rich and smooth base)
  • 1 juiced lime (freshly juiced)
  • 1 teaspoon chili powder (adds a spicy element)
  • to taste salt
  • to taste pepper

Step-by-Step Instructions

  1. Preheat your grill to a medium-high temperature (around 400°F).
  2. In a mixing bowl, combine the shrimp with olive oil, chili powder, salt, and pepper. Allow to marinate for about 5 minutes.
  3. Grill the marinated shrimp for approximately 2-3 minutes on each side until they are pink and opaque.
  4. Grill fresh corn ears for about 8-10 minutes until lightly charred, then cut kernels off the cob.
  5. In a large mixing bowl, combine diced avocados, grilled corn, red onion, red bell pepper, cherry tomatoes, and cilantro.
  6. In a small bowl, whisk together lime juice, reserved lime zest, and a pinch of salt and pepper.
  7. Drizzle the lime dressing over the salad mixture and toss gently to combine.
  8. Gently fold grilled shrimp into the salad.
  9. Serve immediately to enjoy the fresh flavors.

Perfectly cooked shrimp should be pink without being rubbery. Use fresh corn for the best flavor and maintain avocado shape by adding them last.

Salad
American
Avocado Corn Salad With Grilled Shrimp, avocado salad, grilled shrimp, healthy meal, quick recipe, Salad

Filed Under: salad

Irresistible Brown Butter Pumpkin Chocolate Chip Cookies

August 26, 2025 by grace bellamy Leave a Comment

As the leaves begin to change and a crispness fills the air, there’s nothing quite like the warm aroma of freshly baked cookies to bring comfort. This is precisely what inspired my Brown Butter Pumpkin Chocolate Chip Cookies. Not only are these delightful bites a perfect blend of the cozy flavors of fall, but they also whisk together effortlessly! You’ll find that they’re a delightful crowd-pleaser, ideal for sharing at gatherings or savored during quiet evenings at home. With their rich nutty undertones and the lusciousness of pumpkin, these cookies add a fun twist to your traditional cookie lineup. Curious about how such a treat can transform your autumn afternoons? Let’s dive into the cozy sweetness!

Brown Butter Pumpkin Chocolate Chip Cookies

Why are these cookies so special?

Uniquely Delicious: The brown butter adds a nutty richness that elevates the entire cookie. It’s that extra step that makes them irresistible!

Perfectly Pumpkin: Using pumpkin puree not only gives these cookies a lovely flavor but also ensures they stay moist and chewy.

Quick and Easy: With just 15 minutes prep, you can whip these up in no time, making them a go-to for unexpected guests or cozy nights in.

Chill Time Magic: Refrigerating the dough for just one hour enhances the flavor while allowing for perfectly puffy cookies.

Don’t forget to pair these with a cup of coffee or tea, or for more cozy treat ideas, check out my guide on fall desserts that will warm your home!

Brown Butter Pumpkin Chocolate Chip Cookie Ingredients

Get ready to bake these scrumptious cookies with a delightful twist!

For the Cookie Dough

  • unsalted butter – used to create that rich, nutty flavor that sets these cookies apart.
  • pumpkin puree – brings moisture and a subtle autumn taste, making these cookies irresistibly chewy.
  • granulated sugar – sweetens the dough while helping achieve a lovely texture.
  • packed brown sugar – adds depth and a caramel-like richness that complements the pumpkin beautifully.
  • large eggs – bind the ingredients together and contribute to the cookie’s soft structure.
  • vanilla extract – enhances the flavors, making each bite an aromatic delight.
  • all-purpose flour – provides the backbone of the cookie, giving it that perfect chewy bite.
  • baking soda – helps the cookies rise, ensuring they’re light and fluffy.
  • salt – enhances the flavors and balances out the sweetness.
  • semi-sweet chocolate chips – these melt perfectly into the cookie, adding a sweet contrast against the pumpkin.

You’re just a few ingredients away from treating yourself and your loved ones to these Brown Butter Pumpkin Chocolate Chip Cookies!

Step‑by‑Step Instructions for Brown Butter Pumpkin Chocolate Chip Cookies

Step 1: Brown the Butter
In a medium saucepan over medium heat, add 1 cup of unsalted butter. Allow it to melt and foam, swirling the pan occasionally. Keep an eye on it for about five minutes until it turns a golden brown color and releases a nutty aroma—this step creates the rich flavor foundation for your Brown Butter Pumpkin Chocolate Chip Cookies.

Step 2: Cool the Butter
Once your butter is beautifully browned, remove it from heat and let it cool for about 10 minutes. This cooling period allows the butter to thicken slightly; you want it warm but not hot to the touch when you mix it with the other ingredients, ensuring a smooth blend for your cookie dough.

Step 3: Mix Wet Ingredients
In a large mixing bowl, whisk together the cooled, browned butter, 1 cup of pumpkin puree, 1 cup of granulated sugar, 1/2 cup of packed brown sugar, 2 large eggs, and 1 teaspoon of vanilla extract until the mixture is smooth and well combined. The rich, creamy texture promises a delicious base for your cookies.

Step 4: Combine Dry Ingredients
In another bowl, whisk together 2 cups of all-purpose flour, 1 teaspoon of baking soda, and 1/2 teaspoon of salt. Gradually introduce this dry mixture to the wet ingredients in the large bowl, stirring gently until just combined. Be careful not to overmix; a few flour streaks are perfectly fine and will give your Brown Butter Pumpkin Chocolate Chip Cookies that perfect chewy texture.

Step 5: Fold in the Chocolate Chips
With a spatula, gently fold in 1 cup of semi-sweet chocolate chips into your cookie dough until they are evenly distributed. This step ensures that every bite of your cookies is packed with melty chocolate goodness, adding an irresistible sweetness to the overall flavor.

Step 6: Chill the Dough
Cover the mixing bowl with plastic wrap and place it in the refrigerator for at least 1 hour. This chilling time is essential; it enhances the flavors of your dough and helps the cookies maintain their shape when baking, resulting in perfectly puffy Brown Butter Pumpkin Chocolate Chip Cookies.

Step 7: Preheat the Oven
About 15 minutes before you’re ready to bake, preheat your oven to 350°F (175°C). While it heats, prepare two baking sheets by lining them with parchment paper to prevent sticking and ensure even baking for your cookies.

Step 8: Bake the Cookies
Using a cookie scoop or tablespoon, drop balls of dough about two inches apart onto the prepared baking sheets. Bake in the preheated oven for approximately 12 minutes or until the edges are lightly golden but the centers remain soft. Your Brown Butter Pumpkin Chocolate Chip Cookies will be warm and inviting, ready to share with family and friends!

Brown Butter Pumpkin Chocolate Chip Cookies

Make Ahead Options

These Brown Butter Pumpkin Chocolate Chip Cookies are perfect for busy home cooks looking to save time in the kitchen! You can prepare the cookie dough up to 24 hours in advance by following the initial steps and refrigerating it, ensuring it’s well covered to maintain freshness and prevent drying out. Alternatively, you can also scoop the dough into balls and freeze them for up to 3 months. When ready to bake, simply place the frozen dough onto a baking sheet and add an extra minute or two to the baking time for perfectly delicious cookies! This way, you’ll always have a delightful treat ready for any occasion, saving you time while delivering flavor just like fresh from the oven.

What to Serve with Brown Butter Pumpkin Chocolate Chip Cookies

As the sweet aroma of baked cookies dances through your space, it’s the perfect moment to elevate the experience with delightful pairings.

  • Creamy Vanilla Ice Cream: The smooth, rich creaminess beautifully complements the flavors of pumpkin and chocolate, providing a delightful contrast.

  • Spiced Chai Tea: Warm and fragrant, this spiced tea echoes the cozy fall vibes of your cookies, enhancing the overall experience with each sip.

  • Warm Apple Cider: Its sweetness with a hint of spice pairs remarkably well, creating a wonderful autumn atmosphere while enjoying your cookies.

Indulge in this comforting combo as you savor each bite, and feel free to add a drizzle of caramel for an extra layer of flavor!

  • Coffee or Espresso: The bold flavors cut through the sweetness of each cookie, making each bite and sip a harmonious treat.

  • Pumpkin Spice Latte: For an extra dose of pumpkin goodness, this seasonal favorite offers a perfect match, celebrating fall in every aspect.

  • Nutty Granola Bars: These crunchy treats add a different texture, making for a delicious snack that balances the softness of the cookies beautifully.

Embrace the warmth of your cozy kitchen with these mouthwatering pairings that will leave everyone coming back for more!

Brown Butter Pumpkin Chocolate Chip Cookies Variations

Feel free to get creative and customize these delectable cookies to suit your taste!

  • Gluten-Free: Substitute the all-purpose flour with a 1:1 gluten-free flour blend to cater to gluten sensitivities. They’ll still be deliciously chewy!

  • Dairy-Free: Use coconut oil in place of unsalted butter for a dairy-free option that remains rich and flavorful. Coconut oil adds a subtle hint of tropical goodness!

  • Nutty Twist: Incorporate 1/2 cup of chopped walnuts or pecans into the dough for added texture and a lovely crunch. The mingling flavors of nuts with chocolate are simply irresistible!

  • Spiced Up: Add 1 tsp of pumpkin pie spice for a more intense fall flavor. This little touch brings warmth and depth that will make your cookies sing with seasonal goodness!

  • Chocolate Lovers: Swap the semi-sweet chocolate chips for dark chocolate or white chocolate chips for a rich variation. Each version creates a distinctly delightful twist that chocolate lovers will appreciate.

  • Cranberry Kick: Mix in 1/2 cup of dried cranberries alongside the chocolate chips for a tart burst of flavor. The balance of sweet and tart will brighten up your cookie experience!

  • Chili Chocolate: For the adventurous, sprinkle in a dash of cayenne pepper to the dough for a surprising kick. Just a pinch adds warmth without overpowering the sweetness!

Don’t forget, these Brown Butter Pumpkin Chocolate Chip Cookies pair perfectly with a comforting cup of coffee, or explore more warming ideas in my guide on fall desserts that will bring joy to your kitchen!

Expert Tips for Brown Butter Pumpkin Chocolate Chip Cookies

Butter Temperature: Ensure your brown butter cools slightly before mixing to avoid cooking the eggs in the wet ingredients.

Chilling is Key: Don’t skip the chilling step! It enhances flavor and helps the cookies maintain their shape, leading to a perfect bake.

Mix Gently: When adding dry ingredients, mix just until combined—overmixing can lead to dense cookies instead of the soft, chewy texture you want.

Cookie Size Matters: Use a consistent scoop to ensure even baking. Too large or too small can affect cooking time and texture.

Watch the Oven: Keep an eye on the cookies while baking; they should be lightly golden on the edges and soft in the center for the perfect Brown Butter Pumpkin Chocolate Chip Cookies!

How to Store and Freeze Brown Butter Pumpkin Chocolate Chip Cookies

Room Temperature: Keep cookies in an airtight container at room temperature for up to 3 days. This way, you’ll enjoy their soft, chewy texture each day.

Fridge: For longer freshness, store the cookies in the refrigerator, where they can last up to 1 week. Just remember to bring them back to room temperature or warm them slightly before serving!

Freezer: To freeze, place cookies in a single layer on a baking sheet until firm, then transfer to a freezer-safe container. These Brown Butter Pumpkin Chocolate Chip Cookies can be frozen for up to 3 months; simply thaw at room temperature before enjoying.

Reheating: Warm individual cookies in the microwave for about 10-15 seconds to restore that fresh-out-of-the-oven feel and enhance their melty chocolate goodness!

Brown Butter Pumpkin Chocolate Chip Cookies

Brown Butter Pumpkin Chocolate Chip Cookies Recipe FAQs

How do I choose the right pumpkin puree?
Absolutely! When selecting pumpkin puree, look for a product that is 100% pumpkin with no added sugars or spices. Canned puree is often the most convenient option, but if you’re feeling adventurous, you can roast a fresh pumpkin and puree it yourself for a deeper flavor. Just make sure it’s smooth and thick, not watery!

What’s the best way to store Brown Butter Pumpkin Chocolate Chip Cookies?
To keep those delectable cookies at their best, store them in an airtight container at room temperature for up to 3 days. If you want them to last longer, the refrigerator is your friend! In the fridge, they’ll stay fresh for about 1 week. Just allow them to come back to room temperature before enjoying!

Can I freeze these cookies?
Yes! I often freeze my cookies for later enjoyment. Start by placing them in a single layer on a baking sheet until they’re firm. Then, transfer them to a freezer-safe container. Your Brown Butter Pumpkin Chocolate Chip Cookies can be frozen for up to 3 months! Thaw them at room temperature when you’re ready to indulge.

What should I do if my cookie dough is too dry?
If you find your cookie dough is too dry, a common troubleshooting tip is to add a tablespoon of milk or water to the mixture. Just incorporate it gently to moisten the dough without overmixing. This will help achieve the right texture for those soft, chewy cookies.

Are these cookies safe for pets?
No, it’s important to keep these cookies away from pets. The chocolate chips are toxic to dogs and can cause health issues. If you’re looking for a treat to share with your furry friend, consider making a special batch of dog-friendly cookies that are safe and healthy for them!

Can I substitute any of the ingredients?
Absolutely! For a lighter option, you could use half the sugar or substitute coconut sugar. If you’re dairy-free, feel free to use a vegan butter alternative. And for a gluten-free version, you can swap in a 1:1 gluten-free flour blend. Just keep in mind that substituting may change the texture or flavor slightly, but experimenting is part of the fun!

Irresistible Brown Butter Pumpkin Chocolate Chip Cookies

These Brown Butter Pumpkin Chocolate Chip Cookies are a delightful autumn treat, combining rich flavors and a chewy texture.

  • Medium saucepan
  • large mixing bowl
  • Whisk
  • spatula
  • cookie scoop or tablespoon
  • Baking sheets

For the Cookie Dough

  • 1 cup unsalted butter (brown, for rich flavor)
  • 1 cup pumpkin puree (for moisture and flavor)
  • 1 cup granulated sugar (to sweeten the dough)
  • 0.5 cup packed brown sugar (adds caramel richness)
  • 2 large eggs (to bind ingredients)
  • 1 teaspoon vanilla extract (for enhanced flavor)
  • 2 cups all-purpose flour (provides the cookie structure)
  • 1 teaspoon baking soda (helps cookies rise)
  • 0.5 teaspoon salt (balances sweetness)
  • 1 cup semi-sweet chocolate chips (for sweet contrast)

Step-by-Step Instructions

  1. In a medium saucepan over medium heat, add 1 cup of unsalted butter. Allow it to melt and foam, swirling the pan occasionally until it turns golden brown and releases a nutty aroma.
  2. Remove the browned butter from heat and let it cool for about 10 minutes.
  3. In a large mixing bowl, whisk together the cooled, browned butter, pumpkin puree, granulated sugar, packed brown sugar, eggs, and vanilla extract until smooth.
  4. In another bowl, whisk together all-purpose flour, baking soda, and salt. Gradually introduce this dry mixture to the wet ingredients, stirring gently until just combined.
  5. Gently fold in the chocolate chips into the cookie dough until evenly distributed.
  6. Cover the mixing bowl with plastic wrap and refrigerate for at least 1 hour.
  7. Preheat your oven to 350°F (175°C) about 15 minutes before baking and prepare baking sheets with parchment paper.
  8. Drop balls of dough about two inches apart onto the prepared baking sheets and bake for approximately 12 minutes or until edges are lightly golden and centers remain soft.

Ensure the brown butter cools slightly before mixing to avoid cooking the eggs. Chilling is key for flavor enhancement and cookie shape.

Dessert
American
autumn desserts, Brown Butter Pumpkin Chocolate Chip Cookies, chocolate chip cookies, cozy treats, fall baking, pumpkin cookies

Filed Under: Dessert

  • « Previous Page
  • 1
  • …
  • 12
  • 13
  • 14
  • 15
  • 16
  • …
  • 22
  • Next Page »
RecipeCrown

Hello, beautiful people! I’m Grace Bellamy, a foodie, traveler, and writer with wanderlust in my soul. Whether crafting recipes in my kitchen or exploring flavors around the globe, my greatest joy is helping you create healthier, happier lives, one delicious bite at a time.