RecipeCrown

Easy & Delicious Recipes

  • Home
  • Breakfast
  • Main Dishes
  • Dessert
  • About
  • Contact
You are here: Home / Archives for grace bellamy

Zesty Lemon Raspberry Bars to Brighten Your Day

July 19, 2025 by grace bellamy Leave a Comment

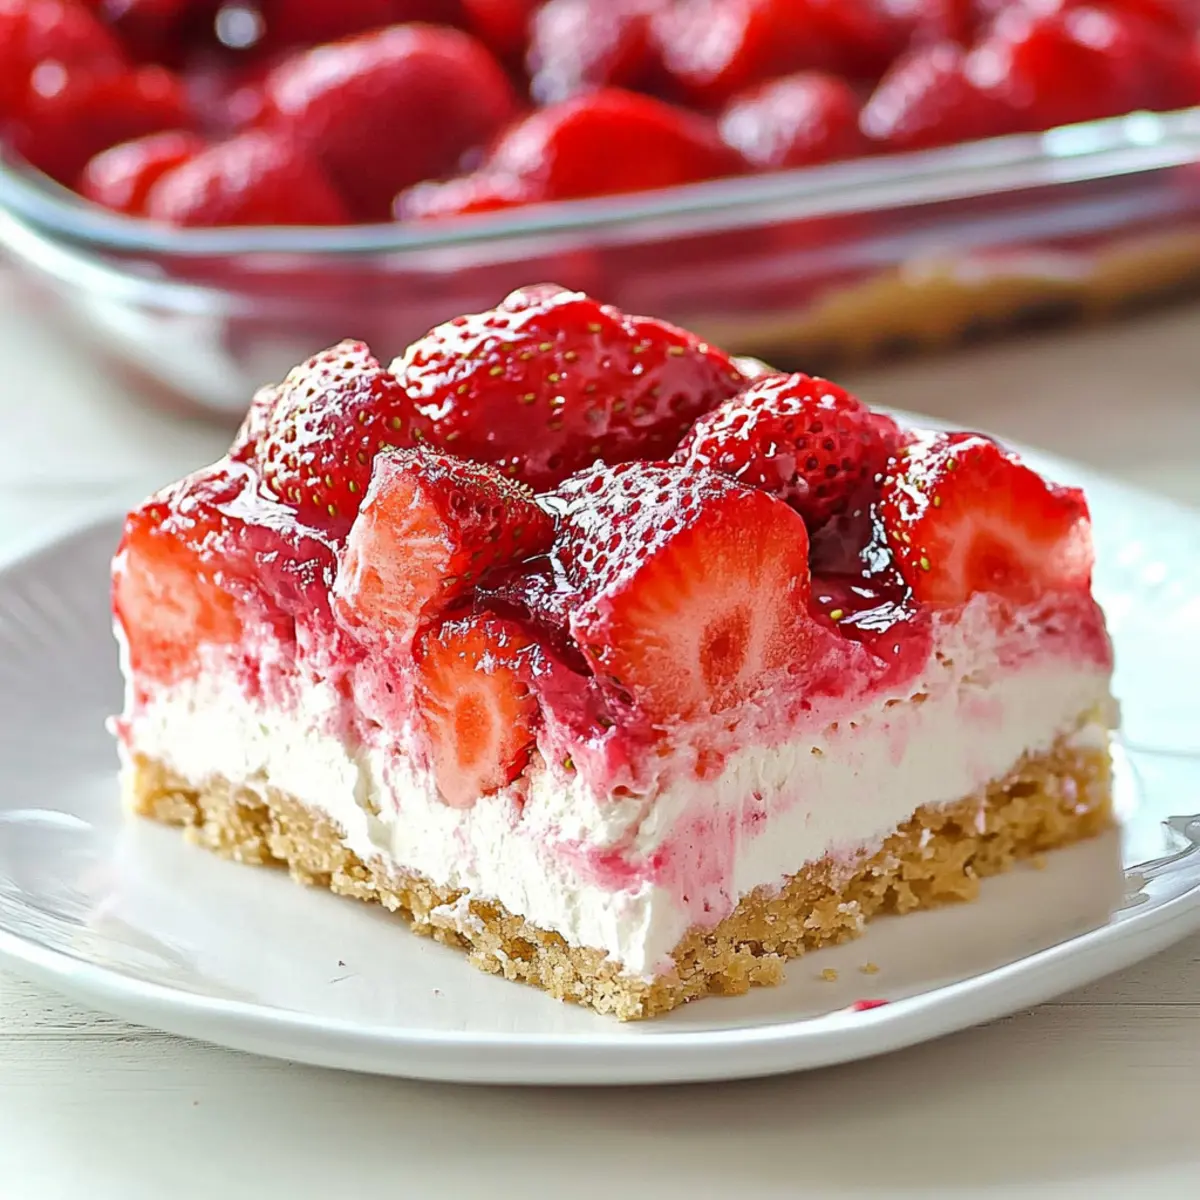
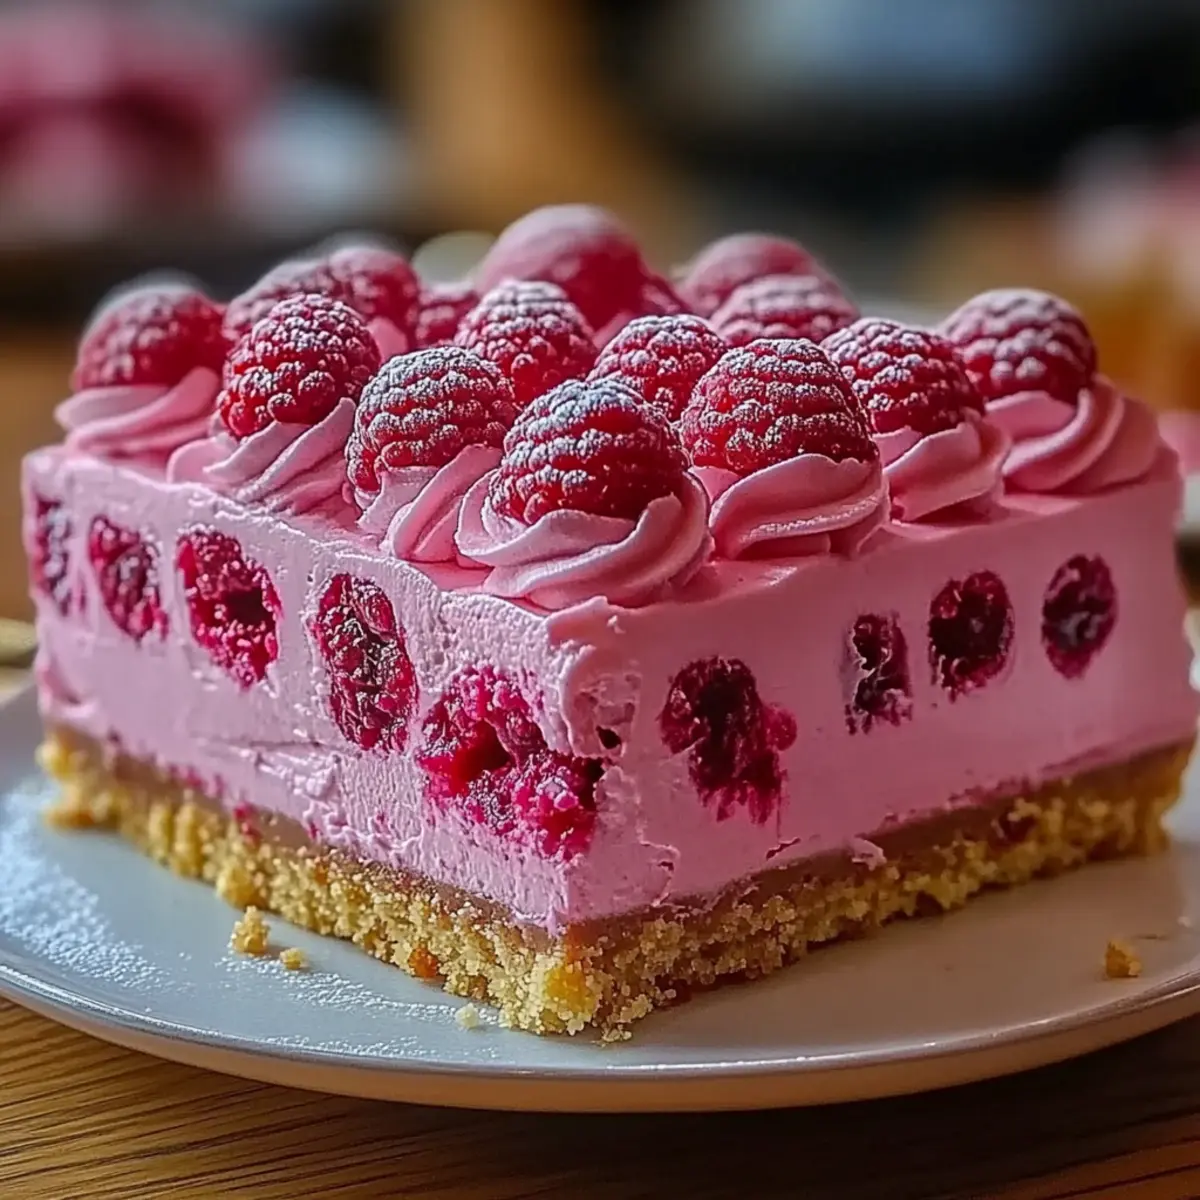
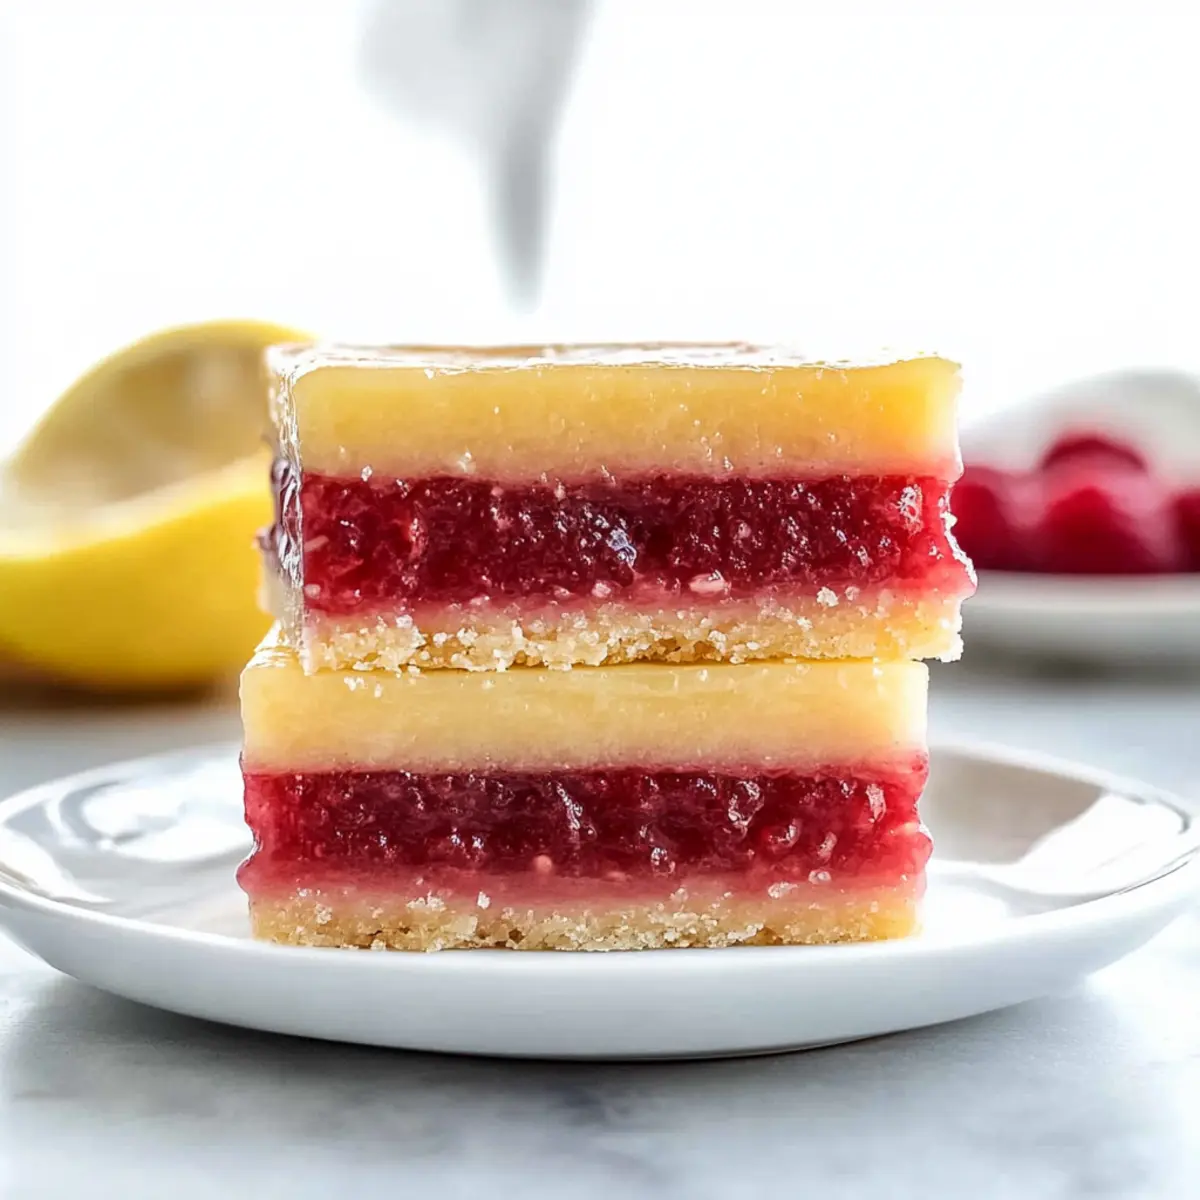
The sun was shining, sending warm rays through my kitchen window as I whipped up a batch of Lemon Raspberry Bars. These delightful treats celebrate summer with their vibrant colors and refreshing taste, perfectly blending tangy lemon and the subtle sweetness of raspberries atop a buttery shortbread crust. What I love about these bars is not just their gorgeous presentation but also their quick prep time—ideal for impromptu gatherings or a sweet escape after a long day. They’re the ultimate crowd-pleasers and make for a perfect vegetarian dessert that can be enjoyed by everyone. Ready to learn how to bring a taste of summer into your home? Let’s dive into this simple recipe that will have you savoring each delightful bite!

Why You’ll Crave These Bars?

Simplicity at Its Best: With just a few basic ingredients, these Lemon Raspberry Bars come together effortlessly, making them an easy option for home bakers of all levels.

Zesty Freshness: The bright blend of tangy lemon and sweet raspberries creates a refreshing flavor explosion that perfectly encapsulates summer vibes.

Versatile Delight: Whether you’re hosting a summer barbecue or looking for a sweet treat to brighten your day, these bars are sure to impress friends and family alike.

Gorgeous Presentation: The vibrant pink raspberry layer over the buttery shortbread crust not only pleases the palate but also serves as a stunning centerpiece for any dessert table.

Quick to Make: In under an hour, you can whip up these bars, giving you more time to enjoy life or try out Pineapple Bliss Bars as another sweet alternative!

Crowd-Pleasing Treat: No one can resist these delightful bars; they’re perfect for potlucks, picnics, or simply indulging at home. Give them a try and watch them disappear!

Lemon Raspberry Bars Ingredients

For the Shortbread Crust
• All-Purpose Flour – Provides structure; gluten-free flour can be used for a gluten-free version.
• Granulated Sugar – Sweetens the crust; coconut sugar is a less refined alternative.
• Corn Starch – Stabilizes the crust and thickens; no direct substitute, but use extra flour if needed.
• Salt – Balances the sweetness in the crust.
• Unsalted Butter – Adds richness; swap with vegan butter for a dairy-free option.

For the Raspberry Filling
• Raspberries – Infuses sweetness and fruity flavor; fresh is preferred, but frozen works too.
• Eggs – Provide structure; flax eggs can be used for a vegan substitute.
• Lemon Juice – Essential for tartness; always opt for freshly squeezed for the best flavor.
• Reduced Raspberry Puree – Ensures the right texture and flavor intensity; make from blended raspberries.
• Corn Starch – Helps thicken the filling; ensures a firm yet creamy consistency.

These Lemon Raspberry Bars are a delightful treat you won’t want to miss out on!

Step‑by‑Step Instructions for Lemon Raspberry Bars

Step 1: Prepare Raspberry Puree
Start by blending fresh raspberries in a food processor until smooth, approximately 2-3 minutes. If desired, strain the mixture through a fine mesh sieve to remove seeds for a smoother filling. Transfer the puree to a saucepan and gently boil over medium heat for 15-20 minutes, stirring often, until it thickens and reduces to about 1/4 to 1/3 cup. Set aside to cool while preparing the crust.

Step 2: Make Shortbread Base
Preheat your oven to 325°F (160°C). In a mixing bowl, whisk together all-purpose flour, granulated sugar, cornstarch, and a pinch of salt. Melt unsalted butter and mix it into the dry ingredients until a thick dough forms. Press this mixture evenly into a parchment-lined 9×13 inch baking pan, creating a slight lip around the edges. Bake for 20-25 minutes, or until the crust is golden and set.

Step 3: Cool and Prick Base
Remove the shortbread crust from the oven and allow it to cool for about 10 minutes. Using a fork, gently prick the top of the crust to prevent bubbling during the next baking phase. Let it cool completely while you prepare the filling to ensure it adheres well to the tart base.

Step 4: Prepare Filling
In a clean mixing bowl, whisk together granulated sugar, cornstarch, and a pinch of salt. Add in the eggs, cooling raspberry puree, and freshly squeezed lemon juice. Mix until the filling is smooth and well combined, allowing the vibrant flavors to meld together. This refreshing blend will be the star of your Lemon Raspberry Bars.

Step 5: Bake Filling
Pour the raspberry-lemon filling evenly over the cooled shortbread crust. Bake in the same oven at 325°F (160°C) for an additional 20-25 minutes, or until the filling is set and slightly firm to the touch. The edges should be lightly golden, signaling that your filling is perfectly cooked and ready for chilling.

Step 6: Chill and Slice
After baking, remove the pan from the oven and cool at room temperature for about 1 hour. Once cooled, transfer the bars to the refrigerator and chill for at least 2 hours, allowing the flavors to deepen and the texture to firm up. When ready to serve, use a sharp knife to slice the chilled Lemon Raspberry Bars into squares for clean cuts.

What to Serve with Tangy Lemon Raspberry Bars?

Indulging in these sweet, tangy morsels brings to mind the carefree days of summer, and the perfect meal deserves accompanying delights.

  • Creamy Whipped Cream: A dollop of this fluffy topping enhances the tartness of the bars, bringing everything together in a luscious embrace. The airy texture supports the vibrant flavors without overshadowing them.
  • Fresh Berry Salad: A medley of strawberries, blueberries, and blackberries offers a refreshing contrast. Tossed in a squeeze of lemon juice, this salad enhances the berry notes in the bars while adding a splash of color to your plate.
  • Lemon Sorbet: This icy treat mirrors the zesty flavor of the bars, making it a refreshing palate cleanser. Its light, tangy taste is perfectly refreshing, especially on a warm day.
  • Iced Tea with Mint: The refreshing coolness of iced tea brewed with fresh mint complements the tartness of the bars. Sipping this alongside gives a delightful balance of warmth and chill, making each bite even more enjoyable.
  • Toasted Almonds: Scattered on top or served on the side, the crunch of toasted almonds adds texture. Their subtle nutty flavor works surprisingly well with the sweet and tangy layers of the bars.
  • Chilled White Wine: A glass of chilled Sauvignon Blanc elevates the experience with its sharp acidity, harmonizing with the lemony notes of the bars. Perfect for a sunny afternoon with friends, it’ll make this dessert shine even more.
  • Lemonade Floats: For a playful dessert twist, consider pairing your bars with a lemonade float. A scoop of vanilla ice cream in fresh lemonade offers creaminess and a burst of citrus that’s utterly delightful alongside the tart bars.
  • Sugar Cookie Crust: For a fun variation, serve the bars over a sugar cookie crust, adding a little more sweetness and chewy texture to the existing layers, making each bite ever more indulgent.

These pairings will elevate your Lemon Raspberry Bars from a simple treat to a festive centerpiece that will leave your guests raving!

Expert Tips for Lemon Raspberry Bars

Fresh Juice Only: Always use freshly squeezed lemon juice for the best flavor; bottled versions often lack the zesty punch that makes these bars special.

Perfect Puree: Ensure the raspberry puree is thick enough to prevent a runny filling by simmering it down until it reduces properly—avoid taking shortcuts here!

Chill Time Matters: Allow the bars to chill in the fridge for at least 2 hours before slicing; this improves texture and makes cutting easier.

Neat Slices: Use a sharp knife to slice the Lemon Raspberry Bars and clean it between cuts for clean, beautiful edges—no one likes messy pieces!

Bake with Love: Keep an eye on the baking time; under-baking the filling can result in a soft texture rather than the firm, creamy filling you want!

Lemon Raspberry Bars Variations

Feel free to explore these delicious variations and make this recipe your own!

  • Berry Switch: Substitute raspberries with blueberries or strawberries for a unique fruit flavor experience. Each fruit brings its own sweetness, providing delightful new twists.
  • Zesty Lime: Use lime juice instead of lemon for a refreshing, tangy version. The vibrant lime adds a tropical twist that will brighten your day.
  • Coconut Crunch: Mix shredded coconut into the shortbread base for a chewy texture. This enhancement creates a delightful tropical flavor perfect for summer gatherings.
  • Nutty Delight: Add chopped almonds or walnuts to the crust for a nutty depth. The extra crunch contrasts beautifully with the smooth filling.
  • Herb Infusion: Fresh basil or mint can be added to the raspberry layer for an unexpected flavor burst. This herbaceous touch elevates your dessert to a gourmet experience.
  • Sweet Swaps: Instead of granulated sugar, try maple syrup or honey for a more natural sweetness. These alternatives add an intriguing flavor while keeping things wholesome.
  • Spicy Kick: For those who enjoy a little heat, add a pinch of cayenne pepper to the filling. It introduces a delightful surprise that beautifully pairs with the sweet and tangy elements.
  • Frozen Goodies: Make these bars into frozen treats by freezing the assembled mixture before slicing. They transform into a refreshing summer dessert that’s perfect for hot days!

These tasty ideas can enhance your experience with Lemon Raspberry Bars, and if you’re in the mood for more fruity delights, try out the refreshing Chip Cookie Bars next!

Storage Tips for Lemon Raspberry Bars

Fridge: Store your Lemon Raspberry Bars in an airtight container in the fridge for up to 5 days to maintain their freshness and flavor.

Freezer: If you want to keep them longer, freeze the bars in a freezer-safe container, separating layers with parchment paper. They can be stored for up to 3 months.

Thawing: To enjoy frozen bars, let them thaw in the fridge overnight before serving, ensuring they maintain their delightful texture.

Reheating: If you prefer them warm, gently warm individual bars in the microwave for a few seconds, just until the filling is slightly warm, but be careful not to overheat!

Make Ahead Options

These Lemon Raspberry Bars are an excellent choice for meal prep! You can prepare the buttery shortbread crust up to 3 days in advance, simply wrap it tightly in plastic wrap and refrigerate to keep it fresh. Additionally, the raspberry puree can be made ahead of time and stored in an airtight container in the fridge for up to 2 days. When you’re ready to enjoy these bars, just follow the final steps: whisk the filling and bake it over the chilled crust for about 20-25 minutes until set. This way, you’ll have a refreshing dessert that’s just as delicious, saving you time on busy weeknights!

Lemon Raspberry Bars Recipe FAQs

How do I select the best raspberries for my lemon raspberry bars?
Absolutely! For optimal flavor, look for fresh raspberries that are plump, firm, and free from dark spots or mold. They should have a vibrant color and a sweet aroma. If fresh ones are unavailable, frozen raspberries can be a great alternative—they should be thawed and drained before use.

How should I store leftover lemon raspberry bars?
To keep your delicious bars fresh, store them in an airtight container in the fridge for up to 5 days. This keeps their flavor intact and prevents them from drying out. Make sure they’re completely cooled before sealing them up to maintain the perfect texture!

Can I freeze lemon raspberry bars?
Absolutely! If you want to enjoy these treats later, freeze your lemon raspberry bars. Allow them to cool completely, then wrap each bar tightly in plastic wrap and place them in a freezer-safe container, separating layers with parchment paper. They can be stored for up to 3 months. To enjoy, simply thaw them in the fridge overnight.

What should I do if my filling doesn’t set properly?
Very! If your filling is soft or runny after baking, it may need a little more time in the oven. Make sure you bake it until the edges are lightly golden and the filling is set to a slight firmness. If it’s still runny, next time ensure your raspberry puree is well reduced, as excess moisture can affect the filling’s consistency.

Are lemon raspberry bars suitable for people with allergies?
For a vegetarian-friendly dessert, yes! However, always check for allergies. If you or a guest has an egg allergy, you can replace eggs with flax eggs (1 tablespoon of flaxseed meal mixed with 2.5 tablespoons of water per egg). If you need to avoid gluten, a gluten-free flour blend could be substituted for all-purpose flour.

How can I achieve a clean slice when cutting my lemon raspberry bars?
To get those perfect slices, there are a few tricks! After chilling, use a sharp knife and clean it between cuts by running it under warm water and wiping it dry. This technique reduces sticking and ensures clean edges, making your presentation even more appealing!

Zesty Lemon Raspberry Bars to Brighten Your Day

Delight in these Lemon Raspberry Bars, a refreshing dessert perfect for summer gatherings.

  • Food Processor
  • Mixing Bowl
  • Whisk
  • baking pan
  • Oven
  • Fine Mesh Sieve

For the Shortbread Crust

  • 2 cups All-Purpose Flour (Gluten-free flour can be used for a gluten-free version.)
  • 0.5 cups Granulated Sugar (Coconut sugar is a less refined alternative.)
  • 0.25 cups Corn Starch (Use extra flour if needed as a substitute.)
  • 0.5 teaspoon Salt (Balances the sweetness.)
  • 1 cup Unsalted Butter (Swap with vegan butter for a dairy-free option.)

For the Raspberry Filling

  • 2 cups Raspberries (Fresh preferred, but frozen works too.)
  • 3 large Eggs (Flax eggs can be used for a vegan substitute.)
  • 0.5 cup Lemon Juice (Always use freshly squeezed for the best flavor.)
  • 0.5 cup Reduced Raspberry Puree (Make from blended raspberries.)
  • 0.25 cups Corn Starch (Helps thicken the filling.)

Step-by-Step Instructions

  1. Start by blending fresh raspberries in a food processor until smooth, about 2-3 minutes. Strain if desired and boil in a saucepan over medium heat for 15-20 minutes until thickened. Set aside to cool.
  2. Preheat your oven to 325°F (160°C). Whisk together flour, sugar, cornstarch, and salt. Melt butter and mix into the dry ingredients until a dough forms. Press into a parchment-lined baking pan and bake for 20-25 minutes.
  3. Remove the crust from the oven and cool for about 10 minutes, pricking the top with a fork. Let it cool completely while preparing the filling.
  4. In a mixing bowl, whisk together sugar, cornstarch, and salt. Add eggs, cooled raspberry puree, and lemon juice, mixing until smooth.
  5. Pour the raspberry-lemon filling over the cooled crust and bake for another 20-25 minutes until set and golden on the edges.
  6. Cool at room temperature for 1 hour, then refrigerate for at least 2 hours before slicing into squares.

Using freshly squeezed lemon juice and allowing sufficient chilling time will enhance the texture and flavor of these bars.

Dessert
American
baking, Easy Recipe, Lemon Raspberry Bars, Summer Treat, Vegetarian Dessert

Filed Under: Dessert

BBQ Bacon Cheeseburger Nachos

July 18, 2025 by grace bellamy Leave a Comment

As the oven warms up, the tantalizing aroma of barbecue wafts through the air, instantly sparking a craving for my favorite game day snack—BBQ Bacon Cheeseburger Nachos! This mouthwatering twist on a classic dish combines lean ground turkey with gooey cheddar and a crunchy, zesty cole slaw topping that takes it over the top. Not only are they quick to prepare in just 20 minutes, but these nachos are also a healthier alternative that everyone at your gathering will devour. The blend of flavors and textures makes them the perfect appetizer for any occasion, whether you’re hosting friends or enjoying a cozy night in. Are you ready to create a nacho masterpiece that’ll have everyone coming back for seconds?

Why Are These Nachos So Irresistible?

Flavor Explosion: The combination of savory ground turkey, smoky bacon, and melty cheddar creates an indulgent taste experience that’s hard to resist.

Quick Prep: Ready in just 20 minutes, these nachos are perfect for impromptu gatherings or satisfying late-night cravings.

Health-Conscious Twist: By using ground turkey, you’ll enjoy a lighter alternative to traditional nachos, proving that indulgence doesn’t have to mean sacrificing health.

Crowd-Pleaser: Whether it’s game day or a movie night, these BBQ Bacon Cheeseburger Nachos are sure to be a hit that everyone will love!

Easy Customization: Experiment with toppings like avocado or jalapeños, or even try variations using ground beef or tempeh for a unique take. Grab your friends and get ready to tray up this delightful dish! For more hearty meal ideas, check out my delicious Bbq Chicken Roasted bowls!

BBQ Bacon Cheeseburger Nachos Ingredients

  • For the Nachos
  • Olive Oil – Adds moisture and helps sauté onions; substitute with avocado oil for a different flavor.
  • Onion – Provides sweetness and depth; yellow or white onion can be used if needed.
  • Ground Turkey (93% lean) – The star protein for a healthier option compared to traditional beef; feel free to swap in ground chicken.
  • Barbecue Sauce – Brings sweetness and richness; opt for low-sugar versions for a healthier feel.
  • Corn Tortilla Chips – The crunchy base; for a lighter treat, try baked chips.
  • Cheddar Cheese (shredded) – Melts beautifully to hold the toppings; mozzarella is a great substitute for a milder taste.
  • Bacon (cooked and crumbled) – Delivers a smoky and salty burst; turkey bacon can replace it for a leaner choice.
  • Orange Bell Peppers – Adds vibrant color and crunch; jalapeños will spice things up if you prefer heat.
  • Tomatoes (diced) – Offers freshness and acidity to balance out the richness; grape or cherry tomatoes work well too.
  • Reser’s Stadium Cole Slaw – Adds unique texture and tang; homemade slaw or fresh greens can be a tasty alternative.

Elevate your gatherings with this delightful BBQ Bacon Cheeseburger Nachos recipe, perfect for those who crave both flavor and a healthier option!

Step‑by‑Step Instructions for BBQ Bacon Cheeseburger Nachos

Step 1: Preheat the Oven
Begin by preheating your oven to 350°F (175°C). This ensures that your BBQ Bacon Cheeseburger Nachos will bake evenly and achieve the perfect melty cheese texture. While the oven heats up, gather all your ingredients to streamline your cooking process and create a delightful atmosphere in your kitchen.

Step 2: Sauté the Onions
In a large skillet, add a splash of olive oil over medium heat. Once hot, toss in your diced onions and sauté for about 5 minutes, stirring occasionally until they become translucent and fragrant. This step not only enhances the flavor of your nachos but also sets a delicious foundation for the ground turkey that follows.

Step 3: Cook the Ground Turkey
Add the ground turkey to the skillet with the sautéed onions, breaking it apart with a spatula. Cook, stirring frequently, until the turkey is browned and no longer pink, about 6-8 minutes. Drain any excess fat if necessary, and then stir in a generous amount of barbecue sauce, mixing thoroughly before removing from heat.

Step 4: Layer the Nachos
On a large baking sheet, start by laying out a layer of corn tortilla chips. Sprinkle a generous amount of shredded cheddar cheese over the chips. For added goodness, place a second layer of chips and top them again with cheddar. This layering technique will ensure each bite of your BBQ Bacon Cheeseburger Nachos is loaded with flavor.

Step 5: Add Toppings
Now it’s time to pile on that delicious ground turkey mixture evenly over your nachos. Sprinkle the crumbled bacon across the top, followed by diced orange bell peppers for a burst of color and crunch. The combination of these savory toppings pairs beautifully with the gooey melted cheese, creating a mouthwatering dish that’s hard to resist.

Step 6: Bake the Nachos
Carefully place the loaded baking sheet in your preheated oven. Bake for approximately 10 minutes, or until the cheese is thoroughly melted but not bubbling over. Keep an eye on your BBQ Bacon Cheeseburger Nachos during the last few minutes to ensure they don’t overcook, as you want them to maintain a delightful texture.

Step 7: Finish with Fresh Toppings
Once out of the oven, immediately top your nachos with freshly diced tomatoes and a generous helping of cole slaw. If you like, drizzle additional barbecue sauce for a final touch of flavor. These fresh ingredients not only enhance the visual appeal but also add a refreshing crunch that complements the rich nacho base.

Step 8: Serve and Enjoy
Your BBQ Bacon Cheeseburger Nachos are now ready to serve! Gather your friends and family, and enjoy this delightful dish hot out of the oven. The explosion of flavors and textures will surely make these nachos a favorite at your gatherings, ensuring everyone comes back for seconds!

Expert Tips for BBQ Bacon Cheeseburger Nachos

  • Check the Temperature: Ensure the ground turkey reaches 165°F for safe eating; use a meat thermometer to avoid any health risks.
  • Layer Wisely: Prevent soggy nachos by layering chips and cheese without overloading; this keeps them crunchy and enjoyable.
  • Watch the Bake Time: Keep an eye on them in the oven—bake just until the cheese melts for the best texture of your BBQ Bacon Cheeseburger Nachos.
  • Upgrade Your Slaw: Use high-quality ingredients for the cole slaw; this will enhance the overall flavor and texture of your nachos.
  • Stay Creative: Feel free to experiment with toppings like guacamole or spicy jalapeños to personalize your BBQ Bacon Cheeseburger Nachos to your taste!

What to Serve with BBQ Bacon Cheeseburger Nachos

Delight your guests by crafting a full, unforgettable meal around these mouthwatering nachos that are bursting with flavor.

  • Fresh Garden Salad: A light, crisp salad with mixed greens and a tangy vinaigrette complements the richness of the nachos beautifully, adding freshness to every bite.

  • Crispy Potato Wedges: Golden-brown wedges drizzled with herbs and spices provide a satisfying crunch, making them the perfect side to accompany the gooey cheesiness of the nachos.

  • Creamy Avocado Dip: Smooth and cool avocado dip elevates the BBQ flavors while adding a creamy texture that balances the nachos’ crunch.

  • Spicy Jalapeño Poppers: These fiery bites bring an extra kick to the table, aligning perfectly with the smoky BBQ essence of your nachos, creating a flavor party everyone will enjoy.

  • Fruit Salsa: A refreshing blend of diced fruits like mango and pineapple brings sweetness and acidity, beautifully contrasting with the savory elements of the nachos.

  • Craft Beer: A crisp lager or a fruity IPA cuts through the richness of the nachos, enhancing their flavor with every sip and making it a delightful pairing for your gathering.

  • Lemonade Spritzer: The refreshing fizz paired with citrus notes cleanses the palate, making it a refreshing drink alongside the BBQ Bacon Cheeseburger Nachos.

  • Chocolate Chip Cookies: End your meal on a sweet note with warm, gooey cookies—this familiar comfort food creates a cozy finale everyone will love!

BBQ Bacon Cheeseburger Nachos Variations

Feel free to unleash your creativity and tailor these nachos to match your flavor preferences!

  • Beefy Option: Swap the ground turkey for ground beef for a classic flavor boost; it’s a heartier alternative everyone will love.

  • Dairy-Free Delight: Use dairy-free cheese instead of cheddar for a completely vegan version, and don’t forget to load up on your favorite toppings!

  • Spicy Kick: Replace cheddar with pepper jack cheese to introduce a delightful spice level that complements the BBQ flavors beautifully.

  • Vegetarian-Friendly: Substitute ground turkey with tempeh or black beans for a protein-packed, plant-based alternative that’s just as satisfying.

  • Tex-Mex Twist: Add chopped jalapeños and diced avocado to introduce a vibrant Tex-Mex tableau bursting with flavor and freshness; this combination truly packs a punch!

  • Crunch Upgrade: Swap out regular tortilla chips for crispy baked sweet potato chips for an exciting, nutritious alternative that adds a hint of sweetness.

  • Cole Slaw Swap: Create your homemade slaw with lime juice and cilantro for a refreshing twist that brightens each bite, while keeping the essence of the original.

  • Flavorful Barbecue: Experiment with different barbecue sauces, like honey or chipotle-flavored, to take the taste of these nachos to new heights!

These variations allow you to create a new nacho experience each time, making these BBQ Bacon Cheeseburger Nachos a truly customizable dish. And if you’re still looking for hearty meals, check out my delicious Bbq Chicken Roasted bowls for more inspiration!

Storage Tips for BBQ Bacon Cheeseburger Nachos

Fridge: Store any leftover BBQ Bacon Cheeseburger Nachos in an airtight container for up to 2 days to maintain freshness and texture.

Freezer: For long-term storage, freeze the nacho toppings (like the ground turkey and cheese) in a sealed bag for up to 3 months. Assemble fresh nachos when ready to eat.

Reheating: To reheat, place nachos in a preheated oven at 350°F (175°C) for 10–15 minutes until warmed through, ensuring the cheesiness returns without becoming rubbery.

Serving Freshness: Always add fresh toppings, like cole slaw and tomatoes, after reheating to keep their crunch and flavor intact.

Make Ahead Options

These BBQ Bacon Cheeseburger Nachos are perfect for meal prep enthusiasts! You can prepare the ground turkey mixture and the sautéed onions up to 24 hours in advance. Just store them in an airtight container in the refrigerator to maintain freshness. You can also slice the bell peppers and dice the tomatoes ahead of time for quicker assembly. When you’re ready to enjoy, simply layer the chips and cheese, add the prepped turkey mixture, and bake as instructed. This way, you’ll have a delicious, time-saving dish with all the flavors intact, making weeknight dinners or gatherings a breeze!

BBQ Bacon Cheeseburger Nachos Recipe FAQs

How do I choose ripe ingredients for my nachos?
Absolutely! Selecting ripe ingredients can significantly enhance the flavor of your BBQ Bacon Cheeseburger Nachos. For tomatoes, look for ones that are firm but slightly yielding when gently squeezed, without any dark spots. The onions should be solid and heavy, avoiding any soft or sprouting ones. As for bell peppers, choose ones with smooth skin and vibrant color; if they have blemishes or wrinkles, they might be past their prime.

What’s the best way to store leftovers?
Very good question! To store your BBQ Bacon Cheeseburger Nachos leftovers, place them in an airtight container and keep them in the refrigerator for up to 2 days. This helps maintain their freshness and prevents them from becoming soggy. It’s best to store the fresh toppings like cole slaw and tomatoes separately and add them just before serving to retain their crunch.

Can I freeze my nachos?
Definitely! If you want to prepare ahead, consider freezing just the nacho toppings to preserve their taste. After cooking the ground turkey and letting it cool, place the turkey and cheese in a sealed freezer bag and store in the freezer for up to 3 months. When you’re ready to enjoy, simply thaw and reheat your toppings, then assemble your nachos fresh with chips and cold toppings!

What should I do if my cheese doesn’t melt properly?
Good to know! If your cheese doesn’t melt well, it may be due to the type of cheese used or the baking time. Ensure you’re using a good-quality cheese—shredded cheddar works beautifully—and try increasing the baking time slightly, watching closely to prevent overcooking. If you notice the cheese is only warming rather than melting, consider covering the nachos with foil during the first part of the baking process to trap the heat and moisture, which helps the melting process.

Are there any dietary considerations I should keep in mind for my nachos?
Absolutely! When preparing BBQ Bacon Cheeseburger Nachos, it’s wise to consider food allergies and dietary preferences. If serving to guests or family, ask if anyone has allergies to common ingredients like dairy or gluten (found in the chips). You can substitute dairy cheese with vegan cheese for a dairy-free option, and use gluten-free tortilla chips for those with gluten sensitivities. And if you’re concerned about sodium, opt for low-sodium barbecue sauce!

Indulgent BBQ Bacon Cheeseburger Nachos Everyone Will Love

BBQ Bacon Cheeseburger Nachos combine lean ground turkey, gooey cheddar, and crunchy cole slaw for a delicious game day snack.

  • skillet
  • Baking Sheet

For the Nachos

  • 1 tablespoon Olive Oil (Substitute with avocado oil for a different flavor.)
  • 1 medium Onion (Yellow or white onion can be used if needed.)
  • 1 pound Ground Turkey (93% lean) (Feel free to swap in ground chicken.)
  • 1/2 cup Barbecue Sauce (Opt for low-sugar versions for a healthier feel.)
  • 8 ounces Corn Tortilla Chips (For a lighter treat, try baked chips.)
  • 2 cups Cheddar Cheese (shredded) (Mozzarella is a great substitute.)
  • 4 slices Bacon (cooked and crumbled) (Turkey bacon can replace it for a leaner choice.)
  • 1 medium Orange Bell Pepper (Jalapeños can be used for heat.)
  • 1 cup Tomatoes (diced) (Grape or cherry tomatoes work well too.)
  • 1 cup Reser’s Stadium Cole Slaw (Homemade slaw or fresh greens can be an alternative.)

Step-By-Step Instructions

  1. Preheat your oven to 350°F (175°C).
  2. In a large skillet, add a splash of olive oil over medium heat. Sauté diced onions for about 5 minutes until translucent.
  3. Add ground turkey to the skillet and cook until browned, about 6-8 minutes. Stir in barbecue sauce before removing from heat.
  4. On a large baking sheet, layer corn tortilla chips, sprinkle a generous amount of cheddar cheese, and add a second layer of chips with more cheese.
  5. Evenly pile the ground turkey mixture over the nachos. Top with crumbled bacon and diced orange bell peppers.
  6. Bake in the preheated oven for approximately 10 minutes until the cheese is melted.
  7. Top nachos with diced tomatoes and cole slaw. Drizzle additional barbecue sauce if desired.
  8. Serve hot and enjoy your BBQ Bacon Cheeseburger Nachos!

Store any leftovers in an airtight container for up to 2 days. Freeze toppings for long-term storage, reheat at 350°F for 10-15 minutes.

Appetizer
American
Appetizer, BBQ Bacon Cheeseburger Nachos, game day snack, healthy nachos, nachos, turkey nachos

Filed Under: Appetizer

Garlic Parmesan Steak Pasta

July 18, 2025 by grace bellamy Leave a Comment

There’s something magical about the cozy aroma of a rich, creamy sauce simmering on the stove, and that’s precisely what you’ll experience with my Garlic Parmesan Steak Pasta. This dish is more than just food; it’s an invitation to savor a moment, whether it’s a special date night or a relaxed family dinner. The tender ribeye steak wrapped in a velvety sauce makes this hearty pasta both a comforting favorite and an effortless gourmet meal. Plus, it’s quick to prepare, making it a perfect option for any weeknight craving or celebration. Are you ready to elevate your dining experience with this delectable dish? Let’s dive into the recipe!

Why is this recipe a must-try?

Comforting Flavor: This Garlic Parmesan Steak Pasta combines rich creaminess with hearty ribeye steak, making it the ultimate comfort food.

Effortlessly Gourmet: Impress your family or that special someone with a dish that tastes like it came straight from a fine restaurant, without all the fuss.

Time-Saving Delight: Quick preparations mean you can whip up this meal in under 30 minutes, perfect for busy weeknights or spontaneous dinner parties.

Versatile Ingredients: Feel free to customize with available pantry staples—substituting Rigatoni for another pasta type or adding your choice of veggies can make it your own!

Crowd-Pleasing Appeal: This dish is guaranteed to be a hit at your table, satisfying even the pickiest eaters while elevating your regular dinner routine.

Pair it with a side of Cheese Garlic Crack for a complete meal that everyone will love!

Garlic Parmesan Steak Pasta Ingredients

For the Steak

  • Ribeye Steak – This tender cut offers unbeatable flavor; sirloin or ground beef can be great alternatives.
  • Paprika – Adds a warm, smoky depth; consider using cayenne for an extra kick.
  • Dried Parsley – Brightens the seasoning; switch to fresh parsley or oregano for varied flavors.
  • Olive Oil – Perfect for searing; feel free to use avocado oil as a substitution.

For the Sauce

  • Butter – Creates a rich, golden crust; use salted or unsalted based on your preference.
  • Salt & Pepper – Key for balancing flavors; season to taste for the best flavor profile.
  • Onion – Delivers a sweet, caramelized element; shallots or leeks work well too.
  • Garlic Cloves – Imparts aromatic quality; garlic powder is a suitable backup if fresh is unavailable.
  • Chicken Broth – Deepens sauce flavor; opt for vegetable or beef stock if desired.
  • Heavy Cream – Gives a luxurious creamy texture; cream cheese or coconut cream are excellent dairy-free swaps.
  • Parmesan Cheese – Provides that nutty goodness; Pecorino Romano or nutritional yeast can be used for a different twist.

For the Pasta

  • Rigatoni – Ideal for sauce adherence; any short pasta or gluten-free versions work fine too.
  • Fresh Parsley – A garnish that adds color and freshness; basil or chives can be delightful alternatives.

Enjoy crafting this Garlic Parmesan Steak Pasta that will impress your family and friends with its exquisite flavor!

Step‑by‑Step Instructions for Garlic Parmesan Steak Pasta

Step 1: Prepare Premium Ingredients
Begin by seasoning your ribeye steaks generously with paprika, dried parsley, salt, and pepper. Drizzle a bit of olive oil over the steaks to ensure they develop a nice crust during cooking. Allow the steaks to rest for about 15 minutes at room temperature to enhance their tenderness and flavor before cooking.

Step 2: Cook Pasta
In a large pot, bring salted water to a rolling boil. Once boiling, carefully add rigatoni and cook according to package instructions, usually around 8-10 minutes, until al dente. Stir occasionally to prevent sticking. Drain the pasta, reserving about a cup of pasta water for later, and set it aside while you prepare the sauce.

Step 3: Sear the Steaks
Heat a large frying pan over medium-high heat until hot. Carefully place the seasoned ribeye steaks in the pan and sear for 1-2 minutes on each side until a golden-brown crust forms. After flipping, add a knob of butter to the pan; as it melts, baste the steaks with the butter for enhanced flavor. Remove the cooked steaks from the pan and let them rest for 5-10 minutes, keeping the pan on the heat.

Step 4: Make Sauce
In the same pan used for the steaks, lower the heat to medium and add a bit more butter if needed. Sauté the diced onion for 3-4 minutes until softened and translucent, stirring frequently to avoid burning. Add minced garlic and cook for an additional 30 seconds, allowing the fragrant aroma to fill the kitchen. If you’re using white wine, deglaze the pan at this point to incorporate any browned bits.

Step 5: Combine Ingredients
Pour in the chicken broth and heavy cream, stirring to combine. Allow the mixture to simmer gently for 3-5 minutes until it starts to thicken, stirring occasionally. Gradually add in the Parmesan cheese, mixing until it melts smoothly into the sauce. If the sauce becomes too thick, use the reserved pasta water to achieve your desired consistency.

Step 6: Serve
Slice the rested ribeye steaks against the grain into bite-sized pieces. Toss the cooked rigatoni into the creamy sauce, ensuring each piece is well-coated. Plate the pasta, then top with the sliced steak pieces, and finish off with a sprinkle of fresh parsley and extra Parmesan cheese. This Garlic Parmesan Steak Pasta is now ready to impress your guests!

Expert Tips for Garlic Parmesan Steak Pasta

  • Rest the Steak: Allow ribeye steaks to rest after cooking to lock in juices and enhance the flavor. Skipping this step can lead to dry meat.

  • Pasta Perfection: Cook rigatoni just until al dente. Overcooking can cause it to become mushy, making it harder to hold onto the creamy sauce.

  • Sauce Consistency: To achieve the perfect creaminess in your garlic parmesan steak pasta, reserve some pasta water. This helps adjust the sauce without thickening it too much.

  • Aromatics Matter: Take care when sautéing garlic and onion; cook them until softened and fragrant, but don’t let them burn. Bitter flavors can spoil your dish’s delicate balance.

  • Tweak for Flavors: Personalize the dish! Adding vegetables like spinach or sun-dried tomatoes can uplift your garlic parmesan steak pasta with new textures and taste.

What to Serve with Creamy Garlic Parmesan Steak Pasta

When you serve this comforting dish, you’re inviting warmth and joy into the dining experience, perfect for gathering loved ones around the table.

  • Garlic Bread: This warm, buttery treat perfectly complements the creamy sauce, making each bite a heavenly experience that enhances your meal.

  • Fresh Green Salad: Crisp greens with a zesty vinaigrette offer a refreshing contrast to the hearty pasta, lifting flavors while balancing the richness.

  • Roasted Vegetables: A medley of roasted veggies like bell peppers and zucchini adds an earthy touch, contributing texture and color that rounds out the plate beautifully.

  • Red Wine: A glass of medium-bodied red wine, such as Merlot, brings out the flavors of the steak while making a romantic pairing on date nights.

  • Chocolate Mousse: End the meal on a sweet note with rich, creamy chocolate mousse, providing a delightful contrast to the savory pasta and a touch of indulgence.

  • Homemade Coleslaw: This crunchy, tangy side dish adds brightness and a pop of flavor, enhancing the overall experience with its fresh texture.

How to Store and Freeze Garlic Parmesan Steak Pasta

Fridge: Store leftover Garlic Parmesan Steak Pasta in an airtight container for up to 3 days. Keep the pasta and steak separate to maintain texture.

Reheating: When reheating, add a splash of cream or chicken broth to the pasta to prevent it from drying out. Use a low microwave setting or heat on the stove until warmed through.

Freezer: Avoid freezing due to the creamy sauce’s potential separation, which can alter the dish’s texture and flavor.

Leftovers: If you have a sauce without pasta, store it separately for up to 3 days and serve with fresh pasta later for a quick meal!

Make Ahead Options

These Creamy Garlic Parmesan Steak Pasta are perfect for busy home cooks looking to save time without sacrificing flavor! You can prepare the ribeye steaks and season them up to 24 hours in advance—just keep them refrigerated in an airtight container. Additionally, cook the rigatoni and store it separately in the fridge, ensuring both components retain their quality. When you’re ready to serve, simply heat a little butter in a skillet, add the cooked pasta, and toss it with the sauce you prepared in advance—this can be done up to 3 days before serving. Finish by slicing the steaks and combining everything together for a delicious meal that’s just as satisfying as when freshly made!

Garlic Parmesan Steak Pasta Variations

Feel free to explore exciting twists on this Garlic Parmesan Steak Pasta recipe and make it uniquely yours!

  • Spicy Kick: Add a teaspoon of red pepper flakes while cooking the sauce for a delightful spice boost that awakens your taste buds.

  • Deluxe Upgrade: Use filet mignon instead of ribeye for an ultra-tender, gourmet experience! Pair this with caramelized onions for added sweetness and depth.

  • Veggie Delight: Toss in sautéed vegetables like bell peppers, spinach, or sun-dried tomatoes for a colorful and hearty meal. It’s a great way to sneak extra nutrients in!

  • Creamy Dream: For an extra luxurious sauce, mix in a dollop of cream cheese along with the heavy cream. It adds an incredible creaminess that’s hard to resist.

  • Herb Infusion: Use fresh basil or thyme in place of dried parsley for a burst of freshness that pairs beautifully with the rich flavors of the sauce.

  • Cheesy Swap: Try using Pecorino Romano instead of Parmesan for a sharper, saltier profile that will really elevate the richness of the dish.

  • Gluten-Free: Substitute rigatoni with gluten-free pasta options like brown rice or quinoa pasta to cater to dietary needs without sacrificing flavor.

Enhance your culinary journey with these variations, and don’t hesitate to serve this dish alongside a side of Garlic Butter Pasta or a fresh salad for a complete dining experience!

Garlic Parmesan Steak Pasta Recipe FAQs

How do I choose the right steak for my Garlic Parmesan Steak Pasta?
When selecting your ribeye steak, look for cuts with good marbling; this will ensure a tender and flavorful result. The ideal steak should have a bright red color with minimal dark spots. If you’re looking for alternatives, sirloin or flank steaks are both excellent options that can provide a great flavor at a lower cost.

What’s the best way to store leftover Garlic Parmesan Steak Pasta?
Store any leftover pasta in an airtight container in the fridge for up to 3 days. To maintain the quality, it’s best to separate the steak and pasta before refrigeration, as this helps preserve the texture. When reheating, add a splash of cream or broth to help rehydrate the sauce and keep it creamy.

Can I freeze Garlic Parmesan Steak Pasta?
Freezing this dish is not recommended due to the creamy sauce’s tendency to separate and alter its texture upon thawing. However, you can freeze the sauce on its own for up to 3 months and then combine it with freshly cooked pasta later.

How do I fix a sauce that’s too thick?
If your sauce becomes too thick, simply add a bit of reserved pasta water while stirring over low heat. Start with a tablespoon at a time and mix until you reach your desired consistency. This technique works wonderfully to maintain a creamy texture without thinning out the flavor.

What dietary considerations should I keep in mind?
For those who prefer dairy-free options, you can substitute heavy cream with coconut cream or cashew cream for a similar texture. Additionally, if you or your guests have gluten sensitivities, using a gluten-free pasta can make this dish accessible while still being delicious!

Are there any common mistakes I should avoid?
Absolutely! One common mistake is overcooking the pasta, which can lead to a mushy texture that doesn’t hold the sauce well. Additionally, don’t rush the steak resting process—allow it to rest for at least 5 minutes post-cooking to seal in the juices for a more flavorful bite.

Indulgent Garlic Parmesan Steak Pasta That Delights Every Bite

This Garlic Parmesan Steak Pasta is a comforting dish combining creaminess and tender ribeye that promises to elevate your dining experience.

  • Large Pot
  • Frying Pan
  • Knife
  • cutting board
  • Measuring Cups
  • Measuring Spoons

For the Steak

  • 2 pounds Ribeye Steak (Sirloin or ground beef can be great alternatives.)
  • 1 teaspoon Paprika (Consider using cayenne for an extra kick.)
  • 1 teaspoon Dried Parsley (Switch to fresh parsley or oregano for varied flavors.)
  • 2 tablespoons Olive Oil (Feel free to use avocado oil as a substitution.)

For the Sauce

  • 3 tablespoons Butter (Use salted or unsalted based on your preference.)
  • to taste Salt (Season to taste for the best flavor profile.)
  • to taste Pepper (Season to taste for the best flavor profile.)
  • 1 medium Onion (Shallots or leeks work well too.)
  • 4 cloves Garlic Cloves (Garlic powder is a suitable backup if fresh is unavailable.)
  • 1 cup Chicken Broth (Opt for vegetable or beef stock if desired.)
  • 1 cup Heavy Cream (Cream cheese or coconut cream are excellent dairy-free swaps.)
  • 1 cup Parmesan Cheese (Pecorino Romano or nutritional yeast can be used for a different twist.)

For the Pasta

  • 12 ounces Rigatoni (Any short pasta or gluten-free versions work fine too.)
  • 2 tablespoons Fresh Parsley (Basil or chives can be delightful alternatives.)

Step‑by‑Step Instructions

  1. Season the ribeye steaks generously with paprika, dried parsley, salt, and pepper. Drizzle olive oil over the steaks and allow them to rest for about 15 minutes.
  2. Bring salted water to a rolling boil in a large pot. Once boiling, add rigatoni and cook according to package instructions, about 8-10 minutes, until al dente. Drain the pasta, reserving a cup of pasta water, and set aside.
  3. Heat a large frying pan over medium-high heat. Sear the seasoned ribeye steaks for 1-2 minutes on each side until golden-brown. Add a knob of butter while flipping and baste the steaks. Remove and let them rest for 5-10 minutes.
  4. In the same pan, lower the heat to medium, add butter if needed, and sauté diced onion for 3-4 minutes until softened. Add minced garlic and cook for 30 seconds
  5. Pour in chicken broth and heavy cream, stirring to combine. Let simmer for 3-5 minutes until thickened. Gradually add Parmesan cheese until it melts into the sauce, adding reserved pasta water as needed.
  6. Slice the rested ribeye steaks and toss the cooked rigatoni into the creamy sauce. Plate the pasta, top with steak, and sprinkle with fresh parsley and extra Parmesan.

Store leftovers in an airtight container for up to 3 days. Reheating may require adding splashes of cream or broth to maintain texture.

Main Dishes
Italian
Creamy Sauce, Garlic Parmesan Steak Pasta, Gourmet Meal, Pasta, quick dinner, Steak

Filed Under: Main Dishes

Savory Bang Bang Cauliflower

July 18, 2025 by grace bellamy Leave a Comment

“Imagine hosting a gathering where everyone raves about your homemade appetizer.” That’s exactly what I experienced the first time I served these Crispy Vegan Bang Bang Cauliflower Wings. They deliver a satisfying combination of chewy and crunchy textures, all wrapped in the irresistible sweetness of Thai chili sauce. This recipe is not only quick to whip up—ideal for those busy weeknights—but also checks the boxes for being vegan, oil-free, and gluten-free. Plus, you can choose between battered and non-battered options, making it a versatile dish for any palate. What’s your favorite way to enjoy cauliflower? Let’s dive into this delightful recipe that’s sure to wow your taste buds!

Why Bang Bang Cauliflower Will Delight You

Crowd-Pleaser: These crispy wings are guaranteed to impress both vegans and non-vegans alike at your next gathering.

Versatile Options: With both battered and non-battered variations, customizing them to suit your guests’ preferences is a breeze.

Easy to Make: You’ll whip these up in no time, utilizing everyday ingredients and simple techniques. Plus, you can prepare them in an oven or air fryer for a quick weeknight meal.

Flavor Explosion: The sweet and spicy contrast of the Thai sweet chili sauce will have everyone reaching for more. Pair them with a side of rice, or enjoy them straight from the bowl for a snack!

For more quick appetizer ideas, check out our collection of easy vegan snacks that you can customize to your craving. These Bang Bang Cauliflower Wings are bound to become one of your favorites!

Bang Bang Cauliflower Ingredients

For the Cauliflower
• Cauliflower – A small head (about 3 cups) serves as the base; pre-cut florets offer convenience.

For the Batter
• Flour of choice – Use all-purpose or gluten-free 1:1 flour as a binding agent for the batter.
• Unsweetened non-dairy milk – Almond, soy, or oat milk create the ideal batter consistency; avoid flavored varieties.
• Spices – Garlic powder, onion powder, ground ginger, and sea salt infuse flavor into the batter.

For Extra Crispiness
• Panko bread crumbs – Provides a deliciously crunchy coating; gluten-free options are available for this Bang Bang Cauliflower.

For the Sauce
• Thai Sweet Chili Sauce – The star of the dish, bringing that sweet and tangy flavor to life.
• Vegan mayo – Adds creaminess to the bang bang sauce; homemade or store-bought works well.
• Sriracha – Add this optional ingredient for a spicy kick that can be adjusted to taste.
• Nutritional yeast – Optional for added savory flavor and slight thickening of the sauce.
• Sea salt – Enhances all flavors; can be omitted if using salty store-bought mayo.

Step‑by‑Step Instructions for Crispy Vegan Bang Bang Cauliflower Wings

Step 1: Preheat the Oven
Begin by preheating your oven to 425°F (218°C). While waiting for the oven, prepare a baking tray lined with parchment paper or a silicone mat to ensure the crispy Vegan Bang Bang Cauliflower Wings don’t stick. This preliminary setup will help you efficiently transition between steps.

Step 2: Mix the Spice Blend
In a large mixing bowl, combine your choice of flour with garlic powder, onion powder, ground ginger, and sea salt. Stir the mixture well until all the spices are evenly incorporated, ensuring your batter will be flavorful. This step is crucial to achieve a delicious coating that enhances the overall flavor of the cauliflower.

Step 3: Combine Milk and Flour
Next, pour in the unsweetened non-dairy milk and whisk until the batter is smooth and creamy. The consistency should be thick enough to adhere to the cauliflower but still pourable. This batter will be the perfect coating for your crispy Vegan Bang Bang Cauliflower Wings, so take your time to get it just right.

Step 4: Prepare the Cauliflower
While the batter sits, cut your cauliflower into large florets. Each piece should be roughly the size of a large bite to ensure even cooking and a satisfying texture. This preparation step is essential, as it creates the base for your Vegan Bang Bang Cauliflower Wings, which will be both tender and crispy.

Step 5: Coat Cauliflower
For a non-battered option, toss the cauliflower florets in olive oil, sweet chili sauce, and your spice blend until evenly coated. If you’re going for the battered version, dip each floret into the batter, allowing any excess to drip off, then roll it in Panko breadcrumbs for an extra crunch. Ensure all pieces are well covered to get the maximum flavor and texture.

Step 6: Arrange on Tray
Carefully place the coated cauliflower florets on your prepared baking tray, ensuring there’s enough space between each piece for optimal air circulation. This spacing is key to producing the signature crispiness you desire in the baked Vegan Bang Bang Cauliflower Wings, so don’t overcrowd the tray.

Step 7: Bake or Air Fry
If baking, roast the cauliflower for 30-40 minutes, flipping halfway through to achieve an even golden-brown color. For air frying, set your air fryer to 400°F (205°C) and cook for 15-25 minutes, shaking the basket halfway for even cooking. Both methods will result in perfectly crispy and tender wings—choose whichever you prefer!

Step 8: Prepare the Sauce
While your cauliflower cooks, prepare the bang bang sauce by mixing together vegan mayo, Thai sweet chili sauce, sriracha (if using), nutritional yeast, and sea salt in a bowl. Stir well until fully combined. This sauce will compliment your crispy Vegan Bang Bang Cauliflower Wings and add layers of flavor, creating a delightful balance.

Step 9: Toss with Sauce
Once the cauliflower is golden and crispy from the oven or air fryer, immediately toss the warm wings in the prepared bang bang sauce. Ensure every piece is generously coated for maximum flavor. This step transforms your dish, introducing the irresistible sweet and spicy notes that define Bang Bang Cauliflower.

Step 10: Serve and Enjoy
Finally, transfer the coated Vegan Bang Bang Cauliflower Wings to a serving platter and garnish as desired, such as with sliced green onions or sesame seeds. Serve them alongside rice or fresh veggies for a complete meal experience that’s simply unbeatable. Enjoy every bite of this deliciously satisfying dish!

Make Ahead Options

These Crispy Vegan Bang Bang Cauliflower Wings are ideal for meal prep enthusiasts looking to save time! You can coat the cauliflower florets up to 24 hours in advance, ensuring they are well-covered in the batter or seasoning before refrigerating. To maintain their crispiness, place them on a parchment-lined tray in a single layer, covering them tightly with plastic wrap. When you’re ready to serve, simply bake or air fry as directed straight from the fridge, increasing the cooking time by about 5 minutes if needed. This way, you’ll enjoy deliciously crispy wings that taste just as fresh and flavorful as if they were made right before serving.

Bang Bang Cauliflower Variations & Substitutions

Feel free to get creative and customize your bang bang cauliflower wings with these enticing variations and swaps!

  • Broccoli Boost: Swap out cauliflower for broccoli florets for a vibrant twist that adds a different texture and flavor.

  • Gluten-Free Option: Ensure your flour and Panko breadcrumbs are gluten-free for a safe and delicious version that everyone can enjoy.

  • Spice It Up: Mix in different seasonings like smoked paprika or cayenne pepper for an extra kick that will awaken your taste buds.

  • Nuts for Crunch: Before serving, toss in some roasted cashews or peanuts for added crunch and a delightful nutty flavor.

  • Buffalo Style: Exchange the bang bang sauce for a spicy buffalo sauce for a fiery twist that pairs perfectly with celery sticks and vegan ranch.

  • Sweet & Sour: Opt for a sweet and sour sauce instead of the traditional bang bang sauce for a tangy twist that offers a different finish.

  • Herb Infusion: Add fresh chopped herbs like cilantro or parsley to your sauce for an herby aroma that brings freshness to each bite.

  • Creamy Alternatives: Instead of vegan mayo, use tahini or coconut yogurt for a creamy sauce that offers a unique flavor profile.

These variations will ensure your bang bang cauliflower is not just a dish, but an exciting culinary experience suitable for any occasion! If you’re interested in more enticing ideas, check out our guide on easy vegan appetizers for even more ways to delight your guests.

How to Store and Freeze Bang Bang Cauliflower

Fridge: Store leftover Bang Bang Cauliflower in an airtight container in the refrigerator for up to 3 days to maintain freshness and flavor.

Freezer: For longer storage, freeze the cooled cauliflower wings in a single layer on a baking sheet, then transfer to a freezer-safe bag for up to 2 months.

Reheating: To reheat, place frozen wings directly into the oven at 400°F (205°C) for 10-15 minutes until crispy and heated through, avoiding the microwave to keep that delightful crunch.

Expert Tips for Bang Bang Cauliflower

  • Choose Fresh Cauliflower: Opt for firm, fresh cauliflower with no brown spots for the best flavor and texture in your bang bang cauliflower wings.

  • Space Perfectly: Ensure florets are well spaced on the baking tray to achieve ultimate crispiness. Crowding can lead to steaming rather than baking.

  • Correct Batter Consistency: Achieve a batter that’s thick enough to cling to the cauliflower but not overly thick, which can prevent even coating.

  • Use Quality Spices: Fresh spices can significantly enhance flavor. Ensure yours are not past their expiration for the best results in your Bang Bang Cauliflower.

  • Sauce it Up: Feel free to adjust the sriracha levels in the sauce to suit your taste. For milder flavors, start small and build up!

  • Leftover Storage: Refrigerate any leftovers in an airtight container; consume within 2-3 days for the best taste and texture. Reheat in the oven to retain crispiness.

What to Serve with Crispy Vegan Bang Bang Cauliflower Wings

Imagine a table filled with vibrant, colorful sides that perfectly complement the irresistible crunch of these savory wings.

  • Coconut Jasmine Rice: Fluffy rice infused with coconut milk creates a creamy backdrop that balances the spiciness of the bang bang sauce beautifully, making each bite divine.

  • Fresh Crunchy Slaw: A zesty slaw made with shredded cabbage and a tangy vinaigrette brings a refreshing crunch that contrasts wonderfully with the crispy cauliflower wings.

  • Roasted Veggies: A mix of seasonal roasted vegetables drizzled with olive oil provides a warm, earthy counterpart, enhancing the sweetness of the Thai chili sauce.

  • Spicy Mango Salsa: Bright, fruity salsa made with diced mango, red onion, and jalapeño adds a sweet and spicy punch, elevating your wing experience to tropical bliss.

  • Creamy Avocado Dip: A smooth avocado dip infused with lime juice creates a creamy, rich element that softens the heat while offering a satisfying texture.

  • Crispy Potato Wedges: Golden, seasoned potato wedges not only add heartiness to your meal but also provide a satisfying crunch that pairs excellently with the wings’ unique flavor.

  • Cool Mint Yogurt Sauce: A cooling yogurt sauce with fresh mint and cucumber offers a delightful contrast to the wings’ heat, refreshing your palate with each bite.

  • Sparking Lemonade: A glass of zesty sparkling lemonade complements the sweet and spicy flavors, making for a bright and refreshing beverage pairing.

  • Chilled Cucumber Salad: Slices of cucumber seasoned with rice vinegar and a hint of sesame oil provide crunch and coolness that cleanse the palate, perfect alongside your bang bang wings.

Bang Bang Cauliflower Recipe FAQs

Is Bang Bang Cauliflower vegan?
Absolutely! Bang Bang Cauliflower is entirely vegan, as it relies on cauliflower as the main ingredient and uses plant-based substitutes for the sauce and batter. No animal products are involved in creating this delicious and guilt-free dish!

What are the seasonings in Bang Bang Cauliflower?
The seasonings typically include garlic powder, onion powder, ground ginger, and sea salt, creating a delightful flavor profile that enhances the crispiness of the cauliflower. These spices are added to the flour mixture for the batter, ensuring every single piece is packed with taste!

What goes with Bang Bang Cauliflower in a vegetarian meal?
Bang Bang Cauliflower pairs beautifully with several accompaniments! Consider serving it over rice for a filling meal, or in tacos for a fun twist. Fresh veggies on the side, like carrot sticks or cucumber slices, also complement this dish, adding a refreshing crunch that contrasts nicely with the crispy cauliflower.

What is the sauce for Bang Bang Cauliflower?
The sauce for Bang Bang Cauliflower typically includes a mix of Thai sweet chili sauce, vegan mayo, and optional sriracha for heat. This sweet and tangy sauce coats the cauliflower wings, bringing all the flavors together and creating the crave-worthy experience that makes this dish so special!

How should I store and reheat leftover Bang Bang Cauliflower?
To store leftover Bang Bang Cauliflower, place it in an airtight container in the refrigerator for up to 3 days. When you’re ready to enjoy it again, I recommend reheating it in the oven at 400°F (205°C) for about 10-15 minutes. This will ensure it stays crispy and delicious; microwaving can make it soggy. If you have more leftovers, freeze them in a single layer on a baking sheet, then transfer to a freezer-safe bag for up to 2 months. When ready, simply bake from frozen for that perfect crunch again!

Can pets eat Bang Bang Cauliflower?
While cauliflower can be a healthy treat for pets, it’s essential to serve it plain and cooked without any seasonings or sauces. Avoid giving your pets the spiced and sauced version of Bang Bang Cauliflower, as ingredients like garlic and onion can be harmful to them. Always consult your vet before introducing new foods to your pet’s diet.

Bang Bang Cauliflower Recipe FAQs

Savory Bang Bang Cauliflower for a Guilt-Free Indulgence

Discover the delightful flavors of Bang Bang Cauliflower, a vegan appetizer that impresses everyone with its crispy texture and sweet-spicy sauce.

  • Oven
  • Mixing Bowl
  • Baking Tray
  • parchment paper
  • Whisk

For the Cauliflower

  • 1 head Cauliflower (About 3 cups; pre-cut florets for convenience)

For the Batter

  • 1 cup Flour of choice (All-purpose or gluten-free 1:1 flour)
  • 1 cup Unsweetened non-dairy milk (Almond, soy, or oat milk)
  • 1 teaspoon Garlic powder
  • 1 teaspoon Onion powder
  • 1 teaspoon Ground ginger
  • 1 teaspoon Sea salt

For Extra Crispiness

  • 1 cup Panko bread crumbs (Gluten-free options available)

For the Sauce

  • 1 cup Thai Sweet Chili Sauce (The star of the dish)
  • 1/2 cup Vegan mayo (Homemade or store-bought)
  • 1 tablespoon Sriracha (Optional for spice)
  • 2 tablespoons Nutritional yeast (Optional for added flavor)
  • 1 teaspoon Sea salt (Can be omitted if using salty mayo)

Step-by-Step Instructions

  1. Preheat your oven to 425°F (218°C) and prepare a baking tray lined with parchment paper.
  2. In a bowl, mix flour with garlic powder, onion powder, ground ginger, and sea salt until well combined.
  3. Pour in the non-dairy milk and whisk until the batter is smooth and creamy.
  4. Cut cauliflower into large florets to ensure even cooking.
  5. Coat cauliflower florets in the batter or toss with oil, sweet chili sauce, and spice blend for non-battered.
  6. Arrange the coated florets on the baking tray, spacing them well.
  7. Bake for 30-40 minutes or air fry at 400°F (205°C) for 15-25 minutes until golden-brown.
  8. Prepare the bang bang sauce by mixing vegan mayo, sweet chili sauce, sriracha, nutritional yeast, and sea salt together.
  9. Toss the cooked cauliflower in the prepared bang bang sauce immediately after cooking.
  10. Serve on a platter and enjoy with rice or veggies.

Store leftovers in an airtight container in the fridge for up to 3 days. Reheat in the oven for best results.

Appetizer
Thai, Vegan
Bang Bang Cauliflower, Crispy Cauliflower, Gluten-Free Snack, Oil-Free Recipe, Vegan Appetizer

Filed Under: Appetizer

Juicy Maryland Crab Cakes

July 18, 2025 by grace bellamy Leave a Comment

As I stood by the water’s edge, the salty breeze carried with it the unmistakable scent of Chesapeake Bay—the very essence of Maryland. This longing for the coast inspired me to create these authentic Maryland Crab Cakes, a dish that perfectly marries convenience with a traditional flavor profile. With their easy prep and low-filler approach, these crab cakes allow the sweet, succulent crab meat to shine without any overpowering distractions. Baked to perfection, they bring the delightful crunch of a well-seared cake with a tender, juicy interior, making them an irresistible main course for any gathering. Are you ready to transport your taste buds to a seaside feast right in your own kitchen?

Why are Maryland Crab Cakes a Must-Try?

Perfection in Every Bite: These Maryland Crab Cakes captivate with their tender, sweet crab meat front and center, making them a delight for seafood fans.
Healthy and Delicious: Baked instead of fried, they’re a guilt-free indulgence that won’t compromise on flavor!
Quick Prep Time: Enjoy this dish in about 30 minutes, allowing more time for celebration and less for cooking—ideal for busy weeknights or last-minute gatherings!
Crowd-Pleasing Appeal: Serve with your favorite dipping sauces for a versatile dish that guests will rave about, just like my popular Crab Stuffed Mushrooms.
Flexible Options: Customize with spices or other seafood, or pair them with flavorful sides, such as a refreshing salad or delicious cornbread, just like my Grain Banana Pancakes. Dive into this irresistible coastal treasure!

Maryland Crab Cakes Ingredients

• Discover the essential components for making perfect Maryland Crab Cakes.

For the Crab Mixture

  • Crab Meat – Fresh jumbo lump or lump crab meat provides the main flavor and substance. Use high-quality fresh crab from the Atlantic coast for optimal taste.
  • Egg – Acts as a binder to hold the crab cakes together. A large egg is essential; omit for vegan variations.
  • Mayonnaise – Adds moisture and richness. Can substitute with Greek yogurt for a lighter version.
  • Dijon Mustard – Enhances flavor with a subtle tang. Yellow mustard can be used as a substitute for mildness.
  • Worcestershire Sauce – Provides depth of flavor. Use vegan Worcestershire sauce for a plant-based alternative.
  • Lemon Juice – Brightens up the flavors. Extra lemon wedges can be served for added freshness.
  • Old Bay Seasoning – A classic Maryland spice mix that adds distinctive taste. Adjust to taste or use a homemade blend of celery salt, black pepper, and paprika.
  • Fresh Parsley – Adds freshness and color. Substitute with chives or omit if not desired.

For Structure

  • Cracker Crumbs – The only filler used for structure. Make your own from saltines or use panko bread crumbs as an alternative.

Get ready to savor the vibrant tastes of Maryland with these delightful crab cakes!

Step‑by‑Step Instructions for Maryland Crab Cakes

Step 1: Prep Mix
In a large mixing bowl, whisk together ½ cup of mayonnaise, 1 large egg, 1 tablespoon of Dijon mustard, 1 tablespoon of Worcestershire sauce, 1 tablespoon of Old Bay seasoning, and the juice of 1 lemon. Ensure the mixture is smooth and creamy as you combine these ingredients, which will become the flavorful base for your Maryland Crab Cakes.

Step 2: Combine Crab
Gently fold in 1 pound of fresh jumbo lump crab meat into the mayonnaise mixture, being cautious not to break the crab lumps. After the crab is well incorporated, sprinkle in ¼ cup of cracker crumbs and mix lightly until just combined. This will create a cohesive yet delicate texture, perfect for shaping your crab cakes.

Step 3: Chill
Cover the crab mixture with plastic wrap or a lid and refrigerate for at least 30 minutes. Chilling the mixture allows it to firm up, making it easier to portion and shape into cakes. This step is crucial for preventing your Maryland Crab Cakes from falling apart during baking.

Step 4: Preheat Oven
While the crab mixture is chilling, preheat your oven to 400°F (200°C). A hot oven will help achieve the ideal golden-brown crust on your Maryland Crab Cakes, providing that satisfying crisp texture on the outside while keeping the crab meat tender inside.

Step 5: Form Cakes
Once chilled, divide the crab mixture into six equal portions. Shape each portion into a slightly flattened round cake, about ¾ inch thick. Use your hands to lightly press the mixture together, ensuring each cake maintains its structure without overworking the delicate crab.

Step 6: Bake
Place the formed crab cakes on a parchment-lined baking sheet, evenly spaced apart. Bake in the preheated oven for 15-18 minutes, or until the crab cakes are golden brown and reach an internal temperature of 165°F. Watch for a nice crisp crust developing, as this indicates they are ready to serve.

Step 7: Serve
Remove the Maryland Crab Cakes from the oven and let them cool for a few minutes. Serve warm with tartar or cocktail sauce, and garnish with freshly squeezed lemon wedges. This final touch enhances the flavors and adds a refreshing citrus zing that perfectly complements the sweet crab meat.

Make Ahead Options

These Maryland Crab Cakes are not only delicious but perfect for meal prep! You can prepare the crab mixture up to 24 hours in advance—just mix all ingredients, cover, and refrigerate. This resting period enhances the flavors and helps the mixture firm up, making it easier to shape the cakes when you’re ready to bake. On the day of serving, simply form the chilled mixture into cakes and bake them straight from the refrigerator. This ensures you’ll have fresh, crispy Maryland Crab Cakes ready to impress with minimal effort, all while saving precious time on busy weeknights!

What to Serve with Perfect Maryland Crab Cakes

As you prepare to indulge in these succulent Maryland Crab Cakes, consider pairing them with delightful sides and beverages that will enhance your seafood feast experience.

  • Creamy Coleslaw: This crunchy, tangy side adds a refreshing contrast to the rich crab cakes while complementing their sweetness.
  • Garlic Mashed Potatoes: The creamy, buttery texture of mashed potatoes pairs beautifully with the crispy crab cakes, offering a comforting and satisfying dish.
  • Cornbread Muffins: Sweet and moist cornbread brings a Southern twist that complements the savory flavors of the crab cakes, making for a delightful bite.
  • Steamed Asparagus: Tender and lightly seasoned asparagus provide a pop of color and are a perfect light side dish that won’t overpower the main attraction.
  • Cucumber Salad: This cool, crisp salad offers a refreshing crunch and a hint of acidity that balances the richness of the crab cakes perfectly.
  • Lemon Dill Aioli: A zesty dipping sauce elevates your crab cakes, infusing them with a burst of bright flavor while enhancing each bite with creamy goodness.
  • Sauvignon Blanc: A chilled glass of this crisp white wine brings citrus notes that harmonize with the sweet crab meat, creating a refreshing dining experience.
  • Key Lime Pie: For dessert, this tangy-sweet pie provides a delightful finish, sweetening the palate after savoring the savory crab cakes.

Maryland Crab Cakes Variations

Feel free to explore these exciting variations that will add a personal touch and elevate your Maryland Crab Cakes to new levels of deliciousness!

  • Seafood Medley: Substitute crab meat with shrimp or a combination of your favorite seafood for a delightful twist. This ensures every bite is packed with juicy flavor and a variety of textures!

  • Spicy Kick: Add diced jalapeños or a dash of your favorite hot sauce to the mixture for an extra zing. This twist will tantalize your taste buds while still allowing the crab to shine through beautifully.

  • Herb Swap: Experiment with different herbs like dill or cilantro instead of parsley for unique flavor profiles. Fresh herbs can completely transform the crabcakes and create exciting new aromas!

  • Detox Delight: For a healthier take, use Greek yogurt instead of mayonnaise. This substitution cuts down on calories without sacrificing moisture or flavor, making your crab cakes feel light yet satisfying.

  • Grain-Free: To make these cakes gluten-free, use crushed gluten-free crackers or almond flour in place of traditional cracker crumbs. Discover the joy of accommodating dietary needs without compromising on taste!

  • Zesty Citrus: Incorporate lime juice or zest along with the lemon for a refreshing citrus twist. The added brightness beautifully enhances the sweet crab meat, giving it a vibrant flavor boost.

  • Baked Version Variations: For an even lighter option, consider air-frying the crab cakes. This method provides a delightful crunch while reducing the use of oil, making them a guilt-free indulgence that still satisfies your cravings.

  • Sweet and Spicy: Add a touch of brown sugar to the mix for a sweet caramelization as they bake, and pair with a chipotle aioli for dipping. This unexpected combination offers a delicious contrast that’s sure to impress your guests!

Embrace your creativity and customize these Maryland Crab Cakes just the way you like them! They make for a delightful meal, whether paired with a fresh salad, like a zesty lemon arugula salad, or alongside warm homemade cornbread, reminiscent of a sunny day by the bay. Enjoy cooking, and happy dining!

Expert Tips for Maryland Crab Cakes

  • Quality Crab: Always choose fresh crab meat from trusted sources, avoiding canned options from Asia for the best flavor in your Maryland Crab Cakes.

  • Chill Time Matters: Don’t skip chilling the mixture for at least 30 minutes; this step is crucial for helping the cakes hold their shape during baking.

  • Baking Tips: If you’re baking, make sure your oven is at 400°F (200°C) for that perfect golden exterior. Fresh crab needs to shine, not hide in excess oil!

  • Forming Cakes: When shaping the crab cakes, be gentle. Over-mixing can break up the chunks of crab that give the cakes a delightful texture and flavor.

  • Temperature Check: Always use an instant-read thermometer to ensure your crab cakes reach an internal temperature of 165°F, ensuring they’re perfectly cooked and safe to eat.

Storage Tips for Maryland Crab Cakes

Fridge: Store leftover Maryland Crab Cakes in an airtight container in the refrigerator for up to 3 days. Ensure they’re cooled completely before sealing to maintain texture.

Freezer: For longer storage, freeze the unbaked crab cakes in a single layer on a baking sheet, then transfer them to a freezer bag for up to 3 months.

Reheating: To reheat, bake from frozen at 375°F (190°C) for 20-25 minutes or until heated through, ensuring the cakes retain their crispy exterior.

Make Ahead: Crab cakes can be prepared in advance and stored in the fridge for up to 24 hours before baking, making party prep a breeze!

Maryland Crab Cakes Recipe FAQs

What makes a Maryland crab cake different?
Maryland crab cakes are distinctively known for their high ratio of crab meat to filler, often featuring fresh jumbo lump crab. A hallmark spice is Old Bay seasoning, which adds depth and celebrates the flavors of the Chesapeake Bay region. The traditional preparation is baked to reduce unnecessary calories while maintaining a crisp, golden exterior.

What are the ingredients in Maryland crab cakes?
The main ingredients include fresh jumbo lump crab meat, egg for binding, mayonnaise for moisture, Dijon mustard for tang, Worcestershire sauce for depth, lemon juice for brightness, Old Bay seasoning for flavor, fresh parsley for a pop of color, and cracker crumbs for structure. This combination creates a deliciously simple recipe that showcases the sweetness of the crab meat.

What is the secret to the best crab cake?
Absolutely! The key lies in using fresh, high-quality crab meat and minimizing fillers—following a low-filler approach truly lets the crab shine. Chilling the mixture for at least 30 minutes before baking is also essential; it firms up the mixture, helping the cakes hold their shape during cooking. Lastly, ensure they reach an internal temperature of 165°F for perfect texture and safety.

How do I store Maryland crab cakes properly?
To store cooked Maryland crab cakes, place them in an airtight container in the refrigerator for up to 3 days. For longer storage, freeze unbaked crab cakes. First, lay them out in a single layer on a baking sheet, freeze until solid, then transfer to a freezer bag for up to 3 months. When you’re ready to enjoy them, bake from frozen at 375°F (190°C) for 20-25 minutes until heated through.

Can my pets eat Maryland crab cakes?
While crab meat can be safe for pets in small amounts, it’s important to avoid dishes containing spices, onion, or garlic like Worcestershire sauce. Always check with your vet before sharing any human food with pets.

What should I do if my crab cakes fall apart during cooking?
Don’t worry—this can happen! If it does, it usually indicates that the mixture was either too wet or not chilled sufficiently. To troubleshoot, you can add a bit more cracker crumbs or chilling the mixture for a longer time next time might help. Form the cakes gently when shaping, ensuring you keep those lumps of crab intact for the best texture!

Juicy Maryland Crab Cakes That Will Wow Your Taste Buds

Enjoy the authentic flavor of Maryland Crab Cakes – a seafood delight with fresh crab meat.

  • Mixing Bowl
  • Baking Sheet
  • Plastic wrap

For the Crab Mixture

  • 1 pound fresh jumbo lump crab meat (Use high-quality fresh crab from the Atlantic coast for optimal taste.)
  • 1 large egg (A large egg is essential; omit for vegan variations.)
  • ½ cup mayonnaise (Can substitute with Greek yogurt for a lighter version.)
  • 1 tablespoon Dijon mustard (Yellow mustard can be used as a substitute for mildness.)
  • 1 tablespoon Worcestershire sauce (Use vegan Worcestershire sauce for a plant-based alternative.)
  • 1 tablespoon lemon juice (Extra lemon wedges can be served for added freshness.)
  • 1 tablespoon Old Bay seasoning (Adjust to taste or use a homemade blend of celery salt, black pepper, and paprika.)
  • ¼ cup cracker crumbs (Make your own from saltines or use panko bread crumbs as an alternative.)
  • 2 tablespoons fresh parsley (Substitute with chives or omit if not desired.)

Step-by-Step Instructions for Maryland Crab Cakes

  1. In a large mixing bowl, whisk together ½ cup of mayonnaise, 1 large egg, 1 tablespoon of Dijon mustard, 1 tablespoon of Worcestershire sauce, 1 tablespoon of Old Bay seasoning, and the juice of 1 lemon. Ensure the mixture is smooth and creamy as you combine these ingredients.
  2. Gently fold in 1 pound of fresh jumbo lump crab meat into the mayonnaise mixture, being cautious not to break the crab lumps. After the crab is well incorporated, sprinkle in ¼ cup of cracker crumbs and mix lightly until just combined.
  3. Cover the crab mixture with plastic wrap or a lid and refrigerate for at least 30 minutes.
  4. While the crab mixture is chilling, preheat your oven to 400°F (200°C).
  5. Once chilled, divide the crab mixture into six equal portions. Shape each portion into a slightly flattened round cake, about ¾ inch thick.
  6. Place the formed crab cakes on a parchment-lined baking sheet, evenly spaced apart. Bake in the preheated oven for 15-18 minutes, or until the crab cakes are golden brown and reach an internal temperature of 165°F.
  7. Remove the Maryland Crab Cakes from the oven and let them cool for a few minutes. Serve warm with tartar or cocktail sauce, and garnish with freshly squeezed lemon wedges.

Always choose fresh crab meat from trusted sources, avoiding canned options from Asia for the best flavor. Don’t skip chilling the mixture for at least 30 minutes; this step is crucial for helping the cakes hold their shape during baking.

Main Dishes
American, Seafood
baked, cakes, crab, easy recipes, Maryland Crab Cakes, seafood

Filed Under: Main Dishes

Easy Honey Lemon Vinaigrette

July 18, 2025 by grace bellamy Leave a Comment

The moment the vivid yellow dressing gracefully drizzles over a fresh salad is nothing short of magical. This Honey Lemon Vinaigrette recipe is a game-changer, effortlessly transforming mundane greens into a vibrant medley of flavors. With just a handful of fresh ingredients, this easy homemade dressing not only elevates your meals but also keeps those pesky additives at bay. In mere minutes, you can whip up this delightful concoction, making it the perfect companion for spring and summer meals. Whether you’re hosting a sunny brunch or simply elevating your dinner routine, this vinaigrette is sure to impress. Are you ready to take your salad game to new heights? Let’s dive into this refreshing recipe together!

Why is Honey Lemon Vinaigrette a Must-Try?

Simplicity at Its Best: With just a few fresh ingredients, this vinaigrette is incredibly easy to make, allowing anyone to create a delicious dressing at home.

Zesty Flavor Explosion: The bright lemon juice and sweet honey bring a refreshing balance to any dish, making salads sing with flavor.

Versatile Ingredient Usage: Great for enhancing salads, marinating proteins, or even as a dip for fresh veggies—this dressing adapts to your cooking needs!

Healthy Alternative: Avoid those store-bought additives—this vinaigrette is lower in calories and packed with nutrition, making it a guilt-free addition to your meals.

Make-Ahead Convenience: Prepare it in advance and keep it in the fridge for up to a week! Just give it a shake before use, and you’re ready to go.

Transform your meals today with this delightful honey lemon vinaigrette recipe!

Honey Lemon Vinaigrette Ingredients

Perfect for a fresh dressing!

For the Vinaigrette

  • Fresh Lemon Juice – Provides acidity and brightness; fresh-squeezed juice yields the best flavor.
  • Fresh Lemon Zest – Enhances the lemon flavor and adds a fragrant aroma; use a microplane for fine zesting.
  • Honey – Adds natural sweetness to balance the acidity; swap with maple syrup for a vegan alternative.
  • White Vinegar – Contributes additional acidity; feel free to substitute with apple cider vinegar for a unique flavor.
  • Dijon Mustard – Acts as an emulsifier, adding depth to the vinaigrette; yellow mustard works in a pinch for milder taste.
  • Extra Virgin Olive Oil – Provides richness and a smooth texture; light olive oil offers a milder flavor, while avocado oil is a healthy option.
  • Salt & Pepper – Enhance overall flavor to taste; adjust based on your personal preference.

Get ready to whip up a delicious, easy homemade honey lemon vinaigrette that will transform your salads!

Step‑by‑Step Instructions for Honey Lemon Vinaigrette

Step 1: Gather Ingredients
Begin by collecting all the ingredients for your Honey Lemon Vinaigrette. You’ll need fresh lemon juice, lemon zest, honey, white vinegar, Dijon mustard, extra virgin olive oil, salt, and pepper. Measure out the ingredients and place them in a clean 16 oz mason jar. This simple and fresh dressing will transform your salads, so ensure everything is ready for easy mixing.

Step 2: Combine Ingredients
Add the fresh lemon juice, lemon zest, honey, white vinegar, and Dijon mustard into the mason jar first. This order helps with the emulsification process. Use a spoon to give everything a gentle stir, ensuring the honey incorporates well with the liquids. The combination of these fresh ingredients provides a zesty flavor that’s perfect for salads!

Step 3: Add Olive Oil
Next, pour in the extra virgin olive oil into the jar, which will bring richness to your Honey Lemon Vinaigrette. Secure the lid tightly, ensuring a snug fit to avoid spills. Now, you are ready to emulsify the dressing; this is the key to a smooth texture that beautifully clings to your greens.

Step 4: Shake Vigorously
Shake the jar vigorously for about 1–2 minutes until the mixture is well combined and creamy. You should see the ingredients emulsifying—look for a slight thickening in the vinaigrette. This step is essential for achieving that delightful consistency that elevates any dish you choose to drizzle it on.

Step 5: Taste and Adjust
After shaking, remove the lid and taste the vinaigrette. Adjust the seasoning by adding salt and pepper according to your preference. You may also want to tweak the flavors further by adding more honey for sweetness or additional lemon juice for tanginess. Each taste will bring you closer to the perfect balance for your salads.

Step 6: Store for Later
If you’re not using the Honey Lemon Vinaigrette immediately, transfer it to an airtight container. Seal it tightly and refrigerate for up to one week. Always give it a gentle shake before each use to recombine the ingredients, ensuring that every drizzle is as fresh and vibrant as the first!

Make Ahead Options

These Honey Lemon Vinaigrette preparations are ideal for busy cooks looking to save time during the week! You can easily prepare the vinaigrette up to 7 days in advance by combining all the ingredients in a mason jar and shaking it to emulsify. Store it in the refrigerator in an airtight container to keep the flavors fresh. When it’s time to serve, simply give the jar a vigorous shake to recombine the ingredients before drizzling over your favorite salads or dishes. This make-ahead option ensures you always have a zesty dressing on hand, making meal planning a breeze while maintaining its delicious quality!

Expert Tips for Honey Lemon Vinaigrette

  • Choose Fresh Ingredients: Fresh lemon juice and zest are key to a vibrant honey lemon vinaigrette. Bottled lemon juice lacks the brightness that fresh lemons provide.

  • Emulsification Matters: Ensure the jar lid is tightly secured before shaking. This prevents spills and helps achieve a smooth, creamy consistency.

  • Adjust to Taste: Don’t hesitate to taste as you go! Add more honey for sweetness or additional mustard for thickness. This helps create a uniquely tailored honey lemon vinaigrette.

  • Storage Savvy: Refrigerate in an airtight container for up to a week. Always shake well before use; ingredients may separate, but this ensures freshness every time!

  • Experiment with Flavor: Try adding minced garlic or fresh herbs to enhance your honey lemon vinaigrette even further, bringing personalized flair to your salads.

What to Serve with Honey Lemon Vinaigrette?

The magic of Honey Lemon Vinaigrette makes every meal a burst of flavor, turning simple dishes into extraordinary ones.

  • Crispy Mixed Greens: The bright vinaigrette adds a zesty kick to peppery arugula and crunchy romaine, enhancing their natural flavors. A light drizzle can elevate even the simplest salads.

  • Grilled Chicken: Marinate chicken breasts in the vinaigrette for a tangy, flavorful twist before grilling. The marinade brings out the juiciness of the meat, making it an irresistible dish.

  • Roasted Vegetables: Toss crispy roasted carrots and bell peppers in Honey Lemon Vinaigrette for a delightful sweet-sour contrast that brightens earthy flavors.

  • Fresh Fruit Salad: Complement sweet fruits like strawberries and oranges with a drizzle of vinaigrette. This unexpected pairing adds a refreshing zing to your fruit medley, leaving your guests wondering about your secret ingredient.

  • Quinoa Salad: Mix cooked quinoa with diced cucumbers, cherry tomatoes, and feta cheese, then dress with the vinaigrette. This hearty, healthy salad takes on a whole new level of flavor.

  • Herbed Couscous: Coat fluffy couscous with this zesty vinaigrette for a side dish that perfectly balances savory herbs and natural sweetness.

  • Crusty Bread: Serve as a dip alongside a loaf of warm, crusty bread. The vinaigrette’s rich, complex flavors invite guests to indulge in an interactive dining experience.

  • Sparkling Water: Pair your meal with a glass of sparkling water with a lemon slice. The effervescence and citrus notes complement the vinaigrette beautifully, enhancing the overall dining experience.

With these pairings, your Honey Lemon Vinaigrette will shine in countless delightful dishes!

Honey Lemon Vinaigrette Variations

Feel free to get creative with your Honey Lemon Vinaigrette and make it uniquely yours!

  • Garlic Infusion: Add minced garlic for an earthy depth that pairs beautifully with the zesty flavors.
  • Herb Garden: Stir in fresh herbs like parsley or basil for a lovely aromatic twist that brightens your greens.
  • Vegan Delight: Substitute honey with maple syrup to create a deliciously sweet vegan vinaigrette that everyone can enjoy.
  • Spicy Kick: Try adding a pinch of red pepper flakes or a dash of hot sauce for a delightful heat that’s sure to excite your taste buds.
  • Nutty Flavor: Whisk in a teaspoon of sesame oil for a nutty undertone that adds a wonderful complexity to your dressing.
  • Citrus Blast: Mix in a splash of orange or lime juice for a vibrant citrus explosion that elevates the vinaigrette even more.
  • Creamy Variation: Blend with a dollop of Greek yogurt or avocado for a thicker, creamier dressing that’s rich and indulgent.
  • Fruit Forward: Incorporate pureed fruits like strawberries or peaches for a sweet and fruity twist that pairs perfectly with summer salads.

Each of these variations is a chance to infuse your personality into the vinaigrette, making it a versatile staple in your kitchen. Looking for more tips on how to spice up your salads? Check out how this delightful vinaigrette enhances other fresh dishes, including marinated vegetables and grilled proteins!

How to Store and Freeze Honey Lemon Vinaigrette

Fridge: Store your Honey Lemon Vinaigrette in an airtight container for up to one week. Always give it a good shake before using, as ingredients may separate over time.

Freezer: For longer storage, you can freeze the vinaigrette in ice cube trays, transferring the cubes to a zip-top bag afterwards. Use within 3 months for best flavor.

Room Temperature: Avoid leaving the vinaigrette at room temperature for more than 2 hours to maintain safety, especially during warmer months.

Reheating: While you don’t need to heat this vinaigrette, if it’s been frozen, allow it to thaw in the fridge overnight before giving it a shake and enjoying it fresh over your favorite dishes.

Honey Lemon Vinaigrette Recipe FAQs

How do I choose the best lemons for my vinaigrette?
Absolutely! Look for lemons that are firm and heavy for their size, which indicates juiciness. The skin should be smooth and free of dark spots. Fresh lemons yield the best flavor, so avoid those that are dull or have dry skin.

How long can I store Honey Lemon Vinaigrette?
You can keep your Honey Lemon Vinaigrette stored in an airtight container in the fridge for up to one week. Make sure to give it a good shake before each use, as the ingredients may separate over time.

Can I freeze Honey Lemon Vinaigrette?
Yes, you can freeze the vinaigrette! I recommend pouring it into ice cube trays and freezing until solid. Once frozen, transfer the cubes to a zip-top bag and use them within 3 months for the best flavor. Simply thaw a cube in the fridge overnight for fresh use.

What should I do if my vinaigrette is too thick?
If your Honey Lemon Vinaigrette turns out too thick for your liking, don’t worry! Simply add a splash of warm water or a little extra olive oil to thin it out. Secure the lid and shake again until you reach your desired consistency.

Is this vinaigrette safe for those with allergies?
Definitely! However, it’s crucial to note that this recipe contains honey, which should be avoided if you’re allergic to bees. For those following a vegan diet or avoiding honey, you can easily substitute it with maple syrup without compromising flavor.

Can I make this vinaigrette in advance for a party?
Yes, making your Honey Lemon Vinaigrette a day ahead is a fantastic idea! It allows the flavors to meld beautifully. Just store it in an airtight container in the fridge, and remember to give it a good shake before serving to recombine the ingredients.

Easy Honey Lemon Vinaigrette That Transforms Your Salads

This Honey Lemon Vinaigrette recipe effortlessly transforms your salads into a vibrant medley of flavors.

  • 16 oz mason jar

For the Vinaigrette

  • 1/4 cup Fresh Lemon Juice (Use fresh-squeezed juice for best flavor)
  • 1 teaspoon Fresh Lemon Zest (Use a microplane for fine zesting)
  • 2 tablespoons Honey (Can swap with maple syrup for a vegan alternative)
  • 1 tablespoon White Vinegar (Can substitute with apple cider vinegar)
  • 1 teaspoon Dijon Mustard (Yellow mustard works in a pinch)
  • 1/2 cup Extra Virgin Olive Oil (Light olive oil is a milder flavor)
  • to taste Salt
  • to taste Pepper

Step-by-Step Instructions for Honey Lemon Vinaigrette

  1. Gather all the ingredients for your Honey Lemon Vinaigrette in a clean 16 oz mason jar.
  2. Combine the fresh lemon juice, lemon zest, honey, white vinegar, and Dijon mustard into the mason jar.
  3. Add extra virgin olive oil into the jar, then secure the lid tightly.
  4. Shake the jar vigorously for about 1–2 minutes until well combined and creamy.
  5. Taste the vinaigrette and adjust seasoning with salt and pepper as needed.
  6. If not using immediately, transfer to an airtight container and refrigerate for up to one week.

This vinaigrette is a perfect blend for enhancing salads, marinating proteins, or using as a dip. Shake well before each use.

Condiment
American
Easy Recipe, Healthy Condiment, Homemade Dressing, Honey Lemon Vinaigrette, Salad Dressing, Vinaigrette

Filed Under: Condiment

Creamy Tuscan Rigatoni

July 18, 2025 by grace bellamy Leave a Comment

As I stood in my cozy kitchen, the aroma of sun-dried tomatoes mingled with garlic, instantly transporting me to a rustic Italian trattoria. This is the essence of my Creamy Tuscan Rigatoni, where each bite feels like a warm embrace on a busy weeknight. Creamy, comforting, and oh-so-satisfying, this dish marries tender rigatoni with a luscious tomato sauce and perfectly grilled chicken, creating a meal you’ll want to indulge in time and again. Not only is it quick to prepare (hello, easy weeknight meal!), but it also promises to be a crowd-pleaser, making it perfect for family dinners or cozy gatherings. Are you ready to make magic in your kitchen? Let’s dive into the recipe!

Why is Creamy Tuscan Rigatoni a Must-Try?

Comfort: This dish wraps you in a warm hug, perfect for those chilly evenings.
Flavor Explosion: The harmonious blend of sun-dried tomatoes, garlic, and creamy sauce creates an irresistible taste sensation.
Quick Preparation: Ready in under 30 minutes, it’s ideal for busy weeknights without sacrificing flavor.
Versatile: Feel free to substitute the chicken with shrimp or veggies for a different twist!
Crowd-Pleasing: It’s a hit with both kids and adults, making it perfect for family dinners or friendly get-togethers. Whether you pair it with a refreshing salad or some garlic bread, this dish guarantees satisfaction on every plate.

Creamy Tuscan Rigatoni Ingredients

• Here’s what you’ll need to create this delectable dish!

For the Chicken
• 2 chicken breasts – A vital protein source that anchors this dish; for different proteins, turkey breasts or plant-based alternatives work wonders.
• 1 tsp garlic powder – Deepens the flavor profile; for a fresher taste, use minced garlic instead.
• 1 tsp onion powder – Adds savory notes; fresh chopped onions can substitute, adjusting to your preference.
• 1 tsp paprika – Provides mild sweetness and beautiful color.
• 1 tsp chili powder – Introduces a subtle kick; omit if a milder flavor is desired.
• 1 tsp oregano – Essential for that authentic Tuscan flavor.
• Salt & pepper (to taste) – Fundamental seasonings to balance everything.

For the Pasta
• 4 cups rigatoni – This shape holds the sauce beautifully; penne or fusilli work just as well if needed.

For the Sauce
• 1 shallot – Adds a mild onion flavor to enrich your sauce; in a pinch, onion or green onions are great substitutes.
• 4 cloves garlic – Provides aromatic strength; a must for flavor.
• Pinch red pepper flakes – Adds heat; adjust according to your spice preference.
• 2-3 tbsp sun-dried tomatoes – Adds concentrated, robust tomato goodness; fresh tomatoes can be used, but the flavor will differ.
• 2 tbsp tomato paste – Thicken your sauce while boosting umami richness.
• 2 cups heavy cream – Gives that luscious, creamy texture; for a lighter option, consider half-and-half or a plant-based alternative.
• 2 handfuls spinach – A great way to incorporate nutrition and color; will wilt beautifully in the sauce.
• 2 small handfuls cherry tomatoes – Brightens up the dish with fresh bursts of flavor.
• Parmesan to taste – The finishing touch to elevate flavor; Pecorino Romano or nutritional yeast work for dairy-free options.

For Garnish
• Parsley (for topping) – Adds a pop of color and freshness to your dish.

Prepare these ingredients, and you’re on your way to creating a delicious bowl of Creamy Tuscan Rigatoni that will warm the hearts of your family and friends!

Step‑by‑Step Instructions for Creamy Tuscan Rigatoni

Step 1: Prepare the Chicken
Begin by slicing each chicken breast in half horizontally to promote even cooking. Season both sides generously with garlic powder, onion powder, paprika, chili powder, oregano, salt, and pepper. Heat a drizzle of olive oil in a large skillet over medium-high heat, providing a sizzle as the chicken cooks.

Step 2: Cook the Chicken
Place the seasoned chicken in the hot skillet, cooking for about 5-7 minutes on each side until they are golden brown and cooked through to an internal temperature of 165°F. Once done, transfer the chicken to a cutting board to rest, allowing the juices to settle for maximum moistness.

Step 3: Boil the Pasta
In a large pot, bring heavily salted water to a rolling boil. Add 4 cups of rigatoni and cook according to package instructions for about 8-10 minutes, until al dente. Reserve ½ cup of pasta water before draining the rigatoni, ensuring the noodles are firm yet tender—this will keep their texture intact when combined with the sauce.

Step 4: Create the Sauce
In the same skillet used for the chicken, reduce heat to medium and add minced garlic and finely chopped shallot into the residual oil. Sauté for 2-3 minutes, stirring frequently until fragrant and translucent. Add a pinch of red pepper flakes and the tomato paste, cooking for an additional minute, allowing the flavors to meld.

Step 5: Finish the Sauce
Pour in the heavy cream and add the sun-dried tomatoes, spinach, and halved cherry tomatoes. Stir gently and let the mixture simmer for about 5 minutes. As the spinach wilts and the tomatoes soften, stir in grated parmesan cheese and season with salt and pepper to taste; this creates a luxuriously creamy sauce for your Creamy Tuscan Rigatoni.

Step 6: Combine Everything
Gently fold the drained rigatoni into the sauce, ensuring each piece of pasta is coated in the creamy goodness. If the sauce appears thick, gradually add some of the reserved pasta water, about a tablespoon at a time, until reaching desired consistency.

Step 7: Serve the Dish
Slice the rested chicken into strips and arrange atop the pasta. Serve the creamy rigatoni in bowls, garnishing with extra parmesan and a sprinkle of fresh parsley for a pop of color. Enjoy the delightful warmth and flavors of your freshly prepared Creamy Tuscan Rigatoni!

What to Serve with Creamy Tuscan Chicken Pasta

Pairing your delicious plate of creamy goodness creates a complete dining experience. Consider these satisfying appetizers and sides to enhance your meal.

  • Garlic Bread: A crunchy, buttery indulgence that complements the creamy sauce perfectly. The rich flavors are irresistible when dipped into the sauce.

  • Caesar Salad: Crisp romaine, crunchy croutons, and creamy dressing provide a fresh contrast to the hearty pasta. The tang from the dressing adds a delightful zing.

  • Roasted Veggies: A mix of seasonal vegetables tossed in olive oil and herbs. Their caramelized sweetness provides a lovely texture contrast and enhances the meal’s color.

  • White Wine: A chilled glass of Sauvignon Blanc or Pinot Grigio elevates the dining mood. The crisp acidity of white wine balances the dish’s richness beautifully.

  • Pesto Bruschetta: Toasted bread topped with vibrant basil pesto. This dish introduces fresh flavors that harmonize with the creamy Tuscan chicken’s savory notes.

  • Lemon Sorbet: Light and refreshing, lemon sorbet serves as a delightful palate cleanser after the rich pasta. It’s a perfect ending to your comforting meal.

Creamy Tuscan Rigatoni Variations

Feel free to play with flavors and textures, making this dish uniquely yours!

  • Shrimp Option: Substitute grilled chicken with sautéed shrimp for a delightful seafood twist. The sweetness of shrimp pairs beautifully with the creamy sauce.
  • Veggie Lovers: Toss in vegetables like zucchini or bell peppers for extra nutrition and vibrant color. Their natural sweetness complements the creamy sauce wonderfully.
  • Spicy Kick: Add chopped jalapeños or spicy Italian sausage to amp up the heat if you’re a spice enthusiast. The extra kick brings a new dimension to every bite.
  • Herb Boost: Experiment with fresh herbs like basil or thyme for a fresh twist. These can enhance the dish’s aromatic profile, making it even more fragrant.
  • Dairy-Free Delight: Use coconut milk or almond milk in place of heavy cream for a lighter, dairy-free version. This adds a subtle nutty flavor while keeping the creaminess intact.
  • Noodle Alternatives: Try brown rice pasta or zucchini noodles for a gluten-free option. These will provide a slight change in texture while keeping the dish satisfying.
  • Creamy Variation: Swap heavy cream for cream cheese or ricotta for an even richer, velvety sauce. This twist is perfect for those who enjoy indulgent pasta dishes.
  • Tomato Swap: For a fresher twist, substitute canned or sun-dried tomatoes with fresh sliced tomatoes during peak summer. This will create a lighter, brighter dish.

Every variation invites you to explore a delicious new experience with your Creamy Tuscan Rigatoni. ✨ Enjoy experimenting with these ideas, and make this dish truly yours!

Storage Tips for Creamy Tuscan Rigatoni

  • Fridge: Store leftovers in an airtight container in the fridge for up to 3 days. Make sure to let the pasta cool before sealing to avoid condensation.
  • Freezer: If needed, you can freeze your Creamy Tuscan Rigatoni for up to 2 months. Divide into single portions, wrap tightly, and use freezer-safe containers.
  • Reheating: When ready to enjoy, thaw overnight in the fridge if frozen. Reheat gently on the stove over low heat, adding a splash of cream or reserved pasta water to revive the sauce’s creamy consistency.
  • Avoiding Separation: To prevent the sauce from separating during reheating, stir constantly and monitor the temperature closely, removing it from heat once warmed through.

Make Ahead Options

Preparing your Creamy Tuscan Chicken Pasta in advance is a game-changer for busy weeknights! You can marinate and cook the chicken up to 24 hours ahead and store it in the refrigerator. The sauce can also be prepared up to 3 days in advance; simply refrigerate it in an airtight container. To ensure the chicken stays juicy and the sauce remains creamy, avoid reheating on high heat; instead, warm gently on the stove while stirring in a splash of reserved pasta water if needed. When it’s time to enjoy your meal, just boil the rigatoni and combine with the warmed sauce and sliced chicken for a quick, comforting dinner that’s just as delicious as when freshly made!

Expert Tips for Creamy Tuscan Rigatoni

  • Chicken Prep: Ensure the chicken breasts are thinly sliced to cook evenly and form a beautiful, golden crust without drying out.
  • Pasta Perfection: Always cook the rigatoni to al dente; undercooking it slightly helps maintain texture when mixing with the creamy sauce.
  • Sauce Consistency: Reserve extra pasta water; it’s a fabulous secret to adjust the sauce thickness to your liking—too thick can be fixed with just a splash!
  • Flavor Boost: For a more robust flavor, let the garlic and shallots sauté until deeply aromatic before adding the cream and other ingredients.
  • Herb Freshness: Don’t skip the fresh parsley garnish; it elevates both presentation and flavor, bringing brightness to this creamy dish.

Creamy Tuscan Rigatoni Recipe FAQs

What is Tuscan rigatoni?
Tuscan rigatoni refers to a delicious, comforting pasta dish typically made with a creamy tomato-based sauce that embodies the flavors of Tuscany. The rigatoni pasta shape is perfect for holding onto the sauce, ensuring each bite is rich and flavorful, often combined with ingredients like chicken, sun-dried tomatoes, and fresh herbs for an authentic Italian experience.

What is Tuscan chicken sauce made of?
Tuscan chicken sauce is typically made with heavy cream, sun-dried tomatoes, garlic, shallots, and fresh spinach. It’s enhanced with spices like oregano, red pepper flakes, and parmesan cheese, delivering an irresistibly creamy and savory flavor profile that complements the tender chicken beautifully. This sauce works perfectly with various pasta shapes, especially rigatoni!

How long can I store Creamy Tuscan Rigatoni in the fridge?
Absolutely! You can store leftover Creamy Tuscan Rigatoni in an airtight container in the refrigerator for up to 3 days. Make sure to let it cool down to room temperature before sealing to prevent condensation, which can make the pasta soggy.

Can I freeze Creamy Tuscan Rigatoni?
Yes! Freezing Creamy Tuscan Rigatoni is a great option. To do this, divide it into single portions and wrap them tightly in plastic wrap. Then, place the wrapped portions into a freezer-safe container or bag. You can store it in the freezer for up to 2 months. When you’re ready to enjoy, simply thaw in the fridge overnight and reheat gently on the stove, adding a splash of cream or reserved pasta water to restore the creamy texture.

What should I do if the sauce is too thick?
If you find that your creamy sauce has become too thick while cooking or reheating, don’t worry! Simply add a tablespoon of reserved pasta water at a time while stirring continuously until you reach your desired consistency. This method not only balances the thickness but also ensures your sauce remains flavorful and creamy!

Can I customize this recipe for dietary restrictions?
Very! If you have dietary considerations, feel free to make some easy alterations. For a dairy-free version, substitute heavy cream with plant-based cream or coconut milk. If you’re looking for a chicken alternative, use turkey breasts, shrimp, or even mix it up with assorted vegetables like mushrooms or bell peppers. This ensures that everyone can indulge in this delightful Creamy Tuscan Rigatoni recipe!

Indulgent Creamy Tuscan Rigatoni for Comforting Nights

Creamy Tuscan Rigatoni is a comforting and quick meal, perfect for busy weeknights and sure to please the whole family.

  • large skillet
  • Pot
  • cutting board
  • Knife

For the Chicken

  • 2 pieces chicken breasts (for different proteins, turkey breasts or plant-based alternatives work wonders.)
  • 1 tsp garlic powder (for a fresher taste, use minced garlic instead.)
  • 1 tsp onion powder (fresh chopped onions can substitute, adjusting to your preference.)
  • 1 tsp paprika (provides mild sweetness and beautiful color.)
  • 1 tsp chili powder (omit if a milder flavor is desired.)
  • 1 tsp oregano (essential for that authentic Tuscan flavor.)
  • Salt & pepper (to taste)

For the Pasta

  • 4 cups rigatoni (penne or fusilli work just as well if needed.)

For the Sauce

  • 1 piece shallot (in a pinch, onion or green onions are great substitutes.)
  • 4 cloves garlic (provides aromatic strength; a must for flavor.)
  • 1 pinch red pepper flakes (adjust according to your spice preference.)
  • 2-3 tbsp sun-dried tomatoes (fresh tomatoes can be used, but the flavor will differ.)
  • 2 tbsp tomato paste (thicken your sauce while boosting umami richness.)
  • 2 cups heavy cream (for a lighter option, consider half-and-half or a plant-based alternative.)
  • 2 handfuls spinach (will wilt beautifully in the sauce.)
  • 2 small handfuls cherry tomatoes (brightens up the dish with fresh bursts of flavor.)
  • Parmesan (to taste; Pecorino Romano or nutritional yeast work for dairy-free options.)

For Garnish

  • Parsley (for topping; adds a pop of color and freshness to your dish.)

Step-by-Step Instructions

  1. Begin by slicing each chicken breast in half horizontally to promote even cooking. Season both sides generously with garlic powder, onion powder, paprika, chili powder, oregano, salt, and pepper.
  2. Heat a drizzle of olive oil in a large skillet over medium-high heat, providing a sizzle as the chicken cooks.
  3. Place the seasoned chicken in the hot skillet, cooking for about 5-7 minutes on each side until they are golden brown and cooked through to an internal temperature of 165°F. Once done, transfer the chicken to a cutting board to rest.
  4. In a large pot, bring heavily salted water to a rolling boil. Add 4 cups of rigatoni and cook according to package instructions for about 8-10 minutes, until al dente. Reserve ½ cup of pasta water before draining the rigatoni.
  5. In the same skillet used for the chicken, reduce heat to medium and add minced garlic and finely chopped shallot into the residual oil. Sauté for 2-3 minutes until fragrant and translucent.
  6. Add a pinch of red pepper flakes and the tomato paste, cooking for an additional minute.
  7. Pour in the heavy cream and add the sun-dried tomatoes, spinach, and halved cherry tomatoes. Stir gently and let the mixture simmer for about 5 minutes.
  8. Stir in grated parmesan cheese and season with salt and pepper to taste.
  9. Gently fold the drained rigatoni into the sauce. If the sauce appears thick, gradually add some of the reserved pasta water.
  10. Slice the rested chicken into strips and arrange atop the pasta. Serve garnished with extra parmesan and fresh parsley.

This dish is perfect for family dinners, crowd-pleasing and easy to make, with the option to substitute proteins. Store leftovers for up to 3 days or freeze for 2 months.

Main Dishes
Italian
comfort food, Creamy Tuscan Rigatoni, crowd-pleaser, Easy Recipe, pasta dish, quick meal

Filed Under: Main Dishes

Creamy Southern Potato Salad for a Perfect Summer Side

July 18, 2025 by grace bellamy Leave a Comment

In the heart of Southern kitchens, a classic dish quietly steals the spotlight: Classic Southern Potato Salad. It’s hard to resist the creamy texture and zesty flavors that remind me of lazy summer days spent savoring backyard barbecues with family. This homemade gem, packed with crunchy dill pickles, hard-boiled eggs, and a tangy hint of yellow mustard, is not just a side dish—it’s a nostalgic journey to the welcoming embrace of Southern hospitality. With the ability to whip this salad together in less than 30 minutes, it’s perfect for any gathering, from potlucks to picnics. Trust me, the unassuming charm of this potato salad will have everyone asking for seconds. Ready to dive into a dish that feels like a warm hug? Let’s get cooking!

Why is Southern Potato Salad a Must-Try?

Creamy, Dreamy Texture: The combination of russet potatoes and mayonnaise creates a rich base that’s hard to resist.

Zesty & Flavorful: With crunchy dill pickles and a splash of yellow mustard, each bite is bursting with tangy goodness, a true nod to Southern flavors.

Quick & Easy: Whipping this up takes less than 30 minutes, making it an ideal choice for spontaneous gatherings or busy weeknights.

Perfect for Any Occasion: Pair it with fried chicken, or serve alongside a delicious Chicken Caesar Salad; its versatility makes it a crowd-pleaser.

Make-Ahead Marvel: This potato salad tastes even better the next day, so feel free to prepare it in advance for your next BBQ or picnic!

When you bring this dish to the table, watch as it captures the essence of Southern hospitality with every creamy spoonful.

Southern Potato Salad Ingredients

• A delightful array to create your creamy masterpiece:

  • Russet Potatoes: – Base of the salad, providing a starchy and creamy texture. Substitution/Prep Note: Yukon Gold or red potatoes can be used, but the texture slightly varies; always peel Russets.

  • Kosher Salt: – Enhances flavor during potato cooking. Use for salting water and seasoning the salad mixture.

  • Hard-Boiled Eggs: – Add creaminess and richness. For convenience, pre-cooked eggs can be purchased.

  • Hamburger Dill Pickles: – Provide crunch and a tangy flavor element. Substitution: Sweet pickles can be used for those preferring a sweeter taste.

  • Hamburger Dill Pickle Juice: – Adds acidity and flavor. Optional if prefer less tang.

  • Vidalia or Sweet Yellow Onion: – Introduces a mild yet savory taste. Omit if avoiding onions.

  • Mayonnaise: – Key ingredient for creaminess, binds the salad. Preferred brands: Dukes or Hellman’s; for lighter versions, Greek yogurt could substitute.

  • Yellow Mustard: – Adds a distinct tang. No substitutes suggested; essential for traditional taste.

  • Ground Black Pepper: – Provides seasoning. Adjust according to taste.

  • Paprika: – Used as a garnish for color and flavor enhancement. Use smoked paprika for a deeper flavor profile.

Step‑by‑Step Instructions for Southern Potato Salad

Step 1: Prepare Potatoes
Fill a large pot with water and bring it to a boil over high heat. Once boiling, generously salt the water, then add cubed russet potatoes. Cook the potatoes for about 10 minutes, or until they are easily pierced with a fork but not falling apart. Once cooked, drain the potatoes and set them aside to cool slightly.

Step 2: Mash Potatoes
Return the drained potatoes to the pot and let them sit for a minute to allow excess steam to escape. Using a potato masher, gently mash the potatoes 3-4 times; you want a creamy texture without completely breaking them down. Allow the mashed potatoes to cool while you prepare the dressing for your Southern Potato Salad.

Step 3: Mix Dressing
In a large mixing bowl, combine mayonnaise, yellow mustard, finely chopped onion, diced hamburger dill pickles, and their juice. Add chopped hard-boiled eggs, salt, and ground black pepper to the mixture. Stir everything together thoroughly until you achieve a smooth, well-combined dressing that captures the essence of Southern flavors.

Step 4: Combine
Once the potatoes have cooled, gently fold them into the dressing mixture. Use a spatula or wooden spoon to ensure each potato cube is evenly coated with the creamy dressing. Be careful not to overmix, as you want the potatoes to retain their shape for a delightful texture in your Southern Potato Salad.

Step 5: Chill and Serve
Transfer the potato salad to a serving bowl and sprinkle with paprika for a lovely garnish. Cover it tightly with plastic wrap or a lid and refrigerate for at least 30 minutes, allowing the flavors to meld beautifully. Serve your Southern Potato Salad chilled or at room temperature for the best taste experience.

Southern Potato Salad Variations & Substitutions

Imagine the joy of personalizing your Southern Potato Salad to perfectly suit your taste buds—let’s explore some tasty twists!

  • Spicy Twist: Replace yellow mustard with spicy mustard for an extra kick that adds a delightful heat to each bite.

  • Sweet Flair: Swap dill pickles for sweet pickle relish to introduce a delightful sweetness that balances the tangy flavors beautifully.

  • Crunchy Add-Ins: Toss in some finely chopped celery or bell peppers for an extra crunchy texture that elevates this classic dish. They bring not only flavor but also a burst of color!

  • Herb-Infusion: Mix in fresh herbs like dill or parsley to infuse a refreshing and aromatic dimension into the creamy salad. These herbs complement the overall profile while elevating freshness.

  • Dairy Swap: To lighten things up, substitute the mayonnaise with Greek yogurt for a tangy alternative without sacrificing creaminess. Your waistline will thank you!

  • Vegan Option: For a plant-based twist, use vegan mayonnaise and replace the hard-boiled eggs with diced avocado. This gives a creamy texture while keeping it entirely plant-based.

  • Fiery Heat: If you’re a fan of spice, add chopped jalapeños or a dash of hot sauce to kick up the heat level for those who love a bit of a zing.

  • Smoky Flavor Boost: Use smoked paprika instead of regular paprika for an additional layer of depth in flavor, turning out each bite irresistible.

Feel inspired to experiment with these variations, and soon you’ll have a Southern Potato Salad that echoes your culinary personality! Pair your dish with something like Pomegranate Rocket Salad for a delightful balance of flavors and textures at your next gathering.

Storage Tips for Southern Potato Salad

  • Fridge: Keep your Southern Potato Salad in an airtight container, where it will stay fresh for up to 5 days. The flavors even improve after a day!

  • Room Temperature: Serve at room temperature if desired, but aim to limit it to 2 hours outside the fridge to ensure food safety.

  • Freezer: It’s best not to freeze this salad, as the creamy texture can change upon thawing, making it less enjoyable.

  • Reheating: If you garnish with paprika, do this just before serving for best results. No reheating necessary; it’s delicious chilled!

Expert Tips for Southern Potato Salad

  • Cook Potatoes Just Right: Avoid mushiness by testing potatoes with a fork; they should be tender yet firm. Overcooking will ruin the salad’s delightful texture.

  • Use Hot Potatoes: Mixing the hot mashed potatoes with the dressing enhances flavor absorption, making your Southern Potato Salad taste even better.

  • Chill Before Serving: Let the salad chill in the fridge for at least 30 minutes before serving. This helps the flavors meld beautifully together, creating a comforting classic.

  • Make Ahead Magic: Prepare your Southern Potato Salad a day in advance; it tastes amazing the next day and is perfect for busy schedules or last-minute gatherings.

  • Adjust for Preference: Feel free to customize with additional ingredients like celery or bell peppers for extra crunch, catering to everyone’s tastes!

Make Ahead Options

These creamy Southern Potato Salad preparations are perfect for busy cooks looking to save time during weeknight meal planning! You can peel and cube the russet potatoes up to 24 hours in advance; just store them submerged in cold water in the refrigerator to prevent browning. Additionally, you can mix the dressing (mayonnaise, mustard, onions, pickles, pickle juice, eggs, salt, and pepper) up to 3 days ahead, keeping it sealed tight in an airtight container. When it’s time to serve, simply combine the chilled potatoes with the dressing, fold gently, and let the flavors blend for about 30 minutes in the fridge. This approach maintains the salad’s delicious quality while freeing up your time!

What to Serve with Classic Southern Potato Salad

Elevate your meal with delightful pairings that complement the creamy, tangy wonder of this classic dish.

  • Fried Chicken: Crispy, juicy fried chicken and creamy potato salad create a Southern classic that’s hard to resist. A match made in comfort food heaven, each mouthful transports you to a sunny backyard picnic.

  • Barbecue Ribs: The smoky, tender flavors of barbecued ribs balance perfectly with the coolness of potato salad. This duo brings quintessential Southern warmth to any gathering.

  • Coleslaw: A refreshing, crunchy slaw adds brightness and texture alongside your potato salad. The vibrant colors and crunch will make your plate a feast for the eyes and the palate.

  • Grilled Corn on the Cob: Sweet, grilled corn brings a smoky char that pairs delightfully with the creamy richness of potato salad. This combination captures summertime on a plate!

  • Lemonade: Ice-cold lemonade provides a refreshing zest that cuts through the creaminess of potato salad, making each bite and sip a delightful experience.

  • Deviled Eggs: These classic bites echo the flavors of the potato salad while offering a different texture. They’re a nostalgic nod to Southern gatherings, perfect for sharing.

  • Peach Cobbler: Finish your meal with a slice of warm peach cobbler. Its sweet, gooey filling and buttery crust are a heartwarming end to a traditional Southern feast.

  • Crispy Green Beans: Lightly fried or sautéed green beans offer a satisfying crunch that contrasts nicely with the creamy salad. Their fresh taste retains the essence of home-cooked goodness.

  • Sweet Tea: Pair with a glass of sweet tea to capture the true Southern experience; it’s the ultimate beverage to wash down a plateful of deliciousness.

Each of these pairings enhances the comforting vibe of the classic Southern potato salad, creating a meal that feels both special and homely. Enjoy!

Classic Southern Potato Salad Recipe FAQs

What is in southern style potato salad?
Southern Potato Salad typically includes the rich and creamy base of russet potatoes, hard-boiled eggs for added richness, crunchy dill pickles for a tangy twist, and a flavorful dressing made of mayonnaise and yellow mustard. This combination embodies the delightful flavors of Southern cuisine, creating a nostalgic dish that’s perfect for gatherings.

How long can I store Southern Potato Salad in the fridge?
You can store your Southern Potato Salad in an airtight container in the refrigerator for up to 5 days. For best flavor, let it chill for at least 30 minutes before serving. The tastes meld beautifully over time, making this a perfect make-ahead dish.

Can I freeze Southern Potato Salad?
It’s not recommended to freeze Southern Potato Salad. The creamy texture from the mayonnaise and potatoes tends to separate upon thawing, which affects both the flavor and mouthfeel. Instead, prepare it fresh and enjoy the flavors that come together after a day in the fridge.

What should I avoid when making potato salad?
To ensure your Southern Potato Salad has the ideal texture, avoid overcooking your potatoes—cooking them just until tender but not falling apart is key. Additionally, make sure to mix the hot potatoes with the dressing; this helps them absorb the flavors better. Lastly, avoid under-seasoning; a little salt and pepper can elevate the dish significantly.

Are there any dietary considerations for Southern Potato Salad?
Absolutely! If you’re catering to dietary restrictions, you can easily customize your Southern Potato Salad. For a lighter version, consider substituting mayonnaise with Greek yogurt. If you need a vegetarian option, confirm that pickles and other ingredients align with your dietary needs. Always check for allergies concerning eggs, mayonnaise, and any additional ingredients you may add, such as celery or onions.

Creamy Southern Potato Salad for a Perfect Summer Side

This Southern Potato Salad is a classic side dish that’s creamy, zesty, and perfect for summer gatherings.

  • Large Pot
  • potato masher
  • Mixing Bowl
  • spatula

Potatoes

  • 2 pounds russet potatoes (Peeled and cubed)

Seasoning

  • 1 teaspoon kosher salt (For cooking potatoes and dressing)
  • 1/4 teaspoon ground black pepper (Adjust to taste)

Other Ingredients

  • 4 large hard-boiled eggs (Chopped)
  • 1 cup hamburger dill pickles (Diced)
  • 1/4 cup hamburger dill pickle juice (Optional)
  • 1 small Vidalia or sweet yellow onion (Finely chopped)
  • 1 cup mayonnaise (Dukes or Hellman’s preferred)
  • 2 tablespoons yellow mustard (Essential for traditional taste)
  • 1 teaspoon paprika (For garnish)

Preparation

  1. Fill a large pot with water and bring it to a boil over high heat. Add salt and then the cubed potatoes. Cook for about 10 minutes until tender. Drain and set aside to cool.
  2. Return the cooled potatoes to the pot and gently mash them a few times, allowing them to cool.
  3. In a large bowl, combine mayonnaise, yellow mustard, onion, diced pickles, pickle juice, chopped eggs, salt, and pepper. Mix well.
  4. Fold in the cooled potatoes until evenly coated with the dressing. Be careful not to overmix.
  5. Transfer to a serving bowl, garnish with paprika, cover tightly, and chill in the refrigerator for at least 30 minutes before serving.

This salad tastes even better the next day, making it a great make-ahead option for gatherings.

Salad
Southern
BBQ, homemade, picnic, potato salad, Southern potato salad, summer side

Filed Under: salad

One Pot Taco Pasta

July 18, 2025 by grace bellamy Leave a Comment

As I stirred the bubbling pot on my stovetop, a wave of nostalgia washed over me. There’s something undeniably comforting about combining classic taco flavors with the convenience of pasta, and my One-Pot Taco Pasta captures that perfect blend. This dish is a busy weeknight savior—whipping up in just 25 minutes, it’s not only gluten-free but also a sure hit with the kids! Picture this: hearty ground beef mingling with zesty spices, all while cooking together in a single pot. It minimizes cleanup and maximizes flavor, turning a typical dinner into a delightful family feast. Are you ready to bring a twist to taco night? Let’s dive into this easy, satisfying recipe that promises to brighten your week!

Why Is One-Pot Taco Pasta So Special?

Simplicity: This dish is delightfully easy to prepare with just one pot required, making cleanup a breeze.

Quick Dinner Solution: In just 25 minutes, you can serve a memorable meal that’s perfect for busy weeknights.

Kid-Approved Flavor: The zesty taco spices and hearty beef are sure to win over even the pickiest eaters in your family.

Versatile: Customize it with your favorite add-ins like bell peppers or even swap the beef for shredded chicken for a unique twist. Pair it with a fresh side salad or some Pasta Salad to complete your dinner!

Healthy Options: Gluten-free and adaptable, it can easily cater to various dietary needs without sacrificing taste. What’s not to love?

One Pot Taco Pasta Ingredients

• Gather everything you need for a scrumptious meal!

For the Base
• Olive or Avocado Oil – Choose avocado oil for a higher smoke point, making it perfect for sautéing.
• Grass-Fed Beef – Rich in flavor; substitute with ground turkey for a lighter dish.
• Onion (1/2, diced fine) – Infuse your dish with aromatic sweetness; shallots can be a milder alternative.

For the Seasoning
• Chili Powder (1 tsp) – Adds warmth and depth; modify based on your family’s spice tolerance.
• Cumin (1/2 tsp) – This spice brings earthiness; feel free to omit for a tamer flavor.
• Dried Oregano (1/2 tsp) – Enhances the overall taste with herbal tones; can be replaced with Italian seasoning.
• Salt & Pepper – Essential for balancing flavors; adjust to your preference.

For the Sauce
• Tomato Paste (2 tbsp) – Provides a rich umami boost; crushed tomatoes can lighten the texture.
• Diced Tomatoes & Jalapenos (10 oz can) – Offers moisture and a spicy kick for that taco flavor; brands like Rotel are ideal for authenticity.

For the Pasta
• Brown Rice Pasta (12 oz box) – This gluten-free pasta holds up nicely in the dish; any small pasta shape will work.
• Chicken Broth (4 cups) – Infuses flavor into the dish; mix with milk for extra creaminess if desired.

Optional Add-Ons
• Shredded Cheese (1 cup) – Mix in for an extra creamy finish; skip it for a dairy-free option.
• Garnishes (optional) – Fresh cilantro, avocado, jalapeños, and radishes add a burst of flavor and visual appeal.

Enjoy this One Pot Taco Pasta that’s bound to become a family favorite!

Step‑by‑Step Instructions for One Pot Taco Pasta

Step 1: Heat the Oil
In a large pot, heat 2 tablespoons of olive or avocado oil over medium-high heat. Look for the shimmering surface of the oil, which indicates it’s hot enough for cooking. This will serve as the base for your One Pot Taco Pasta, creating a flavorful foundation to sauté the ingredients.

Step 2: Brown the Meat and Onion
Add 1 pound of grass-fed beef and ½ diced onion to the hot oil. Cook for about 7 minutes, stirring occasionally to break up the beef into small pieces. The meat should be browned and the onion translucent before moving on. This step builds rich flavors essential for your taco-inspired pasta.

Step 3: Season the Mixture
Once the beef and onion are fully cooked, drain any excess fat from the pot. Season the mixture with salt, pepper, 1 teaspoon of chili powder, ½ teaspoon of cumin, and ½ teaspoon of dried oregano. Stir in 2 tablespoons of tomato paste, ensuring it coats the meat evenly and enhances the dish’s taco flavor profile.

Step 4: Add the Pasta and Broth
Next, incorporate 12 ounces of brown rice pasta, a 10-ounce can of diced tomatoes and jalapeños, and 4 cups of chicken broth into the pot. Stir everything together until combined. You’ll want to see the broth bubbling slightly, preparing to bring the pasta to life with the rich flavors of One Pot Taco Pasta.

Step 5: Simmer to Cook the Pasta
Bring the mixture to a boiling point, then reduce the heat to a simmer. Let it cook for about 13 minutes, stirring occasionally to prevent the pasta from sticking. The pasta should be tender and cooked through, absorbing the amalgamated flavors while remaining al dente.

Step 6: Stir in Cheese
After the pasta is cooked, turn off the heat and, if desired, stir in 1 cup of shredded cheese until it melts smoothly into the pasta. Allow the dish to sit for a few minutes, letting the flavors mesh even further and the cheese to finish melting, adding a creamy texture to your One Pot Taco Pasta.

Step 7: Garnish and Serve
To finish, garnish your One Pot Taco Pasta with fresh cilantro, diced avocado, jalapeños, or thinly sliced radishes as desired. This adds a vibrant color and fresh taste to each serving. Serve this hearty dish immediately for the best texture and flavor.

Storage Tips for One-Pot Taco Pasta

Room Temperature: Allow the One-Pot Taco Pasta to cool for no more than 2 hours before storing to prevent bacterial growth.

Fridge: Store leftovers in an airtight container in the refrigerator for up to 3 days. It helps retain the flavors and texture!

Freezer: For longer storage, freeze in an airtight container for up to 2 months. Thaw in the fridge overnight before reheating.

Reheating: Reheat gently on the stove with a splash of chicken broth to bring back moisture and flavor, ensuring a satisfying second serving!

Make Ahead Options

One-Pot Taco Pasta is a fantastic choice for meal prep, allowing you to enjoy its deliciousness even on the busiest nights! You can prepare the beef, onion, and spices mixture up to 24 hours in advance, storing it in an airtight container in the refrigerator. Additionally, you can cook the pasta separately and refrigerate it for up to 3 days to maintain its texture. When you’re ready to serve, simply reheat the beef mixture in a pot, stir in the cooked pasta and broth, and simmer until heated through. This way, you can whip up an effortlessly satisfying meal that’s just as flavorful, saving you precious time without sacrificing quality!

Expert Tips for One Pot Taco Pasta

  • Choose Lean Beef: Opt for lean ground beef to cut down on grease. Drain any excess fat after browning to keep your dish light and enjoyable.
  • Customize Spice Levels: Adjust the chili powder based on your family’s spice tolerance. Start with less if you have young kids, and add more for a kick!
  • Perfect Pasta Texture: Stir occasionally while simmering to prevent the pasta from sticking together. This ensures a perfect, cohesive texture throughout your One Pot Taco Pasta.
  • Add Veggies: Boost nutrition by including chopped bell peppers, corn, or spinach. These can add color and freshness while enhancing the flavors.
  • Store Smart: Leftovers can be stored in an airtight container for up to 3 days. Reheat gently on the stove, adding a splash of broth if it seems dry.

What to Serve with One-Pot Taco Pasta

Create a deliciously engaging meal that stirs the heart and satisfies the palate.

  • Fresh Side Salad: A vibrant salad provides a crisp crunch, balancing the hearty flavors of the pasta with refreshing vegetables.
  • Corn Tortillas: Warm, soft tortillas add a delightful texture, perfect for scooping up the taco-inspired pasta.
  • Guacamole: Creamy avocado dip enhances the dish’s richness while adding a burst of fresh flavor, making each bite even more enjoyable.
  • Mexican Street Corn: Grilled and slathered with cheese and spices, this sweet and savory side pairs perfectly with the taco pasta’s flavor profile.
  • Quick Salsa: A zesty tomato salsa sprinkled on top can elevate your meal, adding brightness and freshness to every bite.
  • Lime Wedges: A squeeze of fresh lime boosts the dish’s flavor, offering a tangy twist that harmonizes beautifully with taco flavors.

One Pot Taco Pasta: Endless Customization

Dive into the delicious world of One Pot Taco Pasta, and let your creativity shine with these tasty twists!

  • Dairy-Free: Swap shredded cheese with a dairy-free alternative or simply omit it for a light and fresh dish. This keeps the flavors bright without the heaviness!
  • Vegetarian Delight: Use black beans or lentils in place of meat for a hearty vegetarian version. Packed with protein and fiber, this option is just as satisfying.
  • Spicy Kick: If you’re craving heat, add diced serrano peppers or a few dashes of your favorite hot sauce right before serving. It’s a simple way to elevate the flavor!
  • Veggie Boost: Toss in some spinach, bell peppers, or zucchini during the last few minutes of cooking for a nutritious boost. It’s a great way to sneak in more veggies!
  • Citrus Zing: A squeeze of fresh lime juice just before serving brings a zesty brightening note to this comforting dish. Trust me; it’s a game-changer!
  • Gluten-Free Twists: Try using quinoa or zucchini noodles for a lower-carb, gluten-free alternative that doesn’t compromise on taste. The possibilities are endless!
  • One-Pot Variation: Make it a complete meal by adding corn or olives to the pot during cooking. They’ll enhance the flavors while keeping prep simple!
  • Taco Night Theme: Pair your One Pot Taco Pasta with a side of your favorite taco toppings, like guacamole or salsa, to create a fun taco night experience!

For more enjoyable pasta dishes, check out this comforting Chicken Feta Pasta or dive into a Mexican twist with Taco Lasagna. Your family’s taste buds are just a dish away from delight!

One-Pot Taco Pasta Recipe FAQs

What type of pasta should I use for One-Pot Taco Pasta?
I recommend using brown rice pasta for a gluten-free option that holds up well in the dish. However, you can also use any small pasta shape like fusilli, elbow, or penne—just keep an eye on the cooking time, as it may vary slightly.

How should I store leftovers of One-Pot Taco Pasta?
Allow the pasta to cool for no more than 2 hours before transferring it to an airtight container. You can keep it in the refrigerator for up to 3 days. Just remember to look for any signs of spoilage like off smells or changes in texture before reheating!

Can I freeze One-Pot Taco Pasta?
Absolutely! To freeze, let it cool completely, then transfer it to an airtight container. It can be frozen for up to 2 months. When ready to enjoy, thaw in the refrigerator overnight and reheat gently on the stove, adding a splash of broth to maintain moisture.

What can I do if my pasta is mushy after cooking?
If the pasta turns out mushy, it might be due to overcooking. To avoid this in the future, make sure to check the pasta a minute or two early during your cooking time. It should be al dente—firm to the bite. Also, stirring occasionally can help keep the pasta from clumping and overcooking.

Is One-Pot Taco Pasta suitable for kids with allergies?
This dish can be adapted for various dietary needs! If you’re concerned about gluten, be sure to use certified gluten-free pasta and chicken broth. You can also swap out the ground beef for black beans or turkey if there are concerns about red meat allergies.

How can I customize my One-Pot Taco Pasta?
The more the merrier! You can add chopped bell peppers, corn, or spinach for extra nutrition. For those who love a spice kick, consider adding diced jalapeños or a splash of lime juice just before serving to freshen up the flavors. Don’t hesitate to mix and match according to your family’s preferences!

One Pot Taco Pasta: Quick and Easy Family Favorite

A quick and easy One Pot Taco Pasta that blends classic taco flavors and pasta, perfect for busy weeknights.

  • Large Pot

For the Base

  • 2 tbsp olive or avocado oil (Choose avocado oil for a higher smoke point.)
  • 1 lb grass-fed beef (Can substitute with ground turkey.)
  • 1/2 pieces onion (Diced fine; shallots can be used as a milder alternative.)

For the Seasoning

  • 1 tsp chili powder (Adjust based on spice tolerance.)
  • 1/2 tsp cumin (Can be omitted for a tamer flavor.)
  • 1/2 tsp dried oregano (Replace with Italian seasoning if preferred.)
  • salt & pepper (Adjust to taste.)

For the Sauce

  • 2 tbsp tomato paste (Provides umami; crushed tomatoes can lighten the texture.)
  • 10 oz diced tomatoes & jalapeños (Can use brands like Rotel for authenticity.)

For the Pasta

  • 12 oz brown rice pasta (Any small pasta shape will work.)
  • 4 cups chicken broth (Mix with milk for extra creaminess if desired.)

Optional Add-Ons

  • 1 cup shredded cheese (Skip for a dairy-free option.)
  • garnishes (Fresh cilantro, avocado, jalapeños, and radishes.)

Step-by-Step Instructions

  1. In a large pot, heat 2 tablespoons of olive or avocado oil over medium-high heat.
  2. Add 1 pound of grass-fed beef and ½ diced onion to the hot oil. Cook for about 7 minutes.
  3. Drain any excess fat, then season the mixture with salt, pepper, 1 teaspoon of chili powder, ½ teaspoon of cumin, and ½ teaspoon of dried oregano. Stir in 2 tablespoons of tomato paste.
  4. Incorporate 12 ounces of brown rice pasta, a 10-ounce can of diced tomatoes and jalapeños, and 4 cups of chicken broth into the pot.
  5. Bring to a boil, then reduce heat and simmer for about 13 minutes, stirring occasionally.
  6. Turn off the heat and stir in 1 cup of shredded cheese until it melts smoothly.
  7. Garnish with fresh cilantro, avocado, jalapeños, or radishes as desired and serve immediately.

Leftovers can be stored in an airtight container for up to 3 days. Reheat gently on the stove with a splash of broth if it seems dry.

Main Dishes
Tex-Mex
easy dinner, family recipe, gluten-free, One Pot Taco Pasta, quick pasta, taco night

Filed Under: Main Dishes

Easy Lemon Cobbler

July 18, 2025 by grace bellamy Leave a Comment

As I stood in the kitchen, a sudden craving for something sweet and zesty hit me—something that could brighten up the dreariest of days. Enter my easiest magic lemon cobbler, a dessert that practically makes itself and brings a burst of sunshine into any gathering. Using simple pantry staples, this quick dessert is not only a delightful way to satisfy your sweet tooth but also an impressive option for impromptu get-togethers. With its airy texture and refreshing lemon flavor, this cobbler is sure to become your go-to recipe when you’re looking to whip up something delicious without the fuss. Can you resist the allure of warm, lemony goodness?

Why is This Lemon Cobbler a Must-Try?

Simplicity at Its Best: You only need a few pantry staples and about an hour to create this stunning dessert.

Bright, Zesty Flavor: The refreshing burst of lemon brightens your spirits and complements any gathering perfectly.

Effortless Preparation: No complicated techniques or fancy equipment—simply mix and bake!

Crowd-Pleasing Appeal: It’s a guaranteed hit among family and friends, rivaling even a classic Peach Cobbler.

Versatile Options: Customize it easily by switching up the lemon pie filling or adding fresh berries for a fruity twist.

Indulging in this lemon cobbler not only satisfies your cravings but also brings a touch of sunshine to your dessert table!

Lemon Cobbler Ingredients

For the Batter

  • Unsalted Butter – Adds richness and moisture to the cobbler; for a dairy-free option, use margarine.
  • All-purpose Flour – Provides structure; can be replaced with gluten-free flour for a gluten-free version.
  • Baking Powder – A leavening agent that helps the cobbler rise; ensure it’s fresh for best results.
  • Salt – Enhances flavors and balances sweetness.
  • Sugar – Sweetens the batter; consider using brown sugar for a deeper flavor.
  • Whole Milk – Adds moisture; any plant-based milk works well as a substitute.
  • Vanilla Extract – Imparts depth of flavor; don’t skip this for that warm undertone.
  • Lemon Extract – Elevates the citrus flavor; for fresh intensity, use lemon zest instead.

For the Filling

  • Lemon Pie Filling – Provides moisture and tanginess; opt for store-bought or homemade.

For Garnishing

  • Powdered Sugar (optional) – For a sweet finish and visual appeal; it adds a lovely touch when dusted before serving.

Step‑by‑Step Instructions for Easiest Magic Lemon Cobbler

Step 1: Preheat the Oven
Begin by preheating your oven to 350°F (175°C). This crucial step ensures that the heat is just right for your lemon cobbler, allowing it to rise and develop that golden, crispy top you’ll love. As the oven warms up, gather your ingredients and baking dish, so you’re ready for the next steps.

Step 2: Melt the Butter
Place the unsalted butter in a baking dish and slide it into the preheated oven. Allow it to melt for about 5-10 minutes, keeping a close eye to ensure it doesn’t brown. You’ll know it’s ready when it’s fully liquid and bubbly, creating the perfect foundation for your lemon cobbler to develop its magical layers.

Step 3: Mix the Dry Ingredients
In a large mixing bowl, whisk together the all-purpose flour, baking powder, salt, and sugar until well combined. This dry mix is vital for creating the structure of your lemon cobbler. Set aside for a moment, and prepare to add the wet ingredients, ensuring your cobbler will be both fluffy and flavorful.

Step 4: Incorporate Wet Ingredients
Pour in the whole milk, vanilla extract, and lemon extract into the dry ingredients. Stir gently until just combined; the batter should be lumpy but cohesive. This mixture will contribute to the airy texture of your lemon cobbler, blending seamlessly with the buttery base prepared earlier.

Step 5: Assemble the Cobbler
Once your batter is ready, pour it over the melted butter in the baking dish without stirring. This key step allows the batter to float atop the butter, forming delicious layers as it bakes. The anticipation builds as you prepare for the wonderful transformation that will occur in the oven.

Step 6: Add the Lemon Filling
Dollop the lemon pie filling evenly around the batter, sprinkling it generously across the surface. Don’t stir again! The lemon pie filling adds a delightful citrus tang and moisture that complements the cobbler. You’ll see how these layers create the lovely, gooey texture that makes this dessert so special.

Step 7: Bake the Cobbler
Slide your baking dish into the oven and bake for 45-55 minutes. Keep an eye on it, and look for the cobbler to become golden brown and puffed. Your kitchen will be filled with a heavenly aroma, signaling that your magic lemon cobbler is almost ready to be enjoyed.

Step 8: Cool and Garnish
Once baked, allow the lemon cobbler to cool for a few minutes before serving. This short resting period helps it set slightly. For a beautiful finishing touch, dust it with powdered sugar, enhancing both flavor and presentation, ready to impress your family and friends with this delightful treat.

Lemon Cobbler Variations & Substitutions

Feel free to add your own twist to this delightful dessert! Your creativity can make this lemon cobbler even more special.

  • Dairy-Free: Replace unsalted butter with coconut oil or margarine for a deliciously dairy-free version.
  • Gluten-Free: Swap all-purpose flour for a gluten-free flour blend to cater to gluten-sensitive friends. The result will still be just as magical!
  • Berry Bliss: Sprinkle fresh raspberries or blueberries over the lemon pie filling before baking for a fruity explosion of flavor. Adding these vibrant fruits not only enhances taste but also offers a pop of colors.
  • Nuts for Crunch: Incorporate chopped walnuts or almonds into the batter for added texture and a nutty flavor that complements citrus beautifully. Each bite will surprise you with a delightful crunch!
  • Light & Airy: For a more delicate cobbler, replace half of the sugar with a sugar substitute, such as Stevia or monk fruit, ensuring everyone can indulge without guilt.
  • Almond Hints: Swap out vanilla extract for almond extract for a subtle nutty flavor that pairs wonderfully with lemon. This will add a new layer of complexity to your cobbler.
  • Zesty Lemon Lovers: Use freshly grated lemon zest instead of lemon extract to intensify the lemon flavor and brighten the dessert even more! It’s the perfect punch of freshness you won’t want to miss.
  • Spicy Surprise: Spice it up with a pinch of cayenne or ginger in the batter for a warm kick that perfectly complements the tartness of lemons. Just a hint will do, and it might just become your new favorite combination!

Let your creativity shine with these variations, and enjoy a comforting slice of lemon cobbler made just the way you like it!

How to Store and Freeze Lemon Cobbler

  • Refrigerator: Store the lemon cobbler covered with plastic wrap or in an airtight container for up to 5 days to keep it fresh and flavorful.
  • Freezer: For longer preservation, wrap tightly in plastic wrap and aluminum foil, then freeze for up to 3 months. Thaw in the fridge before reheating.
  • Reheating: To enjoy your magical lemon cobbler again, gently reheat in the oven at 350°F (175°C) for about 10-15 minutes until warmed throughout; this maintains the delightful texture.
  • Serving After Storage: Always consider serving warm with a dusting of powdered sugar to enhance the flavor and presentation of your cobbler.

What to Serve with Easiest Magic Lemon Cobbler

Imagine the warm, zesty aroma filling your kitchen as you prepare a delightful meal to accompany this enchanting dessert.

  • Creamy Mashed Potatoes: Their rich, buttery goodness provides a comforting contrast to the bright flavors of lemon cobbler.

  • Grilled Lemon Herb Chicken: This juicy chicken, infused with zest, pairs perfectly with the tangy sweetness of the cobbler, creating a lovely harmony on your plate. A touch of grilled herbs elevates both dishes, making for an unforgettable meal.

  • Seasonal Mixed Greens Salad: Tossed with a light lemon vinaigrette, this salad adds a refreshing crunch, balancing the sweetness of the cobbler beautifully.

  • Steamed Asparagus with Lemon Butter: The earthy green tones of asparagus drizzled with lemon butter offer a lovely complement to the bright citrus notes in your dessert.

  • Vanilla Ice Cream: A scoop of creamy vanilla ice cream served alongside your cobbler creates a delightful melt-in-your-mouth experience, enhancing that tangy sweetness with a touch of creaminess.

  • Iced Tea with Mint: Serve a refreshing chilled mint iced tea, its herbal notes cutting through the sweetness, ensuring a balanced dining experience.

  • Lemon Sorbet: For a double dose of citrus, lemon sorbet will refresh the palate and echo the flavors of the cobbler, perfect for those who crave an extra zing.

  • Meringue Cookies: Light, airy, and subtly sweet, these cookies offer a delightful texture alongside the moist lemon cobbler, making for a whimsical dessert spread.

Expert Tips for Lemon Cobbler

  • Butter Melting: Make sure the butter is melted but not browned—burnt butter can ruin the dish’s flavor and texture.
  • No Stirring: Avoid stirring after pouring the batter over the melted butter; this is essential for achieving the signature magical layers in your lemon cobbler.
  • Oven Check: Baking times may vary; start checking at 45 minutes. Look for a golden brown top to determine doneness.
  • Serve Warm: Enjoy the cobbler warm for the best experience; it enhances the gooey texture and vibrant lemon flavor.
  • Garnish Right: Dust with powdered sugar just before serving for an elegant touch that adds sweetness and visual appeal.

Make Ahead Options

These easiest magic lemon cobblers are perfect for meal prep, allowing you to enjoy this delightful dessert without last-minute fuss! You can prepare the batter and store it covered in the refrigerator for up to 24 hours. Just keep the lemon pie filling separate until you’re ready to bake. When you’re prepared to serve, pour the batter over the melted butter and dollop the lemon pie filling as instructed. Bake it fresh for that golden, puffy texture that makes this lemon cobbler so irresistible. By prepping ahead, you save time and ensure a scrumptious dessert that’s just as delicious as when made on the spot!

Easiest Magic Lemon Cobbler Recipe FAQs

Is lemon curd the same as lemon pie filling?
Not quite! Lemon curd is made by cooking lemon juice, sugar, eggs, and butter together until thickened, resulting in a creamy texture. Lemon pie filling, on the other hand, is often pre-made and usually gel-like, making it easier to use in recipes like this cobbler. They both add a delightful lemon flavor but can have different consistencies.

Why put lemon juice in cobbler?
Lemon juice is essential in this cobbler for its bright, zesty flavor that cuts through the sweetness. It elevates the overall taste, giving each bite a refreshing lift that balances the richness of the butter and sugar in the cobbler. It’s the key ingredient that transforms an ordinary dessert into a vibrant, refreshing treat!

What’s the difference between a cobbler and a dump cake?
While both desserts are easy to prepare and bake, cobblers generally feature a biscuit-like topping placed over fruit or filling, creating a more textured layer. Dump cakes, however, typically involve pouring a cake mix over fruit or filling, resulting in a denser, cake-like consistency. Cobblers generally offer a more homemade, rustic feel, while dump cakes are quick and simple, often needing just a few ingredients.

What is the British version of cobbler?
In the UK, the term “cobbler” often refers to a traditional dessert made with fruit, topped with a scone-like dough. However, you might also find “crumble” or “crisp” which involve fruit with a crumbly topping made from flour, butter, and sugar, resembling the cobbler but with a different texture and flavor profile.

How should I store leftover lemon cobbler?
Store your lemon cobbler covered in the refrigerator for up to 5 days to maintain freshness. If you want to save it longer, wrap it tightly in plastic wrap and aluminum foil and freeze it for up to 3 months. When you’re ready to enjoy it again, simply thaw it in the fridge overnight and reheat in the oven at 350°F (175°C) for 10-15 minutes until it’s warmed through. This way, you’ll have its delightful texture and flavor preserved for your next sweet craving!

Can I add any dietary alternatives to this recipe?
Absolutely! For a dairy-free option, substitute the unsalted butter with margarine or coconut oil. You can also replace whole milk with any plant-based milk, like almond or oat milk. If you’re looking for gluten-free options, use a certified gluten-free flour blend in place of all-purpose flour. These substitutions allow you to enjoy a delicious lemon cobbler while accommodating various dietary needs or preferences.

Easy Lemon Cobbler That Will Brighten Your Day

This easy lemon cobbler is a delightful dessert that will brighten your day with its zesty flavor and simple preparation.

  • Oven
  • Mixing Bowl
  • Baking Dish

For the Batter

  • 1/2 cup Unsalted Butter (Melted)
  • 1 cup All-purpose Flour (Can be replaced with gluten-free flour)
  • 1 tbsp Baking Powder (Ensure it’s fresh)
  • 1/4 tsp Salt
  • 1 cup Sugar (Brown sugar for deeper flavor)
  • 1 cup Whole Milk (Any plant-based milk is a substitute)
  • 1 tsp Vanilla Extract (Essential for flavor)
  • 1 tsp Lemon Extract (Or use lemon zest for freshness)

For the Filling

  • 1 can Lemon Pie Filling (Store-bought or homemade)

For Garnishing

  • 1 cup Powdered Sugar (Optional, for dusting before serving)

Step-by-Step Instructions

  1. Preheat your oven to 350°F (175°C).
  2. Melt the butter in a baking dish in the preheated oven for about 5-10 minutes.
  3. In a mixing bowl, whisk together the flour, baking powder, salt, and sugar.
  4. Mix in the milk, vanilla extract, and lemon extract until just combined.
  5. Pour the batter over the melted butter without stirring.
  6. Dollop the lemon pie filling on top of the batter without stirring.
  7. Bake in the oven for 45-55 minutes until golden brown.
  8. Allow to cool for a few minutes and dust with powdered sugar before serving.

For best flavor, serve warm and dust with powdered sugar just before serving.

Dessert
American
baking, cobbler recipe, dessert recipe, easy lemon dessert, lemon cobbler, quick cobbler

Filed Under: Dessert

Soft Churro Cookies

July 18, 2025 by grace bellamy Leave a Comment

As the sweet aroma of cinnamon fills my kitchen, I can’t help but smile, knowing that these Soft and Chewy Churro Cookies are just moments away from perfection. Inspired by the beloved fair treat, this delightful recipe gives you all the gooey goodness of traditional churros without the fuss of deep frying. The best part? They come together in just 35 minutes with no dough chilling required, making them a perfect last-minute dessert or a warm treat for unexpected guests. Plus, with an optional churro buttercream frosting, you have the freedom to indulge just the way you like! Are you ready to experience the joy of homemade churros in cookie form? Let’s dive in!

Why are churro cookies a must-try?

Irresistible Flavor: The warm combination of cinnamon and sugar transforms your typical cookie into a sweet delight that’s hard to resist.

Quick and Easy: With no chilling time required, you can whip these up in just 35 minutes—perfect for when you need a speedy dessert!

Dairy-Free Option: Enjoy the joy of baking cookies that cater to everyone’s needs by easily substituting ingredients to make them dairy-free.

Crowd-Pleaser: These churro cookies are sure to impress family and friends at gatherings. Imagine the smiles when they take a bite of this delightful twist on a classic treat!

Versatile Treat: Whether served plain or topped with optional churro buttercream, they deliver deliciousness in every bite, allowing you to customize as you wish. If you’re looking for more tasty ideas, check out my guide on quick dessert recipes!

Churro Cookies Ingredients

• For the Cookies

  • Butter – ¾ cup, softened; adds richness and moisture to the cookies, perfect for a chewy texture.
  • Light Brown Sugar – ¾ cup; provides sweetness and a slight caramel flavor, or use dark brown sugar for a more robust taste.
  • Granulated Sugar – ¼ cup; adds sweetness and slight crispness; can be reduced for a less sweet cookie.
  • Egg – 1; provides structure and moisture, or substitute with a flax egg for a vegan option.
  • Vanilla Extract – ½ tablespoon; enhances flavor, best to use pure extract for richer taste.
  • Salt – ¾ teaspoon; balances sweetness and enhances overall flavor; adjust based on dietary needs.
  • Baking Soda – ¾ teaspoon; acts as a leavening agent for a good rise; ensure it’s fresh for optimal results.
  • All-purpose Flour – 2 cups + 2 tablespoons; provides structure; substitute with a 1:1 gluten-free flour blend if needed.
  • Ground Cinnamon – 1½ teaspoons; adds that signature churro flavor, can be adjusted to taste.
  • Cinnamon Sugar – ¼ cup granulated sugar + 1 teaspoon ground cinnamon; use for rolling the cookies to give them that authentic churro effect.

Optional Churro Buttercream

  • Butter – ½ cup, softened; serves as the base for the frosting, or use dairy-free butter if preferred.
  • Ground Cinnamon – 1 tablespoon + 1 teaspoon; flavors the frosting, mimicking the churro taste.
  • Powdered Sugar – 2-2¼ cups; sweetens and thickens the frosting, adjust for your desired consistency.
  • Light Brown Sugar – ½ cup; adds depth to flavor; can be omitted for a less sweet option.
  • Vanilla Extract – 1 teaspoon; enhances the overall flavor of the frosting.
  • Milk – 1-2 tablespoons, as needed; adjust the frosting consistency; feel free to use dairy-free milk.

Dive into the cozy delight of Churro Cookies, and whip these up in your kitchen today!

Step‑by‑Step Instructions for Churro Cookies

Step 1: Preheat and Prepare
Begin by preheating your oven to 350°F (175°C). While the oven warms up, line two baking sheets with parchment paper, ensuring a non-stick surface for your churro cookies. This setup is essential for a smooth transfer of your freshly baked treats.

Step 2: Cream the Butters and Sugars
In a large mixing bowl, use an electric mixer to beat together ¾ cup of softened butter, ¾ cup of light brown sugar, and ¼ cup of granulated sugar. Continue mixing until the mixture becomes light and fluffy, which should take about 2-3 minutes. The sugars should be well incorporated, giving your churro cookies a rich flavor.

Step 3: Add Wet Ingredients
Now, add in ½ tablespoon of vanilla extract and 1 egg to the sugar mixture. Mix until everything is fully combined and smooth, which will take about 1 minute. This step ensures the cookies have a delightful, soft texture and a fragrant aroma, setting the stage for delicious churro cookies.

Step 4: Combine Dry Ingredients
Gradually sift in 2 cups plus 2 tablespoons of all-purpose flour, ¾ teaspoon of baking soda, ¾ teaspoon of salt, and 1½ teaspoons of ground cinnamon. Gently mix until just combined, being careful not to over-mix the dough. You want to maintain a light and airy texture that’s characteristic of churro cookies.

Step 5: Form the Cookie Dough Balls
Using a cookie scoop or a tablespoon, measure out dough portions of about 1½ tablespoons each. Roll the dough into balls, ensuring they are uniform in size for even baking. This step is crucial as it ensures that all the churro cookies bake perfectly together, creating a delightful batch.

Step 6: Coat in Cinnamon Sugar
Prepare the cinnamon sugar by combining ¼ cup of granulated sugar with 1 teaspoon of ground cinnamon in a small bowl. Roll each cookie dough ball in this mixture until fully coated, giving them that iconic churro flavor. This coating will create a sweet and crispy outer layer once baked.

Step 7: Bake the Cookies
Place the coated cookie balls on the lined baking sheets, leaving enough space in between for spreading. Bake in the preheated oven for 8-10 minutes. Look for edges that are set but not browned, and when they come out, they should be soft to the touch.

Step 8: Make the Optional Buttercream
While the cookies are cooling, prepare the churro buttercream if desired. In a mixing bowl, beat together ½ cup of softened butter, 2-2¼ cups of powdered sugar, 1 tablespoon plus 1 teaspoon of ground cinnamon, ½ cup of brown sugar, and 1-2 tablespoons of milk. Mix until creamy and smooth, adjusting for thickness to achieve your preferred frosting consistency.

Step 9: Frost and Serve
Once the churro cookies have cooled completely, you can spread or pipe the churro buttercream on top of each cookie. This added touch enhances the churro experience and adds to the sweetness of each bite. Your delectable churro cookies are now ready to be enjoyed!

Make Ahead Options

These Soft and Chewy Churro Cookies are perfect for meal prep, allowing you to enjoy delicious treats with minimal last-minute effort. You can prepare the cookie dough up to 24 hours in advance; simply roll the dough balls and refrigerate them covered to maintain freshness and prevent drying out. When you’re ready to bake, allow the dough to sit at room temperature for about 10 minutes before rolling in cinnamon sugar and proceeding to bake. The cookies will still turn out just as delightful! If you opt for the churro buttercream frosting, prepare that in advance too and store it in an airtight container in the fridge for up to 3 days; just give it a quick mix before spreading or piping onto your cookies. These make-ahead strategies save you precious time while ensuring your churro cookies remain irresistibly tasty!

What to Serve with Churro Cookies

Nothing beats the sweet joy of churro cookies when paired with delightful accompaniments that elevate your dessert experience.

  • Vanilla Ice Cream: The creamy richness balances the sweet cinnamon flavor, creating a comforting dessert sensation. A scoop of ice cream melting over warm cookies? Yes, please!
  • Coffee or Espresso: The robust notes of coffee enhance the warm, sweet spice of churro cookies, making them an ideal pairing for cozy evenings. A perfect coffee break treat!
  • Chocolate Sauce: Drizzling chocolate over churro cookies adds a rich, decadent twist that contrasts beautifully with their sweetness. It’s a dreamy combination that’s hard to resist.
  • Fruit Salsa: A fresh fruit salsa, like peaches or strawberries with lime, brightens each bite and introduces a zesty flair. The sweet and tart flavors create a refreshing balance.
  • Whipped Cream: Light and airy whipped cream adds a luxurious touch alongside churro cookies, perfect for those who love a creamy addition. It enhances the overall dessert experience wonderfully.
  • Churro Buttercream (Optional): Spread some of the leftover churro buttercream frosting on top for an extra sweet layer, elevating your cookie indulgence to new heights. You’ll be in churro heaven!
  • Hot Chocolate: For a cozy night in, serve churro cookies with a steaming mug of hot chocolate. The rich flavors complement each other beautifully, wrapping you in warmth.

Churro Cookies Variations & Substitutions

Feel free to personalize these churro cookies with exciting twists that will spark joy in your kitchen!

  • Dairy-Free: Swap regular butter for a dairy-free alternative like coconut or vegan butter for a delicious lactose-free treat.
  • Nutty Flavor: Add ½ cup of chopped nuts, such as pecans or walnuts, to the dough for delightful crunch and extra flavor.
  • Chocolate Lover’s Delight: Fold in ½ cup of chocolate chips into the cookie dough for a rich, decadent touch that perfectly complements the cinnamon.
  • Gluten-Free: Replace all-purpose flour with a gluten-free 1:1 flour blend to cater to gluten-sensitive friends while keeping the chewy texture.
  • Cinnamon Sugar Boost: Increase the cinnamon in your rolling sugar to 2 teaspoons for a bolder, spiced flavor that will make your senses dance.
  • Fruity Twist: Incorporate ½ cup of dried fruits, like raisins or cranberries, for added sweetness and a chewy texture packed with flavor surprises.
  • Chili Kick: For a spicy twist, add a pinch of cayenne pepper to the cookie dough or the cinnamon sugar for a surprising zing that enhances the sweet.
  • Extra Layer: Top your churro cookies with a drizzle of caramel or chocolate sauce for an irresistible finishing touch that turns dessert into a masterpiece.

Feel inspired? Check out these ideas, and let your creativity shine as you bake! If you’re hunting for more delightful dessert recipes, don’t miss my collection of easy dessert ideas and delectable sweet treats.

Helpful Tricks for Churro Cookies

Measure Flour Correctly: Ensuring accurate flour measurement is critical for achieving the right texture; always fluff it up and spoon it into your measuring cup.

Beaten to Perfection: Mix the softened butter and sugars thoroughly to create a light and airy mixture; this is key for soft churro cookies.

Uniform Size Matters: Roll your cookie dough into uniform balls; this allows for even baking, resulting in perfectly shaped cookies every time.

Monitor Baking Time: Keep an eye on the cookies while baking; they should be set at the edges but soft in the center to maintain their chewy texture.

Optional Frosting Tip: If you’re using the churro buttercream, apply it once the cookies have cooled completely; this prevents them from becoming soggy.

How to Store and Freeze Churro Cookies

Room Temperature: Store unfrosted churro cookies in an airtight container at room temperature for up to 3 days to maintain their soft and chewy texture.

Fridge: If you’ve decorated your churro cookies with frosting, they can last up to 5 days in the fridge. Be sure to keep them in an airtight container to prevent drying out.

Freezer: For longer storage, freeze cookies in a freezer-safe bag for up to 2 months. Layer them between parchment paper to avoid sticking together.

Reheating: To enjoy them warm again, simply pop frozen churro cookies in the oven at 350°F for about 5-7 minutes. This will revive their gooey goodness!

Churro Cookies Recipe FAQs

How do I select the right ripeness and quality of ingredients?
Absolutely! For the best flavor, use fresh butter that’s just softened—not melted. Light brown sugar should be moist and sticky, while your egg should be at room temperature for a smoother batter. If you’re going for a dairy-free version, opt for quality dairy-free butter that you love.

What is the best way to store churro cookies, and how long will they last?
Unfrosted churro cookies can be stored in an airtight container at room temperature for up to 3 days. If you add the churro buttercream frosting, they can be kept at room temperature for up to 3 days or refrigerated for up to 5 days. Just be sure to keep them covered!

Can I freeze my churro cookies, and if so, how?
Very! To freeze churro cookies, place them in a single layer on a baking sheet and freeze until solid. Then, transfer them to a freezer-safe bag, layering parchment paper between them to prevent sticking. They’ll stay delicious for up to 2 months. When you’re ready to enjoy, just reheat them in the oven at 350°F for about 5-7 minutes.

What if my churro cookies turn out too hard?
It happens sometimes! If your churro cookies are hard, it could be due to overbaking. Make sure to keep an eye on them in the last minutes of baking; they should be set at the edges but still soft in the center when you take them out. Baking times may vary slightly depending on your oven.

Are there any dietary considerations I should be aware of?
Absolutely! If you’re accommodating allergies, ensure you use gluten-free flour if needed and substitute dairy ingredients with dairy-free options. Additionally, if you have pets, remember that chocolate can be harmful to dogs, so skip any chocolate chip additions that may not be pet-friendly.

What’s the difference between churro cookies and snickerdoodles?
Great question! Although they both share a cinnamon-sugar coating, churro cookies are typically softer and have a richer flavor profile due to the vanilla and brown sugar base, while snickerdoodles are characterized by their tartness from cream of tartar and have a chewier texture.

Irresistibly Soft Churro Cookies You’ll Want to Share

These Churro Cookies deliver the delicious flavors of traditional churros in an easy-to-make cookie form, perfect for sharing.

  • Electric mixer
  • Mixing bowls
  • Cookie scoop
  • Baking sheets
  • parchment paper

For the Cookies

  • ¾ cup Butter (softened)
  • ¾ cup Light Brown Sugar
  • ¼ cup Granulated Sugar
  • 1 Egg (or flax egg for vegan option)
  • ½ tablespoon Vanilla Extract (preferably pure)
  • ¾ teaspoon Salt
  • ¾ teaspoon Baking Soda
  • 2 cups + 2 tablespoons All-purpose Flour (or gluten-free blend)
  • 1½ teaspoons Ground Cinnamon
  • ¼ cup Cinnamon Sugar (for rolling cookies)

Optional Churro Buttercream

  • ½ cup Butter (softened, or dairy-free butter)
  • 1 tablespoon + 1 teaspoon Ground Cinnamon
  • 2-2¼ cups Powdered Sugar (adjust for consistency)
  • ½ cup Light Brown Sugar (optional)
  • 1 teaspoon Vanilla Extract
  • 1-2 tablespoons Milk (dairy-free option available)

Step-by-Step Instructions

  1. Preheat your oven to 350°F (175°C) and line two baking sheets with parchment paper.
  2. In a large mixing bowl, beat together softened butter, light brown sugar, and granulated sugar until light and fluffy.
  3. Add vanilla extract and egg to the mixture and mix until fully combined.
  4. Gradually sift in flour, baking soda, salt, and ground cinnamon, mixing until just combined.
  5. Measure out dough portions of about 1½ tablespoons each and roll into uniform balls.
  6. Combine granulated sugar and ground cinnamon to make cinnamon sugar, then roll each dough ball in the mixture.
  7. Place cookie balls on lined baking sheets and bake for 8-10 minutes until edges are set but cookies are soft.
  8. For optional buttercream, beat together softened butter, powdered sugar, ground cinnamon, light brown sugar, and milk until creamy.
  9. Once cookies are cooled, frost them with churro buttercream and enjoy!

Ensure proper flour measurement and monitor baking time for best results.

Dessert
American
baking, Churro Cookies, cookies, dessert, easy recipes, Sweet Treats

Filed Under: Dessert

Delicious Pan Fried Zucchini with Lemon and Parmesan Bliss

July 17, 2025 by grace bellamy Leave a Comment

I still recall the first time I found myself with a bounty of zucchinis from the garden, wondering how to showcase their delicate taste. Enter my beloved Pan Fried Zucchini with Lemon and Parmesan—a quick side dish bursting with sunshine! In just 20 minutes, you can transform fresh zucchini into a tender, vibrant delight that pairs so well with any main dish. The zingy lemon and rich Parmesan elevate this simple vegetable into a culinary star. Plus, it’s a fantastic vegetarian option that even meat lovers will crave. Whether you enjoy it alongside grilled meats or as a light centerpiece for a weekday dinner, this recipe is sure to become a go-to in your kitchen. Curious about how to whip up this delightful dish? Let’s dive into the recipe!

Why is Pan Fried Zucchini a Must-Try?

Quick and Easy: Ready in just 20 minutes, this dish is perfect for busy weeknights when you want something delicious without the fuss.

Bursting with Flavor: The zesty lemon and rich Parmesan create a delightful combination that elevates the natural taste of zucchini, making it irresistible.

Versatile Side Dish: Whether paired with grilled meats, a light salad, or enjoyed on its own, this dish adapts beautifully to various meals.

Crowd-Pleasing Appeal: Even the pickiest of eaters will love this simple recipe, ideal for impressing guests at your next dinner gathering.

For more exciting ways to enjoy vegetables, check out our blueberry lemon bread with lemon glaze, which also highlights fresh, vibrant flavors!

Pan Fried Zucchini with Lemon and Parmesan Ingredients

For the Zucchini
• Zucchini – Freshness is key to achieving that tender texture; you can swap it with yellow squash if you prefer.
• Salt – Enhances the zucchini’s natural flavor; always adjust to your taste.
• Pepper – A little spice to jazz up the dish; feel free to use your favorite blend.

For Cooking
• Olive Oil – The cooking fat that adds richness; butter makes for a richer flavor alternative.

For the Zesty Finish
• Lemon – Brings bright acidity to the dish; using fresh juice from half a lemon is ideal.
• Grated Parmesan Cheese – Adds that umami flavor punch; substitute with asiago or romano for a twist.

Now you’re all set to create this delightful Pan Fried Zucchini with Lemon and Parmesan! Let’s head to the next step and turn these ingredients into something magical.

Step‑by‑Step Instructions for Pan Fried Zucchini with Lemon and Parmesan

Step 1: Prepare the Zucchini
Start by washing and drying the zucchinis thoroughly. Then, slice them into 1/4-inch thick rounds. Ensure each slice is uniform in size to allow for even cooking and to achieve that delightful tender texture. Set your prepared zucchini aside as you get your skillet ready for frying.

Step 2: Season the Zucchini
Lightly season both sides of the zucchini slices with salt and pepper, adjusting the amount to your taste. This will enhance their natural flavor while complementing the richness of the subsequent ingredients. The seasoning will bring out the best in your Pan Fried Zucchini with Lemon and Parmesan.

Step 3: Heat the Skillet
Place a non-stick skillet over medium-high heat and pour in half the olive oil. Allow the oil to heat up until it shimmers, which usually takes about 1-2 minutes. This step is crucial for achieving that perfectly crisp browning on the zucchini slices.

Step 4: Fry the Zucchini
Carefully add the zucchini slices to the hot skillet, ensuring they do not overlap to prevent steaming. Let them cook for about 2-3 minutes, or until the undersides are golden brown. Flip each slice gently and allow the other side to crisp up for another 2-3 minutes.

Step 5: Keep the Zucchini Warm
Once the zucchini slices are beautifully browned, remove them from the skillet and transfer them to a baking sheet. Place the sheet in a low oven (around 200°F) to keep the zucchini warm while you continue frying the remaining batches. Add more olive oil to the skillet as necessary to maintain even frying.

Step 6: Add the Finishing Touches
When all the zucchini slices are cooked and warmed, transfer them to a serving plate. Squeeze fresh lemon juice over the top, allowing the zesty flavor to infuse. Finally, sprinkle generously with grated Parmesan cheese, letting it cling to the warm zucchini in a melt-in-your-mouth finish.

Step 7: Serve and Enjoy
Your Pan Fried Zucchini with Lemon and Parmesan is now ready to delight! Serve it immediately as a vibrant side dish, enjoying the wonderful combination of flavors and textures. This dish pairs beautifully with grilled meats or can stand alone as the star of a light vegetarian meal.

Make Ahead Options

These Pan Fried Zucchini with Lemon and Parmesan are perfect for busy weeknights, allowing you to prep in advance! You can slice the zucchini and season them up to 24 hours ahead of time; just store them in an airtight container in the refrigerator to maintain their crispness. When you’re ready to cook, simply heat the olive oil in your skillet and fry the zucchini slices until they’re golden brown. To keep the delightful flavor intact, squeeze fresh lemon juice and sprinkle with Parmesan just before serving. With this make-ahead approach, you’ll enjoy a delicious side dish without the last-minute rush!

Variations & Substitutions for Pan Fried Zucchini

Make this delightful dish your own by exploring these fun variations that can enhance both flavor and texture!

  • Dairy-Free: Use nutritional yeast instead of Parmesan for a cheesy flavor without the dairy. It adds a nutty essence to the dish!

  • Herb-Infused: Stir in fresh chopped basil or parsley before serving for a fragrant touch. Herbs are an excellent way to elevate the freshness!

  • Spicy Kick: Sprinkle red pepper flakes over the zucchini while frying for a delightful heat. This twist will awaken your taste buds and add excitement!

  • Italian Style: Add a pinch of Italian seasoning or fresh oregano for a burst of Mediterranean flavor. This variation transforms the dish into an herbaceous delight!

  • Nutty Finish: Top with toasted pine nuts or chopped almonds for added crunch and richness. This not only enhances texture but brings a roasted flavor that’s irresistible!

  • Cheesy Twist: Substitute Parmesan with aged cheddar or crumbled feta for a unique flavor profile. Each cheese offers its character and will surprise your palate!

  • Lemon Zest Boost: Add lemon zest to the dish before serving for an extra zing. It’s a simple way to intensify that citrusy brightness!

  • Sweet Addition: Try drizzling a little honey or maple syrup over the cooked zucchini for a sweet-savory balance. This contrast can add a surprising depth to your dish!

How to Store and Freeze Pan Fried Zucchini

Fridge: Store leftovers in an airtight container for up to 2 days. Reheat gently in a skillet over low heat to maintain the texture and flavor.

Freezer: It’s best to avoid freezing Pan Fried Zucchini, as this can result in a mushy texture upon thawing. Enjoy fresh to savor its vibrant taste!

Reheating: For optimal results, reheat in a skillet instead of the microwave, making sure to keep the heat low to preserve the zucchini’s tenderness.

What to Serve with Pan Fried Zucchini with Lemon and Parmesan

Looking to create the perfect meal around this vibrant side? Let’s explore delightful pairings that enhance its fresh, zesty goodness!

  • Grilled Chicken: Tender, smoky chicken adds a satisfying contrast, harmonizing beautifully with the zucchini’s brightness. This combination works wonders, whether marinated in herbs or simply seasoned with salt and pepper.

  • Quinoa Salad: A light, fluffy quinoa salad with vegetables offers a nutty bite that balances the zucchini’s tender texture. Toss in some cherry tomatoes and cucumbers for a refreshing crunch.

  • Lemon Herb Rice: The zesty flavors of lemon-infused rice mirror the zesty notes of the zucchini, creating a cohesive dining experience. Pairing this dish gives each bite a burst of aromatic goodness!

  • Roasted Salmon: Rich and flaky salmon complements the lightness of the zucchini while providing healthy omega-3s. Drizzle with a bit of lemon to unify these flavors perfectly.

  • Fresh Gazpacho: A chilled tomato-based gazpacho brings a refreshing contrast and enhances the meal’s overall brightness, making it a superb summer pairing.

  • Garlic Bread: Crunchy, buttery garlic bread adds a comforting finish—perfect for scooping up any leftover zucchini. The savory notes from garlic balance the dish’s zesty kick pleasantly.

  • Mixed Green Salad: A sprinkle of fresh herbs, such as basil or parsley, in a variety of greens provides a fresh, crunchy element that complements the zucchini’s tenderness without overpowering it.

  • Iced Herbal Tea: Refreshing herbal tea, particularly with notes of lemon or mint, makes for a delightful beverage, enhancing the meal with its cooling effects.

  • Lemon Sorbet: For dessert, a light lemon sorbet rounds out the meal perfectly, echoing flavors from the zucchini while offering a refreshing finish that feels indulgent yet light!

Expert Tips for Pan Fried Zucchini

Single Layer Cooking: Ensure zucchini slices are placed in a single layer for even browning; overcrowding may lead to steaming instead of frying.

Keep Warm: After frying each batch, keep cooked zucchini warm in a low oven to maintain temperature without sogginess.

Choose Fresh Ingredients: Use fresh zucchinis for the best flavor and texture; avoid limp or overly large zucchinis that may lack tenderness.

Adjust Seasoning: Don’t be afraid to adjust salt and pepper to your taste; remember that Parmesan adds saltiness, so taste as you go.

Experiment with Cheese: Try swapping out Parmesan for asiago or romano for a different flavor profile in your Pan Fried Zucchini.

Pan Fried Zucchini with Lemon and Parmesan Recipe FAQs

How to fry zucchini without it getting mushy?
Absolutely! To prevent mushy zucchini, ensure the slices are cut evenly at 1/4-inch thick and cooked in a single layer. This allows for even browning while preventing steaming. Make sure your skillet is preheated to medium-high before adding the zucchini, and don’t forget to flip them only once!

How do you make lemon parmesan zucchini?
Making lemon parmesan zucchini is simple! Start by frying sliced zucchini in olive oil until golden brown. Then, once cooked, squeeze fresh lemon juice over the top and sprinkle with generous amounts of grated Parmesan cheese for that zesty, savory finish. Enjoy this delightful combination of flavors on its own or as a side dish!

How to get zucchini crispy?
To achieve that desired crispiness, make sure the zucchini slices are not overcrowded in the skillet; a single layer is key to avoid steaming. Cook in small batches, allowing each piece to brown properly for 2-3 minutes on each side. Additionally, using a non-stick skillet can help prevent moisture buildup, leading to perfectly crisp zucchini.

Why does my fried zucchini taste bitter?
If your fried zucchini tastes bitter, it could be due to the use of overly ripe zucchinis. Look for fresh, firm zucchinis that are medium-sized with smooth skin, avoiding ones that have dark spots or are overly large, as they can have a bitter flavor. Cooking them with sufficient seasoning and olive oil can also help balance the flavors.

How do you store leftover pan fried zucchini?
Store any leftover Pan Fried Zucchini in an airtight container in the refrigerator for up to 2 days. To reheat, use a non-stick skillet over low heat, adding a touch of olive oil if needed. This will help restore some of the original texture and prevent sogginess. Enjoy it again as a delicious side dish!

Delicious Pan Fried Zucchini with Lemon and Parmesan Bliss

This Pan Fried Zucchini with Lemon and Parmesan is a quick and flavorful side dish bursting with sunshine.

  • Non-stick skillet

For the Zucchini

  • 4 medium Zucchini (Freshness is key; you can swap it with yellow squash.)
  • 1 teaspoon Salt (Adjust to your taste.)
  • 1 teaspoon Pepper (Feel free to use your favorite blend.)

For Cooking

  • 2 tablespoons Olive Oil (Butter can be used for richer flavor.)

For the Zesty Finish

  • 1/2 large Lemon (Fresh juice is ideal.)
  • 1/2 cup Grated Parmesan Cheese (Substitute with asiago or romano if preferred.)

Step-by-Step Instructions

  1. Start by washing and drying the zucchinis thoroughly. Then, slice them into 1/4-inch thick rounds.
  2. Lightly season both sides of the zucchini slices with salt and pepper, adjusting the amount to your taste.
  3. Place a non-stick skillet over medium-high heat and pour in half the olive oil. Allow the oil to heat up until it shimmers.
  4. Carefully add the zucchini slices to the hot skillet, ensuring they do not overlap. Let them cook for about 2-3 minutes, then flip each slice gently.
  5. Once the zucchini slices are beautifully browned, remove them from the skillet and transfer them to a baking sheet.
  6. When all the zucchini slices are cooked and warmed, transfer them to a serving plate. Squeeze fresh lemon juice over the top and sprinkle with grated Parmesan.
  7. Serve immediately and enjoy this vibrant side dish!

Single layer cooking ensures even frying; avoid overcooking for best texture.

Side Dishes
American
Easy Recipe, Lemon, Parmesan, Quick Side Dish, Vegetarian, Zucchini

Filed Under: Side Dishes

Indulgent Hasselback Sweet Potatoes with Herb Butter Bliss

July 17, 2025 by grace bellamy Leave a Comment

The aroma of roasting sweet potatoes wafts through my kitchen, instantly transporting me to a cozy bistro. When you slice those vibrant Hasselback Sweet Potatoes just right, you’re not just preparing a dish—you’re creating a stunning centerpiece for your table that impresses without the fuss. This recipe is quick and easy, making it the perfect comfort food, while optional toppings like Gouda and fresh herbs add a gourmet twist. Plus, the beautiful presentation guarantees compliments from everyone around the dinner table. Who knew that elevating a humble potato could be this much fun? Are you ready to try your hand at these delightful sweet potato masterpieces?

Why Are Hasselback Sweet Potatoes So Special?

Crispy exterior: The unique slicing technique allows for a beautifully crispy outer layer that contrasts perfectly with the fluffy inner flesh.

Gourmet presentation: Hasselback Sweet Potatoes not only taste divine but also look stunning, making them a showstopper at any gathering.

Versatile toppings: Whether you prefer melted Gouda, zesty herbs, or creamy sour cream, this dish welcomes your favorite flavors for a personalized touch.

Quick and easy: With minimal prep and cooking time, this recipe fits seamlessly into your busy schedule.

Explore the creative potential of unique toppings like herb goat cheese or even sweet potato variations to keep the meal exciting!

Nutrition-packed: Packed with vitamins A and C, these sweet potatoes make for a wholesome comfort food choice that doesn’t skimp on flavor.

Hasselback Sweet Potatoes Ingredients

Unlock the secret to gourmet delight with this simple ingredient list.

For the Sweet Potatoes

  • Sweet Potatoes – The star of the dish, offering a natural sweetness and creamy texture; Garnet yams make a tasty substitute.
  • Olive Oil – Adds moisture and richness to the potatoes; avocado oil can work as a healthy swap.

For the Herb Butter

  • Unsalted Butter – Provides a luscious base for the herb mixture; vegan butter can replace it for a dairy-free option.
  • Garlic – Elevates flavor; if fresh garlic isn’t on hand, use 1/2 teaspoon of garlic powder.
  • Parsley & Chives – Fresh herbs for that aromatic touch; dried herbs can be used in a pinch.
  • Rosemary & Thyme – Adds depth to the dish; Italian seasoning is a handy alternative.
  • Paprika – Infuses warmth; adjust to taste and consider omitting nutmeg if it’s not your favorite.

For the Cheesy Topping

  • Gouda Cheese – Melts beautifully between sweet potato slices for added creaminess; feel free to substitute with cheddar or mozzarella.

For the Optional Creamy Finish

  • Sour Cream / Herb Goat Cheese – Perfect topping for serving; Greek yogurt offers a lighter choice with similar flavor.

Elevate your meals with these Hasselback Sweet Potatoes, a vegetarian comfort food that is oh-so-satisfying!

Step‑by‑Step Instructions for Hasselback Sweet Potatoes

Step 1: Preheat Your Oven
Begin by preheating your oven to 400°F (200°C). This ensures that your Hasselback Sweet Potatoes bake evenly, developing that mouthwatering, crispy exterior as they cook. While the oven heats up, gather your ingredients and prepare your baking sheet lined with parchment paper or foil for easier cleanup.

Step 2: Prepare the Sweet Potatoes
Wash and thoroughly dry the sweet potatoes under running water. This step is crucial, as it removes any dirt while ensuring a clean surface for your delicious Hasselback Sweet Potatoes. Once dried, lay each potato horizontally on a cutting board, ready for the next step.

Step 3: Slice the Sweet Potatoes
Carefully make a series of 1/8-inch deep slices along the top of each sweet potato, being careful to stop about ½ inch from the bottom. This unique slicing technique creates the signature Hasselback shape, allowing for delightful crispy edges while keeping the potato intact for easy serving.

Step 4: Drizzle with Olive Oil
Place the sliced sweet potatoes on your prepared baking sheet and drizzle them generously with olive oil. With your hands or a brush, rub the oil across the surface, making sure to coat the skin and drizzle a little between the slices. This not only enhances flavor but mitigates dryness during baking.

Step 5: First Bake
Bake the sweet potatoes in the preheated oven for about 40 minutes, or until they begin to soften. Keep an eye on them during baking; the skin will turn slightly crispy, and the edges will start to caramelize, signaling that your Hasselback Sweet Potatoes are well on their way to perfection.

Step 6: Prepare the Herb Butter
While the sweet potatoes are baking, whisk together the unsalted butter, minced garlic, chopped parsley, chives, rosemary, thyme, paprika, and a sprinkle of salt in a small bowl. This herb butter will lend incredible flavor to your Hasselback Sweet Potatoes when brushed in between the delicious slices.

Step 7: Brush with Herb Butter
After the initial baking time, carefully remove the sweet potatoes from the oven. Use a brush to generously apply the herb butter mixture between the slices of each potato, ensuring that the flavors seep into those delectable crevices. This step is key to infusing the sweet potatoes with aromatic goodness.

Step 8: Final Bake
Return the herb butter-coated sweet potatoes to the oven for an additional 10-20 minutes. Keep an eye on them; they should be tender when poked with a fork, and the edges will take on a lovely golden hue. This final bake perfectly melds the flavors and softens the insides.

Step 9: Add the Cheese (Optional)
For a gooey finishing touch, during the last 5 minutes of baking, distribute Gouda cheese between the slices of each potato. This indulgent layer of melted cheese will take your Hasselback Sweet Potatoes to a whole new level of comfort and flavor, creating a harmonious blend of textures.

Step 10: Serve and Enjoy
Remove the sweet potatoes from the oven and let them cool slightly before serving. Feel free to top them with sour cream or herb goat cheese for an extra creamy finish. Set your stunning Hasselback Sweet Potatoes on the table and prepare for compliments as everyone digs in!

How to Store and Freeze Hasselback Sweet Potatoes

Fridge: Store leftovers in an airtight container for up to 3 days. Keep the sweet potatoes within the container’s moisture-absorbing limits to maintain their texture.

Freezer: For longer storage, freeze the unbaked Hasselback Sweet Potatoes. Prepare them up to the first baking step, then wrap tightly in plastic wrap and aluminum foil. They can be frozen for up to 3 months.

Refrigerate: Reheat leftover sweet potatoes in the oven at 350°F (175°C) for about 15-20 minutes, ensuring they retain their crispy edges and delectable flavors.

Airtight Storage: Make sure to use airtight containers or heavy-duty freezer bags to prevent freezer burn and preserve the delicious taste of your Hasselback Sweet Potatoes.

Hasselback Sweet Potatoes Customizations

Feel free to get creative and make this dish truly your own! The possibilities are endless with these delightful sweet potatoes.

  • Dairy-Free: Substitute unsalted butter with vegan butter for a rich, plant-based alternative. Enjoy the herb butter bliss without sacrificing taste!
  • Cheese Variety: Swap Gouda for sharp cheddar or rich blue cheese to add a tangy twist. Each cheese brings its own unique flavor profile to elevate your dish.
  • Bacon Lovers: Sprinkle crispy bacon bits on top after baking for a savory crunch. The salty bites perfectly balance the sweetness of the potatoes.
  • Herb Boost: Experiment with fresh basil or cilantro as toppings for a burst of flavor. These fresh herbs will add brightness and a refreshing touch.
  • Heat It Up: Add diced jalapeño or a pinch of cayenne pepper to the herb butter for a kick of heat. Spice lovers will relish the exciting contrast!
  • Nutty Flavor: Drizzle with tahini or crushed nuts for added texture and richness. This gives your side dish another layer of sophistication.
  • Citrus Zing: Top with a squeeze of lemon or lime juice before serving for a zesty finish. The citrus notes will elevate the dish and brighten the flavors.
  • Sweet & Savory: Sprinkle brown sugar or drizzle maple syrup between the slices before baking for a delightful sweet contrast. Pairing sweetness with savory brings a comforting harmony.

Remember, cooking is a joyful adventure! Embrace the art of personalizing your Hasselback Sweet Potatoes, and savor the smiles around your dinner table.

Expert Tips for Hasselback Sweet Potatoes

Slice Carefully: Ensure each cut stops ½ inch from the bottom to keep the slices intact, preventing them from falling apart during baking.

Use a Sharp Knife: A sharp knife is crucial for even slices, giving your Hasselback Sweet Potatoes that beautiful presentation—don’t rush this step!

Baking Time Matters: Adjust the baking time based on the size of your sweet potatoes; larger ones may require a little extra love to achieve tenderness.

Flavor Infusion: Don’t skimp on the herb butter; brush it generously between the slices to infuse flavor throughout your Hasselback Sweet Potatoes.

Mix and Match: Feel free to explore different cheeses or colorful toppings to make your dish uniquely yours. This versatility adds even more delight to every bite!

Watch Closely: During the final bake, keep an eye on the potatoes to ensure the cheese melts just right without burning. Enjoy!

What to Serve with Hasselback Sweet Potatoes

Create an unforgettable meal by pairing these delicious, crispy sweet potatoes with wonderful sides that enhance their gourmet allure.

  • Creamy Mashed Potatoes: Serve creamy mashed potatoes as a luxurious side, providing a smooth contrast to the crispy edges of Hasselback Sweet Potatoes.

  • Garlic Green Beans: These sautéed green beans, with garlic and olive oil, add a delightful crunch and fresh flavor that complements the sweetness.

  • Herb Roasted Chicken: A herb-roasted chicken brings a savory depth, making for a balanced meal that pairs beautifully with the sweet and aromatic potatoes.

  • Fresh Garden Salad: A bright garden salad with mixed greens, cherry tomatoes, and a tangy vinaigrette offers a refreshing bite, enhancing the meal’s overall richness.

  • Balsamic Glazed Brussels Sprouts: These sprouts, with their sweet glaze, echo the sweet notes of the potatoes, while their slight bitterness adds complexity to the dish.

  • Feta and Olive Tapenade: A zesty tapenade dolloped on the side can provide a salty and briny punch that contrasts appealingly with the sweet potatoes’ flavors.

  • Spiced Apple Cider: Pair your sweet potatoes with a warm cup of spiced apple cider to complement their sweetness and add a comforting touch.

  • Chocolate Chip Cookies: Finish your meal with chocolate chip cookies for a cozy, nostalgic dessert that rounds out the flavors perfectly.

Make Ahead Options

These Hasselback Sweet Potatoes are perfect for meal prep enthusiasts! You can slice the sweet potatoes and prepare the herb butter mix up to 24 hours in advance, allowing the flavors to meld beautifully. Simply store the sliced sweet potatoes submerged in water in the refrigerator to prevent browning, and keep the herb butter in an airtight container. When you’re ready to serve, drain the potatoes, brush them with olive oil, and follow the baking instructions. Finish by brushing them with the herb butter and adding Gouda during the last 5 minutes of baking for an effortless yet impressive dish that’s just as delicious as when made fresh!

Hasselback Sweet Potatoes Recipe FAQs

Can you do Hasselback potatoes with sweet potatoes?
Absolutely! Sweet potatoes are a fantastic alternative for Hasselback potatoes. Their natural sweetness and creamy texture pair perfectly with the crispy edges created by the slicing technique, making them a delightful option for this dish.

What’s the point of Hasselback potatoes?
The Hasselback method beautifully marries texture and presentation. By slicing the potatoes but leaving them intact, you achieve a crispy exterior while keeping the insides tender. This technique allows for enhanced flavor absorption and creates a visually stunning dish that elevates any meal.

Why do you soak sweet potatoes before roasting?
Soaking sweet potatoes can help remove excess starch, yielding a fluffier and crispier texture when roasted. However, for Hasselback Sweet Potatoes, soaking is typically not necessary. The key is to make even slices and ensure a good oil coating for optimal results.

Does garlic taste good on sweet potatoes?
Very! Garlic complements the sweetness of sweet potatoes beautifully, adding depth and aroma to the dish. Whether incorporated into the herb butter or sprinkled as a seasoning, garlic enhances the overall flavor profile of your Hasselback Sweet Potatoes in an exquisite way.

When not to cook sweet potatoes?
Avoid cooking sweet potatoes that show signs of spoilage, such as dark spots, mushiness, or a shriveled appearance. These indicators often mean the potatoes are past their prime and won’t yield the best flavor or texture for your Hasselback Sweet Potatoes.

Are Hasselback potatoes worth the effort?
Absolutely! The presentation alone makes them a showstopper, and the delicious textures created from the slicing process make them worth the little extra time invested. Plus, they are surprisingly simple to prepare, making them a rewarding and fun experience in the kitchen!

Indulgent Hasselback Sweet Potatoes with Herb Butter Bliss

Delight in Hasselback Sweet Potatoes, beautifully sliced for crispy texture and topped with herb butter for a gourmet side dish.

  • Oven
  • Baking Sheet
  • cutting board
  • Knife
  • small bowl
  • Brush

For the Sweet Potatoes

  • 4 medium Sweet Potatoes (Garnet yams are a tasty substitute.)
  • 3 tablespoons Olive Oil (Avocado oil can be used as a healthy swap.)

For the Herb Butter

  • 4 tablespoons Unsalted Butter (Vegan butter can replace for a dairy-free option.)
  • 2 cloves Garlic (Use 1/2 teaspoon of garlic powder as an alternative.)
  • 2 tablespoons Parsley (Fresh herbs add aromatic touch.)
  • 1 tablespoon Chives (Dried herbs can be used in a pinch.)
  • 1 teaspoon Rosemary (Italian seasoning is a handy alternative.)
  • 1 teaspoon Thyme (Dried herbs can be used in a pinch.)
  • 1/2 teaspoon Paprika (Adjust to taste.)

For the Cheesy Topping

  • 1 cup Gouda Cheese (Feel free to substitute with cheddar or mozzarella.)

For the Optional Creamy Finish

  • 1/2 cup Sour Cream (Greek yogurt offers a lighter choice.)
  • 1/2 cup Herb Goat Cheese

Step-by-Step Instructions for Hasselback Sweet Potatoes

  1. Preheat your oven to 400°F (200°C).
  2. Wash and thoroughly dry the sweet potatoes.
  3. Carefully slice the sweet potatoes 1/8-inch deep, stopping ½ inch from the bottom.
  4. Drizzle olive oil over the sweet potatoes and rub it in.
  5. Bake sweet potatoes for about 40 minutes, until they start to soften.
  6. Whisk together the herb butter ingredients in a small bowl.
  7. Brush the herb butter mixture between the slices of each potato.
  8. Return to the oven for an additional 10-20 minutes until fork-tender.
  9. Distribute Gouda cheese between the slices during the last 5 minutes of baking.
  10. Serve topped with sour cream or herb goat cheese.

Enhance your Hasselback Sweet Potatoes with various toppings for a personalized culinary experience.

Side Dishes
American
comfort food, Gourmet, Hasselback Sweet Potatoes, Herb Butter, Vegetarian

Filed Under: Side Dishes

Indulgent No Bake Strawberry Heaven Dessert You’ll Love

July 17, 2025 by grace bellamy Leave a Comment

As I was savoring the bright flavors of spring, the refreshing Spinach Strawberry Salad with Balsamic Poppy Seed Dressing came into my mind—perfect for turning any meal into a celebration. Each bite of this delightful salad mixes the sweetness of strawberries with the crunch of pecans and the creamy touch of feta, creating a harmonious balance that even salad skeptics can’t resist. Not only is this recipe a breeze to whip up, but it’s also customizable to suit your taste, making it ideal for gatherings or a quick lunch at home. Plus, it’s a healthy option that packs a punch of nutrients and fresh flavors. Are you ready to elevate your salad game? Let’s dive into this culinary delight!

Why Is This Salad a Must-Try?

Vibrant Flavors: The combination of sweet strawberries and tangy feta delivers a refreshing punch that brightens up any meal.
Easy to Prepare: Enjoy the simplicity of assembling this salad—no cooking required!
Customizable: Personalize with your favorite ingredients; swap pecans for seeds or try different cheeses!
Healthy Option: Packed with nutrients from fresh produce, it’s a guilt-free indulgence for any occasion.
Crowd-Pleasing: Perfect for gatherings, this salad is sure to impress guests and family alike. Elevate your meal with this delightful Spinach Strawberry Salad, or for a sweet treat, check out my No Bake Strawberry Heaven Dessert!

Spinach Strawberry Salad Ingredients

• Dive into the deliciousness with these essential components!

For the Salad

  • Fresh Baby Spinach – The perfect base that offers a burst of green, nutrient-rich goodness.
  • Strawberries – Sweet, juicy, and colorful; ensure they’re fresh, hulled, and quartered for the best taste.
  • Red Onion – Adds a sharpness that balances the sweetness; soak lightly in water to mellow its flavor.
  • Pecans – Toast for extra crunch and depth; swap with sunflower seeds for a nut-free version!
  • Feta Cheese – Creamy and tangy, block-style works best; feel free to substitute with goat cheese for variety.

For the Dressing

  • Balsamic Vinegar – Infuses that signature tang and brightness essential for the flavor profile.
  • Extra-Virgin Olive Oil – Richness for the dressing, enhancing the overall taste of the salad.
  • Poppy Seeds – For delightful crunch and an elegant touch; they add a visual appeal as well!
  • Honey – Naturally sweetens the dressing; feel free to adjust the amount to your taste.
  • Dijon Mustard – Helps emulsify the dressing while adding a bit of depth; a must-have for flavor!
  • Kosher Salt – Elevates all the flavors, bringing everything together harmoniously.
  • Ground Black Pepper – A sprinkle adds just the right amount of subtle heat to the dish.

Make this Spinach Strawberry Salad with Balsamic Poppy Seed Dressing your go-to recipe for any occasion!

Step‑by‑Step Instructions for Spinach Strawberry Salad with Balsamic Poppy Seed Dressing

Step 1: Toast the Pecans
Preheat your oven to 350°F (175°C). Spread the pecans evenly on a baking sheet, ensuring they have some space to toast. Place them in the oven for 8–10 minutes, or until they become fragrant and slightly golden. Keep an eye on them to avoid burning! Once toasted, remove from the oven and let them cool before roughly chopping.

Step 2: Prepare the Dressing
In a medium bowl, whisk together ¼ cup of balsamic vinegar and ½ cup of extra-virgin olive oil until well combined. Add 1 tablespoon of honey, 1 tablespoon of Dijon mustard, and 1 tablespoon of poppy seeds to the mixture. Season with kosher salt and ground black pepper to taste. Whisk vigorously until the dressing is emulsified and glossy, then set aside.

Step 3: Assemble the Salad
In a large salad bowl, combine 6 cups of fresh baby spinach, 2 cups of quartered fresh strawberries, and about ½ cup of red onion soaked in water and drained. Drizzle half of your prepared balsamic poppy seed dressing over the salad and toss gently to ensure even coating without bruising the spinach.

Step 4: Finish & Serve
To the tossed salad, add 1 cup of crumbled feta cheese and the toasted pecans. Gently toss again, being careful not to break the feta too much. Serve the salad immediately, garnished with additional dressing on the side for those who prefer extra flavor. Enjoy this vibrant Spinach Strawberry Salad that’s sure to delight your guests!

Expert Tips for Spinach Strawberry Salad

  • Fresh Ingredients: Always use high-quality, fresh ingredients; they make a significant difference to the flavor of your Spinach Strawberry Salad.
  • Soak Red Onion: To reduce bitterness, soak the red onion in cold water for about 10 minutes before adding it to the salad.
  • Add Dressing Gradually: Start with half the dressing and toss gently, adding more to taste. This prevents the salad from becoming soggy!
  • Customize Wisely: Don’t hesitate to substitute ingredients; try different cheeses or nuts to create your perfect variation without losing the essence of the salad.
  • Serving Tips: Serve immediately after assembling for the best texture and taste. If you need to prepare ahead, keep dressing and nuts separate until serving to maintain freshness.

What to Serve with Spinach Strawberry Salad with Balsamic Poppy Seed Dressing

Transform your delightful salad into a full meal by pairing it with mouthwatering accompaniments that enhance its vibrant flavors.

  • Grilled Chicken: Juicy, tender chicken adds a satisfying protein contrast to the fresh textures of the salad, making it a delightful main course.
  • Quinoa Pilaf: Nutty and fluffy quinoa complements the salad’s crunch while infusing additional nutrients, creating a satisfying vegetarian side.
  • Garlic Bread: The warm, crispy texture of garlic bread provides a comforting contrast to the crisp salad, making every bite a delight. It’s simply irresistible when dipped in remaining dressing!
  • Roasted Vegetables: The earthy flavors of roasted seasonal veggies bring warmth and depth, balancing the salad’s lightness beautifully.
  • Fruity White Wine: Refreshing and crisp, a glass of chilled white wine enhances the salad’s sweetness and complements the dressing’s tangy notes.
  • Lemon Sorbet: Light and refreshing, this dessert cleanses the palate after a savory meal, providing a perfect ending to your dining experience.
  • Cheese Platter: Offer a variety of cheeses such as brie, cheddar, and goat cheese, allowing guests to create their own combinations that complement the salad’s flavor profile.

These pairings elevate the Spinach Strawberry Salad with Balsamic Poppy Seed Dressing into a memorable feast that celebrates the essence of spring!

Make Ahead Options

These Spinach Strawberry Salad with Balsamic Poppy Seed Dressing components are perfect for meal prep! You can wash and chop the spinach (up to 3 days in advance) and store it in an airtight container with a paper towel to absorb moisture, keeping it fresh and crisp. Slice the strawberries and soak the red onion (up to 24 hours in advance) for a milder flavor, then refrigerate them separately. The dressing can be made and stored in the refrigerator for up to 1 week; just give it a quick whisk before serving. When it’s time to enjoy your salad, simply combine all the components in a bowl, toss with dressing, and you’ll have a bright, delicious dish that’s just as delightful as if it were freshly made!

How to Store and Freeze Spinach Strawberry Salad

Room Temperature: This salad is best enjoyed fresh. If left out, consume within 2 hours to maintain quality and safety.

Fridge: Store any leftover salad in an airtight container for up to 3 days. For best results, keep the dressing separate until ready to serve to prevent sogginess.

Freezer: Freezing is not recommended for this salad due to the delicate textures of the greens and strawberries. Freshness is key to enjoying this vibrant dish!

Reheating: Since this is a cold salad, there’s no need to reheat. Simply toss and serve cold when ready to enjoy again!

Spinach Strawberry Salad Variations

Feel free to explore these delightful twists to make your salad uniquely yours!

  • Nut-Free: Substitute pecans with toasted sunflower seeds for a satisfying crunch without allergens. This makes the salad more accessible for everyone, especially at family gatherings.
  • Cheese Swap: Replace feta with creamy goat cheese or sharp blue cheese to change up the flavor profile. Each cheese offers a different texture and taste to complement the sweetness of strawberries.
  • Add Avocado: Incorporate creamy avocado slices for an extra layer of richness and healthy fats. This addition elevates the creaminess and brings a vibrant color contrast to the dish.
  • Herby Dressing: Boost flavor by adding fresh herbs like basil or mint to the balsamic dressing. These herbs not only enhance the freshness but also provide a fragrant aroma, making each bite a delightful experience.
  • Citrus Twist: Mix in some zesty orange or lemon juice to the dressing for a citrusy kick that brightens up the entire salad. This twist adds a refreshing zing that perfectly complements the strawberries.
  • Spicy Kick: For those who love some heat, add thinly sliced jalapeños or a sprinkle of red pepper flakes. The heat beautifully balances the sweetness of the strawberries, creating an exciting flavor contrast.
  • Roasted Veggies: Toss in some roasted sweet potatoes or beets for an unexpected twist that adds warmth and earthiness. Roasted veggies not only taste fantastic but also change the salad’s texture and visual appeal.
  • Grains Addition: Mix in cooked quinoa or farro for a heartier version that transforms this salad into a complete meal. This variation adds a satisfying chewiness and additional nutrients, perfect for lunch or dinner!

Spinach Strawberry Salad with Balsamic Poppy Seed Dressing Recipe FAQs

What type of strawberries should I use for the salad?
Absolutely! Look for fresh, ripe strawberries that are vibrant red and free of dark spots or blemishes. You want them to be sweet and juicy, ideally hulled and quartered just before you assemble the salad for the best flavor and texture.

How long can I store leftovers in the fridge?
You can keep any leftover salad in an airtight container in the refrigerator for up to 3 days. Just make sure to store the dressing separately until you’re ready to serve to avoid sogginess.

Can I freeze the Spinach Strawberry Salad?
Freezing this salad isn’t recommended since the delicate spinach and strawberries do not hold up well in cold temperatures. Instead, prepare the salad fresh for that delightful crunch and vibrant flavors!

What should I do if my dressing separates?
No worries! If your dressing separates, simply give it a good whisk or shake in a jar before using it again. If it still doesn’t emulsify, try adding a bit more Dijon mustard or honey. This can help bind the ingredients together better.

Are there any dietary considerations for this salad?
Very much so! This salad can be made gluten-free and is nut-free if you substitute pecans with sunflower seeds. If allergies are a concern, always check labels for your ingredients. Additionally, you can easily adjust the cheese type for lactose-free versions or personal preferences!

How can I customize the ingredients in this salad?
The more the merrier when it comes to customization! Feel free to swap nuts, add fruits like blueberries or raspberries, or try different cheeses like goat or blue cheese. Just remember to keep the key components like spinach and strawberries for that perfect balance of flavors. Adjusting the dressing can also make for exciting variations!

Indulgent No Bake Strawberry Heaven Dessert You’ll Love

A delightful No Bake Strawberry Heaven Dessert packed with fresh flavors for a perfect treat.

  • Mixing Bowl
  • Whisk
  • Baking Dish

For the Base

  • 2 cups Graham Cracker Crumbs
  • 1/2 cup Unsalted Butter (Melted)
  • 1/4 cup Granulated Sugar

For the Filling

  • 2 cups Fresh Strawberries (Sliced)
  • 1 cup Cream Cheese (Softened)
  • 1/2 cup Powdered Sugar
  • 1 cup Whipped Topping
  • 1 teaspoon Vanilla Extract

For the Topping

  • 1 cup Fresh Strawberries (Halved)
  • 1 cup Whipped Topping

Preparation Steps

  1. In a mixing bowl, combine graham cracker crumbs, melted butter, and sugar.
  2. Press the mixture into the bottom of a baking dish to form the base.
  3. In another bowl, beat the cream cheese and powdered sugar until smooth.
  4. Fold in the whipped topping and vanilla extract until well combined.
  5. Add sliced strawberries into the cream mixture and gently combine.
  6. Spread the filling over the graham cracker base evenly.
  7. Top with halved strawberries and additional whipped topping.
  8. Refrigerate for at least 2 hours before serving.

For best flavor, use fresh strawberries and prepare shortly before serving. Keep refrigerated. This dessert is not suitable for freezing as textures may change.

Dessert
American
dessert, Healthy, No Bake Strawberry Heaven Dessert, Quick, Strawberries

Filed Under: Dessert

Irresistibly Crispy Pan Fried Maple Pecan Brussels Sprouts

July 17, 2025 by grace bellamy Leave a Comment

As I stood in the kitchen, the rich aroma of roasted Brussels sprouts mingled with the sweet scent of maple syrup, drawing me in like a cozy hug. These Crispy Pan Fried Maple Pecan Brussels Sprouts have become my go-to side dish, especially during the hustle and bustle of the holiday season. With a quick prep time that lets you spend less time cooking and more time enjoying, this recipe is not just a crowd-pleaser; it perfectly marries the nutty crunch of pecans with the sweet glaze of maple syrup. The result? A vibrant, flavorful addition to your table that elevates any meal, whether for a festive feast or a casual dinner. Curious about how to transform your simple Brussels sprouts into a delightful treat? Let’s dive in!

Why are these Brussels sprouts irresistible?

Quick Preparation: This dish comes together in a flash, making it perfect for busy weeknights or festive gatherings.

Sweet-Savory Delight: The combination of maple syrup and crunchy pecans creates a taste that dances on your palate, leaving you craving more.

Healthy Indulgence: Packed with nutrients, these Brussels sprouts offer a guilt-free indulgence, rich in vitamins and healthy fats.

Versatile Pairing: They complement a variety of mains, whether roasted meats or vegan dishes, making them a favorite for any occasion.

Crowd Appeal: Serve them at your next gathering, and watch how they enchant everyone at the table—you may just want to double the recipe!

For more exciting variations, check out the delicious twists in my Japanese BBQ Chicken Fried Rice Extravaganza.

Pan Fried Maple Pecan Brussels Sprouts Ingredients

For the Sprouts
• Brussels Sprouts – Use fresh and firm Brussels sprouts for the best flavor; trim and halve them for even cooking.
• Salt – Adjust the amount based on your taste preference to enhance the overall flavor.
• Black Pepper – Adds a hint of mild spice that can be adjusted according to your liking.
• Chili Flakes (optional) – These can give your dish a nice kick; omit if you prefer a milder taste.

For the Sweet Glaze
• Maple Syrup – This is the star ingredient that provides the sweet glaze; alternative sweeteners may be used, but they may alter the flavor profile.

For the Crunch
• Pecans – These add a deliciously crunchy texture and nutty flavor; feel free to substitute with walnuts, chestnuts, or pine nuts for a twist.

Discover how these delightful Pan Fried Maple Pecan Brussels Sprouts can enhance your next meal experience!

Step‑by‑Step Instructions for Pan Fried Maple Pecan Brussels Sprouts

Step 1: Prep the Brussels Sprouts
Begin by trimming the ends off the fresh Brussels sprouts, then slice them in half to ensure even cooking. Remove any dry outer leaves to keep them looking vibrant. Rinse the sprouts thoroughly under cool water and pat them dry with a clean kitchen towel; moisture can prevent them from getting crispy when pan-fried.

Step 2: Heat the Pan
In a large skillet, heat 1.5 tablespoons of vegetable oil over medium-high heat until it shimmers, indicating it’s hot enough. Carefully add the halved Brussels sprouts to the pan, cut side down. Allow them to fry undisturbed for about 2 to 3 minutes until they develop a lovely golden-brown color and start to caramelize, enhancing their flavor.

Step 3: Add Pecans and Seasonings
Once the Brussels sprouts are nicely browned, stir in the chopped pecans, ensuring they evenly coat the sprouts. Drizzle the maple syrup over the mixture, then sprinkle in salt, black pepper, and chili flakes if using. Stir everything together well and continue to sauté for another 3 to 5 minutes until the sprouts are beautifully caramelized and just beginning to char.

Step 4: Serve Immediately
Once the Brussels sprouts and pecans reach a crispy finish, remove the pan from heat. Serve the Pan Fried Maple Pecan Brussels Sprouts immediately for the best texture and flavor. These delightful bites are perfect as a side dish or a festive addition to your holiday table, bursting with a balance of sweetness and crunch.

Expert Tips for Pan Fried Maple Pecan Brussels Sprouts

Crispiness Matters: Avoid overcrowding the pan to ensure your Brussels sprouts get that perfect crispy finish—cook them in batches if needed.

Nutty Flavor Boost: For an extra layer of flavor, toast the pecans separately before adding them to the dish. This enhances their nuttiness beautifully.

Sweet Balance: If you find the maple syrup too sweet, consider adding a splash of balsamic vinegar to balance the flavors.

Storage Tip: Leftovers can be stored in an airtight container in the fridge for up to 3 days, but for best results, reheat in a skillet to maintain their crunch.

Serving Warm: These Pan Fried Maple Pecan Brussels Sprouts are best served immediately, so coordinate with your meal timing for maximum flavor!

How to Store and Freeze Pan Fried Maple Pecan Brussels Sprouts

Fridge: Store leftover Brussels sprouts in an airtight container for up to 3 days. This helps to maintain their flavor, though they are best enjoyed fresh.

Freezer: For freezing, allow the sprouts to cool completely, then place them in a freezer-safe bag. They can be frozen for up to 3 months; however, the texture may change upon thawing.

Reheating: To reheat, warm the Brussels sprouts in a skillet over medium heat for 3-5 minutes. This will help restore their crispy texture, making them enjoyable again.

Avoid sogginess: If you plan to make them ahead, leave the pecans out until serving to prevent them from losing their delightful crunch.

Pan Fried Maple Pecan Brussels Sprouts Variations

Feel free to make these Brussels sprouts your own by exploring creative twists that will delight your taste buds!

  • Nut-Free: Omit pecans and add crispy fried onions for a delicious crunch and new flavor profile.
  • Spicy Kick: Include sliced jalapeños or crushed red pepper flakes for a fiery twist that elevates your dish.
  • Garlic Lovers: Sauté minced garlic along with the Brussels sprouts for an aromatic depth that complements the sweetness.
  • Maple-Free: Substitute honey or agave syrup for a different sweetener that pairs just as well with the sprouts.
  • Citrus Zing: Squeeze fresh lemon or orange juice over the finished dish to brighten the flavors and add a refreshing twist.
  • Savory Depth: Mix in vegan bacon bits for an extra savory element, enriching the dish with smoky undertones.
  • Herb Infusion: Toss in fresh thyme or rosemary during cooking for a fragrant herbal note that enhances every bite.
  • Balsamic Bliss: Drizzle balsamic glaze on top before serving for an added layer of flavor that balances sweetness and acidity.

Let your imagination guide you to create variations that your family will love!

What to Serve with Pan Fried Maple Pecan Brussels Sprouts?

Transform your festive meal with delightful pairings that enhance the sweetness and crunch of your favorite side dish.

  • Roasted Chicken: The savory, tender meat beautifully complements the sweet and nutty flavors of the Brussels sprouts, creating a balanced plate.

  • Vegan Mushroom Stroganoff: Earthy mushrooms in a creamy sauce provide a hearty contrast to the crunchy sprouts, making for a filling vegan dinner.

  • Quinoa Salad: Light and refreshing, a colorful quinoa salad adds nutty tones and fresh ingredients that harmonize perfectly with the sweetness of the dish.

  • Garlic Mashed Potatoes: Creamy and buttery, these mashed potatoes offer a comforting texture that pairs wonderfully with the crispy Brussels sprouts.

  • Grilled Tofu Steaks: The smoky flavors from grilled tofu match well with the sweet maple glaze, making it a delicious plant-based option for your table.

  • Cranberry Sauce: A tangy cranberry sauce provides a burst of acidity that cuts through the sweetness of the maple syrup, enhancing the overall flavor profile of your meal.

  • Chardonnay: A chilled glass of Chardonnay elegantly balances the richness of the Brussels sprouts, making it a delightful pairing for your holiday feast.

  • Pecan Pie: For dessert, a slice of pecan pie echoes the nutty elements of the Brussels sprouts, creating a cohesive theme that delights the palate.

Make Ahead Options

These Crispy Pan Fried Maple Pecan Brussels Sprouts are perfect for meal prep enthusiasts! You can wash and trim the Brussels sprouts up to 24 hours in advance, storing them in an airtight container in the refrigerator to keep them fresh. You can also chop the pecans and prepare the glaze (maple syrup, salt, and spices) ahead of time, making your cooking time even shorter. On the day you plan to serve them, simply sauté the Brussels sprouts as instructed until golden, then add in the pecans and maple mixture. This way, you’ll enjoy that delightful crunch and flavor while saving valuable time on busy weeknights!

Pan Fried Maple Pecan Brussels Sprouts Recipe FAQs

What type of Brussels sprouts should I use?
Absolutely! Always choose fresh and firm Brussels sprouts for the best flavor. Look for bright green sprouts without dark spots all over, as those are signs of overripeness. Trim the ends, halve them for even cooking, and remove any dry outer layers to enhance your dish.

How should I store leftover Pan Fried Maple Pecan Brussels Sprouts?
You can store leftover Brussels sprouts in an airtight container in the fridge for up to 3 days. This will help maintain their flavor. However, they’re best served fresh, so I recommend consuming them soon after cooking.

Can I freeze Pan Fried Maple Pecan Brussels Sprouts?
Yes, you can freeze them! Allow the sprouts to cool completely, then place them in a freezer-safe bag. They can be frozen for up to 3 months. Just remember that the texture may change once you thaw them, so reheat them gently in a skillet to help restore some of their original crunch.

What if my Brussels sprouts are soggy after cooking?
Very! If your Brussels sprouts end up soggy, this often happens when the pan is overcrowded. To avoid this, make sure there’s enough space in the pan for them to fry evenly. Cook them in batches if necessary, which will yield crispy results. And if they’re already cooked and soggy, briefly sautéing them in a hot pan can help crisp them up again.

Are these Brussels sprouts safe for people with nut allergies?
It’s worth noting that this recipe includes pecans, which can be problematic for those with nut allergies. If you’re preparing this dish for someone with a nut allergy, feel free to substitute the pecans with seeds like pumpkin or sunflower seeds for a safe and crunchy alternative. Always check ingredient labels to ensure safety!

Irresistibly Crispy Pan Fried Maple Pecan Brussels Sprouts

These Pan Fried Maple Pecan Brussels Sprouts combine nutty pecans and sweet maple syrup into an irresistible side dish.

  • large skillet

For the Sprouts

  • 1 lb Brussels Sprouts (Fresh and firm, trimmed and halved)
  • 1 tsp Salt (Adjust to taste)
  • 1 tsp Black Pepper (Adjust to taste)
  • 1/4 tsp Chili Flakes (Optional, for added heat)

For the Sweet Glaze

  • 1/4 cup Maple Syrup (Primary sweetener)

For the Crunch

  • 1/2 cup Pecans (Chopped; can substitute with other nuts)

Step‑by‑Step Instructions

  1. Trim the ends off the Brussels sprouts, slice them in half, and rinse them under cool water. Pat dry.
  2. Heat vegetable oil over medium-high heat in a large skillet. Add halved Brussels sprouts cut side down and fry for 2-3 minutes.
  3. Stir in chopped pecans, drizzle with maple syrup, and add salt, black pepper, and chili flakes. Sauté for another 3-5 minutes.
  4. Remove from heat and serve immediately for best texture and flavor.

For best results, do not overcrowd the pan during cooking to maintain crispiness. Store leftovers in an airtight container for up to 3 days, reheating in a skillet to restore crunch.

Side Dishes
American
Brussels Sprouts Recipe, Crispy Brussels Sprouts, Holiday Side Dish, Pan Fried Maple Pecan Brussels Sprouts, Vegetable Recipe

Filed Under: Side Dishes

Indulgent Apple Pie French Toast Roll Ups for Easy Mornings

July 17, 2025 by grace bellamy Leave a Comment

As I grabbed my morning coffee, the enticing aroma of cinnamon wafted from the kitchen, instantly transporting me to cozy autumn days. Today, I’m whipping up Apple Pie French Toast Roll Ups—a delightful breakfast that captures the essence of warm apple pie in each golden bite. These little treasures are not only a crowd-pleaser but also incredibly easy to prepare, making them perfect for busy mornings or when you’re craving a sweet treat any time of day. With options for both homemade and canned apple filling, these customizable rolls can cater to your taste while adding a touch of nostalgia to your breakfast table. Are you ready to find out how to make this scrumptious grab-and-go delight?

Why You’ll Adore This Recipe

Simplicity: These Apple Pie French Toast Roll Ups are a breeze to make, even for beginner cooks! Just roll, dip, and fry for a delicious breakfast.

Versatile: Customize your fillings with any fruits or jams you love, ensuring each batch is uniquely yours!

Grab-and-Go: Perfect for those busy mornings, these roll ups can be enjoyed on your way out the door.

Sweet Nostalgia: The warm apple filling and cinnamon aroma evoke cozy memories of fresh-baked pies, making breakfast feel special.

Crowd-Pleasing: Whether for family brunch or a cozy gathering, these roll ups are sure to delight everyone at the table! For another delicious breakfast idea, check out Hawaiian Roll French Toast Casserole.

Apple Pie French Toast Roll Ups Ingredients

  • For the Roll Ups

  • Toast Bread Slices – Use thick slices for easier rolling.

  • Cream Cheese – Adds a creamy texture; substitute dairy-free for vegan.

  • Eggs – Binds the rolls; flaxseed eggs work for a vegan option.

  • Milk – Choose any milk (dairy or plant-based) for added moisture.

  • Sugar – Sweetens your roll ups; opt for coconut sugar for a healthier choice.

  • Ground Cinnamon – Compliments the apple filling beautifully; consider nutmeg for extra warmth.

  • Butter – For frying, gives a rich flavor; use coconut oil for a dairy-free alternative.

  • For the Homemade Apple Filling

  • Butter – Use to sauté the apples to create a rich base.

  • Apples – Any variety works; tart apples add a delightful bite.

  • Brown Sugar – Provides depth; maple syrup is a healthier substitute.

  • Water – Keeps the filling moist while cooking.

  • Cinnamon & Nutmeg – Classic spices that elevate the flavor; adjust to taste.

  • Cornstarch – Thickens your filling; arrowroot powder is a good alternative.

  • For the Canned Apple Pie Filling

  • Canned Apple Pie Filling – A quick alternative; look for low-sugar options to keep it light.

Step‑by‑Step Instructions for Apple Pie French Toast Roll Ups

Step 1: Make the Filling
In a medium skillet, melt 2 tablespoons of butter over medium heat. Add 2 cups of diced apples, ¼ cup of brown sugar, 1 teaspoon of cinnamon, and 2 tablespoons of water. Stir well and cook for about 4–6 minutes, until the apples are slightly softened and fragrant. This apple filling will be the heart of your Apple Pie French Toast Roll Ups.

Step 2: Thicken the Filling
In a small bowl, mix 1 tablespoon of cornstarch with 1 tablespoon of water until smooth. Pour this mixture into the apple filling, stirring constantly for 4-5 minutes until it thickens and coats the apples beautifully. Remove from the heat and let it cool while you prepare the bread, ensuring the filling doesn’t make the roll ups soggy.

Step 3: Prepare Sugar Mixture
In a shallow bowl, combine ¼ cup of sugar and 1 teaspoon of cinnamon. Mix well to create a cinnamon sugar mixture that will coat your finished Apple Pie French Toast Roll Ups. Set this aside; the sweet crunch it adds will perfectly complement the warm, spiced apple filling.

Step 4: Prep Bread
Begin by trimming the crusts off 8 slices of thick bread and then flatten each slice with a rolling pin for easy rolling. Spread a thin layer of cream cheese over one side of each slice. This creamy layer not only enhances the flavor but also helps to bind the roll ups together.

Step 5: Fill the Rolls
On one edge of each prepared bread slice, place a spoonful of the cooled apple filling. Roll the bread tightly, starting from the filled edge and tucking in the sides as you go. Make sure to seal the rolls tightly to prevent any filling from escaping while cooking.

Step 6: Cook the Rolls
Heat 3 tablespoons of butter in a non-stick skillet over medium heat. In a separate bowl, whisk together 2 eggs and ½ cup of milk. Dip each roll carefully in the egg mixture, coating it well, then place it seam-side down in the hot skillet. Cook for about 2-3 minutes on each side until golden brown and crispy.

Step 7: Coat with Cinnamon Sugar
Once cooked, immediately roll each warm Apple Pie French Toast Roll Up in the prepared cinnamon sugar mixture, ensuring an even coating. This sweet touch adds a delightful crunch and flavor. Serve your delectable creations warm, perhaps adding a drizzle of syrup for an extra indulgent treat!

Apple Pie French Toast Roll Ups: Delicious Variations

Feel free to let your creativity shine by customizing these delightful roll ups! With every tweak, you can explore new flavors and textures that suit your cravings.

  • Berry Twist: Substitute apples for fresh strawberries or blueberries for a refreshing change. These berries add a bright pop of flavor and color!

  • Jam-Packed Goodness: Use your favorite fruit jam, like apricot or raspberry, for a sweet and fruity filling. It’s a quick way to add variety without the prep.

  • Caramel Drizzle: For an indulgent touch, drizzle warm caramel sauce over the finished roll ups instead of syrup. The rich sweetness elevates this breakfast to dessert status.

  • Cinnamon Swirl: Mix a bit of cinnamon into the cream cheese before spreading for an extra layer of warmth and spice. It’s a delightful surprise in every bite!

  • Nutty Crunch: Add crushed nuts like walnuts or pecans to the apple filling for a delightful crunch. The added texture brings a whole new element to these rolls.

  • Heat Factor: Sprinkle in a bit of cayenne or chopped jalapeños to your apple filling for a surprising kick. The heat contrasts deliciously with the sweetness.

  • Gluten-Free Delight: Swap regular bread for gluten-free alternatives to cater to dietary needs while keeping the flavors intact. Everyone can enjoy this treat!

  • Flavored Cream Cheese: Try using flavored cream cheese, like honey or cinnamon, adding a hint of extra sweetness and flavor that complements the apple filling beautifully.

Make Ahead Options

These Apple Pie French Toast Roll Ups are perfect for meal prep lovers! You can prepare the apple filling up to 3 days in advance. Simply follow the steps for making the filling and let it cool completely before storing it in an airtight container in the refrigerator. You can also roll and assemble the French toast roll ups up to 24 hours ahead of time; just be sure to keep them covered to prevent them from drying out. When you’re ready to enjoy, dip the cold roll ups in the egg mixture and fry them as instructed. This way, you’ll have a delectable breakfast treat with minimal effort, making your busy mornings a lot easier!

What to Serve with Apple Pie French Toast Roll Ups

Creating a delightful breakfast is easy when you pair these tasty rolls with complementary sides that enhance their warmth and sweetness.

  • Fresh Berries: The tartness of strawberries and blueberries adds a refreshing balance to the sweet cinnamon rolls.

  • Maple Syrup Delight: Drizzling real maple syrup over the roll ups amplifies their sweetness and brings a rich, maple flavor to each bite.

  • Greek Yogurt: A dollop of creamy Greek yogurt provides a tangy contrast, adding a protein boost while keeping the meal light and satisfying.

Pairing these rolls with creamy yogurt not only rounds out the breakfast’s texture but also makes it undeniably indulgent.

  • Sautéed Apples: For an extra apple touch, garnish with warm sautéed apples, enhancing the pie experience with caramelized sweetness.

  • Whipped Cream Topping: A light, fluffy whipped cream adds a lovely decadence, transforming your plate into a dessert-like breakfast experience.

  • Cinnamon Sugar Dusting: Dusting the rolls with a bit of extra cinnamon sugar right before serving keeps the flavor profile consistent and inviting.

  • Iced Coffee: A chilled or iced coffee on the side complements the warmth of the roll ups and offers a refreshing energy boost to start the day.

  • Cheese Platter: For an elevated brunch, consider adding a small cheese platter with sharp cheddar or creamy brie to contrast the sweet flavors from the rolls.

How to Store and Freeze Apple Pie French Toast Roll Ups

Fridge: Store leftovers in an airtight container for up to 3 days. Reheat in a skillet to restore their crispy texture and warmth.

Freezer: For longer storage, freeze the cooked roll ups in a single layer on a baking sheet. Once solid, transfer them to a freezer-safe bag for up to 2 months.

Reheating: Thaw frozen Apple Pie French Toast Roll Ups in the fridge overnight. Reheat in a skillet or oven until heated through, ensuring they regain their delightful crunch.

Wrapping: Wrap each roll individually in plastic wrap or parchment before freezing to avoid freezer burn and retain flavor.

Expert Tips for Apple Pie French Toast Roll Ups

  • Flatten Thoroughly: Ensure your bread slices are well-flattened to avoid tearing during rolling. This step is critical for perfect Apple Pie French Toast Roll Ups.

  • Mind the Butter: Use just enough butter for frying to achieve a golden crisp without excess greasiness. Less is more for the best flavor!

  • Cream Cheese is Key: Don’t skip the cream cheese! It creates a delicious binding layer that keeps the rolls intact while cooking.

  • Chill the Filling: Allow your apple filling to cool properly before using it in the rolls; this prevents sogginess and helps maintain the crispy exterior.

  • Store Right: Keep leftovers in an airtight container in the fridge for up to three days. Reheat in a skillet to preserve crispness before serving.

Apple Pie French Toast Roll Ups Recipe FAQs

What type of bread works best for Apple Pie French Toast Roll Ups?
I recommend using thick slices of bread like Texas toast or brioche. This provides a sturdy base that can hold the filling and allows for easier rolling. If you’re looking for a gluten-free option, you can absolutely use gluten-free bread that’s sliced thick enough to roll.

How long can you store Apple Pie French Toast Roll Ups in the fridge?
You can store these delicious roll ups in an airtight container in the fridge for up to 3 days. Just remember to reheat them in a skillet for the best texture; this will help to restore their crispy exterior and warmth.

Can you freeze Apple Pie French Toast Roll Ups and how?
Absolutely! To freeze, lay the cooked roll ups in a single layer on a baking sheet and freeze until solid. Then, transfer them to a freezer-safe bag. They can be stored for up to 2 months. When you’re ready to enjoy, just thaw them in the fridge overnight and reheat in a skillet or oven until warmed through and crispy.

What are common mistakes to avoid when making French toast?
One common mistake is not allowing the filling to cool before assembling the roll ups. A hot filling can make the bread soggy. Additionally, make sure your bread is thoroughly flattened before rolling to prevent tearing. Lastly, frying at too high a temperature can lead to a burnt exterior while leaving the inside uncooked.

How do you ensure the filling doesn’t leak out during cooking?
To prevent leakage, be sure to roll your bread slices tightly and tuck in the sides as you roll. Also, sealing the edges properly will hold everything together. The creamy layer of cream cheese acts as a great binder, keeping your filling secure during cooking.

What can I use as a dairy-free option in this recipe?
You can substitute regular cream cheese with dairy-free cream cheese, use almond or coconut milk instead of regular milk, and replace the eggs with flaxseed eggs for a fully vegan version. The flavor and texture will still be delightful!

Indulgent Apple Pie French Toast Roll Ups for Easy Mornings

Delightful Apple Pie French Toast Roll Ups capture the essence of warm apple pie in each golden bite, perfect for busy mornings.

  • skillet
  • shallow bowl
  • Rolling Pin
  • medium skillet

For the Roll Ups

  • 8 slices thick toast bread (Use thick slices for easier rolling.)
  • 8 oz cream cheese (Adds a creamy texture; substitute dairy-free for vegan.)
  • 2 large eggs (Binds the rolls; flaxseed eggs work for a vegan option.)
  • ½ cup milk (Choose any milk (dairy or plant-based) for added moisture.)
  • ¼ cup sugar (Sweetens your roll ups; opt for coconut sugar for a healthier choice.)
  • 1 tsp ground cinnamon (Compliments the apple filling beautifully; consider nutmeg for extra warmth.)
  • 3 tbsp butter (For frying, gives a rich flavor; use coconut oil for a dairy-free alternative.)

For the Homemade Apple Filling

  • 2 tbsp butter (Use to sauté the apples to create a rich base.)
  • 2 cups apples (Any variety works; tart apples add a delightful bite.)
  • ¼ cup brown sugar (Provides depth; maple syrup is a healthier substitute.)
  • 2 tbsp water (Keeps the filling moist while cooking.)
  • 1 tsp cinnamon (Classic spice that elevates the flavor; adjust to taste.)
  • 1 tsp nutmeg (Classic spice that elevates the flavor; adjust to taste.)
  • 1 tbsp cornstarch (Thickens your filling; arrowroot powder is a good alternative.)

For the Canned Apple Pie Filling

  • 1 can canned apple pie filling (A quick alternative; look for low-sugar options to keep it light.)

Preparation Steps

  1. In a medium skillet, melt 2 tablespoons of butter over medium heat. Add 2 cups of diced apples, ¼ cup of brown sugar, 1 teaspoon of cinnamon, and 2 tablespoons of water. Stir well and cook for about 4–6 minutes, until the apples are slightly softened and fragrant.
  2. In a small bowl, mix 1 tablespoon of cornstarch with 1 tablespoon of water until smooth. Pour this mixture into the apple filling, stirring constantly for 4-5 minutes until it thickens and coats the apples beautifully.
  3. In a shallow bowl, combine ¼ cup of sugar and 1 teaspoon of cinnamon. Mix well to create a cinnamon sugar mixture.
  4. Trim the crusts off 8 slices of thick bread and then flatten each slice with a rolling pin. Spread a thin layer of cream cheese over one side of each slice.
  5. On one edge of each prepared bread slice, place a spoonful of the cooled apple filling. Roll the bread tightly, starting from the filled edge and tucking in the sides.
  6. Heat 3 tablespoons of butter in a non-stick skillet over medium heat. In a separate bowl, whisk together 2 eggs and ½ cup of milk. Dip each roll carefully in the egg mixture, then place it seam-side down in the hot skillet.
  7. Once cooked, immediately roll each warm Apple Pie French Toast Roll Up in the cinnamon sugar mixture, ensuring an even coating.

These rolls can be stored in an airtight container in the fridge for up to 3 days, or frozen for longer storage.

Breakfast
American
Apple Pie French Toast Roll Ups, breakfast ideas, delicious rolls, easy breakfast, fall recipe, sweet breakfast

Filed Under: Breakfast

Delicious Spinach and Mushroom Ricotta Stromboli Made Easy

July 17, 2025 by grace bellamy Leave a Comment

As the aroma of sautéing mushrooms and fresh spinach wafts through my kitchen, I can’t help but feel a spark of joy. This Easy Spinach and Mushroom Ricotta Stromboli transforms a simple night into something special, effortlessly blending comfort food with a delightful twist on pizza night. Packed with creamy ricotta, gooey mozzarella, and vibrant veggies, it’s not just quick to whip up but also fully customizable—add your favorite meats or throw in whatever vegetables are lingering in your fridge! Imagine a golden, flaky crust encapsulating all that goodness, perfect for feeding your hungry crew or impressing unexpected guests. Are you ready to roll up your sleeves and create the ultimate crowd-pleaser? Let’s dive into this delicious journey together!

Why Make Spinach and Mushroom Ricotta Stromboli?

Comforting Experience: This stromboli offers a warm, satisfying meal that’s perfect for cozy nights in with family or friends.
Quick Preparation: With a prep time of just 30 minutes, you can have a delicious homemade dish ready in no time!
Customizable Delight: Feel free to mix and match ingredients; whether you want to add meat or swap vegetables, this recipe adapts beautifully, just like my Scrambled Eggs with Spinach and Mushrooms!
A Winning Flavor Combo: Creamy ricotta, gooey mozzarella, and earthy mushrooms create a flavor profile that is simply irresistible.
Crowd-Pleasing Appeal: This dish brings people together—everyone loves a good stromboli!

Spinach and Mushroom Ricotta Stromboli Ingredients

For the Dough
• Refrigerated Pizza Dough – This is the main structure; consider using homemade dough for an even fresher taste.

For the Filling
• Fresh Baby Spinach (10 oz. bag) – Adds vibrant color and essential nutrients; frozen spinach is a great substitute if fresh isn’t available.
• Baby Bella Mushrooms (1 cup, sliced thin) – Offers an earthy depth to the filling; white button mushrooms work just as well.
• Onion (1/2 cup, sliced thin) – Enhances the overall flavor; shallots can be utilized for a milder alternative.
• Garlic Powder (1/4 tsp) – Adds a punch of flavor; fresh minced garlic is a suitable substitute if you prefer.
• Salt and Pepper – Essential for seasoning; adjust according to your taste preferences.
• Ricotta Cheese (1 cup) – This creamy base makes the filling luscious; feel free to swap for cottage cheese for a lighter option.
• Shredded Mozzarella (1 cup) – Delivers that ooey-gooey texture; other melted cheeses like provolone can also shine here.
• Italian Seasoning (1/4 tsp) – Imparts wonderful flavor; any dried herb mix or single herbs like oregano can suffice.

For the Topping
• Egg (1, beaten) – Used for an egg wash, helping to achieve a lovely golden crust; skip for a vegan-friendly option.
• Water (2 tbsp) – Mix with the egg to create the perfect egg wash.

For Serving
• Marinara Sauce – A delicious dip option; use homemade or your favorite store-bought version to accompany your Spinach and Mushroom Ricotta Stromboli.

Step‑by‑Step Instructions for Spinach and Mushroom Ricotta Stromboli

Step 1: Preheat and Prepare Dough
Begin by preheating your oven to 400°F (200°C). While the oven heats, take your refrigerated pizza dough out of the fridge and allow it to come to room temperature for about 15 minutes. This step is crucial for easier stretching and rolling later on.

Step 2: Sauté Vegetables
In a large skillet, heat a drizzle of olive oil over medium heat. Once the oil is shimmering, add in the sliced onions, followed by the mushrooms and fresh spinach. Sauté everything together for about 5-7 minutes until the vegetables are softened and vibrant. Season the mixture with salt and pepper to taste.

Step 3: Prepare the Baking Pan
Drizzle a bit more olive oil into a 9×13-inch baking pan. Use your hands or a brush to spread it evenly, preventing the dough from sticking. Once the pan is prepared, stretch the pizza dough into a large rectangle that fits the pan. Make sure the edges are slightly thicker to hold in the filling.

Step 4: Add the Filling
Spread a generous layer of ricotta cheese evenly over the dough, leaving a 1-1.5 inch border around the edges. Next, layer the sautéed spinach and mushroom mixture on top, followed by a sprinkle of garlic powder and shredded mozzarella cheese for that gooey finish. The combination will create a savory filling for your Spinach and Mushroom Ricotta Stromboli.

Step 5: Roll the Stromboli
Carefully start rolling the dough from one edge to the other, tucking in the sides as you go to envelop the filling securely. Aim for a tight roll to ensure the stromboli holds its shape during baking. Once rolled, pinch the seams to seal and tuck the ends tightly.

Step 6: Apply the Egg Wash
In a small bowl, mix the beaten egg with 2 tablespoons of water to create the egg wash. Use a pastry brush to coat the entire surface of the stromboli with this mixture, giving it a beautiful golden color when baked. Sprinkle the top with Italian seasoning to enhance the flavor even further.

Step 7: Bake the Stromboli
Carefully place the assembled Stromboli in the preheated oven. Bake for 35-40 minutes, or until the dough turns a gorgeous golden brown and becomes crispy. Keep an eye on the stromboli during the last few minutes to avoid over-browning.

Step 8: Cool and Serve
Once baked, remove the Spinach and Mushroom Ricotta Stromboli from the oven and allow it to cool for about 5 minutes. This resting period makes it easier to slice. Serve your delicious creation warm with marinara sauce on the side for dipping, and enjoy the delightful flavors!

Expert Tips for Spinach and Mushroom Ricotta Stromboli

  • Room Temperature Dough: Ensure the pizza dough is at room temperature before rolling it out; this makes stretching easier and avoids tearing.
  • Sauté Thoroughly: Don’t rush the sautéing process; properly cooked mushrooms and spinach enhance flavor and avoid excess moisture in your stromboli.
  • Grease Well: Drizzle enough olive oil in your baking pan to prevent sticking; this helps achieve that perfect golden crust on your Spinach and Mushroom Ricotta Stromboli.
  • Seal the Edges: Pinch the seams tightly after rolling to prevent the filling from leaking during baking, ensuring each bite is full of delicious goodness.
  • Check for Doneness: Keep an eye on your stromboli in the oven; it’s best to check a few minutes early to ensure it doesn’t over-brown.
  • Rest Before Slicing: Allow the baked stromboli to cool for a few minutes before slicing to maintain its shape and make for cleaner pieces.

How to Store and Freeze Spinach and Mushroom Ricotta Stromboli

  • Room Temperature: It’s best to enjoy your stromboli fresh. If you need to leave it out, it can stay at room temperature for up to 2 hours before it should be refrigerated.
  • Fridge: Store leftovers in an airtight container in the refrigerator for up to 3 days. Reheat in the oven to recapture that crispy exterior.
  • Freezer: If you want to keep your Spinach and Mushroom Ricotta Stromboli for longer, wrap it tightly in plastic wrap and aluminum foil before freezing for up to 3 months.
  • Reheating: To reheat from frozen, thaw overnight in the fridge, then bake at 350°F (175°C) for about 20 minutes, or until heated through.

Make Ahead Options

These Spinach and Mushroom Ricotta Stromboli are perfect for busy weeknights and meal prep! You can prepare the filling up to 24 hours in advance by sautéing the spinach, mushrooms, and onions, then storing it in an airtight container. Additionally, you can roll the stromboli and place it in the baking pan—just cover it tightly with plastic wrap and refrigerate for up to 3 days. When ready to bake, simply brush the top with the egg wash, sprinkle with Italian seasoning, and bake as instructed. This approach not only saves time but guarantees that your stromboli will be just as delicious and fresh when you serve it!

Spinach and Mushroom Ricotta Stromboli Variations

Feel free to express your culinary creativity by making this dish your own—your taste buds will thank you!

  • Meat Lovers: Add cooked Italian sausage or slices of pepperoni to boost the flavor and heartiness of your stromboli. You’ll create a delightful mix of savory goodness that will satisfy any meat lover!

  • Veggie Delight: Incorporate other vegetables like bell peppers, zucchini, or artichokes for an extra crunch and flavor burst. This is a wonderful way to clean out your fridge while also adding vibrant colors to your dish.

  • Dairy-Free Option: Use a dairy-free ricotta made from nuts or tofu combined with nutritional yeast for that cheesy flavor. You won’t miss traditional cheese as you enjoy every flavorful bite!

  • Cheese Variations: Swap out ricotta or mozzarella for feta, gouda, or even pepper jack for a kicked-up flavor. Each cheese brings a unique twist that can transport your taste buds on an exciting journey.

  • Spicy Kick: Add crushed red pepper flakes or jalapeños to the filling for those who crave heat. Just a little spice can elevate your stromboli to a whole new level—perfect for adventurous eaters!

  • Vegan-Friendly: Substitute the egg wash with plant-based milk or aquafaba for brushing, and use a vegan cheese alternative. You won’t believe how delicious and inclusive this recipe can be for everyone!

  • Herbal Boost: Try adding fresh herbs like basil or parsley to the filling for an aromatic lift. The fragrant addition will enhance the overall experience, making each bite feel like a fresh garden delight.

  • Saucy Interior: For an extra burst of flavor, incorporate a layer of marinara sauce inside the stromboli before rolling it up. The sauce will create a lovely, juicy filling that pairs beautifully with the cheeses and veggies.

Mix and match these variations to create a custom Spinach and Mushroom Ricotta Stromboli that reflects your personal taste while delighting those you share it with!

What to Serve with Spinach and Mushroom Ricotta Stromboli

Creating a memorable meal is all about the perfect pairing, enhancing every bite of your delicious creation.

  • Garlic Bread: Crispy on the outside and soft within, garlic bread complements the savory stromboli, providing extra crunch with rich flavors.

  • Fresh Side Salad: A vibrant mix of greens, tomatoes, and cucumbers dressed in a light vinaigrette brings brightness and balances the hearty flavors of the stromboli.

  • Zesty Marinara Sauce: Serve extra marinara on the side for dipping; its tangy notes elevate the rich cheesiness of the filling.

  • Roasted Vegetables: Seasonal roasted veggies add a lovely touch of smokiness and texture, perfect for those looking to add warmth to the meal.

  • Antipasto Platter: A selection of olives, cheese, and cured meats creates a delightful appetizer that pairs beautifully with your stromboli’s flavors.

  • Wine Pairing: A glass of Chianti or a light Pinot Grigio can beautifully complement the creamy and earthy flavors within the stromboli.

  • Dessert Option: Consider serving a light sorbet or gelato afterward—its chill and sweetness rounds out the meal without being too filling.

Spinach and Mushroom Ricotta Stromboli Recipe FAQs

Can we eat spinach and mushroom together in the morning?
Absolutely! Spinach and mushrooms make for a nutritious, protein-packed breakfast option. Their earthy flavors blend wonderfully and can be enjoyed in omelets, scrambles, or even in a breakfast stromboli!

What is a good filling for a stromboli?
A good filling for a stromboli is not limited to just veggies. Aside from the spinach and mushroom in my recipe, you can include cooked meats like pepperoni, sausage, or ham. Try adding cheeses like provolone, mozzarella, or even feta for a delicious contrast. Mix in roasted peppers, zucchini, or any vegetables you love!

What kind of cheese goes in a stromboli?
Traditionally, mozzarella cheese is a favorite for its melting quality, but you can also combine it with ricotta for creaminess or use provolone for a sharper taste. Don’t hesitate to experiment with other cheeses like gouda or cheddar depending on what flavors you fancy!

Should stromboli have sauce inside?
It depends on your preference! While the classic preparation keeps the sauce for dipping, you can absolutely add marinara, pesto, or a cheese sauce inside if you love that extra burst of flavor. Just be cautious with moisture; too much sauce may make the dough soggy.

Why shouldn’t you eat raw spinach every day?
Raw spinach contains oxalic acid, which can interfere with calcium absorption and potentially lead to kidney stones if consumed in excessive amounts. It’s best to enjoy it in moderation. Cooking the spinach helps reduce oxalate levels, allowing for easier digestion.

What should not be eaten with spinach every day?
It’s recommended to limit combining spinach with high-oxalate foods like rhubarb, beets, and nuts in everyday meals, especially for those prone to kidney stones. Balance is key – enjoy spinach along with a variety of other vegetables for optimal health benefits.

Delicious Spinach and Mushroom Ricotta Stromboli Made Easy

This Spinach and Mushroom Ricotta Stromboli is a comforting, customizable dish perfect for pizza night.

  • large skillet
  • baking pan

For the Dough

  • 1 package Refrigerated Pizza Dough (Store-bought or homemade)

For the Filling

  • 10 oz Fresh Baby Spinach (Can use frozen as substitute)
  • 1 cup Baby Bella Mushrooms (Sliced thin)
  • 1/2 cup Onion (Sliced thin, shallots can be used)
  • 1/4 tsp Garlic Powder (Fresh minced garlic is a substitute)
  • Salt and Pepper (To taste)
  • 1 cup Ricotta Cheese (Cottage cheese can be used for lighter option)
  • 1 cup Shredded Mozzarella (Other melted cheeses can be used)
  • 1/4 tsp Italian Seasoning (Any dried herb mix can suffice)

For the Topping

  • 1 Egg (Beaten, for egg wash)
  • 2 tbsp Water (To mix with egg)

For Serving

  • Marinara Sauce (For dipping)

Step-by-Step Instructions

  1. Preheat your oven to 400°F (200°C) and allow the refrigerated pizza dough to come to room temperature for about 15 minutes.
  2. In a large skillet, heat olive oil over medium heat, add sliced onions, mushrooms, and fresh spinach, sauté for 5-7 minutes, then season with salt and pepper.
  3. Drizzle more olive oil into a 9×13-inch baking pan and evenly spread it. Stretch the pizza dough into a large rectangle that fits the pan.
  4. Spread ricotta cheese over the dough, leaving a 1-1.5 inch border. Layer on sautéed vegetables, sprinkle with garlic powder and shredded mozzarella.
  5. Roll the dough tightly from one edge to the other, sealing sides and ends.
  6. Mix beaten egg with water and brush the entire stromboli, then and sprinkle with Italian seasoning.
  7. Bake assembled stromboli in the oven for 35-40 minutes until golden brown and crispy. Monitor closely in the last few minutes.
  8. Allow to cool for 5 minutes before slicing and serve warm with marinara sauce.

Ensure pizza dough is at room temperature to avoid tearing and enhance flavor by sautéing vegetables properly. Allow the dish to rest before slicing for cleaner pieces.

Main Dishes
Italian
comfort food, crowd-pleaser, customizable meals, easy recipes, pizza twist, Spinach and Mushroom Ricotta Stromboli

Filed Under: Main Dishes

Indulgent Lemon Ricotta Pancakes with Blueberry Bliss

July 17, 2025 by grace bellamy Leave a Comment

As I flipped my first pancake of the morning, the delightful fragrance of lemon and sweetness wafted through the kitchen, proving that brunch isn’t just a meal; it’s a celebration. These Fluffy Lemon Ricotta Pancakes with Blueberry Compote transform a typical weekend into a special occasion, reminiscent of sun-drenched spring mornings. Embracing a tangy twist from fresh lemon juice and zest, these pancakes strike the perfect balance between soft and hearty, thanks to the ricotta cheese. Not only are they a joy to prepare, but they also make for a crowd-pleasing dish that will impress your family and friends alike. Plus, the blueberry compote adds an irresistible burst of flavor, making this recipe not just family-friendly but an inviting centerpiece for any brunch gathering. How do you plan to elevate your next brunch?

Why Are Lemon Ricotta Pancakes Irresistible?

Fluffy Texture: These pancakes are delightfully airy, thanks to the ricotta cheese, achieving a unique fluffiness that will leave you craving more.
Zesty Kick: Infused with vibrant lemon zest and juice, they bring bright flavors that perfectly complement the sweetness of the blueberry compote.
Versatile Option: Perfect for spring breakfast or a weekend brunch, feel free to swap out blueberries for your favorite berries for a new twist!
Crowd-Pleasing Delight: Impress your guests with this gourmet-style dish that’s simple to prepare yet beautiful to serve. For an extra special treat, consider pairing your pancakes with a refreshing side like fresh fruit or yogurt.
Make-Ahead Friendly: Prepare the blueberry compote in advance for maximum convenience, ensuring a stress-free brunch experience.

Lemon Ricotta Pancakes with Blueberry Ingredients

For the Blueberry Compote
• Fresh Blueberries – Adds sweetness and a juicy burst; use fresh or frozen, but do not thaw if using frozen.
• Lemon Zest and Juice – Provides brightness and flavor; fresh lemons offer the best taste.
• Granulated Sugar – Sweetens both the pancake batter and blueberry compote; adjust to taste depending on blueberry sweetness.

For the Pancakes
• All-Purpose Flour – Acts as the base for structure; can substitute with gluten-free flour for a gluten-free option.
• Baking Powder – Leavens the pancakes, ensuring they stay fluffy.
• Ground Nutmeg – Adds warm spice notes; can be omitted for a simpler flavor.
• Salt – Balances sweetness and enhances overall flavors.
• Ricotta Cheese – Adds moisture and richness, creating hearty pancakes; cottage cheese can substitute in a pinch.
• Eggs – Provides structure and stability to the batter.
• Whole Milk – Enriches the batter; almond milk can be used for a dairy-free version.
• Baking Spray – Used for greasing the pan to prevent sticking.

Step‑by‑Step Instructions for Lemon Ricotta Pancakes with Blueberry

Step 1: Make the Blueberry Compote
In a small saucepan, combine fresh blueberries, the juice and zest of a lemon, and granulated sugar over medium-low heat. Stir gently and allow the mixture to simmer until the blueberries soften and release their juices, thickening into a compote, about 10-15 minutes. Once done, remove it from the heat and let it cool while you prepare the pancakes.

Step 2: Prepare the Pancake Batter
In a large mixing bowl, whisk together all-purpose flour, baking powder, ground nutmeg, salt, and sugar until evenly combined. In another bowl, mix ricotta cheese, eggs, whole milk, and the lemon juice and zest until smooth. Gently fold the wet ingredients into the dry mix, being careful not to overmix; a few lumps are okay for fluffy Lemon Ricotta Pancakes.

Step 3: Preheat the Griddle
Heat a non-stick griddle or large skillet over medium heat and lightly grease it with baking spray or butter to prevent sticking. Allow the surface to get hot, which should take about 2-3 minutes. Once it’s ready, you’ll know it’s hot enough when a few drops of water sizzle upon contact.

Step 4: Cook the Pancakes
Pour approximately ¼ cup of pancake batter onto the hot griddle for each pancake. Let them cook for about 3-4 minutes, or until small bubbles form on the surface and the edges look set. Carefully flip the pancakes and cook for an additional 2-3 minutes until both sides are golden brown.

Step 5: Serve the Pancakes
Stack your fluffy Lemon Ricotta Pancakes on a warm plate and generously top them with the blueberry compote you prepared earlier. For a buttery touch, add a pat of butter on top and drizzle with maple syrup if desired. Serve these delicious pancakes warm to enjoy their delightful flavors!

How to Store and Freeze Lemon Ricotta Pancakes

Fridge: Store leftover pancakes in an airtight container in the refrigerator for up to 3 days. Reheat in a toaster or microwave for a quick breakfast fix!

Freezer: For longer storage, place pancakes in a single layer on a baking sheet, freeze until solid, then stack with parchment paper between layers in a freezer-safe bag. They can be kept for up to 2 months.

Blueberry Compote: Keep the blueberry compote in a sealed jar in the fridge for up to a week. It can be reheated gently on the stove or in the microwave when serving with your pancakes.

Reheating: To enjoy your frozen Lemon Ricotta Pancakes, simply pop them in the toaster or microwave until warmed through. Add a fresh topping of blueberry compote for an extra burst of flavor!

Lemon Ricotta Pancakes with Blueberry Variations

Feel free to explore your creativity by customizing this delightful pancake recipe in delightful ways!

  • Berry Bliss: Swap blueberries for fresh raspberries or diced strawberries for a different flavor profile. Each berry brings its sweetness, making pancakes unique.
  • Nutty Crunch: Add poppy seeds or chia seeds into the pancake batter for an added crunch and a nutty flavor twist. It’s a simple way to upgrade your breakfast!
  • Dairy-Free Delight: Use almond milk instead of whole milk for a lactose-free alternative or try coconut milk for a tropical flair. You’ll still get those fluffy results!
  • Healthier Option: Substitute whole grain flour for all-purpose flour to boost fiber content while keeping that delicious taste. You’ll enjoy a wholesome pancake experience!
  • Savory Twist: Incorporate fresh herbs like thyme or rosemary into the batter for a surprising savory pancake version that’s great for brunch. Serve with a poached egg for more excitement!
  • Extra Sweetness: Top with a dollop of whipped cream or a drizzle of maple syrup for a luxurious touch that takes your pancakes over the top. Because who can resist a little indulgence?
  • Zesty Finish: Mix in orange zest along with the lemon zest for a citrus duo that elevates the layer of flavor to new heights. Bright and cheerful, perfect for springtime!
  • Fiery Variant: Add a pinch of cayenne pepper to the batter for a hint of heat, creating a bold contrast with the sweet blueberry compote. It’s a deliciously daring choice!

Expert Tips for Lemon Ricotta Pancakes

  • Whisk Smoothly: Ensure your ricotta is whisked until smooth before mixing to avoid any lumps in your pancake batter. This creates a luxurious texture!
  • Don’t Overmix: Gently combine the wet and dry ingredients to keep your pancakes fluffy. Overmixing can lead to dense Lemon Ricotta Pancakes.
  • Fresh Ingredients Matter: Use fresh eggs and lemons for the best flavor. Old baking powder can hinder the rising; always check its freshness before use.
  • Control the Heat: Maintain medium heat to achieve golden-brown pancakes. Too high a temperature can lead to burnt outsides and raw insides.
  • Customize the Compote: Feel free to swap blueberries with raspberries or strawberries; just adjust the sugar accordingly based on the sweetness of the berries.
  • Make Ahead: Prepare the blueberry compote a day in advance for a quick and hassle-free brunch with delicious Lemon Ricotta Pancakes!

What to Serve with Lemon Ricotta Pancakes with Blueberry Compote

There’s nothing like a delightful spread to elevate your pancake experience while bringing smiles all around the table.

  • Crispy Bacon: The salty crunch of crispy bacon contrasts beautifully with the sweetness of the pancakes, creating a satisfying flavor balance everyone will love.
  • Fresh Fruit Salad: A medley of vibrant, seasonal fruits adds a refreshing touch that complements the zesty pancakes while enhancing their spring vibe. This combination not only tastes great but also looks beautiful on the plate!
  • Greek Yogurt: Creamy, tangy Greek yogurt offers a protein-packed companion that balances the sweetness of syrup and blueberry compote, providing a lightness to your meal.
  • Honey Drizzle: For an extra touch of sweetness, a drizzle of honey amplifies the flavors of the pancakes and offers a delightful floral note that plays perfectly with the lemon and blueberries.
  • Vanilla Ice Cream: Indulging in a scoop of vanilla ice cream on top of warm pancakes is a decadent treat that transforms breakfast into dessert. The melting creaminess is an irresistible pairing!
  • Iced Coffee: A chilled glass of iced coffee is an energizing companion to your brunch; its smooth bitterness pairs nicely with the sweet and tangy flavors of the pancakes.
  • Lemonade Sparkler: A refreshing lemonade spritzer can brighten up the meal, adding a bubbly zest to your brunch and enhancing the lemony goodness of your pancakes.
  • Maple Syrup: A classic! Rich maple syrup adds a comforting sweetness, beautifully drenching the pancakes while tying together all elements of the meal.
  • Whipped Cream: Light and airy whipped cream rounds out the flavor profile, adding a luscious creaminess that works beautifully with the blueberry compote.

Make Ahead Options

These Lemon Ricotta Pancakes with Blueberry Compote are perfect for meal prep, allowing you to enjoy a delicious breakfast without the morning rush! You can prepare the blueberry compote up to 3 days in advance; simply store it in an airtight container in the refrigerator. To make the pancakes ahead of time, whip up the batter the night before and refrigerate (just be sure to cover it well to maintain freshness). When you’re ready to enjoy your breakfast, stir the batter gently, and cook the pancakes as directed. They’ll be just as fluffy and flavorful, saving you precious time on busy mornings.

Lemon Ricotta Pancakes with Blueberry Recipe FAQs

What to serve with lemon ricotta pancakes?
These pancakes pair wonderfully with a variety of sides! Consider serving them with fresh fruit like strawberries, banana slices, or even some crispy bacon for a sweet and savory combination. A dollop of Greek yogurt or whipped cream can add extra creaminess, while a light salad can complement the richness of the pancakes splendidly.

What does ricotta do to pancakes?
Ricotta cheese transforms pancakes by adding moisture and richness, which creates a delightful, fluffy texture. Its creamy consistency helps achieve a soft interior while providing a slight tang that balances the sweetness. The result is a pancake that feels hearty without being dense, making them a truly indulgent breakfast treat!

Are lemon ricotta pancakes healthy?
Absolutely! These lemon ricotta pancakes offer a good source of protein thanks to the ricotta cheese, making them a hearty breakfast option. You can boost their health benefits by reducing the sugar content or using whole-grain flour instead of all-purpose flour. Pairing with fruit not only adds flavor nutritional value but also keeps the dish balanced and satisfying.

Can you reheat ricotta pancakes?
Yes! To reheat leftover ricotta pancakes, simply place them in a toaster or microwave until warmed through. If you want to keep them crispy, the toaster works best! Adding a fresh topping of blueberry compote upon reheating can revive the flavors and give you that fresh-made taste.

What pairs well with lemon pancakes?
Lemon pancakes are delightful with a variety of toppings. Fresh berries, like strawberries or raspberries, enhance the citrus notes beautifully. A drizzle of honey or maple syrup can add sweetness, while a sprinkle of powdered sugar or a dollop of ricotta on top elevates the dish further. Try pairing with a light syrup made from citrus juices for a zesty twist!

What is the difference between ricotta pancakes and regular pancakes?
The primary difference lies in the texture and taste. Ricotta pancakes are typically fluffier and more moist due to the addition of ricotta cheese, which also infuses a subtle creaminess. Regular pancakes are lighter and denser, often relying solely on flour and liquid for consistency. The ricotta gives these pancakes a unique richness that elevates them from standard breakfast fare!

Indulgent Lemon Ricotta Pancakes with Blueberry Bliss

These Lemon Ricotta Pancakes with Blueberry are fluffy, flavorful, and perfect for brunch.

  • Saucepan
  • Mixing Bowl
  • Griddle
  • Whisk

Blueberry Compote

  • 2 cups Fresh Blueberries (Use fresh or frozen, do not thaw if using frozen.)
  • 1 tbsp Lemon Zest (Fresh lemons offer the best taste.)
  • 2 tbsp Lemon Juice (Fresh lemons offer the best taste.)
  • 1 cup Granulated Sugar (Adjust to taste depending on blueberry sweetness.)

Pancakes

  • 1 cup All-Purpose Flour (Can substitute with gluten-free flour.)
  • 2 tbsp Baking Powder (Leavens the pancakes.)
  • 1 tsp Ground Nutmeg (Can be omitted.)
  • 1/2 tsp Salt
  • 1 cup Ricotta Cheese (Cottage cheese can substitute.)
  • 2 pcs Eggs
  • 1 cup Whole Milk (Almond milk can be used.)
  • 1 tbsp Baking Spray (For greasing the pan.)

Blueberry Compote

  1. In a small saucepan, combine fresh blueberries, lemon juice, lemon zest, and granulated sugar over medium-low heat. Stir gently and allow the mixture to simmer until blueberries soften, about 10-15 minutes.
  2. Remove from heat and let it cool.

Pancake Preparation

  1. In a mixing bowl, whisk together flour, baking powder, nutmeg, salt, and sugar until combined.
  2. In another bowl, mix ricotta cheese, eggs, milk, lemon juice, and zest until smooth.
  3. Gently fold the wet ingredients into the dry mix.

Cooking Pancakes

  1. Heat a non-stick griddle over medium heat and lightly grease with baking spray.
  2. Pour ¼ cup of batter onto the hot griddle. Cook for 3-4 minutes until bubbles form, then flip and cook for another 2-3 minutes.

Serving

  1. Stack pancakes on a warm plate, top with blueberry compote, and serve warm.

For best results, whisk ricotta until smooth and don’t overmix the batter. Fresh ingredients are key for optimal flavor.

Breakfast
American
Blueberry Compote, Breakfast Recipes, brunch, Fluffy Pancakes, Lemon Ricotta Pancakes, Pancake Recipes

Filed Under: Breakfast

Creamy Spinach Artichoke Tortellini for Cozy Nights

July 17, 2025 by grace bellamy Leave a Comment

As I stirred the pot, the rich aroma of garlic and creamy sauce wafted through the kitchen, transporting me to my favorite Italian bistro. Today, I’m all about serving up a delightful spin on comfort food with my Creamy Spinach Artichoke Tortellini. This scrumptious dish blends tender tortellini with vibrant spinach and tangy artichokes, creating a satisfying meal that’s both quick to whip up and a real family favorite. In just 20 minutes, you’ll have a wholesome dinner that feels indulgent without the fuss—perfect for busy weeknights or cozy gatherings. So, what twist will you add to elevate this simple joy?

Why is this dish a family favorite?

Quick preparation: With just 20 minutes from start to finish, you’ll have a delicious meal on the table in no time!
Creamy indulgence: The rich, velvety sauce made from parmesan and mozzarella is utterly satisfying and comforting.
Nutrient-packed: Loaded with fresh spinach and artichokes, it’s a delicious way to sneak in those greens.
Customizable: Add your favorite ingredients like rotisserie chicken or sun-dried tomatoes for a personal touch. This Creamy Spinach Artichoke Tortellini can be your go-to recipe that adapts to your cravings!

Spinach Artichoke Tortellini Ingredients

Ready to whip up this creamy delight? Here’s what you need!

For the Tortellini
• 20 ounces cheese tortellini – This is the heart of the dish, offering a delightful cheesy bite.

For the Veggies
• 6 cups fresh spinach – Brings vibrant color and nutrients; frozen spinach can work if fresh isn’t available.
• 14-ounce can artichoke hearts, chopped – Adds a tangy kick; be sure to drain them well before use.

For the Sauce
• 4 tablespoons salted butter – A staple for creating that rich, creamy sauce. You can use unsalted butter if preferred.
• 1/4 cup flour – Essential for thickening the sauce, creating that luscious texture. Gluten-free flour is a great alternative.
• 1 teaspoon kosher salt – Enhances the overall flavor; feel free to adjust based on your taste.
• 1/4 teaspoon pepper – Provides a subtle hint of heat; modify to your liking.
• 4 cloves minced garlic – This aromatic gem infuses the dish with deep flavor; garlic powder (1 teaspoon) is a handy substitute.
• 4 cups milk – Forms the base of your creamy sauce; any dairy or plant-based milk can be used for a lighter version.
• 1 cup shredded parmesan cheese – Adds depth and richness; Pecorino cheese can be a nice swap.
• 1 cup shredded mozzarella cheese – Delivers that melty goodness, perfect for a cozy meal. Other melting cheeses like Monterey Jack can work just as well.

Now that you have everything ready, you’re just steps away from enjoying the rich, creamy indulgence of Spinach Artichoke Tortellini!

Step‑by‑Step Instructions for Spinach Artichoke Tortellini

Step 1: Cook the Tortellini
Begin by bringing a large pot of salted water to a rolling boil. Add 20 ounces of cheese tortellini and cook according to the package instructions, usually about 3–5 minutes until they float to the surface and are al dente. Once cooked, drain the tortellini in a colander and set aside, allowing time for excess water to remove.

Step 2: Sauté the Garlic
In a medium saucepan, melt 4 tablespoons of salted butter over medium-low heat. Add 4 cloves of minced garlic and sauté for about 1–2 minutes until fragrant but not browned. The warm aroma will fill your kitchen as the butter bubbles gently, creating the flavorful base for your creamy sauce.

Step 3: Create the Roux
Sprinkle in 1/4 cup of flour, 1 teaspoon of kosher salt, and 1/4 teaspoon of pepper into the pan. Whisk continually for 3-5 minutes, allowing the mixture to bubble and turn a light golden color. This roux will help thicken the sauce and provide a rich texture to your Spinach Artichoke Tortellini.

Step 4: Whisk in the Milk
Gradually pour in 4 cups of milk while whisking vigorously to prevent any lumps. Increase the heat to medium and keep stirring until the sauce thickens and begins to bubble, about 5-7 minutes. The mixture should take on a creamy consistency that will envelop your tortellini beautifully.

Step 5: Melt the Cheeses
Remove the saucepan from the heat and stir in 1 cup of shredded parmesan and 1 cup of shredded mozzarella cheese. Mix until all the cheese is melted and incorporated, creating a luscious, creamy sauce. If the sauce appears too thick, add a splash of milk to reach your desired consistency.

Step 6: Combine Ingredients
Gently fold in the cooked tortellini, 6 cups of fresh spinach, and the chopped artichoke hearts from a 14-ounce can. Stir until the spinach wilts and everything is well combined, showcasing the vibrant colors of the ingredients. This step brings together all the textures and flavors of your Spinach Artichoke Tortellini.

Step 7: Season and Serve
Taste the dish and adjust seasoning with more salt and pepper if necessary. Once everything is warm and evenly mixed, serve hot in bowls, garnished with extra cheese if desired. Enjoy this comforting dish of Spinach Artichoke Tortellini, perfect for family dinners or cozy nights in.

Spinach Artichoke Tortellini Variations

Feel free to explore your creativity and personalize this dish with delightful twists that play with flavor and texture!

  • Protein-Packed: Add cooked chicken or shrimp to increase protein while keeping the dish hearty and fulfilling. It transforms a simple pasta into a complete meal.

  • Burst of Flavor: Incorporate sun-dried tomatoes for a sweet and tangy touch that enriches the creamy sauce. The added color makes for a beautiful presentation too!

  • Cheesy Blend: Experiment with feta or goat cheese for a tangy kick that contrasts wonderfully with the creaminess of mozzarella and parmesan. Each bite will have a surprising depth.

  • Herbed Goodness: Toss in some fresh herbs like basil or parsley for a vibrant, garden-fresh flavor. A sprinkle of lemon zest can also brighten the whole dish!

  • Nutty Addition: Stir in toasted pine nuts or walnuts for a delightful crunch and nutty undertone. It adds an unexpected texture that elevates the dish.

  • Spicy Kick: For those who enjoy heat, sprinkle in red pepper flakes or diced jalapeños. This little zing creates an exciting twist that enlivens the creamy contours.

  • Vegetable Medley: Include sautéed mushrooms or bell peppers for an added earthy flavor and colorful presentation. It’s a beautiful way to sneak in more veggies!

  • Subtle Sweetness: Add a hint of cream cheese to the sauce for an irresistible creaminess that also provides a touch of sweetness. A comforting favorite that feels extra indulgent!

How to Store and Freeze Spinach Artichoke Tortellini

Fridge: Store leftover Spinach Artichoke Tortellini in an airtight container for up to 3 days. Reheat gently on the stovetop with a splash of milk to restore creaminess.

Freezer: To freeze, portion the cooked tortellini in freezer-safe bags or containers. It keeps well for up to 3 months. Thaw overnight in the fridge before reheating.

Reheating: When ready to enjoy your frozen tortellini, reheat on the stovetop over low heat, adding a touch of milk to keep the sauce silky. Stir frequently to avoid sticking.

Make-Ahead: You can assemble the Spinach Artichoke Tortellini ahead of time and store it in the fridge unbaked for up to 2 days; then, bake when you’re ready to serve!

Expert Tips for Spinach Artichoke Tortellini

  • Stir Continuously: Ensure to stir the sauce continuously after adding milk to prevent lumps from forming, resulting in a smooth creaminess.
  • Don’t Overcook Spinach: Keep an eye on the spinach—it should wilt but remain bright green for optimal flavor and nutrition.
  • Adjusting Thickness: If your sauce gets too thick, gradually add more milk while stirring until you reach the creamy consistency you desire.
  • Quality Cheese Matters: Use good quality cheeses for a more flavorful Spinach Artichoke Tortellini; they’ll melt better and taste richer.
  • Prep Ahead: For a quicker dinner, prep your ingredients in advance; chop artichokes and garlic so you can whip this dish up in no time!
  • Personalize It: Feel free to get creative with add-ins; roasted chicken or sun-dried tomatoes can enhance your Spinach Artichoke Tortellini experience!

Make Ahead Options

These Creamy Spinach Artichoke Tortellini are perfect for meal prep enthusiasts! You can cook the tortellini and prepare the creamy sauce up to 24 hours in advance, allowing busy nights to run smoother. Simply cook the tortellini according to the package instructions, sauté the garlic, create the roux, and mix in the spinach and artichokes, but do not bake. Store the components separately in airtight containers in the refrigerator to maintain quality. When you’re ready to enjoy, simply reheat the sauce gently over medium heat, fold in the cooked tortellini, and serve for a delicious meal that’s just as delightful as when freshly made!

What to Serve With Spinach Artichoke Tortellini

Pair your creamy dish with delicious sides for a well-rounded meal experience.

  • Garlic Bread: The warm, buttery flavors of garlic bread provide a perfect companion, soaking up those creamy sauce remnants with every bite. Plus, who can resist the aroma of freshly baked bread wafting through the air?
  • Caesar Salad: Crisp romaine, crunchy croutons, and a zesty dressing add a refreshing contrast to the richness of the tortellini, creating a delightful balance on your plate. A sprinkle of parmesan ties the meal together beautifully.
  • Roasted Vegetables: Seasonal veggies like asparagus or bell peppers, lightly seasoned and roasted to perfection, offer a hearty texture along with vibrant colors that enhance the meal’s appeal.
  • Mimosa: Light and refreshing, a glass of mimosa pairs beautifully with the creamy flavors, adding a burst of citrus that awakens the palate while keeping the atmosphere festive.
  • Lemon Sorbet: Serve this chilled, zesty sorbet for dessert as a refreshing palate cleanser after savoring the rich tortellini. It’s an elegant way to end the meal, leaving a bright note to remember.
  • Wine Pairing: A crisp Pinot Grigio lifts the dish with its fruity notes while complementing the creaminess, making every mouthful even more enjoyable.

Spinach Artichoke Tortellini Recipe FAQs

How do I know if the spinach is fresh enough to use?
Absolutely! Fresh spinach should be vibrant green and crisp. Avoid any leaves that are wilting or have dark spots all over. When selecting, look for the leaves that are firm to the touch and have no yellowing—these are the ones that will make your Spinach Artichoke Tortellini shine!

How should I store leftovers of Spinach Artichoke Tortellini?
To keep your creamy creation fresh, store your Spinach Artichoke Tortellini in an airtight container in the refrigerator for up to 3 days. When reheating, add a splash of milk to restore that delightful creaminess. Gently warm it on the stovetop over low heat while stirring occasionally.

Can I freeze Spinach Artichoke Tortellini?
Absolutely! Freezing your Spinach Artichoke Tortellini is a great way to have a quick dinner ready in advance. Portion the cooked tortellini into freezer-safe bags or containers, ensuring you remove as much air as possible. It can be stored for up to 3 months. When ready to enjoy, thaw overnight in the fridge and reheat on the stovetop, adding a little milk to maintain creaminess.

What should I do if my sauce becomes too thick?
Very! If your sauce thickens up more than you’d like while cooking, don’t worry! Gradually whisk in additional milk until you achieve your desired consistency. I often add a splash at a time, stirring continuously until it’s silky smooth again. Just taste and adjust the seasoning as you go!

Can I make this dish ahead of time?
You definitely can! If preparing for a busy evening, you can assemble the Spinach Artichoke Tortellini ahead of time and store it in the fridge unbaked for up to 2 days. When you’re ready to serve, simply pop it in the oven or stovetop to heat up. It’ll taste just as delicious while saving you time!

Is it necessary to rinse tortellini after cooking?
It’s best not to rinse tortellini after cooking, as rinsing can wash away some of the flavor and increase the chance of the sauce not adhering properly. The starch left on the tortellini is what helps the sauce cling beautifully when you combine them for your Spinach Artichoke Tortellini!

Creamy Spinach Artichoke Tortellini for Cozy Nights

This Creamy Spinach Artichoke Tortellini blends tender tortellini, vibrant spinach, and tangy artichokes for a comforting family favorite.

  • Large Pot
  • Medium saucepan
  • Colander
  • Whisk

For the Tortellini

  • 20 ounces cheese tortellini (This is the heart of the dish, offering a delightful cheesy bite.)

For the Veggies

  • 6 cups fresh spinach (Brings vibrant color and nutrients; frozen spinach can work if fresh isn’t available.)
  • 14 ounces artichoke hearts, chopped (Adds a tangy kick; be sure to drain them well before use.)

For the Sauce

  • 4 tablespoons salted butter (A staple for creating that rich, creamy sauce. You can use unsalted butter if preferred.)
  • 1/4 cup flour (Essential for thickening the sauce, creating that luscious texture. Gluten-free flour is a great alternative.)
  • 1 teaspoon kosher salt (Enhances the overall flavor; feel free to adjust based on your taste.)
  • 1/4 teaspoon pepper (Provides a subtle hint of heat; modify to your liking.)
  • 4 cloves minced garlic (This aromatic gem infuses the dish with deep flavor; garlic powder (1 teaspoon) is a handy substitute.)
  • 4 cups milk (Forms the base of your creamy sauce; any dairy or plant-based milk can be used for a lighter version.)
  • 1 cup shredded parmesan cheese (Adds depth and richness; Pecorino cheese can be a nice swap.)
  • 1 cup shredded mozzarella cheese (Delivers that melty goodness, perfect for a cozy meal. Other melting cheeses like Monterey Jack can work just as well.)

Step-by-Step Instructions

  1. Begin by bringing a large pot of salted water to a rolling boil. Add 20 ounces of cheese tortellini and cook according to the package instructions, usually about 3–5 minutes until they float to the surface and are al dente. Once cooked, drain the tortellini in a colander and set aside.
  2. In a medium saucepan, melt 4 tablespoons of salted butter over medium-low heat. Add 4 cloves of minced garlic and sauté for about 1–2 minutes until fragrant but not browned.
  3. Sprinkle in 1/4 cup of flour, 1 teaspoon of kosher salt, and 1/4 teaspoon of pepper into the pan. Whisk continually for 3-5 minutes, allowing the mixture to bubble and turn a light golden color.
  4. Gradually pour in 4 cups of milk while whisking vigorously to prevent any lumps. Increase the heat to medium and keep stirring until the sauce thickens and begins to bubble, about 5-7 minutes.
  5. Remove the saucepan from the heat and stir in 1 cup of shredded parmesan and 1 cup of shredded mozzarella cheese. Mix until all the cheese is melted and incorporated.
  6. Gently fold in the cooked tortellini, 6 cups of fresh spinach, and the chopped artichoke hearts from a 14-ounce can. Stir until the spinach wilts and everything is well combined.
  7. Taste the dish and adjust seasoning with more salt and pepper if necessary. Once everything is warm and evenly mixed, serve hot in bowls, garnished with extra cheese if desired.

Tips for better results include stirring continuously after adding milk to prevent lumps, and ensuring spinach wilts but remains bright green for optimal flavor and nutrition.

Main Dishes
Italian
comfort food, creamy pasta, family favorite, quick dinner, Spinach Artichoke Tortellini, Vegetarian

Filed Under: Main Dishes

Indulge in Balsamic Caprese Stuffed Chicken Breasts Today

July 17, 2025 by grace bellamy Leave a Comment

As I sat at a cozy café in Tuscany, a burst of flavors enveloped me—juicy chicken paired with the freshest tomatoes and fragrant basil. I couldn’t help but think of how I could recreate that magical Caprese experience at home. Enter my Balsamic Caprese Stuffed Chicken Breasts! This recipe is not only simple to whip up after a long day but also a crowd-pleaser that will impress guests and family alike. The combination of melted mozzarella, sun-dried tomatoes, and a luscious balsamic reduction is an explosion of flavor you won’t want to miss. Perfect for weeknight dinners or special occasions, this dish brings a taste of Italy to your kitchen. Are you ready to elevate your dinner game?

Why is this chicken recipe a winner?

Simplicity: The preparation process is straightforward, perfect for busy weeknights or novice cooks. Flavor Explosion: With fresh tomatoes, fragrant basil, and melty mozzarella, every bite bursts with the essence of a classic Caprese. Savory Sweet Balance: The balsamic reduction ties it all together, creating a perfect harmony of sweet and tangy flavors. Versatile Pairing: Serve it alongside a light salad or sautéed veggies for a complete meal. Crowd-Pleasing: This dish guarantees rave reviews, making it your go-to recipe for entertaining. For an extra boost of freshness, pair it with a delightful light salad like Spinach Strawberry Salad with Balsamic Poppy Seed Dressing.

Balsamic Caprese Stuffed Chicken Breasts Ingredients

• Elevate your dinner with these must-have ingredients!

For the Chicken

  • Chicken Breasts – Boneless, skinless ensures juicy, tender meat.
  • Salt & Pepper – Essential for enhancing the chicken’s natural flavors.
  • Dried Oregano – Adds a lovely herbal depth; fresh works even better!
  • Dried Basil – Complements the tomatoes well; fresh basil can intensify flavor.

For the Stuffing

  • Roma Tomatoes – Provides delicious moisture and acidity; any ripe tomato can substitute.
  • Sun-Dried Tomato Strips – Infuses rich umami flavor; pick ones in oil for extra taste.
  • Mozzarella Cheese – Melty goodness that makes the stuffing creamy; try provolone for variety.
  • Basil Leaves – Fresh and aromatic, perfect for stuffing; chop them for manageable portions.
  • Garlic – Freshly minced offers a robust flavor compared to pre-packaged.

For the Balsamic Reduction

  • Balsamic Vinegar – The star of the sauce; use high-quality for the best flavor impact.
  • Brown Sugar – Balances the vinegar’s acidity; white sugar works in a pinch.

These flavorful ingredients come together beautifully to craft your own Balsamic Caprese Stuffed Chicken Breasts right at home!

Step‑by‑Step Instructions for Balsamic Caprese Stuffed Chicken Breasts

Step 1: Preheat the Oven
Begin by preheating your oven to 180°C (350°F). This ensures your Balsamic Caprese Stuffed Chicken Breasts will cook evenly and thoroughly. While the oven heats up, prepare your chicken breasts for stuffing by securing a cutting board and a sharp knife at hand.

Step 2: Prepare the Chicken
Carefully create a pocket in each chicken breast by slicing about three-quarters of the way through the thickest side. Take your time to ensure the pocket is large enough for the stuffing, but be cautious not to cut all the way through. This step will become the flavorful canvas for your stuffing ingredients.

Step 3: Season the Chicken
Generously season the chicken breasts with salt, pepper, dried oregano, and dried basil. Be sure to rub the seasonings into the meat to enhance the flavor throughout. After seasoning, drizzle a bit of oil from the sun-dried tomatoes over the breasts to add moisture and richness before moving on to the next step.

Step 4: Stuff the Chicken
Start stuffing each chicken breast with a delightful mix of slices of fresh Roma tomato, sun-dried tomato strips, gooey mozzarella cheese, and fragrant basil leaves. Pack the ingredients in well, but don’t overstuff! Once filled, use toothpicks to seal each pocket securely, ensuring all those delicious flavors stay tucked inside.

Step 5: Sear the Chicken
In a large skillet, heat some remaining sun-dried tomato oil over medium-high heat. Once hot, place your stuffed chicken breasts in the skillet and sear for about 2 minutes on each side, or until they achieve a lovely golden brown color. This step adds texture and enhances flavor before they jump into the oven.

Step 6: Prepare the Balsamic Sauce
While the chicken is searing, mix together minced garlic, balsamic vinegar, and brown sugar in a separate jug. Stir until well combined, creating a rich sauce that will complement your stuffed chicken perfectly. Once your chicken is seared, carefully pour this tangy mixture around the breasts in the skillet.

Step 7: Bake the Chicken
Now it’s time to transform your skillet into the oven! Transfer the skillet directly into your preheated oven and bake for 10 to 15 minutes, or until the chicken is cooked through and reaches an internal temperature of 165°F (74°C). The cheese should be melted, bubbling, and begging to be enjoyed.

Step 8: Serve and Drizzle
After baking, carefully remove the skillet from the oven and let the chicken rest for a few minutes. Remove the toothpicks, then drizzle the pan’s juices generously over each stuffed chicken breast. This luscious finish not only adds flavor but elevates the presentation of your Balsamic Caprese Stuffed Chicken Breasts for a delightful meal.

Make Ahead Options

These Balsamic Caprese Stuffed Chicken Breasts are perfect for meal prep enthusiasts looking to save time during busy weeknights! You can prepare the chicken breasts by creating the pockets and seasoning them up to 24 hours in advance, simply refrigerate until ready to stuff. The stuffing ingredients, including the fresh and sun-dried tomatoes, can also be chopped and stored separately in airtight containers for up to 3 days. When you’re ready to cook, just stuff the breasts, sear, and bake as directed. This approach ensures your chicken stays juicy and delicious, allowing you to enjoy restaurant-quality results with minimal effort!

What to Serve with Caprese Stuffed Balsamic Chicken?

Elevate your dining experience with irresistible sides that beautifully complement your flavorful chicken.

  • Creamy Mashed Potatoes: The velvety texture contrasts nicely with the chicken’s juiciness, soaking up the balsamic reduction perfectly.
  • Garlic Roasted Asparagus: This vibrant side adds a fresh, crunchy element that balances the richness of the stuffed chicken. Simply toss asparagus with olive oil, garlic, and a sprinkle of salt before roasting until tender.
  • Mixed Green Salad: A light salad with lemon vinaigrette offers a refreshing crunch that cuts through the savory richness of the dish. Add cherry tomatoes and cucumbers for extra color and flavor!
  • Balsamic Glazed Brussels Sprouts: The sweet-tart glaze echoes the flavors in the chicken, making for a cohesive meal that excites the palate. Roast until caramelized for an extra depth of flavor.
  • Quinoa Pilaf: Nutty quinoa offers a wholesome grain option that adds a fun texture, along with the vibrant flavors of bell peppers and herbs.
  • Italian Ciabatta Bread: Crusty bread to soak up the delicious balsamic sauce adds authenticity, making each bite feel like a trip to Italy.
  • Chardonnay: A glass of chilled Chardonnay pairs beautifully, enhancing the dish’s flavors with its crisp, fruity notes.

Expert Tips for Balsamic Caprese Stuffed Chicken

  • Choose Quality Chicken: Opt for organic or free-range chicken breasts when possible. It enhances flavor and ensures a better texture throughout your dish.

  • Avoid Overstuffing: Be mindful of how much stuffing you add to each chicken breast. Overstuffing can prevent them from cooking evenly and may cause your delicious filling to spill out during baking.

  • Use Fresh Ingredients: Fresh basil and ripe tomatoes offer a vibrant flavor that dried or canned counterparts cannot match. They will take your Balsamic Caprese Stuffed Chicken to the next level.

  • Monitor Cooking Time: Chicken sizes can vary, so always check the internal temperature. Ensure it reaches 165°F (74°C) to prevent dryness while keeping it juicy.

  • Rest Before Serving: Allow the chicken to rest for a few minutes after baking. This helps retain moisture and makes for a beautifully tender bite.

  • Enhance the Sauce: Experiment with adding a splash of honey or balsamic glaze to the sauce before pouring it around the chicken for an extra layer of flavor.

Balsamic Caprese Stuffed Chicken Variations

Feel free to unleash your culinary creativity and customize this dish to your taste buds!

  • Spinach Twist: Replace fresh basil with fresh spinach leaves for a milder flavor that still adds a delightful green touch to your stuffing.
  • Smoky Flavor: Substitute mozzarella cheese with smoked cheese for a rich, campfire-inspired twist that infuses the chicken with unexpected depth.
  • Vegan Option: Swap chicken breasts for large portobello mushrooms—stuff them the same way for a hearty vegetarian alternative bursting with flavors!
  • Gluten-Free: Ensure all ingredients, especially any sauces or seasonings, are marked gluten-free to accommodate those with gluten sensitivities.
  • Zesty Kick: Add chopped jalapeños or crushed red pepper flakes to the stuffing for a refreshing heat that’ll tantalize your taste buds.
  • Fruit Fusion: Introduce diced fresh peaches or apricots into the stuffing for a touch of sweetness that beautifully contrasts the tangy balsamic.
  • Herb Mix: Mix in other herbs like thyme or rosemary with your stuffing for a fragrant bouquet that elevates the overall flavor profile.
  • Creamy Addition: Consider adding a dollop of cream cheese into the stuffing for an extra layer of creaminess that pairs perfectly with the tomatoes and herbs.

How to Store and Freeze Balsamic Caprese Stuffed Chicken

Fridge: Store leftovers in an airtight container in the refrigerator for up to 3 days. This helps maintain flavor and moisture while keeping your delicious Balsamic Caprese Stuffed Chicken fresh.

Freezer: If you want to save it longer, freeze the stuffed chicken in a freezer-safe container for up to 3 months. Thaw in the fridge overnight before reheating.

Reheating: For the best texture, reheat the chicken in the oven at 180°C (350°F) for about 15-20 minutes, covered with foil to keep it moist. Avoid microwaving, as this can dry it out.

Wraps: If you plan to freeze, individually wrap each chicken breast in plastic wrap before placing them in a container to prevent freezer burn.

Balsamic Caprese Stuffed Chicken Breasts Recipe FAQs

What should I look for when selecting chicken breasts?
Absolutely! When selecting chicken breasts, look for boneless and skinless pieces for the best results. Ensure the meat is pink, firm, and free of dark spots or any unusual odors. Fresh chicken should feel moist but not slimy, indicating it’s still good to cook with.

How can I store leftovers of Balsamic Caprese Stuffed Chicken?
Very! To store leftovers, place them in an airtight container in the refrigerator for up to 3 days. Be sure the container is well sealed to preserve flavor and moisture. Alternatively, you can freeze the chicken in a freezer-safe container for up to 3 months.

What’s the best way to reheat stuffed chicken?
I often recommend reheating stuffed chicken in the oven for the best texture! Preheat your oven to 180°C (350°F). Place the chicken in a baking dish, cover with foil to trap moisture, and heat for about 15-20 minutes or until warmed through. This keeps the chicken juicy and delicious.

Can I freeze Balsamic Caprese Stuffed Chicken? If so, what is the best method?
Absolutely! You can freeze Balsamic Caprese Stuffed Chicken. Start by individually wrapping each stuffed breast in plastic wrap, then place them in a freezer-safe container or resealable bag. This method prevents freezer burn and keeps them fresh for up to 3 months. When ready to eat, thaw overnight in the refrigerator before reheating.

Does balsamic vinegar make chicken tender?
Very! Balsamic vinegar can help tenderize chicken because it contains acids that break down proteins. Marinating the chicken in balsamic vinegar for 30 minutes to an hour before cooking will enhance its tenderness and infuse it with a rich flavor. Pair it with some oil and herbs to create an extra delightful marinade!

What side dishes pair well with Caprese stuffed chicken?
Oh, the more, the merrier! To complement the flavors of your Balsamic Caprese Stuffed Chicken, consider serving it with a light salad, such as a mixed greens salad with a lemon vinaigrette. Grilled vegetables or a side of garlic bread also makes for a delightful pairing, balancing the richness of the cheese and sauce perfectly.

Indulge in Balsamic Caprese Stuffed Chicken Breasts Today

Experience the explosion of flavors in Balsamic Caprese Stuffed Chicken Breasts—juicy chicken, fresh tomatoes, and a balsamic reduction.

  • skillet
  • Oven
  • Knife
  • cutting board

For the Chicken

  • 4 pieces Boneless Skinless Chicken Breasts (Ensures juicy, tender meat.)
  • 1 teaspoon Salt (Essential for enhancing flavor.)
  • 1 teaspoon Pepper (Essential for enhancing flavor.)
  • 1 teaspoon Dried Oregano (Adds herbal depth.)
  • 1 teaspoon Dried Basil (Complements the flavors.)

For the Stuffing

  • 2 cups Roma Tomatoes (Provides moisture and acidity.)
  • 1 cup Sun-Dried Tomato Strips (Pick ones in oil for taste.)
  • 1 cup Mozzarella Cheese (Melty goodness.)
  • 1/2 cup Basil Leaves (Fresh and aromatic.)
  • 2 cloves Garlic (Freshly minced for better flavor.)

For the Balsamic Reduction

  • 1/2 cup Balsamic Vinegar (High-quality for best flavor.)
  • 1 tablespoon Brown Sugar (Balances acidity.)

Step-by-Step Instructions

  1. Preheat the oven to 180°C (350°F).
  2. Create a pocket in each chicken breast by slicing about three-quarters of the way through.
  3. Season the chicken breasts with salt, pepper, dried oregano, and dried basil. Drizzle with sun-dried tomato oil.
  4. Stuff chicken breasts with Roma tomato slices, sun-dried tomatoes, mozzarella cheese, and basil leaves. Use toothpicks to seal.
  5. Sear stuffed chicken in a skillet over medium-high heat until golden brown, about 2 minutes per side.
  6. Mix minced garlic, balsamic vinegar, and brown sugar in a separate jug and stir to combine. Pour around chicken in the skillet.
  7. Transfer the skillet to the oven and bake for 10 to 15 minutes until chicken is cooked through and cheese is melted.
  8. Let chicken rest for a few minutes before serving. Drizzle pan juices over each breast.

Opt for quality ingredients for the best results. Allow the chicken to rest post-baking for better texture.

Main Dishes
Italian
Balsamic Caprese Stuffed Chicken, balsamic reduction, Caprese Chicken, Easy Weeknight Dinner, Italian Cuisine, Stuffed Chicken

Filed Under: Main Dishes

Delicious Honey Garlic Butter Shrimp & Broccoli in 30 Minutes

July 17, 2025 by grace bellamy Leave a Comment

Is there anything quite as satisfying as a quick weeknight dinner that feels like a special treat? Enter my Honey Garlic Butter Shrimp & Broccoli, a dish that takes the hassle out of cooking while delivering on flavor in a big way. With tender shrimp bathed in a sweet and savory glaze that’s complemented by crisp broccoli, this recipe is not just a feast for the taste buds—it’s also a healthier alternative to takeout. Plus, it comes together in a flash, making it perfect for those busy evenings when the last thing you want is to face a long lineup at your favorite restaurant. Could dinner be any easier? Let’s dive into this culinary delight that’s sure to win over your family and awaken your inner chef!

Why is this dish a weeknight winner?

Quick and Easy: This recipe is designed for busy evenings, allowing you to whip up a delicious meal in just 30 minutes.

Flavor Explosion: The harmonious blend of honey and garlic creates a mouthwatering glaze that elevates the shrimp and broccoli in every bite.

Healthy Alternative: Packed with protein and nutrition, this dish is a guilt-free indulgence compared to takeout options.

Versatile: Feel free to switch up the veggies! Substitute with snap peas or bell peppers for a twist on flavors.

Crowd-Pleasing: Whether cooking for family or entertaining guests, this dish will impress everyone at the table, akin to my Garlic Butter Chicken Bites with Creamy Parmesan Pasta.

Minimum Mess, Maximum Impact: With just one skillet needed, cleanup is a breeze—leaving more time to enjoy your meal!

Honey Garlic Butter Shrimp & Broccoli Ingredients

• For the Sauce

  • Honey – Adds sweetness and a sticky texture; can substitute with agave syrup or maple syrup.
  • Low Sodium Soy Sauce – Contributes saltiness and umami flavor; use tamari for a gluten-free option.
  • Fresh Grated Ginger – Provides zing and warmth; ground ginger can be used as a substitute.
  • Minced Garlic – Offers aromatic flavor depth; adjust garlic amount to taste.
  • Red Pepper Flakes – Adds a hint of heat; omit for a milder dish or use fresh chili.
  • Cornstarch – Acts as a thickening agent for the sauce; can replace with arrowroot starch for a gluten-free option.

• For the Shrimp and Broccoli

  • Large Shrimp (peeled & deveined) – Main protein source, tender and quick to cook; may use assorted seafood if desired.
  • Butter – Enhances richness and flavor; substitute with olive oil for a lighter option.
  • Chopped Broccoli – Adds color, nutrition, and crunch; frozen broccoli can be used but must be thawed.
  • Olive Oil – Used for cooking, adds flavor; can replace with vegetable oil.

Enjoy this delightful combination of Honey Garlic Butter Shrimp & Broccoli that’s bound to be a staple for quick and satisfying weeknight meals!

Step‑by‑Step Instructions for Honey Garlic Butter Shrimp & Broccoli

Step 1: Prepare the Sauce
In a small mixing bowl, combine ¼ cup of honey, ¼ cup of low sodium soy sauce, 1 tablespoon of freshly grated ginger, 3 cloves of minced garlic, and a pinch of red pepper flakes. Whisk together until well blended, creating a smooth glaze. This sweet and savory sauce will infuse your Honey Garlic Butter Shrimp & Broccoli with incredible flavor.

Step 2: Marinate the Shrimp
Place 1 pound of peeled and deveined large shrimp in a medium bowl. Pour about one-third of the prepared sauce over the shrimp, ensuring they’re evenly coated. Allow the shrimp to marinate for 30 minutes at room temperature, deepening their flavor while you prep the remaining ingredients.

Step 3: Cook the Broccoli
Meanwhile, heat 1 tablespoon of olive oil in a large skillet over high heat. Add 2 cups of chopped broccoli and season with salt and freshly cracked pepper. Stir-fry for about 5-6 minutes, or until the broccoli is bright green and tender-crisp. Once cooked, remove the broccoli from the skillet and set it aside on a plate.

Step 4: Cook the Shrimp
In the same skillet, melt 2 tablespoons of butter over medium-high heat. Add the marinated shrimp (discard the marinade) in a single layer and cook for 2 minutes per side, or until they turn pink and opaque. Be careful not to overcook; the shrimp should curl slightly but remain tender.

Step 5: Thicken the Sauce
Pour in the remaining honey-garlic sauce while stirring in 1 tablespoon of cornstarch mixed with 1 tablespoon of water. Allow the mixture to simmer for 2-3 minutes, stirring occasionally, until the sauce thickens and becomes glossy. This tasty sauce will beautifully envelop the shrimp.

Step 6: Combine the Ingredients
Return the sautéed broccoli to the skillet, tossing gently to combine with the honey garlic butter shrimp. Cook for an additional 1-2 minutes, allowing the flavors to meld together and the broccoli to warm through. The vibrant colors and aromas will have your kitchen buzzing.

Step 7: Serve the Dish
Transfer your delicious Honey Garlic Butter Shrimp & Broccoli onto plates, serving it over a bed of rice or pasta. Drizzle any extra sauce over the top for added flavor. This delightful meal is ready to be enjoyed, providing a satisfying, healthy alternative to takeout!

What to Serve with Honey Garlic Butter Shrimp & Broccoli

Create a memorable meal by pairing this delightful dish with complementary sides that enhance its flavors and textures.

  • Steamed Jasmine Rice: The fluffy, aromatic rice is perfect for soaking up the honey-garlic sauce, making every bite a delight.

  • Crispy Sweet Potato Fries: Their natural sweetness and crunchy texture contrast beautifully with succulent shrimp, adding a fun twist to your meal.

  • Garlic Noodles: The buttery, garlicky noodles echo the dish’s flavors while providing a satisfying alternative to plain rice.

  • Asian Cucumber Salad: A refreshing counterpoint, this crisp salad with a tangy dressing brightens the meal with crunch and acidity.

  • Lemon Garlic Asparagus: The bright citrus notes and tender crunch of asparagus create a vibrant side, balancing the rich shrimp and buttery sauce.

  • Chilled Sake or White Wine: An elegant drink choice, both will enhance the meal with their crisp notes, making each sip as enjoyable as the dish itself.

  • Fruit Sorbet: For dessert, a light and fruity sorbet cleanses the palate, providing a sweet finish to this hearty meal.

How to Store and Freeze Honey Garlic Butter Shrimp & Broccoli

Fridge: Store leftovers in an airtight container for up to 2 days. Reheat gently on the stovetop to maintain the shrimp’s tenderness.

Freezer: If freezing, separate the shrimp and broccoli before placing in a freezer-safe bag. They can be frozen for up to 2 months; however, the texture may change when reheated.

Reheating: For best results, thaw overnight in the fridge before reheating. Warm gently in a skillet over low heat while adding a splash of water or broth to revive moisture.

Avoid Excess Water: If you’ve used frozen broccoli, ensure it’s fully thawed and drained before adding it to the dish to prevent watery results upon reheating.

Expert Tips for Honey Garlic Butter Shrimp & Broccoli

  • Marinate for Flavor: Let the shrimp marinate for at least 30 minutes; this step enhances the overall taste, making the dish more irresistible.

  • Avoid Overcooking: Shrimp cooks quickly—only 2 minutes per side. Once they are pink and curled, remove them to maintain tenderness.

  • Proper Broccoli Prep: If using frozen broccoli, ensure it is completely thawed and dry to prevent excess water in your dish.

  • Customize Your Veggies: Feel free to substitute broccoli with other veggies like snap peas or bell peppers for added variety and flavor in your Honey Garlic Butter Shrimp & Broccoli.

  • Use a Non-stick Pan: This helps to avoid sticking and makes the cooking process smoother, especially when cooking shrimp and broccoli together.

  • Serve Immediately: For the best texture and flavor, serve this dish right after cooking. It’s when the shrimp are juicy and the broccoli is crisp!

Honey Garlic Butter Shrimp & Broccoli Variations

Feel free to explore new flavors and textures in this delightful dish!

  • Colorful Veggies: Swap the broccoli for snap peas or bell peppers to add a burst of color and unique crunch.
  • Low-Carb Twist: Replace rice with zucchini noodles or cauliflower rice for a lighter, low-carb option that still satisfies.
  • Spicy Kick: Add sliced jalapeños or a dash of sriracha to the sauce for an extra layer of heat that will awaken your taste buds.
  • Nutty Crunch: Sprinkle toasted sesame seeds or chopped peanuts over the finished dish for a delightful crunch and nutty flavor.
  • Coconut Flavor: Use coconut oil instead of butter for a tropical twist that brings a whole new dimension to the sauce.
  • Asian Flair: Add a splash of rice vinegar or sesame oil for a deeper umami flavor in the sauce that enhances the overall dish.
  • Flavor Boost: Toss in a handful of fresh herbs like cilantro or Thai basil before serving for a bright, aromatic finish that elevates every bite.

Explore these variations to customize your Honey Garlic Butter Shrimp & Broccoli into something uniquely yours—perfect for any mood or occasion!

Make Ahead Options

These Honey Garlic Butter Shrimp & Broccoli are perfect for busy home cooks looking to streamline their meal prep! You can marinate the shrimp in the honey garlic sauce up to 24 hours in advance to enhance the flavor. Additionally, chop the broccoli and store it in an airtight container in the refrigerator for up to 3 days. When you’re ready to enjoy this dish, simply sauté the shrimp and broccoli as directed, making sure to discard the marinade before cooking the shrimp to maintain their tenderness. This approach not only saves you time but also ensures a delicious, restaurant-quality meal with minimal effort on those hectic weeknights!

Honey Garlic Butter Shrimp & Broccoli Recipe FAQs

Should I cook broccoli before putting it in stir-fry?
Absolutely! Cooking broccoli beforehand can enhance its texture and taste. However, in this recipe, we stir-fry the broccoli directly, which allows it to retain a nice crunch and vibrant color. Just ensure to sauté it until it’s tender, as specified in the instructions.

Is honey garlic good for stir-fry?
Very! The honey garlic combination brings a sweet and savory element that perfectly complements the shrimp and broccoli in this dish. It not only enhances the overall flavor, but also creates a glossy sauce that clings beautifully to the ingredients, making every bite delightful.

How do Chinese restaurants make shrimp so tender?
Chinese restaurants often use a technique called “velveting.” To achieve that tender texture, marinate the shrimp in a mix of cornstarch, egg white, and a dash of oil for about 30 minutes before cooking. This process creates a protective layer, preventing the shrimp from becoming rubbery and helping to keep them juicy during cooking.

What veggies go with honey garlic shrimp?
You can transform your dish by using a variety of veggies! Snap peas, bell peppers, or even carrots will complement the honey garlic sauce wonderfully. Experimenting with these options will not only add different flavors but also a rainbow of colors to your plate, making it even more appetizing!

Can you stir-fry broccoli without boiling it first?
Certainly! In fact, for this Honey Garlic Butter Shrimp & Broccoli recipe, it’s best to directly sauté the broccoli. Cook it on high heat in olive oil for about 5-6 minutes until it’s bright green and tender-crisp—this ensures you keep all the nutrients and the beautiful crunch that pairs so well with the shrimp.

Do I need to boil carrots before stir-frying?
No boiling necessary! Simply chop them into thin slices or julienne them, and add them to the stir-fry. Carrots can cook quickly when cut small, and this method retains their flavor and texture, adding a lovely crunch to your dish.

When to add garlic and ginger to stir fry?
Add minced garlic and grated ginger toward the end of your sautéing process. They should be added just after the proteins or veggies are cooked through, allowing their essential oils to release and impart their flavors without burning. This is key in achieving that aromatic kick that makes your stir-fry irresistible.

Should you marinate vegetables for stir fry?
Marinating veggies is a great way to infuse extra flavor, but it’s not always necessary. For quick-cooking vegetables like broccoli in this recipe, simply seasoning them before cooking is usually sufficient. If you have heartier veggies, you can marinate them briefly in a soy sauce mixture to enhance their taste before adding to the stir-fry.

Enjoy these Honey Garlic Butter Shrimp & Broccoli Recipe FAQs to take your cooking experience to the next level!

Delicious Honey Garlic Butter Shrimp & Broccoli in 30 Minutes

A quick and satisfying Honey Garlic Butter Shrimp & Broccoli dish that is flavorful and a healthier alternative to takeout.

  • skillet
  • Mixing Bowl

For the Sauce

  • 1/4 cup honey (can substitute with agave syrup or maple syrup)
  • 1/4 cup low sodium soy sauce (use tamari for gluten-free)
  • 1 tablespoon fresh grated ginger (ground ginger can be used as a substitute)
  • 3 cloves minced garlic (adjust to taste)
  • pinch red pepper flakes (omit for milder dish)
  • 1 tablespoon cornstarch (can use arrowroot starch for gluten-free)

For the Shrimp and Broccoli

  • 1 pound large shrimp (peeled & deveined) (may use assorted seafood)
  • 2 tablespoons butter (substitute with olive oil for lighter option)
  • 2 cups chopped broccoli (use thawed frozen broccoli if needed)
  • 1 tablespoon olive oil (can replace with vegetable oil)

Step-by-Step Instructions

  1. In a small mixing bowl, combine the honey, soy sauce, grated ginger, minced garlic, and red pepper flakes. Whisk together to create a smooth glaze.
  2. In a medium bowl, place the shrimp and pour one-third of the sauce over. Marinate for 30 minutes.
  3. Heat olive oil in a large skillet over high heat. Add broccoli, season with salt and pepper, and stir-fry for 5-6 minutes. Remove from skillet.
  4. In the same skillet, melt butter. Add marinated shrimp and cook for 2 minutes per side until pink and opaque.
  5. Pour in remaining sauce and add cornstarch mixed with water. Simmer for 2-3 minutes until the sauce thickens.
  6. Return broccoli to the skillet and toss gently with the shrimp. Cook for an additional 1-2 minutes.
  7. Serve over rice or pasta and drizzle extra sauce on top.

Serve immediately for the best texture and flavor. Customize with other vegetables if desired.

Main Dishes
Asian
30 minutes, broccoli, Healthy Recipe, honey garlic, quick dinner, shrimp

Filed Under: Main Dishes

Irresistibly Delicious Toasted Caprese Garlic Bread Recipe

July 16, 2025 by grace bellamy Leave a Comment

As I pulled the golden, crusty bread out of the oven, the air was filled with a tantalizing aroma of garlic and fresh basil—if only you could catch a whiff yourself! This Toasted Caprese Garlic Bread perfectly embodies the essence of summer with its vibrant colors and irresistible flavors. With juicy tomatoes, creamy mozzarella, and a drizzle of balsamic reduction, it transforms into a delightful appetizer or side dish that’s just as perfect for a gathering as it is for a cozy night in. Plus, it’s quick to prep, letting you spend less time cooking and more time enjoying those summer evenings. Curious to find out how to bring this zesty creation to your table? Let’s dive into the magic of this simple yet satisfying recipe!

Why is Toasted Caprese Garlic Bread a Must-Try?

Fresh Ingredients: This recipe highlights vibrant, seasonal produce like juicy tomatoes and aromatic basil, making every bite burst with summer flavor.
Quick Prep: Ready in under 15 minutes, it’s the ideal solution for busy weeknights or spontaneous gatherings.
Crowd-Pleaser: Loved by all, it’s a guaranteed hit at parties, serving as a delightful appetizer or side dish.
Versatile: Customize it with toppings like avocado or olives, giving it your unique twist.
Simple Steps: Even novice cooks can whip this up with ease. For more flavorful ideas, check out my cheese and garlic crack bread recipe.

Toasted Caprese Garlic Bread Ingredients

For the Bread

  • Italian loaf – A crusty Italian loaf serves as the perfect base for this Toasted Caprese Garlic Bread.

For the Toppings

  • Fresh tomatoes – Use juicy, ripe tomatoes for maximum flavor; vine-ripened or heirloom varieties are excellent alternatives.
  • Fresh basil – Aromatic and fragrant, basil adds freshness; substitute with pesto for a quick alternative.
  • Mozzarella cheese – Opt for fresh mozzarella to achieve that gooey, creamy texture that makes this dish irresistible.
  • Garlic – Minced fresh garlic will elevate the flavor profile; for convenience, garlic powder works well too.
  • Olive oil – Extra virgin olive oil not only adds richness but also ensures the bread toasts beautifully.

For the Drizzle

  • Balsamic reduction – This drizzle contributes the essential acidity and sweetness to balance the rich flavors of the cheese and bread.

Step‑by‑Step Instructions for Toasted Caprese Garlic Bread

Step 1: Prep the Bread
Start by slicing your crusty Italian loaf in half lengthwise. Place both halves cut side up on a baking sheet lined with parchment paper. This will help the Toasted Caprese Garlic Bread become deliciously crispy as it bakes. Preheat your oven to 400°F (200°C) to get ready for the perfect golden finish.

Step 2: Mix Toppings
In a small bowl, combine 2 tablespoons of minced garlic with 3 tablespoons of extra virgin olive oil. Stir well until mixed, then spread this aromatic mixture evenly over the cut sides of the bread. You want to ensure every bite of your Toasted Caprese Garlic Bread is packed with that rich garlic flavor, so spread generously!

Step 3: Add Cheeses and Vegetables
Layer slices of fresh mozzarella evenly over the garlic-coated bread, ensuring each slice is luxuriously covered. Next, add juicy fresh tomatoes—sliced thinly and arranged beautifully on top of the cheese. Finally, sprinkle fresh basil leaves generously over the tomatoes, creating a colorful and fragrant topping for your Toasted Caprese Garlic Bread.

Step 4: Toast the Bread
Place your baking sheet under the preheated broiler, keeping a close eye on it. Broil for about 2-5 minutes, or until the cheese begins to melt and bubble with a golden brown color. Be vigilant during this step to prevent burning; you want that gooey, irresistible layer of cheese on your Toasted Caprese Garlic Bread.

Step 5: Drizzle & Serve
Once the cheese is beautifully melted and bubbly, carefully remove the baking sheet from the oven. Drizzle a generous amount of balsamic reduction over the hot bread to add a sweet and tangy finish. Allow it to cool slightly before slicing into pieces, making it easy to serve as a delightful appetizer or side dish for any gathering.

Toasted Caprese Garlic Bread Variations

Feel free to let your creativity flow and customize this delicious Toasted Caprese Garlic Bread to suit your taste!

  • Gluten-Free: Use a gluten-free bread option, like almond flour bread, to enjoy this dish without the gluten.
  • Pesto Boost: Spread a layer of homemade or store-bought pesto under the cheese for an extra burst of flavor.
  • Spicy Kick: Add red pepper flakes or sliced jalapeños to introduce a delightful heat that will wake up your taste buds.
  • Herb Infusion: Mix fresh or dried Italian herbs, like oregano or thyme, into your olive oil for a fragrant twist.
  • Vegan Options: Substitute mozzarella with cashew cheese or a vegan mozzarella alternative for a plant-based delight.
  • Cheesy Delight: Use a blend of cheeses, like gouda or parmesan, alongside mozzarella for richer, more complex flavors.
  • Toasty Texture: For an extra crunch, add a layer of toasted breadcrumbs on top before broiling.
  • Seasonal Variations: Experiment with seasonal toppings, such as roasted bell peppers in the fall or fresh arugula in the spring, to keep it fresh and exciting.

Make Ahead Options

These Toasted Caprese Garlic Bread slices are perfect for meal prep, allowing you to enjoy that delightful summer flavor even on the busiest of days! You can prepare the bread and toppings—garlic mixture, cheese, tomatoes, and basil—up to 24 hours in advance. Simply slice the Italian loaf, mix the garlic and olive oil, and spread it on the bread. Layer the mozzarella, tomatoes, and basil, then cover tightly with plastic wrap and refrigerate. When you’re ready to enjoy, just pop the assembled bread under the broiler for about 2-5 minutes until everything is melted and bubbly. Following this method ensures your Toasted Caprese Garlic Bread is just as delicious, saving you precious time without compromising on flavor!

What to Serve with Toasted Caprese Garlic Bread?

Transform your gathering into a culinary celebration with a delightful spread that complements every slice of this Italian-inspired treat.

  • Fresh Arugula Salad: The peppery bite of arugula with a light lemon vinaigrette adds a refreshing contrast, balancing the richness of the bread. Toss in some cherry tomatoes for a pop of color!

  • Grilled Vegetables: Smoky, charred veggies like zucchini, bell peppers, and eggplant bring an earthy flavor that pairs beautifully with the bright tomato and basil of the Toasted Caprese Garlic Bread.

  • Pasta Primavera: A light, veggie-stuffed pasta dish makes for a hearty main course, ensuring your feast retains that fresh summer vibe. The vibrant flavors of seasonal vegetables are a perfect match.

  • Chilled White Wine: A crisp Pinot Grigio or a Sauvignon Blanc enhances the meal, cutting through the richness and elevating your dining experience. The acidity complements the balsamic drizzle beautifully.

  • Caprese Salad: Keep the theme going with a classic caprese salad; fresh mozzarella, basil, and tomatoes drizzled with olive oil echo the flavors of the bread for a cohesive meal.

  • Lemon Sorbet: End your meal on a light note with a refreshing lemon sorbet. Its tart sweetness cleanses the palate after the savory delights, making it an inviting finale to any gathering.

Each of these pairings enhances the experience of enjoying your Toasted Caprese Garlic Bread, ensuring your table is filled with summer flavors and cherished memories.

Storage Tips for Toasted Caprese Garlic Bread

Fridge: Store leftover Toasted Caprese Garlic Bread in an airtight container for up to 1 day to maintain its freshness.

Freezer: To freeze, wrap individual slices tightly in plastic wrap or foil, then place them in a freezer-safe bag. They’ll keep for up to 2 months, ready for a quick snack!

Reheating: To revive the crispiness before serving, reheat in the oven at 350°F (175°C) for about 10 minutes, or until heated through and the cheese is melty again.

Best When Fresh: For the tastiest experience, enjoy your Toasted Caprese Garlic Bread fresh from the oven. Typically, it’s best consumed within a few hours of making it for optimal flavor and texture.

Expert Tips for Toasted Caprese Garlic Bread

  • Ingredient Quality: Use high-quality, fresh ingredients like ripe tomatoes and mozzarella; they significantly enhance the overall flavor of your Toasted Caprese Garlic Bread.

  • Watch Closely: Keep an eye on the bread while broiling to prevent burning. It’s best to remove it as soon as the cheese is melted and bubbly.

  • Cool Before Slicing: Allow the bread to cool slightly after baking. This helps maintain its structure for easier slicing and serving.

  • Perfect Garlic Mix: When mixing garlic and olive oil, you can customize the amount to your preference. Too much garlic can overpower the dish, so start with less if unsure.

  • Experiment with Toppings: Don’t hesitate to try different toppings. Adding slices of avocado or olives can introduce delightful new flavors to your Toasted Caprese Garlic Bread.

Toasted Caprese Garlic Bread Recipe FAQs

What type of bread is best for Toasted Caprese Garlic Bread?
A crusty Italian loaf is ideal for this recipe, providing a sturdy base that balances the toppings perfectly. If you prefer a different flavor, you can also use sourdough or whole-grain bread for a unique twist.

How should I store leftover Toasted Caprese Garlic Bread?
Store any leftover Toasted Caprese Garlic Bread in an airtight container in the fridge for up to 1 day. For longer storage, wrap individual slices tightly in plastic wrap or foil and place them in a freezer bag, where they will keep for up to 2 months.

Can I make Toasted Caprese Garlic Bread ahead of time?
Absolutely! You can prep the bread with the garlic and oil topping, layer on the cheese and toppings, then cover it with plastic wrap and refrigerate for a few hours. When you’re ready to serve, simply place it under the broiler, and voila!

Is it okay to use pre-shredded cheese for this recipe?
While fresh mozzarella is preferred for its creaminess and texture, you can definitely use pre-shredded mozzarella in a pinch. However, be aware that it might not melt as perfectly as fresh cheese will.

Can I substitute for allergies or dietary restrictions?
Sure! For dairy-free options, consider using a plant-based cheese that melts well. If you’re avoiding gluten, you can use gluten-free bread as a tasty alternative, ensuring your Toasted Caprese Garlic Bread is accessible for everyone!

How do I ensure my bread doesn’t burn while broiling?
Keep a close eye on the bread while it’s under the broiler, checking it every minute. Broil for about 2-5 minutes, removing it as soon as the cheese is melted and bubbly but not burnt. A preheated broiler can be intense, so monitoring is key!

Irresistibly Delicious Toasted Caprese Garlic Bread Recipe

This Toasted Caprese Garlic Bread is a quick and flavorful appetizer featuring fresh tomatoes, basil, garlic, and mozzarella.

  • Baking Sheet
  • small bowl
  • parchment paper
  • Oven

For the Bread

  • 1 loaf Italian loaf (A crusty Italian loaf serves as the perfect base for this dish.)

For the Toppings

  • 2 medium Fresh tomatoes (Use juicy, ripe tomatoes; vine-ripened or heirloom varieties are excellent alternatives.)
  • 1 cup Fresh basil (Aromatic and fragrant; substitute with pesto for a quick alternative.)
  • 8 oz Mozzarella cheese (Opt for fresh mozzarella for a gooey texture.)
  • 2 tablespoons Garlic (Minced fresh garlic will elevate the flavor; garlic powder can work too.)
  • 3 tablespoons Olive oil (Extra virgin olive oil ensures the bread toasts beautifully.)

For the Drizzle

  • 1 tablespoon Balsamic reduction (Adds essential acidity and sweetness.)

Step‑by‑Step Instructions for Toasted Caprese Garlic Bread

  1. Slice the Italian loaf in half lengthwise and place both halves cut side up on a baking sheet lined with parchment paper. Preheat your oven to 400°F (200°C).
  2. Combine minced garlic with olive oil in a small bowl. Spread this mixture evenly over the cut sides of the bread.
  3. Layer slices of fresh mozzarella over the garlic-coated bread, then add thinly sliced fresh tomatoes, and finally sprinkle fresh basil leaves over the top.
  4. Place the baking sheet under the preheated broiler for about 2-5 minutes or until the cheese is melted and bubbling.
  5. Drizzle balsamic reduction over the hot bread and allow it to cool slightly before slicing for serving.

Store leftover Toasted Caprese Garlic Bread in an airtight container for up to 1 day. To freeze, wrap individual slices tightly and place in a freezer-safe bag for up to 2 months. Reheat in the oven at 350°F (175°C) for about 10 minutes before serving.

Appetizer
Italian
Appetizer, balsamic reduction, garlic bread, mozzarella, Toasted Caprese Garlic Bread, Tomatoes

Filed Under: Appetizer

Irresistibly Cheesy Bacon Wrapped Jalapeno Poppers Recipe

July 16, 2025 by grace bellamy Leave a Comment

As I opened my fridge one afternoon, the vibrant green of jalapeños caught my eye, and an idea sparked—why not turn these spicy beauties into creamy baked bacon-wrapped jalapeno poppers? This easy appetizer is sure to impress anyone you serve them to, offering a crunchy bite of savory bacon paired with a luxuriously cheesy filling. The delightful combination not only satisfies cravings but also comes together quickly, making it ideal for last-minute gatherings or game days. Baked instead of fried, these poppers offer a low-carb, gluten-free twist on a classic favorite, so you can indulge without a hint of guilt. Are you ready to tantalize your taste buds with a mouthwatering recipe that will have everyone asking for seconds?

Why Are Bacon Wrapped Jalapeno Poppers Irresistible?

Flavorful, Crunchy Perfection: These poppers bring together crispy bacon and creamy cheese, creating a winning flavor combination that’s hard to resist.

Guilt-Free Indulgence: Baked instead of fried, they offer a lower carb and gluten-free option, making them perfect for health-conscious snack lovers.

Crowd-Pleasing Appetizer: Ideal for parties, game days, or casual get-togethers, their festive presentation is sure to impress your guests.

Quick to Prepare: You can whip them up easily in about 30 minutes, saving you time while delivering big on flavor.

For a delicious accompaniment, consider serving these with ranch dressing or a spicy dipping sauce! Don’t forget to check out my bacon fried rice for another tasty treat that’s sure to become a favorite.

Bacon Wrapped Jalapeno Poppers Ingredients

For the Poppers
• Jalapeno Peppers – Choose 3-4 inches long for easy stuffing and a perfect balance of spice.
• Cream Cheese – Make sure it’s softened for a smooth, creamy filling that blends easily.
• Cheddar Cheese – Adds great flavor; substitute with pepper jack for a spicier kick!
• Onion Powder – Boosts the overall flavor with its savory essence.
• Salt – Essential for seasoning; consider using lower sodium alternatives to adjust to taste.
• Pepper – Just a pinch adds a mild heat to complement the dish.
• Bacon – Opt for regular-cut bacon for optimal crispiness around the poppers.
• Cooking Spray – This helps your poppers cook evenly and prevents them from sticking to the baking sheet.

Feel free to dive into this delightful recipe for Bacon Wrapped Jalapeno Poppers that are sure to wow everyone at your next gathering!

Step‑by‑Step Instructions for Creamy Baked Bacon Wrapped Jalapeno Poppers

Step 1: Preheat the Oven
Begin by preheating your oven to 400°F (200°C). While the oven heats up, line a baking sheet with aluminum foil for easy cleanup and spray it lightly with cooking spray. This prevents the bacon wrapped jalapeno poppers from sticking during baking, ensuring they come out crispy and delicious.

Step 2: Prepare the Jalapenos
Carefully wash the jalapeno peppers and slice them in half lengthwise. Using a spoon, scoop out the seeds and ribs to reduce the heat for a milder flavor. Aim for jalapenos that are about 3-4 inches long for easy stuffing, and set them aside on a cutting board to make room for the filling.

Step 3: Make the Cheese Filling
In a medium-sized bowl, combine softened cream cheese, shredded cheddar cheese, onion powder, salt, and pepper. Use a fork to blend everything until you achieve a smooth and creamy consistency. This filling will be the heart of your bacon wrapped jalapeno poppers, so ensure all ingredients are well mixed for the best flavor.

Step 4: Stuff the Jalapenos
Generously fill each halved jalapeno with the creamy cheese mixture, ensuring they are well-loaded but not overflowing. The poppers should be filled to the edge, showcasing that delicious filling. This step is essential for achieving that ultimate combination of spicy and creamy in your bacon wrapped jalapeno poppers.

Step 5: Wrap with Bacon
Take your bacon strips and cut them in half, creating shorter pieces that will fit snugly around the jalapenos. Wrap each stuffed jalapeno half tightly with a piece of bacon, securing it with a toothpick if necessary. This will help the bacon adhere during baking and give your poppers a beautiful presentation.

Step 6: Bake the Poppers
Arrange the bacon wrapped jalapeno poppers on the prepared baking sheet, leaving a little space between each one for even cooking. Bake them in the preheated oven for 20 to 25 minutes, until the bacon is crispy and golden brown. Keep an eye on them; they should be bubbling and delicious by the end of baking time.

Step 7: Serve and Enjoy
Once they are perfectly baked, carefully remove the bacon wrapped jalapeno poppers from the oven and let them cool for a few minutes. Serve them warm as a delightful appetizer at your next gathering, and watch as everyone dives in for a taste of that creamy filling and crispy bacon.

How to Store and Freeze Bacon Wrapped Jalapeno Poppers

Fridge: Store leftovers in an airtight container and refrigerate for up to 3 days. Reheat in the oven at 350°F (175°C) for about 10 minutes to restore crispiness.

Freezer: For longer storage, freeze the baked poppers in a single layer on a baking sheet. Once frozen, transfer them to a freezer-safe bag for up to 2 months.

Thawing: When ready to enjoy, thaw in the fridge overnight, then reheat in the oven at 350°F (175°C) until heated through and crispy.

Avoid Room Temperature: Do not leave bacon wrapped jalapeno poppers at room temperature for more than 2 hours, as this can lead to food safety issues.

What to Serve with Bacon Wrapped Jalapeno Poppers

Elevate your gathering with the perfect accompaniments for these savory, baked delights that entice both the eyes and the palate.

  • Creamy Ranch Dressing: This cool, tangy dip complements the spicy poppers beautifully, balancing heat with creaminess. It’s a classic pairing that everyone will love.

  • Spicy Siracha Sauce: For those who crave a kick, drizzling this fiery sauce adds an extra layer of flavor to each bite. It’s the perfect match for thrill-seekers!

  • Refreshing Guacamole: The smooth, rich texture of guacamole brings a nice contrast to the crispy poppers, enhancing the overall taste experience with every scoop.

  • Crunchy Vegetable Platter: Crisp carrots, celery, and bell peppers add freshness to the table, providing a light alternative that pairs well with the poppers’ rich flavors.

  • Sweet Corn Salsa: This vibrant salsa adds a pop of sweetness and freshness that beautifully complements the savory bacon and creamy filling, creating a delightful contrast.

  • Cold Brewed Iced Tea: A refreshing drink choice, its lightness balances the rich and bold flavors of the poppers, making it a perfect companion for warm gatherings.

  • Chocolate Chip Cookies: End your meal on a sweet note! These beloved cookies provide a comforting touch and create a balance with the spicy bite of the jalapeno poppers.

Each of these pairings brings their own delightful flair, helping you create a memorable meal that will have friends and family lingering around the table!

Bacon Wrapped Jalapeno Poppers Variations

Feel free to unleash your creativity and tailor these poppers to your taste!

  • Spicy Pepper Jack: Substitute cheddar with pepper jack for a fiery kick that keeps your taste buds buzzing with excitement. This twist is perfect for spice enthusiasts!

  • Turkey Bacon: Use turkey bacon instead of regular bacon for a leaner, heart-healthy option. You’ll still enjoy that awesome flavor, just a little lighter!

  • Creamy Goat Cheese: Swap cream cheese for tangy goat cheese for a unique flavor profile that’s both creamy and slightly tangy. This variation adds an elegant twist to the classic here!

  • Sweet Maple Glaze: Brush a little maple syrup over the bacon before baking for a sweet twist that beautifully contrasts with the spicy peppers. This touch makes each bite sing in delightful harmony!

  • Vegetarian Delight: Replace the bacon with thin slices of zucchini wrapped around the stuffed jalapenos for a vegetarian-friendly popper that still offers a satisfying bite. This version is full of flavor and fun!

  • Herbed Feta: Mix crumbled feta and fresh herbs like dill or chives into the filling for a Mediterranean-inspired version. This adds brightness and freshness that your guests will adore!

  • Stuffed with Chorizo: For an extra flavor boost, mix cooked chorizo into your cheese filling for a smoky, savory popper. This will definitely amp up the flavor profile and satisfy hearty cravings!

  • Cheesy Bacon Explosion: Double the cheese by incorporating mozzarella alongside cheddar or cream cheese for a cheesier adventure. This twist will be a melting delight that keeps everyone coming back for more!

Expert Tips for Bacon Wrapped Jalapeno Poppers

  • Choose the Right Peppers: Opt for jalapenos that are firm and about 3-4 inches long for perfect stuffing, avoiding overripe ones.
  • Soften the Cheese: Make sure your cream cheese is softened to room temperature; this ensures easy mixing and a creamy filling.
  • Avoid Overstuffing: Fill the jalapenos generously but not excessively, as too much filling can spill out during baking.
  • Watch the Bacon: Bake until crispy but not burnt; bacon should be golden brown to ensure a delightful crunch for your bacon wrapped jalapeno poppers.
  • Prep in Advance: Consider prepping the jalapenos an hour or up to 8 hours ahead; simply refrigerate them until you’re ready to bake for easy hosting.
  • Experiment with Variations: Don’t hesitate to try different cheeses or spice levels; substituting cheddar for pepper jack adds unique flavor to the poppers.

Make Ahead Options

These Bacon Wrapped Jalapeno Poppers are perfect for meal prep and can save you valuable time on busy days! You can prepare the poppers up to 8 hours in advance by filling and wrapping them, then refrigerating before baking. Ensure they are covered tightly with plastic wrap to maintain freshness and prevent drying out. When you’re ready to enjoy these tasty bites, simply preheat your oven and bake them from the fridge—it’s as easy as that! This way, you’ll have creamy, spicy poppers on the table in no time, delivering all the flavor with minimal last-minute effort.

Bacon Wrapped Jalapeno Poppers Recipe FAQs

Should you pre-cook bacon for jalapeño poppers?
Absolutely! Pre-cooking the bacon slightly can help reduce the overall baking time. You can microwave the bacon for about 2-3 minutes until it’s partially cooked but still pliable. This way, you’ll ensure that the bacon becomes crispy without drying out the jalapeños during the baking process.

How to cook bacon wrapped jalapeños without being soggy?
To prevent sogginess, make sure to remove all the seeds and ribs from the jalapeños, as they contain moisture. Also, when baking, line your baking sheet with foil and coat it lightly with cooking spray. This promotes airflow around the bacon, allowing it to crisp up nicely while the jalapeños cook.

How long to bake jalapeño wrapped in bacon?
Bake your bacon-wrapped jalapeño poppers at 400°F (200°C) for 20-25 minutes. Keep an eye on them as they cook; you’ll want them to be golden brown and crispy. Every oven is different, so the key is to watch for that lovely crispy finish!

What are some common mistakes when making jalapeño poppers and how to avoid them?
One common mistake is overstuffing the jalapeños, which can make it difficult for the bacon to adhere. To avoid this, fill the jalapeños generously but leave a little space at the top. Another error is not properly removing the seeds and ribs, which can lead to an overwhelming heat. Always taste a small piece of your jalapeño first to gauge its spiciness level. Lastly, remember to let the poppers cool for a few minutes after baking to prevent burns from the hot filling.

How long to smoke jalapeño poppers wrapped in bacon?
If you’re using a smoker, it typically takes about 1 to 1.5 hours to smoke bacon-wrapped jalapeño poppers at 225°F (107°C). This low-and-slow method infuses fantastic smoky flavors, so feel free to experiment with different wood chips like hickory or applewood for a unique twist. Just keep a close watch on them towards the end of cooking to ensure they don’t burn.

How to prevent jalapeño poppers from getting soggy?
To prevent sogginess, ensure your bacon is not overly thick, as this can trap moisture. Additionally, bake the poppers rather than frying them for a healthier alternative, as frying can introduce extra moisture. Finally, follow proper baking techniques: preheat your oven, let the poppers cool slightly before serving, and avoid covering them while they cool so steam can escape.

Irresistibly Cheesy Bacon Wrapped Jalapeno Poppers Recipe

Enjoy these Bacon Wrapped Jalapeno Poppers, a delightful appetizer filled with creamy cheese and crispy bacon.

  • Oven
  • Baking Sheet
  • Aluminum Foil
  • Mixing Bowl
  • spoon
  • fork
  • Toothpicks

For the Poppers

  • 4 pieces Jalapeno Peppers (Choose 3-4 inches long for easy stuffing.)
  • 8 oz Cream Cheese (Softened for a smooth filling.)
  • 1 cup Cheddar Cheese (Shredded; substitute with pepper jack for a spicier kick.)
  • 1 tsp Onion Powder
  • 0.5 tsp Salt (Consider using lower sodium alternatives.)
  • 0.25 tsp Pepper (Just a pinch for mild heat.)
  • 8 slices Bacon (Regular-cut for optimal crispiness.)
  • 1 tsp Cooking Spray (To prevent sticking.)

Step-by-Step Instructions

  1. Preheat your oven to 400°F (200°C). Line a baking sheet with aluminum foil and spray with cooking spray.
  2. Wash the jalapeno peppers and slice them in half lengthwise. Scoop out the seeds and ribs.
  3. In a bowl, combine softened cream cheese, shredded cheddar cheese, onion powder, salt, and pepper. Mix until smooth.
  4. Fill each halved jalapeno with the creamy cheese mixture.
  5. Cut bacon strips in half and wrap each stuffed jalapeno with a piece of bacon, securing with a toothpick if needed.
  6. Arrange poppers on the baking sheet and bake for 20 to 25 minutes until the bacon is crispy.
  7. Remove from the oven and let cool slightly before serving warm.

Store leftovers in an airtight container in the fridge for up to 3 days. Reheat in the oven at 350°F (175°C) for about 10 minutes to restore crispiness.

Appetizer
American
Appetizer, Bacon Wrapped Jalapeno Poppers, Cheesy Poppers, gluten-free, Low-Carb, party food

Filed Under: Appetizer

Velvety Vegan Coconut Curry Pumpkin Soup You’ll Love

July 16, 2025 by grace bellamy Leave a Comment

The first sip of Coconut Curry Pumpkin Soup transports me to cozy fall evenings, where the leaves crunch underfoot and the air is infused with warm spices. This vegan soup is not just a meal; it’s a hug in a bowl, ready in just over 35 minutes to brighten your busy weeknights. Packed with rich flavors and creamy coconut goodness, it’s an ideal choice for anyone looking to make a healthy, gluten-free dish that feels indulgent without all the fuss. Plus, the delightful aroma wafting through your kitchen will have your loved ones gathering at the table, eager for the first ladleful. Curious to learn how to whip up this comforting fall favorite? Let’s dive into the recipe!

Why is Coconut Curry Pumpkin Soup Perfect?

Quick and Easy Preparation: This soup comes together in just over 35 minutes, making it perfect for those busy weeknights when you crave something comforting without hours of cooking.

Vegan and Gluten-Free: Not only is it suitable for vegans, but it also accommodates gluten-free diets, appealing to a wide array of preferences and dietary needs.

Rich, Creamy Texture: With a velvety base made from coconut milk and pumpkin puree, each spoonful delivers a delightful creaminess that feels indulgent yet healthy.

Flavor Explosion: The combination of spices such as curry powder and garam masala infuses this soup with a warm, aromatic flair that will surely impress your guests.

Versatile and Customizable: Feel free to get creative! Add your favorite veggies or proteins for a personal touch, or serve it alongside crusty bread or a fresh salad for a complete meal.

If you’re looking for additional inspiration, consider trying out a flavorful Thai Chicken Curry Soup for a different twist.

Coconut Curry Pumpkin Soup Ingredients

• Here’s everything you need to create a cozy pot of Coconut Curry Pumpkin Soup that’s sure to warm your heart!

For the Soup Base

  • Olive Oil – Adds richness and helps sauté vegetables; substitute with coconut oil for a tropical twist.
  • Onion – Provides aroma and natural sweetness; use shallots for a more delicate flavor.
  • Garlic – Deepens the overall flavor; fresh garlic is recommended, but garlic powder can be an easy substitute.
  • Ginger – Offers a warm, spicy note; fresh ginger creates the best flavor, while powdered ginger can save time.
  • Mild Curry Powder – Key spice blend for that signature soup taste; adjust the amount based on desired heat level.
  • Garam Masala – Enhances warmth and complexity; optional but adds wonderful depth to the flavor profile.
  • Vegetable Stock – Forms the soup’s base; for non-vegan options, chicken stock works well, or use homemade for better taste.
  • Coconut Milk – Provides creaminess and a hint of sweetness; consider light coconut milk for a lower-calorie version.
  • Pumpkin Puree – The star ingredient thickening the soup; can be swapped with butternut squash puree if needed.
  • Salt and Pepper – Elevates all flavors; adjust according to your taste preferences.

Optional Toppings

  • Pumpkin Seeds – For a delightful crunch; can substitute with sunflower seeds or eliminate for a nut-free dish.
  • Fresh Cilantro – Adds a burst of fresh flavor as a garnish; parsley works too if preferred, or omit altogether.

With this collection of ingredients, you’re all set to craft a heartwarming Coconut Curry Pumpkin Soup that is as nutritious as it is delicious! Enjoy the process, and let the cozy aromas envelop your kitchen.

Step‑by‑Step Instructions for Coconut Curry Pumpkin Soup

Step 1: Sauté Aromatics
In a medium pot, heat 2 tablespoons of olive oil over medium heat. Once hot, add 1 diced onion and sauté for about 5 minutes until it turns translucent and fragrant. This will create a flavorful base for your Coconut Curry Pumpkin Soup, ensuring the aroma fills your kitchen with warmth.

Step 2: Add Garlic and Ginger
Next, add 2 minced garlic cloves and 1 tablespoon of grated fresh ginger to the pot. Cook for another minute, stirring frequently until the garlic becomes fragrant and golden, taking care not to let it burn. This step enhances the depth of flavor in your soup, making it even more comforting.

Step 3: Stir in Spices
Sprinkle in 1 tablespoon of mild curry powder and 1 teaspoon of garam masala, allowing them to toast in the pan. Cook for 1-2 minutes, stirring often to release the natural oils and scents. Your kitchen will begin to smell incredible, setting the stage for the rich flavors of the Coconut Curry Pumpkin Soup.

Step 4: Add Liquid Ingredients
Pour in 4 cups of vegetable stock and 1 can of coconut milk, followed by 1 can of pumpkin puree. Stir everything together, ensuring a smooth blend of flavors. Season with salt and pepper to taste, letting the mixture come together to form a rich base for your creamy soup.

Step 5: Simmer the Soup
Bring the soup to a gentle simmer over medium heat, then reduce the temperature slightly. Allow it to cook for 15-20 minutes, stirring occasionally. Watch as the soup thickens and the flavors meld, creating a beautiful, vibrant orange hue perfect for the fall season.

Step 6: Blend Until Smooth
Using an immersion blender, purée the soup until silky smooth, taking care to avoid splashes. If you don’t have an immersion blender, transfer the soup in batches to a standard blender. Blend until completely smooth, creating that velvety texture that defines your Coconut Curry Pumpkin Soup.

Step 7: Final Touches and Serve
Taste and adjust seasoning as needed, adding a pinch more salt or a touch of sugar if the pumpkin lacks sweetness. Serve the soup hot, drizzling additional coconut milk on top for an elegant finish. Garnish with pumpkin seeds and fresh cilantro, if desired, welcoming everyone to enjoy this delicious, creamy bowl of warmth.

What to Serve with Coconut Curry Pumpkin Soup

Creating a well-rounded meal around your delicious soup can elevate your dining experience. Here are some wonderful pairings to consider.

  • Crusty Bread: A warm, crusty baguette is perfect for dipping into the velvety soup, enhancing its creaminess while adding a satisfying crunch.

  • Simple Green Salad: A vibrant mix of greens with a light vinaigrette brings freshness that balances the rich, spiced flavors of the soup. Toss in some sliced apples or pears for a sweet touch.

  • Roasted Brussels Sprouts: These crispy, caramelized bites offer a nutty flavor that complements the sweetness of the pumpkin, making for a delightful contrast in textures.

  • Spicy Chickpeas: Roasted chickpeas seasoned with paprika or cumin add a crunchy, protein-packed element to your meal, perfectly blending with the curry notes.

  • Coconut Rice: Prepare a fluffy batch of coconut rice to soak up the delicious soup, marrying those tropical flavors in a truly comforting way.

  • Dessert Wine: A chilled glass of Riesling or a sweet white wine can beautifully offset the warmth and spices of the soup, making for a lovely finish to the meal.

Each of these options brings its own unique flair, enhancing the comforting essence of your Coconut Curry Pumpkin Soup. Enjoy the delightful symphony of flavors!

How to Store and Freeze Coconut Curry Pumpkin Soup

Fridge: Store cooled Coconut Curry Pumpkin Soup in an airtight container for up to 4 days. Reheat on the stovetop over low heat or in the microwave until warmed through.

Freezer: For longer storage, freeze the soup for up to 3 months. Portion it into freezer-safe containers or bags, ensuring you leave space for expansion.

Thawing: To enjoy the soup later, transfer it to the refrigerator overnight to thaw. It’s a simple way to have this delightful dish ready when needed!

Reheating: When reheating, stir well to combine any separated ingredients. Heat on the stovetop or microwave until piping hot, making it a comforting meal any day!

Coconut Curry Pumpkin Soup Variations

Embrace your culinary creativity with these delightful twists on the classic Coconut Curry Pumpkin Soup.

  • Extra Veggies: Add diced sweet potatoes or carrots for a touch of natural sweetness and bonus nutrition. They’ll complement the soup’s creamy base beautifully.

  • Protein Boost: Include chickpeas to ramp up the protein content. They’re not only nutritious but also pair perfectly with the flavors of the curry.

  • Different Squash: Swap pumpkin puree for butternut squash or cooked carrots. Each offers a unique sweetness and flavor profile for a fun twist.

  • Spicy Kick: For those who enjoy heat, toss in diced jalapeños or a splash of your favorite hot sauce. It’s a fantastic way to warm up the flavor further!

  • Coconut Kick: Use coconut cream instead of coconut milk for an ultra-rich texture. This adds a decadent touch that will make your soup even more luscious.

  • Herb Twist: Replace fresh cilantro with basil or mint to give an unexpected herbaceous note that brightens the soup’s profile.

  • Nut-Free Crunch: Swap pumpkin seeds for sunflower seeds or omit them entirely to cater to nut allergies while still offering a delightful textural contrast.

  • Sour Note: Drizzle in a bit of lime juice just before serving to brighten and cut through the richness, adding a touch of freshness to every spoonful.

Feel free to mix and match these variations to craft your perfect bowl of Coconut Curry Pumpkin Soup!

Make Ahead Options

These Coconut Curry Pumpkin Soup make ahead options are perfect for busy cooks looking to simplify their meal prep! You can chop the onion, garlic, and ginger up to 24 hours in advance and store them in an airtight container in the refrigerator to save time during your busy week. Additionally, the soup itself can be prepared and refrigerated for up to 4 days, just allow it to cool completely before transferring to a container. When ready to serve, gently reheat the soup on the stovetop until warmed through, and for the best quality, add extra coconut milk just before serving for that creamy finish. Enjoy restaurant-quality flavors with minimal effort!

Expert Tips for Coconut Curry Pumpkin Soup

  • Simmer for Thickness: Allow the soup to simmer longer if you prefer a thicker consistency. Adjust by adding more vegetable stock for a lighter soup.

  • Mind the Sweetness: Taste the pumpkin before cooking! If it’s not sweet enough, add a tablespoon of sugar to balance the flavors in your Coconut Curry Pumpkin Soup.

  • Blending Technique: Use a high-quality immersion blender for the smoothest texture, but be cautious not to over-blend if you like a bit of texture in your soup.

  • Season to Perfection: Always taste and adjust the seasoning at the end; a small pinch of salt can elevate the entire dish.

  • Ingredient Swaps: Feel free to mix in your favorite veggies or proteins, like chickpeas, for added nutrition and customization in your Coconut Curry Pumpkin Soup.

Coconut Curry Pumpkin Soup Recipe FAQs

How do I choose the best pumpkin for this soup?
Absolutely! When selecting a pumpkin, look for one that feels heavy for its size and has a hard, blemish-free skin. Avoid pumpkins with any dark spots or soft areas, as these could indicate spoilage. Sugar pumpkins or canned pumpkin puree are your best bets for a rich flavor without being overly fibrous.

How long can I store leftover Coconut Curry Pumpkin Soup?
You can store your cooled Coconut Curry Pumpkin Soup in an airtight container in the refrigerator for up to 4 days. Just remember to let it cool completely before sealing it up! Reheat gently on the stove or in the microwave until thoroughly warmed through.

Can I freeze this Coconut Curry Pumpkin Soup?
Yes, you can freeze Coconut Curry Pumpkin Soup for up to 3 months! To do so, transfer the cooled soup into freezer-safe containers or bags, leaving a little extra space at the top to allow for expansion. When you’re ready to enjoy, simply thaw it overnight in the refrigerator before reheating.

What should I do if my soup is too thin?
If your soup is too thin for your liking, don’t fret! You can let it simmer uncovered for a bit longer on the stovetop; this will help it thicken naturally. Alternatively, blend in a spoonful of canned pumpkin puree or a cornstarch slurry (mix cornstarch with water, then whisk it into the soup) until you achieve your desired consistency.

Are there any dietary considerations I should be aware of?
Very! This Coconut Curry Pumpkin Soup is naturally vegan and gluten-free, making it suitable for a variety of diets. However, if you or your guests have nut allergies, make sure to omit any nuts, like pumpkin seeds, from the topping. Always double-check labels for broth or canned products to ensure they meet your dietary needs.

How can I add more flavor to the soup?
To enhance the flavor of your soup, consider sautéing additional veggies like bell peppers or carrots with the onion. You can also experiment with spices; adding a pinch of cayenne pepper or a dash of soy sauce can introduce a lovely depth. Don’t forget to taste at the end; sometimes, just a little more salt or a squeeze of lime juice can elevate the flavors significantly!

Velvety Vegan Coconut Curry Pumpkin Soup You’ll Love

Coconut Curry Pumpkin Soup is a rich, creamy, and comforting vegan dish full of warm flavors, ready in just over 35 minutes.

  • Medium pot
  • Immersion blender

Soup Base

  • 2 tablespoons Olive Oil (or coconut oil for a tropical twist)
  • 1 medium Onion (diced)
  • 2 cloves Garlic (minced)
  • 1 tablespoon Ginger (grated fresh)
  • 1 tablespoon Mild Curry Powder (adjust based on heat preference)
  • 1 teaspoon Garam Masala (optional)
  • 4 cups Vegetable Stock (or chicken stock for non-vegan options)
  • 1 can Coconut Milk (consider light for lower calories)
  • 1 can Pumpkin Puree (or butternut squash puree)
  • to taste Salt
  • to taste Pepper

Optional Toppings

  • 1/4 cup Pumpkin Seeds (or sunflower seeds for nut-free)
  • 1/4 cup Fresh Cilantro (or parsley)

Step-by-Step Instructions

  1. In a medium pot, heat 2 tablespoons of olive oil over medium heat. Add 1 diced onion and sauté for about 5 minutes until translucent.
  2. Add 2 minced garlic cloves and 1 tablespoon of grated fresh ginger. Cook for another minute until fragrant.
  3. Sprinkle in 1 tablespoon of mild curry powder and 1 teaspoon of garam masala, cooking for 1-2 minutes.
  4. Pour in 4 cups of vegetable stock and 1 can of coconut milk, then 1 can of pumpkin puree. Season with salt and pepper.
  5. Bring the soup to a gentle simmer, reduce temperature slightly, and cook for 15-20 minutes, stirring occasionally.
  6. Using an immersion blender, purée the soup until silky smooth. Alternatively, transfer to a standard blender in batches.
  7. Taste and adjust seasoning. Serve hot, drizzling more coconut milk on top, and garnish with pumpkin seeds and cilantro.

Store cooled soup in an airtight container for up to 4 days in the fridge or freeze for up to 3 months. Thaw overnight in the refrigerator before reheating.

Soup
Vegan
Coconut Curry, comfort food, gluten-free, Healthy Recipe, Pumpkin Soup, Vegan Soup

Filed Under: Condiment

Irresistibly Creamy Roasted Cauliflower Soup to Warm Your Soul

July 16, 2025 by grace bellamy Leave a Comment

A gust of winter air slipped through my kitchen window as I prepared for a cozy night in. There’s something magical about a bowl of creamy roasted cauliflower soup that warms not just the body but the soul. Made simply yet brimming with flavor, this velvety soup has become my go-to comfort dish, especially on chilly evenings. It’s gluten-free and offers a delightful, dairy-free option for those looking to lighten things up without sacrificing taste. Imagine curling up with a bowl of this luscious soup, accompanied by some crusty bread, as the world outside turns chilly. Ready to discover how this creamy roasted cauliflower soup can transform your weeknight dinners?

Why Is This Soup So Irresistible?

Comforting Warmth: This irresistibly creamy soup wraps you in a cozy hug, perfect for cold evenings.
Flavorful Simplicity: With just a few ingredients, you get an explosion of taste that belies its simplicity.
Dairy-Free Option: For those seeking lighter fare, this recipe offers a delicious vegan adaptation—you won’t miss the cream!
Versatile Delight: Pair it with crusty bread or a hearty salad for a fulfilling meal that suits any occasion.
Freezer-Friendly: Make a big batch and store extra for a quick, satisfying lunch or dinner on busy days.

Roasted Cauliflower Soup Ingredients

For the Soup Base
• Cauliflower – The heart of this roasted cauliflower soup, choose a fresh head for the best flavor and texture.
• Butter – Adds luxurious creaminess; substitute with soaked cashews for a vegan option.
• Onion – Enhances the soup’s flavor; use yellow or white onions for a sweeter taste.
• Garlic – Infuses aromatic complexity; opt for fresh cloves for maximum flavor impact.

For the Liquid
• Vegetable Broth – Serves as the base, contributing rich flavors; opt for low-sodium if watching your salt intake.

For the Finishing Touches
• Nutmeg – Just a pinch elevates the overall flavor profile; can be omitted for a milder taste.
• Lemon Juice – Brightens and adds acidity; fresh juice is recommended for the best taste.
• Salt & Pepper – Essential for seasoning; adjust to taste for a balanced flavor.

Optional Additions
• Crushed Red Pepper Flakes or Smoked Paprika – For those who crave a spicy kick, add these during sautéing.
• Sautéed Greens (e.g., Kale or Spinach) – Incorporate for added nutrition and texture.
• Truffle Oil – A drizzling of truffle oil before serving transforms this soup into a gourmet delight.

Step‑by‑Step Instructions for Creamy Roasted Cauliflower Soup

Step 1: Preheat and Prepare
Preheat your oven to 425°F (220°C) and line a baking sheet with parchment paper. This will help the cauliflower roast evenly, creating that delightful caramelization. While the oven heats, wash and cut a fresh head of cauliflower into florets, ensuring they are all roughly the same size for uniform roasting.

Step 2: Roast the Cauliflower
In a bowl, toss the cauliflower florets with olive oil until well coated. Spread them in a single layer on the prepared baking sheet and sprinkle with salt and pepper. Roast in the preheated oven for about 25-30 minutes, flipping halfway, until they are golden brown and tender, which enhances the flavor for your roasted cauliflower soup.

Step 3: Sauté the Aromatics
While the cauliflower is roasting, grab a large pot and melt butter over medium heat. Add finely chopped onion and sauté for 5-7 minutes, stirring occasionally, until the onion becomes translucent and fragrant. This will form a flavorful base for your soup, creating a wonderful depth that pairs perfectly with the roasted cauliflower.

Step 4: Add Garlic and Broth
Next, add minced garlic to the pot and cook for 1-2 minutes until it becomes aromatic. Then, pour in vegetable broth, scraping up any bits stuck to the bottom of the pot for added flavor. Bring the mixture to a gentle simmer, allowing the flavors to meld together beautifully for about 5 minutes while your roasted cauliflower finishes.

Step 5: Combine and Simmer
Once the cauliflower is roasted, carefully add it to the pot with the broth and onions. Stir to combine and let everything simmer together for an additional 20 minutes. This will ensure the roasted cauliflower soup is infused with the rich flavors from the garlic and onion, making every spoonful delightful.

Step 6: Blend Until Smooth
After simmering, allow the mixture to cool slightly, then carefully transfer it to a blender. Add the butter (or soaked cashews for a vegan option) and blend until completely smooth, which should take about 1-2 minutes. For the creamiest texture, a stand blender works best, giving your roasted cauliflower soup the luxurious consistency you desire.

Step 7: Season and Finish
Return the blended soup to the pot over low heat, adding a pinch of nutmeg and fresh lemon juice. Stir everything together and taste for seasoning, adjusting salt and pepper as needed. Allow it to warm through on the stove for a few minutes, ensuring that your creamy roasted cauliflower soup is served hot and ready to impress.

Step 8: Serve and Enjoy
Ladle your beautifully creamy roasted cauliflower soup into bowls, garnishing with fresh herbs if desired. Pair it with crusty bread or a fresh salad for a comforting meal. Whether it’s for a chilly evening or a cozy dinner party, this soup will surely warm your heart and soul!

What to Serve with Creamy Roasted Cauliflower Soup

Imagine the comforting warmth of a luxurious bowl of soup, paired perfectly with delightful side dishes to create a complete meal experience.

  • Crusty Bread: The perfect accompaniment for dipping, its crunchy texture contrasts beautifully with the smoothness of the soup.
  • Mixed Greens Salad: Fresh greens with a light vinaigrette add a refreshing crunch, balancing the rich flavors of the soup.
  • Grilled Cheese Sandwich: This classic pairing brings together gooey melted cheese and crispy bread, a delightful textural contrast against creamy roasted cauliflower soup.
  • Savory Quiche: A slice of quiche with seasonal vegetables offers a hearty option, making your meal feel extra special.
  • Roasted Vegetables: Seasonal roasted veggies add a sweet, caramelized flavor that complements the earthiness of the cauliflower.
  • Herbed Rice: Light and fragrant, herbed rice provides a subtle flavor that enhances the overall dining experience.
  • Chardonnay: A glass of chilled Chardonnay elevates your meal, its crisp acidity cutting through the creaminess of the soup.
  • Apple Crisp: Finish with a warm apple crisp; its sweet, tart flavor is a perfect contrast to the savory soup.

Roasted Cauliflower Soup Variations & Substitutions

Feel free to get creative and tailor this creamy roasted cauliflower soup to your taste and dietary preferences!

  • Dairy-Free: Substitute butter with soaked cashews blended into the soup for a luxurious vegan alternative.

  • Spicy Kick: Add crushed red pepper flakes or smoked paprika to the sautéed onions to ignite your taste buds with warmth.

  • Chicken Broth: For a non-vegetarian twist, swap vegetable broth for chicken broth to deepen the flavor profile of the soup.

  • Loaded Greens: Stir in sautéed kale or spinach just before blending for an extra pop of color and nutrition.

  • Lemon Zest: For added brightness, include a teaspoon of lemon zest along with the lemon juice to enhance the citrus flavor.

  • Herb Infusion: Add fresh herbs like thyme or rosemary during the simmering stage for an aromatic depth that will elevate your soup.

  • Truffle Oil Garnish: Drizzle a little truffle oil over each bowl just before serving to infuse a gourmet touch that impresses every guest.

  • Nutty Texture: Toss in roasted walnuts or pine nuts just before serving for a delightful crunch that contrasts with the creamy soup.

Expert Tips for Creamy Roasted Cauliflower Soup

• Choose Fresh Cauliflower: Ensure you select a firm, fresh head of cauliflower. Older cauliflower can affect the flavor and consistency of your roasted cauliflower soup.

• Perfect Roasting: Aim for caramelization without burning. Check your cauliflower halfway through roasting to flip and ensure even cooking for richer flavor.

• Smooth Texture: For the creamiest outcome, use a high-speed stand blender. Immersion blenders may lead to a less smooth consistency, impacting your soup’s velvety finish.

• Taste as You Go: Don’t rush the seasoning! Start with a small amount of salt and pepper, tasting as you adjust to avoid over-seasoning your delicious roasted cauliflower soup.

• Custom Flavor Additions: Experiment with spices like smoked paprika or crushed red pepper for a warm kick, enhancing the flavors of your creamy soup.

Make Ahead Options

Preparing this creamy roasted cauliflower soup in advance can save you valuable time on busy weeknights! You can roast the cauliflower and sauté the onions up to 24 hours ahead. Simply cool both components completely and store them in separate airtight containers in the refrigerator. When you’re ready to enjoy your soup, combine the roasted cauliflower and aromatics with the broth as directed, then simmer for about 20 minutes to develop the flavors. Don’t forget to add the finishing touches, like blending until smooth, seasoning, and incorporating the lemon juice just before serving for that fresh taste. This way, your flavorful roasted cauliflower soup will be just as delicious and easy to make!

How to Store and Freeze Roasted Cauliflower Soup

Fridge: Store leftover roasted cauliflower soup in an airtight container for up to 3 days. Reheat gently on the stove or in the microwave, adding a splash of broth if needed.

Freezer: This soup freezes beautifully! Allow it to cool completely, then portion into airtight containers or freezer bags for up to 3 months.

Reheating: Thaw overnight in the fridge before reheating. Warm on the stove over low heat, stirring occasionally until heated through.

Avoid Overfilling: When freezing, leave some space at the top of the container for expansion as the soup freezes.

Creamy Roasted Cauliflower Soup Recipe FAQs

Should you roast cauliflower for soup?
Absolutely! Roasting cauliflower enhances its natural sweetness and depth of flavor, creating a richer, more satisfying soup. This process caramelizes the sugars, giving your creamy roasted cauliflower soup a delightful taste and aroma that boiling alone simply can’t achieve.

What is the 2 ingredient cauliflower soup?
A quick two-ingredient cauliflower soup typically consists of just cauliflower and broth. While simple, it lacks the rich flavors and creaminess of a roasted version. If you’re looking for a comforting twist, consider adding aromatics like onion and garlic, and finishing with butter or plant-based cream for a depth that elevates the dish.

What brings out the flavor of cauliflower soup?
To enhance the flavor of your cauliflower soup, consider adding roasted garlic, sautéed onions, and spices like nutmeg or cumin. A splash of fresh lemon juice before serving brightens the soup, while herbs such as thyme or parsley can provide freshness and additional complexity.

What spices go well in cauliflower soup?
Many spices complement cauliflower beautifully! Nutmeg adds a warm undertone, while crushed red pepper flakes introduce a spicy kick. Try smoked paprika for a subtly smoky flavor. Experimenting with these spices can elevate your creamy roasted cauliflower soup to a gourmet delight!

Why do you soak cauliflower before cooking?
Soaking cauliflower helps remove dirt and any potential pesticides, ensuring a cleaner veggie for cooking. While not mandatory, soaking also softens the cauliflower slightly, leading to a more tender texture when cooked. Just remember to rinse it well before use for the best results.

Why is my cauliflower soup so bitter?
If your cauliflower soup tastes bitter, it could be due to overcooking or using older cauliflower. Fresh, well-roasted cauliflower typically has a pleasant, mild taste. To counteract bitterness, try adding a pinch of sugar to balance the flavors, or incorporating a splash of lemon to brighten the soup!

Irresistibly Creamy Roasted Cauliflower Soup to Warm Your Soul

This creamy roasted cauliflower soup is a comforting dish that warms the soul, perfect for chilly evenings.

  • Oven
  • Pot
  • Blender
  • Baking Sheet

For the Soup Base

  • 1 head Cauliflower (Fresh for best flavor and texture)
  • 2 tablespoons Butter (Or soaked cashews for a vegan option)
  • 1 medium Onion (Yellow or white for sweetness)
  • 3 cloves Garlic (Fresh cloves for maximum flavor)

For the Liquid

  • 4 cups Vegetable Broth (Low-sodium if preferred)

For the Finishing Touches

  • 1 pinch Nutmeg (Can be omitted for milder taste)
  • 2 tablespoons Lemon Juice (Fresh juice recommended)
  • to taste Salt (Essential for seasoning)
  • to taste Pepper (Essential for seasoning)

Optional Additions

  • 1 teaspoon Crushed Red Pepper Flakes (For a spicy kick)
  • 1 cup Sautéed Greens (e.g., Kale or Spinach)
  • 1 tablespoon Truffle Oil (Transforms soup into a gourmet delight)

Step-by-Step Instructions

  1. Preheat your oven to 425°F (220°C) and line a baking sheet with parchment paper.
  2. Toss the cauliflower florets with olive oil, spread on the baking sheet, and season with salt and pepper. Roast for 25-30 minutes.
  3. Melt butter in a large pot over medium heat. Add chopped onion and sauté for 5-7 minutes until translucent.
  4. Add minced garlic to the pot and cook for 1-2 minutes. Pour in vegetable broth and let simmer for 5 minutes.
  5. Add the roasted cauliflower to the pot, stir, and let it simmer for an additional 20 minutes.
  6. Allow the mixture to cool slightly, then transfer to a blender, add butter or cashews, and blend until smooth.
  7. Return the blended soup to the pot, add nutmeg and lemon juice, and adjust seasoning as needed. Warm through.
  8. Ladle the soup into bowls, garnish with fresh herbs, and serve with crusty bread or salad.

Store leftovers in an airtight container for up to 3 days. This soup freezes well for up to 3 months. Thaw and reheat gently.

Appetizer
American
comfort food, creamy soup, gluten-free, Roasted Cauliflower Soup, Vegan Option, Winter Soup

Filed Under: Appetizer

One Pan Cajun Chicken Alfredo Orzo: Easy Family Favorite

July 16, 2025 by grace bellamy Leave a Comment

The aroma of Cajun spices wafting through the kitchen is enough to make anyone’s mouth water. As I toss together a satisfying dinner, my mind wanders to the countless nights spent scrambling for options that are quick, flavor-packed, and easy on cleanup. Enter my One Pan Cajun Chicken Alfredo Orzo—a deliciously creamy dish that checks all those boxes. Not only is it a breeze to whip up on busy evenings, but the combination of tender chicken and zesty sauce transforms a simple one-pan meal into a family-favorite delight. Plus, the magic happens right in one pot, saving you from the dreaded mountain of dirty dishes. Intrigued about how to turn your weeknight dinners into something extraordinary? Let’s dive in!

Why is One Pan Cajun Chicken Alfredo Orzo Amazing?

Bold flavors: The unique Cajun seasoning elevates traditional Alfredo to a whole new level, giving your taste buds a spicy kick.
Quick & easy: With everything cooked in one pan, you can enjoy a satisfying meal without the fuss of multiple pots and pans.
Creamy goodness: Every bite is enveloped in a luscious sauce that pairs perfectly with the tender orzo, making it utterly comforting.
Family-friendly: Kids and adults alike will fall in love with this delightful dish, turning even the pickiest eaters into fans!
Versatile option: Feel free to customize with your choice of protein or add veggies—it’s perfect for using up what you have. Transform your weeknight meals with this incredible dish from the comfort of your kitchen!

One Pan Cajun Chicken Alfredo Orzo Ingredients

For the Cajun Seasoning
• Cajun Seasoning Blend – Adds a smoky, spicy flavor; substitute with store-bought Cajun seasoning if short on time.

For the Chicken and Sauce
• Thin Chicken Breast (1 lb) – Provides protein and substance to the dish; can substitute with turkey breast for a leaner option.
• Extra Virgin Olive Oil (1 tbsp) – Used for cooking chicken to enhance flavor.
• Butter (2 tbsp) – Adds richness to the sauce; can be replaced with margarine for a lighter version.
• Garlic (4 cloves, minced) – Adds aromatic flavor; fresh garlic is preferred for the best taste.
• Milk (1.5 cups) – Creates creaminess in the sauce; use whole milk for a richer flavor or almond milk for a dairy-free option.
• Chicken Broth (1 cup) – Provides depth of flavor; vegetable broth can be used for a vegetarian version.
• Orzo (1 cup, uncooked) – The main carbohydrate that absorbs the sauce; other small pasta shapes can be substituted.
• Heavy Cream (1/4 cup) – Adds a rich, creamy consistency; use half-and-half for a lighter sauce.
• Parmesan Cheese (3/4 cup, freshly grated) – Adds savory umami flavor; nutritional yeast can be used as a vegan alternative.
• Fresh Parsley (1/4 cup, chopped) – For garnish and a fresh flavor contrast.

Step‑by‑Step Instructions for One Pan Cajun Chicken Alfredo Orzo

Step 1: Prepare Cajun Seasoning
In a small bowl, combine the Cajun seasoning ingredients to create your homemade blend. This flavorful mixture will elevate your One Pan Cajun Chicken Alfredo Orzo. Give it a good stir to ensure the spices are evenly mixed and set it aside for later use.

Step 2: Marinate the Chicken
Take your thin chicken breasts and coat them with olive oil and half of the prepared Cajun seasoning. Allow the chicken to marinate for about 30 minutes to absorb those robust flavors. While waiting, you can prepare and gather your other ingredients, making the next steps even smoother.

Step 3: Cook the Chicken
Heat a large high-rimmed sauté pan over medium heat and add a drizzle of olive oil. Once hot, place the marinated chicken in the pan and cook for about 5 minutes on each side until golden brown and cooked through. The chicken should feel firm to the touch. Remove it from the pan and let it rest while you continue with the sauce.

Step 4: Sauté the Garlic
In the same pan, melt the butter over medium heat and add the minced garlic. Sauté for about 1 minute until fragrant, making sure the garlic doesn’t burn. This step will infuse your One Pan Cajun Chicken Alfredo Orzo with rich, aromatic flavors that set the stage for the creamy sauce.

Step 5: Add Liquids and Orzo
Pour in the milk and chicken broth, stirring well to combine and scraping any browned bits off the bottom of the pan. This will enhance the depth of flavor. Once everything is mixed, add in the uncooked orzo to the bubbling liquids. Adjust the seasoning with additional Cajun seasoning if desired, then bring it to a vigorous boil.

Step 6: Cook the Orzo
Lower the heat to a gentle simmer and cook the orzo, stirring frequently to prevent sticking. Over the next 20 minutes, add water in ½ cup increments as needed, ensuring the orzo stays saucy and tender while absorbing all those flavors from the Cajun spices.

Step 7: Incorporate the Chicken
Once the orzo is cooked to al dente, cut the rested chicken into bite-sized pieces and return it to the pan. Stir gently to combine, allowing the chicken to warm through and blend with the creamy orzo.

Step 8: Create the Creamy Sauce
Reduce the heat to low and stir in the heavy cream and freshly grated Parmesan cheese. Mix continuously until the cheese is melted and everything is creamy. The final result should be a luscious, rich sauce enveloping the orzo, elevating your One Pan Cajun Chicken Alfredo Orzo to a comforting masterpiece.

Step 9: Garnish and Serve
Once the sauce is silky and well combined, remove the pan from the heat. Serve your One Pan Cajun Chicken Alfredo Orzo immediately, garnished with a sprinkle of fresh parsley for a burst of color and flavor. Enjoy the satisfaction of a quick, hearty meal that everyone will love!

One Pan Cajun Chicken Alfredo Orzo Variations

Feel free to explore these delightful twists on the classic dish, enhancing flavors and accommodating your family’s tastes.

  • Seafood Swap: Replace chicken with shrimp or sautéed scallops for a luxurious seafood version. The briny notes of shrimp complement the Cajun spices beautifully.

  • Vegetarian Delight: Swap the chicken for sautéed mushrooms and add extra veggies like bell peppers or zucchini. This version is just as satisfying and colorful!

  • Spicy Kick: For a heat infusion, add diced jalapeños or a dash of hot sauce while cooking. It’ll crank up the flavor complexity and heat levels.

  • Dairy-Free: Use almond or coconut milk instead of regular milk and choose a vegan cheese alternative for a creamy texture. Perfect for those with dairy intolerances!

  • Whole Grain Option: Swap regular orzo for whole wheat orzo to add fiber and nutrients. It maintains the dish’s integrity while being a healthier choice.

  • Creamy Alternative: For a lighter sauce, substitute heavy cream with Greek yogurt mixed with a bit of reserved pasta water. This will still give you creaminess without the calories.

  • Herbaceous Twist: Incorporate fresh basil or cilantro during mixing for a refreshing herbal touch that brightens the dish.

  • Cheese Explosion: Experiment with different cheeses like gouda or a spicy pepper jack instead of Parmesan for a unique flavor profile. Every bite will surprise you!

What to Serve with One Pan Cajun Chicken Alfredo Orzo

Transform your spicy, creamy creation into a full meal that delights every palate and brings everyone to the table.

  • Garlic Bread: The buttery, garlicky taste is a perfect contrast to the rich orzo, making for a satisfying, hearty combination.
  • Simple Green Salad: A refreshing medley of crisp greens and vinaigrette cuts through the creaminess, adding a lightness that compliments the dish beautifully.
  • Roasted Vegetables: Seasonal veggies like bell peppers or zucchini not only add color but also introduce a delightful texture to balance the creamy dish.
  • Corn on the Cob: Sweet and juicy, corn on the cob brings a delightful crunch and pairs wonderfully with the bold flavors of the Cajun seasoning.
  • Sparkling Lemonade: A fizzy, citrusy drink refreshes the palate and adds a zesty twist to your meal, elevating the overall dining experience.
  • Chocolate Mousse: For dessert, this rich, airy treat offers a sweet finish without overpowering the meal’s spicy notes, creating a perfect ending to the evening.

Expert Tips for One Pan Cajun Chicken Alfredo Orzo

  • Spice Adjustment: Adjust the level of Cajun seasoning based on your family’s spice tolerance to keep every palate in mind.

  • Liquid Balance: Ensure the orzo has enough liquid throughout cooking to achieve a creamy texture; it should look saucy and not dry.

  • Marinade Time: Marinate the chicken longer for a deeper flavor absorption if you can. If short on time, a quick coat will still do!

  • Ingredient Swaps: Feel free to swap the chicken for shrimp or even add veggies, allowing for your One Pan Cajun Chicken Alfredo Orzo to remain versatile and fun!

Make Ahead Options

Making the One Pan Cajun Chicken Alfredo Orzo ahead of time is a fantastic strategy for busy weeknights! You can marinate the chicken with olive oil and half of the Cajun seasoning up to 24 hours in advance, allowing those flavors to truly penetrate. Additionally, you can prepare the Cajun seasoning and store it in an airtight container for up to 3 days to save time on cooking day. When you’re ready to serve, simply cook the marinated chicken as instructed and complete the recipe with the orzo and sauce ingredients. For optimal quality, be sure to stir the dish frequently to prevent sticking, and feel free to sprinkle a little extra milk before serving to restore that creamy consistency. Enjoy quick, delicious meals without the hassle!

How to Store and Freeze One Pan Cajun Chicken Alfredo Orzo

Fridge: Store leftovers in an airtight container for up to 3 days, ensuring the creamy sauce stays fresh.

Freezer: Freeze in a tightly sealed container for up to 2 months. When ready to enjoy, thaw overnight in the fridge.

Reheating: Reheat gently on the stovetop, adding a splash of water or milk to restore the creamy texture of your One Pan Cajun Chicken Alfredo Orzo.

Serving Tip: It’s best to reheat slowly to maintain the quality and richness of the dish—just like when it was freshly made!

One Pan Cajun Chicken Alfredo Orzo Recipe FAQs

What kind of Cajun seasoning should I use?
Absolutely! You can use a homemade Cajun seasoning blend for the best flavor, or you can save time by opting for store-bought Cajun seasoning. If you’re making your own, combine spices like paprika, cayenne pepper, garlic powder, onion powder, thyme, oregano, and black pepper in a small bowl for a smoky and spicy kick.

How should I store leftovers of One Pan Cajun Chicken Alfredo Orzo?
Very simple! Store any leftovers in an airtight container in the refrigerator for up to 3 days. When you’re ready to enjoy it again, gently reheat on the stovetop over low heat, adding a splash of water or milk to maintain that creamy texture.

Can I freeze One Pan Cajun Chicken Alfredo Orzo?
Yes, you can! Place the dish in a tightly sealed container and freeze it for up to 2 months. To reheat, simply thaw overnight in the refrigerator, and then warm it on the stovetop, ensuring to add a splash of liquid to keep it creamy.

What if my orzo seems dry while cooking?
No worries at all! If you notice that your orzo is looking dry, just add water in ½ cup increments as needed during cooking. Stir frequently and keep an eye on the texture; it should be saucy and tender, absorbing all those delicious flavors.

Is there a way to make this dish healthier?
Certainly! You can lighten up the One Pan Cajun Chicken Alfredo Orzo by using less heavy cream and cheese, or swap in half-and-half. You can also add plenty of colorful veggies such as spinach, bell peppers, or peas to boost the nutritional value without sacrificing flavor!

Can I make this recipe suitable for dietary restrictions?
Absolutely! For a dairy-free option, substitute heavy cream and milk with almond milk or a dairy-free cream alternative. You can also swap chicken for tofu or shrimp if you wish for a different protein, particularly making sure to adjust cooking times accordingly.

One Pan Cajun Chicken Alfredo Orzo: Easy Family Favorite

Discover the delightful flavors of One Pan Cajun Chicken Alfredo Orzo, a creamy and quick meal perfect for family dinners.

  • sauté pan

Cajun Seasoning

  • 1 tablespoon Cajun Seasoning Blend (Add smoky, spicy flavor; substitute with store-bought if short on time.)

Chicken and Sauce

  • 1 lb Thin Chicken Breast (Can substitute with turkey breast for a leaner option.)
  • 1 tablespoon Extra Virgin Olive Oil (Used for cooking chicken to enhance flavor.)
  • 2 tablespoons Butter (Can be replaced with margarine for a lighter version.)
  • 4 cloves Garlic, minced (Fresh garlic is preferred for the best taste.)
  • 1.5 cups Milk (Use whole milk for a richer flavor or almond milk for dairy-free option.)
  • 1 cup Chicken Broth (Vegetable broth can be used for a vegetarian version.)
  • 1 cup Orzo, uncooked (The main carbohydrate; other small pasta shapes can be substituted.)
  • 1/4 cup Heavy Cream (Use half-and-half for a lighter sauce.)
  • 3/4 cup Parmesan Cheese, freshly grated (Nutritional yeast can be used as a vegan alternative.)
  • 1/4 cup Fresh Parsley, chopped (For garnish and fresh flavor contrast.)

Step-by-Step Instructions

  1. Prepare Cajun Seasoning: Combine the Cajun seasoning ingredients to create your homemade blend. Stir to ensure spices are evenly mixed, and set aside.
  2. Marinate the Chicken: Coat thin chicken breasts with olive oil and half of the prepared Cajun seasoning. Marinate for about 30 minutes.
  3. Cook the Chicken: Heat a sauté pan over medium heat, add olive oil, and cook the marinated chicken for about 5 minutes on each side until golden brown. Remove and let rest.
  4. Sauté the Garlic: In the same pan, melt butter over medium heat and add minced garlic. Sauté for about 1 minute until fragrant.
  5. Add Liquids and Orzo: Pour in milk and chicken broth, stir well, add uncooked orzo and adjust seasoning. Bring to a vigorous boil.
  6. Cook the Orzo: Lower heat, simmer, and cook orzo for about 20 minutes, adding water in ½ cup increments as needed to keep it saucy.
  7. Incorporate the Chicken: Cut rested chicken into bite-sized pieces and return to the pan. Stir gently to combine.
  8. Create the Creamy Sauce: Reduce heat, stir in heavy cream and Parmesan cheese, mixing continuously until creamy.
  9. Garnish and Serve: Remove from heat, serve immediately garnished with fresh parsley.

Store leftovers in an airtight container for up to 3 days in the fridge. Freeze for up to 2 months. Reheat gently and add a splash of water or milk to restore creaminess.

Main Dishes
Cajun
creamy pasta, easy dinner, family favorite, One Pan Cajun Chicken Alfredo Orzo, one pot meal, quick meal

Filed Under: Main Dishes

Delicious Lemon Ricotta Pasta & Spinach in 15 Minutes!

July 16, 2025 by grace bellamy Leave a Comment

The tantalizing aroma of lemon zest mingling with garlic wafts through my kitchen, immediately lifting my spirits as I prepare one of my go-to weeknight meals: Lemon Ricotta Pasta with Spinach. In under 15 minutes, you’ll find yourself twirling pasta that’s creamy, tangy, and packed with vibrant greens, making it a delightful vegetarian dish that satisfies both the taste buds and the soul. This quick dinner is perfect when you’re craving comfort without the fuss, and the best part? It’s endlessly customizable! You can easily swap in your favorite protein or seasonal veggies to make it your own. So, what are you waiting for? Let’s dive into this refreshing recipe that promises to be a family favorite!

Why is this Lemon Ricotta Pasta special?

Quick and Easy: This delightful dish comes together in under 15 minutes, making it ideal for busy weeknights.

Creamy and Zesty: The combination of smooth ricotta and bright lemon creates a deliciously tangy sauce that elevates the simple pasta to gourmet status.

Nutrient-Packed: Loaded with fresh spinach, this recipe not only tastes great but is also a healthy choice that leaves you feeling satisfied.

Endless Versatility: Feel free to customize with proteins like shrimp or chicken, or swap out the spinach for broccoli or peas to suit your family’s preferences.

Crowd-Pleaser: Whether cooking for your family or entertaining guests, this dish is sure to impress with its vibrant colors and flavors.

For a well-rounded weeknight meal, you might enjoy serving it alongside a refreshing salad like Fresh Spinach and Tomato Pasta to complement the zesty notes!

Lemon Ricotta Pasta Ingredients

• Whip up this delightful dish with fresh ingredients that truly shine!

For the Pasta

  • Pasta – 1/2 lb (8oz/220 grams); use spaghetti or penne for perfect texture.

For the Sauce

  • Whole-Milk Ricotta – 1 cup (9oz/250 grams); creamy richness that makes this lemon ricotta pasta irresistible.
  • Lemon – 1 unwaxed lemon, zest and juice; adds the perfect bright acidity to balance the creamy sauce.
  • Grated Parmesan Cheese – 1/3 cup (35 grams); gives that umami depth; feel free to use a vegan substitute.
  • Extra Virgin Olive Oil – 1 Tbsp; enhances richness; drizzle a little extra for serving.
  • Garlic Clove – 1, grated or pressed; aromatic flavor that rounds out the dish perfectly.
  • Salt and Black Pepper – To taste; essential seasonings to elevate all the flavors.

For the Greens

  • Fresh Baby Spinach – 8 oz (230 grams); a vibrant, nutritious addition that makes this dish pop!

Step‑by‑Step Instructions for LEMON RICOTTA PASTA & SPINACH

Step 1: Cook the Pasta
In a large pot, bring salted water to a boil. Add your choice of pasta, cooking it according to the package instructions until al dente, usually about 8-10 minutes. Stir occasionally to prevent sticking. Once cooked, reserve ½ cup of the pasta water, then drain the pasta, allowing the steam to escape, which will help it stay firm.

Step 2: Mix the Sauce
While your pasta is cooking, grab a medium-sized bowl and combine the whole-milk ricotta, olive oil, grated Parmesan cheese, and the freshly grated garlic. Zest the unwaxed lemon directly into the bowl, then squeeze in the juice, adding a pinch of salt and black pepper to taste. Mix everything together until it’s smooth and creamy, setting the flavorful sauce aside.

Step 3: Add Spinach to Pasta
In the final minute of cooking your pasta, add the fresh baby spinach directly into the pot, allowing it to wilt quickly. The vibrant green leaves should turn bright and tender in about 30-60 seconds. Drain both the pasta and spinach together, shaking off excess water, while keeping your reserved pasta water close by for the next step.

Step 4: Combine and Toss
Return the drained pasta and wilted spinach to the pot, creating a warm base for your Lemon Ricotta Pasta & Spinach. Gradually spoon in the creamy ricotta mixture, tossing everything together. If the sauce feels too thick, drizzle in some reserved pasta water a little at a time until you achieve a luscious consistency that clings nicely to the pasta.

Step 5: Serve with Flair
Serve your delightful Lemon Ricotta Pasta immediately in warm bowls. Finish with a sprinkle of extra Parmesan cheese, a drizzle of olive oil for added richness, and optional red pepper flakes for a hint of heat. The dish should look inviting, with vibrant colors and creamy texture that beckons everyone to dig in!

What to Serve with Lemon Ricotta Pasta with Spinach

Elevate your weeknight dinner by creating a delightful spread that balances flavors and textures beautifully.

  • Garlic Bread: Slathered in buttery garlic goodness, this classic side is perfect for sopping up the creamy sauce.
  • Mixed Green Salad: A refreshing salad with tangy vinaigrette adds brightness, cutting through the richness of the pasta.
  • Roasted Asparagus: Tender asparagus spears drizzled with olive oil bring a satisfying crunch and vibrant color that complements the dish.
  • Grilled Chicken: Opt for marinated grilled chicken to add a hearty protein source that harmonizes with the lemony notes.
  • Chardonnay: This crisp white wine offers a fruity balance that enhances the lemon ricotta’s brightness while pairing effortlessly with the spinach.
  • Lemon Sorbet: A light, icy dessert mercifully cools the palate while echoing the zesty lemon, making for a refreshing finish.
  • Parmesan Crisps: These crunchy, cheesy bites provide an addictive snack while pairing perfectly with the pasta’s creamy texture.
  • Zucchini Noodles: A healthier, low-carb option, these noodles add texture and a subtle flavor that goes fantastically well with the sauce.
  • Caprese Skewers: Fresh mozzarella, tomatoes, and basil drizzled with balsamic reduction create a visually stunning appetizer that leads to a delectable meal.

How to Store and Freeze Lemon Ricotta Pasta

Fridge: Store leftovers in an airtight container for up to 2 days to keep the flavors fresh. Allow to cool completely before sealing.

Freezer: For longer storage, freeze the pasta without spinach for up to 2 months. When ready to enjoy, thaw in the fridge overnight.

Reheating: Reheat gently in a pan over low heat, adding a splash of water or olive oil to maintain creaminess. Avoid high heat to prevent the pasta from becoming mushy.

Serving: If prepped ahead, serve the lemon ricotta pasta warm, garnished with freshly grated Parmesan and a squeeze of lemon for that zesty kick!

Make Ahead Options

These Lemon Ricotta Pasta & Spinach are perfect for busy home cooks who love to meal prep! You can prepare the ricotta sauce and store it in the refrigerator for up to 3 days. Simply mix the ricotta, olive oil, Parmesan, garlic, lemon zest, and juice (seasoned with salt and pepper), then keep it in an airtight container. Additionally, cook your pasta and spinach, drain them, and refrigerate them in a separate container for up to 24 hours. When you’re ready to serve, reheat everything in a pan over low heat, adding reserved pasta water as needed to refresh the sauce and ensure it remains creamy. With these make-ahead tips, you’ll enjoy delicious Lemon Ricotta Pasta with Spinach with minimal effort during your busy week!

Expert Tips for Lemon Ricotta Pasta

Avoid Overcooking: Ensure the pasta remains al dente to maintain texture. Overcooking can make the lemon ricotta pasta mushy and less enjoyable.

Perfect Sauce Consistency: Gradually add reserved pasta water to the sauce; it helps achieve a creamy texture without overpowering the flavors.

Prep Ahead: Chop garlic and measure cheese beforehand for a smoother cooking experience when making this quick dinner.

Taste as You Go: Season gradually with salt and pepper, tasting the sauce to ensure the lemon ricotta pasta shines with its zesty flavors.

Consider Variations: Feel free to customize by swapping spinach for other greens like arugula or kale, ensuring your dish is both nutritious and exciting!

LEMON RICOTTA PASTA Variations & Substitutions

Feel free to personalize your dish with these fun twists that bring new flavors to your bowl!

  • Protein Boost: Add grilled chicken or shrimp for a heartier meal. Simply toss them in during the last minute to warm through.

  • Creamy Vegan: Substitute whole-milk ricotta with cashew cream or a vegan spinach dip for a delightful plant-based version. Creamy and surprisingly satisfying!

  • Zesty Greens: Swap spinach for kale or arugula to introduce different textures and flavors. Each leafy green brings a distinct brightness to the dish.

  • Extra Veggie: Incorporate roasted cherry tomatoes or zucchini for a burst of color and nutrition. These veggies add sweetness and a lovely caramelized flavor.

  • Whole Grain: Choose whole-grain or chickpea pasta for a wholesome twist, offering more fiber and a nutty taste that complements the creamy sauce beautifully.

  • Heat It Up: Add a pinch of red pepper flakes or a drizzle of hot sauce for a spicy kick that perfectly contrasts the creamy richness.

  • Herb Infusion: Fresh herbs like basil or parsley can elevate your flavors. Chopped and tossed in, they provide a vibrant freshness you won’t want to miss!

  • Pasta Shape Change: Experiment with different pasta shapes like orecchiette or fusilli for fun bites that hold onto the sauce differently and bring new textures to each forkful.

Lemon Ricotta Pasta with Spinach Recipe FAQs

Can I mix lemon with ricotta?
Absolutely! Mixing lemon with ricotta creates a delightful tangy flavor that enhances the creaminess of the cheese. The lemon juice also adds brightness to the dish, balancing its richness beautifully.

What does adding lemon juice to pasta sauce do?
Adding lemon juice to pasta sauce elevates the flavor profile by introducing acidity, which cuts through the richness of creamy sauces. It brings a refreshing brightness that enhances the overall taste and makes each ingredient shine. In the Lemon Ricotta Pasta, this zesty addition transforms the dish into something truly special!

Will lemon juice make ricotta curdle?
No worries! Lemon juice won’t cause ricotta to curdle. Instead, it blends smoothly with the cheese, enhancing its creamy texture while providing a nice tang. Just be sure to mix it well, like in our Lemon Ricotta Pasta recipe, for a harmoniously creamy sauce.

How should I store leftover Lemon Ricotta Pasta?
Store any leftovers in an airtight container in the refrigerator for up to 2 days. It’s best to let it cool completely before sealing. Reheat gently on the stove over low heat; adding a splash of water or olive oil will help to revive its creamy consistency.

How do I freeze Lemon Ricotta Pasta?
To freeze Lemon Ricotta Pasta, it’s best to omit the spinach before freezing. Store in an airtight container or freezer bag for up to 2 months. When you’re ready to enjoy it again, thaw overnight in the refrigerator and reheat slowly on the stove. You can reintroduce fresh spinach at the end for that vibrant touch!

Can I customize Lemon Ricotta Pasta for dietary needs?
Definitely! This dish is versatile and easy to adapt. You can switch whole-milk ricotta for low-fat or dairy-free alternatives if you’re avoiding dairy. Additionally, feel free to incorporate gluten-free pasta or add different veggies like zucchini or peas to make it more exciting and suitable for personal dietary preferences.

Delicious Lemon Ricotta Pasta & Spinach in 15 Minutes!

A quick and delightful Lemon Ricotta Pasta & Spinach recipe that combines creamy ricotta with zesty lemon, perfect for a busy weeknight dinner.

  • Large Pot
  • Medium-Sized Bowl

For the Pasta

  • 1/2 lb Pasta (use spaghetti or penne for perfect texture)

For the Sauce

  • 1 cup Whole-Milk Ricotta (creamy richness that makes this lemon ricotta pasta irresistible)
  • 1 Lemon (unwaxed, zest and juice)
  • 1/3 cup Grated Parmesan Cheese (feel free to use a vegan substitute)
  • 1 Tbsp Extra Virgin Olive Oil (drizzle a little extra for serving)
  • 1 Garlic Clove (grated or pressed)
  • Salt and Black Pepper (to taste)

For the Greens

  • 8 oz Fresh Baby Spinach (a vibrant, nutritious addition)

Step-by-Step Instructions

  1. In a large pot, bring salted water to a boil. Add your choice of pasta, cooking it according to the package instructions until al dente, usually about 8-10 minutes.
  2. While your pasta is cooking, combine the whole-milk ricotta, olive oil, grated Parmesan cheese, and freshly grated garlic in a medium-sized bowl. Zest the unwaxed lemon into the bowl, then squeeze in the juice, and add a pinch of salt and black pepper to taste. Mix together until smooth and creamy.
  3. In the final minute of cooking, add the fresh baby spinach directly into the pot, allowing it to wilt quickly. The leaves should be bright and tender in about 30-60 seconds.
  4. Return the drained pasta and wilted spinach to the pot, then gradually spoon in the creamy ricotta mixture, tossing everything together. If the sauce feels too thick, drizzle in some reserved pasta water until you achieve a desired consistency.
  5. Serve your Lemon Ricotta Pasta immediately in warm bowls. Finish with extra Parmesan cheese, a drizzle of olive oil, and optional red pepper flakes for heat.

Store leftovers in an airtight container for up to 2 days. For longer storage, freeze the pasta without spinach for up to 2 months. Reheat gently in a pan over low heat, adding a splash of water or olive oil to maintain creaminess.

Main Dishes
Italian
comfort food, Easy Recipe, Lemon Ricotta Pasta, quick dinner, Spinach, Vegetarian

Filed Under: Main Dishes

Delicious Banana Bread Overnight Oats for Busy Mornings

July 16, 2025 by grace bellamy Leave a Comment

As I stood in my kitchen one busy morning, the familiar aroma of ripe bananas hit my senses, instantly transporting me back to lazy weekend breakfasts filled with homemade banana bread. This nostalgia inspired my creation of Easy Vegan Banana Bread Overnight Oats, a delightful twist on that cherished classic. With just a quick 5 minutes of prep, these oats combine the rich flavors of banana bread into a creamy, satisfying breakfast perfect for on-the-go meals. Not only are they a healthier choice compared to drive-thru options, but they’re also completely customizable—mix in your favorite nuts or sweeteners for extra flair! Whether you savor them chilled from the fridge or warm them up for comfort, these Banana Bread Overnight Oats will elevate your mornings. What’s your favorite way to jazz them up?

Why Choose Banana Bread Overnight Oats?

Quick and Easy: With just 5 minutes of prep, these oats are a time-saver for busy mornings.

Nostalgic Flavor: Enjoy the beloved taste of banana bread without the baking hassle.

Healthy and Satisfying: Each serving is packed with nutrients while keeping you full, making it a fantastic breakfast option.

Customizable Delight: You can mix in your favorite nuts or sweeteners to make them your own! Try adding chia seeds or a scoop of nut butter for extra flavor.

No-Cook Convenience: Just refrigerate overnight, and you’re ready to go in the morning.

Crafted for those who appreciate delicious homemade food, these overnight oats are a perfect alternative to fast food. Don’t forget, if you’re craving something equally delightful, check out my Double Chocolate Banana Bread for another indulgent treat!

Banana Bread Overnight Oats Ingredients

For the Oats

  • Mashed Ripe Banana – This forms the sweet and flavorful base of your overnight oats; consider swapping with mashed avocado for a unique twist.
  • Rolled Oats – The main structure of the dish; ensure they’re gluten-free if required for dietary needs.
  • Milk of Choice (1/2 cup) – Provides creaminess and moisture; use almond, soy, or oat milk for a dairy-free option.
  • Chopped Pecans or Walnuts (2 tablespoons) – Adds a delightful crunch and nutty flavor; almonds work just as well if you’re looking for variety.
  • Vanilla Extract (1 teaspoon) – Boosts sweetness and aroma; almond extract can be a lovely alternative.
  • Cinnamon (1/2 teaspoon) – Infuses a warm spice flavor that’s optional but highly recommended for that cozy taste.
  • Dash of Sea Salt – A crucial element that balances the sweetness; feel free to adjust based on your preference.
  • Ground Flax (1 tablespoon, optional) – Adds a nutritional boost; chia seeds are a great substitute if flax isn’t on hand.
  • 100% Pure Maple Syrup (2 teaspoons) – Sweetens the oats naturally, adjust the amount to suit your sweetness craving.

Craft these Banana Bread Overnight Oats as a wholesome start to your morning, and enjoy every bite of the nostalgia they bring!

Step‑by‑Step Instructions for Banana Bread Overnight Oats

Step 1: Mash the Banana
Begin by gathering a medium-sized bowl or a jar. Take one ripe banana and use a fork to mash it thoroughly at the bottom, ensuring it’s creamy with minimal lumps. This will serve as the flavor base for your Banana Bread Overnight Oats. The sweet, ripe banana will transform as it mixes with the other ingredients.

Step 2: Combine the Dry Ingredients
Next, add ½ cup of rolled oats, 1 tablespoon of ground flax (if using), and a dash of sea salt to the same bowl. Sprinkle in ½ teaspoon of cinnamon and stir the mixture gently with your fork until everything is evenly distributed. This step builds the wholesome texture and flavor for your oats, ensuring a delightful balance.

Step 3: Add the Wet Ingredients
Pour in ½ cup of your milk of choice—dairy, almond, or oat milk—along with 1 teaspoon of vanilla extract and 2 teaspoons of pure maple syrup. Blend all the ingredients together using a whisk or a spoon until the oats are fully coated and a luscious mixture develops. This will create a creamy consistency reminiscent of banana bread batter.

Step 4: Mix in Nuts
Now, fold in 2 tablespoons of chopped pecans or walnuts. These add a lovely crunch and nutty flavor to your Banana Bread Overnight Oats. Ensure the nuts are mixed in evenly, distributing their delightful texture throughout the entire mixture, which will enhance the overall experience of your breakfast.

Step 5: Refrigerate Overnight
Cover the bowl or jar tightly with a lid or plastic wrap, sealing in all that deliciousness. Place it in the refrigerator and let it chill overnight, or for at least 4 hours. This soaking process allows the oats to absorb the moisture and flavors, resulting in thick, creamy oats that are ready to be savored.

Step 6: Serve and Garnish
In the morning, give your Banana Bread Overnight Oats a good stir, checking the consistency. If desired, gently warm it in the microwave for about 30 seconds for a comforting touch. Serve cold or warm, and top with additional sliced banana, a sprinkling of nuts, or even a dollop of nut butter for extra flavor and nutrition!

What to Serve with Banana Bread Overnight Oats

Start your morning off in a delightful way by complementing these creamy oats with some perfect pairings.

  • Fresh Fruit: Adding a medley of berries or sliced bananas brings a burst of brightness and freshness that enhances the beloved banana flavor.

  • Nut Butter Swirl: A dollop of almond or peanut butter not only adds protein but also a creamy richness that harmonizes beautifully with the oats.

  • Yogurt: A scoop of Greek or dairy-free yogurt offers tanginess, creating a luxurious balance in texture and flavor while boosting protein content.

  • Chia Seed Pudding: On the side, a small cup of chia seed pudding introduces a lovely crunch and a nutrient boost, making your breakfast feel even more indulgent.

  • Honey Drizzle: For those with a sweet tooth, a light drizzle of honey or agave syrup enhances the oats’ natural sweetness while providing a touch of elegance.

  • Herbal Tea or Smoothie: Pair with a warming cup of herbal tea or a refreshing smoothie to round out your meal, giving a flavorful beverage choice that matches your breakfast vibe.

Experiment with these serving ideas to tailor your Banana Bread Overnight Oats experience to your taste and make mornings a little sweeter!

Expert Tips for Banana Bread Overnight Oats

Seal it Right: Always use a sealed jar or bowl to prevent drying out. This ensures your Banana Bread Overnight Oats stay creamy and delicious.

Storage Advice: For the best flavor and texture, consume within three days. Consider adding fresh mashed banana just before serving to refresh the taste.

Mix & Match: Feel free to explore different nuts, sweeteners, or even fruits to customize your oats. This versatility keeps your breakfasts exciting and satisfying!

Try Different Textures: If you prefer creamier oats, use less milk or mash the banana into a smoother consistency before mixing. Adjust to your taste for an ideal breakfast experience.

Make it Vegan: For a fully vegan option, always opt for plant-based milk and ensure any added sweeteners are also vegan-friendly, like maple syrup.

How to Store and Freeze Banana Bread Overnight Oats

Fridge: Store your prepared Banana Bread Overnight Oats in a sealed container in the refrigerator for up to 4-5 days. This will keep them fresh and ready for busy mornings.

Freezer: If you want to make them ahead of time, freeze individual portions of the mixture in airtight containers for up to 3 months. Thaw overnight in the fridge before serving.

Reheating: When you’re ready to enjoy, you can serve the oats cold or microwave for about 30 seconds to warm them. Stir well after reheating for the best texture.

Reminder: For optimal freshness, consider adding fresh toppings like sliced bananas or nuts right before serving.

Banana Bread Overnight Oats Variations

Customize your Banana Bread Overnight Oats with these delightful twists that will elevate your breakfast experience!

  • Dairy-Free: Swap regular milk for almond, soy, or oat milk to keep it completely vegan!
  • Nut-Free: Leave out the nuts or replace them with sunflower seeds to avoid allergens while still adding crunch.
  • Fruit Twist: Substitute the mashed banana with applesauce or pumpkin puree for a unique flavor profile.
  • Spiced Up: Add a dash of nutmeg or ginger to complement the cinnamon and create a warm, spicy kick.
  • Chocolate Delight: Mix in chocolate chips or cacao nibs for a deliciously indulgent breakfast treat.
  • Protein Boost: Stir in a scoop of your favorite protein powder to make your oats more filling and nutritious.
  • Sweetness Swap: Experiment with different sweeteners like agave syrup or honey according to your taste preference.
  • Tropical Flavor: Add shredded coconut and diced pineapple for a fun, tropical twist that brightens your morning!

Make Ahead Options

These Banana Bread Overnight Oats are perfect for meal prep, allowing you to enjoy a hearty breakfast with minimal morning effort! You can prepare the oats up to 3 days in advance by following the initial steps, mixing the ingredients, and sealing them in a jar or a bowl in the refrigerator. To maintain their luscious texture, be sure to cover them tightly. When you’re ready to indulge, simply give them a stir and add any fresh toppings, like sliced bananas or nuts, before serving. With this prep, your delicious Banana Bread Overnight Oats will be just as delightful and convenient for busy weekdays!

Banana Bread Overnight Oats Recipe FAQs

Is overnight oats with bananas healthy?
Absolutely! Overnight oats made with bananas are not only delicious but also packed with nutrients. Bananas provide dietary fiber, essential vitamins, and minerals, making them a fantastic choice for a healthy breakfast option. Combined with rolled oats, which offer complex carbohydrates and additional fiber, this dish supports sustained energy and digestive health.

What not to add in overnight oats?
Be cautious with high-sugar ingredients and overly perishable items. Avoid adding excessive sweeteners like honey or agave syrup if you want to keep it healthy. Also, steer clear of dairy-based yogurts that might spoil quickly unless you plan to consume the oats within a day. Ingredients with a very high fat content, such as heavy cream, can alter the texture and flavor negatively.

What is the number one mistake made when making banana bread?
The most common mistake people make is using overripe bananas! For banana bread or banana-flavored recipes like these overnight oats, you want your bananas to be perfectly ripe—meaning they should have dark spots but not be completely black. This ensures maximum sweetness and flavor without an unpleasant bitter taste from overly ripe fruit.

Is oats overnight actually healthy?
Very! Overnight oats provide a convenient way to incorporate whole grains into your diet. They retain all the fiber and nutrients found in traditional oats and can be tailored to your dietary needs. By using wholesome ingredients like bananas, nuts, and plant-based milk, you can create a balanced meal that is both satisfying and nutritious, perfect for busy lifestyles.

How do I properly store and freeze Banana Bread Overnight Oats?
To keep your Banana Bread Overnight Oats fresh, store them in a sealed container in the refrigerator for up to 4-5 days. For longer storage, you can freeze individual portions in airtight containers. To freeze, simply portion out the oats, seal tightly, and label with the date. When ready to enjoy, thaw overnight in the fridge and stir well before serving. This keeps the oats creamy and delicious!

Delicious Banana Bread Overnight Oats for Busy Mornings

A quick and easy recipe for Banana Bread Overnight Oats perfect for busy mornings.

  • bowl
  • fork
  • Whisk
  • sealed container

For the Oats

  • 1 large ripe banana (mashed)
  • 1/2 cup rolled oats (ensure gluten-free if required)
  • 1/2 cup milk of choice (dairy, almond, or oat milk)
  • 2 tablespoons chopped pecans or walnuts (or use almonds)
  • 1 teaspoon vanilla extract (almond extract can be an alternative)
  • 1/2 teaspoon cinnamon (optional but recommended)
  • 1 dash sea salt (to balance sweetness)
  • 1 tablespoon ground flax (optional; chia seeds are a substitute)
  • 2 teaspoons 100% pure maple syrup (adjust for sweetness)

Step‑by‑Step Instructions for Banana Bread Overnight Oats

  1. Mash the banana in a medium-sized bowl or jar until creamy with minimal lumps.
  2. Combine the dry ingredients: add rolled oats, ground flax (if using), sea salt, and cinnamon to the same bowl. Stir until evenly distributed.
  3. Add the wet ingredients: pour in milk, vanilla extract, and maple syrup. Blend until oats are coated.
  4. Fold in chopped nuts evenly throughout the mixture.
  5. Cover the bowl or jar tightly and refrigerate overnight or for at least 4 hours.
  6. In the morning, stir the oats and warm in the microwave if desired. Serve with additional toppings.

Store in a sealed container in the refrigerator for up to 4-5 days. Freeze individual portions for up to 3 months. Add fresh toppings just before serving.

Breakfast
Vegan
Banana Bread Overnight Oats, Customizable Oats, Easy Vegan Recipe, Healthy Breakfast, No-Cook Meal, Quick Prep

Filed Under: Breakfast

Quick and Easy Spinach and Feta Breakfast Quesadilla Delight

July 16, 2025 by grace bellamy Leave a Comment

There’s something incredibly satisfying about hearing that sizzle when you toss a tortilla into the pan. Enter the 10 Minute Spinach and Feta Breakfast Quesadilla, a dish that celebrates the joy of quick, homemade breakfasts. With vibrant spinach, fluffy eggs, and a melty blend of cheeses, this vegetarian delight comes together in a flash, making it an ideal solution for those busy mornings when you need a nutritious start. Not only does it tick the box for a healthy breakfast, but it’s also super versatile—feel free to mix in your favorite veggies or cheeses! Imagine enjoying the crispy goodness paired with a dollop of Greek yogurt or some fresh salsa. Are you ready to transform your breakfast game? Let’s dive into this easy, mouth-watering recipe!

Why Choose This Breakfast Quesadilla?

Simplicity, this recipe is a breeze to whip up in just 10 minutes, perfect for those hectic mornings. Flavor-packed, the combination of spinach, eggs, and feta creates a deliciously savory experience. Versatile, switch up the veggies or cheeses to keep things exciting every time you cook. Freezer-friendly, prep them ahead and store for quick meals later! For a delightful addition, serve it with a side of Greek yogurt, taking your breakfast to the next level with every bite.

Spinach and Feta Breakfast Quesadilla Ingredients

• Discover the delicious components of your meal!

For the Filling

  • Extra Virgin Olive Oil or Butter – Adds richness and moisture.
    Note: Unsalted butter is recommended for better flavor control.
  • Spinach – Primary vegetable providing health benefits and flavor.
    Note: Can substitute with other veggies like zucchini or bell peppers for variety.
  • Garlic Powder – Enhances flavor.
    Note: Fresh garlic can be used for a stronger taste; adjust to preference.
  • Onion Powder – Adds depth of flavor.
    Note: Use finely chopped fresh onion for a more robust profile, but it will increase prep time.
  • Large Eggs – Provides structure and protein.
    Note: For a lighter version, substitute with egg whites.
  • Feta Cheese – Contributes tangy flavor and creaminess.
    Note: Can substitute with goat cheese or ricotta for varied tastes.

For the Quesadilla

  • Large Flour Tortilla – Acts as the base for the quesadilla.
    Note: Use gluten-free tortillas for a gluten-free version.
  • Mozzarella Cheese – Melts beautifully, adding creaminess.
    Note: Freshly shredded mozzarella is preferred over pre-shredded for better melt.

Step‑by‑Step Instructions for Spinach and Feta Breakfast Quesadilla

Step 1: Heat the Pan
Begin by heating 1 tablespoon of extra virgin olive oil or butter in a non-stick skillet over medium heat. Allow it to melt and warm for about 1 minute until shimmering. This step ensures that your spinach and feta breakfast quesadilla will have a rich, flavorful base while preventing sticking.

Step 2: Sauté the Spinach
Add in a generous handful of fresh spinach along with ¼ teaspoon of garlic powder and ¼ teaspoon of onion powder. Sauté for about 1 minute, stirring frequently, until the spinach wilts and is vibrant green. The aroma of the sautéed spinach will fill your kitchen, hinting at the delicious quesadilla that’s about to come together!

Step 3: Scramble the Eggs
Crack two large eggs directly into the pan with the cooked spinach mixture. Use a spatula to scramble the eggs gently, cooking for 1 to 2 minutes until they are fully set and fluffy. The eggs will combine beautifully with the spinach, creating a hearty filling for your quesadilla.

Step 4: Add Feta Cheese
Stir in crumbled feta cheese into the egg and spinach mixture, allowing it to melt slightly into the warm filling. Remove the skillet from the heat and set the mixture aside. This savory, creamy filling is the heart of your Spinach and Feta Breakfast Quesadilla, giving it that delightful tang.

Step 5: Prepare the Tortilla
Lower the skillet temperature to medium-low and place a large flour tortilla in the pan. Allow it to warm for about 20 seconds, making it pliable and perfect for folding. Watch carefully for slight bubbling as this indicates the tortilla is getting nicely heated.

Step 6: Assemble the Quesadilla
Sprinkle half of the shredded mozzarella cheese on one half of the tortilla, followed by the spinach, egg, and feta mixture. Top with the remaining mozzarella cheese before expertly folding the other half of the tortilla over the filling. This layering creates a deliciously cheesy and savory Spinach and Feta Breakfast Quesadilla.

Step 7: Cook the Quesadilla
Cook the folded quesadilla on medium-low heat for approximately 90 seconds, checking for a crispy, golden-brown underside. You’ll know it’s ready when you can smell the melting cheese and see the tortilla turning golden at the edges.

Step 8: Flip and Finish Cooking
Carefully flip the quesadilla using a spatula and cook for an additional 90 seconds. The other side should become equally crispy and golden brown. At this point, your quesadilla is almost ready to be devoured, with melted cheese and warm filling waiting inside!

Step 9: Slice and Serve
Once both sides are perfectly cooked, remove the quesadilla from the skillet and place it on a cutting board. Allow it to cool slightly, then slice it into wedges. Serve warm, perhaps with a side of salsa or a dollop of Greek yogurt to elevate your breakfast experience!

What to Serve with 10 Minute Spinach and Feta Breakfast Quesadilla

Looking to create a breakfast spread that dances on your taste buds? Pair these delightful quesadillas with complementary flavors and textures!

  • Salsa Fresca: A zesty fresh salsa adds a burst of flavor, balancing the creamy filling in the quesadilla perfectly.
  • Avocado Slices: Creamy avocado brings a rich texture and a healthy fat component, making every bite more satisfying.
  • Greek Yogurt: A dollop of tangy Greek yogurt doubles as a refreshing cool contrast to the warm, savory quesadilla.
  • Fresh Fruit Salad: Vibrant berries or citrus fruits enhance the meal with a touch of sweetness and refreshing acidity.
  • Coffee or Herbal Tea: A warm drink complements the flavors nicely, providing an invigorating start to your day.
  • Crispy Hash Browns: Golden, crunchy hash browns serve as a delightful side that contrasts with the quesadilla’s creaminess.
  • Smoothie: A light, fruit-packed smoothie adds nutrition and rounds out your breakfast without overwhelming the palate.

Elevate your morning routine by mixing and matching these ideas with your Spinach and Feta Breakfast Quesadilla!

Expert Tips for Spinach and Feta Breakfast Quesadilla

  • Quality Ingredients: Use fresh spinach and high-quality feta for optimal flavor. Freshness enhances the taste of your quesadilla, making it a delightful experience.

  • Tortilla Choice: Opt for larger flour tortillas for a more substantial quesadilla. For those needing a gluten-free option, choose gluten-free tortillas that don’t compromise on texture.

  • Prep Ahead: Chop vegetables and measure out your ingredients the night before to save time in the morning. This can make your breakfast prep quick and easy!

  • Watch the Heat: Keep your pan at medium-low heat while cooking. Too high of a temperature can burn the tortillas before the cheese melts fully, leading to a less enjoyable texture.

  • Serving with Flair: Elevate your meal by serving your quesadilla with sides like fresh avocado or salsa. These add flavor and freshness, making your Spinach and Feta Breakfast Quesadilla even more satisfying!

  • Storage Tips: If making extra, cool the quesadillas completely before freezing. Store in an airtight container for a quick breakfast option you can enjoy later—just reheat and devour!

Make Ahead Options

These Spinach and Feta Breakfast Quesadillas are perfect for busy home cooks looking to save time! You can prepare the filling—cooked spinach, scrambled eggs, and feta cheese—up to 24 hours in advance by refrigerating it in an airtight container. Additionally, you can assemble the quesadillas and store them uncooked in the refrigerator for up to 3 days. To maintain quality, wrap them tightly in plastic wrap to prevent drying out. When you’re ready to serve, simply cook the quesadillas from cold in a skillet for 3-4 minutes per side or until crispy and golden. Enjoy hassle-free, delicious breakfasts in no time!

Spinach and Feta Breakfast Quesadilla Variations

Feel free to get creative and adapt this recipe to suit your taste buds! Customize your quesadilla to make it even more delightful.

  • Kale Swap: Replace spinach with kale for a more robust flavor and added nutrients. Just ensure you sauté it a little longer until it softens.

  • Add Bacon: For a non-vegetarian twist, incorporate crispy bacon bits or cooked sausage for a hearty breakfast boost. This adds a smoky flavor that pairs wonderfully with the cheese.

  • Cheese Varieties: Experiment with different cheeses such as cheddar for a sharper taste or pepper jack for a spicy kick. Each cheese brings its unique flavor profile to this savory dish.

  • Vegan Option: Substitute eggs with scrambled tofu and use dairy-free cheese to cater to a vegan-friendly version. This way, you still enjoy a delicious and nutritious breakfast!

  • Mediterranean Flair: Add sun-dried tomatoes and olives for a Mediterranean touch. The extra saltiness will enhance the feta’s tanginess, transporting you to a sunny café!

  • Add Heat: Spice things up by adding diced jalapeños or a dash of hot sauce to the filling. This way, you get a fiery surprise in every bite that ignites the senses!

  • Different Tortillas: Switch to whole wheat or spinach tortillas for added fiber and a unique taste. They add a wholesome touch to your quesadilla without sacrificing flavor.

  • Mushroom Medley: Incorporate sautéed mushrooms into the mix for an earthy depth that complements the spinach and cheese. The added texture will make each bite more interesting.

How to Store and Freeze Spinach and Feta Breakfast Quesadilla

Fridge: Store cooked quesadillas in an airtight container for up to 3 days. Reheat in a skillet over medium heat for the best texture.

Freezer: Freeze uncooked quesadillas in a single layer on a baking sheet, then transfer to a freezer-safe bag for up to 2 months.

Reheating: To reheat from frozen, thaw overnight in the refrigerator. Cook in a skillet on medium-low heat for about 4-5 minutes per side until crispy and heated through.

Make-Ahead: Prepare your Spinach and Feta Breakfast Quesadilla in advance for busy mornings. Just cool completely before storing!

Spinach and Feta Breakfast Quesadilla Recipe FAQs

How do you make a feta and spinach quesadilla?
Absolutely! To make a feta and spinach quesadilla, sauté fresh spinach with a bit of garlic and onion powder in olive oil. Add scrambled eggs and crumbled feta cheese, then fill a tortilla with this mixture, topping it with mozzarella cheese. Cook in a skillet until crispy, then serve hot!

Is feta cheese good in a quesadilla?
Very! Feta cheese adds a distinct tangy flavor and creaminess that complements the other ingredients wonderfully. Its unique texture contrasts nicely with the melted mozzarella, making every bite of your Spinach and Feta Breakfast Quesadilla a delightful experience.

What goes in a breakfast quesadilla?
A breakfast quesadilla typically includes a protein source like eggs, vegetables such as spinach or bell peppers, and cheese like feta or mozzarella. You can customize it to your liking by adding ingredients such as cooked bacon or different herbs and spices for added flavor. The key is to create a balance between flavors and textures!

What is the best cheese combination for quesadillas?
I often recommend combining mozzarella with feta for quesadillas, as this blend creates a wonderful meltiness while also providing that rich, tangy flavor. You can experiment with other cheeses too, such as sharp cheddar or pepper jack, for more adventurous tastes. The more the merrier!

How do you store spinach and feta breakfast quesadillas?
To store cooked quesadillas, simply place them in an airtight container in the refrigerator for up to 3 days. For longer storage, freeze uncooked quesadillas on a baking sheet before transferring them to a freezer-safe bag. They can remain in the freezer for up to 2 months.

How do you reheat frozen quesadillas?
For the best results, thaw your frozen quesadillas overnight in the refrigerator. Then, cook them in a skillet over medium-low heat for about 4-5 minutes per side until they are crispy and heated through. This method helps maintain the texture while ensuring your quesadilla is warm and delicious.

Quick and Easy Spinach and Feta Breakfast Quesadilla Delight

A delicious Spinach and Feta Breakfast Quesadilla that combines vibrant spinach, eggs, and cheese for a quick, healthy breakfast.

  • skillet
  • spatula
  • cutting board

Filling

  • 1 tablespoon Extra Virgin Olive Oil or Butter (Unsalted butter is recommended for better flavor control.)
  • 2 cups Spinach (Can substitute with other veggies like zucchini or bell peppers for variety.)
  • 1/4 teaspoon Garlic Powder (Fresh garlic can be used for a stronger taste; adjust to preference.)
  • 1/4 teaspoon Onion Powder (Use finely chopped fresh onion for a more robust profile, but it will increase prep time.)
  • 2 large Eggs (For a lighter version, substitute with egg whites.)
  • 1/2 cup Feta Cheese (Can substitute with goat cheese or ricotta for varied tastes.)

Quesadilla

  • 1 large Flour Tortilla (Use gluten-free tortillas for a gluten-free version.)
  • 1/2 cup Mozzarella Cheese (Freshly shredded mozzarella is preferred over pre-shredded for better melt.)

Preparation Steps

  1. Heat the pan by melting 1 tablespoon of extra virgin olive oil or butter in a non-stick skillet over medium heat for about 1 minute until shimmering.
  2. Add a generous handful of fresh spinach with 1/4 teaspoon of garlic powder and 1/4 teaspoon of onion powder; sauté for about 1 minute until the spinach wilts.
  3. Crack two large eggs into the pan with the spinach mixture and scramble gently, cooking for 1-2 minutes until fully set and fluffy.
  4. Stir in crumbled feta cheese and remove the skillet from heat, setting the mixture aside.
  5. Lower the skillet temperature to medium-low and warm a large flour tortilla for about 20 seconds.
  6. Sprinkle half of the mozzarella cheese on one half of the tortilla, followed by the spinach, egg, and feta mixture, then top with remaining mozzarella cheese.
  7. Cook the folded quesadilla on medium-low heat for approximately 90 seconds until the underside is golden-brown.
  8. Flip the quesadilla and cook for an additional 90 seconds until crispy on both sides.
  9. Remove from skillet, slice into wedges, and serve warm with salsa or Greek yogurt.

Store cooked quesadillas in an airtight container for up to 3 days; freeze uncooked quesadillas in a single layer for up to 2 months. Thaw frozen quesadillas overnight in the refrigerator before reheating in a skillet.

Breakfast
Mexican
Easy Recipe, Freezer-friendly, Healthy, Quick Breakfast, Spinach and Feta Breakfast Quesadilla, Vegetarian

Filed Under: Breakfast

Refreshingly Simple Mediterranean Chickpea Salad for Everyone

July 16, 2025 by grace bellamy Leave a Comment

With summer’s vibrant colors on the horizon, I find myself craving fresh and lively dishes that nourish both body and soul. Enter the Mediterranean Chickpea Salad—a simple yet delightful creation that’s a perfect companion for sunny afternoons. Bursting with the crunch of cucumber, juicy cherry tomatoes, and the creamy tang of feta, this salad is truly a celebration of summer’s bounty. Not only is it ready in just 10 minutes, making it a lifesaver for busy days, but it’s also gluten-free and packed with protein, making it a fantastic healthy choice. Whether you’re preparing a light lunch or a side for dinner, this recipe will keep you satisfied and refreshed. Curious about how this delightful mix comes together? Let’s dive in!

Why Is This Salad a Must-Try?

Vibrant Flavors: Each ingredient in this Mediterranean Chickpea Salad pops with freshness, from the juicy cherry tomatoes to the crisp cucumber, leaving your taste buds dancing.

Quick Prep: Ready in just 10 minutes, it’s the ultimate lifesaver for busy days when you crave a nourishing meal without the fuss.

Healthier Option: Packed with protein and fiber, this gluten-free dish not only satisfies hunger but also supports a healthier lifestyle.

Versatile Serving: Serve it as a refreshing lunch, a delightful side at dinner, or enjoy it as a tasty snack. Plus, check out other recipes like Mexican Macaroni Salad for more delicious ideas!

Crowd-Pleaser: Its light, colorful presentation makes it a hit at gatherings, bringing smiles to everyone who tries it!

Mediterranean Chickpea Salad Ingredients

For the Salad
• Chickpeas – Packed with protein, use canned for convenience or cook your own for a fresher taste.
• Cucumber – Adds a refreshing crunch; zucchini is a great alternative if you want a different bite.
• Red Bell Pepper – Offers sweetness and vibrant color, but you can swap it with green or omit entirely.
• Cherry Tomatoes – Juicy and acidic, feel free to use diced heirloom tomatoes as a delightful substitute.
• Red Onion – Provides sharpness and bite; use green onions for a milder option if preferred.
• Feta Cheese – Adds creamy saltiness; for a dairy-free version, consider using avocado or leaving it out.
• Parsley – Brings freshness; mint or basil can also enhance the salad’s flavor significantly.

For the Vinaigrette
• Lemon Vinaigrette – A zesty dressing that brightens the overall flavors; adjust according to your taste for the Mediterranean Chickpea Salad.

Step‑by‑Step Instructions for Mediterranean Chickpea Salad

Step 1: Prepare the Chickpeas
Start by draining and rinsing one can (15 ounces) of chickpeas under cold water for about 30 seconds until thoroughly clean. This step removes excess sodium and ensures a fresher taste in your Mediterranean Chickpea Salad. Once rinsed, let the chickpeas sit in the colander to drain well while you prep the vegetables.

Step 2: Chop the Vegetables
Using a sharp knife and cutting board, dice one medium cucumber, one red bell pepper, and half of a red onion into small, bite-sized pieces. Halve about a cup of cherry tomatoes for an inviting burst of flavor. Aim for uniform sizes for even mixing, and admire the colorful medley as you prep these fresh ingredients for your salad.

Step 3: Combine All Ingredients
In a large mixing bowl, combine the drained chickpeas, chopped cucumber, red bell pepper, halved cherry tomatoes, diced red onion, and a handful of finely chopped parsley. If you’re using feta cheese, crumble it over the top. Gently stir with a large spoon until all the components are well mixed, creating a vibrant salad mixture that showcases the Mediterranean flavors.

Step 4: Add the Vinaigrette
Drizzle your desired amount of lemon vinaigrette over the salad mixture—about 3 tablespoons is a great starting point. The vinaigrette adds a tangy brightness to your Mediterranean Chickpea Salad. Using your spoon, gently toss all the ingredients until the vinaigrette coats everything evenly, ensuring every bite is packed with flavor.

Step 5: Adjust and Serve
Take a moment to taste the salad and see if it needs any adjustments—add salt, pepper, or more dressing according to your personal preference. For a refreshing option, serve immediately, or cover the bowl with plastic wrap and refrigerate for at least 30 minutes to let the flavors meld together, enhancing your Mediterranean Chickpea Salad even more.

Mediterranean Chickpea Salad Variations

Feel free to get creative with your Mediterranean Chickpea Salad for a delightful twist on flavors and textures!

  • Dairy-Free: Replace feta with creamy avocado for a luscious texture while keeping it dairy-free and ultra-satisfying.
  • Extra Crunch: Toss in some toasted nuts, like almonds or walnuts, for added crunch and a delightful nutty flavor that elevates each bite.
  • Spicy Kick: Add diced jalapeños or a dash of red pepper flakes to spice things up and create a lively flavor explosion that awakens the palate.
  • Herb Swap: Instead of parsley, use fresh mint or basil to bring an aromatic freshness that transports your taste buds straight to the Mediterranean.
  • Roasted Veggies: Incorporate roasted zucchini or bell peppers for a warm, caramelized flavor that deepens the salad’s complexity and adds a hearty element.
  • Quinoa Boost: Mix in cooked quinoa for a protein-packed twist, turning this refreshing salad into a fulfilling main dish with a new texture.
  • Citrusy Twist: Squeeze in some fresh orange juice or add orange segments to introduce a sweet and zesty layer of flavor that complements the salad beautifully.
  • Vegan Option: For a fully vegan experience, omit the cheese and replace the vinaigrette with a tahini dressing for a creamy, nutty finish.

How to Store and Freeze Mediterranean Chickpea Salad

Fridge: Store your Mediterranean Chickpea Salad in an airtight container for up to 5 days. This helps maintain freshness without wilting the ingredients.

Make-Ahead: This salad can be prepared a day in advance! Let it marinate in the vinaigrette overnight to enhance the flavors.

Freezer: While not ideal for freezing due to the texture of fresh vegetables, you can freeze chickpeas separately to use later in another dish.

Reheating: If served chilled, no reheating is necessary. Simply enjoy straight from the fridge for a refreshing meal!

Make Ahead Options

This Mediterranean Chickpea Salad is a fantastic choice for meal prep, allowing you to enjoy flavorful, healthy meals throughout the week! You can prepare the entire salad up to 24 hours in advance; simply keep the chickpeas, diced vegetables, feta, and chopped parsley in an airtight container in the refrigerator. To maintain freshness and prevent the veggies from becoming soggy, store the lemon vinaigrette separately and mix it in just before serving. If you prep it this way, the salad will taste just as delicious, with all the vibrant flavors intact. When you’re ready to dig in, just toss everything together, and you’re set for a quick and nutritious meal anytime!

What to Serve with Mediterranean Chickpea Salad

Enhance your dining experience by pairing this refreshing salad with delightful complements that will elevate each bite.

  • Grilled Chicken Skewers: Juicy, marinated chicken adds protein and pairs wonderfully with the salad’s fresh flavors, making for a satisfying meal.
  • Quinoa Pilaf: This fluffy, nutty dish offers a hearty, wholesome base that contrasts perfectly with the vibrant crunch of the chickpea salad.
  • Pita Bread and Hummus: The soft pita complements the salad’s textures, while hummus brings additional creaminess and flavor, ideal for dipping.
  • Roasted Vegetables: A medley of caramelized veggies introduces smoky warmth, creating a perfect balance to the Mediterranean brightness.
  • Chilled Rosé Wine: A crisp, fruity wine enhances the salad’s freshness, making it a delightful sipper for warm days or gatherings.
  • Tzatziki Sauce: This creamy cucumber-yogurt sauce adds a refreshing coolness, deepening the Mediterranean essence of your meal.
  • Couscous Salad: Fluffy couscous lightly dressed with lemon and herbs offers a delightful texture that pairs seamlessly with the chickpea salad.
  • Lemon Sorbet: As a light dessert, this sweet-sharp treat cleanses the palate, providing a refreshing finish after enjoying your meal.

Expert Tips for Mediterranean Chickpea Salad

• Marinate for Flavor: Allow the salad to sit in the vinaigrette for at least 30 minutes. This enhances the flavors and creates a more cohesive dish.

• Chickpea Choice: If using canned chickpeas, always drain and rinse them well to reduce sodium. Alternatively, cook dried chickpeas for a fresher taste in your Mediterranean Chickpea Salad.

• Veggie Alternatives: Feel free to swap out the bell peppers or cucumbers according to your taste; zucchini or avocado can offer delightful variations without compromising texture.

• Feta Substitutes: For those avoiding dairy, consider creamy avocado instead of feta. It retains the richness while keeping the dish light and refreshing.

• Storage Hint: Keep the salad in an airtight container in the fridge for up to 5 days. It’ll hold up beautifully, making it a perfect option for meal prep.

Mediterranean Chickpea Salad Recipe FAQs

What dressing goes well with chickpea salad?
Absolutely! A simple lemon vinaigrette perfectly complements the flavors in a Mediterranean Chickpea Salad. The acidity from the lemon brightens up the fresh ingredients, making every bite a refreshing experience. You can also try a balsamic vinaigrette or a yogurt-based dressing for a creamier option!

Are chickpeas ok on a Mediterranean diet?
Very! Chickpeas are a wonderful fit for the Mediterranean diet as they are high in protein and fiber while being low in saturated fats. They also provide essential nutrients and help you feel fuller, making them a fantastic addition to salads, soups, and more.

Is it okay to eat chickpea salad every day?
Certainly! Enjoying this Mediterranean Chickpea Salad daily can be healthy, given its nutritional profile. It’s rich in protein, fiber, and vitamins, making it a wholesome choice. Just be mindful of your overall diet to ensure a balance of nutrients. If you find yourself making it frequently, try mixing in different ingredients or dressings to keep it exciting!

What is in a Tuscan chickpea salad?
Tuscan chickpea salad typically includes chickpeas, tomatoes, red onion, and various herbs. It may also feature ingredients like olives, artichokes, and a zesty dressing made with olive oil and vinegar. The bold flavors reflect the rustic and vibrant influences of Italian cooking, making it similar yet distinct from the Mediterranean Chickpea Salad.

How to store Mediterranean Chickpea Salad?
For best results, store your Mediterranean Chickpea Salad in an airtight container in the fridge for up to 5 days. It’s great for meal prep since the flavors meld beautifully when allowed to sit. If you want to enjoy it later, prepare the salad without the dressing, and just add the lemon vinaigrette before serving to keep everything fresh and crunchy.

How to freeze chickpeas for later use?
While it’s not ideal to freeze the entire Mediterranean Chickpea Salad due to the fresh veggies losing their crispness, you can freeze the chickpeas. To do so, rinse and drain cooked or canned chickpeas, then spread them in a single layer on a baking sheet. Freeze for 1-2 hours until solid, then transfer them to a freezer-safe bag. They can last up to 3 months—perfect for tossing into soups or future salads!

Refreshingly Simple Mediterranean Chickpea Salad for Everyone

This Mediterranean Chickpea Salad is a vibrant, gluten-free dish ready in just 10 minutes, perfect for busy days.

  • cutting board
  • sharp knife
  • large mixing bowl
  • spoon

For the Salad

  • 1 can (15 ounces) chickpeas (drained and rinsed)
  • 1 medium cucumber (diced)
  • 1 medium red bell pepper (diced)
  • 1 cup cherry tomatoes (halved)
  • 1/2 medium red onion (diced)
  • 1/2 cup feta cheese (crumbled, optional)
  • 1/4 cup parsley (finely chopped)

For the Vinaigrette

  • 3 tablespoons lemon vinaigrette (adjust to taste)

Step-by-Step Instructions for Mediterranean Chickpea Salad

  1. Drain and rinse one can of chickpeas under cold water for about 30 seconds until thoroughly clean.
  2. Dice one medium cucumber, one red bell pepper, and half of a red onion into small, bite-sized pieces. Halve about a cup of cherry tomatoes.
  3. Combine the drained chickpeas, chopped cucumber, red bell pepper, halved cherry tomatoes, diced red onion, and parsley in a large mixing bowl.
  4. Drizzle your desired amount of lemon vinaigrette over the salad mixture and gently toss to coat.
  5. Taste the salad and adjust seasoning as needed. Serve immediately or refrigerate for at least 30 minutes.

Store in an airtight container in the fridge for up to 5 days. Let it marinate in the vinaigrette overnight for enhanced flavors.

Salad
Mediterranean
chickpea salad, Easy Recipe, gluten-free, healthy salad, quick meal, Summer Salad

Filed Under: salad

Refreshing Spinach Strawberry Salad That’s Simply Irresistible

July 16, 2025 by grace bellamy Leave a Comment

As I scoured my kitchen for inspiration, the vibrant colors of fresh strawberries caught my eye, promising a lovely spring salad. That’s when I decided to whip up a Spinach Strawberry Salad with Balsamic Poppy Seed Dressing, combining the crispness of baby spinach with juicy strawberries and crunchy pecans. This delightful dish is not only healthy and gluten-free, but it’s also a quick prep marvel that transforms any gathering into a sunny affair. Whether you’re looking for a refreshing lunch or a crowd-pleaser as a side, this salad is a game-changer. So, what’s your favorite ingredient to brighten up a garden salad?

What makes this salad an instant favorite?

Vibrant Colors: The fresh spinach and juicy strawberries create a beautifully bright salad that’s as pleasing to the eye as it is to the palate.

Quick Prep: This recipe comes together in minutes, making it perfect for busy cooks or last-minute gatherings.

Crowd-Pleaser: Whether served for lunch or as a side, it’s guaranteed to be a hit with friends and family, appealing to both kids and adults alike.

Healthy & Gluten-Free: Packed with nutrition, this salad is a guilt-free option that doesn’t compromise on flavor.

Feeling inspired? Consider pairing your Spinach Strawberry Salad with a side of Spinach Strawberry Salad with Balsamic Poppy Seed Dressing for an even more delightful spread!

Spinach Strawberry Salad Ingredients

  • For the Salad
    • Fresh Baby Spinach – The vibrant base that gives the salad its lush color and nutrition. Mix with arugula for an extra flavor boost.
    • Strawberries – Sweet and juicy additions that make each bite refreshing. Select ripe, hulled, and quartered berries for the best taste.
    • Raw Pecans – Provide a lovely crunch and nutty notes. To make it nut-free, substitute with toasted sunflower seeds.
    • Red Onion – Adds a sharpness that balances the sweetness of the strawberries. Soak in water to soften the flavor before adding.
    • Crumbled Feta Cheese – Offers a creamy texture that enhances the salad. Opt for block-style feta for better quality and flavor.

  • For the Dressing
    • Balsamic Vinegar – The tangy foundation for the dressing that ties all the flavors together.
    • Extra-Virgin Olive Oil – Provides richness and depth to the dressing. Avocado oil can be a great substitute if preferred.
    • Poppy Seeds – Add delightful texture and a subtle nuttiness.
    • Honey – A natural sweetener that balances the tang of the vinegar. Use maple syrup for a vegan alternative.
    • Dijon Mustard – Adds a welcome depth and slight tang to the dressing.
    • Kosher Salt & Ground Black Pepper – Essential seasonings that enhance all the flavors.

This Spinach Strawberry Salad is not just a dish; it’s a celebration of fresh ingredients combining to create something simply irresistible. Enjoy!

Step‑by‑Step Instructions for Spinach Strawberry Salad

Step 1: Toast the Pecans
Preheat your oven to 350°F (175°C). Spread the raw pecans evenly on a baking sheet and bake them for 8-10 minutes, or until they’re fragrant and lightly browned. Keep an eye on them to prevent burning, as nuts can turn quickly. Once toasted, allow the pecans to cool before roughly chopping them for your Spinach Strawberry Salad.

Step 2: Prepare the Dressing
In a small bowl, whisk together ¼ cup of balsamic vinegar, ⅓ cup of extra-virgin olive oil, 1 tablespoon of poppy seeds, 1 tablespoon of honey, and 1 teaspoon of Dijon mustard. Season with kosher salt and ground black pepper to taste. Whisk until everything is well combined and the dressing is smooth. Set it aside, allowing the flavors to mingle while you prepare the salad.

Step 3: Assemble the Salad
In a large mixing bowl, layer the fresh baby spinach, quartered strawberries, and drained red onion. Drizzle half of the balsamic poppy seed dressing over the salad mixture. Using a pair of tongs, toss everything gently until the spinach and strawberries are evenly coated with the dressing, ensuring the vibrant colors mix beautifully in your Spinach Strawberry Salad.

Step 4: Finish the Salad
After tossing the main ingredients, add the crumbled feta and the chopped pecans to the salad bowl. Toss lightly once more to combine, allowing the creamy cheese and crunchy nuts to distribute evenly throughout the salad. Serve immediately, accompanied by the remaining dressing on the side for anyone who likes an extra drizzle.

What to Serve with Spinach Strawberry Salad with Balsamic Poppy Seed Dressing

Elevate your meal experience with delightful pairings that complement the fresh and vibrant flavors of this salad.

  • Grilled Chicken: Perfectly seasoned and juicy chicken adds protein and complements the sweet notes of the strawberries beautifully.

  • Quinoa Tabbouleh: A nutty and herbaceous side dish that brings a contrasting texture, making the salad feel blissfully satisfying.

  • Herbed Garlic Bread: Crispy, buttery bread complements the salad’s freshness while offering a comforting crunch that everyone loves.

  • Watermelon Feta Salad: A refreshing and juicy counterpart, this combo brings a sweet and salty balance that enhances the meal’s seasonal essence.

  • Roasted Veggies: Tossed in olive oil and herbs, warm roasted vegetables add depth and earthiness, pairing nicely with the salad’s brightness.

  • Sparkling Lemonade: This effervescent drink is light and refreshing, providing a zesty counterpoint to the salad’s flavors.

  • Fruit Sorbet: Conclude your feast with a refreshing fruit sorbet for a light, sweet finish that echoes the salad’s beautiful ingredients.

These pairings not only enhance your Spinach Strawberry Salad experience but also turn a simple dish into an unforgettable meal.

Spinach Strawberry Salad Variations

Feel free to play with this recipe to make it your own and enjoy delightful new flavors in every bite!

  • Cheese Swap: Use goat cheese for a tangy twist. Its creamy texture pairs wonderfully with the sweet strawberries and adds a unique flavor profile.

  • Nut-Free Option: Substitute pecans with sunflower seeds for a delicious crunch without the nuts. This keeps the salad light and suitable for all guests.

  • Berries Galore: Mix it up by adding blueberries or raspberries for extra color and flavor. Each berry brings a different nuance that adds depth to your salad.

  • Herb Infusion: Incorporate fresh mint or basil for an aromatic touch. Simply chop a few leaves and toss them in for an unexpected burst of freshness.

  • Warm Up: Roast ingredients like beets or sweet potatoes alongside the pecans. Toss them in for a hearty twist that transforms your salad into a cozy meal.

  • Heat Things Up: Drizzle a bit of sriracha or chili oil over the dressing for a spicy kick. This could awaken the salad and make it irresistible for heat lovers.

  • Greens Medley: For enhanced flavor, blend the spinach with arugula or kale. The peppery notes from arugula will give the salad an exciting edge.

  • Creamy Dressing: Swap the balsamic dressing for a creamy ranch or yogurt-based dressing for a different tangy flair. This will create a luscious, coating experience that’s equally delightful.

Embrace these variations and turn your Spinach Strawberry Salad into a new culinary adventure each time!

Expert Tips for Spinach Strawberry Salad

  • Choose the Right Strawberries: Select ripe strawberries for the best sweetness and juiciness. Look for bright red berries without any white spots or blemishes.

  • Maximize Crunch: To avoid soggy spinach, toss the salad just before serving and keep the dressing on the side. This ensures the leaves remain crisp and fresh.

  • Cheese Selection: Opt for block-style feta cheese rather than pre-crumbled for superior texture and flavor in your Spinach Strawberry Salad. This small change makes a noticeable difference!

  • Nut Toasting: Always toast nuts right before using them to enhance their flavor. Monitor them closely in the oven to prevent burning, as nuts can brown quickly.

  • Veggie Alternatives: If red onion’s sharpness is too strong for you or your guests, try soaking the slices in cold water for a few minutes before adding them to the salad. This reduces their intensity without sacrificing flavor.

How to Store and Freeze Spinach Strawberry Salad

Fridge: Store the assembled Spinach Strawberry Salad in an airtight container for up to 3 days. Keep dressing separate until ready to serve to maintain the spinach’s crispness.

Leftover Dressing: The balsamic poppy seed dressing can be refrigerated for up to 1 week. Store it in a sealed jar or container; give it a good shake before using.

Freezer: It’s not recommended to freeze the Spinach Strawberry Salad, as the texture of fresh vegetables and strawberries will degrade upon thawing.

Reheating: This salad is best enjoyed cold, so no reheating is necessary. Just toss fresh ingredients together when ready to serve for a vibrant dish!

Make Ahead Options

These Spinach Strawberry Salad preparations are perfect for busy home cooks looking to save time! You can wash and tear the spinach, slice the strawberries, and chop the pecans up to 24 hours in advance for a quick assembly later. To maintain freshness, store the spinach and strawberries in separate airtight containers in the refrigerator. Additionally, prepare the balsamic poppy seed dressing and refrigerate it overnight to enhance the flavors. When you’re ready to serve, simply mix the prepped ingredients, toss in the crumbled feta, and drizzle with the dressing. This way, you’ll have a delicious, vibrant salad ready in just minutes, making mealtime a breeze!

Spinach Strawberry Salad with Balsamic Poppy Seed Dressing Recipe FAQs

What kind of dressing goes on strawberry spinach salad?
Absolutely, the star of this dish is the light and tangy balsamic poppy seed dressing! It’s made with balsamic vinegar, extra-virgin olive oil, and a touch of sweetness from honey, perfectly complementing the fresh strawberries and spinach. You can also experiment with other dressings like a lemon vinaigrette or poppy seed ranch for different flavor profiles!

Can you eat strawberries and spinach together?
Very! Strawberries and spinach not only pair wonderfully together but they also create a visually stunning and nutritious salad. The sweetness of the strawberries offsets the slight bitterness of spinach, making for a balanced flavor. Plus, they both offer a host of vitamins and minerals, making it a delightful, healthy option.

Do strawberries and pecans go together?
Absolutely, strawberries and pecans make a delicious duo! The sweet, juicy strawberries nicely contrast the rich, nutty flavor of pecans, adding both texture and depth to your Spinach Strawberry Salad. If you’d like a similar crunch, consider trying toasted sunflower seeds as a nut-free alternative!

Is strawberry spinach salad healthy?
Yes! This salad is not only healthy but also packed with antioxidants, vitamins, and minerals. Fresh spinach is a fantastic source of iron and folate, while strawberries are rich in vitamin C and fiber. Together, they offer a guilt-free dish that’s both nutritious and satisfying.

How should I store leftover Spinach Strawberry Salad?
To keep your Spinach Strawberry Salad fresh, store it in an airtight container in the fridge for up to 3 days. It’s key to keep the dressing separate until you’re ready to serve to prevent the spinach from wilting. The balsamic poppy seed dressing can last up to a week when stored in a sealed jar, giving you plenty of time to enjoy this vibrant salad!

Can I freeze Spinach Strawberry Salad?
Unfortunately, freezing is not recommended for this salad. The texture of the fresh spinach and strawberries will suffer upon thawing, resulting in a mushy salad. Instead, prepare the salad fresh as needed to enjoy the best flavors and textures!

Refreshing Spinach Strawberry Salad That’s Simply Irresistible

A vibrant Spinach Strawberry Salad combines fresh spinach, juicy strawberries, and crunchy pecans for a refreshing dish.

  • Oven
  • Baking Sheet
  • Mixing Bowl
  • Whisk
  • tongs

For the Salad

  • 6 cups Fresh Baby Spinach (Mix with arugula for an extra flavor boost.)
  • 2 cups Strawberries (Select ripe, hulled, and quartered berries for the best taste.)
  • 1 cup Raw Pecans (To make it nut-free, substitute with toasted sunflower seeds.)
  • 1/4 cup Red Onion (Soak in water to soften the flavor before adding.)
  • 1/2 cup Crumbled Feta Cheese (Opt for block-style feta for better quality and flavor.)

For the Dressing

  • 1/4 cup Balsamic Vinegar
  • 1/3 cup Extra-Virgin Olive Oil (Avocado oil can be a great substitute if preferred.)
  • 1 tablespoon Poppy Seeds
  • 1 tablespoon Honey (Use maple syrup for a vegan alternative.)
  • 1 teaspoon Dijon Mustard
  • to taste Kosher Salt
  • to taste Ground Black Pepper

Step-by-Step Instructions for Spinach Strawberry Salad

  1. Preheat your oven to 350°F (175°C). Spread the raw pecans evenly on a baking sheet and bake them for 8-10 minutes, or until they’re fragrant and lightly browned. Keep an eye on them to prevent burning.
  2. In a small bowl, whisk together ¼ cup of balsamic vinegar, ⅓ cup of extra-virgin olive oil, 1 tablespoon of poppy seeds, 1 tablespoon of honey, and 1 teaspoon of Dijon mustard. Season with kosher salt and black pepper to taste. Whisk until well combined.
  3. In a large mixing bowl, layer the fresh baby spinach, quartered strawberries, and drained red onion. Drizzle half of the balsamic poppy seed dressing over the salad. Toss gently with tongs.
  4. Add the crumbled feta and the chopped pecans to the salad bowl. Toss lightly once more to combine. Serve immediately, accompanied by the remaining dressing on the side.

Store the assembled salad in an airtight container for up to 3 days, keeping dressing separate. Leftover dressing can be refrigerated for up to 1 week.

Salad
gluten-free, Healthy, Quick, Salad, Spinach, strawberry

Filed Under: salad

Irresistibly Creamy Pink Velvet Raspberry Cheesecake Recipe

July 6, 2025 by grace bellamy Leave a Comment

The moment I set eyes on this Pink Velvet Raspberry Cheesecake, I knew I had stumbled upon something extraordinary. With its vibrant hue and creamy texture, it’s a dessert that effortlessly steals the show at any gathering. Imagine serving a slice of this beauty, its rich cream cheese filling tinged with tart raspberries, all nestled in a decadent chocolate cookie crust. It’s like a symphony of flavors dancing on your palate!

After a long week, I found myself craving something indulgent yet surprisingly easy to whip up. This cheesecake not only satisfied my sweet tooth but also brought an element of elegance to my kitchen. Whether it’s a birthday celebration, a cozy dinner with friends, or simply a treat for yourself, this dessert is perfect for any occasion. And the best part? It can be adapted to fit any dietary preference, with gluten-free crust options and fruity variations like strawberries or blueberries.

Let’s dive into this delicious recipe that combines sophistication with simplicity—your taste buds will thank you!

Why is Pink Velvet Raspberry Cheesecake so special?

Visual Delight: The striking pink hue of this cheesecake makes it a showstopper, perfect for any occasion.
Creamy Texture: With a smooth, velvety filling, it’s a heavenly treat that melts in your mouth.
Easy Prep: Made with simple ingredients, even novice bakers can impress friends and family effortlessly.
Versatile Options: Feel free to swap raspberries for strawberries, blueberries, or even cherries, making it your own!
Crowd-Pleasing: With its fusion of sweet and tart flavors, this dessert is sure to win over everyone at your gathering.
For an extra refreshing pairing, consider serving it with a glass of whipped pink lemonade to elevate your dessert experience!

Pink Velvet Raspberry Cheesecake Ingredients

• Here’s what you need to create this dreamy dessert!

For the Crust
• Chocolate Cookie Crumbs – The base that adds a rich chocolatey flavor to the cheesecake.
• Unsalted Butter, Melted – Binds the cookie crumbs together for a firm and delicious crust.

For the Filling
• Cream Cheese (3 packages, 8 oz each), Softened – The star of the show; ensure it’s fully softened for a smooth and creamy filling.
• Granulated Sugar – Balances the tartness of the raspberries with sweetness.
• Raspberries (Fresh or Frozen) – Provides vibrant color and a tangy flavor; consider strawberries, blueberries, or cherries for variations!
• Eggs (Large) – Helps bind all the ingredients together for a stable structure.
• Vanilla Extract – Enhances the overall flavor, bringing warmth to the cheesecake.
• Heavy Cream – Adds richness, making the filling extra creamy.
• Red Food Coloring (Optional) – Brightens the color for that perfect pink hue.

This Pink Velvet Raspberry Cheesecake is sure to become a favorite family recipe, perfect for any gathering or a well-deserved treat!

How to Make Pink Velvet Raspberry Cheesecake

  1. Preheat oven: Begin by preheating your oven to 325°F (160°C). This ensures your cheesecake bakes evenly and reaches that perfect creamy texture.

  2. Prepare the crust: In a mixing bowl, combine the chocolate cookie crumbs and melted butter. Press this mixture firmly into the bottom of a 9-inch springform pan to create a solid base for your cheesecake.

  3. Beat the filling: In another bowl, beat the softened cream cheese and granulated sugar together until smooth and creamy. This is where your cheesecake gets its luxurious texture, so make sure there are no lumps!

  4. Add eggs: Gradually beat in the large eggs, one at a time, ensuring each is fully incorporated before adding the next. This helps create a stable structure for the cheesecake.

  5. Fold in ingredients: Gently fold in the fresh or frozen raspberries, vanilla extract, heavy cream, and optional red food coloring. This will give your cheesecake that delightful pink hue and rich flavor.

  6. Pour the filling: Carefully pour the raspberry mixture over the prepared crust, spreading it evenly to create a beautiful layer of filling.

  7. Bake to perfection: Place the cheesecake in the preheated oven and bake for 55-60 minutes. You want the edges to be set while the center is slightly jiggly—this means it will be creamy!

  8. Cool down: Once baked, turn off the oven and crack the door slightly. Let the cheesecake cool in the oven for 1 hour. This gradual cooling helps prevent cracking.

  9. Chill in fridge: Finally, refrigerate the cheesecake for at least 4 hours, or better yet, overnight. This allows the flavors to meld together beautifully.

Optional: Serve with a dollop of freshly whipped cream for an extra touch of indulgence.

Exact quantities are listed in the recipe card below.

How to Store and Freeze Pink Velvet Raspberry Cheesecake

  • Fridge: Store the cheesecake covered in the refrigerator for up to 1 week. Make sure it’s airtight to preserve its creamy texture and flavor.

  • Freezer: For longer storage, wrap slices of cheesecake tightly in plastic wrap, then place them in an airtight container. They will stay fresh for up to 3 months.

  • Thawing: When ready to enjoy, thaw the frozen slices overnight in the refrigerator for a deliciously creamy treat.

  • Reheating: If desired, enjoy your Pink Velvet Raspberry Cheesecake cold or gently reheat individual slices in the microwave for about 10-15 seconds for a soft bite.

Pink Velvet Raspberry Cheesecake Variations

Feel free to personalize your cheesecake delight with these fun and delicious variations!

  • Gluten-Free:
    Use gluten-free chocolate cookie crumbs to create a crust that everyone can enjoy, ensuring no one misses out on this treat.

  • Berry Swap:
    Swap the raspberries for strawberries, blueberries, or cherries to introduce a new fruit flavor. Each berry variation brings its own unique sweetness!

  • Nutty Twist:
    Add crushed walnuts or almonds to the crust for an added crunch that complements the creamy filling beautifully. It introduces a delightful texture contrast.

  • Citrus Zing:
    Mix in a bit of lemon or lime zest for a bright citrus flavor that cuts through the creaminess. This adds a refreshing note that elevates the dessert.

  • Chocolate Ganache:
    Pour a silky chocolate ganache over the cooled cheesecake for an extra layer of indulgence. It’s a deliciously rich touch that chocolate lovers will adore.

  • Spiced Flavor:
    Incorporate a pinch of cinnamon or nutmeg into the filling for a warm spice that adds depth to the flavor profile. This twist turns the cheesecake into a comforting delight.

  • Dairy-Free:
    Substitute cream cheese with a dairy-free alternative and use coconut cream instead of heavy cream for a lactose-free version that doesn’t compromise on creaminess.

  • Whipped Cream Topping:
    Serve each slice with a dollop of fresh whipped cream, perhaps flavored with a hint of vanilla or almond extract, to make every slice feel like a special occasion. It’s the perfect finishing touch!

What to Serve with Pink Velvet Raspberry Cheesecake?

As you prepare to dazzle your guests with this stunning dessert, consider the perfect accompaniments that will elevate the entire experience.

  • Fresh Berry Salad: A medley of berries like strawberries, blueberries, and blackberries brings a refreshing pop of flavor. The natural sweetness complements the tart raspberry notes beautifully.

  • Whipped Cream: A dollop of freshly whipped cream adds a light, airy touch to the creamy cheesecake. It’s the classic pairing that never fails to enchant!

  • Vanilla Ice Cream: Rich and creamy vanilla ice cream balances out the tartness of the raspberries, creating a delightful contrast. Each spoonful is a little taste of heaven.

  • Sparkling Lemonade: Offer a sparkling lemonade on the side for a zesty refreshment that cuts through the richness of the cheesecake. This bubbly drink adds a festive touch to any gathering.

  • Chocolate Sauce Drizzle: For a touch of decadence, drizzle warm chocolate sauce over each slice. The combination of chocolate and raspberry creates a divine flavor explosion.

  • Mint Leaves Garnish: Add a few fresh mint leaves for a touch of color and freshness. Their aromatic quality enhances the overall presentation while enveloping each bite in a flavor-rich experience.

With these delightful pairings, your Pink Velvet Raspberry Cheesecake will shine even brighter, making for an unforgettable dessert spread!

Expert Tips for Pink Velvet Raspberry Cheesecake

  • Soften Cream Cheese: Ensure your cream cheese is fully softened to room temperature for a smooth filling. Cold cream cheese can lead to lumps.
  • Avoid Overmixing: Mix just until combined to maintain the cheesecake’s velvety texture. Overmixing can introduce air and cause cracks.
  • Cool Slowly: Letting the cheesecake cool gradually in the oven helps prevent cracks. It’s a gentle process that makes a significant difference!
  • Precise Baking Time: Watch your cheesecake closely towards the end of baking. The edges should be set, and the center slightly jiggly for that perfect creamy consistency.
  • Chill for Flavor: Refrigerate for at least 4 hours to enhance the flavor of the Pink Velvet Raspberry Cheesecake. Overnight chilling is even better!

Pink Velvet Raspberry Cheesecake Recipe FAQs

What kind of raspberries should I use?
Absolutely! You can use either fresh or frozen raspberries in this recipe. If using frozen raspberries, there’s no need to thaw them before adding to the filling—just fold them in gently, as they will blend beautifully into the creamy mixture.

How can I store leftover Pink Velvet Raspberry Cheesecake?
Store any leftover cheesecake covered in the refrigerator for up to 1 week. I recommend using an airtight container or wrapping it well to maintain its creamy texture and prevent it from absorbing other odors in the fridge.

Can I freeze my Pink Velvet Raspberry Cheesecake?
Yes! To freeze your cheesecake, wrap it tightly in plastic wrap, then place it in an airtight container. It will stay fresh for up to 3 months. For the best flavor and texture, thaw the slices overnight in the refrigerator before enjoying.

Why did my cheesecake crack?
Don’t worry; it happens to the best of us! Cracking usually occurs if the cheesecake cools too quickly or is overmixed. To prevent this, let your cheesecake cool gradually in the oven with the door slightly ajar for about an hour after baking. This gentle cooling helps maintain that perfect velvety texture without unsightly cracks.

Is this recipe suitable for those with allergies?
Be mindful that this cheesecake contains dairy and eggs, which may not be suitable for those with lactose intolerance or egg allergies. You can experiment with dairy alternatives, like nut-based cream cheeses, but be prepared for different consistency and flavor outcomes.

Can my pets enjoy any of these ingredients?
While fresh raspberries are safe for dogs and cats in moderation, please avoid giving them any cheesecake due to the high sugar and fat content that can upset their stomachs. Always prioritize your furry friends’ health, providing only vet-approved treats!

[tasty-recipe id=”2386″]

Filed Under: Dessert

Flavor-packed Mexican Macaroni Salad: A BBQ Essential!

July 5, 2025 by grace bellamy Leave a Comment

When the summer sun shines bright, nothing delights quite like a vibrant dish that captures the essence of a lively gathering. Enter my Mexican Macaroni Salad—a colorful side that has become a staple at BBQs and potlucks alike. As the aroma of freshly cooked elbow macaroni mingles with the zest of tangy pickled jalapeños, I can’t help but reminisce about warm afternoons spent savoring good food and great company.

This recipe is all about easy preparations and bold flavors; it combines creamy mayonnaise, crisp mixed vegetables, and savory deli ham for a delightful crunch in every bite. Best of all, it’s a fantastic make-ahead option that tastes even better the next day! Whether you’re contributing to a neighborhood cookout or simply looking to spice up a weeknight meal, this Mexican Macaroni Salad is your ticket to culinary success. Let’s dive into the details and create a dish that smiles back at you!

Why is Mexican Macaroni Salad a Must-Try?

Vibrant colors make this dish a feast for the eyes, instantly elevating any meal. Easy to prepare, you won’t spend hours in the kitchen, making it ideal for busy cooks. Packed with flavor, the blend of creamy mayonnaise, crunchy vegetables, and zesty jalapeños offers a delightful balance. Perfect for gatherings, it’s a crowd-pleaser that pairs wonderfully with grilled meats at your next BBQ. If you love colorful, fresh options, consider mixing in some ingredients from this Mexican Street Corn Salad for an exciting twist!

Mexican Macaroni Salad Ingredients

• Dive into the flavors with these essential ingredients!

For the Salad

  • Elbow Macaroni – the heart of this Mexican macaroni salad, cook it al dente for the best texture.
  • Mayonnaise – offers creamy richness, making the salad irresistibly smooth.
  • Mixed Vegetables – enhances flavor and crunch; opt for frozen varieties that are thawed and drained.
  • Deli Ham – adds a savory depth; chop it up for even distribution in your salad.
  • Pickled Jalapeno – imparts heat and tang; mince it finely for an extra kick!
  • Pickled Jalapeno Juice – optional but recommended for an added flavor boost.

How to Make Mexican Macaroni Salad

  1. Cook the Elbow Macaroni: Begin by boiling salted water and cooking the elbow macaroni according to the package instructions until al dente, which usually takes about 7-9 minutes. Drain and set aside.

  2. Rinse the Pasta: Once cooked, rinse the macaroni under cold water until it’s no longer hot. This step stops the cooking process and helps keep your salad cool and refreshing.

  3. Combine the Ingredients: In a large mixing bowl, gently combine the cooked macaroni with mayonnaise, thawed mixed vegetables, chopped deli ham, minced pickled jalapeño, and if desired, a splash of pickled jalapeño juice. Stir until well mixed.

  4. Refrigerate the Salad: Cover the bowl with plastic wrap or a lid and refrigerate for at least one hour before serving. This allows all the delightful flavors to meld beautifully, enhancing the taste.

Optional: Garnish with fresh cilantro or a sprinkle of paprika just before serving for an extra pop of color and flavor!

Exact quantities are listed in the recipe card below.

Expert Tips for Mexican Macaroni Salad

  • Chill for Flavor: Allow the Mexican macaroni salad to rest in the refrigerator for at least an hour—this cooling time lets flavors marry for a tastier experience.

  • Drain Properly: If using canned mixed vegetables, always drain them thoroughly to prevent excess moisture, which can make your salad soggy.

  • Pickle Preference: Adjust the amount of minced pickled jalapeño based on your heat preference; more jalapeños create a spicier dish, while less will tone it down.

  • Mix and Match: Feel free to substitute the deli ham with cooked chicken or even chickpeas for a vegetarian twist, maintaining that delightful texture and flavor.

  • Fresh Herbs Boost: Consider adding fresh herbs like cilantro or parsley right before serving for a fresh touch that enhances the overall flavor profile.

  • Presentation Matters: When serving, not only keep it cold but also consider a colorful garnish to make your Mexican macaroni salad visually appealing!

Mexican Macaroni Salad Variations

Feel free to give this dish your own personal touch—experimenting with flavors and ingredients can lead to delightful new combinations!

  • Veggie-Packed: Add chopped bell peppers, corn, or diced tomatoes for a colorful crunch that enhances the salad’s freshness.
  • Spicy Twist: Incorporate diced serrano peppers or a dash of hot sauce for an extra kick of heat that spice-lovers will adore.
  • Creamy Avocado: Fold in diced avocado just before serving to introduce a rich, creamy element that pairs beautifully with the flavors.
  • Chickpea Substitute: Swap out deli ham for canned chickpeas for a vegetarian option that still delivers protein and texture.
  • Citrus Zing: Squeeze in fresh lime juice in place of pickled jalapeño juice for a bright, tangy flavor that complements the salad perfectly.
  • Herbed Mayo: Mix fresh herbs such as dill, cilantro, or parsley into the mayonnaise for a fragrant twist that elevates the dish.
  • Cheesy Delight: Add crumbled queso fresco or shredded cheese for a savory layer of flavor that cheese enthusiasts will love.
  • Nutty Crunch: Toss in toasted sunflower seeds or chopped walnuts for a pleasant crunch that adds both texture and nutrition.

With these variations, you can create a unique version of Mexican Macaroni Salad that suits your taste and pleases those around you!

What to Serve with Mexican Macaroni Salad?

When planning a meal that lights up the table, pairing your vibrant mac salad with complementary dishes is key.

  • Grilled Chicken: Juicy, marinated chicken breast adds a savory touch that contrasts beautifully with the salad’s creaminess. Serve with a drizzle of lime for a refreshing twist.

  • Corn on the Cob: Sweet, buttery corn delights the palate and brings a fun, summery element to your spread. It’s a classic match for BBQs that everyone loves!

  • Black Bean Tacos: Hearty and satisfying, these tacos are a protein-packed, plant-based option that pairs well with the salad’s vibrant flavors. The combination is a festival of tastes!

  • Tomato Salsa: Fresh, zesty salsa adds a burst of flavor and can be served with crispy tortilla chips. The cool salsa complements the rich macaroni salad perfectly.

  • Margaritas: Sip on a refreshing margarita—whether classic lime or fruity variations, they bring a party vibe that matches well with this festive dish.

  • Churros: For dessert, delight your guests with crispy churros dusted in cinnamon sugar. They offer a sweet finish that captures the spirit of Mexican cuisine.

  • Grilled Veggie Skewers: Smoky, caramelized veggies on a skewer provide a delightful crunch and colorful addition to your meal. This pairing is both nutritious and incredibly tasty!

Embrace these options, and your gathering will be a delicious success!

How to Store and Freeze Mexican Macaroni Salad

Fridge: Keep your Mexican macaroni salad in an airtight container in the refrigerator for up to 3 days. The flavors will deepen, making it even tastier!

Freezer: While it’s best enjoyed fresh, you can freeze leftovers for up to 1 month. Just make sure to use a freezer-safe container and thaw in the fridge before serving.

Reheating: This dish is typically served cold, but if you prefer to enjoy it warm, gently reheat in the microwave or on the stovetop.

Airtight Seal: For optimal freshness, always ensure your container is well-sealed to prevent any moisture from affecting the texture of the macaroni salad.

Mexican Macaroni Salad Recipe FAQs

What is in Mexican macaroni salad?
Mexican macaroni salad typically includes elbow macaroni, creamy mayonnaise, a mix of vegetables, deli ham, pickled jalapeños, and sometimes a splash of pickled jalapeño juice for that extra kick. Each ingredient contributes to a delicious fusion of flavors that makes this salad a hit at gatherings!

What does a Mexican salad consist of?
A Mexican salad can vary widely, but it often includes fresh ingredients like tomatoes, corn, beans, avocados, and bell peppers. Flavors are usually enhanced with lime juice, cilantro, and spices for a refreshing and zesty combination. In the case of a macaroni salad, the addition of pasta makes it a heartier option, loved for its creamy texture.

What are the five mistakes to avoid in pasta salad?

  1. Overcooking pasta: Always cook your elbow macaroni al dente to maintain the perfect texture.
  2. Not rinsing after boiling: Rinsing your pasta helps cool it quickly and prevents it from becoming sticky.
  3. Skipping the chill time: Letting your salad chill in the fridge for at least an hour allows flavors to meld beautifully.
  4. Overloading with dressing: Start with less mayonnaise; you can always add more to achieve the desired creaminess.
  5. Failing to drain ingredients: If using canned vegetables, be sure to drain them well to avoid a soggy salad.

What are the main ingredients of macaroni salad?
The key ingredients in macaroni salad generally include elbow macaroni, mayonnaise, various vegetables (such as peas, carrots, and bell peppers), and often some type of protein like ham or chicken. Seasonal variations may include ingredients such as hard-boiled eggs or cheese. For our Mexican macaroni salad, we add a twist with pickled jalapeños for heat and flavor!

Why do you put vinegar in macaroni salad?
Vinegar adds acidity and brightness to macaroni salad, helping to balance the creaminess of the mayonnaise. It enhances the overall flavor profile and provides a tangy contrast that enlivens the dish. If you’re looking for that extra zest, consider adding a splash of vinegar or even lemon juice in your Mexican macaroni salad!

Can I customize my Mexican macaroni salad?
Absolutely! This recipe is highly adaptable! You can swap the deli ham with cooked chicken for a different protein, or include other vegetables like diced bell peppers, corn, or black olives for a fresh twist. If you’re in the mood for extra heat, adjust the amount of pickled jalapeños or add some chopped fresh cilantro for an aromatic touch!

[tasty-recipe id=”2339″]

Filed Under: Dessert

Irresistibly Easy Bacon Fried Rice for a Flavorful Feast

July 5, 2025 by grace bellamy Leave a Comment

After a long day filled with chaos and to-do lists, the last thing I want to do is settle for fast food. Instead, the comforting aroma of sizzling bacon instantly calls me to my kitchen. That’s when I decided to whip up my favorite Easy Bacon Fried Rice—a dish that transforms leftovers into a delightful, savory meal. Picture crispy bacon mingling with tender vegetables and fluffy rice, all brought together with a splash of soy sauce and sesame oil.

This recipe doesn’t just save time; it’s a crowd-pleaser that rivals any takeout option, making it perfect for family dinners or a comforting solo meal. What’s more, you can easily customize it with whatever protein you have on hand—be it grilled chicken or even tofu! Let’s dive into this delicious recipe that has become a staple at my table, proving time and again that homemade beats takeout, hands down.

Why is Bacon Fried Rice a Must-Try?

Simplicity at its finest: This recipe comes together in under 30 minutes, so you can enjoy a homemade dish without a lengthy prep time.

Savory Delight: The rich flavor of crispy bacon combined with tender vegetables elevates your meal to new heights.

Kid-Friendly: A dish that pleases the entire family, it’s sure to be a hit with even the pickiest of eaters!

Customizable: You can use whatever proteins or veggies you have on hand—think leftover grilled chicken or even tasty tofu—as seen in my Egg Fried Rice recipe.

Crowd-Pleaser: Perfect for family dinners or entertaining friends, it rivals any takeout in taste and satisfaction!

Bacon Fried Rice Ingredients

• A quick note: Gather these ingredients for a delightful homemade Bacon Fried Rice.

For the Base
• Chopped Bacon – Provides a savory flavor and renders fat, which is perfect for cooking.
• Chopped White Onion – Adds an aromatic base that brings depth to your dish.
• Frozen Peas and Carrots – Infuses sweetness and provides great texture.
• Lightly Beaten Eggs – Binds all the ingredients, adding richness and protein.
• Cooked White Rice – The heart of the dish; medium-to-long grain rice like Jasmine is best for fluffy results.

For Flavor
• Sesame Oil – Introduces a nutty flavor, making the dish more authentic.
• Soy Sauce – Adds saltiness and umami, enhancing the savory profile of the Bacon Fried Rice; adjust to taste.

For Garnish
• Chopped Green Onions – Adds a fresh, bright finish that elevates the dish visually and flavor-wise.

How to Make Bacon Fried Rice

  1. Cook Bacon: Start by sizzling the chopped bacon in a large skillet over medium heat. Cook until it’s perfectly crisp, about 5-7 minutes, then reserve about 1 tablespoon of the delicious bacon grease in the pan.

  2. Sauté Vegetables: Add the chopped onion along with the frozen peas and carrots into the skillet. Stir-fry for around 3-4 minutes until the onion is translucent and the vegetables are tender and vibrant.

  3. Scramble Eggs: Push the veggies to one side of the skillet and pour in the lightly beaten eggs. Scramble them quickly for about 1-2 minutes until they’re just set and creamy, then mix everything together.

  4. Combine Rice: Gently fold in the cooked white rice, breaking up any clumps. Add the crispy bacon and the sautéed vegetables and eggs to the mixture, ensuring a harmonious blend of flavors.

  5. Add Seasoning: Drizzle in the sesame oil and soy sauce, stirring continuously until the rice is heated through and coated evenly, about 2-3 minutes. The rice should start to glisten!

  6. Garnish and Serve: Finish off by garnishing with chopped green onions for a pop of color and freshness. Serve your Bacon Fried Rice warm, and enjoy the delightful flavors!

Optional: Serve with a splash of extra soy sauce for added flavor.
Exact quantities are listed in the recipe card below.

Bacon Fried Rice Variations

Feel free to get creative with this recipe and make it your own!

  • Protein Boost: Add leftover grilled chicken or pork for an easy protein upgrade that keeps everyone satisfied.

  • Vegetarian Delight: Swap out the bacon for diced tofu, ensuring it’s well-cooked for that crispy bite everyone loves.

  • Different Rice: Experiment with brown rice or cauliflower rice for a nutritious twist that adds a different texture.

  • Flavor Kick: Toss in some diced red pepper flakes for a spicy finish that wakes up your taste buds.

  • Extra Veggies: Sneak in more veggies like bell peppers or broccoli to amp up the nutrition and color of your dish.

  • Nutty Flavor: Substitute peanut oil for sesame oil to introduce a deeper, nutty flavor that wonderfully complements the bacon.

  • Sweet Twist: Add a sprinkle of pineapple chunks for a sweet and savory combination that will surprise and delight.

  • Herb Infusion: Incorporate fresh herbs like basil or cilantro at the end for a fragrant finish that elevates this dish to new heights!

What to Serve with Easy Bacon Fried Rice?

There’s nothing like a comforting bowl of fried rice to bring the whole family together, and pairing it with the right sides can elevate your meal experience.

  • Steamed Broccoli: The crunchy, vibrant florets provide a fresh contrast to the savory bacon and the soft rice texture, enhancing each bite with nutritional goodness.

  • Crispy Spring Rolls: These delightfully crunchy wraps add a satisfying texture, bursting with veggies and flavors that complement the dish beautifully.

  • Egg Drop Soup: A warm, soothing soup balances the heartiness of the bacon fried rice and adds a lovely, light element to your meal.

  • Sweet and Sour Chicken: This dish’s tangy sauce pairs perfectly with the umami of the bacon, creating a delightful flavor harmony that everyone loves.

  • Chilled Cucumber Salad: A refreshing salad drizzled with sesame dressing brings a crispness that cuts through the richness of the fried rice and bacon.

  • Mango Sticky Rice: For dessert, this sweet treat offers a wonderful finish, merging tropical sweetness with a creamy texture that echoes through the meal.

With these pairings, you’ll create an inviting and memorable dining experience that perfectly showcases your Easy Bacon Fried Rice!

Expert Tips for Bacon Fried Rice

• Rice Choice: Use medium-to-long grain rice, like Jasmine, to ensure a fluffy texture that won’t clump or become mushy while frying.

• Crispy Bacon: Cook the bacon until it’s perfectly crisp; undercooked bacon can make your dish greasy instead of savory.

• Keep It Moving: Stir continuously when adding the soy sauce and sesame oil to avoid sticking and ensure even flavor distribution in your Bacon Fried Rice.

• Veggie Freshness: If possible, use fresh vegetables instead of frozen for a vibrant color and fresher flavor, but keep in mind frozen options are convenient and still tasty.

• Custom Additions: Don’t hesitate to personalize your bacon fried rice with proteins or vegetables you adore; leftover grilled chicken or tofu works wonderfully!

How to Store and Freeze Bacon Fried Rice

Fridge: Store any leftover Bacon Fried Rice in an airtight container for up to 3 days. Make sure to let it cool before sealing to prevent moisture buildup.

Freezer: For longer storage, freeze the Bacon Fried Rice in a freezer-safe container for up to 3 months. Ensure it’s completely cooled before freezing to maintain texture.

Reheating: To reheat, thaw overnight in the fridge, then warm in a skillet over medium heat, adding a splash of soy sauce or water to revive moisture. Enjoy it warm and delicious!

Room Temperature: Avoid leaving the cooked dish at room temperature for more than 2 hours to prevent any food safety issues.

Easy Bacon Fried Rice Recipe FAQs

Can you put bacon in fried rice?
Absolutely! Bacon adds a delicious savory flavor to fried rice, making each bite irresistible. The rendered fat from the bacon also enhances the overall taste and helps cook the other ingredients.

What gives Chinese fried rice its flavor?
The flavor in Chinese fried rice comes from ingredients like soy sauce and sesame oil, which add depth and umami. The use of aromatic vegetables like onion, along with proteins like bacon or chicken, creates a rich and satisfying taste.

Does bacon work with rice?
Very! Bacon pairs perfectly with rice, complementing the fluffy grains with its crispy texture. The combination of bacon, soy sauce, and sesame oil creates a unique taste profile that elevates traditional fried rice to a whole new level!

Is bacon grease good for fried rice?
Absolutely! Using bacon grease to sauté vegetables adds an irresistible flavor to your fried rice. Just be cautious about the amount you use, as too much grease can make the dish greasy rather than savory.

Is bacon fried rice healthy?
Bacon fried rice can be part of a balanced meal, but moderation is key. While it provides protein and flavor, the bacon contributes fat and sodium. To make it healthier, boost the veggie content or opt for leaner proteins like chicken or tofu.

How to reheat frozen bacon fried rice properly?
To reheat frozen Bacon Fried Rice, first, thaw overnight in the fridge. Next, add a splash of soy sauce or a little water to a skillet and warm it over medium heat. Stir frequently for about 5-7 minutes until it’s heated through and has regained its moisture. Enjoy it warm for the best taste experience!

[tasty-recipe id=”2364″]

Filed Under: Main Dishes

Crispy Cheesy Corn Fritters: Your New Favorite Savory Snack

July 4, 2025 by grace bellamy Leave a Comment

There’s a certain joy in the kitchen that comes alive when the sound of frying fills the air, and that’s exactly what happens when you whip up these Cheesy Corn Fritters. Picture this: the delightful aroma of sweet corn mingling with the salty notes of rich cheese, instantly transporting you to sunny days at the local farmers’ market.

As I was going through my pantry, I stumbled upon a stash of fresh corn kernels and a block of Parmigiano Reggiano just waiting to be celebrated. The result? These crispy fritters that are so good you’ll be tempted to eat them straight from the pan! Each bite bursts with juicy corn sweetness while enveloped in a perfectly crispy exterior. They’re versatile enough to be served as a side dish or a snack on their own—ideal for those evenings when fast food just won’t do. Let’s bring some excitement back into your meals with this easy yet delicious recipe!

Why will you love Cheesy Corn Fritters?

Crispy perfection: The exterior of these fritters is fried to golden-brown perfection, creating a satisfying crunch that contrasts beautifully with the juicy corn inside.

Fresh and vibrant: Using seasonal corn elevates this dish, giving it an unmatched freshness that frozen alternatives just can’t match.

Taste explosion: The savory Parmigiano Reggiano adds rich umami flavors, perfectly balancing the sweet burst of corn with every bite.

Simplicity at its best: Just a handful of ingredients are needed to create a scrumptious treat that is quick and easy to prepare.

Versatile delight: Whether enjoyed as a side with your evening meal or as a snack while watching your favorite show, these fritters are sure to please. If you’re looking for more fun recipes, check out these Fried Chicken Street Corn Tacos for a tasty twist!

Cheesy Corn Fritter Ingredients

For the Fritters
• Corn Kernels – fresh corn brings the sweet, juicy flavor that makes these fritters shine.
• Grated Cheese (Parmigiano Reggiano) – adds a salty umami boost and helps with binding for that perfect crunch.
• Flour – forms a light batter that creates a fabulous crispy exterior.
• Chopped Herbs (Optional: Chives, Cilantro, or Parsley) – these add a pop of freshness and color to your fritters.

Feel free to experiment and enjoy the delightful taste of these Cheesy Corn Fritters with your loved ones!

How to Make Cheesy Corn Fritters

  1. Combine ingredients: In a large mixing bowl, gently mix fresh corn kernels, grated Parmigiano Reggiano cheese, and flour until evenly combined. This mixture should be thick and coalesce nicely without excess batter.

  2. Prep for frying: Avoid adding any liquid to the mixture until you’re ready to cook. The moisture from the corn will keep it light and flavorful, so wait until the last moment for best results.

  3. Fry to perfection: Heat oil in a frying pan over medium-high heat. Drop spoonfuls of the mixture into the hot oil, frying until they achieve a deep golden color—about 3-4 minutes per side. Check for that irresistible crunch!

  4. Drain excess oil: Once golden, carefully transfer the fritters to a plate lined with paper towels. This will help absorb any excess oil and keep them light and crispy.

Optional: Serve with a squeeze of fresh lemon for an added zing!

Exact quantities are listed in the recipe card below.

How to Store and Freeze Cheesy Corn Fritters

Fridge: Store leftover fritters in an airtight container for up to 3 days. Reheat in a skillet over medium heat to revive their crispiness.

Freezer: Freeze cooled fritters individually on a baking sheet, then transfer to a freezer bag for up to 2 months. Reheat directly from frozen in the oven for optimal crunch.

Room Temperature: If serving immediately, keep fritters on a wire rack to avoid sogginess for up to 2 hours. Enjoy your Cheesy Corn Fritters while they’re warm!

What to Serve with Cheesy Corn Fritters?

These crispy delights make the perfect centerpiece for a delightful meal, inviting flavors that complement and elevate every bite.

  • Creamy Avocado Dip: A smooth, rich dip adds a luscious contrast to the crunchy fritters, enhancing their savory flavor.

  • Garlic Butter Sauteed Greens: Brightly sautéed greens balance the richness of the fritters, offering a nutritious, vibrant addition to your plate.

  • Fresh Tomato Salad: Juicy tomatoes with a splash of balsamic create a fresh, tangy counterpart that amps up the overall flavor profile.

  • Zesty Coleslaw: This crunchy, slightly tangy side offers a playful crunch and a refreshing bite that pairs beautifully with the fritters’ texture.

  • Spicy Remoulade Sauce: A kick of spice in a creamy sauce not only complements the savory notes but also elevates the entire dish to gourmet status.

  • Crisp White Wine: A chilled glass of Sauvignon Blanc boasts bright acidity that cuts through the richness of the fritters, refreshing your palate.

  • Peach Chutney: This sweet-tart spread brings an unexpected twist and enhances the natural sweetness of the corn, making for a delightful pairing.

  • Mini Cornbread Muffins: Adding a touch of southern charm, these muffins echo the corn flavor while providing a soft, sweet contrast to the crispy fritters.

Expert Tips for Cheesy Corn Fritters

• Fresh Corn Matters: Always choose fresh corn in-season for the sweetest flavor and best texture in your fritters.

• Temperature Check: Ensure the oil is hot enough before frying; this prevents sogginess and promotes that crispy exterior we all love.

• Batter Consistency: Avoid overmixing, as a thick batter helps create airy fritters—too much mixing can lead to tough fritters!

• Golden Perfection: Keep an eye on the frying time—cooking until deep golden not only enhances the flavor but ensures optimal crispiness for your cheesy corn fritters.

• Herb Infusion: Feel free to experiment! Adding chopped herbs like cilantro or parsley can enhance the flavor and add a beautiful pop of color.

Cheesy Corn Fritters Sides

There’s something special about elevating your cheesy corn fritters with delightful pairings that complement their flavor profile beautifully.

  • Spicy Aioli: Mix mayonnaise with minced garlic, lemon juice, and a pinch of cayenne for a flavorful dip that adds heat.

  • Fresh Salsa: A vibrant homemade salsa with diced tomatoes, onion, cilantro, and lime juice brightens up your fritters and adds a zesty kick.

  • Herbed Yogurt Sauce: Combine Greek yogurt with fresh herbs like dill or mint for a creamy, cooling dip that balances the fritters’ crispiness.

  • Guacamole: Serve with a scoop of creamy guacamole for a luscious avocado pairing that offers richness and smooth texture.

  • Mixed Greens Salad: A light salad with seasonal greens and a simple vinaigrette provides a refreshing contrast and adds a crunchy element to your meal.

  • Sweet Corn Relish: A refreshing corn salsa with lime, jalapeños, and onion can add a sweet and spicy flavor burst alongside your fritters.

  • Hot Sauce Drizzle: For those who love a spicy kick, a drizzle of your favorite hot sauce adds that fiery flair perfect for adventurous eaters.

Each of these sides will not only enhance your eating experience but also make your cheesy corn fritters truly unforgettable! Enjoy experimenting!

Cheesy Corn Fritters Recipe FAQs

Why are my fritters not crispy?
Absolutely! If your fritters are turning out soft or soggy, it could be due to too much moisture in the batter. Ensure you’re not adding extra liquid until just before frying, as the corn’s natural moisture should be enough for binding. Also, make sure the oil is hot enough; if it’s not sizzling, the fritters will absorb oil rather than fry up crisp.

How to stop fritters from going soggy?
Very! To prevent sogginess, ensure you’re frying the fritters at the proper temperature—usually around 350°F (175°C) works best. If the oil is too cool, the fritters will absorb it, becoming less crunchy. Additionally, drain them well on paper towels after frying to soak up any excess oil.

Does baking powder make fritters crispy?
It can! Baking powder can create a lighter batter, giving a slight puff to fritters, which can help with texture. However, for Cheesy Corn Fritters, the key to crispiness lies more in the frying technique and oil temperature than in the leavening agent. If you decide to use it, about 1/4 teaspoon per cup of flour works wonders.

Can you bake corn fritters instead of frying them?
Definitely! While frying brings that sought-after crunch, you can bake your Cheesy Corn Fritters for a healthier option. Preheat your oven to 400°F (200°C) and place the fritters on a baking sheet lined with parchment paper. Lightly spray them with cooking oil and bake for 20-25 minutes, flipping halfway through until they’re golden brown.

What is the best oil for frying fritters?
I recommend using oils with high smoke points, such as vegetable oil, canola oil, or peanut oil. These oils can withstand higher frying temperatures without breaking down, allowing your Cheesy Corn Fritters to achieve that beautiful golden crisp without any oily flavor.

How should I store leftover fritters?
Certainly! Store leftover Cheesy Corn Fritters in an airtight container in the fridge for up to 3 days. When you’re ready to enjoy them again, reheat in a skillet over medium heat to restore their crispiness. For longer storage, remember to freeze them! Cool fritters can be frozen separately on a baking sheet before transferring to a freezer bag for up to 2 months. Reheat directly from frozen for the best results!

[tasty-recipe id=”2318″]

Filed Under: Side Dishes

Creamy Cajun Potato Soup: A Spicy Comfort Food Delight

June 30, 2025 by grace bellamy Leave a Comment

When the evening air cools and the cravings for warmth and comfort kick in, there’s nothing quite like a big bowl of rich, creamy Cajun Potato Soup to satisfy your appetite. The first time I whipped up this dish, I was searching for a way to transform standard potato soup into something truly captivating, and boy, did I find it! A burst of Cajun spices dances together with hearty chunks of andouille sausage, coming together in a luxurious blend of creamy goodness that warms more than just the stomach.

As the aroma fills your kitchen, it’s hard not to imagine cozy gatherings with friends or family, each person savoring the spicy warmth and hearty flavors. From the first spoonful, you’ll experience a delightful balance of textures—the tender russet potatoes mingling beautifully with a creamy base, while a sprinkle of cheddar cheese brings it all together. Best of all, this recipe is versatile enough to tweak according to your taste. So whether you’re looking to impress at a dinner party or simply enjoy a hearty weeknight meal, this Cajun Potato Soup is your ticket to a flavorful experience!

Why is Cajun Potato Soup a must-try?

Comforting Warmth: This Cajun Potato Soup is the epitome of cozy meals, offering a spicy note that awakens your taste buds.

Simple Preparation: You’ll be amazed at how easily you can whip this up, making it perfect for busy weeknights or last-minute gatherings.

Flavor Explosion: The combination of andouille sausage and Cajun spices creates a rich, savory profile that everyone will adore.

Customizable Goodness: Feel free to tailor it to your liking by adding veggies like spinach or swapping the sausage for turkey—it’s all up to you!

Perfect for Sharing: With its hearty and creamy texture, this soup is destined to be the star of your next family dinner.

If you’re a fan of deliciously creamy dishes, you might also enjoy making a warm, comforting bowl of Creamy Potato Soup alongside this one!

Cajun Potato Soup Ingredients

For the Soup Base
• Vegetable Oil – Perfect for sautéing the sausage to develop rich flavor.
• Andouille Sausage – The key flavor element; feel free to substitute with Kielbasa or smoked bratwurst for a different taste.
• Onion – Adds a sweet and savory depth to the soup.
• Celery – Introduces a savory vegetable base that complements the other ingredients.
• Red Bell Pepper – Enhances the flavor with a touch of sweetness and vibrant color.
• Garlic – A flavor enhancer that rounds out the dish beautifully.
• Cajun Seasoning – Delivers that quintessential Cajun kick; consider making your own blend for a personal touch.
• Kosher Salt – Essential for balancing flavors.
• Black Pepper – Adds a subtle bite to the soup.
• Paprika – Brings a lovely color and a hint of smokiness.
• Cayenne Pepper – Adds a spicy heat; adjust according to your preference.
• Chicken Broth – The liquid foundation that enhances the overall flavor; chicken stock is a fine swap if needed.
• Russet Potatoes – Absorb flavors beautifully; Yukon gold or red potatoes work too.

For the Creaminess
• Heavy Whipping Cream – Creates that luxurious, rich, and creamy texture everyone loves.
• Mild Cheddar Cheese – Offers a creamy bliss; shredded cheese melts evenly for the perfect finish.

You can find full measurements in the recipe card below.

How to Make Cajun Potato Soup

  1. Brown the Sausage: Heat vegetable oil in a large pot over medium heat. Add the sliced andouille sausage and cook for about 3-4 minutes, until browned. Once done, set it aside to keep the flavors intact.

  2. Sauté the Vegetables: In the same pot, add diced onion, celery, and red bell pepper. Sauté for 5-8 minutes until they soften, then stir in minced garlic for another minute to infuse that delicious aroma.

  3. Prepare the Soup Base: Now it’s time to add flavor! Toss in Cajun seasoning, kosher salt, black pepper, paprika, and cayenne pepper. Pour in the chicken broth along with the cubed potatoes. Simmer on low for 20-25 minutes, or until the potatoes are fork-tender and bursting with flavor.

  4. Finish the Soup: Return the browned sausage to the pot. Add heavy whipping cream and shredded cheddar cheese, stirring until the cheese melts and the soup is creamy, about 5 minutes more.

  5. Garnish and Serve: Ladle the soup into bowls and garnish with fresh parsley. Enjoy it warm alongside some crusty bread or your favorite crackers.

Optional: For an extra kick, sprinkle some extra cayenne on top before serving.

Exact quantities are listed in the recipe card below.

How to Store and Freeze Cajun Potato Soup

Fridge: Cool the soup completely before transferring it to an airtight container. It can be stored in the fridge for up to 3-4 days.

Freezer: Once cooled, pour the soup into freezer-safe containers, leaving space for expansion. Freeze for up to 2-3 months for best quality.

Reheating: Thaw in the refrigerator overnight. Reheat on the stove over low heat, stirring occasionally until heated through, adding a splash of broth if needed for creaminess.

Portion Control: For easy meals, consider dividing the soup into individual portions before freezing. This way, you can enjoy a warm bowl of Cajun Potato Soup anytime the craving strikes!

Cajun Potato Soup Variations

Feel free to elevate your Cajun Potato Soup experience by incorporating these delightful variations!

  • Add Greens: Toss in baby spinach and kale for a burst of color and nutrition; they wilt beautifully and add a fresh note.

  • Carrot Crunch: Include carrot sticks for a sweet crunch, complementing the creamy texture perfectly!

  • Seafood Twist: Incorporate crawfish tails for a true Cajun experience; their sweet, briny flavor takes the soup to another level.

  • Healthier Option: Substitute turkey sausage for a lighter option without sacrificing flavor; it offers a delicious twist that’s equally satisfying.

  • Seasoning Customization: Create your own Cajun seasoning mix with your favorite spices. Personalize the heat level to suit your taste!

  • Creamy Coconut: For a dairy-free alternative, replace heavy cream with coconut milk. It adds a hint of sweetness and creaminess!

  • Spicy Upgrade: Increase the heat by adding sliced jalapeños or diced habaneros to the base; perfect for those who crave an extra kick!

  • Cheesy Delight: Mix in different cheeses like pepper jack or gouda for varied flavors and a creamy finish. Each adds a unique twist!

What to Serve with Cajun Potato Soup?

When the rich, spicy aroma of Cajun Potato Soup envelops your kitchen, it’s time to think about delectable accompaniments that enhance this delightful dish.

  • Crusty French Bread: Perfect for dipping, this bread’s crispy exterior and soft inside soak up the creamy broth beautifully. Consider toasting it for extra crunch!

  • Garden Salad: A fresh, light salad with mixed greens, cherry tomatoes, and a tangy vinaigrette adds a crisp contrast, balancing the soup’s creamy texture.

  • Cornbread: The slightly sweet, crumbly cornbread meshes wonderfully with the soup, adding a homely feel to your meal. You’ll love how the flavors complement each other!

  • Pickled Vegetables: A side of tangy pickled veggies brightens up your plate and adds a zesty crunch that cuts through the richness of the soup.

  • Garlic Breadsticks: Soft, buttery breadsticks infused with garlic make an enticing side, pulling you in for another bite as you enjoy your soup.

  • Iced Tea: For a refreshing drink pairing, a glass of sweet iced tea provides just the right balance to the spices.

  • Key Lime Pie: A slice of this tart, creamy dessert finishes the meal on a light and sweet note. The contrast of flavors will leave your palate satisfied!

Each of these delightful options will take your meal to the next level, making it a heartwarming experience for family and friends.

Expert Tips for Cajun Potato Soup

  • Adjust Spice Levels: For a milder Cajun Potato Soup, reduce the amount of Cajun seasoning and cayenne pepper to suit your palate.

  • Check Potato Tenderness: Ensure potatoes are fork-tender before adding cream and cheese; this guarantees a smooth, creamy texture in your soup.

  • Watch Cooking Times: When doubling the recipe, extend cook times appropriately as the increased volume can affect how quickly everything cooks.

  • Sauté for Flavor: Browning the andouille sausage well adds depth to the flavors—don’t rush this step!

  • Experiment with Add-ins: Feel free to embellish the soup with extra veggies like baby spinach or even crawfish tails to make it more personalized.

Cajun Potato Soup Recipe FAQs

What type of potatoes are best for Cajun Potato Soup?
I recommend using russet potatoes as they absorb flavors beautifully. You can also use Yukon gold or red potatoes, but make sure to peel and cube them before adding to the soup for the best texture.

How can I store leftover Cajun Potato Soup?
Absolutely! Allow the soup to cool completely, then transfer it to an airtight container. You can store it in the fridge for up to 3-4 days. When you’re ready to enjoy it again, just reheat on the stovetop over low heat.

Can I freeze Cajun Potato Soup?
Yes, you can! Allow it to cool thoroughly, then pour the soup into freezer-safe containers, making sure to leave some space for expansion. It can be frozen for up to 2-3 months. To reheat, thaw in the refrigerator overnight and gently warm it on the stove, adding a bit of broth if necessary to restore creaminess.

Why is my soup too thick, and how can I fix it?
If your soup turns out too thick, don’t fret! Simply add a splash of chicken broth or water and stir well until you reach your desired consistency. This will restore the creaminess and make the soup more enjoyable.

Can I adjust the spice level of my Cajun Potato Soup?
Very much so! If you prefer a milder flavor, you can easily reduce the amount of Cajun seasoning and cayenne pepper. You can also substitute andouille sausage for a less spicy option, like turkey sausage, without compromising the heartiness of the soup.

Is this soup suitable for my gluten-free diet?
Yes, this Cajun Potato Soup can be adapted for gluten-free diets! Simply ensure that the Cajun seasoning and chicken broth you use are labeled gluten-free, and you’re all set to enjoy a delicious, comforting meal!

[tasty-recipe id=”2245″]

Filed Under: Main Dishes

Creamy Cheddar Broccoli Potato Soup You’ll Want Every Day

June 30, 2025 by grace bellamy Leave a Comment

As the chilly air of autumn settles in, I find myself craving hearty comfort foods that wrap me in warmth. One of my ultimate go-to recipes is creamy Cheddar Broccoli Potato Soup. This delightful dish, often affectionately referred to as Cheesy Vegetable Chowder, masterfully combines the rich flavors of melted cheese, fresh broccoli, and tender potatoes into a single warm bowl of happiness. The moment those vibrant veggies simmer alongside savory garlic and onions, the aroma fills my kitchen, making every corner feel like home.

What truly sets this soup apart is its incredible versatility—you can easily tweak the cheese or switch up the milk for a lighter option without sacrificing the creamy goodness. Designed to satisfy even the pickiest eaters, this soup is perfect for cozy family dinners or intimate gatherings with friends. So, whether you’re looking for a quick weeknight meal or a comforting dish to share, this Cheddar Broccoli Potato Soup is about to become your new favorite!

Why is Cheddar Broccoli Potato Soup so special?

Comforting Warmth: This Cheddar Broccoli Potato Soup is a hug in a bowl, keeping you cozy during chilly evenings.
Satisfying All Ages: Its creamy texture and cheesy flavor make it a hit with kids and adults alike.
Flexible Ingredients: Easily modify it—even simple swaps like different cheeses or milk alternatives can tailor it to your taste.
Quick & Easy: With simple steps, you can whip up a comforting dish in no time, perfect for busy weeknights.
Nourishing and Flavorful: Packed with nutrients from broccoli and heartiness from potatoes, you’ll feel good about every bite. For an even more comforting experience, pair it with a side of Creamy Potato Soup for a delightful savoring session!

Cheddar Broccoli Potato Soup Ingredients

For the Soup Base
• Butter – adds richness and helps sauté vegetables.
• Chopped Carrots – provides sweetness and vibrant color.
• Chopped Celery – adds a savory flavor foundation.
• Chopped Yellow Onion – contributes essential flavor depth.
• Garlic – enhances the savory experience.
• Low-sodium Chicken Broth – forms the flavorful heart of the soup.
• Peeled and Cubed Russet Potatoes – adds substance and makes it hearty.
• Chopped Broccoli Florets – delivers nutrition and lovely texture.
• Dried Thyme – infuses a gentle herbal note.
• Salt and Freshly Ground Black Pepper – essential for seasoning.

To Thicken and Creamify
• All-purpose Flour – thickens the soup perfectly; a crucial step!
• Milk – brings creaminess; use lower-fat options if desired.
• Heavy Cream – adds significant richness for that dreamy texture.

For the Cheese Lovers
• Shredded Sharp Cheddar Cheese – imparts that iconic cheesy flavor.
• Finely Shredded Parmesan Cheese – adds an extra layer of cheesiness.

Full measurements are in the recipe card below.

How to Make Cheddar Broccoli Potato Soup

  1. Melt Butter: In a large pot, melt 3 tablespoons of butter over medium heat. Add chopped carrots, celery, and onion, sautéing until softened, about 5-7 minutes. The kitchen will start to smell delightful!

  2. Add Garlic: Stir in the minced garlic and cook for 1 additional minute until fragrant, being careful not to let it brown. This step adds a wonderful savory note to your soup.

  3. Simmer Broth and Potatoes: Pour in the low-sodium chicken broth and add the peeled, cubed potatoes. Bring to a gentle simmer and let it cook for about 15-20 minutes, until the potatoes are tender.

  4. Incorporate Broccoli: Add the chopped broccoli florets and dried thyme, cooking for another 5 minutes, or until the broccoli is vibrant green and tender. This will enhance the soup’s color and nutrition!

  5. Make the Roux: In a separate pan, whisk the remaining 2 1/2 tablespoons of butter with the flour over medium heat. Cook until bubbly and golden, about 1-2 minutes. This thickening agent is essential for creaminess.

  6. Create the Cream Base: Gradually whisk in the milk to the roux until smooth and thickened, about 3-4 minutes. Stir in the heavy cream and remove from heat.

  7. Combine and Melt: Pour the cream mixture into the soup pot, stirring until everything is well combined and heated through.

  8. Melt the Cheeses: Add the shredded cheddar and parmesan cheese, stirring until melted and creamy. You’ll love how it transforms the soup into pure comfort!

Optional: For an extra pop of flavor, sprinkle with fresh chives before serving.

Exact quantities are listed in the recipe card below.

Cheddar Broccoli Potato Soup Variations

Feel free to play around with these suggestions to make your soup truly yours!

  • Corn Addition: Fold in fresh corn off the cob for a sweet, crunchy texture that brightens every bite. It adds a delightful sweetness, making your soup even more comforting.

  • Cheese Adjustments: Modify the amount of cheese to suit your family’s taste; more cheese equals extra creaminess! Experimenting with different cheese ratios can lead to exciting new flavors.

  • Milk Swaps: Use almond, oat, or soy milk for a dairy-free option that still keeps the soup creamy. This change accommodates those with dietary restrictions without compromising taste.

  • Spicy Twist: Add a pinch of cayenne pepper or a dash of hot sauce for a warming kick. This fun twist can elevate the whole dish, making it perfect for spice lovers.

  • Herb Variations: Try fresh herbs like basil or parsley instead of thyme for a fresh, vibrant flavor. Fresh herbs bring another level of brightness to your Cheddar Broccoli Potato Soup.

  • Texture Additions: Toss in cooked bacon or croutons for a crunchy element that contrasts with the soup’s creaminess. This delightful contrast gives you both texture and richness in every spoonful.

  • Veggie Boost: Mix in some fresh spinach or kale to up the nutritional value while adding a pop of color. This swap makes your soup even heartier and packed with goodness.

  • Roasted Garlic Infusion: For richer flavor, roast the garlic before adding it to the soup. Roasting mellows out the garlic’s bite, creating a warmer, sweeter flavor that melds beautifully with the cheese.

What to Serve with Cheddar Broccoli Potato Soup?

Warm up your dining experience with delightful pairings that enhance this creamy comfort food.

  • Crusty Bread: Perfect for dipping, a warm, crusty baguette elevates the soup, soaking up every cheesy morsel.
  • Garden Salad: A fresh garden salad adds a crisp counterpoint, with vibrant greens providing a refreshing crunch to balance the richness.
  • Garlic Breadsticks: These warm, buttery delights bring a savory, aromatic touch, making this meal feel extra special and indulgent.
  • Grilled Cheese Sandwich: An all-time favorite, a melty grilled cheese brings nostalgia and a delightful crunch alongside your comforting soup.
  • Roasted Veggies: Roasted seasonal vegetables add earthy flavors and texture, enriching the meal while offering a nutritious addition.
  • Chardonnay: A chilled glass of Chardonnay complements the cheese wonderfully, its crispness cutting through the richness of the soup.
  • Crunchy Tortilla Chips: Serve these for a fun, casual lunch option, adding a crunchy texture that pairs nicely with the creamy soup.
  • Apple Crisp: End your meal on a sweet note with a warm apple crisp, balancing the savory flavors with a hint of sweetness.
  • Cornbread Muffins: Tender and slightly sweet, cornbread muffins pair beautifully, rounding out the meal with a comforting Southern flair.
  • Pineapple Smoothie: Refreshing and light, this fruity drink can provide a zesty kick, making the meal feel vibrant and lively.

How to Store and Freeze Cheddar Broccoli Potato Soup

• Fridge: Store your Cheddar Broccoli Potato Soup in an airtight container for up to 3 days. Allow it to cool completely before refrigerating to maintain its creamy texture.

• Freezer: For longer storage, freeze the soup in freezer-safe containers for up to 3 months. Ensure to leave some space for expansion, as the soup may thicken upon freezing.

• Reheating: When ready to enjoy, thaw the soup overnight in the fridge and reheat on the stove over medium-low heat, stirring frequently. Add a splash of milk or broth if it thickens too much.

• Avoid Repeated Refreezing: To maintain the best flavor and texture, avoid refreezing once thawed. Enjoy this comforting Cheddar Broccoli Potato Soup fresh!

Expert Tips for Cheddar Broccoli Potato Soup

• Cheese Quality Matters: Using high-quality sharp cheddar cheese enhances flavor. Don’t opt for pre-shredded cheese, as it often contains anti-caking agents that prevent melting.

• Cook Veggies Thoroughly: Ensure all vegetables are tender before adding cheese to achieve a smooth and creamy texture in your Cheddar Broccoli Potato Soup.

• Thickening Techniques: If you prefer a thicker soup, add more flour to the roux or let the soup simmer longer after incorporating the cream.

• Season Gradually: Taste and adjust seasoning towards the end of cooking. Adding salt at the beginning may lead to an overly salty soup.

• Experiment with Variations: Don’t hesitate to add fresh corn, spinach, or even bacon for a twist on your Cheddar Broccoli Potato Soup! Adjust these additions to fit your family’s taste.

Cheddar Broccoli Potato Soup Recipe FAQs

What is the secret ingredient in broccoli cheese soup?
Absolutely! While broccoli cheese soup is traditionally made with cheese and broccoli, a secret ingredient that many chefs love to use is a bit of mustard. It adds a wonderful depth of flavor without overpowering the dish. If you’re feeling adventurous, try adding a teaspoon of Dijon mustard to your Cheddar Broccoli Potato Soup for an extra twist!

Do you put potatoes in broccoli cheddar soup?
Very much so! Potatoes bring a delightful heartiness to the Cheddar Broccoli Potato Soup. They not only add substance but also enhance the creamy texture. So yes, including peeled and cubed russet potatoes is essential for creating that comforting, filling bowl of soup.

What are some storage methods for Cheddar Broccoli Potato Soup?
When storing your soup, place it in an airtight container, allowing it to cool completely first to maintain its creamy texture. In the refrigerator, it will last up to 3 days. For the freezer, transfer to freezer-safe containers, leaving some space for expansion, and it can be stored for up to 3 months. Always remember to label your containers with the date!

How do I reheat frozen Cheddar Broccoli Potato Soup without losing creaminess?
To reheat frozen Cheddar Broccoli Potato Soup effectively, first, thaw it overnight in the refrigerator. Once thawed, pour it into a saucepan and reheat over medium-low heat. Stir frequently, and if it seems too thick, add a splash of milk or chicken broth to bring it back to that creamy consistency. This method preserves the flavor and texture beautifully.

Why won’t my cheese melt in broccoli cheddar soup?
A common issue with melting cheese in soups is the use of pre-shredded cheese, which often contains anti-caking agents that hinder smooth melting. To ensure a beautifully creamy result, always use freshly shredded sharp cheddar cheese. This will melt beautifully into your Cheddar Broccoli Potato Soup and enhance the flavor perfectly!

What dietary considerations should I keep in mind for this soup?
For those with dietary restrictions, it’s important to consider allergies to dairy and gluten. You can easily make this soup gluten-free by substituting all-purpose flour with cornstarch or a gluten-free flour blend. For a dairy-free version, opt for plant-based milk and a vegan cheese alternative. Always check labels to ensure all ingredients align with your dietary needs.

[tasty-recipe id=”2266″]

Filed Under: Soups

Irresistibly Crunchy Fried Chicken Street Corn Tacos Recipe

June 29, 2025 by grace bellamy Leave a Comment

There’s something incredibly satisfying about biting into a taco that combines bold flavors and comforting textures. I remember the day I craved something beyond the typical weeknight dinner—a vibrant, street food-inspired meal that would tantalize my taste buds. Enter these Fried Chicken Street Corn Tacos! A crispy, golden taco filled with crunchy fried chicken, smoky bacon, and that heavenly creamy jalapeño-lime ranch sauce, all wrapped in a perfectly pan-fried tortilla. It’s a feast that brings both joy and nostalgia, reminding me of summer nights spent at food truck fiestas.

Not only is this recipe a flavor explosion, but it’s also deceptively easy to make, making it perfect for impressing friends or treating yourself after a long day. The secret? A simple marinade technique that ensures tender chicken with a delightfully crispy coating, paired with a refreshing street corn salad that adds sweetness to the mix. Whether it’s for taco Tuesday or simply to elevate your dinner game, these Fried Chicken Street Corn Tacos are bound to become a family favorite. So, roll up your sleeves and let’s dive into this delicious adventure!

Why are Fried Chicken Street Corn Tacos a must-try?

Flavors That Pop: The vibrant mix of fried chicken, bacon, and creamy jalapeño sauce creates a fiesta of flavors.

Quick & Easy: With simple steps, you can whip up these tacos in no time—perfect for busy weeknights!

Crowd-Pleasing: These tacos are sure to be a hit at gatherings, bringing smiles to everyone’s faces.

Ultimate Comfort: The combination of crispy textures and rich flavors makes every bite feel indulgent.

Versatile Ingredients: Swap out the chicken for store-bought tenders for a quicker option, or experiment with toppings based on your preferences.

You’ll love this recipe, especially on a taco night, where everyone can personalize their tacos! Try pairing it with a Street Corn Chicken Rice Bowl for an extra treat!

Fried Chicken Street Corn Tacos Ingredients

Get ready to create a flavor-packed taco night with these mouthwatering ingredients!

For the Chicken

  • Chicken Tenders – The main protein that provides juiciness and flavor.
  • Bacon – Adds a smoky, salty crunch to elevate your tacos.
  • Pickle Juice – Use this to marinate the chicken for a tangy kick and tender texture.
  • Buttermilk – Ensures the chicken stays moist and helps the coating stick.
  • All-Purpose Flour – Forms the crispy coating for the chicken.
  • Cornstarch – Mix this in for an extra crispy texture.
  • Garlic Powder – Enhances the overall flavor of the chicken coating.
  • Paprika – Adds a beautiful color and depth of flavor.
  • Salt – Essential for bringing out the flavors.
  • Onion Powder – Another layer of flavor for the chicken.
  • Black Pepper – A great seasoning that complements the other spices.
  • Cayenne Powder – Use this for a hint of heat.
  • Hot Sauce – Incorporate this into the coating for added flavor.
  • Peanut Oil/Vegetable Oil – For frying the chicken until golden brown.

For the Tacos

  • Flour Tortillas – The perfect vessel to hold all the delicious fillings.
  • Street Corn Salad – Adds a sweet crunch that pairs wonderfully with the fried chicken.
  • Chuy’s Creamy Jalapeno Copycat Sauce – A tangy, creamy sauce that takes these tacos over the top.
  • Lime Wedges – Serve these on the side for a burst of fresh citrus flavor.

Full measurements are in the recipe card below.

How to Make Fried Chicken Street Corn Tacos

  1. Marinate Chicken: Submerge the chicken tenders in a mix of pickle juice and buttermilk. Let them soak for at least 2 hours or overnight for the best flavor and tenderness.

  2. Prepare Flour Mixture: In a large bowl, combine the all-purpose flour, cornstarch, garlic powder, paprika, salt, onion powder, black pepper, cayenne powder, and some hot sauce. This will create a flavorful coating for your chicken.

  3. Prepare Wet Mixture: In a separate bowl, mix together more buttermilk and hot sauce. This will keep your coating moist and delicious.

  4. Fry Chicken: Dip each marinated chicken tender first into the flour mixture, then into the buttermilk/hot sauce mix, and back into the flour mixture. Fry in hot oil at 350°F until golden brown, about 5-7 minutes, until the internal temperature reaches 165°F.

  5. Pan-fry Tortillas: In a skillet, heat a splash of neutral oil on medium heat. Fry each flour tortilla until golden brown and pliable, about 30 seconds per side.

  6. Assemble Tacos: Warm up the tortillas and fill them with crispy fried chicken, a generous scoop of street corn salad, and drizzle with creamy jalapeño sauce. Serve with lime wedges on the side for a fresh kick.

Optional: Garnish with chopped cilantro for extra freshness.

Exact quantities are listed in the recipe card below.

Expert Tips for Fried Chicken Street Corn Tacos

  • Marination Magic: Allow the chicken to marinate overnight if possible. This enhances flavor and tenderness, resulting in juicy fried chicken.

  • Double-Dip Delight: For extra crunch, consider a double-dip in the wet and dry mixtures before frying. This yields a thicker, crispier coating for your tacos.

  • Temperature Check: Use a thermometer to ensure your oil is at 350°F before frying. This prevents greasy chicken while ensuring a golden, crispy texture.

  • Skillet Secret: When pan-frying tortillas, don’t skip this step! It adds an essential layer of flavor and prevents them from tearing when filled.

  • Avoid Crowding: Fry chicken in small batches to keep the oil temperature steady. Crowding the pan can lead to soggy chicken instead of the crunchy goodness you desire.

  • Sauce it Right: Drizzle or dollop on the creamy jalapeño sauce just before serving to keep the tacos fresh and flavorful. Enjoy crafting these Fried Chicken Street Corn Tacos!

What to Serve with Fried Chicken Street Corn Tacos?

These tacos are a festive centerpiece, bursting with flavor and perfect for a delicious meal that’ll leave your guests asking for more!

  • Zesty Lime Rice: This bright side dish adds a refreshing touch that complements the rich flavors of the tacos beautifully.
  • Spicy Black Beans: Their earthy depth and creamy texture balance the crispiness of the chicken and corn, adding a satisfying bite.
  • Tangy Coleslaw: A crunchy, tangy coleslaw enhances the taco experience, making each bite feel vibrant and lively.
  • Guacamole: Creamy and rich, this avocado delight provides a smooth contrast against the crispy chicken, elevating every taco.
  • Corn Salsa: This colorful mix of sweet corn, diced tomatoes, and zesty lime pairs perfectly, echoing the street corn salad in your tacos.
  • Watermelon Salad: A refreshing cut of sweetness with a hint of mint offers a light, palate-cleansing side to round out your meal.
  • Margaritas: A classic pairing, these citrusy cocktails add a festive flair, helping to cool down the heat from the jalapeño sauce.
  • Churros: For dessert, these sugary, crunchy treats are a sweet finish to your taco night, making it utterly unforgettable!

How to Store and Freeze Fried Chicken Street Corn Tacos

Fridge: Store leftover tacos in an airtight container for up to 3 days. Keep the components separate if possible to maintain crispiness.

Freezer: For longer storage, wrap individual fried chicken tacos tightly in foil and place them in a freezer bag. They can be frozen for up to 2 months.

Reheating: To reheat, thaw overnight in the fridge, then bake at 350°F for about 10-15 minutes to ensure the chicken stays crispy.

Assemble Fresh: When ready to eat, consider adding fresh street corn salad and creamy jalapeño sauce just before serving for the best flavor experience.

Fried Chicken Street Corn Tacos Variations

Feel free to shake things up with these tasty twists and substitutions that will make your tacos even more exciting!

  • Gluten-Free: Substitute regular tortillas with gluten-free tortillas and use a gluten-free flour blend for coating to maintain that crunch.
  • Spicy Kick: Add diced jalapeños to the street corn salad or opt for spicier hot sauce for a bolder flavor. Spice-lovers will appreciate the extra heat!
  • Vegetarian: Swap chicken for fried eggplant or cauliflower bites seasoned with similar spices, keeping the fried flavor profile intact. It’s a delightful vegetarian twist!
  • Quesadilla Style: Make quesadillas instead by placing chicken, street corn salad, and creamy sauce in tortillas, grilling until golden. Perfect for a quick meal!
  • Crispy Tofu: For a plant-based option, marinate and fry tofu in the same flavorful coating for a fantastic taco alternative that’s full of texture.
  • Smoky Flavor: Infuse smoked paprika or chipotle powder into the coating mix to add a new level of smokiness that beautifully complements the bacon.
  • Loaded Tacos: Pile on toppings like avocado slices, fresh cilantro, or crumbled queso fresco for an extra layer of flavor and visual appeal.
  • Salsa Verde: Swap out the creamy sauce for salsa verde to add a fresh, tangy component that brings a different vibe altogether. Fresh and zesty!

Fried Chicken Street Corn Tacos Recipe FAQs

What type of chicken is best for these tacos?
Using chicken tenders is ideal as they cook quickly and remain tender. If you’re short on time, you can also use store-bought chicken tenders for a convenient option. They’ll still give you that crispy deliciousness!

How do I store leftover Fried Chicken Street Corn Tacos?
For best results, store the components separately: the fried chicken, tortillas, and street corn salad in airtight containers. This approach keeps everything fresh and allows the taco ingredients to maintain their textures. They should be consumed within 3 days for the best taste.

Can I freeze Fried Chicken Street Corn Tacos?
Absolutely! To freeze, wrap each taco tightly in foil and place them in a freezer-safe zip-top bag. They can be stored for up to 2 months. When ready to enjoy, thaw in the refrigerator overnight and reheat in the oven at 350°F for 10-15 minutes to maintain that crispy goodness.

What should I do if my chicken coating isn’t crispy?
If your chicken coating turns out soggy, it could be due to overcrowding the frying pan or the oil not being hot enough. Always maintain oil temperature at 350°F and fry in small batches. For extra crunch, consider a double-dip in the flour mixture before frying!

Can I modify the recipe for dietary restrictions?
Of course! For gluten-free options, substitute regular flour with a gluten-free flour blend. If you’re cooking for someone with egg allergies, you can simply omit the hot sauce used in the wet mixture. Always check any pre-made ingredients, like sauces, for allergens.

How can I ensure my fried chicken is tender?
To achieve perfectly tender fried chicken, marinate it in a mixture of pickle juice and buttermilk for at least 2 hours, or overnight if you can. This technique not only adds flavor but also helps to tenderize the chicken for a melt-in-your-mouth texture!

[tasty-recipe id=”2216″]

Filed Under: Sandwiches

Irresistibly Soft Christmas Sugar Cookie Bars You’ll Love

June 27, 2025 by grace bellamy Leave a Comment

As the holiday season unfolds and twinkling lights adorn our homes, I can’t help but think of the sweet moments that fill the air—like the delightful aroma of warm, freshly baked Christmas Sugar Cookie Bars wafting from the kitchen. These bars have become a cherished tradition in my home, blending the festive spirit with the comfort of homemade treats. With their soft, chewy texture and creamy frosting, they are a crowd-pleaser that never fails to bring smiles to family gatherings and holiday parties.

You might be surprised at how easy they are to whip up, making them perfect for even the busiest of holiday schedules. Whether you’re hosting a get-together or simply craving a cozy, sweet indulgence, this recipe transforms simple ingredients into something truly magical. So, roll up your sleeves, grab those festive sprinkles, and let’s spread some holiday cheer with these irresistible Christmas Sugar Cookie Bars!

Why are Christmas Sugar Cookie Bars a must-try?

Festive and Fun: These Christmas Sugar Cookie Bars bring a burst of holiday cheer with their vibrant sprinkles and creamy frosting—a delightful treat for any festive gathering.
Quick and Easy: No elaborate techniques are required! With only a few simple steps, you can have these tasty bars ready in no time.
Soft Texture: Expect an irresistible soft and chewy bite that melts in your mouth, making them the perfect indulgence for all ages.
Versatile Occasions: Customize with different sprinkles to fit any holiday or celebration! Check out the joy of chocolate chip cookie bars for another delicious option.
Crowd-Pleaser: With their delightful sweetness, they’re guaranteed to be a hit at your holiday parties, creating joyous memories with every bite.

Christmas Sugar Cookie Bars Ingredients

Get ready to bake something delicious!

For the Sugar Cookie Bars

  • Salted Butter – Softened well, provides flavor and structure. Note: Ensure butter is softened, not melted.
  • Sugar – Sweetness and a lovely texture.
  • Large Egg – Binds the ingredients together beautifully.
  • Vanilla Extract – Adds a warm, delightful flavor.
  • All-Purpose Flour – Essential for structure. Note: Avoid overmeasuring flour; use the spoon and level method.
  • Baking Powder – Acts as the leavening agent to make them fluffy.
  • Festive Sprinkles – Adds a pop of color and fun visuals.

For the Frosting

  • Powdered Sugar – The primary sweetener, giving the frosting its delightful sweetness.
  • Salted Butter – Softened, this adds creaminess and flavor to the frosting.
  • Cream Cheese – Adds a tangy twist and creaminess to the frosting.
  • Vanilla Extract – Enhances the overall flavor of the frosting.
  • Milk – Adjusts the frosting consistency for smooth spreading.
  • Additional Sprinkles – For garnishing and added appeal.

You’ll find the full measurements in the recipe card below.

How to Make Christmas Sugar Cookie Bars

  1. Preheat Oven: Start by preheating your oven to 350°F (175°C). This ensures your Christmas Sugar Cookie Bars bake evenly and come out perfectly!
  2. Prepare the Pan: Line a 9×9 inch baking pan with parchment paper to prevent sticking and make cleanup a breeze.
  3. Cream Butter and Sugar: In a mixing bowl, cream the softened butter and sugar together until fluffy and light in color. This usually takes about 2-3 minutes.
  4. Add Wet Ingredients: Beat in the large egg and vanilla extract, mixing well until combined and smooth. This adds a delicious, warm flavor to your bars.
  5. Mix Dry Ingredients: Gradually add the all-purpose flour and baking powder to the wet mixture, stirring until a thick dough forms. Be careful not to overmix!
  6. Fold in Sprinkles: Gently mix in the festive sprinkles, allowing them to fold into the dough without breaking.
  7. Spread and Bake: Spread the batter evenly into the prepared pan. Bake for 20 minutes or until the edges are golden brown, and a toothpick comes out clean from the center.
  8. Cool Completely: Let the bars cool completely in the pan before frosting to ensure a smooth finish.
  9. Prepare the Frosting: In a new bowl, blend powdered sugar, softened butter, cream cheese, vanilla extract, and milk until smooth. Adjust with more milk if necessary for the perfect consistency.
  10. Frost and Decorate: Once the bars are cool, spread the frosting generously on top and feel free to add additional sprinkles for that festive touch.
  11. Cut and Serve: Slice the bars into squares, and they’re ready to be enjoyed! You can serve them right away or let the frosting set for a firmer texture.

Optional: Serve with a warm mug of cocoa for a cozy holiday treat!
Exact quantities are listed in the recipe card below.

Christmas Sugar Cookie Bars Variations

Customize your delicious cookies bars and surprise your loved ones with unique twists!

  • Gluten-Free: Substitute all-purpose flour with a 1:1 gluten-free blend to cater to gluten sensitivities without sacrificing flavor.
  • Choco-Chip Delight: Elevate with a sprinkle of chocolate chips in the dough for an irresistibly gooey contrast to the sugar base. The sweetest fusion of flavors awaits!
  • Nutty Crunch: Add chopped nuts like pecans or walnuts for extra texture and a nutty boost that complements the sweetness. You’ll love the delightful crunch!
  • Holiday Spice: Incorporate a teaspoon of cinnamon or nutmeg for a warm, spicy twist that will envelop your kitchen in cozy, festive aromas.
  • Cream Cheese Fun: Swap half the powdered sugar in the frosting with sweetened cream cheese for a richer, tangy flavor that enhances the overall experience.
  • Minty Fresh: Blend in a few drops of peppermint extract into the frosting for a refreshing seasonal flavor that will transport you to holiday bliss.
  • Fruit Infusion: Fold in finely chopped dried cranberries or cherries into the dough to add tangy bursts of flavor and a splash of color to your bars.
  • Colorful Layers: Divide the batter into sections and color each with food dye for vibrant, rainbow layers before baking—a lovely surprise when served!

What to Serve with Christmas Sugar Cookie Bars?

The holiday cheer of Christmas Sugar Cookie Bars deserves companions that harmonize with their sweet and festive flavor.

  • Warm Milk: A classic pairing that enhances the sweetness of the bars, soothing your taste buds while providing a comforting experience.
  • Hot Cocoa: Rich, velvety hot cocoa topped with marshmallows adds a deliciously indulgent touch, perfect for cozy gatherings by the fire.
  • Fruit Salad: A refreshing mix of seasonal fruits balances the sweetness of the bars, providing a lighter option that adds color to your dessert table.
  • Coffee: Brewed coffee, especially flavored varieties, creates a delightful contrast to the sweetness, making each bite even more enjoyable.
  • Mini Cheesecakes: These creamy, rich desserts complement the soft texture of the cookie bars and elevate your holiday spread impressively.
  • Holiday Punch: A festive, fruity punch brings a splash of color and fun, making every gathering feel extra special while harmonizing with the flavors.
  • Nutmeg Cookies: Spiced nutmeg cookies echo the warmth of holiday flavors, making for a delightful dessert pairing that brings joy with every bite.
  • Peppermint Bark: The cool, refreshing crunch of peppermint bark beautifully complements the sweetness, adding a festive twist to your dessert selection.
  • Ice Cream: A scoop of vanilla or peppermint ice cream creates a delightful contrast of temperature, adding creaminess that pairs perfectly with the bars.
CHRISTMAS SUGAR COOKIE BARS

CHRISTMAS SUGAR COOKIE BARS

Expert Tips for Christmas Sugar Cookie Bars

• Perfect Butter Temperature: Use softened butter (not melted) for the best texture and flavor in your Christmas Sugar Cookie Bars.

• Avoid Overmixing: Mix until just combined when adding flour—overmixing can lead to tough bars.

• Correct Measuring: Use the spoon and level method to measure flour accurately, preventing crumbly dough.

• Adjust Baking Time: Keep an eye on your bars while baking; ovens vary, and the perfect bake may differ slightly.

• Frost When Cool: Make sure the bars are completely cool before frosting to prevent melting and sliding.

How to Store and Freeze Christmas Sugar Cookie Bars

Room Temperature: These Christmas Sugar Cookie Bars can be stored at room temperature for up to 3 days in an airtight container to maintain their freshness.

Fridge: For longer storage, refrigerate the bars in an airtight container for up to 1 week. This helps preserve their soft texture and flavor.

Freezer: Freeze the cookie bars, either frosted or unfrosted, by wrapping them tightly in plastic wrap and placing them in a freezer-safe container. They can be stored for up to 3 months.

Reheating: When ready to enjoy frozen bars, thaw them overnight in the fridge. For a warm treat, microwave them for about 10-15 seconds before serving.

Christmas Sugar Cookie Bars Recipe FAQs

What kind of butter should I use for the sugar cookie bars?
Use salted butter that is softened well, not melted. This helps provide the perfect flavor and structure for your Christmas Sugar Cookie Bars.

How should I store the sugar cookie bars, and how long do they last?
You can store these bars at room temperature for up to 3 days in an airtight container. For longer storage, refrigerate them for up to 1 week. Make sure they’re kept in an airtight container to maintain their divine softness!

Can I freeze the Christmas Sugar Cookie Bars?
Absolutely! You can freeze the bars with or without frosting. Wrap them tightly in plastic wrap and place them in a freezer-safe container for up to 3 months. When you’re ready to enjoy them, just thaw overnight in the fridge. For that fresh-baked taste, pop them in the microwave for about 10-15 seconds to warm them up.

What if my sugar cookie dough is too crumbly?
No worries! If your dough is too crumbly, simply add milk a tablespoon at a time until it reaches the desired consistency. This should make it easier to spread into your baking pan. Keep mixing gently to avoid overworking the dough.

Can I customize the sprinkles used in the recipe?
Very much! You can vary the sprinkles based on the festive occasion. For instance, use heart-shaped sprinkles for Valentine’s Day or red, white, and blue sprinkles for Independence Day. Feel free to let your creativity shine through!

Are there any allergy considerations with these sugar cookie bars?
Yes! Since the recipe contains gluten (from all-purpose flour), dairy (in butter and cream cheese), and eggs, it’s not suitable for those with allergies to these ingredients. If you need alternatives, consider using gluten-free flour and dairy substitutes for the frosting!

[tasty-recipe id=”2177″]

Filed Under: Dessert

Deliciously Easy Green Velvet Cake with Cream Cheese Frosting

June 27, 2025 by grace bellamy Leave a Comment

There’s something undeniably cheerful about the vibrant hue of a Green Velvet Cake—it instantly lifts the mood of any gathering. As the festive seasons roll around, this delightful dessert practically begs to take center stage at your table. Imagine a soft, fluffy cake layered with rich cream cheese frosting, just waiting to be sliced and shared. It’s the sort of treat that not only pleases the palate but also ignites joyous conversations among friends and family.

I first made this cake for a St. Patrick’s Day celebration, and it quickly became my go-to for many occasions, from Christmas to casual get-togethers. The subtle hint of cocoa adds a delightful depth, while the playful green color makes it perfect for any festive celebration. Best of all, it’s surprisingly easy to whip together. So, whether you’re a seasoned baker or just looking to switch things up from the usual dessert routine, get ready to impress with this Easy & Festive Green Velvet Cake!

Why is Green Velvet Cake a must-try?

Festive Fun: This vibrant cake isn’t just visually stunning; it brightens up any celebration, whether it’s St. Patrick’s Day or Christmas.
Simple Steps: With straightforward instructions, it’s accessible for bakers of all skill levels, ensuring a win for you every time.
Decadent Flavor: The rich cream cheese frosting paired with the subtly flavored cake creates a deliciously unique treat.
Versatile: Adapt the recipe for cupcakes or other colors to suit your theme or mood, making it a true crowd-pleaser.
Connection: Sharing this cake fosters joyful moments with friends and family, sparking delightful conversations around the table.
Storage Made Easy: Leftovers (if there are any!) can be stored effortlessly in the fridge or freezer, so you can enjoy this treat for days! Consider pairing it with German Pancakes for a delightful brunch option!

Green Velvet Cake Ingredients

• Discover the magic behind our Green Velvet Cake with this simple ingredient list!

For the Cake
• All-purpose flour – the base that holds everything together.
• Cocoa powder – offers a subtle chocolate flavor and contributes to the velvet texture; opt for high-quality for the best results.
• Baking soda – acts as a leavening agent to help the cake rise perfectly.
• Salt – elevates the overall flavor profile of the cake.
• Granulated sugar – sweetens and adds moisture to the cake.
• Vegetable oil – ensures the cake stays moist and tender.
• Eggs – create structure while adding richness.
• Vanilla extract – a flavor enhancer that complements all the ingredients.
• White vinegar – reacts with the baking soda to create the perfect rise.
• Buttermilk – provides moisture, tang, and tenderness; can be substituted with whole milk mixed with vinegar or lemon juice.
• Green food coloring – gives our cake its joyful signature color; liquid food coloring yields a more vibrant shade.

For the Cream Cheese Frosting
• Unsalted butter – contributes a rich, creamy texture; ensure it’s at room temperature for easy mixing.
• Cream cheese – the star ingredient of the frosting, also at room temperature for a smooth blend.
• Powdered sugar – sweetens the frosting; sifting prevents lumps for a silky texture.
• Milk or heavy cream – adjust the consistency of the frosting as needed.
• Green sprinkles (optional) – for an extra dash of festive flair!

You can find the full measurements in the recipe card below.

How to Make Green Velvet Cake

  1. Prepare the Cake Batter: In a mixing bowl, whisk together the all-purpose flour, cocoa powder, baking soda, and salt. In a separate bowl, blend the granulated sugar, vegetable oil, eggs, vanilla extract, buttermilk, white vinegar, and green food coloring until smooth. Gradually combine the dry ingredients with the wet, mixing gently until just incorporated.
  2. Bake the Cake: Preheat your oven to 350°F (175°C). Grease and flour your cake pans. Pour the prepared batter evenly into the pans and bake for 25-30 minutes, or until a toothpick inserted in the center comes out clean. Allow the cakes to cool in the pans for about 10 minutes before transferring them to wire racks.
  3. Make the Cream Cheese Frosting: In a mixing bowl, beat the softened unsalted butter and cream cheese together until smooth and creamy. Gradually add the sifted powdered sugar and mix well. If desired, add milk or heavy cream to achieve your preferred frosting consistency.
  4. Assemble the Cake: Once the cake layers have completely cooled, place one layer on a serving plate. Spread a generous layer of cream cheese frosting on top. Carefully place the second layer on top and frost the entire cake for a beautiful finish.
  5. Decorate: Sprinkle green sprinkles atop the frosted cake for an added festive touch. For a professional finish, use a cake turntable to help you frost evenly.

Optional: Add a few fresh mint leaves for a pop of color and freshness.
Exact quantities are listed in the recipe card below

Green Velvet Cake

Green Velvet Cake

Storage Tips for Green Velvet Cake

Room Temperature: Store uneaten cake covered at room temperature for about 1 day if you prefer it fresh and soft.

Fridge: Keep the cake in the refrigerator, tightly covered, for up to 3 days to enjoy the rich flavors without compromising quality.

Freezer: For longer storage, wrap the cake tightly in plastic wrap and freeze for up to 2 months; this will preserve its moisture and taste.

Reheating: Thaw slices in the fridge overnight or microwave them unwrapped until thawed for a deliciously soft treat anytime!

Green Velvet Cake Variations & Substitutions

Feel free to take this classic Green Velvet Cake and make it your own with delightful twists!

  • Cupcake Version: Transform the cake into cupcakes for easy individual servings. Bake for about 18-20 minutes.
  • Blue Velvet: Swap out the green food coloring for blue to create a stunning blue velvet cake that’s perfect for themed parties.
  • Pink Velvet: Change things up by using pink food coloring for a lovely pink velvet version that’s sweet and eye-catching.
  • Coconut Velvet: Add unsweetened shredded coconut to the batter for a tropical twist. The coconut flavor beautifully complements the cream cheese frosting.
  • Pineapple Velvet: Incorporate crushed pineapple into the batter for a fruity flavor explosion that’s refreshing and fun.
  • Gluten-Free: Substitute all-purpose flour with a gluten-free blend for a deliciously inclusive option that everyone can enjoy.
  • Lemon Zest: Add a teaspoon of lemon zest to the cream cheese frosting for a bright, citrusy flavor that enhances the richness of the cake.
  • Spicy Kick: Mix in a pinch of cayenne or cinnamon for a surprising, slightly spicy undertone that will elevate the flavor profile.

Expert Tips for Green Velvet Cake

• Choose Quality Ingredients: Select high-quality cocoa powder and food coloring to enhance the cake’s flavor and vibrant color.

• Avoid Overmixing: When combining wet and dry ingredients, mix just until incorporated to ensure a light, fluffy texture for your Green Velvet Cake.

• Check for Doneness: Use a toothpick to test the cake during baking; insert it into the center, and if it comes out clean, your cake is ready.

• Room Temperature Ingredients: Ensure your cream cheese and butter are at room temperature for smooth frosting that spreads easily.

• Enhance Flavor: If you prefer a deeper taste, consider adjusting the cocoa or vanilla flavors to make your cake even more delightful.

• Proper Storage: Store leftovers in an airtight container at room temperature for a day or in the refrigerator for up to three days to maintain freshness.

What to Serve with Green Velvet Cake?

Delight in creating a memorable meal around this vibrant cake, perfect for any celebration or festive gathering.

  • Rich Vanilla Ice Cream: A scoop of creamy vanilla ice cream balances the cake’s sweetness and adds a lovely temperature contrast.
  • Fresh Berries: Juicy strawberries or raspberries provide a pop of color and a tangy flavor that complements the rich frosting beautifully.
  • Mint Tea: A warm cup of mint tea refreshes the palate and enhances the cake’s unique flavors, making every bite feel light and delightful.
  • Chocolate Drizzle: A drizzle of chocolate sauce elevates the cake’s decadence, adding a silky texture that pairs delightfully with the creaminess of the frosting.

Adding these elements creates a feast that appeals to both the eyes and the taste buds. Pairing your Green Velvet Cake with a variety of textures and flavors will make your dessert table an unforgettable experience!

  • Buttercream Cookies: Soft, sweet cookies provide a fun, nostalgic element that will delight guests, especially kids, while balancing out the cake’s richness.
  • Coffee: A bold cup of coffee adds a depth that offsets the sweetness, making it the perfect companion for an afternoon treat or after-dinner dessert.
  • Lemonade: Bright, refreshing lemonade can cleanse the palate and offers a zesty twist that harmonizes with the cake’s vibrant green color.
  • Mini Cheesecakes: These elegant desserts can provide contrasting textures with a creamy richness that enhances the overall dessert experience.

Green Velvet Cake Recipe FAQs

What flavor is green velvet?
Green Velvet Cake is a subtle blend of cocoa and vanilla flavors, offering a rich yet not overpowering taste. The cocoa powder adds a depth that harmonizes beautifully with the sweetness of the cake, making it a delightful treat both visually and in flavor.

Can I make a red velvet cake green?
Absolutely! You can easily modify a classic red velvet cake recipe by simply swapping out the red food coloring for green. Just make sure to keep the same base ingredients, including cocoa powder, to maintain the velvety texture.

Is there pink velvet cake?
Yes, pink velvet cake is a popular variation that offers a sweet, soft texture similar to both red and green velvet cakes. It’s created by using pink food coloring instead of red or green, and it often incorporates similar flavor profiles with a delightful twist!

How do I ensure my green velvet cake stays moist?
To keep your Green Velvet Cake moist, make sure to use vegetable oil (which enhances moisture) and buttermilk for tenderness. Store the cake wrapped in plastic wrap once cooled to prevent it from drying out, and you can also place it in an airtight container in the fridge for physical storage or freeze it for longer enjoyment.

Can I freeze my green velvet cake?
Certainly! To freeze your Green Velvet Cake, first, allow it to cool completely. Then, wrap individual slices tightly in plastic wrap, and place them in a freezer-safe bag or container. This method preserves freshness for up to 2 months. When you’re ready to enjoy, simply thaw the slices in the fridge overnight or microwave them unwrapped until thawed.

Are there any dietary considerations for this cake?
If you or your guests have dietary concerns, there are plenty of substitutions you can make. For a dairy-free version, use dairy-free cream cheese and almond or coconut milk in place of buttermilk. Additionally, to cater to vegans, substitute eggs with flaxseed meal mixed with water or a commercial egg replacer, and choose plant-based butter for the frosting.

[tasty-recipe id=”2160″]

Filed Under: Dessert

Crispy Potato Cheese Sticks: Your New Favorite Comfort Snack

June 25, 2025 by grace bellamy Leave a Comment

The first time I took a bite of these crispy potato cheese sticks, it felt like I was unearthing a secret treasure. Picture this: the tantalizing crunch as your teeth break through the golden crust, giving way to a fluffy, cheesy interior bursting with bold cheddar flavor. It’s everything you adore about fries, but with a twist that sends your taste buds into a delightful dance.

After a long week of fast food fatigue, I craved something homemade that was both fun to make and satisfying to eat. These potato cheese sticks turned out to be the perfect antidote. Not only are they easy to whip up in your own kitchen, but they’re also a crowd-pleasing appetizer that will have everyone asking for more. Whether you’re serving them at a gathering or just enjoying a cozy night in, they promise a taste experience that feels indulgent without the hassle.

Let’s dive into this fun recipe that combines the best of potatoes and cheese, transforming simple ingredients into an unforgettable snack!

Why will you love these Potato Cheese Sticks?

Crispiness, each bite reveals a delightful crunch. Cheesy goodness with every stick, packed with robust cheddar flavor! Easy to prepare, these sticks come together with simple ingredients, making them a breeze for any home cook. Versatile options allow for ingredient swaps, like using potato starch or vegan cheese. Perfect for gatherings or cozy nights, they’re basically guaranteed to impress your guests! Check out these quick beetroot and goats cheese quiches with crispy potato cups for another fun appetizer idea.

Potato Cheese Sticks Ingredients

For the Sticks
• Medium Yellow Potatoes – The main ingredient, providing a fluffy base for your sticks.
• Sharp Cheddar Cheese (shredded) – Adds a strong cheese flavor; consider extra sharp for an even bolder taste. Substitute with vegan cheese for a dairy-free option.
• Cornstarch – Helps bind the mixture and creates a crispy crust. You can swap this with potato starch if preferred.
• Vegetable Oil (or canola, peanut) – Essential for deep frying, ensuring a nice golden finish.
• Salt (1 tsp) – Enhances the flavor of the potatoes during boiling.

For Serving
• Ketchup – A classic accompaniment for delicious dipping fun!

All full measurements are in the recipe card below.

How to Make Potato Cheese Sticks

  1. Prepare Potatoes: Peel your medium yellow potatoes, chop them into small chunks, and boil them in salted water for about 15-20 minutes until they’re tender. The boiling time will ensure they’re soft and ready for mashing.

  2. Mash Potatoes: Once boiled, transfer the potatoes to a strainer, pushing them through to create a smooth, fluffy mash. You can also use a fork or a potato masher for this step—just ensure there are no lumps!

  3. Combine Ingredients: In a large mixing bowl, combine the mashed potatoes with shredded sharp cheddar cheese and cornstarch. Knead the mixture until it forms a cohesive dough; it should feel soft yet firm.

  4. Shape and Freeze Dough: Divide the dough into two halves. Flatten each half into sandwich bags and place them in the freezer for about 20 minutes. This helps firm up the dough for easier cutting.

  5. Cut and Re-freeze: Remove the dough from the freezer and cut it into strips about the thickness of your pinky finger. Place the cut strips back in the freezer for another 20 minutes to maintain their shape while frying.

  6. Fry: Heat your vegetable oil to 350°F (180°C). Fry the frozen potato strips in batches for 3-4 minutes until they turn golden brown and crispy. Make sure not to overcrowd the pan for even results!

  7. Serve: Once fried, transfer the potato cheese sticks to a wire rack to cool slightly. Serve them warm with a side of ketchup for dipping—your taste buds will thank you!

Optional: Try serving with a sprinkle of fresh herbs for added flavor!

Exact quantities are listed in the recipe card below.

Expert Tips for Potato Cheese Sticks

• Oil Temperature: Maintain the oil at 350°F (180°C) for perfect frying. If the oil is too cool, the sticks may absorb too much oil and become greasy.

• Freezing Technique: Don’t skip the freezing steps! Freezing the shaped dough twice helps keep the sticks intact, preventing them from falling apart during frying.

• Batch Cooking: Fry the potato cheese sticks in small batches. This ensures even cooking and prevents them from sticking together, giving you that desirable crispy texture.

• Cheese Choice: Use extra sharp cheddar for the richest flavor. If you’re opting for vegan cheese, ensure it melts well to maintain the deliciously cheesy interior you desire.

• Avoid Overmashing: While mashing the potatoes, be careful not to overdo it. Over-mashing can make them gummy. Aim for a fluffy consistency!

Potato Cheese Sticks Variations

Feel free to explore these delightful alternatives that will elevate your potato cheese sticks to new heights!

  • Vegan Cheese: Swap out cheddar for your favorite vegan cheese to cater to a dairy-free audience; ensure it melts beautifully!

  • Sweet Potato Twist: Use sweet potatoes instead of medium yellow potatoes for a sweeter flavor and vibrant color. They add a unique and delicious change to the recipe.

  • Spicy Kick: Add a pinch of cayenne pepper or crushed red pepper flakes into the cheese mixture for a mouthwatering kick that spice lovers will adore.

  • Herb Infusion: Mix in fresh herbs like chives or parsley into the dough for an aromatic lift. Their vibrant flavors will enhance the overall taste and aesthetic.

  • Crispy Coating: After cutting the strips, roll them in breadcrumbs before frying for an additional crunchy layer. This creates a satisfying texture contrast!

  • Cheese Blends: Blend different types of cheese, like mozzarella and gouda, with the cheddar for a more complex and rich flavor profile that will entice cheese enthusiasts.

  • Garlic Flavor: Add minced garlic or garlic powder to the potato mixture for a delightful savory twist. It pairs wonderfully with the cheesy goodness!

  • Baking Option: For a healthier twist, bake instead of fry! Coat the sticks lightly in oil and bake at 425°F (220°C) for 20-25 minutes, turning halfway through to achieve a crispy texture.

How to Store and Freeze Potato Cheese Sticks

Fridge: Store leftover potato cheese sticks in an airtight container for up to 3 days. This keeps them fresh while maintaining their delightful texture.

Freezer: For longer storage, freeze the sticks after frying them. Place in a single layer on a baking sheet until solid, then transfer to a resealable freezer bag for up to 3 months.

Reheating: When ready to enjoy, reheat the frozen potato cheese sticks in an oven at 400°F (200°C) for about 10-12 minutes until crispy again. This helps retain that original crunch!

Thawing: If you prefer to thaw them first, leave the sticks in the fridge overnight or soak them briefly in room temperature water before reheating.

What to Serve with Potato Cheese Sticks?

Elevate your snack game by pairing these crispy delights with complementary sides that enhance their flavor and texture.

  • Creamy Ranch Dip: A cool, zesty ranch dip adds a refreshing counterpoint to the cheesy warmth of the sticks.

  • Coleslaw: Crunchy, tangy coleslaw provides a refreshing contrast, balancing the richness of the cheese with its crisp vegetables.

  • Garlic Bread: Savory garlic bread adds a delightful crunch and bold flavors, creating a satisfying combo that enchants the palate.

  • Vegetable Platter: A colorful array of fresh veggies offers a crispy, healthy contrast, making for a delightful and balanced snack spread.

  • Spicy Aioli: A whipped spicy aioli sauce amps up the taste with creamy, garlicky goodness, providing an exciting kick that perfectly accompanies each bite.

  • Light Beer: A crisp light beer pairs wonderfully with the sticks, enhancing their crunch while balancing the richness of the cheddar flavor.

These pairing options create the perfect ambiance for any gathering or cozy night in, making your potato cheese sticks the star of the show!

Potato Cheese Sticks Recipe FAQs

How do I select the best medium yellow potatoes for this recipe?
Absolutely! Look for potatoes that are firm and have smooth skin, free of dark spots or blemishes. The ideal medium yellow potatoes should feel heavy for their size, indicating they’re fresh and full of moisture. If you find any potatoes with dark spots or greenish hues, it’s best to avoid those as they may taste bitter.

What is the best way to store leftover potato cheese sticks?
Very! To keep your potato cheese sticks fresh, place them in an airtight container in the fridge. They will stay yummy for up to 3 days. If you’re not planning to eat them within that timeframe, consider freezing them. After frying, let the sticks cool completely, then arrange them in a single layer on a baking sheet and freeze until solid before transferring to a resealable freezer bag. They’ll maintain their quality for up to 3 months!

Can I freeze the uncooked potato cheese sticks?
Yes, you can! After shaping the sticks, freeze them on a baking sheet until solid then transfer them to a resealable freezer bag. They can be stored in the freezer for up to 3 months. When you’re ready to fry them, there’s no need to thaw—just fry them straight from the freezer for about 4-5 minutes until golden brown!

What should I do if my potato cheese sticks are too soft after frying?
If you find your sticks are too soft, it might be due to not freezing them long enough before frying. Consider freezing them for an additional 10-15 minutes before frying. Also, ensure your oil is at the right temperature—350°F (180°C) is ideal. If the oil is too cool, the sticks will absorb more grease and lose their desired texture.

Are there any dietary considerations for pets or allergies?
Very good point! The ingredients in these potato cheese sticks are not suitable for pets, especially the cheese, which can be harmful to dogs. For allergies, always check if anyone has sensitivities to dairy or specific starches like cornstarch. If that’s the case, feel free to substitute with dairy-free cheese and potato starch. Always prioritize the health and well-being of your loved ones!

How can I reheat frozen potato cheese sticks to ensure they stay crispy?
To reheat your frozen potato cheese sticks, preheat your oven to 400°F (200°C). Place the sticks on a baking sheet and bake for 10-12 minutes. This method restores their original crispiness without making them soggy. Avoid using a microwave, as it tends to soften the texture!

[tasty-recipe id=”2092″]

Filed Under: Appetizer

Zesty Marinated Cucumbers, Onions, and Tomatoes Delight

June 23, 2025 by grace bellamy Leave a Comment

I still remember the lazy summer afternoons when my mom would whip up her famous Cucumber Tomato Salad. The kitchen would fill with the delightful sounds of chopping, and the air would be saturated with the fresh aroma of crisp vegetables. It was a simple dish but one that always brought our family together, especially when served alongside grilled meats at backyard barbecues or nestled next to picnic sandwiches during our weekend adventures.

Marinated Cucumbers, Onions, and Tomatoes (3)

This Refreshing Cucumber Tomato Salad is not just a recipe; it’s a nostalgic journey that captures the essence of summer. With its cool cucumbers, vibrant tomatoes, and the zingy bite of onions, this salad adds a refreshing twist to any meal. Best of all? It comes together in just 15 minutes and can easily be prepped ahead of time. Whether you’re looking for a quick side dish to complement a busy weeknight dinner or a light addition to your next outdoor gathering, this Marinated Cucumbers, Onions, and Tomatoes salad is sure to impress. Let’s dive into this easy and invigorating recipe that will undoubtedly become a family favorite!

Why love Marinated Cucumbers, Onions, and Tomatoes?

Nostalgic flavors: This salad evokes memories of carefree summer days.
Quick prep: Whip it up in just 15 minutes, perfect for busy schedules.
Make-ahead magic: Marinate and enjoy later—flavors deepen deliciously!
Versatile side: Complements everything from grilled burgers to picnic sandwiches.
Refreshing crunch: The cool cucumbers and juicy tomatoes deliver vibrant taste!
Discover how to enhance your summer picnics with this delightful twist on a timeless classic!

Ingredients for Marinated Cucumbers, Onions, and Tomatoes

For the Vinaigrette
• Water – Base for the sweet and tangy dressing.
• Distilled White Vinegar – Provides a tart kick; apple cider vinegar can be substituted for a different flavor.
• Vegetable Oil – Adds richness and helps emulsify the dressing.
• Sugar – Balances acidity for a harmonious taste.
• Salt – Enhances flavors; add to your personal preference.
• Freshly Ground Black Pepper – Adds depth; adjust according to taste.

For the Salad
• Cucumbers (3) – Provide a cool, crisp base; peel and slice into 1/4-inch thick rounds.
• Tomatoes (3) – Offer juicy freshness; cut into wedges for easy eating.
• Onion (1) – Introduces a savory element; slice thinly and separate into rings. Sweet onions like Vidalia create a delightful flavor contrast.

Full measurements are in the recipe card below.

How to Make Marinated Cucumbers, Onions, and Tomatoes

  1. Whisk the Vinaigrette: In a large bowl, combine water, distilled white vinegar, vegetable oil, sugar, salt, and freshly ground black pepper. Whisk until the mixture is smooth and well-blended, about 1-2 minutes.

  2. Add the Vegetables: Gently fold in the sliced cucumbers, tomatoes, and onion into the vinaigrette. Make sure all the vegetables are evenly coated with the dressing.

  3. Marinate the Salad: Cover the bowl with plastic wrap and refrigerate for at least 2 hours. This step is crucial as it allows the flavors to meld beautifully!

  4. Serve and Enjoy: After marination, give the salad a quick stir before serving. It pairs wonderfully with grilled meats or as a refreshing side at picnics.

Optional: Garnish with fresh herbs like dill or parsley for an extra flavor boost.

Exact quantities are listed in the recipe card below.

Marinated Cucumbers, Onions, and Tomatoes (3)

Variations & Substitutions for Marinated Cucumbers, Onions, and Tomatoes

Feel free to explore these exciting twists to make this salad your own!

  • Sweet Onion: Swap regular onion for Vidalia for a milder, sweeter flavor that complements the salad beautifully.

  • Apple Cider Vinegar: Use apple cider vinegar instead of white vinegar for a fruity, tangy twist that adds depth.

  • Add Herbs: Toss in fresh herbs like dill or basil to elevate the freshness and add aromatic notes.

  • Spicy Kick: Mix in a pinch of red pepper flakes or sliced jalapeños for a zesty heat that enlivens every bite.

  • Add Avocado: Fold in diced avocado just before serving for a creamy texture and healthy fat boost that enhances richness.

  • Vegetable Medley: Include bell peppers or radishes for a colorful crunch and additional nutrients, making your salad even more refreshing.

  • Quinoa Boost: Mix in cooked quinoa for added protein and texture, turning the salad into a more filling dish.

  • Citrus Zing: Squeeze in fresh lemon or lime juice to brighten up the vinaigrette and add a zesty layer of flavor.

Experiment freely with these variations to create a uniquely delicious version of your Marinated Cucumbers, Onions, and Tomatoes!

What to Serve with Marinated Cucumbers, Onions, and Tomatoes?

This vibrant salad brings a refreshing crunch that perfectly complements a variety of dishes for your summer gatherings.

  • Grilled Chicken: Tender, smoky grilled chicken pairs beautifully with the tangy freshness of the salad, creating a balanced plate.

  • BBQ Ribs: Slathered in BBQ sauce, these ribs benefit from the crispness of the salad, cutting through the rich flavors and adding a light touch.

  • Pasta Salad: A creamy pasta salad offers richness that contrasts delightfully with the bright, zesty marinated cucumbers, onions, and tomatoes.

  • Vegan Tacos: The salad can serve as a crunchy topping, enhancing the flavors of savory fillings, while adding a refreshing contrast.

  • Chilled White Wine: A glass of chilled Sauvignon Blanc or Pinot Grigio elevates the meal, mirroring the salad’s bright and crisp profile.

  • Grilled Corn on the Cob: Sweet, charred corn adds texture and sweetness, making for a colorful and delightful summery feast.

  • Watermelon Feta Salad: This sweet and savory option creates a refreshing medley, complementing the tang from the marinated salad.

Particularly on warm evenings, these pairings highlight the delightful contrasts of taste and texture, creating a symphony of flavors on your dinner table!

Expert Tips for Marinated Cucumbers, Onions, and Tomatoes

• Flavor Fusion: Remember to marinate for at least 2 hours; it enhances the flavor of your Marinated Cucumbers, Onions, and Tomatoes beautifully!

• Crisp Factor: To keep cucumbers crisp, add them just before serving if you plan to store leftovers.

• Sweet Onions: Consider using Vidalia onions for a milder taste; they soften and become wonderfully sweet as they marinate.

• Tartness Control: Adjust the acidity by modifying vinegar types—apple cider vinegar adds a different layer that many reviewers love!

• Seasoning Touch: Always taste your vinaigrette before adding to the vegetables; this lets you tweak the salt and sugar balance to your liking.

• Storage Tips: Keep the salad covered in the fridge; it lasts 3 to 5 days, but prepare for softer tomatoes as the days go by!

Marinated Cucumbers, Onions, and Tomatoes (3)

How to Store and Freeze Marinated Cucumbers, Onions, and Tomatoes

Fridge: Store your salad in an airtight container for up to 5 days; this ensures the flavors meld while the vegetables retain some crunch.

Covering: If you anticipate leftovers, cover the salad tightly with plastic wrap to keep it fresh and flavorful.

Serving Tip: For the best texture, consider adding the cucumbers just before serving if you plan to tuck into the Marinated Cucumbers, Onions, and Tomatoes later.

Soften Tomato Alert: Keep in mind, as days pass, tomatoes will soften, but their flavor will remain delightful!

Marinated Cucumbers, Onions, and Tomatoes Recipe FAQs

How long should you marinate cucumber?
Absolutely! For the best flavor infusion, marinate your cucumbers for at least 2 hours. However, if you can plan a bit ahead, letting them sit overnight really allows the flavors to meld.

Can we eat cucumber, tomato, and onion together?
Very! Cucumber, tomato, and onion not only can be eaten together—they create a harmonious blend of flavors and textures. The coolness of cucumbers pairs wonderfully with the juiciness of tomatoes and the sharpness of onions, making for a refreshing salad.

How long do marinated cucumbers stay good for?
Marinated cucumbers, onions, and tomatoes can be stored in the refrigerator for up to 5 days. Make sure they are in an airtight container. Just keep in mind that while they stay safe to eat, cucumbers may lose some crunch and tomatoes might soften over time.

How long will cucumbers and onions in vinegar last in the refrigerator?
When stored properly in the fridge, cucumbers and onions in vinegar will last for about 3 to 5 days. As they marinate, the flavors deepen, but be mindful that the texture might change, particularly for the cucumbers, which can soften slightly.

How long do I soak cucumbers in salt before?
If you’re looking to draw excess moisture out of your cucumbers before making your salad, you can soak them in salt for about 20-30 minutes. This process helps enhance their crunchiness by extracting water, resulting in a firmer texture in your salad.

How to keep cucumbers fresh for the longest?
To keep cucumbers fresh for the longest time, store them uncut in a cool place, ideally wrapped in a paper towel and placed in a plastic bag in the fridge. This helps to absorb excess moisture. If you’re prepping them for your Marinated Cucumbers, Onions, and Tomatoes, add them just before serving to maintain their crispness!

Filed Under: salad

  • « Previous Page
  • 1
  • …
  • 19
  • 20
  • 21
  • 22
  • Next Page »
RecipeCrown

Hello, beautiful people! I’m Grace Bellamy, a foodie, traveler, and writer with wanderlust in my soul. Whether crafting recipes in my kitchen or exploring flavors around the globe, my greatest joy is helping you create healthier, happier lives, one delicious bite at a time.