RecipeCrown

Easy & Delicious Recipes

  • Home
  • Breakfast
  • Main Dishes
  • Dessert
  • About
  • Contact
You are here: Home / Archives for grace bellamy

Easy Light Pesto Caprese Pasta Salad You’ll Love for Summer!

June 18, 2025 by grace bellamy Leave a Comment

I can still recall the summer BBQs at my aunt’s house, where the sun-drenched days were filled with laughter and the aroma of fresh basil wafting through the air. That’s where I first fell in love with the bright, vibrant flavors of a Caprese salad. One afternoon, as I savored each bite of juicy tomatoes and creamy mozzarella, I knew I had to recreate that deliciousness in my own kitchen.

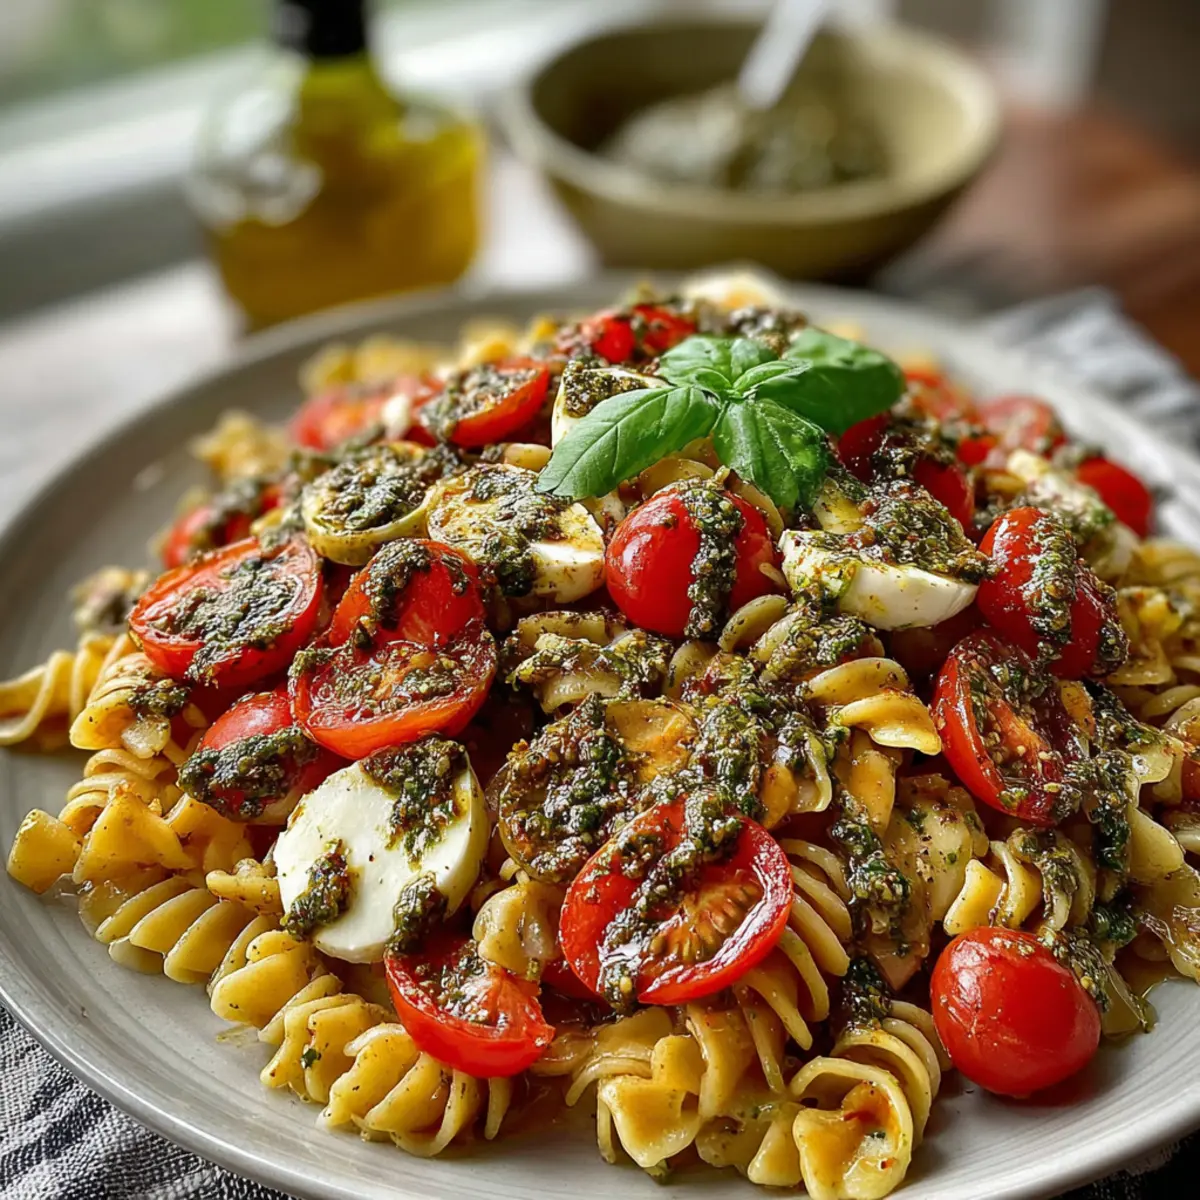
Enter my Light Pesto Caprese Pasta Salad—a delightful twist on the classic that’s perfect for any occasion! Combining the beloved elements of Caprese with al dente farfalle pasta, this dish bursts with fresh ingredients like juicy cherry tomatoes, fragrant basil, and rich pesto. Whether you’re preparing a light lunch for meal prep or taking a dish to share at a gathering, it’s a breeze to whip up. Best of all, it’s wonderfully versatile; you can even add your favorite protein for a heartier meal. Trust me, this pasta salad is bound to become a favorite you’ll want to make all summer long!

Why is Light Pesto Caprese Pasta Salad a must-try?

Simplicity reigns supreme in this recipe, with minimal steps and ingredients.
Freshness shines through with vibrant cherry tomatoes and fragrant basil, elevating every bite.
Versatility allows for endless variations, whether you’re adding protein or keeping it vegetarian.
Perfect for meal prep, this salad can be prepared in advance, making it a go-to for busy weekdays.
Crowd-pleaser at gatherings, bringing people together over delicious flavors.
Elevate your summer meals and check out how to incorporate this delightful dish into your lunch routine with my pasta salad recipe.

Light Pesto Caprese Pasta Salad Ingredients

• Here’s what you’ll need for this vibrant salad!

For the Pasta
• Farfalle Pasta – This pasta shape provides a fun bite and serves as the perfect base for this Light Pesto Caprese Pasta Salad.

For Flavoring the Pasta
• Bouillon Cube (or Chicken Broth) – Adding this to your boiling water gives the pasta a depth of flavor that enhances the whole salad.

For the Salad
• Cherry Tomatoes – Their juicy sweetness adds a refreshing burst to each mouthful.
• Shallot – Adds a mild onion flavor that complements the other ingredients nicely.
• Fresh Basil – Essential for that herbal zing; fresh is a must for the best flavor.
• Mini Mozzarella Balls – These provide a creamy texture and protein that balances the salad perfectly.

For the Dressing
• Pesto – This oil and herb mix not only serves as a dressing but also infuses the dish with vibrant flavors.
• Balsamic Vinegar – Adds a tangy acidity that brightens the entire salad.
• Kosher Salt – Enhances all the flavors, making them pop!

Full measurements are in the recipe card below.

How to Make Light Pesto Caprese Pasta Salad

  1. Boil the Pasta: Start by bringing a pot of water to a boil and flavor it with a bouillon cube (or chicken broth). Cook the farfalle pasta according to the package directions until al dente, typically around 8-10 minutes.

  2. Drain the Pasta: Once cooked, drain the pasta and remember, do not rinse! This helps the dressing adhere better, packing in more flavor.

  3. Combine Ingredients: In a large bowl, combine the cooked pasta with halved cherry tomatoes, minced shallot, chopped basil, and mini mozzarella balls. Gently mix to distribute the ingredients evenly.

  4. Dress the Salad: Pour in the pesto and balsamic vinegar, then sprinkle in the kosher salt. Toss everything together until the pasta is well-coated and colorful.

  5. Serve: This delicious Light Pesto Caprese Pasta Salad can be served chilled or at room temperature—perfect for those sunny days!

Optional: Garnish with extra basil leaves for an added touch of freshness.

Exact quantities are listed in the recipe card below.

Light Pesto Caprese Pasta Salad Variations

Feel free to get creative and make this dish your own with my fun variations!

  • Protein Boost: Add grilled chicken, shrimp, or rotisserie chicken for a satisfying protein kick.

  • Dairy-Free Delight: Swap mini mozzarella balls for dairy-free cheese or avocado, maintaining creaminess without the dairy.

  • Whole Grain Option: Use whole wheat farfalle for a nutty flavor and added fiber, enhancing the dish’s texture.

  • Zesty Twist: Incorporate sun-dried tomatoes for a concentrated sweetness that beautifully complements the fresh ingredients.

  • Nutty Flavors: Toss in pine nuts or walnuts for a crunchy texture that adds richness and depth to each bite.

  • Heat It Up: Add crushed red pepper flakes for a spicy kick, elevating the flavors and making each mouthful exciting.

  • Herbed Variation: Experiment with other fresh herbs like parsley or arugula for a unique aromatic flair that brightens the dish.

  • Vegan Version: Replace pesto with a blend of nutritional yeast, olive oil, and garlic for a delicious and dairy-free alternative.

There’s no limit to the delicious possibilities; enjoy customizing this pasta salad to suit your taste!

Expert Tips for Light Pesto Caprese Pasta Salad

  • Don’t Rinse: Skipping the rinse after draining the pasta helps the dressing cling better, ensuring your Light Pesto Caprese Pasta Salad is more flavorful.
  • Choose Fresh: Always use fresh basil for an aromatic finish; dried herbs won’t deliver the same vibrant taste.
  • Pasta Timing: Cook pasta just until al dente, as it’ll continue to soften when mixed with other ingredients.
  • Add Protein: For a heartier meal prep option, consider grilled chicken or shrimp, enhancing both flavor and nutrition.
  • Taste and Adjust: Before serving, taste your salad; you may want to add a dash more salt or extra balsamic vinegar for a flavor boost.

How to Store and Freeze Light Pesto Caprese Pasta Salad

Fridge: Store the Light Pesto Caprese Pasta Salad in an airtight container for up to 3 days. This keeps the flavors fresh while ensuring the pasta remains deliciously tender.

Freezer: For best quality, do not freeze the pasta salad as the fresh ingredients can lose their texture and flavor upon thawing.

Serving Suggestions: Enjoy your pasta salad cold or at room temperature. If you’ve added protein, be mindful of the storage time based on the protein type.

Reheating: If preferred warm, gently reheat individual servings in the microwave for 30 seconds, but note that it’s best fresh or chilled!

What to Serve with Light Pesto Caprese Pasta Salad?

Looking to create a balanced and delightful summer meal? Here are delicious pairings to complement each vibrant bite.

  • Grilled Chicken: Juicy and flavorful, grilled chicken adds a hearty protein element that pairs beautifully with the light pasta salad.

  • Garlic Bread: Crunchy and savory, garlic bread offers a delightful crunch and buttery flavor that complements the fresh ingredients.

  • Caprese Skewers: Enhance the Caprese theme with skewers of fresh mozzarella, basil, and cherry tomatoes—all drizzled with balsamic glaze for an added zing.

  • Roasted Vegetables: Colorful roasted vegetables provide a warm and earthy element, rounding out the meal with hearty texture and flavor.

  • Lemonade: Refreshing homemade lemonade brings a zesty brightness to your table, accentuating the freshness of the salad.

  • Berry Tart: A light and fruity dessert, a berry tart offers a sweet finish while maintaining a seasonal, light feel after your meal.

Enjoy exploring these delightful pairings and elevate your summer dining experience!

Light Pesto Caprese Pasta Salad Recipe FAQs

What kind of pasta should I use for this recipe?
I recommend using farfalle pasta for this Light Pesto Caprese Pasta Salad, as its unique shape provides a fun bite and holds the dressing perfectly. However, you can experiment with any pasta shape you enjoy, like penne or rotini!

How should I store leftover Light Pesto Caprese Pasta Salad?
Store the salad in an airtight container in the refrigerator for up to 3 days. This will help maintain the freshness of the ingredients, especially the basil and tomatoes, ensuring you can enjoy those vibrant flavors for a few meals!

Can I freeze the Light Pesto Caprese Pasta Salad?
It’s best not to freeze this salad, as the fresh ingredients like tomatoes and basil can become mushy and lose their taste upon thawing. If you’re looking for a meal prep option, consider making a batch without the fresh vegetables to freeze—just add them after thawing.

What if I don’t have fancy balsamic vinegar?
Absolutely! If you’re short on balsamic vinegar, you can substitute it with red wine vinegar or apple cider vinegar for a similar tangy flavor. Just keep in mind that the taste will vary slightly, so start with a smaller amount and adjust according to your preference!

How can I add protein to my pasta salad?
To add protein for a heartier meal, you can toss in grilled chicken, shrimp, or even chickpeas for a vegetarian option! If you choose to add grilled protein, I recommend using about 1 cup for this recipe. Simply mix it in after combining the other ingredients for the best result.

Are there any dietary considerations for this recipe?
This Light Pesto Caprese Pasta Salad is vegetarian-friendly! However, if someone has dairy allergies, you can skip the mozzarella or substitute it with dairy-free cheese. Always make sure to check the ingredient labels if anyone has sensitivities. Enjoying delicious food is possible for everyone!

[tasty-recipe id=”2048″]

Filed Under: salad

Irresistibly Easy Peach and Blueberry Cobbler to Delight You

June 13, 2025 by grace bellamy Leave a Comment

I still remember the summer afternoons spent at my grandmother’s house, where the air would be filled with the sweet aroma of freshly baked pies and cobblers. One particular day, she surprised me with her famous Peach and Blueberry Cobbler, a vibrant medley of juicy fruit and buttery goodness that danced on my taste buds. As we sat on the porch with our spoons in hand, the sun setting in hues of gold, those moments felt like a little slice of heaven.

Fast forward to today, and I find myself recreating that same cobbler in my own kitchen, eager to share this simple yet delightful recipe with you. The joy of combining fresh peaches and blueberries into a sweet, fluffy batter that surrounds them, all topped with a golden, caramelized crust, is truly special. This Easy Peach and Blueberry Cobbler is perfect for showcasing summer’s best flavors and makes for a comforting dessert that’s just as good served warm with a scoop of vanilla ice cream. Let’s dive in and bring a taste of nostalgia to your table!

Table of Contents
  • Why Love This Peach and Blueberry Cobbler?
  • Peach and Blueberry Cobbler Ingredients
  • How to Make Peach and Blueberry Cobbler
  • How to Store and Freeze Peach and Blueberry Cobbler
  • Expert Tips for Peach and Blueberry Cobbler
  • What to Serve with Peach and Blueberry Cobbler?
  • Peach and Blueberry Cobbler Variations
  • Peach and Blueberry Cobbler Recipe FAQs
    • How do I choose ripe peaches for the cobbler?
    • How should I store leftover Peach and Blueberry Cobbler?
    • Can I freeze Peach and Blueberry Cobbler? If so, how?
    • What if my cobbler is too runny after baking?
    • Can I use other fruits in my Peach and Blueberry Cobbler?
    • Is this cobbler safe for pets or people with allergies?

Why Love This Peach and Blueberry Cobbler?

Simplicity at its best: This recipe requires minimal effort, allowing you to savor homemade goodness without the fuss.
Flavor explosion: Fresh peaches and blueberries blend into a deliciously sweet filling, complemented by a caramelized brown sugar topping.
Versatile options: You can easily use frozen or canned fruit, making this dessert a breeze year-round.
Crowd-pleaser: Serve warm with vanilla ice cream, and you’ll have everyone coming back for more!
Perfect for summer gatherings: The vibrant colors and heavenly aroma make it a stunning centerpiece for any occasion, reminiscent of lazy summer afternoons. For more summer delights, don’t miss out on my Peach Cobbler Recipe!

Peach and Blueberry Cobbler Ingredients

• Gather these ingredients to create a delightful Peach and Blueberry Cobbler that reflects summer’s sweetness!

For the Batter
• Butter – Adds richness and helps create the base; melt it in your baking dish for a crispy edge.
• Flour – Provides structure for the cobbler base, making it fluffy and light.
• Granulated Sugar – Sweetens the batter perfectly, balancing the fruit’s tartness.
• Baking Powder – Leavens the batter, ensuring it rises beautifully in the oven.
• Salt – Enhances all the flavors, bringing depth to the dessert.
• Milk – Moistens the batter for a tender texture.
• Vanilla Extract – Adds a warm, aromatic flavor that complements the fruit wonderfully.

For the Fruit Filling
• Fresh Peach Slices – The main fruit bringing a juicy texture and flavor; if using frozen, be sure to thaw them first!
• Fresh Blueberries – Adds bursts of sweetness and color; feel free to use them frozen to reduce prep time.
• Lemon Juice – Brightens the flavor of the fruit, making every bite refreshing.

For the Topping
• Brown Sugar – Creates a caramelized topping that gives a delightful crunch to finish off your cobbler.

Full measurements are in the recipe card below.

How to Make Peach and Blueberry Cobbler

  1. Preheat your oven to 350°F (175°C). Start by placing cubed butter in a 9×13 inch baking dish and melt it in the oven for that perfect crispy edge.

  2. Mix in a medium bowl. Combine flour, granulated sugar, baking powder, and salt until well-blended. This will form the base of your cobbler.

  3. Add milk and vanilla extract to the dry ingredients. Stir until smooth, creating a creamy batter that’s ready to adorn your buttery dish.

  4. Pour the batter evenly over the melted butter. Don’t stir; just let the magic happen as it will rise beautifully during baking.

  5. Toss peach slices and blueberries with lemon juice. Spread them evenly over the batter, allowing the fruit to nestle in without mixing.

  6. Sprinkle brown sugar evenly over the top. This will caramelize as it bakes, creating a sweet, crunchy topping that you’ll adore.

  7. Bake for 40-50 minutes. Keep an eye on it until the top is golden brown and no longer jiggles; it should look utterly irresistible!

  8. Cool for 15 minutes before diving in. Serve warm with a luscious scoop of vanilla ice cream for a nostalgic finish.

Optional: Garnish with a sprig of mint for a fresh touch!

Exact quantities are listed in the recipe card below.

How to Store and Freeze Peach and Blueberry Cobbler

Fridge: Store leftover Peach and Blueberry Cobbler in an airtight container for up to 3 days. To keep it fresh, place a piece of wax paper between the cobbler and the lid.

Freezer: If you want to freeze the cobbler, wrap it tightly in aluminum foil or transfer it to a freezer-safe container. It can last up to 3 months in the freezer.

Reheating: To reheat, place slices in a preheated oven at 350°F (175°C) for about 15-20 minutes, or until warmed through. Add a scoop of vanilla ice cream for extra indulgence!

Thawing: When ready to enjoy a frozen cobbler, let it thaw in the fridge overnight before reheating for the best texture.

Expert Tips for Peach and Blueberry Cobbler

• Choose the Right Dish: Use a 9×13 inch baking dish for even baking and a perfect crust. Avoid smaller dishes to prevent overflowing.

• Avoid Stirring: For best results, don’t stir the batter after placing it over melted butter or after adding the fruit; this creates that delightful rise around the Cobbler.

• Thaw Your Peaches: If using frozen peaches, make sure to thaw them before adding to the batter. This ensures they mix well without adding extra moisture.

• Canned Fruit Caution: If opting for canned peaches, drain them thoroughly to avoid a soggy cobbler.

• Experiment with Berries: Try mixing in other berries like raspberries or blackberries for a delicious twist on the classic Peach and Blueberry Cobbler.

• Adjust Sweetness Wisely: If your fruit is particularly sweet, consider reducing the granulated sugar in the batter to achieve a balanced flavor.

What to Serve with Peach and Blueberry Cobbler?

The comforting warmth of sweet cobbler deserves delightful companions to elevate your dessert experience.

  • Vanilla Ice Cream: A scoop of creamy vanilla perfectly complements the warm cobbler, creating a harmony of temperatures and flavors.

  • Whipped Cream: Light and airy, whipped cream adds a luscious touch that balances the sweetness of the fruit while enhancing its flavors.

  • Fresh Mint Leaves: A sprig of mint brings a refreshing aroma and a hint of brightness, wonderfully contrasting the rich, buttery cobbler.

  • Lemon Sorbet: The tartness of lemon sorbet provides a delightful, refreshing counterpoint to the sweet cobbler, cleansing the palate in between bites.

  • Iced Tea: A glass of sweetened iced tea brings a touch of Southern charm to your summer gatherings, pairing beautifully with the fruity flavors of the cobbler.

  • Caramel Sauce: Drizzling warm caramel sauce over the cobbler elevates it to a decadent dessert, adding an additional layer of sweet, buttery richness.

  • Mixed Berry Salad: A fresh salad of mixed berries can introduce a tart and juicy element, creating a vibrant contrast alongside the warm cobbler.

  • Sparkling Water: For a light and invigorating option, sparkling water with a slice of lemon or lime enhances the dessert experience without overpowering the cobbler.

Peach and Blueberry Cobbler Variations

Feel free to explore these fun ideas to make this delightful cobbler even more your own!

  • Spiced Up: Add 1 teaspoon of cinnamon and a pinch of ginger to the fruit for a cozy, spiced flavor.
  • Berry Medley: Substitute some of the blueberries with raspberries or blackberries for a colorful twist and a mix of flavors.
  • Nutty Crunch: Sprinkle a handful of chopped pecans or almonds on top before baking for a satisfying crunch.
  • Citrus Zing: Add a teaspoon of orange or lemon zest to the batter to brighten the flavors and add a zing of freshness.
  • Butter Swap: Replace butter with coconut oil for a subtle coconut flavor and a dairy-free option.
  • Sweet Twist: Drizzle honey or maple syrup over the fruit before baking for an extra layer of sweetness.
  • Chocolate Delight: Toss in some dark chocolate chips with the fruit for a rich, decadent twist on this classic dish.
  • Savory Touch: Enhance with a sprinkle of sea salt on top just before baking to contrast the sweetness with a savory element.

Every variation adds a unique touch to your cobbler, creating a sweet centerpiece for any gathering!

For more recipes, follow us on Pinterest

Peach and Blueberry Cobbler Recipe FAQs

How do I choose ripe peaches for the cobbler?

Absolutely! Look for peaches that are slightly soft to the touch and have a fragrant aroma. The skin should have a vibrant color, free of dark spots or blemishes. If they’re firm, don’t worry; just allow them to sit at room temperature for a few days until they soften.

How should I store leftover Peach and Blueberry Cobbler?

Very simply! Place any leftover cobbler in an airtight container and refrigerate it for up to 3 days. To help retain moisture and freshness, you can place a piece of wax paper between the cobbler and the lid. This way, your dessert stays delicious for your next cravings!

Can I freeze Peach and Blueberry Cobbler? If so, how?

Absolutely! To freeze your cobbler, wrap it tightly in aluminum foil or place it in a freezer-safe container. It can last up to 3 months in the freezer. When you’re ready to enjoy it, thaw it in the fridge overnight. This will help maintain the texture when you reheat it.

What if my cobbler is too runny after baking?

Don’t worry; it happens! A common reason for a runny cobbler is excess moisture from overly ripe fruit. If you find yourself in this situation, try adding a tablespoon of cornstarch to the fruit mixture before placing it on the batter next time. This will help thicken the juices while baking and create that perfect cobbler texture.

Can I use other fruits in my Peach and Blueberry Cobbler?

Very much! This recipe is quite flexible. You can mix in other berries like strawberries or blackberries or even use a different stone fruit like plums or cherries. Just remember to adjust the sweetness of the batter if your chosen fruit is significantly sweeter or tarter.

Is this cobbler safe for pets or people with allergies?

Great question! This Peach and Blueberry Cobbler contains common allergens like butter, flour, and milk. If you’re serving it to someone with dietary restrictions, you can easily substitute these ingredients, using dairy-free butter and plant-based milk alternatives. However, it’s best to keep it away from pets, especially chocolate and sugar-rich desserts!

Filed Under: Dessert

Irresistibly Easy Baked Feta Pasta with Bursting Tomatoes

May 30, 2025 by grace bellamy Leave a Comment

I still remember the first time I stumbled upon the magic of Baked Feta Pasta—it was a chilly evening, and I was in desperate need of something warm and comforting. Scrolling through my feed, I was drawn in by vibrant images of molten feta nestled among juicy cherry tomatoes, and I knew I had to try it. With just a handful of simple ingredients, this dish comes together effortlessly, transforming into a creamy, cheesy delight with each bite.

As the tomatoes burst in the oven, their sweetness mingles with the tangy feta, creating a sauce that clings to every twist of pasta—it’s pure comfort food in a bowl! Perfect for those busy weeknights when you crave something delicious but don’t have hours to spare in the kitchen, this viral sensation has quickly become a favorite in my household. It’s not just a dish; it’s an experience that’s perfect for sharing with loved ones or savoring all by yourself. Let’s dive into this easy recipe that’s sure to become a staple in your kitchen!

Table of Contents
  • Why is Baked Feta Pasta a must-try?
  • Baked Feta Pasta Ingredients
  • How to Make Baked Feta Pasta
  • Baked Feta Pasta Variations
  • How to Store and Freeze Baked Feta Pasta
  • Expert Tips for Baked Feta Pasta
  • What to Serve with Baked Feta Pasta?
  • Baked Feta Pasta Recipe FAQs
    • What kind of tomatoes should I use for Baked Feta Pasta?
    • How should I store leftover Baked Feta Pasta?
    • Can I freeze Baked Feta Pasta?
    • What if my tomatoes didn’t burst while baking?
    • Are there dietary considerations I should be aware of for Baked Feta Pasta?
    • Can I use different cheeses in Baked Feta Pasta?

Why is Baked Feta Pasta a must-try?

Simplicity: This recipe requires minimal effort—just toss everything together and let the oven work its magic!

Flavor Explosion: Bursting tomatoes combined with creamy feta create a mouthwatering sauce that’s both savory and sweet.

Crowd-Pleasing: Perfect for family dinners or impressing guests, this dish guarantees smiles all around.

Customizable: Switch up pasta shapes or add your favorite veggies for a unique touch every time.

Quick Dinner Solution: Ready in just 35 minutes, it fits seamlessly into busy weeknight routines.

No-Fuss Experience: For another delightful pasta dish, try my Baked Feta Potatoes to spice things up!

Baked Feta Pasta Ingredients

• Get ready to create pure comfort in a bowl!

For the Pasta
• Cavatappi Pasta – the base of the dish; any pasta shape with curves helps the sauce cling beautifully.

For the Sauce
• Cherry Tomatoes – these juicy gems provide the sauce’s sweetness; substitute with canned diced tomatoes if needed.
• Feta Cheese (8 ounce block) – the creamy heart of the dish; keep it whole for optimal meltiness in the oven.
• Extra Virgin Olive Oil – this adds richness and aids in bursting those cherry tomatoes.
• Salt – elevates the flavors and enhances the deliciousness.
• Black Pepper – brings a lovely hint of spice to the mix.
• Garlic Cloves (2, minced) – infuses a savory depth into the sauce.
• Fresh Basil (1/4 cup, chopped and packed, plus more for serving) – brightens the dish with freshness and aroma.

Full measurements are in the recipe card below.

How to Make Baked Feta Pasta

  1. Preheat oven: Set your oven to 400°F (200°C) to prepare for a wonderful baking experience that will fill your kitchen with delightful aromas.

  2. Prepare tomatoes: Place the cherry tomatoes in an oven-safe baking dish; drizzle with extra virgin olive oil and season generously with salt and pepper. Toss them gently to ensure they’re evenly coated.

  3. Add feta: Nestle the block of feta cheese right in the center of the tomatoes. Make sure to pour a little more olive oil and sprinkle some salt and pepper on the feta to enhance its flavors.

  4. Bake away: Slide the dish into the oven and bake for 35 minutes, watching as the tomatoes burst and the feta becomes beautifully melted and creamy.

  5. Cook pasta: While the feta and tomatoes are baking, boil a pot of salted water and cook the pasta until al dente, usually about 8-10 minutes. Remember to reserve ½ cup of that precious pasta water!

  6. Mix in garlic and basil: Once the baking is done, take the dish out of the oven and immediately add the minced garlic and chopped basil to the tomatoes and feta. Toss gently to combine everything!

  7. Combine pasta: Add the cooked pasta to your baking dish, then toss thoroughly. Use the reserved pasta water to help create that deliciously creamy consistency!

  8. Garnish and serve: Finish off with a sprinkle of fresh basil for that extra pop of color and flavor. Serve warm and enjoy the comforting goodness of your homemade Baked Feta Pasta!

Optional: Sprinkle with crushed red pepper flakes for a little heat!

Exact quantities are listed in the recipe card below.

Bring more flavor to your feed—follow us on Pinterest for simple and delicious recipes.

Baked Feta Pasta Variations

Embrace your creativity and make this dish your own with delightful twists and substitutes!

  • Pasta Shape: Switch it up with penne, spaghetti, or even fun bow-tie pasta for a new texture experience.
  • Cheese Alternatives: Try creamy goat cheese or rich ricotta for a different flavor profile that still melts beautifully.
  • Veggie Boost: Toss in asparagus, sautéed onions, or earthy mushrooms to add nutrition and color to your plate.
  • Extra Kick: Add a handful of crushed red pepper flakes for a zesty punch that enhances the overall flavor.
  • Herb Infusion: Swap basil for fresh oregano or thyme, giving a fragrant herbal touch that complements the dish beautifully.
  • Olive Variation: For deeper taste, replace olive oil with garlic-infused oil; it adds a lovely aroma to the dish.
  • Nutty Delight: Want crunch? Sprinkle with toasted pine nuts or slivered almonds for added texture and nuttiness.
  • Make it Hearty: Add cooked chickpeas or spinach for an extra dose of protein and nutrients, making it a more filling meal.

Explore and enjoy the playful marvels of this easy recipe!

How to Store and Freeze Baked Feta Pasta

Room Temperature: Baked Feta Pasta is best enjoyed fresh, but if left out, consume it within 2 hours to ensure food safety.

Fridge: Store any leftover Baked Feta Pasta in an airtight container in the refrigerator for up to 3 days. Reheat gently in the microwave or on the stovetop with a splash of water for extra moisture.

Freezer: For longer storage, freeze the pasta in a freezer-safe container for up to 2 months. To reheat, thaw overnight in the fridge and warm gently on the stovetop, adding a little pasta water if needed.

Reheating: Always reheat until heated through, taking care to preserve the creaminess of the feta sauce.

Expert Tips for Baked Feta Pasta

Optimal Feta Placement: Ensure your feta is placed in the center surrounded by tomatoes for optimal melting and creaminess in the final dish.

Oven-Safe Dish: Always use an oven-safe baking dish to prevent any mishaps while baking your delicious Baked Feta Pasta.

Reserve Pasta Water: Don’t forget to reserve some pasta water; it helps achieve the perfect sauce consistency for your baked dish.

Prevent Overbaking: Keep an eye on the tomatoes; they should burst but not completely disintegrate. Remove from the oven as soon as they’re perfectly soft.

Customize Flavors: Feel free to experiment with different vegetables or cheese types to make this Baked Feta Pasta uniquely yours!

What to Serve with Baked Feta Pasta?

The perfect sides can elevate your Baked Feta Pasta into a complete meal, creating a delightful dining experience.

  • Garlic Bread: The crispy texture of garlic bread complements the creamy sauce, perfect for soaking up those delicious flavors.

  • Simple Green Salad: A fresh salad with lemon vinaigrette adds a bright contrast, enhancing the overall taste and bringing a refreshing crunch.

  • Roasted Vegetables: Seasonal veggies, caramelized to perfection, not only add nutrition but also a delightful roasted flavor that pairs beautifully with your pasta.

  • Crusty Italian Bread: This essential pairing is ideal for mopping up the remnants of creamy feta sauce, making every bite count!

  • Wine Pairing – Sauvignon Blanc: A crisp, light white wine like Sauvignon Blanc contrasts nicely with the dish’s creaminess, enhancing the overall flavor experience.

  • Fresh Fruit Plate: A selection of seasonal fruits, such as berries or melon, can provide a sweet finish to your meal, offering a delightful palate cleanser.

  • Limoncello Sorbet: End your meal on a refreshing note with this zesty dessert that will cleanse the palate and leave you feeling light and satisfied.

With these suggestions, you can transform your Baked Feta Pasta into a memorable feast that delights the senses!

Baked Feta Pasta Recipe FAQs

What kind of tomatoes should I use for Baked Feta Pasta?

Absolutely! While cherry tomatoes are the star of the show, you can also use whole tomatoes or canned diced tomatoes if they are what you have on hand. However, cherry tomatoes yield the best sweetness and flavor, especially as they burst during baking, creating that delicious sauce.

How should I store leftover Baked Feta Pasta?

For optimal freshness, place any leftover Baked Feta Pasta in an airtight container in the refrigerator. It will keep well for up to 3 days. When you’re ready to enjoy it again, gently reheat it in the microwave or on the stovetop, adding a splash of water or olive oil to keep the pasta moist.

Can I freeze Baked Feta Pasta?

Yes, you can! To freeze Baked Feta Pasta, allow it to cool completely and then transfer it to a freezer-safe container. It can be frozen for up to 2 months. When you’re ready to eat it, thaw it overnight in the fridge and reheat on the stovetop, adding a bit of reserved pasta water to help regain that creamy texture.

What if my tomatoes didn’t burst while baking?

Don’t worry! If the tomatoes are still intact after baking, they may just need a bit more time in the oven. Check them after the initial 35 minutes, and if they haven’t burst, return them to the oven for an additional 5–10 minutes, keeping a close eye. You want them softened and bubbling for the best flavor in your sauce.

Are there dietary considerations I should be aware of for Baked Feta Pasta?

That’s an excellent question! This recipe is vegetarian-friendly. If you have allergies or dietary preferences, consider choosing gluten-free pasta for a celiac-friendly option. Also, make sure to opt for lactose-free feta if you’re sensitive to dairy. Always check ingredient labels to ensure there’s nothing harmful for you or your loved ones.

Can I use different cheeses in Baked Feta Pasta?

Very much so! While feta gives the dish its signature flavor, you can substitute it with goat cheese or high-quality full-fat ricotta if you’re looking for different flavors or textures. Just remember to adjust cooking times accordingly, as different cheeses may melt or bake differently!

Filed Under: Main Dishes

Irresistibly Fluffy German Pancakes: A Breakfast Game Changer

May 30, 2025 by grace bellamy Leave a Comment

I still remember the first time I tasted those puffed-up clouds of delight—German Pancakes, also known as Dutch Baby pancakes. It was a cozy Sunday morning, sunlight streaming through the kitchen window, as the enticing aroma of butter melting in the oven filled the air. My aunt had whipped them up with such ease that I couldn’t help but feel an overwhelming sense of comfort wash over me. Fast forward to today, and I’m thrilled to share my own take on this enchanting breakfast treat.

This recipe is all about simplicity and flavor—only six ingredients and just five minutes of prep time stand between you and a wonderfully golden-brown masterpiece. These German Pancakes rise like magic in the oven, begging to be topped with a dusting of powdered sugar and a drizzle of warm syrup. Not only are they a family favorite that appeals to young and old alike, but they also allow for delightful variations, such as a gluten-free twist. So let’s dive into this delightful journey and bring a touch of whimsy to your breakfast table!

Table of Contents
  • Why are German Pancakes so irresistible?
  • German Pancakes Ingredients
  • How to Make German Pancakes
  • German Pancakes Variations
  • How to Store and Freeze German Pancakes
  • What to Serve with German Pancakes?
  • Tips for the Best German Pancakes
  • German Pancakes Recipe FAQs
    • What is the difference between German and Dutch pancakes?
    • What are German fluffy pancakes?
    • Can you cook pancakes in the oven?
    • Can I make a Dutch baby in a Dutch oven?
    • Why are my German pancakes not fluffy?
    • What is the best topping for German pancakes?

Why are German Pancakes so irresistible?

Simplicity: This recipe requires just six common ingredients, making it incredibly easy to whip up any time you crave a comforting breakfast.
Fluffy Magic: Watch in awe as the batter transforms into a puffy delight that rises beautifully in the oven.
Family Favorite: With its deliciously sweet flavor, it’s sure to please everyone at the breakfast table, from kids to adults.
Versatile Options: Feel free to experiment with toppings or try a gluten-free adaptation for those with dietary needs.
Quick Prep: With only five minutes of hands-on time, you’ll be savoring these delicious pancakes in no time! For another quick breakfast option, check out Whole Grain Banana Pancakes.

German Pancakes Ingredients

You’ll find full measurements in the recipe card below.

For the Batter
• Eggs – 6 large, providing structure and richness.
• Milk – 1 cup (240 ml), adds moisture and creates steam for that perfect puff.
• All-purpose Flour – 1 cup (120 g), essential for forming the pancake’s structure.
• Salt – a dash, to enhance the flavors beautifully.
• Vanilla Extract – 1 teaspoon (5 ml), offering delightful aroma and flavor.

For the Pan
• Butter – 5 tablespoons (70 g), used to grease the pan and enrich the pancake with flavor.

For a gluten-free alternative, simply swap the all-purpose flour with a trusted gluten-free brand.

How to Make German Pancakes

  1. Preheat Oven: Set your oven to 425°F (220°C). Place the butter in a 9×13-inch metal baking dish and let it melt while the oven heats up.

  2. Blend Ingredients: In a blender, combine the eggs, milk, flour, salt, and vanilla extract. Blend until the mixture is smooth and free of lumps, about 30 seconds.

  3. Add Batter: Carefully pour the blended batter into the baking dish over the melted butter. Don’t worry if it looks a little bubbly; that’s part of the magic!

  4. Bake: Slide the dish into the oven and bake for 22-27 minutes. Keep an eye on it until the edges are golden brown and the center is puffy.

  5. Serve: Remove from oven and sprinkle generously with powdered sugar and syrup before slicing. Slice into pieces and enjoy while it’s warm!

Optional: Top with fresh fruit or a dollop of whipped cream for a festive touch!

Exact quantities are listed in the recipe card below.

Looking for more recipe inspiration? Explore our collection on Pinterest for fresh ideas you’ll love!

German Pancakes Variations

Feel free to put your own spin on this delightful recipe and savor the flavors in a whole new way!

  • Gluten-Free: Substitute all-purpose flour with a gluten-free blend like Cup4Cup or King Arthur Measure for Measure.
  • Cinnamon Delight: Add 1 teaspoon of cinnamon to the batter for a warm, cozy flavor that pairs beautifully with syrup.
  • Lemon Zest: Incorporate the zest of one lemon into the batter for a refreshing, citrusy twist.
  • Cheesy Variation: Fold in ½ cup of shredded cheese like cheddar or Gruyère before baking for a savory option that’s sure to surprise!
  • Berries Galore: Top with fresh berries or fold in blueberries or raspberries into the batter before baking for a fruity explosion.
  • Spicy Kick: Add a pinch of cayenne pepper to the batter for an unexpected heat that beautifully complements the sweetness.
  • Chocolate Lovers: Stir in ½ cup of chocolate chips for a decadent treat that will satisfy any sweet tooth.
  • Nutty Texture: Fold in ¼ cup of chopped nuts, such as pecans or walnuts, to add a delightful crunch to the soft pancake.

Experiment with these variations to find your family’s favorite or try them all for a breakfast adventure!

How to Store and Freeze German Pancakes

Room Temperature: German Pancakes are best enjoyed fresh, but if you have leftovers, keep them at room temperature for up to 2 hours.

Fridge: Store any leftover pancakes in an airtight container in the refrigerator for up to 3 days. Reheat gently in the microwave or oven for best results.

Freezer: For longer storage, freeze the cooled pancakes in a single layer, then transfer to a zip-top bag for up to 2 months. Thaw in the fridge overnight before reheating.

Reheating: Reheat individual portions in the microwave or pop them back in the oven at 350°F (175°C) until warmed through, ensuring you maintain their fluffy texture.

What to Serve with German Pancakes?

There’s nothing quite like the experience of a delightful breakfast spread that complements those puffy, golden-brown delights.

  • Fresh Berries: The burst of sweetness and acidity from berries like strawberries or blueberries brightens every bite of German Pancakes. A colorful berry medley adds a fresh, inviting touch to your breakfast table.

  • Whipped Cream: Fluffy whipped cream creates a luscious texture that pairs beautifully with the light and airy pancakes, transforming your breakfast into a delightful indulgence.

  • Maple Syrup: Pouring warm, rich maple syrup over your pancakes not only enhances their flavor but also introduces a lovely sweetness and moisture—an irresistible combination!

  • Sautéed Apples: Sweet, cinnamon-spiced sautéed apples offer a comforting, warm complement, creating a cozy, autumn-inspired twist to your breakfast. The soft texture brings balance to the lightness of the pancakes.

  • Breakfast Sausages: Savory breakfast sausages provide a satisfying contrast to the sweetness of German Pancakes, making for a hearty morning feast that pleases all appetites.

  • Scrambled Eggs: A side of scrambled eggs adds protein and richness, making the meal more filling while providing a creamy texture that melds well with the pancakes.

  • Hot Chocolate or Coffee: Warm drinks like hot cocoa or a bold cup of coffee enhance the breakfast experience, inviting you to savor each bite slowly.

  • Cinnamon Sugar Dusting: A sprinkle of cinnamon sugar on top adds a touch of warmth and sweetness, creating an irresistible flavor profile that pairs perfectly with the classic pancake.

Tips for the Best German Pancakes

Pans Matter: Use a metal or cast iron pan to achieve the best puff and browning; non-stick pans may not provide the same effect.

Melt Butter Fully: Make sure the butter is completely melted before adding the batter—this prevents any sticking and enhances flavor.

Blend Smoothly: To avoid lumps, blend the ingredients until completely smooth; this helps the German pancakes rise beautifully.

Don’t Open the Oven: Resist the urge to peek while baking; opening the oven door lets heat escape and can affect the puffiness.

Serve Warm: These pancakes taste best warm, so serve them straight from the oven for that delightful, fluffy experience.

German Pancakes Recipe FAQs

What is the difference between German and Dutch pancakes?

Both German and Dutch pancakes are variations of the same dish. The main difference lies in the name and some regional variations in ingredients. German pancakes are typically thicker and fluffier, while Dutch pancakes can be thinner, much like crepes. Both are baked, resulting in a beautiful puffed-up shape when finished.

What are German fluffy pancakes?

German fluffy pancakes, or Dutch Baby pancakes, are oven-baked pancakes that puff up dramatically as they cook. They are made from eggs, milk, flour, and a hint of flavor, such as vanilla, and are often served warm with toppings like powdered sugar or fresh fruit, creating a delightful breakfast experience that’s both airy and rich.

Can you cook pancakes in the oven?

Absolutely! That’s the magic of German pancakes. Baking in the oven allows them to puff up beautifully, creating a light and airy texture that you won’t find in traditional stovetop pancakes. Just preheat your oven, mix your batter, and pour it into a hot, buttery pan to achieve this delightful breakfast dish.

Can I make a Dutch baby in a Dutch oven?

Yes, you can make a Dutch baby in a Dutch oven! Use the same steps, but make sure to preheat the Dutch oven in the oven along with the butter for a proper rise. The heavy lid of the Dutch oven helps trap the heat and steam, which contributes to that lovely puffiness!

Why are my German pancakes not fluffy?

Several factors can lead to less-than-fluffy German pancakes. First, ensure your oven is preheated; if the batter hits a cold surface, it won’t puff properly. Second, avoid opening the oven door too soon, as this lets heat escape. Lastly, make sure to fully blend your batter until there are no lumps, as a smooth mixture creates steam that helps them rise.

What is the best topping for German pancakes?

The toppings are endless! Traditionally, a dusting of powdered sugar and a drizzle of warm syrup are classic choices. Fresh fruits like berries, sliced bananas, or sautéed apples can add a delightful twist. For a more decadent experience, consider adding whipped cream or a sprinkle of cinnamon sugar. The more, the merrier!

Filed Under: Breakfast

Easy and Zesty Mexican Street Corn Salad Perfect for Summer!

May 29, 2025 by grace bellamy Leave a Comment

I still remember the first time I tasted Mexican street corn salad—a vibrant fusion of flavors that whisked me straight to the bustling streets of Mexico. It was a sweltering summer day, and my friends and I gathered for a picnic, with blankets sprawled out and laughter echoing in the air. That salad was the star of the spread, its creamy texture, zesty lime, and smoky warmth dancing together in perfect harmony.

Now, I’ve taken that delightful essence and transformed it into an easy-to-make dish that captures all the magic of those sunny days. My Easy & Creamy Mexican Street Corn Salad has everything you crave for the perfect summer side—a delightful blend of fresh corn, tangy lime, and just the right kick of jalapeño. What really makes this recipe special, though, is its versatility. Whether you’re gearing up for a barbecue or a casual weeknight dinner, this salad can easily fit in or stand out as a delightfully creamy centerpiece. And it’s a wonderful option for those looking for a vegan twist. Trust me, this flavorful dish is bound to please everyone around the table!

Table of Contents
  • Why is Mexican Street Corn Salad a Must-Try?
  • Mexican Street Corn Salad Ingredients
  • How to Make Mexican Street Corn Salad
  • How to Store and Freeze Mexican Street Corn Salad
  • Mexican Street Corn Salad Variations
  • What to Serve with Mexican Street Corn Salad?
  • Expert Tips for Mexican Street Corn Salad
  • Mexican Street Corn Salad Recipe FAQs
    • What are the ingredients for Mexican corn salad?
    • Is Mexican street corn salad served cold or warm?
    • How long can you store Mexican street corn salad?
    • Can you freeze Mexican street corn salad?
    • What goes with Mexican street corn salad?
    • Does Mexican corn have mayo?

Why is Mexican Street Corn Salad a Must-Try?

Vibrant, Fresh Ingredients: The use of fresh corn and vibrant herbs makes this salad a true showstopper at any gathering.

Creamy Delight: A light yet creamy dressing enhances the flavors without overpowering them, making each bite irresistible.

Spicy Kick: With the addition of jalapeño, this dish brings a delightful heat that elevates the experience.

Versatile Side: Perfect as a side for BBQs or a light main dish, it complements a variety of meals. Looking for more tasty inspirations? Check out this Mexican Street Corn Dip for a similar zest!

Simple Preparation: With minimal cooking and fresh ingredients, it’s quick to whip up for any occasion.

Mexican Street Corn Salad Ingredients

Discover the fresh components of this delicious salad!

For the Salad
• Fresh Corn – The star of this dish, offering sweetness and crunch.
• Extra-virgin olive oil – Necessary for grilling corn, enhancing flavor while preventing sticking.
• Mayonnaise (or vegan mayo) – Provides the creamy base of the dressing; choose vegan mayo for a dairy-free option.
• Garlic Clove – Infuses the dressing with savory depth and richness.
• Lime Zest and Juice – Brightens the overall taste; adjust lime quantities to match your personal preference.
• Chopped Scallions – Adds a subtle onion flavor that complements the other ingredients beautifully.
• Cotija Cheese (or feta cheese) – Delivers a salty, tangy profile; for a vegan alternative, feel free to omit or use vegan feta.
• Finely Chopped Fresh Cilantro – This herb adds a fresh, aromatic touch to the salad.
• Smoked Paprika (or chili powder) – Adds a smoky warmth or spiciness that elevates every bite.
• Jalapeño pepper, diced – Infuses heat; roasting it with corn can mellow its flavor.
• Sea Salt – Essential for seasoning and balancing the other components.

Full measurements are in the recipe card below.

How to Make Mexican Street Corn Salad

  1. Preheat the Grill: Start by heating your grill to medium-high. This ensures the corn gets those perfect grill marks and a delicious smoky flavor.

  2. Prepare the Corn: Brush the fresh corn with extra-virgin olive oil. Grill it, turning occasionally, until it’s beautifully charred and has grill marks, about 2 minutes per side.

  3. Mix the Dressing: In a large bowl, combine mayonnaise, minced garlic, lime zest, and lime juice. Whisk until smooth, making a creamy dressing to perfectly coat the salad.

  4. Cut the Corn Kernels: Once the corn is grilled and cooled slightly, cut the kernels off the cob. Add the corn and chopped scallions to the bowl with the mayo mixture.

  5. Stir and Add Cheese: Gently stir to coat the corn and scallions with the dressing. Then fold in the Cotija cheese, chopped cilantro, smoked paprika, diced jalapeño, and a sprinkle of sea salt.

  6. Season and Serve: Taste the salad and adjust the seasoning to your liking. You can serve it immediately or chill it in the fridge to enhance the flavors even more!

Optional: Top with extra cilantro or a sprinkle of chili powder for added color and zest.

Exact quantities are listed in the recipe card below.

🥞 Brunch goals? Follow our Pinterest feed for weekend-worthy recipes.

How to Store and Freeze Mexican Street Corn Salad

Fridge: Store any leftover Mexican street corn salad in an airtight container in the refrigerator for up to 3 days. The flavors will continue to develop, making it even tastier on day two!

Freezer: While freezing is not recommended due to the texture of fresh corn and creamy ingredients, you can freeze any leftover dressing separately for up to 1 month.

Reheating: If serving chilled leftovers, give the salad a gentle stir before serving. If the salad has been in the fridge, enjoy it directly as a refreshing treat!

Mexican Street Corn Salad Variations

Feeling adventurous? You can easily customize this salad to suit your taste preferences or dietary needs!

  • Vegan Twist: Substitute mayonnaise with vegan mayo for a creamy, dairy-free delight that everyone can enjoy.
  • Colorful Zest: Add diced red bell pepper for an extra pop of color and sweetness that complements the corn beautifully.
  • Frozen Corn: If fresh corn isn’t an option, opt for frozen corn—simply roast it in the oven at 425°F for about 20 minutes for a smoky flavor.
  • Cheesy Flavor: Replace Cotija cheese with feta for a tangy twist, or try a vegan feta for a delightful dairy-free alternative.
  • Citrusy Brightness: Use lemon juice in place of lime for a slightly different citrus kick that pairs well with the other ingredients.
  • Spicy Kick: For more heat, add extra diced jalapeños or a pinch of cayenne pepper to amp up the spice level.
  • Herb Swap: Experiment with fresh herbs like parsley or dill instead of cilantro for a different herbal note.
  • Crunchy Texture: Toss in some toasted corn nuts or sunflower seeds for added crunch—every bite will be a burst of flavor and texture!

What to Serve with Mexican Street Corn Salad?

When you’re ready to bring a burst of fresh flavors to your table, consider these delightful pairings to create a memorable summer meal.

  • Veggie Burgers: Their hearty texture complements the creamy salad beautifully while offering a satisfying bite. Try pairing with a tangy sauce to enhance the flavor combination.

  • Grilled Chicken Tacos: The smoky char from the tacos harmonizes with the zesty corn salad, making it an irresistible duo for a Mexican-inspired feast.

  • Quinoa or Rice Bowl: Serve it on a bed of fluffy quinoa or cilantro lime rice for a refreshing and filling meal. Top with guacamole and a sprinkle of feta for extra flavor.

  • Black Bean Quesadillas: The creamy filling pairs wonderfully with the sharp heat of jalapeño in the salad, creating a satisfying bite that echoes summer vibes.

  • Chilled Rosé Wine: A glass of chilled rosé complements the bright flavors of the salad, making each sip a refreshing experience.

  • Mango Salsa: The sweetness of diced mango mixed with lime and cilantro adds a tropical twist that contrasts delightfully with the spicy elements of the salad.

With these suggestions, your Mexican Street Corn Salad will shine as part of a beautifully balanced meal!

Expert Tips for Mexican Street Corn Salad

• Corn Selection: Choose fresh, sweet corn for the best flavor. If fresh isn’t available, frozen roasted corn works too.

• Adjusting Creaminess: For a lighter salad, start with less mayo and add gradually until desired creaminess is achieved.

• Jalapeño Heat: Roast the jalapeño to mellow its flavor. Start with a small amount to gauge heat preferences.

• Flavor Fusion: Chilling the salad for at least 30 minutes allows the ingredients to meld, enhancing the flavors before serving.

• Garnishing: Add a sprinkle of smoked paprika or extra cilantro on top for a beautiful presentation and flavor boost.

Mexican Street Corn Salad Recipe FAQs

What are the ingredients for Mexican corn salad?

Absolutely! The ingredients for Mexican street corn salad include fresh corn, extra-virgin olive oil, mayonnaise (or vegan mayo), garlic, lime zest and juice, chopped scallions, Cotija cheese (or vegan alternative), fresh cilantro, smoked paprika, diced jalapeño, and sea salt. These vibrant components create a delightful blend of flavors that are perfect for summer gatherings.

Is Mexican street corn salad served cold or warm?

This salad can be enjoyed both ways! While it is commonly served chilled, allowing the flavors to meld beautifully, you can also serve it warm right after mixing. It’s delicious at any temperature, but I often recommend chilling it for at least 30 minutes to intensify the flavors.

How long can you store Mexican street corn salad?

You can store leftover Mexican street corn salad in an airtight container in the refrigerator for up to 3 days. The flavors will continue to develop, making it even tastier the next day! Just give it a gentle stir before serving to reinvigorate the ingredients.

Can you freeze Mexican street corn salad?

Freezing the entire salad is not recommended because the fresh corn and creamy dressing may change in texture. However, if you have leftover dressing, you can freeze it separately for up to 1 month. To use, simply thaw it in the refrigerator overnight and stir it back into your salad before serving.

What goes with Mexican street corn salad?

Very! This salad pairs beautifully with a variety of dishes. Serve it alongside BBQ items like veggie burgers, black bean burgers, or grilled portobello mushrooms. It also complements a Mexican-themed dinner perfectly, adding a zesty and creamy element that enhances your whole meal.

Does Mexican corn have mayo?

Yes, traditional Mexican street corn salad often includes mayonnaise as the base for the creamy dressing. For a vegan option, you can easily substitute with vegan mayo, providing the same delightful creaminess without the dairy.

Filed Under: salad

Irresistibly Creamy Parmesan Italian Sausage Ditalini Soup Delight

May 29, 2025 by grace bellamy Leave a Comment

I still remember the first chilly evening I decided to whip up a pot of Creamy Parmesan Italian Sausage Ditalini Soup. As the rich aroma of sautéed garlic and Italian sausage danced through my kitchen, I could already feel the warmth wrapping around me like a cozy blanket. My family gathered around the table, eager to dig into a bowl of this comforting goodness. With its creamy broth and tender ditalini pasta, every spoonful felt like a warm hug—a perfect antidote to those hectic weeknights when fast food just won’t cut it.

What makes this soup truly special is its adaptability. Whether you prefer spicy Italian sausage for a kick or turkey sausage for a lighter twist, this recipe is incredibly versatile. You can toss in seasonal veggies like fresh spinach or zucchini for added nutrition, making it a family favorite year-round. So why wait? Grab your favorite pot and let’s create a dish that will have everyone begging for seconds!

Table of Contents
  • Why is Creamy Parmesan Italian Sausage Ditalini Soup so special?
  • Creamy Parmesan Italian Sausage Ditalini Soup Ingredients
  • How to Make Creamy Parmesan Italian Sausage Ditalini Soup
  • Tips for the Best Creamy Parmesan Italian Sausage Ditalini Soup
  • What to Serve with Creamy Parmesan Italian Sausage Ditalini Soup?
  • Creamy Parmesan Italian Sausage Ditalini Soup Variations
  • How to Store and Freeze Creamy Parmesan Italian Sausage Ditalini Soup
  • Creamy Parmesan Italian Sausage Ditalini Soup Recipe FAQs
    • What type of Italian sausage should I use?
    • How can I store leftover Creamy Parmesan Italian Sausage Ditalini Soup?
    • Can I freeze this soup?
    • Why is my pasta getting mushy in the soup?
    • What if I have food allergies or dietary restrictions?
    • How can I enhance the flavor further?

Why is Creamy Parmesan Italian Sausage Ditalini Soup so special?

Irresistibly comforting, this soup wraps you in warmth with every bite. Adaptable to your tastes, you can easily switch out sausages or add vibrant seasonal veggies, making it a true crowd-pleaser. Rich flavors of Parmesan infuse every spoonful, providing that ultimate soul-soothing experience. Plus, it’s simple enough for weeknight dinners, ensuring delicious home-cooked meals on busy evenings. If you’re looking for more comforting dishes, check out the delightful garlic butter chicken bites with creamy parmesan pasta for another family favorite!

Creamy Parmesan Italian Sausage Ditalini Soup Ingredients

Get ready to dive into comfort with these essential ingredients!

For the Soup
• Italian Sausage – The hearty protein base; opt for spicy sausage for heat or turkey sausage for a leaner choice.
• Olive Oil – Essential for browning the sausage and sautéing vegetables to perfection.
• Onion – Adds a depth of flavor; sauté until translucent for optimal sweetness.
• Garlic – This aromatic staple creates a savory foundation for the soup.
• Diced Tomatoes – Adds essential acidity and body to the creamy broth.
• Chicken Stock – The flavorful liquid base that brings the soup together.
• Dried Basil and Oregano – These herbs provide that classic Italian flair, enhancing the overall taste.
• Ditalini Pasta – Its small shape absorbs the broth beautifully; toasting it first in olive oil adds a delightful nuttiness.
• Heavy Cream – The magic ingredient for achieving that irresistible creamy texture.
• Parmesan Cheese – Offers a rich, savory flavor; freshly grated is a must for melting into the soup.
• Fresh Parsley – This bright garnish elevates the dish; substitute with basil in summer for a refreshing twist.
• Salt and Black Pepper – Essential for seasoning to taste, balancing all the flavors perfectly.

You’ll find full measurements in the recipe card below.

How to Make Creamy Parmesan Italian Sausage Ditalini Soup

  1. Brown the sausage: In a large pot, heat olive oil over medium-high heat. Add Italian sausage and break it up into small pieces, cooking until it’s browned and cooked through, about 5-7 minutes. Remove from the pot and set aside.

  2. Sauté onions and garlic: In the same pot, add diced onions and minced garlic, sautéing until the onions become translucent and fragrant, roughly 3-4 minutes. This will create a flavorful base for your soup.

  3. Combine ingredients: Stir in the diced tomatoes, chicken stock, dried basil, oregano, and the browned sausage. Bring the mixture to a gentle simmer, allowing the flavors to meld for about 10 minutes.

  4. Add the pasta: Toss in the ditalini pasta and cook according to package instructions, generally 7-9 minutes. For added flavor, lightly toast the pasta in olive oil before this step for a nutty touch.

  5. Stir in cream and cheese: Lower the heat and mix in the heavy cream and freshly grated Parmesan cheese, stirring until melted and blended into the soup. Don’t forget to reserve some pasta cooking water to adjust the consistency if needed!

  6. Season and garnish: Season with salt and black pepper to taste. Ladle the soup into bowls and garnish with fresh parsley for a pop of color and flavor.

Optional: Serve with a sprinkle of extra Parmesan for that cheesy goodness!

Exact quantities are listed in the recipe card below.

🍳 Craving extra flavor inspo? Follow our Pinterest for fresh ideas every day!

Tips for the Best Creamy Parmesan Italian Sausage Ditalini Soup

Use Quality Cheese: Freshly grated Parmesan: Opt for high-quality Parmesan cheese, preferably Parmigiano Reggiano, for rich flavors and a perfect melt.

Toast the Pasta: Enhance flavor: Lightly toast the ditalini in olive oil before adding to the soup for added nuttiness and warmth.

Add Veggies Wisely: Boost nutrition: Incorporate seasonal vegetables like spinach or zucchini, but be cautious not to overcrowd—balance is key!

Mind the Pasta: Avoid mushiness: Do not overcook the pasta; it should remain al dente to absorb broth while maintaining its shape.

Adjust Consistency: Perfect reheating tip: When reheating leftovers, add a splash of chicken stock to restore that desired creamy consistency.

What to Serve with Creamy Parmesan Italian Sausage Ditalini Soup?

Creating a stunning meal is easy when you have delightful sides and drinks in mind to complement that creamy bowl of goodness.

  • Crusty Italian Bread: Pair with warm, crusty bread to soak up the creamy soup. A light spread of garlic butter takes it to the next level.

  • Simple Green Salad: A fresh green salad dressed with olive oil and balsamic vinegar adds a bright contrast, balancing the richness of the soup.

  • Roasted Vegetables: Seasoned and roasted seasonal vegetables offer a deliciously sweet complement. The caramelization enhances the flavors of both the soup and the veggies.

  • Cheesy Garlic Knots: These warm, cheesy bites are perfect for dipping into the soup, making each bite irresistible.

  • Red Wine: A glass of robust red wine elevates the meal. The wine’s depth complements the savory Italian flavors beautifully.

  • Chilled Lemonade: If you prefer a non-alcoholic option, a refreshing glass of lemonade adds a zingy brightness that contrasts the soup’s creaminess.

  • Dessert: Finish off with a light dessert, like panna cotta or fruit sorbet, to cleanse the palate without overwhelming it.

Each pairing not only enhances your creamy Parmesan Italian Sausage Ditalini Soup but also transforms it into a complete dining experience your family will adore!

Creamy Parmesan Italian Sausage Ditalini Soup Variations

Feel free to explore these delightful twists to make this comforting soup your own!

  • Spicy Kick: Use spicy Italian sausage for an extra layer of heat that’ll warm your soul on chilly nights.
  • Turkey Swap: Opt for turkey sausage for a lighter, guilt-free version without compromising flavor.
  • Orzo Option: Replace ditalini with orzo or small shells, adding a unique texture to delight your palate.
  • Veggie Boost: Toss in fresh spinach or kale, zucchini, or cherry tomatoes for a burst of color and nutrition.
  • White Bean Delight: Incorporate white beans for added creaminess and protein, making it even heartier.
  • Herb Twist: Consider fresh basil during summer for a fragrant change, or chives for a milder herb kick.
  • Creamy Alternative: Swap heavy cream with half-and-half for a slightly lighter soup without losing that creaminess.

Each of these variations brings a fresh spin to your bowl, making the recipe endlessly adaptable for your family’s tastes. So, gather your ingredients, and let your creativity flow!

How to Store and Freeze Creamy Parmesan Italian Sausage Ditalini Soup

Fridge: Store leftover soup in an airtight container in the refrigerator for up to 3 days. This keeps the creamy goodness fresh!

Freezer: For longer storage, freeze the soup in a freezer-safe container for up to 3 months. Avoid freezing with pasta to prevent it from becoming mushy.

Reheating: When ready to enjoy, thaw in the fridge overnight, then reheat on the stove. Add a splash of chicken stock to maintain the creamy texture.

Make-Ahead Tip: Prepare the soup in advance but store the pasta separately to prevent it from absorbing too much liquid before serving.

Creamy Parmesan Italian Sausage Ditalini Soup Recipe FAQs

What type of Italian sausage should I use?

Absolutely! The choice between spicy Italian sausage and turkey sausage is all yours. If you desire a little kick, spicy sausage will add heat and zest to the soup. For a lighter meal, turkey sausage is an excellent alternative—it’s flavorful but cuts down on fat. I often recommend experimenting with both to discover your family’s favorite!

How can I store leftover Creamy Parmesan Italian Sausage Ditalini Soup?

Very easily! Simply transfer any leftover soup into an airtight container and store it in the refrigerator for up to 3 days. Ensure it’s cooled down to room temperature before sealing to maintain freshness. This way, you’ll have delicious comfort food ready for busy days ahead!

Can I freeze this soup?

Of course! Freezing is a great option for longer storage. I recommend that you freeze the soup in a freezer-safe container for up to 3 months. Just remember to leave out the pasta before freezing, as it can become mushy after thawing. When you’re ready to enjoy, thaw the soup overnight in the fridge, then reheat on the stove, adding a bit of chicken stock if needed for creaminess.

Why is my pasta getting mushy in the soup?

Oh, don’t worry! This happens when the pasta is overcooked or if it sits in the broth too long. To avoid this, make sure to add the ditalini during the last few minutes of cooking. Also, you can cook the pasta separately and combine it with the soup only when serving. This way, the pasta remains perfectly al dente and maintains its delightful texture.

What if I have food allergies or dietary restrictions?

Definitely consider ingredient substitutions! If you’re cooking for someone with gluten sensitivities, you can use gluten-free pasta like rice or quinoa. For dairy-free options, coconut cream or almond milk can serve as great alternatives to heavy cream. Just remember to read the labels, especially when it comes to sausage, to ensure they meet any dietary needs.

How can I enhance the flavor further?

The more, the merrier! To amp up the flavor, try toasting your ditalini in olive oil before adding it to the soup—this step adds a lovely nuttiness. You can also incorporate your favorite seasonal veggies—such as spinach or zucchini—just be cautious not to overcrowd the soup. Adding fresh herbs right before serving can also elevate its flavor profile!

Filed Under: Soups

Irresistible Lemon Raspberry Cookies That Are Guilt-Free & Scrumptious

May 28, 2025 by grace bellamy Leave a Comment

I still remember the sunny afternoon my friend and I decided to bake something special together. As we rummaged through the pantry, our eyes landed on a basket of vibrant, plump raspberries and a couple of lemons, their bright yellow skins begging to be turned into something delightful. That’s when the idea hit us—Lemon Raspberry Cookies! The thought of soft, chewy cookies bursting with fruity goodness and the zesty tang of fresh lemon was irresistible.

These gluten-free delights are not just any cookies; they’re a playful twist on classic flavors that bring joy to every bite. With a sprinkle of lemon sugar on the outside, the cookies have a delightful crunch that gives way to a tender, soft interior filled with sweet, tart raspberry goodness. They’re perfect for satisfying those afternoon cravings or impressing guests at your next gathering. Plus, they can easily be made vegan, nut-free, and even tailored for those who prefer all-purpose flour! So let’s dive into this scrumptious recipe—it’s time to create some cookie magic!

Why Are Lemon Raspberry Cookies So Irresistible?

Delightful Flavor Combo: These cookies perfectly balance sweet and tangy, making every bite a vibrant taste explosion.
Guilt-Free Indulgence: Gluten-free and easily adaptable, they cater to various dietary needs without sacrificing flavor.
Fun Texture: Enjoy a crispy lemon sugar exterior contrasted by a soft, chewy interior, creating a delightful eating experience.
Quick and Easy: Whip these up in no time for a delicious treat or special occasion. They’re perfect for when friends drop by unexpectedly!
Endless Variations: Whether you want vegan, nut-free, or all-purpose flour options, this recipe caters to all preferences. Try pairing them with a comforting bowl of lemon chicken orzo soup for a delightful meal!

Table of Contents
  • Why Are Lemon Raspberry Cookies So Irresistible?
  • Lemon Raspberry Cookies Ingredients
  • How to Make Lemon Raspberry Cookies
  • What to Serve with Lemon Raspberry Cookies?
  • Expert Tips for Lemon Raspberry Cookies
  • How to Store and Freeze Lemon Raspberry Cookies
  • Lemon Raspberry Cookies Variations
  • Lemon Raspberry Cookies Recipe FAQs
    • What should I look for when selecting raspberries for the cookies?
    • How should I store my Lemon Raspberry Cookies?
    • Can I freeze the cookie dough? If so, how?
    • Why did my cookies come out gummy?
    • Do I need to refrigerate Lemon Raspberry Cookies?
    • Can I make a vegan version of these cookies?

Lemon Raspberry Cookies Ingredients

• Discover the key ingredients that make these cookies a true delight!

For the Cookie Dough
• Gluten-Free Flour – Provides structure; for all-purpose flour substitute, use 2 packed cups (336 grams).
• Baking Powder – Acts as a leavening agent to help the cookies rise.
• Kosher Salt – Enhances the flavors and balances the sweetness.
• Unsalted Butter or Vegan Baking Stick – Adds richness and tenderness; ensure it’s at room temperature.
• Granulated Sugar – Sweetens while aiding in browning for a nice crisp.
• Cornstarch – Aids in binding and gives a tender crumb when mixed with water.
• Milk – Adds moisture; opt for non-dairy milk for a vegan option.
• Fresh Squeezed Lemon Juice – Infuses tartness and vibrant flavor into the cookies.
• Lemon Zest – Gives an intense lemon flavor and a lovely aroma.
• Frozen Raspberries (Chopped) – Brings moisture and the delightful raspberry flavor; avoid over-chopping.

For the Lemon Sugar Coating
• Lemon Sugar – A mix of granulated sugar and lemon zest to create a delightful crunch on the cookie’s exterior.

For the Optional Raspberry Glaze
• Confectioners Sugar – Creates a sweet glaze; whisk with fresh raspberries and water until smooth.

Full measurements are in the recipe card below.

How to Make Lemon Raspberry Cookies

  1. Prep Lemons and Raspberries: Begin by zesting and juicing your lemons. Next, chop your frozen raspberries into smaller pieces, making sure not to puree them—that fresh raspberry flavor should shine through!

  2. Combine Dry Ingredients: In a mixing bowl, whisk together the gluten-free flour, baking powder, and kosher salt until well combined. This will ensure that your cookies rise perfectly.

  3. Make Cornstarch Water: In a small bowl, whisk the cornstarch with a little water until smooth. This mixture will help bind your cookie dough and keep it tender.

  4. Cream Butter & Sugar: In another large bowl, cream the unsalted butter (or vegan baking stick) with granulated sugar until it’s soft and creamy. This step is key to achieving fluffy cookies!

  5. Incorporate Wet Ingredients: Add the cornstarch water mixture, milk, and lemon zest/juice to the butter-sugar blend. Mix until all wet ingredients are fully combined.

  6. Mix in Dry Ingredients: Gradually incorporate the dry mixture from step two into the wet ingredients. Gently fold in the chopped raspberries. Once mixed, freeze the dough for at least 1 hour to prevent spreading while baking.

  7. Make Lemon Sugar: In a small bowl, whisk together granulated sugar and lemon zest. This vibrant mix will create the delicious, crunchy exterior for your cookies.

  8. Scoop and Coat: Using a cookie scoop or spoon, form dough balls and roll them in the lemon sugar mixture until fully coated.

  9. Bake: Preheat your oven to 325°F (160°C) and place the coated dough balls on a parchment-lined baking sheet. Bake for 15-16 minutes until the edges are lightly golden.

  10. Reshape and Cool: Immediately reshape cookies with a spatula for uniformity. Let them cool on the baking sheet for a few minutes before transferring them to a cooling rack.

  11. Make Glaze: In a bowl, whisk together confectioners sugar, fresh raspberries, and a little water until smooth to create your optional raspberry glaze.

  12. Glaze and Serve: Drizzle the glaze over your cooled cookies, allowing it to harden before serving.

Optional: Serve with a dollop of whipped cream for an extra treat!
Exact quantities are listed in the recipe card below.

What to Serve with Lemon Raspberry Cookies?

Nothing elevates the experience of savoring these delightful cookies quite like thoughtfully paired accompaniments that complement their zesty and sweet flavors.

  • Fresh Berries: A medley of strawberries and blueberries enhances the fruity notes and adds a refreshing touch. The brightness of the berries mirrors the vibrant raspberry flavor in the cookies.

  • Lemonade: A chilled glass of homemade lemonade is a perfect match! Its tartness brightens the lemon notes in the cookies while refreshing the palate between bites.

  • Vanilla Ice Cream: The creaminess of vanilla ice cream juxtaposes the chewy texture of the cookies. You can even crumble the cookies on top for a delightful dessert combination!

  • Herbal Tea: A fragrant herbal tea, like chamomile or lemon balm, brings a soothing element to the table. The floral notes harmonize beautifully with the citrus flavor of the cookies.

  • Coconut Whipped Cream: Light and airy coconut whipped cream adds a subtle sweetness and richness, making each bite more indulgent. A dollop on the side creates a delightful interplay of flavors.

  • Cheese Platter: A selection of soft cheeses, like goat cheese or brie, contrasts the sweetness of the cookies. The creaminess creates an unexpected yet harmonious fusion of tastes.

  • Sparkling Water: Offering a bubbly sparkling water with a hint of lemon or lime refreshes the mouth after the sweet adventure of these cookies. It balances the sweetness with a light effervescence.

  • Chocolate Drizzle (Optional): For those who enjoy a richer contrast, a light drizzle of dark chocolate over the cookies can bring a decadent twist that pairs beautifully with the fruitiness.

  • Peach Sorbet: A scoop of peach sorbet adds a fruity chill to each bite. The sweet and tart profile complements the cookies and creates a delightful summer dessert experience.

Expert Tips for Lemon Raspberry Cookies

  • Chill the Dough: Don’t skip chilling the dough for at least 1 hour; this step prevents spreading and ensures a perfect shape.

  • Reshape Right Away: Immediately reshape cookies with a spatula after baking to keep a neat circle. This will enhance their appetizing appearance.

  • Coat with Lemon Sugar: Roll cookie dough balls thoroughly in lemon sugar for that irresistible crunch and tart flavor balance.

  • Check Baking Time: Monitor your cookies closely during the last few minutes of baking; they should be lightly golden around the edges for the best texture.

  • Vegan Adaptation: If you’re making vegan lemon raspberry cookies, substitute dairy ingredients with plant-based alternatives, ensuring delicious results without sacrifice.

How to Store and Freeze Lemon Raspberry Cookies

Room Temperature: Keep cookies in an airtight container at room temperature for up to 3 days to maintain freshness and flavor.

Fridge: For extended freshness, store the lemon raspberry cookies in the fridge for up to 5 days. Ensure they are in a well-sealed container to prevent drying out.

Freezer: Freeze the cookie dough balls wrapped in plastic wrap and placed inside a zip-top bag for up to 30 days. Bake from frozen, adding an extra minute or two to the baking time.

Reheating: To enjoy warm cookies, pop them in the microwave for about 10-15 seconds or warm in the oven at 300°F (150°C) for a few minutes until just heated through.

Lemon Raspberry Cookies Variations

These delightful cookies are just begging for your personal touch!

  • Vegan: Swap the butter for a vegan baking stick and use non-dairy milk for a lush, plant-based delight. The results will be equally delicious while catering to your vegan friends!

  • All-Purpose Flour: Replace the gluten-free flour with 2 packed cups (336 grams) of all-purpose flour. Just remember to keep chilling the dough for consistent goodness!

  • Smaller Cookies: Use a small cookie scoop to create mini treats and bake for 13-14 minutes. Perfect for bite-sized pleasures! Each little cookie is bursting with flavor and will disappear in seconds.

  • Zesty Twist: Add a pinch of lime zest along with the lemon for an exciting citrus punch. The combined flavors will bring a unique twist to your cookies that will set them apart.

  • Berry Medley: Mix in frozen blueberries or blackberries in place of half the raspberries. This swap introduces a new berry flavor and colorful contrast that your taste buds will thank you for!

  • Nutty Crunch: Consider adding a handful of chopped walnuts or pecans for added texture and a nutty flavor. Just ensure you’re okay with nuts for dietary needs!

  • Spicy Kick: Stir in a hint of ground ginger or cinnamon to warm the flavors. It gives the cookies a cozy, unexpected kick that’s perfect for chilly days.

  • Lemon Glaze: Instead of raspberry glaze, try making a simple lemon glaze with powdered sugar and lemon juice. Drizzling this bright topping will accentuate the lemon flavor beautifully!

For More Recipes, Follow Us On Pinterest

Lemon Raspberry Cookies Recipe FAQs

What should I look for when selecting raspberries for the cookies?

Choosing the right raspberries is crucial for flavor. Look for plump, firm berries that are deep red in color. Avoid any with dark spots or mushiness, as they may be overripe. Fresh raspberries can be used if preferred, but if you opt for frozen, make sure they are evenly chopped so they mix well into the dough without turning the cookies blue.

How should I store my Lemon Raspberry Cookies?

For optimal freshness, store your cookies in an airtight container at room temperature for up to 3 days. If you want to extend their shelf life, keep them in the fridge for up to 5 days. Always ensure they are sealed well to prevent them from drying out.

Can I freeze the cookie dough? If so, how?

Absolutely! To freeze the dough, scoop the cookie dough balls and roll them in lemon sugar. Wrap each ball tightly in plastic wrap and place them in a zip-top bag. They can be frozen for up to 30 days. When you’re ready to bake, simply preheat your oven and bake the frozen dough, adding an extra minute or two to the baking time.

Why did my cookies come out gummy?

Gummy cookies can result from overmixing the dough or not having the right flour-to-liquid ratio. Make sure to gently fold the dry ingredients into the wet ones. If your dough feels too wet, consider adding a touch more gluten-free flour to balance it out. Chilling the dough also helps prevent this issue by firming it up.

Do I need to refrigerate Lemon Raspberry Cookies?

It’s not necessary to refrigerate them, but doing so can help keep them fresh for a few extra days. If you prefer your cookies chilled, feel free to pop them in the fridge, just remember to bring them to room temperature before enjoying for the best flavor!

Can I make a vegan version of these cookies?

Certainly! To make vegan Lemon Raspberry Cookies, substitute the unsalted butter with a vegan baking stick, and use non-dairy milk in place of regular milk. Both options will yield delicious results without compromising flavor or texture. Don’t forget to check for vegan sugar if that’s a dietary concern as well!

Filed Under: Dessert

Easy Beef Chow Mein: Quick, Delicious, and Totally Satisfying

May 28, 2025 by grace bellamy Leave a Comment

I still remember the first time I whipped up this Beef Chow Mein recipe in my cozy kitchen, the fragrant aroma swirling around me, instantly transporting me to my favorite local Asian bistro. It was a hectic weeknight, and I found myself yearning for something vibrant, comforting, and utterly satisfying without spending hours in the kitchen. With just 30 minutes to spare, this stir-fry miracle became my go-to dish!

Tender strips of steak mingle with perfectly cooked chow mein noodles and a colorful medley of crisp vegetables, all enveloped in a savory sauce that’s bursting with umami flavor. Not only is this recipe unbelievably quick and easy, but it’s also incredibly versatile—swap in chicken or prawns for a delightful twist! Perfect for busy evenings when you want to elevate your dinner without the hassle, this Beef Chow Mein will quickly become a favorite at your table. Join me in crafting a dish that’s full of flavor and nostalgia; it’s time to make your weeknights deliciously memorable!

Why is Beef Chow Mein a must-try?

Quick Preparation: You’ll have this delicious meal ready in just 30 minutes, perfect for busy weeknights!
Flavor Explosion: The blend of umami-rich ingredients ensures each bite is packed with flavor.
Versatile Options: Easily swap out beef for chicken or prawns, tailoring it to your taste preferences.
Healthy and Colorful: A vibrant mix of fresh vegetables adds nutrients and a delightful crunch.
Family Favorite: Whether it’s a casual dinner or special occasion, this dish is sure to be a crowd-pleaser.
Looking for more quick meals? Check out my Beef Chow Mein for family-friendly inspiration!

Beef Chow Mein Ingredients

• Dive into making this beloved dish!

For the Noodles
• Dried Chow Mein Noodles – Main carbohydrate component; for a lighter alternative, use fine egg noodles.

For the Beef
• Thin Sirloin, Skirt, or Flank Steak – Main protein component; slice thinly against the grain for tenderness.
• Garlic Salt – A seasoning that enhances the flavor of the beef.
• Black Pepper – Adds a hint of spice to complement the seasoning.

For the Vegetables
• Small Onion – Provides a sweet aromatic base for the stir-fry.
• Garlic – Minced, it brings a pungent flavor that elevates the dish.
• Carrot – Adds natural sweetness and a delightful crunch.
• Green Bell Pepper – Contributes color and texture to the stir-fry.
• Savoy Cabbage – Adds a lovely crispness.
• Beansprouts – Offers a fresh, crunchy element that brightens every bite.

For the Sauce
• Cornflour (Cornstarch) – Thickens the chow mein sauce for a satisfying consistency.
• Dark Soy Sauce – Provides rich umami flavor and dark color.
• Chinese Rice Wine – Deepens the flavor and adds authenticity.
• Kecap Manis (Sweet Soy Sauce) – Infuses sweetness and thickness into the sauce.
• Hoisin Sauce – Adds a sweet and savory profile to the dish.
• Beef Stock – Serves as the base for the chow mein sauce.
• Sesame Oil – Delivers a lovely nutty flavor that enhances the dish.
• White Pepper – Adds subtle spice to round out the flavors.

For Garnishing
• Chopped Spring Onions (Scallions) – Fresh garnish to add mild onion flavor.
• Sesame Seeds – Provides a lovely crunch on top.
• Chilli Flakes – For those who crave a bit of heat!

You can find full measurements in the recipe card below.

How to Make Beef Chow Mein

  1. Cook the Noodles: Bring a pot of water to a boil and cook the chow mein noodles according to the package instructions. Drain and rinse them under cold water to stop the cooking process.

  2. Prepare the Sauce: In a bowl, mix the cornflour, dark soy sauce, Chinese rice wine, kecap manis, hoisin sauce, beef stock, sesame oil, and white pepper together until combined. Set aside.

  3. Heat the Wok: Heat 2 tablespoons of sunflower oil in a wok over high heat until shimmering. This quick process helps achieve that desired stir-fry quality.

  4. Stir-Fry the Steak: Season the thinly sliced steak with garlic salt and black pepper, then add it to the hot wok. Stir-fry for 2-3 minutes until just cooked through, then remove and set aside.

  5. Cook the Vegetables: Pour the remaining tablespoon of oil into the wok, then add the sliced onion, minced garlic, and matchstick carrots. Stir-fry for about 3 minutes until the vegetables begin to soften.

  6. Add More Veggies: Toss in the green bell pepper, savoy cabbage, and beansprouts. Continue stir-frying for an additional 2 minutes until they’re vibrant and tender-crisp.

  7. Combine Everything: Return the cooked steak and drained noodles to the wok. Pour the prepared sauce over the mixture and gently toss everything together until well combined and heated through for about 2-3 minutes.

  8. Serve and Garnish: Spoon your delicious beef chow mein onto plates, and garnish with fresh chopped spring onions, a sprinkle of sesame seeds, and chili flakes for an extra kick if desired.

Optional: Add a dash of soy sauce for an extra flavor boost!
Exact quantities are listed in the recipe card below.

Beef Chow Mein Variations

Feel free to get creative with your chow mein! Each twist promises a delightful take on the classic dish.

  • Chicken Swap: Replace beef with sliced chicken breast for a lighter, yet equally delicious option.

  • Prawn Delight: Use prawns instead of beef for a seafood twist; just be sure to cook them until pink and opaque.

  • Mushroom Medley: Add sliced mushrooms for an earthy flavor that complements the other ingredients beautifully.

  • Extra Crunch: Toss in some water chestnuts for a delightful crunch and added texture in every bite.

  • Spice It Up: Incorporate sliced jalapeños or a dash of sriracha for an exciting kick of heat that warms your palate.

  • Veggie Power: Replace beef with tofu for a vegetarian option that’s packed with protein and flavor.

  • Snow Peas Addition: Include snow peas in your mix for a fresh burst of sweetness that brightens the dish.

  • Sweet & Sour Twist: Drizzle a touch of sweet and sour sauce alongside your chow mein sauce for an extra layer of delightful flavor.

How to Store and Freeze Beef Chow Mein

Fridge: Store any leftover beef chow mein in an airtight container in the fridge for up to 3 days. Ensure it’s completely cooled before sealing to maintain freshness.

Freezer: For longer storage, freeze beef chow mein in freezer-safe bags or containers for up to 2 months. Remove as much air as possible to prevent freezer burn.

Reheating: To reheat, thaw in the refrigerator overnight, then stir-fry in a hot wok for a few minutes until warmed through. You can add a splash of water or soy sauce to revitalize the dish.

Portioning: Consider portioning out servings before freezing; this makes it easy to defrost the exact amount you need for a quick dinner night featuring your delicious beef chow mein!

Expert Tips for Beef Chow Mein

• Slice Against the Grain: Always slice your steak against the grain for maximum tenderness; this ensures each bite is melt-in-your-mouth delicious.

• Prep Ingredients First: Since this dish cooks quickly, have all ingredients prepped and ready before starting to prevent any overcooking.

• Wok Heat is Key: Ensure your wok is hot when adding ingredients; this achieves that beloved stir-fry sear and enhances the flavors wonderfully.

• Don’t Overcook the Beef: Remove the steak as soon as it’s no longer pink; it will continue cooking off the heat, ensuring it stays juicy in your Beef Chow Mein.

• Customize Away: Feel free to swap out veggies or protein for what you have on hand, making this dish truly adaptable and suited to your family’s preferences.

For More Recipes Follow Us On Pinterest

What to Serve with Beef Chow Mein?

Creating a delightful dining experience is about pairing flavors and textures that enhance your meal’s vibrancy and satisfaction.

  • Crispy Spring Rolls: These golden, crunchy bites provide a satisfying contrast to the tender beef and noodles, making a perfect starter.

  • Steamed Dumplings: Soft, savory dumplings filled with meat or veggies complement the chow mein’s flavors and elevate your Asian dinner night.

  • Egg Fried Rice: Fluffy rice laden with eggs, peas, and carrots offers a satisfying balance of textures while soaking up the delicious chow mein sauce.

  • Asian Cucumber Salad: Refreshingly crisp and tangy, this salad adds a bright, crunchy element that cuts through the richness of the noodles.

  • Sweet and Sour Chicken: The sweet, tangy flavors of this classic dish provide a complementary taste experience, making your meal fun and exciting.

  • Mango Bubble Tea: This trendy drink adds a hint of sweetness and flavor that pairs well with the savory notes of your beef chow mein.

Indulge in these pairings for a complete journey through Asian flavors that your family will love!

Beef Chow Mein Recipe FAQs

What is a beef chow mein?

Beef chow mein is a classic Chinese stir-fry dish featuring thinly sliced beef, chow mein noodles, and a variety of colorful vegetables, all tossed together in a savory sauce. It’s renowned for its delightful combination of textures and flavors that provide a satisfying meal.

What is the difference between beef lo mein and beef chow mein?

The primary difference lies in the type of noodles and cooking method. Chow mein noodles are typically stir-fried until crispy, while lo mein noodles are boiled and then mixed with the sauce. In essence, chow mein features a delightful crunch, whereas lo mein boasts a softer, chewier consistency.

How to tenderize beef for chow mein?

To tenderize beef for chow mein, slice it thinly against the grain and marinate it if desired. You can use ingredients like soy sauce, cornstarch, or even a touch of baking soda to help break down the protein fibers. Allow the beef to marinate for at least 15-30 minutes for the best results, ensuring a tender bite in your dish.

How to store leftover beef chow mein?

To store leftover beef chow mein, place it in an airtight container and refrigerate it for up to 3 days. Make sure to let it cool completely before sealing to maintain optimal freshness. This way, you can enjoy the delicious flavors again!

Can I freeze beef chow mein?

Absolutely! For freezing, portion your beef chow mein into freezer-safe bags or containers, removing as much air as possible to prevent freezer burn. It can be stored for up to 2 months. When you’re ready to eat, simply thaw it in the fridge overnight, then stir-fry it in a hot wok with a splash of water or soy sauce to refresh the flavors.

What dietary considerations should I be aware of?

If you’re cooking for someone with food allergies, consider checking for sensitivities to soy sauce or gluten. You can easily swap soy sauce for a gluten-free alternative like tamari or omit it altogether. Additionally, keep an eye on the vegetables used; some may not be suitable for certain diets. Always ensure to serve a balanced meal that suits everyone’s preferences and dietary needs.

Filed Under: Main Dishes

Irresistibly Easy Caprese Dip: Cheesy Summer Bliss

May 27, 2025 by grace bellamy Leave a Comment

It was a sunny afternoon, and the air was filled with the sweet scent of summer. I was reminiscing about the times spent at our family potlucks, where the centerpiece was always a vibrant tray of Caprese salad — fresh tomatoes, lush basil, and creamy mozzarella. Those flavors, while delightful, sparked my inspiration to create something even more comforting. Enter my Easy Hot Caprese Dip, a warm twist on the classic favorite that combines all those beloved elements into a gooey, cheesy delight.

As I stirred the bubbling mix of roasted tomatoes and melt-in-your-mouth cheese, I could already picture the faces of family and friends lighting up as they gathered around the table. Not only is this dip simple to whip up, but it’s also a delightful homage to Italy that’s sure to steal the show at any gathering. Whether you’re seeking a crowd-pleaser for your next summer get-together or just a cozy appetizer for yourself, this Hot Caprese Dip is the answer to your cravings. Let’s dive into how to make this cheesy wonder!

Why is Caprese Dip a Must-Try?

Flavor Explosion: The Caprese Dip delivers a delightful burst of roasted tomato and gooey cheese that tantalizes the taste buds.

Quick and Easy: With minimal prep time, this dip can be ready to serve in under an hour, making it a perfect last-minute addition to any gathering.

Versatile Variations: Feel free to get creative—try adding artichokes or switch to burrata for a richer experience.

Family-Friendly: Capture everyone’s attention as they eagerly scoop up this warm, cheesy delight with crusty bread or crunchy chips.

Perfect for Summer: Ideal for warm weather gatherings, this dip will bring that comforting Italian essence to your outdoor parties.

Whether you’re in the mood for a simple snack or entertaining guests, this Caprese Dip is a delicious choice that promises satisfaction with every bite!

Caprese Dip Ingredients

For the Dip Base
• Cherry Tomatoes – Provide a juicy bite and rich flavor, essential for a vibrant Caprese Dip.
• Olive Oil – Adds richness; opt for a flavored variety for an extra kick.
• Basil Pesto – Deepens the taste with aromatic herb notes; you can use homemade or store-bought.
• Minced Garlic – Enhances savoriness; be sure to mince finely for balanced flavor.
• Kosher Salt & Black Pepper – Season to taste, bringing all the ingredients together beautifully.

For Creaminess and Cheese
• Sour Cream – Contributes tanginess and creamy texture to the dip.
• Fresh Chopped Basil – Brightens the dish with fresh herb aroma; add it just before serving.
• Fresh Mozzarella (cut into chunks) – Provides that gooey, melty texture; opt for high-quality for best results.
• Shredded Provolone Cheese – Adds a slightly sharp flavor and enhances the meltiness of the dip.
• Freshly Grated Parmesan Cheese – Introduces a nutty, salty undertone that elevates the overall flavor.

For Serving
• Crusty Bread, Crackers, or Tortilla Chips – Perfect for scooping and indulging in the cheesy goodness of the Caprese Dip.

All full measurements are in the recipe card below.

How to Make Caprese Dip

  1. Preheat your oven to 400°F. This ensures your dip bakes evenly and develops that delightful golden color.

  2. Arrange 1 cup of cherry tomatoes in a baking dish. Drizzle them with olive oil, then sprinkle over the basil pesto, minced garlic, kosher salt, and black pepper. Mix well to coat.

  3. Bake the tomatoes for 15 minutes. This step will bring out their sweetness and deepen the flavors, setting a delicious base for your dip.


  4. Mix together sour cream, chopped basil, mozzarella, provolone, and parmesan in a bowl. Stir until everything is well combined and creamy.

  5. Combine the cheese mixture with the roasted tomatoes from the oven. Toss gently to ensure each tomato is enrobed in cheesy goodness.

  6. Top the dip with halved cherry tomatoes, arranging them beautifully over the cheese mixture. This adds extra texture and a vibrant burst of flavor.

  7. Bake for another 20 minutes, until the cheese is bubbling, melted, and golden. Keep an eye on the edges for that perfect golden-brown hue.

  8. Garnish with fresh basil before serving for a pop of color and fresh aroma.

Optional: Serve with hearty sides like crusty bread or nifty tortilla chips for dipping joy.

Exact quantities are listed in the recipe card below.

Table of Contents
  • Why is Caprese Dip a Must-Try?
  • Caprese Dip Ingredients
  • How to Make Caprese Dip
  • What to Serve with Caprese Dip?
  • How to Store and Freeze Caprese Dip
  • Caprese Dip Variations
  • Expert Tips for the Best Caprese Dip
  • Easy Hot Caprese Dip Recipe FAQs
    • How do I choose the best tomatoes for my Caprese Dip?
    • How should I store leftover Caprese Dip?
    • Can I freeze Caprese Dip and how?
    • What if my Caprese Dip turns out too watery?
    • Is this dip suitable for those with dairy allergies?
    • How can I make the Caprese Dip spicier?

What to Serve with Caprese Dip?

Imagine gathering around with loved ones, laughter filling the air, as you dip into a warm, cheesy creation that brings comfort and joy.

  • Crusty Bread: The perfect vehicle for your Caprese Dip, its crunchy texture balances the creamy richness, making every scoop a delight.

  • Tortilla Chips: They add a satisfying crunch and a hint of salt, enhancing the dip’s flavors while offering a fun alternative for scooping.

  • Fresh Garden Salad: A light, refreshing salad with mixed greens and a tangy vinaigrette complements the rich and cheesy dip, providing a delightful contrast.

  • Grilled Vegetables: The smoky flavor of grilled zucchini, bell peppers, or eggplant brings a rich depth to your meal, harmonizing with the fresh ingredients in the dip.

  • Pasta Salad: Serve a cold pasta salad tossed with cherry tomatoes, olives, and basil for a hearty yet refreshing side that echoes the Caprese flavors.

  • White Wine Spritzer: A chilled glass of white wine spritzer or a refreshing spritz made with club soda will complement the creamy and tangy flavors of your dip beautifully.

Each of these pairings adds a unique touch, elevating your gathering while accentuating the exquisite taste of your Caprese Dip. Enjoy the warmth of family, friends, and flavorful bites!

How to Store and Freeze Caprese Dip

Fridge: Store leftover Caprese Dip in an airtight container for up to 3 days. Reheat in the oven at 400°F until bubbly and warmed through.

Freezer: You can freeze the dip for up to 2 months. Allow it to cool completely, then transfer to a freezer-safe container. To reheat, thaw in the fridge overnight and bake at 400°F until hot.

Airtight Wrapper: Be sure to wrap the dip tightly if freezing, preventing freezer burn and preserving its cheesy goodness.

Fresh Basil Storage: If you’ve garnished with fresh basil, add it right before serving to keep its vibrant color and flavor intact.

Caprese Dip Variations

Feel free to put your own spin on this delightful dip, bringing your personal touch to the table.

  • Artichoke Addition: Mix in artichoke hearts for an earthy flavor and added texture that complements the cheese beautifully.

  • Burrata Bliss: Substitute fresh mozzarella with creamy burrata during the last five minutes of baking for a richer, luxurious flavor. The ooze of burrata will elevate your dip to new heights!


  • Spicy Kick: Add jalapeños or a sprinkle of crushed red pepper flakes while roasting the tomatoes for a vibrant heat that dances on the palate.

  • Herb Blend: Switch up the herbaceous notes by introducing fresh oregano or thyme, providing a unique twist that enhances the classic taste.

  • Nutty Flavor: Stir in toasted pine nuts or walnuts for a crunchy surprise that adds depth and a nutty richness to every bite.

  • Creamy Avocado: Fold in mashed avocado for a creamy, green addition that brings a buttery texture and flavor enhancement—a great summer twist!

  • Cheese Swap: Experiment with different cheeses like goat cheese or feta for a tangy variation that’s perfect for adventurous taste buds. Goat cheese pairs splendidly with the tomato and basil.

  • Roasted Garlic: Instead of minced garlic, use roasted garlic cloves for a mellow, sweet, and caramelized flavor that will take your dip to a whole new level.

Let your creativity flourish and make this Caprese Dip truly yours!

Expert Tips for the Best Caprese Dip

• Fresh Ingredients: Always use the freshest tomatoes, basil, and cheese to enhance the flavor of your Caprese Dip.

• Roast Perfectly: Monitor the baking time closely to ensure the tomatoes roast without burning while retaining their juices.

• Cheese Quality Matters: Opt for high-quality mozzarella and provolone for a truly gooey, melty texture; it makes a big difference!

• Spice it Up: For a kick, add red pepper flakes when roasting the tomatoes. Just a pinch can elevate the flavor profile!

• Layer Wisely: Don’t mix in fresh basil until just before serving to maintain its vibrant color and fresh flavor.

• Serve Fresh: Enjoy your Caprese Dip warm; the gooey texture and robust flavors are best experienced immediately after baking.

For more delicious recipes like this, follow us on Pinterest!

Easy Hot Caprese Dip Recipe FAQs

How do I choose the best tomatoes for my Caprese Dip?

It’s best to select cherry tomatoes that are vibrant and firm to the touch, avoiding those with dark spots or wrinkled skin. Look for tomatoes that have a sweet aroma, as this usually indicates they are ripe and bursting with flavor!

How should I store leftover Caprese Dip?

Store any leftover Caprese Dip in an airtight container in the refrigerator for up to 3 days. When you’re ready to enjoy it again, simply reheat it in the oven at 400°F until it’s bubbling and heated through for that freshly baked taste.

Can I freeze Caprese Dip and how?

Absolutely! To freeze your Caprese Dip, let it cool completely, then transfer it to a freezer-safe container. Be sure to cover it tightly to avoid freezer burn. You can freeze it for up to 2 months. To reheat, thaw it in the fridge overnight, then bake at 400°F until warm and bubbling.

What if my Caprese Dip turns out too watery?

If your dip is too watery, it could be due to excess moisture from the tomatoes. Next time, try deseeding the tomatoes or using a bit of thickening agent like crumbled feta or a touch more cream cheese. Baking the dip a little longer can also help evaporate extra liquid.

Is this dip suitable for those with dairy allergies?

Unfortunately, the traditional recipe contains several dairy products like mozzarella, sour cream, and parmesan. However, you can make a delicious dairy-free version using vegan cheese alternatives and cashew cream instead of sour cream for a similar creamy texture.

How can I make the Caprese Dip spicier?

For a spicier twist, simply add red pepper flakes along with the garlic in the initial baking step. If you like a real kick, you can even toss in some diced jalapeños for an extra layer of heat that pairs beautifully with the creamy cheeses!

Filed Under: Appetizer

Irresistibly Creamy Tomato Rigatoni Pasta in Just 25 Minutes

February 20, 2025 by grace bellamy Leave a Comment

I still remember the first rainy evening I decided to whip up a comforting meal that would embrace me like a warm hug. I wanted something quick yet indulgent, a dish that would transform my kitchen into a cozy Italian bistro. That’s when I stumbled upon this Creamy Tomato Rigatoni Pasta recipe, and it quickly stole my heart. With tender rigatoni noodles coated in a rich, velvety tomato sauce, every bite is a satisfying blend of flavors and nostalgia.

What makes this dish even more special is how effortlessly it comes together in just 25 minutes—ideal for those whirlwind weeknights when takeout is far too tempting. Plus, it’s vegetarian-friendly, making it a hit with everyone at the table. Whether you’re feeding the family or treating yourself after a long day, this dish is guaranteed to bring smiles and happy bellies. So, let’s dive into creating this creamy delight that’s sure to inspire a love for homemade meals once again!

Why is Creamy Tomato Rigatoni Pasta a must-try?

Quick and Easy: This delightful pasta dish comes together in just 25 minutes—perfect for busy weeknights.

Rich, Comforting Sauce: The combination of heavy cream and flavorful tomato sauce creates a dangerously delicious blend that clings to every bite.

Vegetarian-Friendly: Everyone can enjoy this comforting meal, making it an excellent choice for family dinners.

Versatile Ingredients: With simple pantry staples, you can easily customize this recipe by adding your favorite proteins or veggies.

Crowd-Pleaser: Impress your family or guests with this cozy, satisfying dish; they’ll absolutely love it!

For a similar quick and delightful dinner option, check out our One Pot Creamy Sun Dried Tomato Pasta.

Creamy Tomato Rigatoni Pasta Ingredients

• Here’s everything you need for this delectable dish!

For the Pasta

  • Rigatoni Pasta – Use dry rigatoni for the perfect pasta base; it can be swapped for penne, fusilli, or rotini.

For the Saucy Goodness

  • Salted Butter – Adds richness and enhances the depth of flavor in the sauce.
  • Onion – Provides savory depth; finely dice to soften evenly.
  • Garlic – Essential for aromatic flavor; fresh, minced garlic is preferred (3-4 cloves).
  • Salt – Key for seasoning both the sauce and the pasta water.
  • Italian Seasoning – Infuses delightful Italian flavors into the dish.
  • Crushed Red Pepper Flakes – Adds the perfect heat; adjust according to taste, or omit for a milder dish.
  • Black Pepper – For seasoning; fresh-ground is always best!
  • All-Purpose Flour – Helps thicken the sauce while creating a roux for a creamy finish.
  • Heavy Cream – Creates that irresistible creamy texture; can be substituted with half-and-half for a lighter sauce.
  • Tomato Pasta Sauce – Use your favorite marinara or tomato sauce for a burst of flavor.
  • Parmesan Cheese – Freshly grated cheese adds that salty, umami finish that ties everything together.

Full measurements are in the recipe card below.

How to Make Creamy Tomato Rigatoni Pasta

  1. Cook the Rigatoni: Bring a large pot of salted water to a rolling boil. Add the dry rigatoni and cook until al dente, following the package instructions, usually about 10-12 minutes. Drain and set aside.
  2. Sauté Onions and Garlic: In a large skillet, melt the salted butter over medium heat. Add finely diced onion and cook until soft and translucent, about 3-4 minutes. Stir in minced garlic, salt, Italian seasoning, crushed red pepper flakes, and black pepper, cooking for 1 minute—keep an eye on the garlic to avoid burning.
  3. Thicken the Sauce: Sprinkle the all-purpose flour into the skillet, stirring continuously until no white flour remains, about 1-2 minutes. Gradually pour in the heavy cream and tomato pasta sauce, stirring to combine. Let the mixture simmer until it thickens slightly, about 3-4 minutes.
  4. Combine and Finish: Reserve 1 cup of the pasta water before draining the rigatoni. Add the drained pasta to the sauce in the skillet. Mix well, adding reserved pasta water a little at a time to reach your desired sauce consistency.
  5. Serve: Plate the creamy pasta, topping each serving with freshly grated Parmesan cheese. Enjoy this comforting dish hot!

Optional: Garnish with fresh basil for an aromatic touch.

Exact quantities are listed in the recipe card below.

Expert Tips for Creamy Tomato Rigatoni Pasta

• Cook Pasta Perfectly: Aim for al dente rigatoni to ensure it holds its shape and absorbs the creamy sauce beautifully.

• Watch the Garlic: Sauté garlic until fragrant, but don’t let it burn; burnt garlic can turn the dish bitter.

• Adjust for Creaminess: For a lighter sauce, consider substituting heavy cream with half-and-half, maintaining flavor without the richness.

• Pasta Water Magic: Reserve pasta water before draining; it’s perfect for adjusting sauce consistency, ensuring it clings to the rigatoni.

• Customize Flavor: Feel free to add your favorite proteins or vegetables to the Creamy Tomato Rigatoni Pasta for extra nutrition and taste!

What to Serve with Creamy Tomato Rigatoni Pasta?

Elevate your weeknight dinner with delightful sides that complement this creamy delight perfectly!

  • Garlic Bread: The crunchy, buttery flavor of garlic bread is irresistible alongside this rich pasta, perfect for scooping up every bite.
  • Roasted Green Beans: Fresh green beans bring a crisp, vibrant contrast to the creamy sauce, adding color and nutrition to your meal.
  • Caesar Salad: A refreshing Caesar salad, with its crisp romaine, parmesan, and tangy dressing, balances the richness of the rigatoni beautifully.
  • Air Fryer Pork Tenderloin: Juicy, herb-seasoned pork tenderloin offers a flavorful protein option that pairs wonderfully with the creamy pasta, satisfying the heartiest of appetites.
  • Sautéed Spinach: Lightly sautéed spinach adds a touch of earthy flavor and vibrant green hues, creating a lovely plate that feels wholesome and fulfilling.
  • Italian Red Wine: A glass of Chianti or Sangiovese enhances the Italian experience, pairing exquisitely with the layered flavors of the creamy tomato sauce.
  • Lemon Sorbet: For dessert, a light, zesty lemon sorbet cleanses the palate after the richness of the pasta, making every bite feel refreshing.
  • Baked Chicken Breast: Tender and seasoned chicken breast serves as a perfect contrast to the creaminess of the pasta, offering a savory addition to your plate.

These combinations not only make your meal unforgettable but also create a cozy dining experience that everyone will love!

Creamy Tomato Rigatoni Pasta Variations

Get ready to explore delicious ways to personalize this pasta dish and make it uniquely yours!

  • Gluten-Free: Swap out the rigatoni for a gluten-free pasta alternative like brown rice or chickpea pasta for a similar texture.
  • Dairy-Free: Use coconut cream or cashew cream in place of heavy cream to maintain a creamy texture without dairy, perfect for lactose intolerance.
  • Protein Boost: Add cooked chicken, shrimp, or sautéed mushrooms for a heartier meal that still focuses on rich flavors.
  • Veggie-Loaded: Toss in some spinach or zucchini for extra nutrition and color; they’ll add a delightful freshness to the dish.
  • Spicy Kick: Mix in diced jalapeños or a splash of your favorite hot sauce to ignite some heat, creating a zesty twist on the original recipe.
  • Smoky Flavor: Stir in some smoked paprika or roasted red pepper puree for a deeper, more complex taste that tantalizes the palate.
  • Herbaceous Twist: Fresh herbs make everything better! Add a handful of chopped basil, parsley, or oregano to enhance the aroma and flavor.
  • Cheesy Delight: Experiment with different cheeses like mascarpone or blue cheese for unique richness that elevates the dish.

No matter your taste, these variations will make your Creamy Tomato Rigatoni Pasta even more irresistible!

How to Store and Freeze Creamy Tomato Rigatoni Pasta

Fridge: Store leftover creamy tomato rigatoni pasta in an airtight container for up to 4-5 days. Reheat gently on the stove or in the microwave, adding a splash of milk or cream to restore creaminess.

Freezer: Avoid freezing creamy tomato rigatoni, as it can negatively affect the sauce’s texture, resulting in separation.

Reheating: For best results, reheat in a skillet over low heat, stirring until warmed through. If the sauce seems thick, add a little reserved pasta water to loosen it up.

Serving Fresh: Enjoy this delightful dish fresh for the best flavor and texture, ideally made in smaller portions to minimize leftovers!

Creamy Tomato Rigatoni Pasta Recipe FAQs

What sauce goes with rigatoni pasta?
Rigatoni pairs beautifully with a variety of sauces, but for my Creamy Tomato Rigatoni Pasta, a rich tomato sauce is the star. You can use marinara or any favorite tomato pasta sauce, adding cream to create that luscious, velvety texture. The creaminess beautifully clings to the pasta shapes, making each bite irresistible!

What cream is best for rigatoni?
I recommend using heavy cream for the richest flavor in your Creamy Tomato Rigatoni Pasta. However, if you prefer a lighter option, half-and-half works wonderfully too! Just keep in mind that the richness of heavy cream contributes to the overall creaminess, so if you switch to half-and-half, your sauce will be a bit lighter, but still satisfying.

Can I use rigatoni for Alfredo?
Absolutely! Rigatoni is a fantastic choice for Alfredo sauce as its shape beautifully holds onto the creamy sauce. The ridges make every bite flavorful, ensuring that each forkful is a delight. If you’re in the mood for something ultra-rich, try combining it with a homemade Alfredo sauce for a decadent twist!

How should I store leftover creamy tomato rigatoni?
To store leftover Creamy Tomato Rigatoni Pasta, place it in an airtight container in the refrigerator for up to 4-5 days. When reheating, I suggest warming it on the stove over low heat and adding a splash of milk or cream. This enhances the creaminess that might diminish during storage and helps bring the textures back to life!

What are common troubleshooting tips for creamy sauces?
If your sauce appears too thick or clumpy while making Creamy Tomato Rigatoni Pasta, don’t fret! Simply add reserved pasta water incrementally, stirring to combine until you reach your desired consistency. Also, ensure you’re not burning the garlic or flour while sautéing, as it can lead to bitterness. If this happens, starting fresh with a clean pan may be the best bet.

Can I adjust the recipe for dietary considerations?
Absolutely! You can make variations to suit your dietary preferences easily. For a dairy-free version, try using a plant-based cream alternative, like coconut cream or cashew cream. And if you’re managing allergies, just make sure to review your sauce and pasta labels carefully. Rigatoni is generally egg-free, so it should work for most vegetarian diets!

[tasty-recipe id=”1616″]

Filed Under: Main Dishes

  • « Previous Page
  • 1
  • …
  • 20
  • 21
  • 22
RecipeCrown

Hello, beautiful people! I’m Grace Bellamy, a foodie, traveler, and writer with wanderlust in my soul. Whether crafting recipes in my kitchen or exploring flavors around the globe, my greatest joy is helping you create healthier, happier lives, one delicious bite at a time.