RecipeCrown

Easy & Delicious Recipes

  • Home
  • Breakfast
  • Main Dishes
  • Dessert
  • About
  • Contact
You are here: Home / Archives for Sandwiches

Delicious Korean BBQ Chicken Sandwich with Crunchy Slaw

November 12, 2025 by grace bellamy Leave a Comment

As I perched over my stovetop, a vibrant array of spices danced before me, invoking the spirit of faraway street markets bursting with life. This Korean BBQ Chicken Sandwich with Cabbage Slaw combines bold flavors and a satisfying crunch, making it the perfect antidote to those unfulfilling fast food cravings. The marinade transforms simple chicken thighs into tender morsels, while the slaw adds a refreshing kick that brightens each bite. An undeniable crowd-pleaser, this recipe takes just about 35 minutes from start to finish, making it not only easy but an excellent option for busy weeknights or weekend gatherings. Whether you’re a seasoned home chef or an enthusiastic beginner, I guarantee this sandwich will wow your taste buds and leave you wanting more. Ready to discover how to create this culinary delight and impress your family or friends? Let’s dive into the recipe!

Korean BBQ Chicken Sandwich

Why is this sandwich a must-try?

Bold flavors: The marinade infuses the chicken with a rich, savory taste that will make your taste buds sing.
Crunchy slaw: Crisp cabbage and carrots provide a refreshing contrast, elevating each bite to new heights.
Quick and easy: In just 35 minutes, you can whip up this showstopper, perfect for busy nights.
Versatile appeal: Whether you’re a BBQ enthusiast or just seeking a satisfying meal, this sandwich caters to all tastes.
Crowd-pleaser: Serve it at gatherings, and watch as it disappears—everyone will be coming back for seconds!
Get ready to impress even the pickiest eaters with this Korean BBQ Chicken Sandwich.

Korean BBQ Chicken Sandwich Ingredients

For the Chicken
• 2 lbs boneless skinless chicken thighs – juicy and flavorful, perfect for absorbing the marinade.
• 1/2 cup soy sauce – adds salty depth and umami richness to the marinade.
• 3 tablespoons brown sugar – balances the flavors with a hint of sweetness.
• 1 tablespoon honey – enhances the glaze for a delightful caramelization.
• 2 tablespoons gochujang – a spicy Korean chili paste that brings the heat and flavor.
• 1 tablespoon rice vinegar – adds brightness and helps tenderize the chicken.
• 1 tablespoon sesame oil – infuses the chicken with a nutty aroma.
• 4 garlic cloves, minced – contributes pungent flavor to the marinade.
• 1 teaspoon grated fresh ginger – adds warmth and a hint of spiciness.
• 1 tablespoon toasted sesame seeds – provides a delightful crunch and nutty flavor.

For the Slaw
• 3 cups shredded green cabbage – offers a crisp texture that complements the sandwich.
• 1 cup shredded red cabbage – adds color and additional crunch to the slaw.
• 1 medium carrot, julienned – brings sweetness and a pop of color to the slaw mix.
• 2 tablespoons mayonnaise – creates a creamy base for your slaw dressing.
• 1 tablespoon rice vinegar – adds tanginess to enhance the slaw’s flavors.
• 1 teaspoon sugar – balances the acidity for a harmonious taste.
• Salt and black pepper to taste – season to your liking for an extra flavor boost.

For Assembly
• 4 brioche or potato sandwich buns – soft and slightly sweet, perfect for holding all the goodness.
• Butter for toasting buns – adds a golden, crispy exterior that enhances texture.
• Additional gochujang or Korean BBQ sauce for dipping (optional) – an extra kick for those who crave more spice!

This delightful blend of ingredients comes together to create an unforgettable Korean BBQ Chicken Sandwich that you and your loved ones will absolutely adore!

Step‑by‑Step Instructions for Korean BBQ Chicken Sandwich

Step 1: Prepare the Marinade
In a medium bowl, whisk together soy sauce, brown sugar, honey, gochujang, rice vinegar, sesame oil, minced garlic, grated ginger, and toasted sesame seeds until fully combined. This marinade should have a smooth consistency and a rich aroma. Add the 2 lbs of boneless skinless chicken thighs into the mixture, tossing them to ensure they are well coated. Let the chicken marinate for at least 20 minutes at room temperature for great flavor or refrigerate for up to 2 hours for an even deeper taste.

Step 2: Make the Cabbage Slaw
While the chicken is marinating, prepare the slaw to add a refreshing crunch to your Korean BBQ Chicken Sandwich. In a large bowl, combine 3 cups of shredded green cabbage, 1 cup of shredded red cabbage, and 1 julienned carrot. In a separate smaller bowl, whisk together 2 tablespoons of mayonnaise, 1 tablespoon of rice vinegar, 1 teaspoon of sugar, and a pinch of salt and black pepper. Pour this dressing over the cabbage mixture, tossing gently to coat. Chill the slaw in the refrigerator until you’re ready to assemble the sandwich.

Step 3: Cook the Chicken
Heat a cast-iron skillet or grill pan over medium-high heat, ensuring it’s hot enough for a good sear. Lightly oil the skillet if necessary to prevent sticking. Once hot, add the marinated chicken thighs, cooking them for about 6-7 minutes on each side. Look for a nice char on the exterior and ensure the chicken is cooked through, reaching an internal temperature of 165°F. After cooking, let the chicken rest for 5 minutes before slicing or serving it whole to retain juiciness.

Step 4: Toast the Buns
As the chicken rests, prepare the brioche or potato sandwich buns for that perfect crispy texture. Split each bun in half and butter each half lightly. Place them cut-side down on the same skillet or under a broiler to toast until golden brown and crisp, just about 2-3 minutes. Keep an eye on them to avoid burning, ensuring they are beautifully crisp around the edges to hold all the delicious components of the Korean BBQ Chicken Sandwich.

Step 5: Assemble the Sandwich
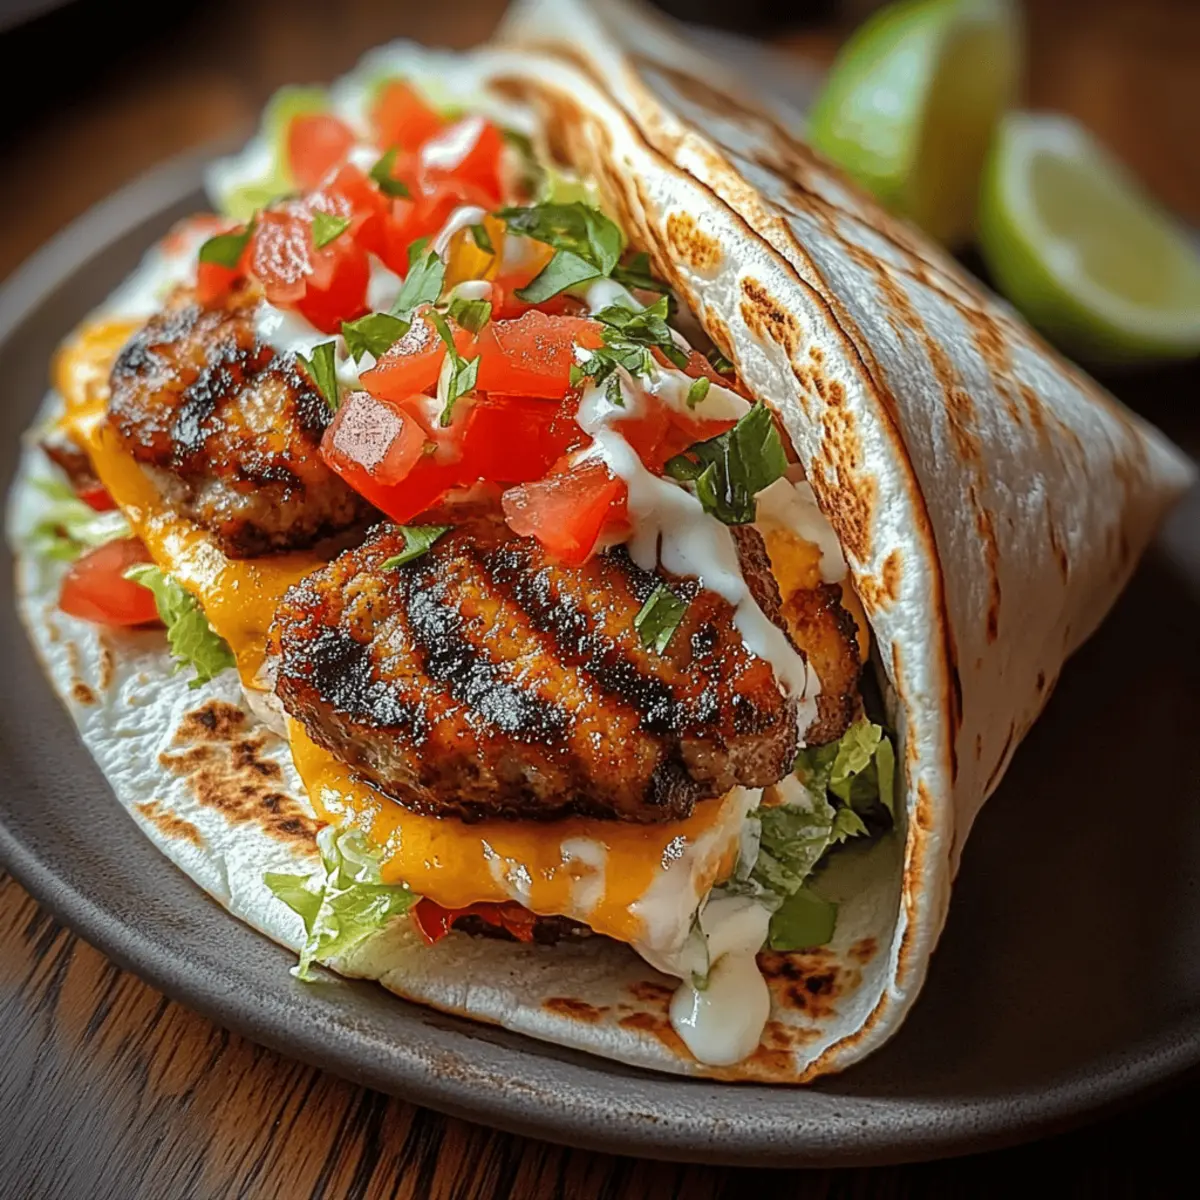
Now it’s time to bring your Korean BBQ Chicken Sandwich to life! Start by placing the bottom half of the toasted bun on a plate. Layer on the sliced or whole grilled chicken thighs, adding a spoonful of additional gochujang or Korean BBQ sauce for extra flavor. Top it off with a generous handful of the chilled cabbage slaw, allowing the crunch to peek out beautifully. Finally, crown the sandwich with the top bun and serve immediately for a delightful meal everyone will adore.

Korean BBQ Chicken Sandwich

Make Ahead Options

These Korean BBQ Chicken Sandwiches are perfect for meal prep enthusiasts! You can marinate the chicken thighs up to 24 hours in advance, allowing the flavors to deepen wonderfully. Simply combine the marinade ingredients and coat the chicken, then refrigerate until you’re ready to cook. The cabbage slaw can also be prepared a day ahead—just make sure to keep it in an airtight container in the refrigerator to maintain crispness. When it’s time to enjoy your sandwiches, grill the marinated chicken, toast the buns, and assemble with the prepared slaw for a meal that’s just as delicious as if you made it all at once. This way, you can save precious time on busy weeknights!

Korean BBQ Chicken Sandwich Variations

Feel free to mix it up and customize your Korean BBQ Chicken Sandwich to suit your taste buds!

  • Gluten-Free: Use tamari instead of soy sauce and opt for gluten-free buns.
  • Dairy-Free: Skip the mayonnaise in the slaw; try avocado or coconut yogurt for a creamy twist.
  • Spicy Kick: Add sliced jalapeños or sriracha to the slaw for an extra spicy crunch that awakens your taste buds.
  • Vegetarian Option: Swap chicken for marinated firm tofu or grilled portobello mushrooms, giving a hearty yet plant-based alternative.
  • Tangy Upgrade: Incorporate a splash of lime juice into the slaw dressing for a zesty freshness you won’t want to miss.
  • Crispier Slaw: Add shredded radishes or apple slices to your slaw for a new texture and flavor balance; the sweetness will make each bite pop.
  • Herb Infusion: Mix in fresh herbs like cilantro or basil into the slaw for a fragrant lift that brings a garden-fresh vibe.
  • Sweet and Spicy: Experiment with a fig or apricot jam spread on the bun for a delightful combination of sweet and savory that’s unexpectedly tasty.

These variations invite you to unleash your creativity in the kitchen. For additional accompaniments to elevate your meal, consider pairing with a refreshing Cucumber Salad or some crispy Sweet Potato Fries for the perfect balance!

Tips for the Best Korean BBQ Chicken Sandwich

Marinade Time: Let the chicken marinate for at least 20 minutes; refrigerating for 2 hours intensifies the flavor, preventing dry meat.

Crispy Slaw: Ensure the cabbage and carrots are well-coated in the dressing but avoid sogginess by mixing just before serving.

Perfectly Toasted Buns: Keep an eye on the buns as they toast; they should be golden brown to add that perfect crunch to your Korean BBQ Chicken Sandwich.

Rest the Chicken: Allow the cooked chicken to rest for 5 minutes; this step locks in moisture and tenderness, enhancing your sandwich’s overall texture.

Custom Spice Level: Adjust the gochujang amount to suit your taste; it can be dialed up for spice lovers or toned down for a milder flavor.

How to Store and Freeze Korean BBQ Chicken Sandwich

Room Temperature: Avoid leaving the assembled sandwich out for longer than 2 hours, as ingredients like mayonnaise can spoil quickly.

Fridge: Store any leftovers in an airtight container for up to 3 days, keeping the sandwich separate from the slaw to maintain crunch.

Freezer: If you want to freeze components, wrap the marinated chicken tightly in foil or freezer bags for up to 3 months; defrost in the fridge before cooking.

Reheating: For best results, reheat the chicken in a skillet over medium heat until warmed through, and toast buns again for that delicious crunch.

What to Serve with Korean BBQ Chicken Sandwich

Imagine a delightful feast that brings together vibrant flavors and comforting textures, perfectly complementing each mouthwatering bite.

  • Sweet Potato Fries: Crispy and sweet, these fries offer a satisfying crunch that pairs wonderfully with the savory chicken and slaw.
  • Kimchi: A traditional Korean side, this fermented cabbage delivers a spicy, tangy kick that contrasts beautifully with the sandwich’s rich flavors.
  • Asian Noodle Salad: Light and refreshing, this slaw-like salad adds an extra crunch and a complex flavor profile to your meal.
  • Mango Avocado Salsa: This bright, fruity combination adds a refreshing element, enhancing the savory profile of the Korean BBQ chicken.
  • Pickled Vegetables: A tangy bite from pickled carrots or radishes will cleanse the palate and add zest to each delicious sandwich bite.
  • Cold Soba Noodles: Light and nutty, these noodles offer a cool, refreshing counterpart to the warm, flavorful sandwich.
  • Bubble Tea: A fun, sweet drink that brings an element of playfulness, providing a delightful contrast to the savory meal.
  • Green Salad with Sesame Dressing: A light, crunchy salad with a toasty sesame dressing refreshes the palate and adds balance to your Korean BBQ feast.

Korean BBQ Chicken Sandwich

Korean BBQ Chicken Sandwich Recipe FAQs

What is the best way to select ripe chicken thighs?
When choosing chicken thighs, look for ones that are plump and have a pinkish hue. Avoid any that have an unusual odor or are discolored. Fresh chicken should feel firm to the touch, and if you’re buying organic, check for a label indicating the meat is hormone-free and antibiotic-free for a healthier option.

How should I store leftover Korean BBQ Chicken Sandwich?
Absolutely! Store any leftover Korean BBQ Chicken Sandwich in an airtight container in the fridge for up to 3 days. I recommend keeping the slaw separate until you are ready to enjoy your sandwich again, as this will help maintain the crunchiness of the cabbage.

Can I freeze the chicken for later use?
Yes, you can! To freeze your marinated chicken, tightly wrap it in foil or place it in a freezer-safe bag. It can last in the freezer for up to 3 months. When you’re ready to use it, simply defrost it in the fridge overnight and cook as per the recipe instructions. This ensures that you can enjoy a delicious meal anytime without starting from scratch!

What if my chicken isn’t cooking through?
If you find that your chicken isn’t cooking through, it might be that the heat is too high, causing the outside to char while the inside remains raw. I recommend lowering the heat slightly and cooking it longer. Always check for an internal temperature of 165°F to ensure it’s fully cooked. If it’s browning too quickly, reduce the heat and cover the pan with a lid to allow even cooking.

Are there any dietary considerations for this recipe?
When preparing the Korean BBQ Chicken Sandwich, it’s crucial to note common allergens. The soy sauce contains wheat, which may not be suitable for those with gluten sensitivities or celiac disease. For a gluten-free alternative, look for tamari sauce. Additionally, if you’re serving this sandwich to pets, avoid giving them the chicken that has been marinated in sauces due to the high sodium content. Always consult with a veterinarian regarding appropriate diets for your furry friends.

How long can I keep the slaw in the fridge?
The slaw can generally be stored in the refrigerator for up to 2 days, but it’s best enjoyed within the first day after preparation. The crunchiness of the cabbage is what makes it so delightful, so if you notice it starting to get soft, that’s a good indication that it’s time to use it up. Tossing it right before serving will help rejuvenate the texture!

Delicious Korean BBQ Chicken Sandwich with Crunchy Slaw

This Korean BBQ Chicken Sandwich is a crowd-pleasing dish combining bold flavors and crunchy slaw.

  • Medium bowl
  • large bowl
  • Cast-iron skillet or grill pan

For the Chicken

  • 2 lbs boneless skinless chicken thighs (juicy and flavorful, perfect for absorbing the marinade)
  • 1/2 cup soy sauce (adds salty depth and umami richness to the marinade)
  • 3 tablespoons brown sugar (balances the flavors with a hint of sweetness)
  • 1 tablespoon honey (enhances the glaze for a delightful caramelization)
  • 2 tablespoons gochujang (a spicy Korean chili paste that brings the heat and flavor)
  • 1 tablespoon rice vinegar (adds brightness and helps tenderize the chicken)
  • 1 tablespoon sesame oil (infuses the chicken with a nutty aroma)
  • 4 cloves garlic, minced (contributes pungent flavor to the marinade)
  • 1 teaspoon grated fresh ginger (adds warmth and a hint of spiciness)
  • 1 tablespoon toasted sesame seeds (provides a delightful crunch and nutty flavor)

For the Slaw

  • 3 cups shredded green cabbage (offers a crisp texture that complements the sandwich)
  • 1 cup shredded red cabbage (adds color and additional crunch to the slaw)
  • 1 medium carrot, julienned (brings sweetness and a pop of color to the slaw mix)
  • 2 tablespoons mayonnaise (creates a creamy base for your slaw dressing)
  • 1 tablespoon rice vinegar (adds tanginess to enhance the slaw’s flavors)
  • 1 teaspoon sugar (balances the acidity for a harmonious taste)
  • salt and black pepper to taste (season to your liking for an extra flavor boost)

For Assembly

  • 4 pieces brioche or potato sandwich buns (soft and slightly sweet, perfect for holding all the goodness)
  • Butter for toasting buns (adds a golden, crispy exterior that enhances texture)
  • Additional gochujang or Korean BBQ sauce for dipping (optional) (an extra kick for those who crave more spice)

Preparation

  1. In a medium bowl, whisk together soy sauce, brown sugar, honey, gochujang, rice vinegar, sesame oil, minced garlic, grated ginger, and toasted sesame seeds until fully combined. Add the chicken thighs into the mixture, tossing to ensure they are well coated. Let the chicken marinate for at least 20 minutes at room temperature or refrigerate for up to 2 hours.
  2. In a large bowl, combine shredded green cabbage, shredded red cabbage, and julienned carrot. In a separate bowl, whisk together mayo, rice vinegar, sugar, and a pinch of salt and black pepper. Pour this dressing over the cabbage mixture, tossing gently to coat. Chill until ready to assemble the sandwich.
  3. Heat a cast-iron skillet or grill pan over medium-high heat. Add the marinated chicken thighs, cooking for about 6-7 minutes on each side until nicely charred and cooked through. Let the chicken rest for 5 minutes before slicing or serving whole.
  4. Butter each half of the split buns and toast them cut-side down in the skillet or under the broiler until golden brown, about 2-3 minutes.
  5. Assemble the sandwich by placing the bottom half of the toasted bun on a plate. Layer on the grilled chicken, add gochujang or Korean BBQ sauce, and top with a generous handful of the chilled slaw. Crown with the top bun and serve immediately.

Marinate chicken for at least 20 minutes for best flavor. Keep slaw crunchy by mixing just before serving.

Sandwiches
Korean
BBQ, chicken, easy recipes, Korean BBQ Chicken Sandwich, quick meals, sandwich

Filed Under: Sandwiches

Monster Bagels: Fun and Spooky Breakfast for Halloween Mornings

October 19, 2025 by grace bellamy Leave a Comment

As autumn leaves swirl and the air turns crisp, it’s the perfect time to conjure up some fun in the kitchen. This Halloween, let’s transform breakfast into a feast of ghoulish delights with ideas that will thrill both kids and adults alike. One standout in my collection of Halloween breakfast ideas is the whimsical Monster Bagels, a creative twist on the classic breakfast staple that’s sure to delight even the pickiest eaters. With their playful presentation, these bagels not only double as a canvas for your culinary creativity but also sneak in some nutritious elements—thanks to the avocado and veggie toppings. Plus, they come together in no time, allowing you to spend more moments enjoying the festivities. Curious about how to make these monstrous morsels? Keep scrolling to unleash your inner chef and turn your breakfast into a spooky masterpiece!

Monster Bagels

Why Are Monster Bagels So Fun?

Whimsical creations: Monster Bagels transform an ordinary breakfast into a spooky dinner table centerpiece that both kids and adults will love.

Easy preparation: With just a few ingredients like avocado and colorful veggies, these bagels come together quickly, making breakfast fun without a huge time commitment.

Nutrient-packed: Sneak in healthy toppings alongside the fun designs—parents will appreciate the nutritious elements supporting their child’s energy for Halloween festivities!

Creative expression: Let your imagination run wild; create unique monsters with varied toppings for each family member, turning breakfast into a canvas for culinary art.

Crowd pleaser: These spooky bagels can be a hit at Halloween parties or themed brunches and are bound to make your gathering memorable.

Ready to dive into the spooky season? Check out more Halloween breakfast ideas to keep the festivities flowing!

Monster Bagels Ingredients

• Prepare to create your spookiest breakfast yet!

For the Bagels

  • Bagels – Choose whole grain or your favorite flavor for a nutritious base.
  • Avocado – A creamy layer that adds healthy fats, making these bagels deliciously satisfying.

For the Decorations

  • Cucumber slices – Use these for monster teeth and scales; they’re refreshing and crunchy.
  • Olives – Perfect for spooky eyes! Use black olives to give your monster extra character.
  • Cherry tomatoes – Slice them up as fun monster noses or add vibrant color to your creations.

For Optional Spreads

  • Cream cheese – A classic spread that adds creaminess; try flavored varieties for extra fun!
  • Guacamole – A perfect pairing with avocado, it gives a greenish hue to enhance the monster theme.

Let the monster-making begin and have fun transforming your breakfast with these Monster Bagels!

Step‑by‑Step Instructions for Monster Bagels

Step 1: Prepare the Bagels
Start by slicing your bagels in half. If you prefer toasted bagels, place the halves in a toaster or on a broiler setting for about 3-5 minutes until golden brown and crispy. Once toasted, set them aside to cool slightly; the trick is to let them maintain their shape for decorating.

Step 2: Spread the Base Layer
Generously spread a layer of creamy avocado or guacamole over each bagel half. Use a knife to spread it evenly, ensuring every bite has that delicious green goodness. The vibrant color not only enhances the monster theme but also adds a nutritious boost, setting the stage for the fun toppings to come.

Step 3: Create the Monster Features
Now for the fun part! Start decorating your Monster Bagels. Arrange cucumber slices around the edges to form teeth or scales and position cherry tomato halves as vibrant noses. Get creative; the more playful the arrangement, the more monster-like they’ll become!

Step 4: Add the Spooky Eyes
Place black olives on top of the guacamole to serve as the eyes of your creatures. You can cut the olives in half for a more dramatic effect or use whole olives for larger, more expressive eyes. This step adds personality, making your Monster Bagels come alive on the plate.

Step 5: Final Touches and Serve
Once your monsters are fully assembled, take a step back to admire your work! Feel free to add any other fun toppings or sprinkle a bit of extra seasoning for flavor. Serve your Monster Bagels immediately to friends and family, and enjoy the smiles as they take a bite into these spooky creations!

Monster Bagels

Storage Tips for Monster Bagels

  • Room Temperature: Serve Monster Bagels fresh for the best taste. If you’re preparing them ahead, keep them at room temperature for up to 2 hours before decorating to prevent sogginess.

  • Fridge: Store leftover Monster Bagels wrapped tightly in plastic wrap or an airtight container in the refrigerator for up to 1 day. However, note that the toppings may lose some crunch.

  • Freezer: For longer storage, freeze plain bagel halves for up to 2 months. When ready to enjoy, simply toast them from frozen and then add fresh toppings!

  • Reheating: If you have leftover decorated Monster Bagels, reheat them gently in a toaster oven to restore their crispness. Avoid microwaving, as it can make them chewy.

What to Serve with Monster Bagels

Embrace the spirit of Halloween and create a delightful breakfast spread that will enchant both young and old alike.

  • Pumpkin Spice Latte: A cozy drink that complements the savory and creamy flavors of the bagels, warming hearts on crisp autumn mornings.

  • Crispy Bacon Strips: The salty crunch of bacon adds a satisfying contrast, making each bite of your Monster Bagels even more enjoyable.

  • Fruit Skewers: Bright, colorful fruits like strawberries, grapes, and melon bring freshness and vibrancy, enhancing the spooky theme while keeping things light.

  • Spiced Apple Cider: A warm drink that fills the air with autumn aromas; its sweetness pairs perfectly with the savory toppings on your bagels.

  • Cheesy Scrambled Eggs: These fluffy eggs provide a comforting texture and flavor, balancing the creativity of your Monster Bagels with hearty satisfaction.

  • Halloween Smoothie Bowls: Serve these vibrant bowls topped with spooky fruits and seeds for a fun, visually appealing complement to your breakfast feast.

  • Witch’s Brew Shake: A playful, green smoothie made from spinach, banana, and almond milk that mirrors the monster theme while being nutritious.

Gather your friends and family, and make this Halloween breakfast a delicious and memorable occasion with these delightful pairings!

Tips for the Best Monster Bagels

  • Fresh Ingredients: Always use ripe avocados and fresh veggies, as they enhance the flavors and visual appeal of your Monster Bagels.

  • Creative Shapes: Experiment with different cuts and arrangements of vegetables to bring your monsters to life! Use fun, unexpected shapes for added excitement.

  • Flavor Combinations: Don’t hesitate to mix spreads! Try combining cream cheese with herbs or spices to give your bagels an extra kick of flavor and fun.

  • Get the Kids Involved: Let children help decorate their own Monster Bagels—this makes breakfast a fun activity and encourages them to eat healthy!

  • Avoid Sogginess: If you’re toasting bagels, let them cool a bit before adding toppings. This helps prevent the vegetables from wilting and keeps everything nice and crisp.

  • Switch It Up: Feel free to swap in other toppings, like bell peppers or radishes, to create unique monsters. The sky’s the limit when making your Monster Bagels!

Monster Bagels Variations & Substitutions

Get ready to let your creativity shine by mixing and matching toppings—these Monster Bagels are perfect for customization!

  • Gluten-Free: Use gluten-free bagels or make your own using almond or coconut flour for a safe alternative.
  • Vegan: Swap cream cheese for a plant-based version and use hummus to add creaminess without animal products.
  • Spicy Twist: Add sliced jalapeños or a drizzle of sriracha to give your Monster Bagels a kick that’s sure to excite.
  • Cheesy Delight: Sprinkle shredded cheese on top before baking for a melty, delicious twist that elevates the flavor profile.

For a mini-paragraph twist, consider adding roasted veggies like bell peppers or zucchini for a hearty bite. They lend a delicious flavor and an exciting texture that can satisfy even the most discerning palate.

  • Sweet Monsters: Top with peanut butter and banana slices for a nutty and sweet version that kids will find irresistible. Little hands can help slice the bananas and spread the peanut butter for all those tiny chefs in the family!

  • Colorful Creations: Go wild with a rainbow of toppings! Use shredded carrots, beets, and purple cabbage to create visually stunning monsters that are as appealing to the eyes as they are to the tummy.

  • Kid-Friendly: Offer a variety of toppings so children can build their own monsters—let them choose their eyes, mouths, and other features. This hands-on approach makes breakfast a delightful experience for everyone.

Ready for more Halloween fun in the kitchen? Explore exciting options like Creepy Crawly Cinnamon Rolls or discover new inspirations with these creative Halloween Breakfast Ideas that’ll have everyone gobbling up the ghoulish goodness!

Make Ahead Options

These delightful Monster Bagels are perfect for busy mornings and meal prep enthusiasts! You can slice and toast the bagels up to 24 hours in advance, then store them in an airtight container to keep them fresh. Additionally, you can prepare the avocado spread and store it separately in the refrigerator for the same period—just remember to add a splash of lemon juice to maintain its vibrant color and prevent browning. When you’re ready to serve, simply spread the avocado on the bagels and decorate with your desired toppings. With these make-ahead options, you’ll enjoy quick and spooky breakfasts that are just as delicious as when freshly made!

Monster Bagels

Monster Bagels Recipe FAQs

What kind of bagels should I use for Monster Bagels?
Absolutely! You can use any bagel variety that you enjoy, but I recommend whole grain for a nutritious base. They offer a heartier texture and pair wonderfully with toppings.

How should I store leftover Monster Bagels?
If you have any Monster Bagels left over, store them in the refrigerator wrapped tightly in plastic wrap or in an airtight container for up to 1 day. Keep in mind that while they will still be edible, the toppings may lose some of their crispness.

Can I freeze the bagels?
Yes, you can freeze plain bagel halves for up to 2 months! To do this, simply slice the bagels and wrap each half tightly in plastic wrap before placing them in a freezer-safe bag. When you’re ready to enjoy them, toast the frozen halves directly from the freezer, then add your fresh toppings!

What should I do if my avocado is not ripe enough?
If your avocado isn’t ripe, place it in a paper bag with a banana or apple for a day or two; the ethylene gas they emit will help speed up the ripening process. If you’re in a hurry, you can also use a bit of guacamole as an alternative spread until your avocado ripens.

Can I include other toppings on my Monster Bagels?
Very! Feel free to get creative with your toppings! Bell peppers, radishes, or even mini carrots can add extra flair. The more variety you include, the more fun and unique your Monster Bagels will be—let your imagination run wild!

How long can I keep Monster Bagels at room temperature before serving?
You can keep your Monster Bagels at room temperature for up to 2 hours before serving. Just be sure to wait until the last minute to add toppings, as this will help prevent any sogginess and keep your breakfast bright and delightful.

Monster Bagels: Fun and Spooky Breakfast for Halloween Mornings

Create whimsical Monster Bagels for Halloween breakfast fun using nutritious ingredients like avocado and veggies. Perfect for kids and adults alike!

  • toaster
  • Knife
  • cutting board

For the Bagels

  • 4 whole bagels (Choose whole grain or your favorite flavor for a nutritious base.)
  • 2 medium avocados (A creamy layer that adds healthy fats.)

For the Decorations

  • 1 cup cucumber slices (Use for monster teeth and scales.)
  • 1 cup black olives (Perfect for spooky eyes!)
  • 1 cup cherry tomatoes (Slice for fun monster noses.)

For Optional Spreads

  • 1 cup cream cheese (Try flavored varieties for extra fun!)
  • 1 cup guacamole (Perfect pairing with avocado.)

Preparation Instructions

  1. Slice bagels in half. Toast if desired for 3-5 minutes until golden brown. Allow to cool slightly.
  2. Spread avocado or guacamole over each bagel half evenly.
  3. Decorate with cucumber slices as teeth/scales and cherry tomato halves as noses.
  4. Place black olives on top for eyes, cut in half for effect if desired.
  5. Serve immediately and enjoy the playful Monster Bagels.

Use fresh ingredients for better flavor and visual appeal. Get kids involved in decorating for a fun activity!

Sandwiches
American
bagels, fun food, Halloween breakfast, healthy recipes, Monster Bagels, spooky meals

Filed Under: Sandwiches

Irresistible Jalapeño Popper Grilled Cheese You’ll Crave

October 13, 2025 by grace bellamy Leave a Comment

There’s something utterly delightful about combining bold flavors in a classic comfort food, and that’s exactly what this Jalapeño Popper Grilled Cheese offers. Imagine sinking your teeth into a warm, gooey grilled cheese stuffed with cheesy baked jalapeños and crispy bacon—it’s pure bliss! This recipe not only elevates your ordinary grilled cheese but does so quickly, making it a perfect weeknight winner. Plus, who can resist a meal that feels indulgent yet is easy enough for any home cook? Whether you want to impress guests or treat yourself to a cozy dinner, this dish will have you dreaming of more. Ready to discover the joy of this spicy twist on a classic? Let’s dive in!

Jalapeño Popper Grilled Cheese

Why is this grilled cheese irresistible?

Bold flavors: This Jalapeño Popper Grilled Cheese infuses spicy jalapeños with creamy cheese and smoky bacon for a taste explosion.
Quick & Easy: In about 30 minutes, you can whip up this gourmet comfort food, making it perfect for busy weeknights.
Crowd-Pleaser: Serve this at your next gathering, and watch it disappear! It’s a hit with friends and family alike.
Customizable: Feel free to add more toppings or adjust the spice level to suit your taste, ensuring each bite is just right.
Even if you’re looking to elevate a simple weeknight meal, this recipe is sure to make your taste buds sing!

Jalapeño Popper Grilled Cheese Ingredients

For the Jalapeños

  • Jalapeños – use 4 large ones for that perfect spicy kick!
  • Cream Cheese – 8 ounces will create a creamy filling that blends beautifully with the spices.

For the Sandwich

  • Thick White Bread – 8 slices provide a sturdy base for grilling.
  • Cheddar Cheese – use 4 slices for a sharp, rich flavor that complements the other ingredients.
  • Monterey Jack Cheese – 4 slices add creaminess and help bind everything together.
  • Bacon – 4 strips, crispy and crumbled, will give a smoky crunch to each bite.

For Grilling

  • Butter – generously spread on the outside for that golden, crispy finish.
  • Chopped Cilantro (optional) – this fresh touch adds a burst of color and flavor if you want to elevate your sandwich!

This Jalapeño Popper Grilled Cheese recipe delivers a mouthwatering experience that you won’t forget!

Step‑by‑Step Instructions for Jalapeño Popper Grilled Cheese

Step 1: Prepare the Jalapeños
Preheat your oven to 375°F (190°C). Wearing food-safe gloves, slice each jalapeño in half lengthwise and carefully remove the seeds and membranes. This not only reduces spiciness but also creates a space for the cream cheese. Fill each jalapeño half with about 1 ounce of cream cheese, then arrange them on a baking sheet. Bake for 25–30 minutes until the peppers are semi-soft, the cream cheese is bubbly, and the tops turn lightly golden.

Step 2: Assemble the Sandwiches
While the jalapeños bake, get your sandwich components ready. Take two slices of thick white bread and place one slice of cheddar cheese on each, while on two other slices, place one slice of Monterey Jack cheese. Once the jalapeños are baked, slice them into bite-sized pieces and distribute them evenly atop the cheddar slices. For added flavor, layer two strips of crispy bacon on top of each Monterey Jack slice before combining the halves to form two delicious sandwiches.

Step 3: Butter and Grill the Sandwiches
Now it’s time to create that golden, crispy exterior! Generously spread butter on the outer sides of each of your assembled Jalapeño Popper Grilled Cheese sandwiches. Heat a skillet over medium-low heat until warm. Once heated, place the sandwiches butter-side down in the skillet. Grill each side for about 3–4 minutes or until the bread is a gorgeous golden brown and crispy, flipping once to ensure the cheese melts beautifully into gooey perfection.

Jalapeño Popper Grilled Cheese

Make Ahead Options

These Jalapeño Popper Grilled Cheese sandwiches are ideal for busy weeknights where every minute counts! You can prepare the jalapeños stuffed with cream cheese up to 24 hours in advance. Simply bake them as directed, allow them to cool completely, and refrigerate in an airtight container. For the sandwiches, assemble them (including bacon and cheeses) without grilling, wrap tightly, and store in the fridge for up to 3 days. When you’re ready to serve, just heat a skillet over medium-low heat, butter the outsides, and grill until golden brown and toasty, resulting in a mouthwatering sandwich that’s just as delicious as fresh!

Jalapeño Popper Grilled Cheese Variations

Feel empowered to switch things up and personalize this Jalapeño Popper Grilled Cheese to match your taste buds!

  • Dairy-Free: Swap cream cheese with a dairy-free alternative and use vegan cheese for a deliciously creamy bite.
    For an indulgent spin on dairy-free, try using cashew cream for that rich texture without the cream.

  • Spicy Kick: Add diced serrano peppers alongside your jalapeños for an extra heat boost that spice lovers will adore!
    These small adjustments can set your taste buds on fire while elevating the overall flavor experience.

  • Vegetarian Delight: Omit the bacon and replace it with sautéed mushrooms for an earthy flavor and satisfying texture.
    Mushrooms work wonders in this sandwich, adding depth to the overall taste without sacrificing satisfaction.

  • Herb Infusion: Sprinkle your sandwich with fresh basil or dill instead of cilantro for a fragrant twist.
    Experimenting with herbs can enhance the overall flavor profile and bring a unique freshness to each bite.

  • Cheese Lovers: Blend in more layers of cheese like pepper jack or gouda for a melty extravaganza!
    This can turn your grilled cheese into a cheese-lover’s dream, creating that gooeyness we all yearn for.

  • Crunch Factor: Introduce bread crumbs mixed with Parmesan to the outer layer of the sandwich for added crunch.
    This simple addition transforms your grilled cheese into something crispy and satisfying while maintaining its core flavor.

  • Satisfying Sides: Serve alongside a refreshing tomato or avocado salad for a balanced meal.
    Pairing it with fresh veggies can enhance your dining experience, making this comforting meal feel lighter and more vibrant.

  • Sweet Surprise: Add a layer of sliced peaches or figs for a delightful sweetness that contrasts the spicy jalapeños.
    This unexpected change transforms your grilled cheese into something truly unique, balancing spice with sweet perfection.

Explore these variations, and let your culinary creativity shine while diving into this warm, cheesy goodness! For more fun with flavors and combinations, don’t forget to check out our ideas like spicy chipotle grilled cheese to keep those taste buds excited! Or try out our delicious classic grilled cheese for those classic moments when simplicity reigns. Enjoy every bite!

How to Store and Freeze Jalapeño Popper Grilled Cheese

Fridge: Store leftover Jalapeño Popper Grilled Cheese in an airtight container for up to 3 days. This helps keep the flavors fresh while preventing the bread from becoming soggy.

Freezer: For longer storage, wrap each sandwich tightly in plastic wrap and aluminum foil and freeze for up to 3 months. This prevents freezer burn and maintains flavor.

Reheating: To reheat, unwrap the sandwiches and place them in a skillet on medium heat, covered, for about 5-7 minutes until warmed through and the cheese is gooey again. You can also use an oven preheated to 350°F (175°C) for about 10-15 minutes.

Expert Tips for Jalapeño Popper Grilled Cheese

  • Choose the Right Peppers: Opt for large jalapeños for a good balance of heat and meatiness while still allowing a creamy filling.
  • Avoid Sogginess: Ensure the jalapeños are well-drained after baking to prevent excess moisture from making your grilled cheese soggy.
  • Customize Spice Level: If you prefer less heat, remove all seeds and membranes from the jalapeños, or substitute with milder peppers entirely.
  • Double the Cheese: For extra gooeyness, consider adding more cheese or different varieties, such as pepper jack, to enhance the flavor profile of your Jalapeño Popper Grilled Cheese.
  • Watch the Heat: Grill on medium-low heat to achieve a perfectly toasted exterior without burning the bread while waiting for the cheese to melt.

What to Serve with Jalapeño Popper Grilled Cheese

Nothing pairs better with a warm and cheesy sandwich than delightful side dishes and drinks to round out your meal.

  • Creamy Tomato Soup: A classic pairing that provides a soothing, velvety counterbalance to the spicy grilled cheese.
  • Crispy Sweet Potato Fries: Their sweetness contrasts beautifully with the jalapeño heat, adding a crunchy texture to your meal.
  • Garlic Herb Roasted Vegetables: These colorful veggies offer a hearty, earthy flavor that complements the richness of the cheese.
  • Mixed Green Salad: A refreshing salad with zesty dressing brings a lightness to the dish altogether, balancing out the indulgence of the sandwich.
  • Spicy Salsa: Serve with a side of salsa to enhance the flavor profile, giving you an extra kick that ignites the taste buds!
  • Margaritas: Sip on a refreshing margarita which echoes the festive spirit of the jalapeños, marrying rich flavors perfectly.
  • Churros for Dessert: For a sweet finale, these warm, cinnamon-sugar treats provide a delightful contrast to your savory meal.
  • Pickled Jalapeños: Add some extra zing with pickled jalapeños on the side; their acidity will elevate every bite of your sandwich!

Jalapeño Popper Grilled Cheese

Jalapeño Popper Grilled Cheese Recipe FAQs

What type of jalapeños should I use?
Absolutely, when choosing jalapeños for your Jalapeño Popper Grilled Cheese, opt for large, firm ones. They should be bright green and free of dark spots or blemishes. This ensures you get the perfect balance of heat and meatiness, and they’ll hold up nicely in your sandwiches!

How should I store leftover grilled cheese?
Very simply! Store any leftover Jalapeño Popper Grilled Cheese in an airtight container in the fridge for up to 3 days. This keeps your sandwiches fresh and flavorful while preventing the bread from becoming soggy. Just remember to let them cool completely before sealing!

Can I freeze Jalapeño Popper Grilled Cheese?
Definitely! For freezing, wrap each sandwich tightly in plastic wrap followed by aluminum foil to protect them from freezer burn. They can be stored in the freezer for up to 3 months. When you’re ready to enjoy, simply unwrap and reheat in a skillet or oven until warm and gooey.

What if my peppers seem too spicy?
Don’t worry! If you prefer a milder flavor for your Jalapeño Popper Grilled Cheese, it’s best to remove all seeds and membranes from the jalapeños, as that’s where most of the heat resides. You can also substitute with milder peppers like banana peppers or even bell peppers for a similar cheesy delight without the kick.

How do I revive my grilled cheese if it gets soggy?
If your sandwiches turn out soggy, it may be due to excess moisture from the jalapeños. To prevent this, ensure they are well-drained after baking. If you find your sandwiches are soggy after cooking, you can crisp them up by placing them in a skillet on medium heat for a few minutes or even in a toaster oven for a quick revamp. Just remember to flip them to get both sides crispy!

Is there a way to make this recipe vegetarian-friendly?
Absolutely, making this Jalapeño Popper Grilled Cheese vegetarian is easy! Simply omit the bacon and consider adding extra layers of veggies, such as roasted red peppers or spinach, to enhance flavors without compromising on taste. Enjoy experimenting with the ingredients to match your dietary needs!

Irresistible Jalapeño Popper Grilled Cheese You’ll Crave

This Jalapeño Popper Grilled Cheese combines bold flavors for a delightful comfort food experience.

  • Oven
  • skillet
  • Baking Sheet
  • Knife
  • cutting board

For the Jalapeños

  • 4 large Jalapeños (for that perfect spicy kick!)
  • 8 ounces Cream Cheese (creates a creamy filling that blends beautifully with the spices.)

For the Sandwich

  • 8 slices Thick White Bread (provides a sturdy base for grilling.)
  • 4 slices Cheddar Cheese (for a sharp, rich flavor.)
  • 4 slices Monterey Jack Cheese (adds creaminess.)
  • 4 strips Bacon (crispy and crumbled for smoky crunch.)

For Grilling

  • 1 tablespoon Butter (generously spread on the outside.)
  • Chopped Cilantro (optional for added flavor.)

Step-by-Step Instructions for Jalapeño Popper Grilled Cheese

  1. Preheat your oven to 375°F (190°C). Slice each jalapeño in half lengthwise and remove the seeds and membranes. Fill each jalapeño half with about 1 ounce of cream cheese, then arrange them on a baking sheet. Bake for 25–30 minutes until the peppers are semi-soft and the cream cheese is bubbly.
  2. While the jalapeños bake, take two slices of thick white bread and place one slice of cheddar cheese on each. Place one slice of Monterey Jack cheese on two other slices. Once the jalapeños are baked, slice them into bite-sized pieces and distribute them evenly atop the cheddar slices. Layer two strips of crispy bacon on top of each Monterey Jack slice before combining the halves to form two sandwiches.
  3. Spread butter on the outer sides of each sandwich. Heat a skillet over medium-low heat. Place the sandwiches butter-side down in the skillet. Grill each side for about 3–4 minutes until golden brown and crispy, flipping once.

Store leftovers in an airtight container for up to 3 days. For longer storage, wrap each sandwich and freeze for up to 3 months. Reheat in a skillet or oven until warmed through.

Sandwiches
American
Cheesy Sandwich, comfort food, grilled cheese, Jalapeño Popper Grilled Cheese, quick dinner, Spicy Sandwich

Filed Under: Sandwiches

Delicious Spooky Spider Sandwiches for a Fun Family Treat

October 8, 2025 by grace bellamy Leave a Comment

On a crisp autumn afternoon, with leaves crunching underfoot and the scent of pumpkin spice wafting through the air, I stumbled upon a delightful idea: Spooky Spider Sandwiches. These whimsical creations are perfect for celebrations or simply spicing up lunchtime. Barely taking 10 minutes to make, they are a fantastic way to engage kids and bring a bit of festive fun to your home. Plus, with the classic combination of peanut butter and jelly, these sandwiches are sure to please even the pickiest eaters. So, are you ready to embrace the creative chaos of Halloween cuisine? Let’s dive into this spooktacular recipe!

Spooky Spider Sandwiches

Why Make Spooky Spider Sandwiches?

Creative Fun: Transform a simple lunch into a festive masterpiece that’s perfect for Halloween or any fun occasion.

Kid-Friendly: Kids will love helping with the assembly, making this a fantastic family activity.

Quick Prep: With only 10 minutes of prep time, these sandwiches are the ideal solution for busy days.

Delicious Duo: The classic peanut butter and jelly combination ensures these treats are both tasty and familiar.

Eye-Catching Appeal: The addition of candy eyes and pretzel legs makes these sandwiches a show-stopper at parties.

Give these Spooky Spider Sandwiches a try and add some fun to your family meals! For more creative ideas, check out my Halloween treats or explore easy lunchbox favorites.

Spooky Spider Sandwich Ingredients

Get ready to whip up some playful magic with these simple ingredients!

For the Sandwiches

  • 8 slices bread – Use any type you like; whole grain adds a nutty flavor!
  • 1 cup peanut butter – Creamy or crunchy, it’s all deliciously spooky!
  • 1 cup strawberry jelly – Substitute with grape jelly for a different twist.

For the Spider Legs

  • 48 pretzel sticks – These add the perfect crunch and a fun texture!

For Decoration

  • 16 candy eyes – These are essential for bringing your spooky spiders to life!

Now that you have the ingredients gathered, you’re one step closer to creating your delightful Spooky Spider Sandwiches. Let’s get assembling!

Step‑by‑Step Instructions for Spooky Spider Sandwiches

Step 1: Prepare the Bread
Start by placing the 8 slices of bread on a clean cutting board. Using a biscuit cutter, press down firmly to cut out the center of each slice, creating circular holes. This step adds a fun element to your Spooky Spider Sandwiches! Set aside the cut-out circles; they might even come in handy for a mini snack later.

Step 2: Spread the Peanut Butter
Take four of the bread slices and spread a generous layer of peanut butter evenly across the surface using a butter knife. Make sure to cover the entire slice for maximum flavor! The peanut butter will serve as the “glue” for your spider sandwiches. Once done, you’ll have a delightful base ready for the next step.

Step 3: Add the Jelly
Now, grab the remaining four bread slices and spread a thick layer of strawberry jelly on top of each slice. The sweet jelly complements the creamy peanut butter beautifully, creating a delicious duo. Once you finish spreading, take a moment to appreciate the beautiful colors of your Spooky Spider Sandwiches!

Step 4: Assemble the Sandwiches
Carefully place a jelly-covered slice on top of a peanut butter-covered slice, pressing down gently to combine the two. Repeat with the remaining bread slices to form the sandwiches. Ensure each sandwich is evenly assembled, and take a moment to admire your handiwork as you create these festive treats.

Step 5: Create Spider Legs
With your sandwiches assembled, it’s time to make them spooky! Take 3 pretzel sticks and gently insert them into each side of the sandwich to form spider legs. Press them in until they feel secure. The pretzels should be evenly spaced for that authentic spider look. Get creative with the angle for extra pizzazz!

Step 6: Add the Candy Eyes
To finish off your Spooky Spider Sandwiches, gently place 2 candy eyes on top of each sandwich. Position them near the center to bring your creepy crawlers to life! The candy eyes will add a whimsical touch, making these sandwiches perfect for fun lunches or Halloween parties.您的美食已经准备好了!

Spooky Spider Sandwiches

Make Ahead Options

These Spooky Spider Sandwiches are fantastic for busy home cooks looking to save time! You can prepare the sandwiches up to 24 hours in advance by assembling them without the pretzel legs and candy eyes. Simply spread the peanut butter and jelly on the bread, sandwich them together, and store them in an airtight container in the refrigerator. To maintain their freshness and prevent the bread from becoming soggy, it’s essential to assemble them shortly before serving. When you’re ready to serve, just stick in the pretzel legs and candy eyes for that spooky flair! You’ll enjoy delightful, ready-to-go snacks that are just as delicious as if they were made fresh!

What to Serve with Spooky Spider Sandwiches

Embrace the playful spirit of Halloween with delightful side dishes that perfectly round out mealtime!

  • Crunchy Veggie Sticks: Fresh carrots, cucumbers, and bell peppers add a crisp contrast, ensuring a balanced, nutritious plate.
  • Creepy Cucumber Fingers: Slice cucumbers into finger shapes and use slivers of red bell pepper for “fingernails,” making them a spooky snack hit!
  • Haunted Fruit Salad: A colorful mix of spooky-themed fruits like ghostly bananas and pumpkin-shaped melons provides a sweet, refreshing finish.
  • Pumpkin Soup: Serve warm and creamy pumpkin soup in mini pumpkins for a festive touch, paired deliciously with your spider sandwiches.
  • Spooky Snacks Platter: Create a mix of cheese cubes, olives, and crackers, perfect for grazing while enjoying the fun vibes!
  • Witch’s Brew Punch: Serve a refreshing green punch with floating “eyeballs” (lychee fruits with blueberries) to elevate the Halloween experience.
  • Grainy Pudding Cups: Sweeten the evening with chocolate chia pudding topped with crushed graham crackers, resembling dirt for a spooky dessert delight.
  • Ghostly Meringue Cookies: Light-as-air meringue cookies shaped like ghosts are a whimsical addition that kids will love alongside the sandwiches.
  • Chocolate Milkshakes: Creamy chocolate shakes topped with whipped cream and crushed cookies create a deliciously indulgent finale!
  • Apple Slices with Caramel Dip: Crisp apple slices served with rich caramel dip offer a sweet bite that complements the textures of the sandwiches.

How to Store and Freeze Spooky Spider Sandwiches

Room Temperature: Keep assembled sandwiches at room temperature for up to 2 hours, especially if serving at a party. They’re best enjoyed fresh for optimal flavor and texture.

Fridge: Store any leftover Spooky Spider Sandwiches in an airtight container in the fridge for up to 3 days. This keeps them fresh for those impromptu snack cravings!

Freezer: To have some fun ready-made treats, freeze the assembled sandwiches in a single layer, wrapped tightly in plastic wrap, for up to 1 month. Thaw overnight in the fridge before serving.

Reheating: If you prefer warm sandwiches, place them in a toaster oven for a few minutes to warm them up. Just be sure to remove pretzel legs and candy eyes beforehand!

Expert Tips for Spooky Spider Sandwiches

Quality Bread: Use fresh, hearty bread for the best structure; stale bread can make the sandwiches fall apart.

Spread Evenly: Ensure your peanut butter and jelly layers are spread evenly to keep the sandwiches firm and prevent any sogginess.

Pretzel Positioning: Insert the pretzel legs at a slight angle for a creepy, realistic spider look that kids will love!

Candy Eye Placement: Make sure to center the candy eyes to maximize their spooky cuteness; this will attract kids’ attention.

Creative Variations: Feel free to swap in different spreads like Nutella or almond butter to cater to different tastes while enjoying these Spooky Spider Sandwiches!

Spooky Spider Sandwiches: Fun Variations

Feel free to unleash your creativity and give these spooky treats your own personal twist!

  • Nut-Free: Swap peanut butter for sunflower seed butter to keep it safe for nut allergies. It’s equally creamy and delicious!
  • Whole Wheat: Opt for whole wheat or multigrain bread for a healthier twist, adding a touch of nuttiness to your sandwiches.
  • Fruit-Infused: Use fruit preserves or spreads like blackberry or raspberry jelly to switch up the flavor profile and surprise the taste buds!
  • Choco-Spiders: Replace strawberry jelly with chocolate spread for a rich, decadent variation that chocolate lovers will absolutely adore. The sweetness will be a hit!
  • Veggie Twist: Add thinly sliced cucumbers or bell peppers to your sandwiches for a crunchy surprise that boosts nutrition and adds freshness. The colors will make them even more inviting!
  • Spicy Touch: For the bold, try spreading spicy pepper jelly instead of regular jelly; it adds an exciting kick that will turn heads. Get ready for a flavor adventure!
  • Monster Eyes: Instead of candy eyes, use mini marshmallows or gummy candies for a different fun look, keeping the creepy vibes alive in a playful way.
  • Sweet Spider: Drizzle some honey over the peanut butter before stacking for an added layer of sweetness that kids will love. It brings a delightful sticky sweetness to the mix!

Explore these variations to elevate your Spooky Spider Sandwiches to the next level, and don’t forget to check out my Halloween treats for more festive inspirations or dive into easy lunchbox favorites for even more fun!

Spooky Spider Sandwiches

Spooky Spider Sandwiches Recipe FAQs

What kind of bread should I use for Spooky Spider Sandwiches?
Absolutely! For the best structure and flavor, I recommend using fresh, hearty bread such as whole grain or sourdough. If you prefer a sweeter taste, you can even use white bread. Just avoid stale bread, as it can crumble easily.

How should I store leftover Spooky Spider Sandwiches?
Great question! You can keep any leftover Spooky Spider Sandwiches in an airtight container in the fridge for up to 3 days. This way, they stay fresh and ready for a quick snack. If you’re serving them at a party, it’s best to keep them at room temperature for no longer than 2 hours to maintain optimal flavor and texture.

Can I freeze Spooky Spider Sandwiches?
Yes, you can! To freeze your assembled sandwiches, wrap them tightly in plastic wrap and place them in a single layer in the freezer for up to 1 month. When you’re ready to enjoy, simply thaw them overnight in the fridge. For warm sandwiches, heat them in a toaster oven for a few minutes—just remember to remove the pretzel legs and candy eyes beforehand!

What if I have dietary restrictions or allergies?
When it comes to dietary considerations, you can easily modify this recipe. For peanut allergies, alternatives like sunflower seed butter or soy nut butter work wonderfully. If you’re looking for a gluten-free option, choose gluten-free bread and ensure that all your ingredients comply with your dietary needs. Always check labels to avoid cross-contamination.

How do I prevent sogginess in my Spooky Spider Sandwiches?
Very good point! To prevent sogginess, I recommend spreading the peanut butter first and allowing it to form a barrier on the bread. Then, apply the jelly on the other slice. By keeping the two spreads separate until they’re assembled, you minimize moisture transfer. Enjoy your delicious creations to the last bite!

What is the best way to arrange the pretzel legs for a spooky look?
For that authentic spider look, insert the three pretzel sticks at a slight angle on each side of the sandwich. Space them evenly apart for a creepy, crawly effect. And remember, the more pretzel legs, the merrier—kids will love the extra detail!

Enjoy creating these Spooky Spider Sandwiches and embrace the festive fun!

Delicious Spooky Spider Sandwiches for a Fun Family Treat

These Spooky Spider Sandwiches are a fun Halloween treat, combining peanut butter and jelly with a playful twist, perfect for family gatherings.

  • biscuit cutter
  • Butter knife
  • cutting board

For the Sandwiches

  • 8 slices bread (Use any type you like; whole grain adds a nutty flavor!)
  • 1 cup peanut butter (Creamy or crunchy, it’s all deliciously spooky!)
  • 1 cup strawberry jelly (Substitute with grape jelly for a different twist.)

For the Spider Legs

  • 48 sticks pretzel (These add the perfect crunch and a fun texture!)

For Decoration

  • 16 candy eyes (These are essential for bringing your spooky spiders to life!)

Step-by-Step Instructions

  1. Prepare the Bread: Start by placing the 8 slices of bread on a clean cutting board. Using a biscuit cutter, press down firmly to cut out the center of each slice, creating circular holes.
  2. Spread the Peanut Butter: Take four of the bread slices and spread a generous layer of peanut butter evenly across the surface using a butter knife. Ensure complete coverage.
  3. Add the Jelly: Spread a thick layer of strawberry jelly on the remaining four bread slices, complementing the peanut butter beautifully.
  4. Assemble the Sandwiches: Carefully place a jelly-covered slice on top of a peanut butter-covered slice, pressing down gently to combine.
  5. Create Spider Legs: Insert 3 pretzel sticks into each side of the sandwich to form spider legs. Press them in until they feel secure.
  6. Add the Candy Eyes: Place 2 candy eyes on top of each sandwich near the center to bring them to life!

Use fresh, hearty bread for best results. Spread evenly to keep the sandwiches firm and insert pretzel legs at a slight angle for maximum effect.

Sandwiches
American
family meals, festive food, Halloween Treats, kids lunch, sandwiches, Spooky Spider Sandwiches

Filed Under: Sandwiches

Ultimate Veggie Sandwich That Taste Buds Will Love

September 21, 2025 by grace bellamy Leave a Comment

There’s something magical about crafting a perfect sandwich—especially one packed with vibrant veggies. My Ultimate Veggie Sandwich isn’t just a meal; it’s a culinary canvas waiting for your personal touch. With just 15 minutes of prep, this sandwich offers a satisfying escape from the fast-food routine. It’s a delightful way to fuel your day and impress your taste buds without breaking a sweat. The sky’s the limit when it comes to customizable fillings and fresh ingredients! Plus, it’s portable enough to accompany you on your next adventure or hectic workday. Ready to dive in and create what could be your new favorite lunch? Let’s get started!

Veggie Sandwich

Why Choose This Veggie Sandwich?

Simplicity: Whip this sandwich up in just 15 minutes—perfect for busy days or unexpected guests!

Customization: Use your favorite veggies and condiments, making it truly your own or catering to different tastes.

Flavor-packed: The combination of fresh ingredients ensures each bite is satisfying, bursting with crunch and zest.

Nutritious: A hearty blend of protein and fresh produce offers a guilt-free meal that delights your senses.

Portable: Wrapped tightly, it makes for an easy-to-eat treat whether at work or on a picnic. Don’t forget to check out my tips for easy meal prep to maximize your time!

With this Ultimate Veggie Sandwich, you’ll enjoy a delicious, homemade break from fast food that you’ll want to savor again and again.

Veggie Sandwich Ingredients

Ready to make your Ultimate Veggie Sandwich? Gather these fresh ingredients for a delightful, satisfying experience!

For the Bread

  • Whole grain bread – A nutty flavor and hearty texture elevate your sandwich.
  • Ciabatta roll – Adds a delightful crustiness for an upscale touch.

For the Filling

  • Hummus – Provides a creamy base packed with protein and flavor.
  • Avocado – Creamy and rich, it’s a nutritional powerhouse that adds heartiness.

For the Veggies

  • Spinach leaves – Packed with nutrients and a mild flavor, perfect for a fresh crunch.
  • Cucumber slices – Crisp and refreshing to enhance the overall texture.
  • Roasted red peppers – Sweet and smoky, offering a burst of flavor in every bite.
  • Shredded carrots – Adds a sweet crunch that complements the other veggies beautifully.

For the Condiments

  • Balsamic vinaigrette – Drizzled for a tangy kick that brightens up the sandwich.
  • Mustard – A zesty touch that adds a hint of spice; great for flavor balance.

For Optional Extras

  • Feta cheese – Crumbled on top for a salty contrast that elevates your veggie sandwich.
  • Olives – Sliced for a savory bite, they bring a Mediterranean flair.

These ingredients will make your Veggie Sandwich not just a meal, but a vibrant experience that keeps your taste buds dancing!

Step‑by‑Step Instructions for Ultimate Veggie Sandwich

Step 1: Choose the Bread
Begin by selecting your preferred type of bread, such as whole grain or ciabatta rolls. Slice them in half and lightly toast them in a toaster at medium heat for about 3-5 minutes until golden and crispy. This creates a delightful base for your Ultimate Veggie Sandwich, enhancing both texture and flavor.

Step 2: Prepare the Spread
Spread a generous layer of hummus on the bottom half of the toasted bread, ensuring an even coating to complement the veggies. If you’re using avocado, mash half with a fork and slather it across the bread, creating a creamy consistency that adds richness to your veggie sandwich.

Step 3: Layer the Greens
Next, add a handful of fresh spinach leaves over the hummus or avocado for that essential crunch and nutrition. Sprinkle lightly with salt to enhance the flavor of the greens. Their vibrant color and freshness will brighten your Ultimate Veggie Sandwich and set the stage for the layers to come.

Step 4: Add Crunchy Veggies
Place slices of crisp cucumber and roasted red peppers on top of the spinach layer. For added sweetness, include a sprinkle of shredded carrots. As you stack the veggies, pay attention to the colors and textures; this playful combination will make each bite of the Ultimate Veggie Sandwich visually appealing and taste spectacular.

Step 5: Drizzle with Condiments
Now, add a drizzle of balsamic vinaigrette and a touch of mustard on top of the veggies for a burst of tangy flavor. Ensure the sauces coat the veggies evenly, bringing them together harmoniously. This step is crucial for enhancing the overall taste profile of your veggie sandwich.

Step 6: Add Optional Extras
If desired, crumble some feta cheese or sprinkle sliced olives across the top for added flavor and a Mediterranean twist. These optional toppings will elevate your Ultimate Veggie Sandwich, adding extra richness and savory notes that keep your palate intrigued and delighted.

Step 7: Assemble and Wrap
Finally, carefully place the top half of the bread onto your veggie-laden base, pressing lightly to hold everything together. To transport or prepare for later, wrap your assembled Ultimate Veggie Sandwich tightly in parchment paper, ensuring it’s secure and easy to handle. This will maintain freshness, making it a perfect meal for work or a picnic.

Veggie Sandwich

Veggie Sandwich Variations to Explore

Feel free to add your personal twist to this Ultimate Veggie Sandwich, transforming it into a unique culinary treat!

  • Gluten-Free: Swap out traditional bread for gluten-free alternatives like chickpea or almond flour-based wraps, making it inclusive for those with dietary restrictions.
    Embrace the variety available today; you might discover an unexpected favorite!

  • Spicy Kick: Add sliced jalapeños or a smear of spicy sriracha to give your sandwich an exciting heat.
    A little spice can awaken your taste buds and kick the flavor up a notch!

  • Protein Boost: Toss in some grilled chicken or turkey slices for an extra dose of protein.
    This not only adds heartiness but makes the sandwich even more satisfying for a hungry crowd.

  • Herb Flavor: Sprinkle fresh herbs like basil or cilantro into your layers for an aromatic lift in flavor.
    Herbs can elevate your sandwich, transforming it into a garden-fresh experience!

  • Creamy Alternative: Substitute hummus with tzatziki for a refreshing twist that balances perfectly with crunchier veggies.
    This mild yet tangy flavor complements the ingredients beautifully.

  • Nutty Addition: Include a spoonful of almond or peanut butter for a surprisingly delightful savory-sweet contrast.
    It’s a flavor pairing that could change your perspective on veggie sandwiches!

  • Cheese Choices: Experiment with various cheeses like pepper jack for added heat or goat cheese for creaminess.
    Each cheese brings its unique character, ensuring each sandwich can be a new flavor adventure!

  • Savory Sauces: Drizzle with pesto or chimichurri for a burst of herby richness that enhances every layer.
    These sauces can turn your basic sandwich into a gourmet experience!

Let your imagination run wild with these variations; your Ultimate Veggie Sandwich is sure to sweeten the dining experience! If you’re gearing up for meal prep, check my tips for easy meal prep to keep those flavors fresh!

Make Ahead Options

These Ultimate Veggie Sandwiches are perfect for busy meal prep enthusiasts! You can prepare the spread (hummus and avocado) up to 24 hours in advance and store them in airtight containers in the refrigerator to maintain freshness. Additionally, wash and slice your crunchy veggies like cucumbers, carrots, and peppers, and keep them in separate containers for up to 3 days. To assemble your sandwiches, simply layer the prepped ingredients on toasted bread right before serving, which will ensure that everything stays crisp and flavorful. Wrapping them tightly in parchment paper is key to keeping them fresh on the go, making your lunchtime routine both quick and satisfying!

Expert Tips for the Best Veggie Sandwich

Right Bread Choice: Start with fresh, quality bread like whole grain or ciabatta; it not only adds flavor but also ensures structural integrity.

Layer Wisely: For the best texture, alternate creamy spreads with crunchy veggies. This technique keeps your veggie sandwich from becoming too soggy.

Season the Greens: A pinch of salt enhances the natural flavors of spinach and other leafy greens, ensuring each bite is flavorful and fresh.

Don’t Overstuff: While you may be tempted to pile on the fillings, overstuffing can lead to a messy sandwich. Keep it balanced for easy eating!

Freshness Matters: Assemble your veggie sandwich just before serving to maintain the crispness of ingredients. This keeps the textures vibrant and appetizing.

By following these tips, you’ll create a scrumptious veggie sandwich that’s sure to impress!

What to Serve with Ultimate Veggie Sandwich?

Elevate your lunch experience with complementary sides and drinks that bring out the best in this colorful creation.

  • Sweet Potato Chips: The crunchy and slightly sweet flavor provides a delightful contrast to your sandwich’s fresh, savory notes.
  • Mixed Green Salad: Tossed with a light vinaigrette, it adds a refreshing crunch that enhances the sandwich’s flavors.
  • Vegetable Soup: A warm, comforting bowl to dip into that enriches the veggie experience without overpowering it.
  • Fruit Salad: Bright and juicy, a side of seasonal fruits can cleanse the palate and add natural sweetness to your meal.
  • Herbal Iced Tea: Serve chilled, this refreshing drink provides a cooling balance to the hearty veggie sandwich.
  • Chickpea Salad: Packed with protein and zest, it makes a nutritious pairing that complements the fresh ingredients of your sandwich perfectly.

Combining these sides and drinks will create a cohesive meal that showcases the taste and texture of your Ultimate Veggie Sandwich on a whole new level!

How to Store and Freeze Veggie Sandwich

Room Temperature: Enjoy your veggie sandwich at room temperature for up to 2 hours for the freshest taste and texture.

Fridge: Store any leftovers in an airtight container in the fridge for up to 3 days. To keep the bread from getting soggy, separate the veggies and condiments from the bread if possible.

Freezer: If you want to store the sandwich for longer, wrap it tightly in plastic wrap and then in foil. Freeze for up to a month. Thaw in the fridge overnight before enjoying.

Reheating: For best results, warm your assembled sandwich in a toaster oven or panini press until the bread is crispy and the filling is heated through.

Veggie Sandwich

Ultimate Veggie Sandwich Recipe FAQs

How do I choose the best bread for my Veggie Sandwich?
Absolutely! Opt for fresh bread that has a sturdy texture, such as whole grain or ciabatta. Whole grain offers a nutty flavor and a hearty bite, while ciabatta adds a delightful crustiness. Look for bread that feels firm and springy; avoid anything stale or too soft that may become soggy.

What’s the best way to store leftovers of my Veggie Sandwich?
Very! Store any leftover veggie sandwich in an airtight container in the fridge for up to 3 days. To prevent the bread from becoming soggy, it’s essential to separate the veggies and condiments from the bread, if possible. When you’re ready to eat, you can assemble it quickly for freshness.

Can I freeze my Veggie Sandwich for later?
Absolutely! To freeze your sandwich, wrap it tightly in plastic wrap and then foil to prevent freezer burn. It can be stored in the freezer for up to a month. When you’re ready to enjoy it, thaw in the fridge overnight. To reheat, warm it in a toaster oven until the bread is crispy again. This method ensures you savor the flavors just like when you made it fresh.

What if my veggies are starting to look wilted?
No worries! If your veggies seem wilted, give them a quick soaking in cold water for about 30 minutes—it helps bring them back to life! Use firm, vibrant veggies for your sandwich. For leafy greens like spinach, wilted leaves can still be used for spreads, so don’t toss them out immediately unless they are slimy or have dark spots all over. Always prioritize freshness for the best taste!

Are there any dietary considerations with this Veggie Sandwich?
Very! This ultimate veggie sandwich is generally vegan-friendly, but it’s important to check for potential allergies to specific ingredients such as nuts (in hummus) or dairy (if using feta cheese). For those with gluten sensitivities, consider using gluten-free bread options. Also, always keep in mind any toppings you plan to add; olives and certain mustards could contain additives that some may want to avoid.

How do I ensure my Veggie Sandwich stays crunchy and fresh when traveling?
Absolutely! To keep your veggie sandwich fresh and crunchy while traveling, assemble it just prior to eating if possible. Wrap it tightly in parchment paper, which allows it to breathe while protecting it from moisture. If you need to prepare in advance, store each component—bread, fillings, and sauces—separately until you’re ready to eat. This will maintain the integrity of the sandwich and ensure every bite remains delightful!

Ultimate Veggie Sandwich That Taste Buds Will Love

Discover the Ultimate Veggie Sandwich, packed with vibrant veggies and customizable fillings for a delicious meal that satisfies your taste buds.

  • toaster
  • Knife
  • cutting board

For the Bread

  • 2 slices Whole grain bread (Nutty flavor and hearty texture)
  • 1 roll Ciabatta roll (Adds crustiness)

For the Filling

  • 1/2 cup Hummus (Creamy protein-rich base)
  • 1 whole Avocado (Mashed for a creamy texture)

For the Veggies

  • 1 cup Spinach leaves (Mild flavor, packed with nutrients)
  • 1/2 cup Cucumber slices (Crisp and refreshing)
  • 1/2 cup Roasted red peppers (Sweet and smoky)
  • 1/2 cup Shredded carrots (Adds sweetness and crunch)

For the Condiments

  • 2 tablespoons Balsamic vinaigrette (Tangy kick)
  • 1 tablespoon Mustard (Zesty flavor balance)

For Optional Extras

  • 1/4 cup Feta cheese (Crumbled for salty contrast)
  • 1/4 cup Olives (Sliced for savory bite)

Step-by-Step Instructions

  1. Choose and prepare your preferred bread, slicing it in half and toasting it until golden.
  2. Spread hummus on the bottom half of the toasted bread; if using, mash and add avocado.
  3. Layer fresh spinach leaves on top of the spread and lightly sprinkle with salt.
  4. Add cucumber slices, roasted red peppers, and shredded carrots to create a colorful veggie stack.
  5. Drizzle with balsamic vinaigrette and mustard evenly over the veggies.
  6. Add optional feta cheese and olives if desired, then place the top half of the bread.
  7. Wrap the sandwich tightly in parchment paper for easy transport and to maintain freshness.

Perfect for busy days, this sandwich is a customizable, nutritious option that you can enjoy at home or on the go.

Sandwiches
Mediterranean
customizable, Delicious, Healthy Sandwich, quick lunch, Vegetarian, Veggie Sandwich

Filed Under: Sandwiches

Crispy Air Fryer Grilled Cheese You Can’t Resist

September 20, 2025 by grace bellamy Leave a Comment

As I pulled the door of my air fryer open, a tantalizing aroma filled the kitchen, instantly transporting me back to my childhood, where simple pleasures like the crispy crunch of a grilled cheese brought endless joy. This Air Fryer Grilled Cheese recipe is a delightful twist on that classic favorite, marrying convenience with nostalgia. It’s incredibly quick to whip up, taking only 13 minutes from start to finish, making it a perfect solution for busy weeknights or lazy weekends. Plus, using the air fryer gives you that deliciously crispy outside while the cheese melts to gooey perfection inside—no frying pan mess required! Are you ready to rediscover this beloved comfort food? Let’s get started!

Air Fryer Grilled Cheese

Why is Air Fryer Grilled Cheese Amazing?

Crunchy exterior: Your sandwich will have a perfect golden-brown finish without the extra oil.
Melty goodness: The cheese will become wonderfully gooey, delivering that classic flavor we all crave.
Time-saving: At just 13 minutes total, this recipe is perfect for a quick lunch or snack.
Family-friendly: Loved by kids and adults alike, it’s a surefire hit at the dinner table.
Versatile option: Customize with your favorite cheeses or add-ins for a unique twist. Try it with different breads or pair it with homemade tomato soup for an unbeatable meal combination! If you’re interested in more quick ideas, check out our easy weeknight recipes.

Air Fryer Grilled Cheese Ingredients

• Get ready to gather your ingredients for a deliciously crispy Air Fryer Grilled Cheese!

For the Sandwich

  • 4 slices bread – Choose your favorite bread for a hearty base.
  • 2 slices cheese (Cheddar, Havarti, or American recommended) – Use high-quality cheese for the best melty results.
  • 1 tablespoon butter – Butter the bread generously for a golden, crispy texture.

Step‑by‑Step Instructions for Air Fryer Grilled Cheese

Step 1: Preheat the Air Fryer
Start by preheating your air fryer to 375°F (190°C) for about 3–5 minutes. This crucial step ensures that your Air Fryer Grilled Cheese will cook evenly and achieve that crispy, golden-brown exterior. While the air fryer preheats, you can begin prepping the sandwich ingredients, allowing for a seamless cooking process.

Step 2: Butter the Bread
Take the time to generously spread butter on one side of each slice of bread, making sure to cover it evenly. The butter will create that irresistible crispy texture once it hits the hot air fryer. Choose a nice, thick layer for maximum flavor, as this is your secret weapon for achieving a deliciously golden crust.

Step 3: Assemble the Sandwich
Now it’s time to build your sandwich! Place one slice of cheese between two slices of buttered bread, ensuring that the buttered sides are facing out. This arrangement will help deliver that perfect crunch while keeping the melty cheese inside. Feel free to use your favorite blend of cheeses for a personal touch.

Step 4: Place in Air Fryer
Carefully place your assembled sandwich into the preheated air fryer basket, taking care not to crowd it if you’re making multiple sandwiches. This space will allow hot air to circulate evenly, ensuring a crispy finish. Make sure the sandwich is positioned flat for optimal cooking results.

Step 5: Cook to Crispy Perfection
Set the timer for 8 minutes and let your Air Fryer Grilled Cheese work its magic. Halfway through the cooking process, take a moment to check on the sandwich’s progress, gently flipping it if necessary for even browning. You’ll know it’s done when the bread is a lovely golden color and the cheese is bubbling.

Step 6: Adjust Cooking Time if Needed
Once the cooking time is complete, carefully remove the sandwich from the air fryer using tongs. If you desire additional crispness, you can return it to the air fryer for another minute or two. Remember, air fryer performance can vary, so adjust your time accordingly for that perfect finish!

Air Fryer Grilled Cheese

How to Store and Freeze Air Fryer Grilled Cheese

Fridge: Store any leftover Air Fryer Grilled Cheese in an airtight container for up to 3 days. Reheat in the air fryer or microwave to regain its crispy texture.

Freezer: You can freeze unassembled sandwiches for up to 1 month. Place the buttered bread and cheese in a freezer-safe bag, separating layers with parchment paper.

Reheating: For best results, reheat from frozen in the air fryer at 375°F (190°C) for about 5-6 minutes, ensuring the cheese is melted and the bread is crispy again.

Room Temperature: If you need to leave the sandwich out briefly, it can sit at room temperature for a maximum of 2 hours before it should be refrigerated to maintain freshness.

Make Ahead Options

These Air Fryer Grilled Cheese sandwiches are perfect for meal prep, saving you time on busy weeknights! You can assemble the sandwiches up to 24 hours in advance—just place your buttered bread and cheese layers together, wrap them tightly in plastic wrap, and refrigerate. This method not only keeps them fresh but also allows the flavors to meld beautifully. When you’re ready to enjoy, simply pop the unwrapped sandwiches in the preheated air fryer and cook for about 8 minutes. Remember to check halfway and flip if needed for even browning. With these make ahead options, you’ll have delicious, gooey grilled cheese ready with minimal effort!

Tips for the Best Air Fryer Grilled Cheese

Butter Balance: Ensure you apply an even layer of butter on the bread for optimal crispiness; too little may result in a soggy sandwich.
Correct Temperature: Preheating the air fryer to 375°F is key; if it’s not hot enough, the sandwich won’t achieve that perfect golden crust.
Cheese Choices: Opt for high-quality cheese like sharp Cheddar or creamy Havarti for maximum melt; avoid cheap processed slices that may not melt well.
Check Halfway: Flip the sandwich halfway through cooking to achieve even browning on both sides; this simple step ensures a beautifully crispy result.
Cooking Adjustments: Keep an eye on cooking time; different air fryer models vary in performance, so feel free to add another minute if needed.

Air Fryer Grilled Cheese Variations

Feel free to get creative with your Air Fryer Grilled Cheese by incorporating these fun variations for an extra twist!

  • Dairy-Free: Substitute regular cheese with your favorite dairy-free cheese like almond or cashew-based options for a creamy taste.
    Dairy-free options can also bring delightful textures; try mixing different varieties for a surprise element in each bite!

  • Spicy Kick: Add a sprinkle of crushed red pepper flakes or a few slices of jalapeños inside the sandwich for a fiery twist.
    A little heat can elevate your grilled cheese from classic to adventurous, tantalizing your taste buds with that perfect zing.

  • Herbed Delight: Mix dried herbs like oregano or thyme into the butter before spreading it on the bread to enhance flavor.
    The aroma of herbs wafting from the air fryer will entice your senses, making every bite a delightful experience.

  • Crunchy Add-ins: Incorporate crispy bacon bits or sautéed onions inside the sandwich for added texture and flavor.
    These additions not only add crunch but also introduce depth to every mouthful, making for an unforgettable sandwich!

  • Sweet & Savory: Layer in some sliced apple or pear with the cheese for a sweet contrast to the salty richness.
    This combination will surprise you with its delightful balance of flavors and textures, making it a perfect wrapper for lunch.

  • Mediterranean Twist: Swap traditional cheese for feta or goat cheese and add a slice of tomato and fresh spinach.
    The tangy and fresh ingredients will transport you to sunny shores, offering a refreshing take on the classic comfort food.

  • Pantry Special: Experiment with unique bread options, like sourdough or whole grain, to add personality to your grilled cheese.
    Each type of bread brings its own taste, creating an entirely new experience each time you switch it up!

  • Homemade Dipping Sauce: Whip up a quick garlic aioli or marinara for a delicious dip to accompany your sandwich.
    Dipping can elevate the whole experience, allowing you to savor rich flavors in every bite alongside that perfect crunch!

Each of these variations is a wonderful way to craft your perfect Air Fryer Grilled Cheese masterpiece. Don’t hesitate to let your creativity reign, and for more ideas, check out our creative sandwich recipes and cozy comfort food.

What to Serve with Air Fryer Grilled Cheese

Who doesn’t love to elevate their meal experience with perfect pairings that enhance every delightful bite?

  • Tomato Soup: A classic match that’s both comforting and refreshing, balancing the rich, gooey cheese perfectly. The acidity of the soup cuts through the richness, creating a harmonious blend.

  • Crispy Fries: Add a side of golden, crispy fries for that satisfyingly crunchy element. Whether hand-cut or frozen, their saltiness complements the melty cheese beautifully.

  • Garden Salad: A light, refreshing side salad tossed with lemon vinaigrette brings an extra zing and freshness to your meal. The veggies add crunch and color, making it a more balanced plate.

  • Pickles: Tart, crunchy dill pickles are a fun, zesty addition that cuts through the richness of the sandwich. Their briny flavor offers a tasty contrast, enhancing your overall experience.

  • Fruit Chutney: Sweet and tangy chutney, like mango or apple, provides an unexpected twist that pairs wonderfully with the savory sandwich. A little sweetness goes a long way in elevating comfort food.

  • Iced Tea: A chilled glass of iced tea, sweetened or unsweetened, makes a perfect refreshment. Its lightness cleanses your palate between bites, letting each flavor shine through.

  • Chocolate Chip Cookies: For dessert, these warm, gooey treats wrap up the meal beautifully. Their sweetness contrasts delightfully with the salty grilled cheese, creating a satisfying finish.

Air Fryer Grilled Cheese

Air Fryer Grilled Cheese Recipe FAQs

What type of bread is best for Air Fryer Grilled Cheese?
Selecting the right bread is crucial for a great grilled cheese. I recommend using sturdy options like sourdough, whole grain, or even a classic white bread for the best structure. Make sure it’s fresh and not too thick, as you want it to crisp up nicely in the air fryer.

How should I store leftover Air Fryer Grilled Cheese?
To store leftovers, place the grilled cheese in an airtight container in the fridge for up to 3 days. When ready to enjoy, simply reheat in your air fryer or microwave. Using the air fryer will help regain that delightful crispiness, which is key to a perfect bite!

Can I freeze my Air Fryer Grilled Cheese?
Absolutely! You can freeze unassembled sandwiches for up to 1 month. Here’s how: lay the buttered bread and cheese between sheets of parchment paper in a freezer-safe bag. This prevents them from sticking together. When you’re ready to eat, simply reheat straight from the freezer in the air fryer at 375°F (190°C) for about 5-6 minutes, ensuring that both the cheese melts and the bread crisps up again.

What should I do if my Air Fryer Grilled Cheese isn’t getting crispy?
If your sandwich isn’t achieving that desired crispiness, ensure you’ve applied an even layer of butter on the bread—it’s a game changer! Also, check the air fryer’s temperature; it should be set to 375°F. If the cooking time seemed insufficient, don’t hesitate to add an extra minute or two, as different air fryers can vary in performance.

Can I use other types of cheese for my grilled cheese?
Definitely! While classic choices like Cheddar, Havarti, or American work beautifully, feel free to experiment with others. Gouda, mozzarella, or even a spicy pepper jack can add a unique twist to your Air Fryer Grilled Cheese. Just keep in mind that some cheeses may melt differently, so choose ones known for their gooey qualities.

Is Air Fryer Grilled Cheese safe for pets?
While grilled cheese isn’t toxic to pets, it’s best to avoid sharing it with them. The butter and cheese can be heavy for their digestion, and some pets may have lactose intolerance. This delightful dish is best enjoyed by humans, but consider making a pet-friendly version with whole grains and dog-safe cheese alternatives if you’d like to treat your furry friends!

Crispy Air Fryer Grilled Cheese You Can’t Resist

Enjoy this Air Fryer Grilled Cheese recipe for quick comfort food packed with nostalgic flavor and crispy texture.

  • Air Fryer

For the Sandwich

  • 4 slices bread (Choose your favorite bread for a hearty base.)
  • 2 slices cheese (Cheddar, Havarti, or American recommended.)
  • 1 tablespoon butter (Butter the bread generously for a golden, crispy texture.)

Step-by-Step Instructions

  1. Preheat your air fryer to 375°F (190°C) for about 3–5 minutes.
  2. Generously spread butter on one side of each slice of bread.
  3. Place one slice of cheese between two slices of buttered bread, with the buttered sides facing out.
  4. Carefully place your assembled sandwich into the preheated air fryer basket.
  5. Set the timer for 8 minutes and let your Air Fryer Grilled Cheese work its magic.
  6. Carefully remove the sandwich from the air fryer using tongs.

Ensure even butter application for optimal crispiness; check for doneness halfway through cooking.

Sandwiches
Air Fryer Grilled Cheese, Cheese Sandwich, comfort food, grilled cheese, quick recipes, snack

Filed Under: Sandwiches

Cucumber Salad Sandwiches for a Refreshingly Light Lunch

September 20, 2025 by grace bellamy Leave a Comment

When I first tasted Cucumber Salad Sandwiches at a summer picnic, I was immediately taken by their refreshing simplicity. This delightful blend of creamy Greek yogurt, crumbled feta, and crisp, crunchy cucumbers comes together in mere minutes, making it the perfect fuss-free meal for those busy days. Not only do these sandwiches deliver a satisfying crunch, but they’re also a nutritious alternative to the usual fast food fare, ensuring you feel good about what you’re eating. Whether packed for lunch or served as a light dinner, they’re sure to impress! Are you ready to bring a little freshness into your kitchen?

Cucumber Salad Sandwiches

Why are Cucumber Salad Sandwiches so Special?

Simplicity at its finest: These sandwiches come together in just 15 minutes, making them a fantastic option for quick meals.

Creamy and Tangy: The combination of Greek yogurt and feta creates a delightful flavor that compliments crunchy cucumbers perfectly.

Nutritious Alternative: Ditch the fast food and enjoy a meal that’s tasty and packed with wholesome ingredients.

Versatile Twist: Perfect for picnics, lunches, or light dinners—these sandwiches are as versatile as they are delicious.

Crowd-Pleasing Appeal: Whether you’re a home cook or a budding chef, everyone will love this refreshing twist on a classic sandwich. Try making your own seasoning blend or even adding some of your favorite fresh herbs for a personal touch!

Cucumber Salad Sandwiches Ingredients

• Get ready to whip up this delightful dish!

For the Sandwich Filling

  • English cucumbers – choose firm cucumbers for that perfect crunch in your Cucumber Salad Sandwiches.
  • Greek yogurt – opt for plain, full-fat yogurt to add a creamy texture and tangy flavor.
  • Feta cheese – crumbled feta adds a salty note that beautifully complements the other ingredients.
  • Fresh herbs – try mixing dill and parsley for an aromatic boost that elevates the salad.
  • Salt and pepper – season to taste for a flavor balance that brings harmony to your filling.

For the Bread

  • Whole-grain bread – whole grains provide a hearty base, making your sandwiches satisfying and nutritious.

These simple ingredients will help you craft delicious Cucumber Salad Sandwiches that are perfect for lunch or a light dinner!

Step‑by‑Step Instructions for Cucumber Salad Sandwiches

Step 1: Slice the Cucumbers
Begin by washing the two English cucumbers under cool running water. Once clean, slice them thinly using a sharp knife or a mandoline for uniformity. Aim for slices about 1/8-inch thick which will provide the perfect crunch and ease of layering in your Cucumber Salad Sandwiches. Set them aside on a clean cutting board or plate.

Step 2: Prepare the Yogurt and Feta Mixture
In a mixing bowl, combine 1 cup of Greek yogurt with ½ cup of crumbled feta cheese. Using a spatula, gently fold the ingredients together until they are well blended, creating a creamy filling with a delightful tang. Don’t rush—ensure there are no large lumps of feta left, as it adds a lovely texture to your Cucumber Salad Sandwiches.

Step 3: Season the Mixture
Add salt and pepper to taste in the yogurt-feta mixture. Start with a pinch of salt and a couple of cracks of fresh pepper, then mix thoroughly. Taste as you go—this step ensures that the creamy filling is balanced, complementing the freshness of the cucumbers. This seasoned blend is key to elevating your Cucumber Salad Sandwiches.

Step 4: Assemble the Sandwiches
Spread an even layer of the yogurt-feta mixture onto slices of whole-grain bread, covering them generously without overloading. Place the prepared cucumber slices on half of the slices, ensuring they are evenly distributed to maximize crunch. Top with the remaining slices of bread to complete your Cucumber Salad Sandwiches, creating delightful little stacks.

Step 5: Cut and Serve
Once assembled, take a sharp knife and cut the sandwiches into halves or quarters, depending on your preference. Arrange them on a serving platter for a visually appealing presentation. Enjoy your Cucumber Salad Sandwiches right away for the best texture, or pack them for a picnic where their freshness will shine!

Cucumber Salad Sandwiches

Cucumber Salad Sandwiches Variations & Substitutions

Feel free to get creative and personalize your Cucumber Salad Sandwiches to match your taste buds!

  • Gluten-Free Bread: Swap whole-grain bread for gluten-free options like rice cakes or gluten-free sandwich bread. Enjoy the same creamy filling without the gluten!

  • Avocado Upgrade: Add sliced or mashed avocado for an extra layer of creaminess and healthy fats. It complements the cucumbers beautifully while adding a subtle richness.

  • Spicy Kick: For heat lovers, incorporate a pinch of red pepper flakes or a splash of hot sauce into your yogurt-feta mixture. This little addition transforms the flavor profile into a zesty delight!

  • Cheese Variations: Swap feta for other cheeses like goat cheese or even cream cheese for a different flavor twist. Each option brings a unique taste, inviting you to discover your favorite!

  • Flavorful Greens: Mix in chopped spinach or arugula for added nutrition and texture. These greens not only elevate the taste but also add a lovely vibrant color to your sandwiches.

  • Herb Explosion: Experiment with herb combinations! Consider using fresh mint or basil alongside dill and parsley for a refreshing, aromatic twist that elevates each bite.

  • Crunch Factor: For an exciting texture contrast, add thinly sliced radishes or peppers along with the cucumbers. These will not only provide crunch but also a pop of color and flavor!

  • Balsamic Drizzle: A drizzle of balsamic glaze over the fillings adds a sweet-tangy punch to your sandwiches. This finishing touch can enhance the overall flavor experience and impress your guests!

Feel free to take these ideas and make the recipe your own. Each twist can create a new sandwich favorite—enjoy the journey!

Make Ahead Options

These Cucumber Salad Sandwiches are a fantastic choice for meal prep, allowing you to savor their delightful flavors even on the busiest days! You can prepare the yogurt-feta filling and store it in an airtight container in the refrigerator for up to 3 days, ensuring that the creamy goodness stays fresh. Slice the cucumbers up to 24 hours in advance, but remember to store them separately to maintain their crunch. When you’re ready to serve, simply spread the filling onto slices of whole-grain bread, layer on the cucumbers, and cut them into halves or quarters. This prep strategy allows you to enjoy these refreshing sandwiches with minimal effort while still tasting just as delicious!

Expert Tips for Cucumber Salad Sandwiches

• Slice Uniformly: Aim for even cucumber slices to ensure they fit perfectly in your Cucumber Salad Sandwiches, providing a consistent crunch in every bite.

• Choose the Right Bread: Whole-grain bread works best, but don’t hesitate to use sourdough or rye for added flavor—just ensure it can hold the filling without becoming soggy.

• Season Generously: Don’t shy away from seasoning your yogurt-feta mixture. A balanced salt and pepper flavor helps to elevate the Cucumber Salad Sandwiches, making each bite delightful.

• Mix Fresh Herbs: Experiment with fresh herbs like dill, chives, or mint; they not only enhance flavor but also add brightness to your Cucumber Salad Sandwiches.

• Serve Immediately: For the best texture and taste, serve your sandwiches right after assembling. If making ahead, store the filling separately from the bread to maintain crunch.

How to Store and Freeze Cucumber Salad Sandwiches

Room Temperature: Enjoy your Cucumber Salad Sandwiches fresh for the best flavor and texture; they are best served immediately.

Fridge: If you have leftovers, store them in an airtight container for up to 2 days. Keep the cucumbers and filling separated to avoid sogginess.

Freezer: Freezing is not recommended as the cucumbers will lose their crunch when thawed. For best results, prepare sandwiches fresh when needed.

Reheating: If you’ve prepared the filling in advance, simply assemble the sandwiches just before serving to maintain freshness.

What to Serve with Cucumber Salad Sandwiches

These delightful sandwiches are perfect to pair with dishes that elevate their refreshing flavor and complement their light, crunchy texture.

  • Chilled Gazpacho: This cool tomato soup adds a burst of flavor that contrasts beautifully with the creamy filling of the sandwiches.

  • Crunchy Vegetable Chips: Offering a satisfying crunch, these chips provide a fun contrast to the smoothness of the yogurt-feta mixture.

  • Fresh Fruit Salad: A medley of seasonal fruits brings sweetness and brightness, rounding out your meal with a vibrant and refreshing touch.

  • Quinoa Salad: Packed with protein and fresh herbs, this dish lends a nutty flavor and a chewy texture that complements the sandwiches superbly.

  • Lemonade or Iced Tea: A glass of refreshing lemonade or herbal iced tea enhances the lightness of your meal, making each bite even more enjoyable.

  • Herb-Infused Olive Oil: Drizzling a little herb-infused olive oil over your sandwiches adds an aromatic touch, taking their flavor to the next level.

  • Dark Chocolate Truffles: For dessert, these rich treats contrast nicely with the lightness of the meal, providing a sweet finish to your brunch or lunch.

  • Yogurt Parfait: Layered with granola and fresh berries, this creamy dessert complements the yogurt in your sandwiches while keeping things light.

Cucumber Salad Sandwiches

Cucumber Salad Sandwiches Recipe FAQs

How do I select the best cucumbers for my Cucumber Salad Sandwiches?
Absolutely! When choosing cucumbers, look for English cucumbers that are firm and shiny with no dark spots or wrinkles. This ensures that you get that perfect crunch you want in your sandwiches. If they’re too ripe, they may be overly soft and watery, which can affect the texture of your Cucumber Salad Sandwiches.

How should I store leftover Cucumber Salad Sandwiches?
Very good question! Store any leftovers in an airtight container in the fridge for up to 2 days. However, be sure to keep the cucumber slices and the yogurt-feta filling separated to prevent the bread from becoming soggy. This way, you’ll preserve the delightful crunch when you enjoy them again!

Can I freeze Cucumber Salad Sandwiches?
I recommend against freezing these sandwiches. The cucumbers will lose their delightful crunch and become mushy when thawed. If you want to prepare in advance, consider making just the filling and storing it in the fridge for up to 3 days. Assemble the sandwiches fresh when you’re ready to serve!

What if my yogurt-feta mixture is too thick or lumpy?
No worries! If your mixture is too thick, you can add a little bit of water or milk, a tablespoon at a time, until you reach your desired consistency. Stir slowly to combine and ensure there are no lumps. This will help in getting that smooth and creamy texture I’ve come to love in my Cucumber Salad Sandwiches.

Are there any dietary considerations I should keep in mind for Cucumber Salad Sandwiches?
Definitely! If you’re cooking for someone with lactose intolerance, consider using a dairy-free yogurt substitute in place of Greek yogurt. For those with a gluten intolerance, you can easily swap out the whole-grain bread for gluten-free alternatives. It’s always good to tailor the Cucumber Salad Sandwiches to the needs of your loved ones!

Cucumber Salad Sandwiches for a Refreshingly Light Lunch

Cucumber Salad Sandwiches are a refreshing and nutritious meal, perfect for a light lunch or picnic.

  • sharp knife
  • Mixing Bowl
  • spatula
  • mandoline
  • cutting board

For the Sandwich Filling

  • 2 whole English cucumbers (choose firm cucumbers for crunch)
  • 1 cup Greek yogurt (plain, full-fat for creaminess)
  • ½ cup Feta cheese (crumbled for salty flavor)
  • to taste Fresh herbs (mix dill and parsley)
  • to taste Salt (season to balance flavors)
  • to taste Pepper (add for flavor enhancement)

For the Bread

  • 8 slices Whole-grain bread (for a hearty base)

Step‑by‑Step Instructions for Cucumber Salad Sandwiches

  1. Slice the cucumbers thinly using a sharp knife or mandoline, aiming for 1/8-inch thick slices.
  2. Combine Greek yogurt and crumbled feta in a bowl, folding together until well blended.
  3. Add salt and pepper to the yogurt-feta mixture, adjusting to taste.
  4. Spread the yogurt-feta mixture on bread slices and layer cucumber slices on half of them.
  5. Top with remaining slices of bread, cut into halves or quarters, and serve.

Serve immediately for the best texture and taste. Store leftovers in an airtight container in the fridge for up to 2 days.

Sandwiches
Mediterranean
Cucumber Salad Sandwiches, easy sandwiches, healthy recipes, light lunch, picnic food, refreshing meals

Filed Under: Sandwiches

Crispy Air Fryer Baked Potatoes in Just 40 Minutes

September 18, 2025 by grace bellamy Leave a Comment

As I took my first bite of a perfectly crispy Air Fryer Baked Potato, a wave of nostalgia washed over me—like warm hugs from family gatherings. If you’ve ever craved that impeccable blend of a crunchy skin and fluffy interior, you’re in for a real treat with this recipe. Air Fryer Baked Potatoes not only whip up in record time but are also a wholesome, gluten-free side that pairs beautifully with almost any main dish. Plus, they’re surprisingly easy to customize, whether you’re a fan of classic sour cream or adventurous toppings like chili and cheese. Are you ready to tantalize your taste buds and bring some homemade warmth back into your kitchen?

Air Fryer Baked Potatoes

Why choose air fryer baked potatoes?

Quick and Convenient: With just 10 minutes of prep, you’ll have delicious baked potatoes ready in under an hour!

Perfect Texture: The air fryer gives you that sought-after crispy skin while maintaining a fluffy interior that’s simply irresistible.

Versatile Toppings: Whether it’s the classic butter and chives or a loaded chili variation, the options are endless.

Healthier Option: Cut down on oil compared to traditional frying methods, making these gluten-free baked potatoes a guilt-free side dish.

Crowd-Pleaser: Easy to make in batches, these potatoes are perfect for family dinners or casual gatherings. Dive deeper with other essential tips on making baked potatoes even better, like trying different seasonings or cooking times!

Air Fryer Baked Potatoes Ingredients

• Get ready to transform your spuds!

For the Potatoes

  • Medium potatoes – Choose russet or Yukon gold for the best texture and flavor.
  • Oil – 1 tablespoon helps achieve a crispy exterior while keeping the insides fluffy.
  • Salt – 1 teaspoon enhances the potato’s natural flavor—experiment with different salts for a unique taste!
  • Pepper – 1/2 teaspoon adds a subtle kick; feel free to adjust based on your spice preference.

Optional Toppings

  • Sour cream – A classic topping that adds creaminess to your Air Fryer Baked Potatoes.
  • Chives – Fresh herbs brighten up your baked potato and provide a lovely crunch.
  • Shredded cheese – Melting cheese on top is an indulgent twist that elevates the flavors.
  • Bacon bits – Crispy bacon crumbles add savory goodness that everyone loves.

Feel free to mix and match according to your cravings, and enjoy the delightful simplicity of homemade Air Fryer Baked Potatoes!

Step‑by‑Step Instructions for Air Fryer Baked Potatoes

Step 1: Preheat Your Air Fryer
Begin by preheating your air fryer to 400°F (200°C) for about 5 minutes. This initial heating guarantees that your Air Fryer Baked Potatoes will cook evenly, achieving that coveted crispy skin. Use the temperature settings on your air fryer, and get ready to transform those potatoes.

Step 2: Prepare the Potatoes
While the air fryer heats, scrub the medium potatoes under cold water to remove any dirt, then pat them dry with a kitchen towel. This step is crucial since moisture on the skins can hinder crispiness. Take a moment to inspect for any bad spots and ensure your potatoes are fresh to enjoy.

Step 3: Prick and Season
Using a fork, prick each potato several times—this allows steam to escape during cooking. Once they’re ready, rub the potatoes with a tablespoon of oil, ensuring an even coat. Then, sprinkle with a teaspoon of salt and half a teaspoon of pepper to enhance their natural flavor.

Step 4: Air Fry the Potatoes
Carefully place the seasoned potatoes into the air fryer basket in a single layer. It’s important they aren’t overcrowded to allow proper air circulation for even cooking. Set the timer for 35 to 40 minutes, flipping them halfway through to achieve a beautiful golden brown exterior that is irresistible.

Step 5: Check for Doneness
As the cooking time nears its end, check the potatoes with a fork for doneness. They should feel tender when pierced and the skin should have a delightful crisp. If they need a bit more time, continue cooking, checking every few minutes until perfectly crispy.

Step 6: Cool and Serve
Once done, carefully remove the Air Fryer Baked Potatoes from the basket. Let them cool slightly for 5 minutes to avoid burns. Now your perfectly baked potatoes are ready to be topped with your favorite condiments—perhaps rich sour cream or fresh chives—to enhance their delicious flavors.

Air Fryer Baked Potatoes

Expert Tips for Air Fryer Baked Potatoes

  • Choose the Right Potatoes: Opt for russet or Yukon gold varieties, as they yield the best texture and flavor for air fryer baked potatoes.

  • Avoid Moisture: Make sure to dry the potatoes thoroughly after washing. Excess moisture can lead to a soggy skin instead of the crispiness you desire.

  • Pricking is Key: Don’t skip pricking the potatoes with a fork! This allows steam to escape during cooking, preventing any “exploding” mishaps.

  • Monitor Cooking Time: Cooking times can vary based on potato size and air fryers. Check for doneness by piercing with a fork; they should be tender inside and crispy outside.

  • Experiment with Seasoning: Feel free to customize your seasoning! Try different herbs or spices to elevate your air fryer baked potatoes beyond just salt and pepper.

How to Store and Freeze Air Fryer Baked Potatoes

  • Room Temperature: Let the Air Fryer Baked Potatoes cool completely before storing at room temperature for up to 2 hours to prevent moisture buildup.

  • Fridge: Wrap uneaten baked potatoes in foil or place them in an airtight container. They’ll stay fresh for up to 3 days in the fridge.

  • Freezer: For longer storage, freeze baked potatoes individually wrapped in plastic wrap and then in foil. They can keep for up to 3 months in the freezer.

  • Reheating: Thaw frozen potatoes in the fridge overnight. Reheat in the air fryer at 350°F (175°C) for about 10-15 minutes until heated through and crispy again.

Air Fryer Baked Potatoes Variations

Feel free to explore these delightful variations that can elevate your Air Fryer Baked Potatoes for a brand-new taste experience!

  • Dairy-Free: Substitute dairy toppings with avocado or a drizzle of olive oil for creamy richness. Your taste buds will dance with joy as you savor this fresh twist!

  • Spicy Kick: Add a sprinkle of chili powder or cayenne pepper to the oil before coating the potatoes. This fiery twist will awaken your senses—perfect for those who love heat!

  • Herb-Infused: Mix fresh or dried herbs like rosemary or thyme into the oil for added depth. This way, each bite bursts with aromatic flavors that tell a delicious story.

  • Cheesy Goodness: Top your baked potatoes with nutritional yeast or dairy-free cheese for a cheesy, guilt-free indulgence. It’s a winning combination that feels decadent yet wholesome.

  • Loaded Potato: For a hearty variation, pile on toppings like black beans, corn, and salsa. This loaded twist turns your baked potatoes into a fulfilling meal straight from the comforting depths of home cooking.

  • Sweet Twist: Try sweet potatoes instead of regular for a different flavor and nutritional boost. Their natural sweetness pairs beautifully with a sprinkle of cinnamon or brown sugar!

  • Crispy Bacon: Add crispy bacon bits or pancetta to your toppings for a savory crunch. This addition is a favorite around the dinner table, bringing a smile to everyone’s face.

  • Stuffed Potatoes: Make a filling with diced vegetables and protein (like shredded chicken or beans) and stuff the baked potatoes for a satisfying main dish. It’s a versatile way to mix flavors and textures!

In case you’re looking for delightful toppings, check out suggestions for Versatile Toppings that can make your baked potatoes even more special!

Make Ahead Options

These Air Fryer Baked Potatoes are perfect for busy weeknights when you need to save time! You can prep the potatoes up to 24 hours in advance by scrubbing, drying, and seasoning them with oil, salt, and pepper, then wrapping them tightly in plastic wrap or placing them in an airtight container in the refrigerator. This not only keeps them fresh but also allows the flavors to infuse. When you’re ready to cook, simply preheat your air fryer and throw them in for 35-40 minutes, just as you would if you hadn’t prepped ahead. Your meal will come together effortlessly, letting you enjoy delicious, crispy Air Fryer Baked Potatoes without the last-minute rush!

What to Serve with Air Fryer Baked Potatoes?

Elevate your dining experience by pairing these crispy delights with mouthwatering accompaniments that bring out their unique flavors.

  • Creamy Chili: A warm and hearty chili offers a spicy kick that beautifully contrasts the fluffy potato interior. Consider garnishing with shredded cheese for added richness.

  • Garlic Butter Sauteed Spinach: Fresh spinach sautéed in garlic butter provides a vibrant and nutritious side that complements the potatoes’ crisp exterior while adding a tender texture.

  • Savory Grilled Chicken: Juicy, herb-marinated grilled chicken makes for a wholesome main dish that perfectly balances the simplicity of baked potatoes. The smoky flavors elevate every bite!

  • Coleslaw: A crunchy and tangy coleslaw adds a refreshing crunch, enhancing the meal with a delightful contrast to the warm potatoes. It’s a fantastic way to sneak in some veggies!

  • Stuffed Mushrooms: These savory bites, filled with cheese and herbs, create a gourmet touch that pairs superbly with your baked potatoes, adding depth and flavor to your dinner table.

  • Crispy Bacon Bits: Sprinkling crispy bacon bits over your baked potato creates an irresistible savory explosion—perfect for bacon lovers craving that extra crunch.

  • Classic Beef Stew: Rich and comforting, a bowl of beef stew not only warms you up but also perfectly harmonizes with the fluffy baked potatoes, soaking up all those delicious flavors.

  • Chilled White Wine: A glass of chilled white wine, such as Sauvignon Blanc, pairs nicely, bringing a refreshing acidity that balances the richness of baked potatoes and your chosen toppings.

Air Fryer Baked Potatoes

Air Fryer Baked Potatoes Recipe FAQs

How do I choose the right potatoes for air fryer baked potatoes?
Absolutely! For the best texture and flavor, opt for medium russet or Yukon gold potatoes. They have a high starch content that results in a fluffy interior, making them perfect for baking in the air fryer.

How do I store leftover air fryer baked potatoes?
Once your Air Fryer Baked Potatoes have cooled completely, wrap them in foil or place them in an airtight container. They can be stored in the fridge for up to 3 days. Just make sure they are sealed well to maintain freshness!

Can I freeze air fryer baked potatoes?
Very much so! For freezing, individually wrap each cooled baked potato in plastic wrap, then place them inside a freezer-safe bag or wrap in foil. They’ll stay good for up to 3 months. When you’re ready to enjoy them, simply thaw in the fridge overnight and reheat in the air fryer for about 10-15 minutes at 350°F (175°C).

What should I do if my potatoes aren’t crispy after air frying?
If your baked potatoes don’t turn out as crispy as you hoped, it could be due to excess moisture. Ensure you dry each potato thoroughly after washing and prick them well with a fork. If they still seem lackluster, try cooking them for a few additional minutes, checking the texture periodically until you reach the desired crispiness.

Are air fryer baked potatoes safe for my dog?
While baked potatoes without added salt or toppings can be safe for dogs in small amounts, it’s essential to avoid giving them any seasoned or buttered versions. Always consult your vet before introducing new foods to your pet’s diet!

Crispy Air Fryer Baked Potatoes in Just 40 Minutes

Enjoy crispy Air Fryer Baked Potatoes that are fluffy inside and perfect as a side dish in just 40 minutes.

  • Air Fryer

For the Potatoes

  • 2 pieces Medium potatoes (russet or Yukon gold)
  • 1 tablespoon Oil (for crispy exterior)
  • 1 teaspoon Salt (to enhance flavor)
  • 1/2 teaspoon Pepper (to taste)

Optional Toppings

  • 1/4 cup Sour cream (for creaminess)
  • 1/4 cup Chives (for garnish)
  • 1/2 cup Shredded cheese (for indulgence)
  • 1/4 cup Bacon bits (for savory addition)

Step-by-Step Instructions

  1. Preheat your air fryer to 400°F (200°C) for about 5 minutes.
  2. Scrub the medium potatoes under cold water, then pat them dry.
  3. Using a fork, prick each potato several times, then rub with oil and sprinkle with salt and pepper.
  4. Place the seasoned potatoes in the air fryer basket in a single layer. Cook for 35 to 40 minutes, flipping halfway through.
  5. Check the potatoes for doneness. They should feel tender when pierced and have a crispy skin.
  6. Remove the potatoes from the basket and let them cool slightly for 5 minutes before serving with your favorite toppings.

These Air Fryer Baked Potatoes are easy to customize with various toppings for every taste. Experiment with different herbs and spices for unique flavors.

Side Dishes
American
Air Fryer Baked Potatoes, comfort food, Crispy Potatoes, easy side dish, gluten-free, quick recipes

Filed Under: Sandwiches

Juicy Turkey Burger Recipe for a Flavorful Dinner Night

September 14, 2025 by grace bellamy Leave a Comment

I once stumbled upon a family barbecue where the scent of sizzling burgers danced in the air, instantly igniting my cravings. It was here that I first tried a turkey burger, and I was hooked! These turkey burgers are not just an easy dinner choice; they offer a healthier twist without sacrificing that juicy goodness we all love. With just a handful of ingredients and 30 minutes, you’ll have a satisfying meal that makes you feel good about your choices. Perfectly seasoned and grilled to perfection, this turkey burger recipe is bound to become a weeknight staple. Ready to elevate your burger game? Let’s dive into creating a deliciously wholesome feast!

Turkey Burger

Why is This Turkey Burger Unique?

Juicy, Flavorful Patties: The use of ground turkey elevates the classic burger experience, providing a lean yet delicious alternative.

Herb-Infused Goodness: Fresh parsley and garlic blend into the meat, infusing each bite with vibrant flavor that traditional burgers often lack.

Quick and Easy: Ready in just 30 minutes, this recipe is perfect for busy weeknights or last-minute gatherings with friends.

Crowd-Pleasing Appeal: Each turkey burger is customizable with your choice of toppings—lettuce, tomatoes, and condiments for an unforgettable bite.

Healthy Twist: With lower calories and fat than beef burgers, you can indulge without the guilt! Try pairing these with a side of sweet potato fries for a complete meal.

Turkey Burger Ingredients

• Get ready to create a delicious turkey burger that’s both satisfying and wholesome!

For the Patties

  • 1 pound ground turkey – A lean protein that forms the juicy base of our turkey burger.
  • 1/4 cup finely chopped onion – Adds sweetness and moisture to the patties.
  • 2 cloves garlic, minced – Infuses the mixture with aromatic flavor.
  • 1/4 cup fresh parsley, chopped – Brings a burst of freshness that brightens each bite.
  • 1 tablespoon Worcestershire sauce – Enhances the umami flavor, making your turkey burger irresistible.
  • 1 teaspoon Dijon mustard – Adds a touch of tang for extra depth of flavor.
  • 1/2 teaspoon salt – Essential for bringing out the natural flavors in the turkey.
  • 1/2 teaspoon black pepper – Adds a mild heat that compliments the ingredients.
  • 1/4 teaspoon smoked paprika (optional) – Introduces a hint of smokiness that elevates the flavor profile.

For Serving

  • 4 burger buns – The perfect vehicle for your delicious turkey burger.
  • Lettuce leaves – Adds freshness and a crunch that pairs well with the juicy patty.
  • Sliced tomatoes – A classic topping that provides juiciness and flavor.
  • Sliced cheese (optional) – Melting on top offers a creamy texture if desired.
  • Condiments of choice – Customize your turkey burger with ketchup, mayo, mustard, or whatever you prefer!

This Turkey Burger recipe is simple, and scrumptious, and is sure to delight your family and friends at dinner time!

Step‑by‑Step Instructions for Turkey Burger

Step 1: Prepare the Mixture
In a mixing bowl, combine 1 pound of ground turkey, 1/4 cup of finely chopped onion, 2 cloves of minced garlic, 1/4 cup of fresh chopped parsley, 1 tablespoon of Worcestershire sauce, 1 teaspoon of Dijon mustard, 1/2 teaspoon of salt, 1/2 teaspoon of black pepper, and 1/4 teaspoon of smoked paprika (if using). Mix gently with your hands until everything is just combined; avoid overworking the meat to keep your turkey burger juicy.

Step 2: Shape the Patties
Divide the turkey mixture into four equal portions and shape each into a patty about 1 inch thick. Make a slight indentation in the center of each patty to help them cook evenly and avoid puffing up. This step is crucial for ensuring a perfectly cooked turkey burger that retains its shape and moisture.

Step 3: Preheat the Grill or Skillet
Preheat your grill to medium-high heat or heat a skillet or grill pan over medium heat. Add a splash of oil to prevent sticking and enhance browning. Wait until the grill is hot, or the skillet shimmers, indicating it’s ready for cooking your flavorful turkey patties.

Step 4: Cook the Patties
Carefully place the patties on the grill or skillet. Cook for 5-7 minutes on one side until they turn golden brown and release easily from the cooking surface. Flip the patties and cook for another 5-7 minutes, ensuring the internal temperature reaches a safe 165°F (74°C) for a perfectly cooked turkey burger.

Step 5: Add Cheese (Optional)
If you want to melt cheese on your burgers, place a slice on top of each patty during the last minute of cooking. Close the grill lid or cover the skillet briefly to trap the heat and aid melting. This step adds a gooey, creamy texture that perfectly complements the savory turkey meat.

Step 6: Toast the Buns
If desired, lightly toast your burger buns on the grill or in a toaster for a golden, crispy exterior. Toasting enhances the flavor and texture, making your turkey burger even more enjoyable. Keep an eye on them to prevent burning; a few minutes is all you need for a delightful crunch.

Step 7: Assemble Your Burger
Begin assembling your turkey burger by placing each cooked patty onto a toasted bun. Layer with crisp lettuce, juicy sliced tomatoes, and any other condiments you love. Feel free to get creative with toppings to personalize your turkey burger and make it uniquely yours.

Step 8: Serve Immediately
Serve your homemade turkey burgers while they are still hot and juicy. The aroma will entice everyone to the table, and the delightful flavors will leave them coming back for more. These turkey burgers make for a perfect meal shared with family and friends!

Turkey Burger

Expert Tips for Turkey Burger

  • Don’t Overmix: Gently combine the ingredients to keep your turkey burger juicy. Overworking can lead to tough patties, so mix just until blended.

  • Indent the Patties: Creating a slight indentation in the center of each patty helps them cook evenly and prevents puffing during grilling.

  • Use a Meat Thermometer: Always check that your turkey burgers reach an internal temperature of 165°F (74°C) for safe eating. This guarantees they are cooked perfectly!

  • Experiment with Toppings: Elevate your turkey burger by trying unique toppings, such as avocado, sautéed mushrooms, or spicy aioli, to add flavor and excitement.

  • Toast the Buns: Lightly toasting your burger buns enhances texture and flavor, making each bite even more satisfying. A minute or two is all you need!

  • Season Generously: Feel free to adjust the seasoning to your taste. Adding more spices or herbs can make your turkey burger even more flavorful.

Make Ahead Options

These Turkey Burgers are perfect for meal prep, allowing you to enjoy delicious homemade food on busy weeknights! You can prep the turkey mixture and shape the patties up to 24 hours in advance—just cover the mixing bowl with plastic wrap and refrigerate. For even more convenience, cook the patties in advance and refrigerate them for up to 3 days. When it’s time to serve, simply reheat the turkey burgers in a skillet or on the grill until warmed through and juicy. By prepping ahead, you’ll save valuable time without compromising on flavor—your family will love these turkey burgers just as much, even on the busiest days!

Turkey Burger Variations & Substitutions

Feel free to unleash your creativity and adapt this recipe to match your taste buds!

  • Gluten-Free: Swap regular buns for gluten-free burger buns or lettuce wraps for a lighter option.
  • Spicy Kick: Add diced jalapeños or a dash of hot sauce to the turkey mixture for a flavorful heat that’ll ignite your palate.
  • Cheese Lovers: Experiment with different cheeses like pepper jack or feta for unique flavor profiles that elevate your burger experience.
  • Herb Twist: Replace parsley with fresh basil or cilantro to introduce a fresh new dimension to your turkey burgers. The fragrant herbs will surprise and delight your taste buds.
  • Veggie-Packed: Mix in finely grated zucchini or carrots into the patty mixture for added moisture and nutrition. These veggies blend seamlessly, keeping your burgers moist and wholesome.
  • BBQ Flavor: Substitute Worcestershire sauce with your favorite BBQ sauce for a smoky, sweet twist – perfect for summer barbecues!
  • Lentil Option: For a vegetarian version, combine cooked lentils with similar seasonings for satisfying patties that are full of flavor.
  • Bun Alternatives: Try using portobello mushrooms or slices of sweet potato in place of traditional buns for a fun, healthy variation.

Feeling adventurous? Don’t hesitate to explore options to enhance your cooking experience! For a complementary side, serve with sweet potato fries or try a colorful tossed salad for a balanced meal. Enjoy your journey into the world of turkey burgers!

How to Store and Freeze Turkey Burger

Fridge: Store leftover turkey burgers in an airtight container in the fridge for up to 3 days. Reheat in a skillet or microwave until heated through.

Freezer: Freeze cooked turkey burger patties in a single layer, then transfer to a freezer-safe bag for up to 3 months. Thaw in the fridge before reheating.

Reheating: For best results, reheat turkey burgers in a skillet over medium heat for about 5 minutes per side, or until warmed through to ensure juiciness.

Assembly: If you’ve already assembled your burgers, wrap them tightly in plastic wrap and store in the fridge for up to 2 days for quick meals.

What to Serve with Turkey Burger

A turkey burger is the perfect centerpiece for a delightful meal that will satisfy your cravings.

  • Creamy Coleslaw: Adds a crunchy, tangy contrast that complements the juicy turkey, making every bite more exciting.
  • Sweet Potato Fries: They bring a natural sweetness and crispy texture, perfectly balancing the savory flavors of your turkey burger.
  • Grilled Corn on the Cob: The smoky-sweet corn enhances the summertime vibes, pairing deliciously with the grilled turkey patties.
  • Spicy Pickles: A zesty crunch that brightens the meal, spicy pickles add an exciting kick to every turkey burger.
  • Garden Salad: Fresh greens and vibrant vegetables create a refreshing side that lightens the meal while adding nutrition and color.
  • Garlic Parmesan Roasted Potatoes: Creamy and crispy, these buttery potatoes bring a rich flavor profile that pairs beautifully with turkey.
  • Sparkling Lemonade: This refreshing drink pairs perfectly with the meal, cutting through the richness while adding a zesty twist.
  • Chocolate Chip Cookies: For dessert, these cookies provide a warm, indulgent finish to your family feast, inviting nostalgia with each bite.
  • Fruit Salad: A light, fresh dessert option that rounds out the meal, adding a burst of flavor with seasonal fruits.

Turkey Burger

Turkey Burger Recipe FAQs

How do I know if my turkey is ripe and ready for cooking?
When selecting ground turkey, look for a bright pink color with little or no dark spots. Fresh turkey should have a clean smell and be firm to touch. If you notice any dark spots or your turkey has an off-putting odor, it’s best to avoid it.

How should I store leftover turkey burgers?
Absolutely! Store leftover turkey burgers in an airtight container in the fridge. They’ll stay fresh for up to 3 days. If you plan to keep them longer, it’s better to freeze them to maintain quality.

Can I freeze turkey burger patties?
Yes! To freeze your turkey burger patties, lay them out in a single layer on a baking sheet and freeze until solid. Then, transfer them to a freezer-safe bag, separating each patty with parchment paper if desired. They’ll last for up to 3 months. When you’re ready to eat, simply thaw them in the fridge overnight before cooking!

What should I do if my turkey burger falls apart while cooking?
Very! If your turkey burger patties start to crumble, it could be due to overmixing or not enough binder. To fix this, gently combine your mixture next time and consider adding a beaten egg or breadcrumbs for extra binding power. If they do start falling apart, you can finish cooking them in a skillet, turning the burger into a delicious turkey burger bowl!

Are turkey burgers safe for pets?
While plain cooked turkey is generally safe for pets, avoid giving them any seasoned turkey burger due to added onions, garlic, or other spices, which can be harmful to them. Always check with your vet about including new foods in your pet’s diet.

Juicy Turkey Burger Recipe for a Flavorful Dinner Night

This Juicy Turkey Burger recipe offers a flavorful, healthier dinner option that will become a weeknight staple.

  • grill
  • Mixing Bowl
  • skillet
  • spatula

For the Patties

  • 1 pound ground turkey (A lean protein that forms the juicy base of our turkey burger.)
  • 1/4 cup finely chopped onion (Adds sweetness and moisture to the patties.)
  • 2 cloves garlic, minced (Infuses the mixture with aromatic flavor.)
  • 1/4 cup fresh parsley, chopped (Brings a burst of freshness that brightens each bite.)
  • 1 tablespoon Worcestershire sauce (Enhances the umami flavor, making your turkey burger irresistible.)
  • 1 teaspoon Dijon mustard (Adds a touch of tang for extra depth of flavor.)
  • 1/2 teaspoon salt (Essential for bringing out the natural flavors in the turkey.)
  • 1/2 teaspoon black pepper (Adds a mild heat that compliments the ingredients.)
  • 1/4 teaspoon smoked paprika (Introduces a hint of smokiness that elevates the flavor profile.)

For Serving

  • 4 pieces burger buns (The perfect vehicle for your delicious turkey burger.)
  • Lettuce leaves (Adds freshness and a crunch that pairs well with the juicy patty.)
  • Sliced tomatoes (A classic topping that provides juiciness and flavor.)
  • Sliced cheese (Melting on top offers a creamy texture if desired.)
  • Condiments of choice (Customize your turkey burger with ketchup, mayo, mustard, or whatever you prefer!)

Step-by-Step Instructions for Turkey Burger

  1. In a mixing bowl, combine ground turkey, finely chopped onion, minced garlic, fresh chopped parsley, Worcestershire sauce, Dijon mustard, salt, black pepper, and smoked paprika. Mix gently with your hands until just combined.
  2. Divide the mixture into four equal portions and shape each into a patty about 1 inch thick. Make a slight indentation in the center of each patty.
  3. Preheat your grill to medium-high heat or heat a skillet over medium heat. Add a splash of oil to prevent sticking.
  4. Place the patties on the grill or skillet. Cook for 5-7 minutes on one side until golden brown. Flip and cook for another 5-7 minutes, ensuring the internal temperature reaches 165°F (74°C).
  5. If desired, place a slice of cheese on top during the last minute of cooking to melt.
  6. Lightly toast your burger buns on the grill or in a toaster until golden and crispy.
  7. Assemble your turkey burger by placing each cooked patty onto a toasted bun and layering with lettuce, sliced tomatoes, and any other condiments.
  8. Serve your homemade turkey burgers immediately while still hot and juicy.

This turkey burger recipe is simple, scrumptious, and sure to delight your family and friends at dinner time.

Sandwiches
American
comfort food, easy dinner, Grilled Turkey Burger, Healthy Burger, Turkey Burger, weeknight meal

Filed Under: Sandwiches

Grilled Spicy Chicken Tortilla Wrap: A Flavor Adventure

September 10, 2025 by grace bellamy Leave a Comment

Standing in front of the grill, the fragrance of sizzling spices wafts through the air, transporting me to the bustling streets of my favorite taco stand. Today, I’m whipping up these delicious Grilled Spicy Chicken Tortilla Wraps that have become a go-to for my busy weekdays. The beauty of this recipe lies not just in its incredible flavor but also in its quick prep time—ready in just 29 minutes, it’s perfect for those evenings when life’s a whirlwind. Plus, these wraps are a total crowd-pleaser, packed with juicy chicken, fresh veggies, and a zesty kick. Whether you’re hosting a casual get-together or just craving a satisfying meal, these wraps won’t disappoint. Are you ready to fire up the grill and dive into a delightful culinary adventure?

Grilled Spicy Chicken Tortilla Wrap

Why Will You Love This Wrap?

Simplicity: This recipe is quick and easy, with a total time of just 29 minutes. Perfect for busy weeknights!

Zesty Flavor: The blend of spices like chili powder and cayenne delivers a bold taste that’s sure to excite your palate.

Crowd-Pleaser: This dish is versatile, making it a hit at gatherings or family dinners. Everyone will appreciate the juicy chicken and fresh toppings!

Customizable: Feel free to swap veggies or add your favorite herbs for a personal touch. Try it with a side of spicy salsa for an extra kick!

Nourishing: Each wrap packs a balanced meal in one, making it both satisfying and nutritious at around 450 calories per serving. Dive into your next culinary adventure with these delicious wraps!

Grilled Spicy Chicken Tortilla Wrap Ingredients

For the Chicken
• Boneless, skinless chicken breasts – crucial for tender, juicy wraps.
• Olive oil – adds richness and helps the spices stick.
• Chili powder – the base spice giving that delightful, zesty warmth.
• Paprika – contributes color and a mild smoky flavor.
• Cayenne pepper – adjust to taste for that extra kick you crave!
• Garlic powder – enhances the flavor profile with a savory touch.
• Salt and pepper – simple essentials to elevate the overall taste.

For the Wrap
• Flour tortillas – the perfect foldable base for all your delicious fillings.
• Shredded lettuce – adds crunch and freshness to each bite.
• Large tomato, diced – brings juicy flavor and vibrant color.
• Shredded cheddar cheese – melting beautifully for that comforting touch.
• Sour cream – adds creaminess and balances the spices.
• Salsa – a zesty topping that complements the wraps perfectly.
• Lime, cut into wedges – for a refreshing, tangy kick.

Embark on your cooking journey and whip up these delightful Grilled Spicy Chicken Tortilla Wraps that are sure to please everyone at the table!

Step‑by‑Step Instructions for Grilled Spicy Chicken Tortilla Wrap

Step 1: Prepare the Marinade
In a small bowl, combine 2 tablespoons of olive oil, 2 teaspoons of chili powder, 1 teaspoon of paprika, 1/2 teaspoon of cayenne pepper (adjust to your preference), and 1 teaspoon of garlic powder. Add salt and pepper to taste, mixing until you have a smooth marinade. This flavorful blend will coat your chicken breasts and infuse them with a delightful spiciness.

Step 2: Marinate the Chicken
Rub the prepared spice mixture evenly over both sides of the 2 boneless, skinless chicken breasts. Ensure every inch is covered for maximum flavor. Let the chicken sit for about 10 minutes to absorb the spices while you preheat your grill, enhancing the grilling experience of your Grilled Spicy Chicken Tortilla Wrap.

Step 3: Heat the Grill
Preheat your grill or grill pan over medium-high heat for about 5 minutes. You want the grill hot enough to create those beautiful sear marks on the chicken. Once ready, carefully place the marinated chicken breasts onto the grill and listen for that satisfying sizzle, signaling the beginning of a mouthwatering adventure.

Step 4: Grill the Chicken
Cook each side of the chicken breasts for about 6-7 minutes. You’ll know they are done when the internal temperature reaches 165°F (75°C) and the juices run clear. As the chicken cooks, it will develop a gorgeous golden-brown color, adding visual appeal to your Grilled Spicy Chicken Tortilla Wrap.

Step 5: Slice the Chicken
Once cooked, remove the chicken from the grill and let it rest for 5 minutes. This resting period ensures the juices redistribute, keeping the chicken tender. After resting, slice the chicken into thin, bite-sized strips, making it easy to layer into your tortilla wraps.

Step 6: Assemble the Wraps
Take 4 large flour tortillas and lay them flat. Start layering each tortilla with a generous handful of shredded lettuce, followed by diced tomato, the grilled chicken strips, shredded cheddar cheese, sour cream, and salsa. This colorful medley will elevate your Grilled Spicy Chicken Tortilla Wrap into a satisfying meal.

Step 7: Roll the Tortillas
Fold the sides of each tortilla inward to secure the filling, then roll it tightly from the bottom to the top. Ensure the wraps are secure to prevent any delicious fillings from spilling out. At this stage, you’ve created perfect Grilled Spicy Chicken Tortilla Wraps ready for enjoyment.

Step 8: Grill the Wrapped Tortillas
For an optional crisp, return the wraps to the grill for 1-2 minutes on each side. This will warm them through and give a lovely crisp texture that enhances the overall flavor. Watch closely as they turn golden, adding another layer of irresistible appeal to your wraps.

Step 9: Serve with Lime
Once grilled, serve the wraps on plates with lime wedges on the side. Squeezing fresh lime juice over your Grilled Spicy Chicken Tortilla Wrap adds a refreshing zing, perfectly balancing the spice and bringing all the flavors together.

Grilled Spicy Chicken Tortilla Wrap

What to Serve with Grilled Spicy Chicken Tortilla Wrap

The delightful warmth of grilled chicken and zesty toppings deserves some equally captivating companions to round out your meal.

  • Creamy Avocado Dip: A velvety, rich dip that enhances the wrap’s bold flavors while adding a creamy texture.
  • Mexican Street Corn Salad: Sweet, crunchy corn mixed with lime, cilantro, and cheese creates a refreshing side that contrasts wonderfully with the spicy wraps.
  • Chips and Fresh Salsa: Crispy tortilla chips serve as a perfect crunchy companion alongside a tangy, homemade salsa for added flavor and fun.
  • Cilantro-Lime Rice: Fluffy rice infused with cilantro and lime brightens the meal while providing a satisfying, filling element.
  • Grilled Vegetables: Charred bell peppers, zucchini, and onions offer a smoky flavor and vibrant color, complementing the seasoned chicken beautifully.
  • Pineapple Mojito: This refreshing cocktail combines mint, citrus, and pineapple flavors for a fruity counterpoint to the spices in your wrap.
  • Fresh Fruit Salad: A medley of juicy fruits like watermelon, berries, and lime brings a refreshing sweetness to balance the savory dish.
  • Chocolate Churros: Indulgent and crispy, these sweet treats make for a delightful dessert that adds a satisfying touch to your vibrant meal.
  • Corn Tortilla Soup: Rich and comforting, this soup adds warmth and depth, creating a hearty contrast to the freshness of your wraps.
  • Hibiscus Iced Tea: This floral, fruity tea can balance the heat while providing a quenching sip alongside your wraps.

Expert Tips for Grilled Spicy Chicken Tortilla Wrap

Marinade Magic: Allow the chicken to marinate for at least 10 minutes or longer for deeper flavor. It ensures each bite of your Grilled Spicy Chicken Tortilla Wrap is packed with zesty goodness.

Check Temperature: Always use a meat thermometer to verify the internal temperature of 165°F. This prevents overcooking and ensures juicy chicken in your wraps.

Layer Wisely: When assembling, layer ingredients evenly to avoid tearing the tortilla. Securely folding the sides before rolling helps prevent messiness while enjoying your wraps.

Customize Heat: Adjust cayenne pepper according to your spice tolerance. Start with less and add more for your ideal heat level in the Grilled Spicy Chicken Tortilla Wrap.

Crispy Finish: Grilling the assembled wraps for a couple of minutes brings a lovely texture. Watch them closely to achieve that golden-brown crisp without burning.

Grilled Spicy Chicken Tortilla Wrap Variations

Feel free to let your creativity shine as you explore these delightful twists on the classic wrap!

  • Whole Wheat Tortillas:
    Swap out the flour tortillas for whole wheat for a nuttier flavor and added fiber.

  • Grilled Veggies:
    Add grilled bell peppers and onions for a colorful, smoky crunch that complements the chicken.

  • Avocado:
    Slice in some creamy avocado for a richness that balances the spice beautifully.

  • Spicy Cilantro Lime Rice:
    Serve the wraps with a side of spicy cilantro lime rice for an extra burst of flavor in every bite.

  • Chipotle Mayo:
    Drizzle some chipotle mayo inside the wrap for a smoky, creamy sauce that elevates the flavor profile.

  • Plant-Based Option:
    Use grilled tofu or tempeh instead of chicken for a satisfying and heart-healthy plant-based alternative.

  • Extra Heat:
    If you love spice, increase the cayenne pepper or add jalapeños into the wrap for an extra fiery kick.

  • Mediterranean Twist:
    Incorporate feta cheese, kalamata olives, and a hint of oregano to turn your wrap into a Mediterranean delight.

Make Ahead Options

These Grilled Spicy Chicken Tortilla Wraps are perfect for meal prep, saving you time on busy weeknights! You can marinate the chicken breasts up to 24 hours in advance to maximize flavor—just coat them with the spice mix and refrigerate. Additionally, you can pre-slice the grilled chicken and store it in an airtight container in the fridge for up to 3 days. When you’re ready to enjoy your wraps, simply layer the tortillas with fresh veggies, cheese, and prepped chicken, then grill for a couple of minutes to warm and crisp the tortillas. This way, your Grilled Spicy Chicken Tortilla Wraps will be just as delicious, allowing you to savor flavorful, homemade meals with minimal effort!

How to Store and Freeze Grilled Spicy Chicken Tortilla Wrap

Fridge: Store leftover wraps in an airtight container for up to 3 days. For best results, separate layers with parchment paper to prevent sticking.

Freezer: Wrap individual Grilled Spicy Chicken Tortilla Wraps tightly in plastic wrap and foil before placing them in a freezer-safe bag. They can be frozen for up to 2 months.

Reheating: To reheat, unwrap and place the frozen wraps in a preheated oven at 350°F (175°C) for about 15-20 minutes, or until warmed through. You can also use the microwave, heating in 30-second intervals until hot.

Grilled Spicy Chicken Tortilla Wrap

Grilled Spicy Chicken Tortilla Wrap Recipe FAQs

How do I choose the right chicken breasts?
Absolutely! Look for boneless, skinless chicken breasts that are firm, plump, and devoid of dark spots. Fresh chicken should have a light pink color and also be stored at 40°F (4°C) or lower. Avoid any packages that are leaking or have an unpleasant odor.

What’s the best way to store leftover wraps?
Very good question! Store your leftover Grilled Spicy Chicken Tortilla Wraps in an airtight container for up to 3 days. For the best flavor and texture, you can separate each wrap with parchment paper to prevent them from sticking together. This way, you can enjoy them later without losing any deliciousness!

Can I freeze the wraps? If so, how?
Yes, you can! To freeze your Grilled Spicy Chicken Tortilla Wraps, first let them cool completely. Then, individually wrap each one tightly in plastic wrap followed by foil to protect against freezer burn. Place the wrapped wraps in a freezer-safe bag, and they’ll stay fresh for up to 2 months. When you’re ready to eat, simply unwrap them and reheat at 350°F (175°C) for about 15-20 minutes until warmed through.

What if my chicken is dry after grilling?
If your chicken turns out dry, it might have been overcooked. Always use a meat thermometer to ensure it reaches an internal temperature of 165°F (75°C). For future reference, let the chicken rest for 5 minutes after grilling, which helps the juices redistribute. Also, consider marinating for longer next time or using a brine for extra moisture!

Are there any dietary considerations with this recipe?
Absolutely! If you’re cooking for someone with allergies, make sure to check for any sensitivities to spices like paprika or cayenne pepper, as well as dairy content in sour cream and cheddar cheese. If you’re preparing meals for pets, it’s best to refrain from sharing these wraps, particularly due to the spices and citrus. Always tailor to your guests’ dietary needs for a safe and enjoyable dining experience!

Grilled Spicy Chicken Tortilla Wrap: A Flavor Adventure

Enjoy a flavorful Grilled Spicy Chicken Tortilla Wrap, perfect for busy weeknights with its zesty spices and juicy chicken.

  • grill
  • grill pan
  • Meat Thermometer
  • Mixing Bowl

For the Chicken

  • 2 pieces boneless, skinless chicken breasts
  • 2 tablespoons olive oil (for marinade)
  • 2 teaspoons chili powder (adjust to taste)
  • 1 teaspoon paprika
  • 0.5 teaspoon cayenne pepper (adjust to taste)
  • 1 teaspoon garlic powder
  • to taste salt
  • to taste pepper

For the Wrap

  • 4 large flour tortillas
  • 2 cups shredded lettuce
  • 1 large tomato, diced
  • 1 cup shredded cheddar cheese
  • 0.5 cup sour cream
  • 0.5 cup salsa
  • 1 piece lime, cut into wedges

Step-by-Step Instructions

  1. In a small bowl, combine olive oil, chili powder, paprika, cayenne pepper, garlic powder, salt, and pepper to create the marinade.
  2. Rub the marinade evenly over the chicken breasts and let them sit for 10 minutes.
  3. Preheat the grill or grill pan over medium-high heat.
  4. Grill the marinated chicken for about 6-7 minutes on each side until the internal temperature reaches 165°F.
  5. Remove the chicken from the grill, let it rest for 5 minutes, then slice into strips.
  6. Layer each tortilla with shredded lettuce, diced tomato, grilled chicken strips, shredded cheddar cheese, sour cream, and salsa.
  7. Fold the sides of the tortilla inward and roll tightly from the bottom to the top.
  8. Optional: grill the wrapped tortillas for 1-2 minutes on each side for a crispy finish.
  9. Serve the wraps with lime wedges on the side to squeeze over for freshness.

For best flavor, marinate the chicken longer and ensure even layering while assembling the wraps. Adjust spice levels as per taste.

Sandwiches
Mexican
crowd-pleaser, Grilled Spicy Chicken, Healthy Wrap, quick meal, Tortilla Wrap, Zesty Flavors

Filed Under: Sandwiches

Savory Grilled Tuna Melt with Creamy Cheddar Bliss

September 7, 2025 by grace bellamy Leave a Comment

As I flipped through my recipe book, a delightful memory washed over me: the first time I savored a Savory Grilled Tuna Melt with Creamy Cheddar on a rainy afternoon. The combination of crispy bread, melty cheese, and zesty tuna never fails to wrap me in warmth, creating a cozy embrace even on the cloudiest of days. This dish isn’t just a lunch option; it’s an effortless way to turn pantry staples into a comforting meal that brings everyone to the table. With just 15 minutes of prep and 10 minutes of cook time, it’s perfect for busy weeknights or those lazy weekends when you crave something homemade. Plus, it holds a secret twist—sneaking in fresh arugula for a burst of brightness! Ready to make this ultimate comfort food? Let’s dive into how to create the perfect grilled tuna melt that will leave everyone asking for seconds!

Savory Grilled Tuna Melt with Creamy Cheddar

Why Is This Tuna Melt a Must-Try?

Simplicity: With just a handful of pantry staples, you can whip up this Savory Grilled Tuna Melt with Creamy Cheddar in less than 30 minutes.

Flavor Explosion: The creamy cheddar combined with zesty tuna and fresh veggies makes for an irresistible flavor combination that your taste buds will thank you for!

Customizable: Swap out the whole-grain bread for your favorite variety or add extra toppings like avocado or jalapeños for a twist on the classic.

Nostalgia: This dish brings back childhood memories, reminding us that comfort food doesn’t have to be complicated!

Crowd-Pleaser: Perfect for family dinner or a casual gathering, it’s sure to impress everyone at the table!

If you’re interested in checking out more easy meals, don’t miss my post on Quick and Delicious Weeknight Dinners.

Savory Grilled Tuna Melt Ingredients

Get ready to create a comforting classic with these simple yet flavorful ingredients!

For the Tuna Mixture

  • Canned tuna in water – packed with protein and perfect for a quick meal.
  • Mayonnaise – adds creaminess and ties the tuna mixture together nicely.
  • Dijon mustard – a zesty kick that enhances the overall flavor profile.
  • Celery – adds crunch and freshness, making your melt feel light.
  • Red onion – provides a bite that complements the creaminess of the cheese.
  • Lemon juice – brightens the flavors with a burst of acidity.
  • Salt and pepper – essential for seasoning to suit your taste!

For the Sandwich

  • Whole-grain bread – a wholesome base that adds fiber and nutty flavor.
  • Butter – ensures a golden, crispy crust when grilling.
  • Creamy cheddar cheese – melts beautifully for that dreamy cheese pull.
  • Ripe tomatoes – juicy slices bring moisture and sweetness.
  • Arugula or spinach leaves – a healthy touch that adds nutrients and color.

Feel free to swap ingredients as you like! This Savory Grilled Tuna Melt with Creamy Cheddar is all about making it your own. Enjoy!

Step‑by‑Step Instructions for Savory Grilled Tuna Melt with Creamy Cheddar

Step 1: Prepare the Tuna Mixture
In a medium bowl, combine the drained tuna with mayonnaise, Dijon mustard, chopped celery, and diced red onion. Stir in the lemon juice, and season with salt and pepper to taste. Mix until all ingredients are fully coated and the mixture is smooth and creamy, creating the flavorful base for your Savory Grilled Tuna Melt.

Step 2: Butter the Bread
Lay out eight slices of whole-grain bread on a clean surface. Evenly spread softened butter on one side of each slice, ensuring that it covers the entire surface for a golden, crispy crust as you grill the sandwiches. This step is essential for achieving that perfect melt experience!

Step 3: Heat the Skillet
Take a large skillet or griddle and heat it over medium heat until it’s hot enough to sizzle a drop of butter. This should take about 2 minutes. The right temperature will help achieve an ideal balance between a crispy exterior and a perfectly melted interior for your delicious tuna melts.

Step 4: Assemble the Sandwiches
Place four slices of the prepared bread, buttered side down, onto the skillet in a single layer. On each slice, layer one slice of cheddar cheese, followed by a generous scoop of the creamy tuna mixture, a couple of tomato slices, and a handful of fresh arugula or spinach. Top with another slice of cheddar cheese for that melt-in-your-mouth goodness.

Step 5: Complete the Sandwich Assembly
Gently place the remaining slices of bread on top of each prepared sandwich, ensuring that the buttered side faces up. This will create a delightful exterior that crisps up beautifully while the Savory Grilled Tuna Melt cooks.

Step 6: Grill the Sandwiches
Grill the sandwiches for about 3–4 minutes per side, or until the bread is golden brown and the cheese has melted completely. Use a sturdy spatula to carefully flip them halfway through to ensure even grilling. Keep an eye on them to avoid burning!

Step 7: Cut and Serve
Once the sandwiches are perfectly toasted, remove them from the skillet and let them cool for a minute. Cut each sandwich in half on the diagonal to reveal the melty layers inside. Serve warm, and relish the comforting flavors of your Savory Grilled Tuna Melt with Creamy Cheddar!

Savory Grilled Tuna Melt with Creamy Cheddar

What to Serve with Savory Grilled Tuna Melt with Creamy Cheddar

Pairing your tuna melt with the right sides transforms this dish into a heartwarming meal that everyone will love.

  • Crispy Sweet Potato Fries: The natural sweetness of sweet potatoes balances the savory tuna melt, providing an enticing crispy texture. They make a great finger food option alongside the sandwich.

  • Classic Coleslaw: A tangy coleslaw adds crunch and freshness, enhancing the flavors of the tuna melt. Its creamy dressing complements the richness of the cheese beautifully.

  • Chilled Gazpacho: The bright, refreshing notes of this cold soup are a perfect contrast to the warm, gooey tuna melt. It’s a summer favorite that cleanses the palate.

  • Garlic Butter Asparagus: Lightly sautéed asparagus with garlic adds a gourmet touch, pairing wonderfully with the tuna’s richness. Its bright green color also makes the plate pop!

  • Mixed Green Salad: Tossing together arugula, cherry tomatoes, and a zesty vinaigrette complements the melt, creating a vibrant explosion of flavors. This fresh side can brighten any meal.

  • Sparkling Lemonade: A homemade sparkling lemonade adds a zesty, refreshing splash that elevates the entire meal. Its citrus notes play off the lemon juice in the tuna melt.

  • Chocolate Chip Cookies: End on a sweet note with warm chocolate chip cookies! They add comforting nostalgia, perfectly rounding out your savory tuna melt experience.

Elevate your lunch or dinner with these pairing ideas and create a meal that’s perfect for sharing—each bite inviting and warm, just like home.

How to Store and Freeze Savory Grilled Tuna Melt with Creamy Cheddar

Room Temperature: Best enjoyed fresh, but if left out, your tuna melts are safe for up to 2 hours.

Fridge: Store any leftovers in an airtight container for up to 3 days. This will keep the tuna mixture and cheese flavors intact.

Freezer: To freeze, wrap sandwiches tightly in plastic wrap and then aluminum foil. They’ll stay fresh for up to 2 months. Thaw in the fridge before reheating.

Reheating: For optimal texture, heat in a skillet on medium-low until golden brown on both sides and warmed through. Enjoy your Savory Grilled Tuna Melt with Creamy Cheddar like freshly made!

Savory Grilled Tuna Melt Variations

Feel free to make this comforting classic your own by exploring some delightful variations!

  • Gluten-Free: Substitute whole-grain bread with gluten-free bread for a safe and delicious option.

  • Spicy Tuna: Add diced jalapeños or a splash of sriracha to the tuna mixture for a fiery kick. Spice lovers will savor this bold twist!

  • Cheese Variety: Experiment with different cheeses like mozzarella or pepper jack for a unique flavor profile that elevates your melt experience.

  • Veggie-Loaded: Enhance nutrition by adding sautéed mushrooms or bell peppers to the tuna mixture and layering with extra spinach. Your melt becomes not just tasty but nourishing too!

  • Herbed Tuna: Mix in fresh herbs like dill or parsley to the tuna for an aromatic burst. This brings a fresh garden touch to your savory creation.

  • Open-Faced Melt: Skip the top slice of bread and serve it open-faced. This option lets more of the delicious toppings shine through!

  • Crispy Additions: Consider adding crispy bacon or fried onions for a textural contrast that make each bite even more delectable.

  • Asian-Inspired: Swap the mayonnaise for mayo mixed with wasabi and add shredded carrots instead of celery. It’s a fun fusion that’ll surprise your taste buds!

If you’re in the mood for other easy meals, check out my post on Quick and Delicious Weeknight Dinners for more inspiration!

Make Ahead Options

These Savory Grilled Tuna Melts with Creamy Cheddar are perfect for busy weeknights, allowing you to enjoy homemade goodness without the last-minute rush! You can prep the tuna mixture (tuna, mayonnaise, Dijon mustard, celery, red onion, lemon juice, salt, and pepper) up to 24 hours in advance; simply store it in an airtight container in the refrigerator to maintain its freshness. Additionally, you can butter the bread slices ahead of time and keep them separated with parchment paper for easy assembly. When you’re ready to serve, layer the prepped ingredients onto the bread, grill them as directed, and enjoy warm, delicious sandwiches just as satisfying as if they were made from scratch!

Tips for the Best Savory Grilled Tuna Melt

Quality Tuna Matters: Use high-quality canned tuna for a richer flavor. Opt for tuna packed in water rather than oil to keep it light.

Even Spreading: Ensure that your butter is evenly spread on the bread for consistent browning. Missing this step may leave some areas soggy.

Don’t Rush the Grill: Let the skillet heat thoroughly before cooking. This prevents the bread from burning while the cheese remains unmelted.

Watch the Cheese: Keep an eye on the cheese’s melting point. If it’s not melting quickly enough, you can cover the skillet with a lid for a minute to trap heat.

Fresh Greens: Add the arugula or spinach right before grilling if you’re concerned about wilting. This keeps the greens fresh and vibrant in your Savory Grilled Tuna Melt.

Savory Grilled Tuna Melt with Creamy Cheddar

Savory Grilled Tuna Melt with Creamy Cheddar Recipe FAQs

What type of tuna should I use for the best flavor?
Absolutely! I recommend using high-quality canned tuna packed in water for the best flavor and texture. Look for tuna labeled either “chunk light” or “solid white” for a rich, hearty flavor that complements the creamy ingredients beautifully.

How should I store leftovers of my Savory Grilled Tuna Melt?
Leftovers are easy to store! Place them in an airtight container and refrigerate for up to 3 days. Just remember to keep the sandwiches separate if you don’t want them to get soggy. If you have a fresh batch of tuna mixture, store that separately in the fridge as well!

Can I freeze Savory Grilled Tuna Melt sandwiches?
Yes, you can! To freeze your sandwiches, wrap each one tightly in plastic wrap, followed by aluminum foil. This double-wrapping helps prevent freezer burn. They can be stored in the freezer for up to 2 months. When you’re ready to enjoy, thaw them overnight in the fridge and then reheat in a skillet for that crispy goodness.

What if my bread gets too soggy during grilling?
Very! To prevent sogginess, make sure to spread a generous layer of butter evenly on the bread and ensure your skillet is hot enough before placing the sandwiches in. You can also toast the bread lightly before assembling to create a barrier against moisture.

Can I adapt this recipe for dietary restrictions?
Of course! If you have dietary considerations, feel free to swap out the mayonnaise with a vegan alternative or Greek yogurt for a lighter option. For those avoiding gluten, choose gluten-free bread. It’s versatile, and you can personalize it to suit any dietary needs while still savoring the delightful flavors of the Savory Grilled Tuna Melt with Creamy Cheddar.

How do I know when my Savory Grilled Tuna Melt is done grilling?
Keep an eye out for that golden brown crust! Grill for about 3–4 minutes per side, but don’t hesitate to peek underneath to check for the perfect color. You want to see a lovely, crispy exterior with every bit of cheese melted inside. If needed, cover with a lid for even more melting action!

Savory Grilled Tuna Melt with Creamy Cheddar Bliss

Enjoy the warmth of Savory Grilled Tuna Melt with Creamy Cheddar, a comforting dish bringing together crispy bread, melty cheese, and zesty tuna.

  • skillet

For the Tuna Mixture

  • 1 can Canned tuna in water
  • 2 tablespoons Mayonnaise
  • 1 tablespoon Dijon mustard
  • 1/2 cup Celery (chopped)
  • 1/4 cup Red onion (diced)
  • 1 tablespoon Lemon juice
  • to taste Salt
  • to taste Pepper

For the Sandwich

  • 8 slices Whole-grain bread
  • 2 tablespoons Butter (softened)
  • 8 slices Creamy cheddar cheese
  • 1 cup Ripe tomatoes (sliced)
  • 1 cup Arugula or spinach leaves

Step-by-Step Instructions

  1. In a medium bowl, combine the drained tuna with mayonnaise, Dijon mustard, chopped celery, and diced red onion. Stir in the lemon juice, and season with salt and pepper to taste. Mix until all ingredients are fully coated and the mixture is smooth and creamy.
  2. Lay out eight slices of whole-grain bread on a clean surface. Evenly spread softened butter on one side of each slice.
  3. Take a large skillet or griddle and heat it over medium heat until hot enough to sizzle a drop of butter.
  4. Place four slices of the prepared bread, buttered side down, onto the skillet. On each slice, layer one slice of cheddar cheese, followed by a generous scoop of the creamy tuna mixture, a couple of tomato slices, and a handful of fresh arugula or spinach. Top with another slice of cheddar cheese.
  5. Gently place the remaining slices of bread on top of each prepared sandwich, ensuring that the buttered side faces up.
  6. Grill the sandwiches for about 3–4 minutes per side, or until the bread is golden brown and the cheese has melted completely.
  7. Once the sandwiches are perfectly toasted, remove them from the skillet and let them cool for a minute. Cut each sandwich in half on the diagonal to reveal the melty layers inside. Serve warm.

Feel free to swap ingredients and customize your tuna melt to your liking! Enjoy fresh greens just before grilling for the best taste.

Sandwiches
American
comfort food, Easy Recipe, grilled cheese, quick meal, Savoury Dish, Tuna Melt

Filed Under: Sandwiches

Savory Roasted French Dip Sandwich for Cozy Nights In

September 7, 2025 by grace bellamy Leave a Comment

As I stood in the kitchen, the rich aroma of slow-roasted beef mingled with the warmth of fresh bread, creating a cozy embrace that felt like home. Today, I’m excited to share my recipe for a Savory Roasted French Dip Sandwich that transforms simple ingredients into a delightful, hearty meal. This dish is not only perfect for impressing guests but also incredibly easy to whip up with just a bit of patience. With minimal active prep time and the magic of a long, slow roast, you can enjoy tender, flavorful beef paired with melty provolone and crusty baguette. Plus, it’s an irresistible comfort food that rivals any takeout! Are you ready to elevate your sandwich game and bring some joy into your kitchen?

Savory Roasted French Dip Sandwich

Why is this sandwich a must-try?

Unparalleled Flavor: The Savory Roasted French Dip Sandwich boasts an incredible depth of flavor from slow-roasting the beef with fresh herbs and spices, ensuring every bite is a taste sensation.

Easy Preparation: With just 15 minutes of prep, you can let the oven do the work, making it perfect for cooks of all skill levels.

Versatile Serving Options: Serve it as a main dish or cut into smaller portions for a delightful appetizer at your next gathering.

Crowd-Pleasing Appeal: This dish will wow both family and friends, making it a go-to for cozy nights in or casual gatherings.

Dipping Delight: The savory cooking liquid doubles as a rich dipping sauce, elevating your sandwich experience to new heights. Enjoy it alongside horseradish sauce for an extra kick!

Savory Roasted French Dip Sandwich Ingredients

For the Beef Roast
• Beef chuck roast – A great choice for braising, this cut ensures succulent meat perfect for shredding.
• Olive oil – Used for searing; it helps develop a beautiful crust.
• Kosher salt – Enhances the beef’s natural flavors; feel free to adjust to taste.
• Black pepper – Adds a touch of heat and depth to the seasoning blend.
• Garlic powder – A must for that savory boost in flavor.
• Onion powder – Complements the garlic while enhancing overall taste.
• Dried thyme – Provides herbal notes that pair beautifully with beef.
• Dried rosemary – Offers a distinct fragrance and flavor profile.

For the Onions and Broth
• Large onion, sliced – Sweetens the dish as it caramelizes during cooking.
• Beef broth – Forms the savory base for simmering; opt for low-sodium if preferred.
• Soy sauce – Adds umami depth and a touch of saltiness to the broth.

For the Sandwich Assembly
• Baguette – The perfect vessel for your sandwich, crusty on the outside and soft inside.
• Provolone cheese – Melts beautifully, adding creamy richness to each bite.
• Optional: Horseradish sauce – A zesty dip that complements the savory flavors of the sandwich.

Each ingredient contributes to the delicious experience of a Savory Roasted French Dip Sandwich, ensuring you savor every bite!

Step‑by‑Step Instructions for Savory Roasted French Dip Sandwich

Step 1: Preheat the Oven
Begin by preheating your oven to 325°F (163°C) to prepare for a slow roast that will transform your beef into a tender masterpiece. While the oven warms up, gather your ingredients and ensure your cooking space is tidy, ready for a delightful cooking experience.

Step 2: Heat the Skillet
In a large, oven-safe skillet, drizzle 1 tablespoon of olive oil and heat it over medium-high until shimmering. You’ll know the oil is ready when it lightly bubbles. This step is crucial for developing a rich, flavorful crust on your beef chuck roast as it sears.

Step 3: Season the Beef
Generously season the 2 lbs beef chuck roast with kosher salt, black pepper, garlic powder, onion powder, dried thyme, and dried rosemary. Make sure to rub the seasonings all over the roast for even flavor. The savory blend will enhance the deliciousness of your Savory Roasted French Dip Sandwich!

Step 4: Sear the Roast
Once the oil is hot, carefully place the seasoned roast into the skillet. Sear for about 8-10 minutes, turning occasionally to get a deep golden-brown color on all sides. This step locks in the juices, setting up a mouthwatering base for the sandwich.

Step 5: Sauté the Onions
Remove the beef from the skillet and set it aside temporarily. In the same skillet, add sliced onions and sauté for about 5 minutes until they soften and become slightly caramelized. The sweetness of the onions will balance the savory beef beautifully, enhancing your sandwich experience.

Step 6: Combine the Ingredients
Return the beef to the skillet with the sautéed onions, and pour in 4 cups of beef broth and 1/4 cup of soy sauce. The broth will add rich depth and moisture, making every bite of your Savory Roasted French Dip Sandwich truly enjoyable.

Step 7: Roast the Beef
Cover the skillet with a lid or aluminum foil and place it in the preheated oven. Roast for approximately 3-4 hours, or until the beef is fork-tender and shreds easily. Keep an eye on the aroma; it will be heavenly as it fills your kitchen!

Step 8: Shred the Beef
Once the beef is done roasting, carefully remove it from the oven and let it rest for a few minutes. Then, using two forks, shred the beef into bite-sized pieces. This tender beef is what makes your Savory Roasted French Dip Sandwich incredibly satisfying.

Step 9: Preheat the Broiler
While the beef rests, preheat your broiler to high. This step is essential for getting that melty, bubbly cheese which elevates the sandwich to a whole new level of deliciousness.

Step 10: Prepare the Baguette
Cut the baguette pieces in half lengthwise and arrange them on a baking sheet, cut side up. Place slices of provolone cheese on one side of each baguette half, ensuring generous coverage as this will create a delightfully cheesy layer in your sandwich.

Step 11: Broil for Melty Goodness
Broil the baguette halves for about 2-3 minutes, or until the cheese is melted and bubbling. Keep a close watch to avoid burning; you want a lovely golden color that adds to the overall appeal of your Savory Roasted French Dip Sandwich.

Step 12: Assemble the Sandwiches
To assemble, pile the shredded beef onto the cheese-topped baguette halves. The combination of savory beef and gooey cheese nestled in the crusty baguette is irresistible. Don’t forget to spoon some of the cooking liquid from the skillet on top for added moisture!

Step 13: Serve with Dipping Sauce
Utilize the remaining cooking liquid as a rich dipping sauce for your sandwiches. This savory addition makes each bite even more enjoyable. Optionally, serve with horseradish sauce on the side for an extra kick that enhances the flavors of your Savory Roasted French Dip Sandwich.

Savory Roasted French Dip Sandwich

Make Ahead Options

These Savory Roasted French Dip Sandwiches are perfect for meal prep, making weeknight dinners a breeze! You can season and sear the beef chuck roast up to 24 hours in advance—just refrigerate it covered. The sautéed onions can also be prepared ahead and stored in an airtight container in the fridge for up to 3 days. When you’re ready to enjoy, simply add the previously prepped ingredients to the pot with beef broth and soy sauce, then roast as directed. This method not only saves time but also ensures the flavors meld beautifully, leaving you with a deliciously tender beef that tastes just as amazing as if you had made it in one go!

Expert Tips for Savory Roasted French Dip Sandwich

  • Choose the Right Roast: Use a beef chuck roast for its marbling and tenderness. Avoid lean cuts as they may dry out during the long roast.

  • Searing Essentials: Don’t skip the searing step! It locks in juices and creates a rich crust that deepens the flavor of your Savory Roasted French Dip Sandwich.

  • Season Generously: Be bold with your seasoning! Proper seasoning elevates the dish, ensuring every bite bursts with flavor.

  • Monitor Oven Time: Each oven is different. Check your beef around the 3-hour mark; you want it fork-tender but not overcooked.

  • Creative Dipping Options: Use the cooking liquid wisely as a dipping sauce. Experiment with additional spices like cayenne or smoked paprika for a unique flavor twist.

  • Storage Guidance: If you have leftovers, store the shredded beef and broth separately. This way, you can reheat without soggy bread for a quick meal the next day.

What to Serve with Savory Roasted French Dip Sandwich

Bring your dining experience to life with delicious companions that harmonize perfectly with each bite of your savory creation!

  • Creamy Mashed Potatoes: Silky smooth and buttery, they absorb the rich dipping sauce, creating a perfect match for comfort food lovers.

  • Garlic Parmesan Fries: Crispy on the outside and fluffy on the inside, these fries add a delightful crunch to balance the soft sandwich textures. Pair them with a sprinkle of fresh parsley for a pop of color!

  • Coleslaw: A refreshing crunch provides a pleasant contrast to the hearty beef, and its tangy dressing brightens every bite, making it a superb sidekick.

  • Roasted Vegetables: Roast a medley of seasonal veggies like carrots, bell peppers, and zucchini for a healthy touch. The natural sweetness complements the savory flavors beautifully.

  • French Onion Soup: Embrace the French theme with this rich, brothy delight. The cheesy crouton topping mirrors your sandwich’s melted provolone, creating a warm, comforting duo.

  • Crisp Green Salad: A simple arugula or mixed greens salad dressed lightly with vinegar can cleanse the palate and brighten the meal, making it feel lighter and refreshing.

  • Sparkling Water or Lemonade: Quench your thirst with a fizzy beverage that uplifts the rich flavors without overpowering them. A splash of citrus adds a refreshing zing!

  • Chocolate Chip Cookies: End your meal on a sweet note with warm cookies, which provide a nostalgic comfort that pairs nicely with that post-sandwich satisfaction!

Savory Roasted French Dip Sandwich Variations

Feel free to explore these delicious twists that bring new flavors and textures to your Savory Roasted French Dip Sandwich!

  • Gluten-Free: Use gluten-free rolls or lettuce wraps instead of baguettes for a suitable option.

  • Spicy Kick: Add sliced jalapeños or a sprinkle of red pepper flakes for heat that will thrill your taste buds. Even a small amount works wonders to awaken the flavors!

  • Herb Infusion: Swap the dried thyme and rosemary for fresh herbs like parsley or basil to amplify the freshness of the dish. Fresh herbs bring a vibrant idiom to your savory flavors!

  • Cheese Varieties: Experiment with different cheeses, like mozzarella or sharp cheddar, to add a unique flair to your sandwich. Each cheese will melt differently, creating diverse flavor experiences.

  • Vegetable Medley: Throw in some sautéed bell peppers or mushrooms with the onions for a hearty veggie twist. These add a delightful texture to every mouthful while ramping up the flavor profile!

  • Sweet BBQ: Drizzle a bit of your favorite barbecue sauce over the beef before serving for a sweet and smoky experience that’s sure to impress. It’s an unexpected flavor explosion that will surprise and delight!

  • Stuffed Baguette: Before broiling, add a layer of spinach or arugula to your assembled sandwiches for added freshness and a pop of color. This not only boosts nutrition but also gives visual appeal.

  • Baked Potatoes: Serve your French Dip with a side of loaded baked potatoes for a comforting meal. It’s a match made in cozy cuisine heaven that will leave you satisfied!

Feel free to mix and match these ideas; the journey in your kitchen is all about flavor exploration and personal touch. Happy cooking!

Storage Tips for Savory Roasted French Dip Sandwich

Fridge: Store any leftover shredded beef and broth in an airtight container in the fridge for up to 3 days. This keeps it fresh and ready to reheat!

Freezer: To enjoy your Savory Roasted French Dip Sandwich later, freeze the shredded beef and broth in separate airtight containers for up to 3 months. This helps maintain flavor and texture.

Reheating: When ready to eat, thaw in the fridge overnight, then reheat on the stove over low heat, adding a splash of broth to moisten the beef if needed.

Sandwich Assembly: For the best sandwich experience, assemble and broil fresh baguette halves with cheese just before serving, as this keeps the bread crispy and the cheese gooey!

Savory Roasted French Dip Sandwich

Savory Roasted French Dip Sandwich Recipe FAQs

What type of beef is best for the Savory Roasted French Dip Sandwich?
Choosing a beef chuck roast is key! It has the ideal marbling, which keeps the meat tender and juicy during the long roasting process. Avoid lean cuts like sirloin, as they can dry out and won’t shred as nicely.

How should I store leftovers from the Savory Roasted French Dip Sandwich?
Store any leftover shredded beef and broth in airtight containers in the fridge for up to 3 days. This keeps them fresh. If you want to save them longer, freeze the beef and broth in separate airtight containers for up to 3 months to maintain flavor and texture.

Can I freeze the Savory Roasted French Dip Sandwich?
Absolutely! To freeze, store the shredded beef and broth separately in airtight containers. When you’re ready to enjoy them again, thaw overnight in the fridge and reheat on the stove over low heat, adding a splash of broth for moisture.

What should I do if my beef isn’t shredding easily?
If your beef isn’t shredding well, it may need more time in the oven. Roast it for an additional 30 minutes to 1 hour, checking periodically. You’ll know it’s ready when it’s fork-tender and falls apart effortlessly for that mouthwatering Savory Roasted French Dip Sandwich.

Is there a way to make this recipe gluten-free?
Yes, you can easily make a gluten-free version of the Savory Roasted French Dip Sandwich. Just use gluten-free soy sauce or coconut aminos instead of regular soy sauce and make sure the baguette is gluten-free as well. There are some great gluten-free bread options available in stores nowadays!

Savory Roasted French Dip Sandwich for Cozy Nights In

This Savory Roasted French Dip Sandwich is a delightful, hearty meal perfect for cozy nights in, featuring slow-roasted beef with melty provolone.

  • Oven-safe skillet

For the Beef Roast

  • 2 lbs beef chuck roast (A great choice for braising.)
  • 1 tablespoon olive oil (Used for searing.)
  • 2 teaspoons kosher salt (Adjust to taste.)
  • 1 teaspoon black pepper
  • 1 teaspoon garlic powder
  • 1 teaspoon onion powder
  • 1 teaspoon dried thyme
  • 1 teaspoon dried rosemary

For the Onions and Broth

  • 1 large onion, sliced (Sweetens as it caramelizes.)
  • 4 cups beef broth (Opt for low-sodium if preferred.)
  • 1/4 cup soy sauce (Adds umami depth.)

For the Sandwich Assembly

  • 8 oz provolone cheese (Melts beautifully.)
  • to taste horseradish sauce (Optional.)

Step-by-Step Instructions

  1. Preheat your oven to 325°F (163°C) to prepare for a slow roast.
  2. In a large, oven-safe skillet, drizzle olive oil and heat over medium-high until shimmering.
  3. Generously season the beef chuck roast with kosher salt, black pepper, garlic powder, onion powder, dried thyme, and dried rosemary.
  4. Carefully place the seasoned roast into the skillet and sear for about 8-10 minutes, turning occasionally.
  5. Remove the beef from the skillet and set it aside. In the same skillet, add sliced onions and sauté for about 5 minutes.
  6. Return the beef to the skillet with the sautéed onions, then pour in beef broth and soy sauce.
  7. Cover the skillet and place it in the preheated oven. Roast for approximately 3-4 hours, or until fork-tender.
  8. Once done, remove the beef and let it rest for a few minutes before shredding it into bite-sized pieces.
  9. Preheat your broiler to high while the beef rests.
  10. Cut the baguette pieces in half lengthwise, arrange on a baking sheet, and place provolone cheese on each half.
  11. Broil the baguette halves for about 2-3 minutes, until the cheese is melted and bubbling.
  12. Assemble by piling the shredded beef onto the cheese-topped baguette halves and spoon some cooking liquid on top.
  13. Serve with the remaining cooking liquid as a dipping sauce and optional horseradish sauce on the side.

For the best sandwich experience, assemble and broil fresh baguette halves with cheese just before serving.

Sandwiches
American
beef sandwich, comfort food, Cozy Meal, Easy Recipe, Savory Roasted French Dip Sandwich, slow-roasted beef

Filed Under: Sandwiches

Spooktacular Cheesy Halloween Breadstick Bones for Fun Dipping

September 5, 2025 by grace bellamy Leave a Comment

As I stood in the kitchen, the scent of melted cheese and freshly baked bread took me back to cozy autumn nights filled with laughter and spooky tales. This season, I couldn’t resist whipping up my Cheesy Halloween Breadstick Bones, a recipe that marries fun with flavor. These delightful breadsticks are not only a perfect addition to your Halloween festivities but also a crowd-pleaser that everyone will love. With just 35 minutes from start to finish, they’re quick enough for a last-minute snack while being a playful alternative to traditional appetizers. Serve them warm with marinara sauce for dipping, and watch as they vanish before your eyes! Want to add a spooky twist to your next gathering? Let’s dive into this fun and cheesy recipe!

Cheesy Halloween Breadstick Bones

Why are these breadsticks a Halloween must-try?

Fun and Festive: These Cheesy Halloween Breadstick Bones are not just snacks; they’re a playful addition to any spooky gathering that gets everyone into the Halloween spirit.

Quick to Prepare: With only 35 minutes from start to finish, these delightful treats save you time, making them perfect for any last-minute gatherings or cozy nights in.

Cheesy Goodness: The combination of melted mozzarella and grated Parmesan provides a rich, savory flavor that will keep your taste buds dancing with joy.

Easy to Customize: Feel free to experiment with your favorite flavors or serve with a variety of dipping sauces. They are versatile enough to be enjoyed all year round!

Crowd-Pleaser: With each bite, you’ll have your guests asking for more. They’re perfect for parties, movie nights, or as a fun and interactive snack for kids.

Try them alongside some of your favorite festive treats, and watch as they steal the show!

Cheesy Halloween Breadstick Bones Ingredients

Ready to whip up these spooky delights? Here’s what you need!

For the Breadsticks
• Pizza dough – 1 pound ensures a soft, chewy texture perfect for forming bone shapes.
• Unsalted butter – 2 tablespoons (melted) adds a rich flavor and helps the cheese stick.
• Grated Parmesan cheese – ½ cup for that nutty, sharp taste that enhances every bite.
• Shredded mozzarella cheese – 1 cup creates the melty, gooey effect everyone loves in these Cheesy Halloween Breadstick Bones.
• All-purpose flour – for dusting your surface to prevent sticky situations.

For Dipping
• Marinara sauce – pair with warm breadsticks for a classic and delicious dip that complements the cheese!

Step‑by‑Step Instructions for Cheesy Halloween Breadstick Bones

Step 1: Preheat the Oven
Begin by preheating your oven to 375°F (190°C). This ensures the perfect baking environment for your Cheesy Halloween Breadstick Bones. While the oven warms up, line two baking sheets with parchment paper to prevent sticking and make cleanup a breeze.

Step 2: Prepare the Dough
Allow your pizza dough to sit at room temperature for about 10 minutes. This will make it easier to work with. Once ready, dust your working surface with all-purpose flour to prevent the dough from sticking. Divide the dough into 10 equal pieces, ensuring they all bake evenly.

Step 3: Shape the Bones
Take each piece of dough and roll it out into an 8-inch long rope, making the ends slightly thicker to resemble bones. This playful shape adds to the Halloween theme! Once shaped, snip the ends about 1 inch deep, then gently pull apart to create the bone look that your guests will love.

Step 4: Arrange on Baking Sheets
Place the shaped breadsticks on the lined baking sheets, leaving enough space between them to allow for rising. This spacing is crucial for achieving that delightful puffiness. You’ll want to see a bit of space around each stick, ensuring they bake evenly and don’t stick together.

Step 5: Add the Flavor
Brush the tops of each breadstick generously with melted butter, coating them for a rich flavor. Next, sprinkle an even layer of grated Parmesan cheese over the butter-brushed breadsticks. This adds a nutty and savory kick, enhancing the cheesy goodness you expect from Cheesy Halloween Breadstick Bones.

Step 6: Bake to Perfection
Slide the baking sheets into the preheated oven and bake for about 15 minutes. Keep an eye on them; they should puff slightly and turn a light golden brown, signaling they’re on their way to deliciousness. The aroma will fill your kitchen with a mouthwatering scent!

Step 7: Cheese It Up
Once they have that lovely golden color, take the breadsticks out of the oven and sprinkle shredded mozzarella cheese on top of each one. This step creates the melty, gooey cheese effect that makes your Cheesy Halloween Breadstick Bones irresistible. Return them to the oven.

Step 8: Final Bake
Bake again for an additional 5-7 minutes until the mozzarella is melted and bubbly. The breadsticks should be beautifully golden and have an inviting appearance. Keep an eye on them to ensure they don’t over-bake; you want that glorious gooeyness!

Step 9: Cool and Serve
After removing your Cheesy Halloween Breadstick Bones from the oven, let them cool slightly on the baking sheet for about 5 minutes. This cooling time helps maintain their shape. Serve them warm alongside marinara sauce for dipping, and watch them disappear at your Halloween gathering!

Cheesy Halloween Breadstick Bones

Cheesy Halloween Breadstick Bones Variations

Get ready to transform your Cheesy Halloween Breadstick Bones into something even more exciting and delicious!

  • Spicy Twist: Add a pinch of red pepper flakes to the butter for a zesty kick. Your guests will love the unexpected heat!

  • Herb-Infused: Mix garlic powder and Italian herbs into the melted butter for an aromatic flavor boost. The added herbs will make your kitchen smell divine!

  • Gluten-Free: Substitute traditional pizza dough with gluten-free dough to make these breadsticks accessible for everyone. It’s a fantastic way to share the joy of baking!

  • Cheddar Delight: Combine mozzarella with shredded cheddar cheese for an extra cheesy depth of flavor. This variation offers a delightful twist that’s sure to please cheese lovers!

  • Veggie Packed: Add finely chopped spinach or kale into the dough before shaping to incorporate some greens into your spooky treats. It not only enhances the nutrition but adds a lovely color too!

  • Sweet Surprise: Drizzle with honey or maple syrup after baking for a sweet finish that pairs beautifully with the savory flavors. It’s a playful contrast that will intrigue the taste buds!

  • Make ‘Em Mini: Shape smaller breadsticks for bite-sized treats perfect for dipping! They’re ideal for kids and fun bites at your Halloween party.

  • Bacon & Cheese: Sprinkle cooked, crumbled bacon atop the mozzarella for a rich, savory addition. This variation is sure to be a hit at any gathering!

With these variations, the possibilities are endless! Explore these ideas to find your favorite spin on these delightful breadsticks. For a festive atmosphere, arrange your spooky breadsticks alongside some [Cheesy Pumpkin Puffs](internalLink) or [Witch’s Brew Soup](internalLink), creating a spread that will enchant all your guests!

Storage Tips for Cheesy Halloween Breadstick Bones

Room Temperature: Allow leftovers to cool completely and store in a breathable container at room temperature for up to 1 day; enjoy them while they’re still soft!

Fridge: For longer storage, place breadsticks in an airtight container and refrigerate for up to 3 days. Reheat in a preheated oven at 350°F for best results.

Freezer: To freeze, cool the Cheesy Halloween Breadstick Bones completely, wrap individually in foil, and store in a freezer-safe bag. They can be reheated directly from frozen in the oven.

Reheating: For all storage methods, a quick reheat will restore their cheesy goodness, so don’t skip this step!

What to Serve with Cheesy Halloween Breadstick Bones

As the aroma of warm, cheesy breadsticks wafts through your kitchen, let’s elevate your festive gathering with these delicious pairings.

  • Marinara Sauce: This classic dipping sauce complements the cheesy flavors perfectly and adds a tangy twist. Each dip brings an extra layer of yum!
  • Spooky Veggie Platter: Fresh-cut veggies add crunch and a pop of color, creating a playful contrast to the warm breadsticks. Think carrots, bell peppers, and cucumbers arranged like a Halloween masterpiece!
  • Pumpkin Soup: A creamy, whimsical soup pairs wonderfully with the cheesy breadsticks, offering warmth and comfort for any autumn gathering.
  • Garlic Butter Dip: Elevate the breadsticks further by serving with a garlicky dip. The buttery garlic flavor makes each bite even more irresistible.
  • Caesar Salad: The crisp romaine and tangy dressing provide a refreshing balance to the richness of the breadsticks, making for a well-rounded meal.
  • Hot Apple Cider: For a delicious drink option, warm up some apple cider with spices for an enchanting fall beverage that will please your guests.
  • Witch’s Brew Cocktail: A fun, themed cocktail—mixing pomegranate juice with sparkling water—adds a festive touch to your meal.
  • Chocolate Dipped Pretzels: For a sweet ending, these salty-sweet delights will be a delightful contrast. They’re perfect for nibbling while sharing spooky stories!
  • Ghoulish Cheese Board: Pair with a variety of cheeses and crackers to keep your guests snacking all night long. It’s a fun way to incorporate flavors that go beyond the breadsticks!
  • Caramel Apple Slices: Sliced apples drizzled with caramel sauce provide a sweet treat that mirrors the fun and whimsy of your Cheesy Halloween Breadstick Bones.

Tips for the Best Cheesy Halloween Breadstick Bones

Use Fresh Dough: Ensure your pizza dough is fresh for the best texture. Old dough can be tough and won’t rise properly, affecting your Cheesy Halloween Breadstick Bones’ fluffiness.

Space Them Out: Leave enough space between the breadsticks on the baking sheet to allow them to expand without sticking together. This helps them bake evenly and puff up nicely.

Watch the Oven Time: Keep an eye on the baking time during both stages to avoid over-baking. The goal is a light golden exterior with a gooey cheese top.

Cool Before Serving: Allow the breadsticks to cool slightly before serving them. This prevents the cheese from being too hot and makes for an easier dipping experience.

Experiment with Toppings: Feel free to spice things up! Try adding garlic powder or Italian herbs to the melted butter for an extra flavor kick that your guests will adore.

Make Ahead Options

These Cheesy Halloween Breadstick Bones are ideal for meal prep, saving you precious time on busy days! You can shape the breadsticks up to 24 hours in advance; simply follow the first four steps and cover them loosely with plastic wrap before refrigerating. To maintain their quality, it’s best to bake them the same day if possible. When you’re ready to enjoy these tasty treats, preheat your oven to 375°F (190°C) and place the shaped dough directly onto the baking sheets. Brush the melted butter and sprinkle the cheeses, then bake according to the recipe instructions for deliciously fresh results that will impress your guests—even if you prepared them a day ahead!

Cheesy Halloween Breadstick Bones

Cheesy Halloween Breadstick Bones Recipe FAQs

What is the best way to select pizza dough?
Absolutely! When choosing pizza dough, go for fresh options if possible. Look for dough that feels slightly elastic and is free of any dark spots or overly dry patches. If using store-bought, check the expiration date to ensure freshness for your Cheesy Halloween Breadstick Bones.

How should I store leftover breadsticks?
Leftovers can be stored in an airtight container in the refrigerator for up to 3 days. Make sure they cool completely before storage to keep them fresh. A simple way to reheat them is to place them in a preheated oven at 350°F for about 5-10 minutes to regain their delightful texture.

Can I freeze the Cheesy Halloween Breadstick Bones?
Yes! To freeze, cool the Cheesy Halloween Breadstick Bones completely after baking. Wrap each breadstick individually in foil to prevent freezer burn, and then store them in a freezer-safe bag. They can be reheated directly from frozen, baking at 375°F for about 15-20 minutes until warmed through.

What should I do if my breadsticks aren’t puffing up?
If your breadsticks aren’t puffing up, it’s likely due to the dough being too cold. Make sure you let the pizza dough come to room temperature before rolling, as this helps activate the gluten and yeast for a better rise. Also, ensure your oven is fully preheated to the right temperature to create that perfect environment for bubbling!

Are there any dietary considerations for these breadsticks?
Definitely! Since these Cheesy Halloween Breadstick Bones contain dairy, they’re not suitable for those with lactose intolerance. For a dairy-free option, consider using non-dairy cheese melts and buttery spreads available in most grocery stores, which will keep the fun alive without compromising on taste!

How do I ensure my breadsticks are perfectly cheesy?
For that melty, gooey cheese topping, add the mozzarella cheese during the last few minutes of baking. This way, it has time to melt perfectly without burning. If you’d like to add extra flavor, mix in some Italian herbs with your shredded cheese for a tasty twist!

Spooktacular Cheesy Halloween Breadstick Bones for Fun Dipping

Try these Cheesy Halloween Breadstick Bones for a fun and flavorful take on a classic snack perfect for Halloween gatherings.

  • Oven
  • Baking sheets
  • parchment paper
  • Mixing surface
  • Knife

For the Breadsticks

  • 1 pound Pizza dough (ensures a soft, chewy texture perfect for forming bone shapes.)
  • 2 tablespoons Unsalted butter ((melted) adds a rich flavor and helps the cheese stick.)
  • 0.5 cups Grated Parmesan cheese (for that nutty, sharp taste that enhances every bite.)
  • 1 cup Shredded mozzarella cheese (creates the melty, gooey effect everyone loves.)
  • All-purpose flour (for dusting your surface to prevent sticky situations.)

For Dipping

  • 1 cup Marinara sauce (pair with warm breadsticks for a classic and delicious dip.)

Step‑by‑Step Instructions

  1. Preheat your oven to 375°F (190°C) and line two baking sheets with parchment paper.
  2. Allow your pizza dough to sit at room temperature for about 10 minutes and dust your working surface with all-purpose flour. Divide the dough into 10 equal pieces.
  3. Roll each piece of dough into an 8-inch long rope, making the ends thicker to resemble bones. Snip the ends about 1 inch deep and pull apart to create the bone look.
  4. Place the shaped breadsticks on the baking sheets with space between them for rising.
  5. Brush the tops of each breadstick with melted butter and sprinkle grated Parmesan cheese over them.
  6. Bake in the preheated oven for about 15 minutes until puffed and lightly golden.
  7. Once golden, sprinkle shredded mozzarella cheese on top of each breadstick and return to the oven.
  8. Bake for an additional 5-7 minutes until the mozzarella is melted and bubbly.
  9. Let the breadsticks cool slightly for about 5 minutes on the baking sheet, then serve warm with marinara sauce for dipping.

These cheesy breadstick bones are a fun addition to any Halloween gathering and can be customized with your favorite flavors or additional toppings.

Side Dishes
American
breadsticks, Cheese Dip, Cheesy Halloween Breadstick Bones, easy recipes, Halloween snacks, party food

Filed Under: Sandwiches

Spook Up Snack Time with Cheesy Halloween Breadstick Bones

September 4, 2025 by grace bellamy Leave a Comment

As I grabbed the pizza dough from my fridge, a delightful idea took shape in my mind—transforming simple ingredients into something a little spooky and extra fun. Enter Cheesy Halloween Breadstick Bones! This recipe not only brings a festive flair to your table, but it’s also incredibly easy to whip up, making it perfect for a busy weeknight or a Halloween gathering. Imagine the smiles on your family and friends’ faces when they dip these cheesy delights into marinara sauce, all while being playfully presented as “bones.” The best part? These breadsticks come together in just 35 minutes, so you can serve up a delicious distraction from fast food in no time. So, are you ready to summon your inner chef and create some delightful Halloween magic in your kitchen?

Cheesy Halloween Breadstick Bones

Why Are These Bones So Irresistible?

Deliciously cheesy: Combining gooey mozzarella and savory Parmesan, these breadsticks are the ultimate comfort food that both kids and adults will adore.

Quick and easy: With just 35 minutes from start to finish, they’re perfect for those busy weeknights or spontaneous Halloween festivities.

Creative presentation: Shaped like bones, these breadsticks add a fun, spooky touch to your meal, making dinner entertaining and memorable.

Dip-worthy: Paired with marinara sauce, they make an irresistible snack that encourages sharing and laughter around the table.

Kid-friendly fun: Kids will love helping shape the dough into “bones,” turning cooking into a delightful family activity. For even more spooky ideas, check out our guide on fun Halloween snacks!

Cheesy Halloween Breadstick Bones Ingredients

Ready to make some spook-tacular snacks? Here’s what you’ll need to create your Cheesy Halloween Breadstick Bones!

For the Dough
• 1 pound pizza dough – You can use store-bought or homemade; either works perfectly!
• All-purpose flour – Dust your surface to prevent sticking and help shape those bone-like figures!

For the Topping
• 2 tablespoons unsalted butter – Melted butter adds a rich flavor and helps the cheese adhere beautifully.
• ½ cup grated Parmesan cheese – This cheese adds a delightful nuttiness and enhances the overall flavor profile.
• 1 cup shredded mozzarella cheese – Gooey and melty, mozzarella creates that irresistible layer on top!

For Dipping
• Marinara sauce – Perfect for dipping these cheesy delights; consider adding a sprinkle of crushed red pepper for extra zing!

Now, gather your ingredients and get ready to enjoy a spook-tacular baking adventure while crafting your Cheesy Halloween Breadstick Bones!

Step‑by‑Step Instructions for Cheesy Halloween Breadstick Bones

Step 1: Preheat the Oven
Begin by preheating your oven to 375°F (190°C). While the oven heats up, line two baking sheets with parchment paper to ensure your Cheesy Halloween Breadstick Bones don’t stick and bake evenly. This preparation step will help streamline the process and ensure a smooth baking experience.

Step 2: Prepare the Dough
Let your pizza dough sit at room temperature for about 10 minutes. Meanwhile, dust your clean surface with all-purpose flour to prevent sticking. Once ready, divide the dough into 10 equal pieces, which will form the base for your spooky breadstick bones. This step sets the stage for easy shaping later on.

Step 3: Shape the Bones
Now, roll each piece of dough into an 8-inch long rope. To give your Cheesy Halloween Breadstick Bones a more bone-like appearance, make the ends slightly thicker. Then, snip each end about 1 inch deep and gently pull apart to create a bony texture. This fun, hands-on shaping is part of what makes this recipe enjoyable!

Step 4: Arrange on Baking Sheets
Carefully place the shaped breadsticks on your prepared baking sheets, ensuring that they have space between them for expansion while baking. This will allow for even cooking and help maintain their unique bone shape. Visualize how adorable these cheesy creations will look once baked to a golden hue!

Step 5: Add Toppings
Brush the tops of each breadstick generously with melted butter, which adds flavor and helps the cheese adhere nicely. Then, sprinkle the grated Parmesan cheese evenly across each breadstick, ensuring they’re well-covered for a delightful cheesy experience. This step adds that extra layer of flavor that makes your Cheesy Halloween Breadstick Bones so irresistible.

Step 6: Bake the Breadsticks
Place the baking sheets in the preheated oven and bake for about 15 minutes, or until the breadsticks start to puff up and turn light golden. Keep an eye on them, as the aroma will beckon you! This is where the magic of transformation happens, turning simple dough into spooky treats.

Step 7: Add Mozzarella Cheese
Once the initial baking is complete, remove the breadsticks from the oven. Now, sprinkle a generous amount of shredded mozzarella cheese on top of each one. Return them to the oven for another 5-7 minutes, until the cheese is melted and bubbly, creating that gooey, cheesy goodness we all love in our Cheesy Halloween Breadstick Bones.

Step 8: Cool and Serve
Finally, let your spooky breadsticks cool slightly on the baking sheets before serving. This brief pause ensures they won’t be too hot to handle. Pair them with warm marinara sauce for dipping, and prepare to enjoy the fun and flavor of your homemade Cheesy Halloween Breadstick Bones!

Cheesy Halloween Breadstick Bones

Make Ahead Options

These Cheesy Halloween Breadstick Bones are perfect for meal prep! You can shape the breadsticks up to 24 hours in advance, then cover them with plastic wrap and refrigerate. This keeps them fresh and ready to bake when you’re short on time. When you’re ready to serve, simply brush with melted butter and sprinkle with Parmesan cheese, then bake as directed. If you’d like to prep even further, consider making the dough a full 3 days ahead of time and freezing it. Just thaw in the fridge overnight before shaping and baking, ensuring your spooky treats are just as delicious and gooey when served!

Expert Tips for Cheesy Halloween Breadstick Bones

  • Dough Temperature: Let your pizza dough sit at room temperature. This makes it easier to shape into bones and creates a fluffier texture when baked.

  • Perfectly Shaped Bones: When shaping the dough, ensure the ends are thicker to mimic real bones. This enhances the spooky look while allowing them to bake evenly.

  • Butter Brush: Don’t skimp on brushing melted butter before baking! It not only adds great flavor but also helps the cheeses melt beautifully without burning.

  • Cheese Layering: Add your mozzarella cheese in the last few minutes of baking. This ensures it melts perfectly and gets that golden, bubbly finish on your Cheesy Halloween Breadstick Bones.

  • Serving Suggestions: Consider serving with marinara and a sprinkle of crushed red pepper for an extra kick. This adds a fun twist to the traditional dip and will surprise your guests!

What to Serve with Cheesy Halloween Breadstick Bones

Imagine a fun Halloween gathering where each bite is as delightful as it is spooky, ensuring laughter and satisfaction all around.

  • Pumpkin Soup: This creamy, spiced soup is a warm counterpart, perfect for dipping and enhancing the Halloween ambiance.
  • Caesar Salad: The crisp romaine and crunchy croutons offer a refreshing contrast to the cheesy warmth of the breadsticks.
  • Spooky Stuffed Peppers: Stuff bell peppers with rice and vegetables to resemble little monsters; they add a colorful, healthy side.

For something sweet:

  • Cinnamon Sugar Cookies: These soft, buttery cookies make a wonderful dessert with a hint of spookiness to match your theme.
  • Apple Cider: A warm glass of spiced apple cider elevates the meal with a cozy, autumnal touch that ties the flavors together beautifully.

Storage Tips for Cheesy Halloween Breadstick Bones

Room Temperature: Allow the breadsticks to cool completely and store them in an airtight container at room temperature for up to 1 day for the best taste.

Fridge: If you want to keep them longer, place the cooled breadsticks in the fridge. They will last for up to 3 days; just reheat them in a preheated oven at 350°F for 5-7 minutes.

Freezer: For extended storage, wrap each breadstick individually in foil and place them in a freezer-safe bag. They can be frozen for up to 3 months. Bake directly from frozen at 375°F until hot.

Reheating: For the best results, always reheat leftover Cheesy Halloween Breadstick Bones in the oven to maintain their crispy texture instead of using the microwave.

Cheesy Halloween Breadstick Bones Variations

Feel free to get creative and make these breadsticks your own with these fun twists and substitutions!

  • Gluten-Free: Use gluten-free pizza dough for a deliciously alternative treat that everyone can enjoy. It will still be chewy and satisfying!

  • Herbed Delight: Mix dried oregano, basil, or garlic powder into the melted butter before brushing for an aromatic herb-infused breadstick. This will elevate the flavor profile—a rewarding aromatic experience!

  • Cheddar Explosion: Swap out mozzarella for sharp cheddar cheese. Its robust flavor will add an extra layer of richness that cheese lovers will adore.

  • Spicy Kick: Sprinkle red pepper flakes or drizzle some hot sauce before serving for a fiery burst of flavor that enhances the cheesy goodness. This spicy surprise will make taste buds dance!

  • Veggie Boost: Toss in chopped spinach or shredded zucchini into the dough for a nutritious twist. It’s a sneaky way to add greens into your snacks without losing the fun!

  • Sweet Treat: Try using cinnamon sugar on top instead of cheese for a unique dessert idea. Combine it with a side of warm apple sauce for a delightful dipping experience.

  • Smoky Flavor: Add smoked paprika or a touch of liquid smoke to the butter for a savory, smoky flavor that will transport your taste buds.

  • Seasoned Flour: Mix Italian seasoning or garlic powder into the all-purpose flour for dusting before shaping. This small change adds a delightful scent and extra flavor with each bite.

With these variations, you can turn your cheesy Halloween breadstick bones into a snack that fits every family member’s taste!

Cheesy Halloween Breadstick Bones

Cheesy Halloween Breadstick Bones Recipe FAQs

How do I select the best pizza dough?
Absolutely! When choosing pizza dough, look for one that feels smooth and elastic. If homemade, ensure it has been allowed to rise properly. If you’re buying pre-made, opt for fresh dough from your local bakery or grocery store for the best flavor.

What’s the best way to store leftover breadsticks?
To keep your Cheesy Halloween Breadstick Bones fresh, allow them to cool completely, then place them in an airtight container. They will last for up to 1 day at room temperature or up to 3 days in the fridge. Just pop them in a preheated oven at 350°F for about 5-7 minutes to revive their crispy texture!

Can I freeze Cheesy Halloween Breadstick Bones?
Very! To freeze, let your breadsticks cool completely. Individually wrap each one in aluminum foil, then store them in a freezer-safe bag. They’ll keep for up to 3 months. When you’re ready, bake directly from frozen at 375°F until heated through, usually 15-20 minutes.

What if my breadsticks are too soft or dense?
If your breadsticks come out too soft, it could be due to under-baking or not allowing the dough to rise properly. Be sure the dough is at room temperature before shaping and follow the baking times closely. If they seem dense, ensure you’re using enough flour while shaping to prevent excess moisture.

Are these breadsticks safe for kids and pets?
Definitely! The ingredients in Cheesy Halloween Breadstick Bones are kid-friendly and safe for pets if they don’t have lactose intolerance. However, keep marinara sauce away from pets, especially cats and dogs, as it may contain ingredients that aren’t good for them.

What should I do if I run out of mozzarella cheese?
No worries! You can substitute with other cheeses like cheddar or fontina for a unique twist. If using a cheese blend, aim for those that melt well to achieve that delicious gooey texture. Enjoy getting creative!

Spook Up Snack Time with Cheesy Halloween Breadstick Bones

Cheesy Halloween Breadstick Bones are a delightful snack, perfect for Halloween gatherings and busy weeknights, combining flavors of mozzarella and Parmesan for a spooky twist.

  • Oven
  • Baking sheets
  • parchment paper
  • Rolling Pin

For the Dough

  • 1 pound pizza dough (store-bought or homemade)
  • cups all-purpose flour (for dusting)

For the Topping

  • 2 tablespoons unsalted butter (melted)
  • ½ cup grated Parmesan cheese
  • 1 cup shredded mozzarella cheese

For Dipping

  • cups marinara sauce (for serving)

Step-by-Step Instructions

  1. Preheat your oven to 375°F (190°C) and line two baking sheets with parchment paper.
  2. Let your pizza dough sit at room temperature for about 10 minutes and dust a clean surface with all-purpose flour.
  3. Divide the dough into 10 equal pieces and roll each into an 8-inch long rope, making the ends thicker.
  4. Arrange the shaped breadsticks on the prepared baking sheets, leaving space for expansion.
  5. Brush the tops with melted butter and sprinkle with grated Parmesan cheese.
  6. Bake for about 15 minutes or until puffed and light golden.
  7. Remove from the oven, sprinkle with shredded mozzarella cheese, and return for an additional 5-7 minutes until melted.
  8. Cool slightly on baking sheets before serving with marinara sauce.

Allow breadsticks to cool completely and store in an airtight container at room temperature for up to a day. For longer storage, refrigerate for up to 3 days and freeze for up to 3 months.

Side Dishes
American
Cheesy Halloween Breadstick Bones, comfort food, easy recipes, family fun, Halloween snacks, party appetizers

Filed Under: Sandwiches

Ultimate Philly Cheese Steak Sloppy Joes for Comfort Food Lovers

August 27, 2025 by grace bellamy Leave a Comment

As I stood in my kitchen, the rich aroma of sautéing onions and mushrooms flooded my senses, instantly transporting me to a bustling Philly street corner. Today, I’m thrilled to share my take on Philly Cheese Steak Sloppy Joes—a fun and hearty twist on two classic favorites. This recipe not only brings the famous flavors of the iconic sandwich to your dinner table, but it also allows for quick prep time, making it a perfect choice for busy weeknights. Packed with savory ground beef, melty provolone cheese, and a medley of veggies, these sloppy joes are a guaranteed crowd-pleaser, sure to satisfy even the pickiest eaters. Are you ready to elevate your comfort food game? Let’s dive into this scrumptious journey together!

Philly Cheese Steak Sloppy Joes

Why not try these sloppy joes tonight?

Unique Flavor Fusion: The Philly Cheese Steak Sloppy Joes masterfully combine the rich, savory essence of a cheesesteak with the comforting heartiness of sloppy joes.

Quick and Easy Preparation: With just a few simple steps, you can create a satisfying meal in under 30 minutes, perfect for those busy weeknights when time is of the essence.

Crowd-Pleasing Comfort Food: Serve these delicious sandwiches at your next gathering and watch them disappear as friends and family rave about the incredible flavors.

Customizable Goodness: Feel free to experiment with additional toppings like jalapeños or avocado for an extra twist. Plus, you can easily customize the recipe for dietary preferences or ingredient availability.

The combo of gooey provolone and hearty beef creates an irresistible dish that makes dinner feel special. Don’t forget to check out my other comfort food recipes, like homemade mac and cheese or classic beef tacos, to keep your meal lineup exciting!

Philly Cheese Steak Sloppy Joes Ingredients

• Get ready to savor every bite with these key ingredients!

For the Filling
• 1 lb ground beef – choose lean ground beef for a balanced flavor and texture.
• 1 tbsp butter – adds richness and depth to the sautéed vegetables.
• 1 medium onion, chopped – caramelizes beautifully, enhancing the savory taste.
• 1 bell pepper, chopped – contributes sweetness and vibrant color to the dish.
• 1 cup mushrooms, chopped – adds umami and a meaty texture, complementing the beef.
• 1 cup beef broth – provides moisture and enhances the beefy flavor profile.
• 1 tbsp cornstarch – thickens the mixture for a hearty consistency.
• 1/2 cup ketchup – offers sweetness and a classic touch to the sloppy joe sauce.
• 1 tbsp Worcestershire sauce – elevates the savory flavor with its unique tangy depth.
• Salt, to taste – highlights and balances all the flavors.
• Pepper, to taste – adds a welcome spice that livens up every bite.
• 1 cup provolone cheese, chopped – melts beautifully for that rich, cheesy finish.
• 4 brioche buns, toasted – the perfect foundation for these flavorful sloppy joes.

With these simple yet delicious ingredients, you’re all set to create memorable Philly Cheese Steak Sloppy Joes that your family will love!

Step‑by‑Step Instructions for Philly Cheese Steak Sloppy Joes

Step 1: Brown the Beef
Heat a cast iron skillet over medium-high heat. Add the ground beef and let it sear without stirring for about 3–4 minutes until it forms a deep brown crust. As you stir, look for crispy edges that indicate it’s starting to caramelize. This step brings rich flavors to your Philly Cheese Steak Sloppy Joes.

Step 2: Set Aside the Beef
Once about half of the beef is caramelized, remove it from the skillet and set it aside on a plate. This will allow the beef to rest while you cook the vegetables, preserving its juiciness and flavor. Keep the skillet ready for an aromatic addition to your sloppy joe filling.

Step 3: Sauté the Veggies
In the same skillet, melt 1 tablespoon of butter over medium heat. Add the chopped onions, bell pepper, and mushrooms, allowing them to cook undisturbed for 1–2 minutes to deepen the caramelization. Stir them occasionally for another 3–4 minutes until they’re soft and golden, filling your kitchen with amazing aromas that are essential for these Philly Cheese Steak Sloppy Joes.

Step 4: Combine Beef and Veggies
Return the browned ground beef to the skillet, mixing it in with the sautéed vegetables. Ensure all the flavors meld together beautifully. This is the heart of your Philly Cheese Steak Sloppy Joes, so make sure it’s well combined for maximum flavor.

Step 5: Add Broth and Thicken
In a small bowl, whisk together 1 cup of beef broth and 1 tablespoon of cornstarch until smooth. Pour this mixture into the skillet along with 1/2 cup of ketchup, 1 tablespoon of Worcestershire sauce, salt, and pepper to taste. Stir everything well and let it simmer for 3–5 minutes until thickened and saucy, creating that luscious filling essential for your sloppy joes.

Step 6: Melt the Cheese
Turn off the heat and stir in 1 cup of chopped provolone cheese until it melts into a creamy consistency. Ensure the mixture becomes thick and cheesy, rather than soupy, adding that signature comfort to your Philly Cheese Steak Sloppy Joes.

Step 7: Assemble the Sloppy Joes
Spoon the hot beef and cheese mixture generously onto toasted brioche buns. The crispy exterior of the buns contrasts beautifully with the rich filling, making each bite a delightful experience. Serve these scrumptious Philly Cheese Steak Sloppy Joes while hot, ready to share with family or friends.

Philly Cheese Steak Sloppy Joes

Philly Cheese Steak Sloppy Joes Variations

Feel free to personalize your Philly Cheese Steak Sloppy Joes with these delightful twists!

  • Spicy Kick: Add diced jalapeños or a splash of hot sauce for an extra layer of heat that will excite your taste buds.
    For a flavor experience that hits all the right notes, toss in some sliced jalapeños right with your veggies. The hint of spice balances beautifully with the gooey cheese!

  • Veggie-Loaded: Substitute beef with 1 lb of your favorite plant-based ground meat or lentils for a delicious vegetarian option.
    Feel free to add in extra veggies like zucchini and spinach for added texture and nutrition without compromising that hearty feeling!

  • Creamy Addition: Mix in 1/2 cup of cream cheese or a dollop of sour cream for an extra creamy and velvety filling.
    This variation will elevate the richness of your dish, making every bite feel indulgent and comforting, especially loved by cheesy goodness fans.

  • Herb Infusion: Sprinkle in fresh herbs like thyme or parsley for a refreshing contrast and aromatic flair to the filling.
    These herbs add freshness that brightens the flavors, making these sloppy joes a perfect spring or summer dish!

  • Cheese Experiment: Swap provolone with gooey mozzarella or sharp cheddar for a completely different cheesy experience.
    Each cheese brings its own unique flavor profile, giving you the freedom to play with textures and tastes.

  • Toppings Galore: Pile on additional toppings like avocado, crispy bacon bits, or even coleslaw for crunch and richness.
    Some crunchy coleslaw on top adds an exciting texture to your sandwiches and can balance the richness of the beef and cheese beautifully.

  • Savory Sauce Mix: Experiment with BBQ sauce replace ketchup for a smoky, sweet flavor twist that will surprise your guests.
    This variation brings a whole new vibe to the classic sloppy joes, ensuring they’re bursting with layers of flavor that keep everyone coming back for more!

Enjoy the journey of customizing your Philly Cheese Steak Sloppy Joes! You might discover a new family favorite along the way! And if you’re still looking for more comfort food ideas, don’t miss my delicious homemade mac and cheese or classic beef tacos that everyone will love!

Make Ahead Options

These Philly Cheese Steak Sloppy Joes are perfect for meal prep enthusiasts! You can sauté the onions, bell peppers, and mushrooms and store them in an airtight container in the refrigerator for up to 3 days. Additionally, you can brown the ground beef and mix it with the prepped veggies. To maintain their quality, ensure everything is cooled before refrigerating. When you’re ready to serve, simply reheat the mixture in a skillet, stir in the beef broth, ketchup, Worcestershire sauce, and provolone cheese until melted, then spoon it onto toasted brioche buns. This way, you’ll enjoy the same delicious flavor with minimal effort, making your busy weeknights a breeze!

What to Serve with Philly Cheese Steak Sloppy Joes

Looking to create the perfect dinner around your delightful creation?

  • Crispy French Fries: The warm, crispy fries provide a satisfying crunch that perfectly complements the cheesy richness of the sloppy joes. Dip them in your favorite ketchup for an extra indulgence.

  • Classic Coleslaw: This refreshing side brings a zesty crunch that balances the savory flavors of the sloppy joes, while offering a creamy texture that enhances each bite.

  • Garlic Butter Corn: Sweet, buttery corn on the cob adds a touch of sweetness that pairs magically with the savory, hearty filling, making your meal even more comforting.

  • Pickle Chips: A tangy crunch of pickle chips contrasts nicely with the gooeyness of the sloppy joe, brightening up the whole meal experience. A must for every savory bite!

  • Roasted Veggies: Colorful roasted vegetables, like bell peppers, zucchini, and carrots, offer a nutritious, vibrant contrast while harmonizing flavors with the hearty beef filling.

  • Iced Lemonade: A refreshing glass of iced lemonade cuts through the richness of the sloppy joes, providing a bright and citrusy contrast that uplifts your dining experience.

  • Chocolate Brownies: Finish off your meal on a sweet note with fudgy brownies. Their rich chocolate flavor is the perfect treat after the savory delight of the sloppy joes.

  • Brewed Iced Tea: A chilled glass of unsweetened iced tea makes for a classic pairing that refreshes without overpowering the delightful flavors of the sloppy joe.

How to Store and Freeze Philly Cheese Steak Sloppy Joes

Room Temperature: Keep any leftover Philly Cheese Steak Sloppy Joes at room temperature for no more than 2 hours to ensure food safety and freshness.

Fridge: Store your leftovers in an airtight container in the fridge for up to 3 days. Reheat gently on the stove or in the microwave, adding a splash of broth if needed.

Freezer: For longer storage, freeze the filling in a freezer-safe container for up to 3 months. To thaw, place it in the fridge overnight before reheating.

Reheating: When ready to enjoy again, reheat on the stovetop over medium heat, stirring occasionally until heated through. Serve on fresh toasted brioche buns for the ultimate comfort food experience!

Expert Tips for Philly Cheese Steak Sloppy Joes

Browning the Beef: Ensure your ground beef develops a nice crust by not stirring it too soon. This deep browning enhances the flavor of your Philly Cheese Steak Sloppy Joes.

Veggie Caramelization: Allow the onions and peppers to sit undisturbed for a couple of minutes before stirring. This helps achieve a beautiful caramelization that adds depth to your dish.

Cheese Selection: Use high-quality provolone cheese for the best melting experience. Avoid pre-shredded cheese as it may contain anti-caking agents that prevent it from melting smoothly.

Check Consistency: If your mixture turns out too soupy, let it simmer longer to thicken or add a bit more cornstarch. The perfect Philly Cheese Steak Sloppy Joes should be thick and cheesy, not runny.

Bun Choice: Toast your brioche buns just before serving to maintain their crispness. A good bun will hold up against the juicy filling without getting soggy.

Philly Cheese Steak Sloppy Joes

Philly Cheese Steak Sloppy Joes Recipe FAQs

What type of ground beef should I use?
I recommend using lean ground beef, ideally around 80% lean, for a balanced flavor without too much grease. This allows the rich flavors of the other ingredients to shine through, while still providing that satisfying beefy taste.

How long can I store leftovers in the fridge?
Your leftover Philly Cheese Steak Sloppy Joes can be safely stored in an airtight container in the fridge for up to 3 days. Just make sure to let them cool to room temperature before placing them in the fridge to maintain freshness!

Can I freeze the filling, and how should I do it?
Absolutely! To freeze the filling, allow it to cool completely before transferring it to a freezer-safe container. It can be stored for up to 3 months. When you’re ready to enjoy again, just thaw it in the fridge overnight, then reheat it on the stovetop over medium heat, stirring occasionally until warmed through.

How can I adjust the recipe for dietary restrictions?
If you’re looking to accommodate specific dietary needs, you can swap the ground beef for ground turkey or even a plant-based meat alternative for a lighter option. Additionally, choose gluten-free buns if you’re avoiding gluten, and ensure other ingredients like Worcestershire sauce are gluten-free as well.

What if my Sloppy Joes turn out too soupy?
No worries! If your filling ends up too soupy, simply let it simmer on low heat for an additional 3–5 minutes to thicken. Alternatively, you can mix a little more cornstarch with a splash of broth in a separate bowl until smooth and add it to the pot, stirring until you achieve the desired thickness.

How should I store the cooked sloppy joe mixture?
Once the sloppy joe mixture has cooled, store it in an airtight container in the fridge for up to 3 days. If you’re preparing ahead of time, keep the toasted buns separate until serving to maintain their crispiness!

Ultimate Philly Cheese Steak Sloppy Joes for Comfort Food Lovers

This Philly Cheese Steak Sloppy Joe recipe combines the savory essence of cheesesteak with the heartiness of sloppy joes, creating a satisfying meal.

  • Cast-iron skillet

For the Filling

  • 1 lb ground beef (choose lean ground beef for a balanced flavor and texture)
  • 1 tbsp butter (adds richness and depth to the sautéed vegetables)
  • 1 medium onion, chopped (caramelizes beautifully, enhancing the savory taste)
  • 1 medium bell pepper, chopped (contributes sweetness and vibrant color to the dish)
  • 1 cup mushrooms, chopped (adds umami and a meaty texture, complementing the beef)
  • 1 cup beef broth (provides moisture and enhances the beefy flavor profile)
  • 1 tbsp cornstarch (thickens the mixture for a hearty consistency)
  • 1/2 cup ketchup (offers sweetness and a classic touch to the sloppy joe sauce)
  • 1 tbsp Worcestershire sauce (elevates the savory flavor with its unique tangy depth)
  • to taste Salt (highlights and balances all the flavors)
  • to taste Pepper (adds a welcome spice that livens up every bite)
  • 1 cup provolone cheese, chopped (melts beautifully for that rich, cheesy finish)
  • 4 brioche buns toasted (the perfect foundation for these flavorful sloppy joes)

Step-by-Step Instructions for Philly Cheese Steak Sloppy Joes

  1. Heat a cast iron skillet over medium-high heat. Add the ground beef and let it sear without stirring for about 3–4 minutes until it forms a deep brown crust.
  2. Once about half of the beef is caramelized, remove it from the skillet and set it aside on a plate.
  3. In the same skillet, melt 1 tablespoon of butter over medium heat. Add the chopped onions, bell pepper, and mushrooms, stirring occasionally until they’re soft and golden.
  4. Return the browned ground beef to the skillet, mixing it in with the sautéed vegetables.
  5. In a small bowl, whisk together 1 cup of beef broth and 1 tablespoon of cornstarch until smooth. Pour this mixture into the skillet along with 1/2 cup of ketchup, 1 tablespoon of Worcestershire sauce, salt, and pepper.
  6. Turn off the heat and stir in 1 cup of chopped provolone cheese until it melts into a creamy consistency.
  7. Spoon the hot beef and cheese mixture generously onto toasted brioche buns and serve while hot.

Feel free to experiment with additional toppings like jalapeños or avocado for an extra twist.

Sandwiches
American
comfort food, easy weeknight dinners, ground beef recipes, Philly Cheese Steak Sloppy Joes, quick meals, sandwiches

Filed Under: Sandwiches

Delicious Mini Pita Pockets with Hummus for Quick Snacking

August 27, 2025 by grace bellamy Leave a Comment

While rummaging through my pantry one afternoon, I stumbled upon a stash of mini whole wheat pitas. My mind immediately lit up with the idea of whipping up some delightful Mini Pita Pockets with Hummus! In just 13 minutes, you can enjoy these vibrant, nutritious pockets filled with fresh veggies, creamy hummus, and tangy feta—perfect for a quick lunch or an impressive snack for guests. Not only are they incredibly easy to make, but they’re also a fantastic way to incorporate more fruits and vegetables into your day. Each bite is a fresh reminder that healthy eating doesn’t have to be boring. Curious how to assemble these beauties? Let’s dive into the recipe!

Mini Pita Pockets with Hummus

Why are Mini Pita Pockets a Must Try?

Quick Assembly: You’ll be amazed at how effortlessly these mini pita pockets come together. With just 10 minutes of prep, you can create a healthy snack or meal that looks and tastes gourmet.

Flavor Explosion: The combo of creamy hummus, fresh veggies, and tangy feta makes each bite a delightful experience. It’s a flavor medley that keeps your taste buds dancing!

Versatile Choices: Feel free to get creative with your fillings! Swap out the veggies for your favorites or try different hummus varieties for new flavor twists.

Healthy Appeal: Each pocket is packed with nutrients, making these a guilt-free choice for any time of day. Plus, kids love them—perfect for getting little ones to enjoy healthy eating without the fuss!

Crowd Pleaser: Whether serving at parties or indulging during a solo lunch, these mini pita pockets are a surefire way to impress your guests. Don’t forget to check out other fun ways to enjoy hummus like in this delightful dip.

Mini Pita Pockets with Hummus Ingredients

For the Pockets
• Mini whole wheat pitas – These soft pitas are the perfect vessel for holding all your delicious fillings!

For the Filling
• Hummus – Any variety you love will add a creamy, flavorful base packed with nutrients.
• Cucumber – Thinly sliced for a refreshing crunch that complements the rich hummus.
• Cherry tomatoes – Halved to bring a burst of sweetness and juiciness to each bite.
• Feta cheese – Crumbled to add a tangy, salty kick that elevates the flavor of your Mini Pita Pockets with Hummus.
• Fresh baby spinach – A handful adds vibrant color and important vitamins.

These ingredients make assembling your Mini Pita Pockets a fun and nutritious experience! Enjoy!

Step‑by‑Step Instructions for Mini Pita Pockets with Hummus

Step 1: Prepare the Ingredients
Start by gathering all your ingredients on a clean countertop. Rinse the cucumber and cherry tomatoes under cold water, ensuring they’re fresh. Slice the cucumber thinly, aiming for about 1/8-inch rounds, and halve the cherry tomatoes. This vibrant, colorful prep sets the stage for your delightful Mini Pita Pockets with Hummus!

Step 2: Toast the Pitas
In a dry skillet, heat over medium heat and place the mini whole wheat pitas in the pan. Toast them for approximately 30 seconds on each side, just until they’re warm and slightly crisp but still soft. Keep an eye out for a light golden color; this is a perfect cue to remove them from the skillet and avoid burnt edges!

Step 3: Fill the Pitas
Once your pitas are lightly toasted and pliable, gently open each mini pita using your fingers. Scoop a generous dollop of hummus into the pocket, spreading it evenly along the inside. The creamy hummus not only adds flavor to your Mini Pita Pockets but also helps to hold the fillings in place—making for a satisfying bite!

Step 4: Layer the Fresh Veggies
Now it’s time to add those fresh, vibrant veggies! Start layering in the thinly sliced cucumbers, halved cherry tomatoes, crumbled feta cheese, and a handful of fresh baby spinach. The goal here is to create a colorful and nutritious filling that will delight your senses with each bite of the Mini Pita Pockets with Hummus.

Step 5: Close and Serve
Carefully close each mini pita pocket, pressing gently to secure the fillings inside. Serve them immediately while still warm for the best taste experience. These Mini Pita Pockets with Hummus are best enjoyed fresh, so gather your loved ones around and relish the joy of sharing a healthy, delicious snack!

Mini Pita Pockets with Hummus

Expert Tips for Mini Pita Pockets with Hummus

Fresh Ingredients: Always use fresh veggies and high-quality hummus for the best flavor in your Mini Pita Pockets. Quality ingredients make a noticeable difference!

Toast Carefully: Toast the pitas just until warm, not crispy. Over-toasting can make them difficult to open without tearing.

Assemble Last Minute: For the freshest taste, assemble the pockets just before serving. This keeps the veggies crunchy and the pita soft.

Experiment with Fillings: Don’t hesitate to swap or add ingredients to the filling! Avocados, roasted peppers, or even grilled chicken make excellent additions.

Storage Tip: If you have leftovers, store the fillings and pitas separately in airtight containers. This ensures quality for later enjoyment.

How to Store and Freeze Mini Pita Pockets with Hummus

Fridge: Store leftover mini pita pockets in an airtight container for up to 3 days. Keep the veggies separate to maintain their crunch.

Freezer: You can freeze the filled mini pitas for up to 1 month, but it’s best to freeze the pitas and fillings separately to avoid sogginess.

Reheating: When ready to enjoy, microwave the pitas for about 15-20 seconds to warm them up. If frozen, it’s best to thaw them in the fridge overnight before reheating.

Assembly: For the freshest taste experience, assemble the mini pita pockets with hummus just before serving. This will help preserve the vibrant flavors and textures!

Mini Pita Pockets with Hummus Variations

Feel free to elevate your Mini Pita Pockets with Hummus by trying out these fun and flavorful variations!

  • Veggie Boost: Add roasted red peppers or shredded carrots for a delightful textural crunch and a pop of flavor.
    These colorful additions make your pockets even more vibrant and nutritious.

  • Spicy Kick: Incorporate sliced jalapeños or a dash of hot sauce for a zesty heat that wakes up your taste buds.
    Spice lovers will appreciate this fiery twist on the classic!

  • Protein Power: Toss in cooked quinoa or chickpeas for an extra protein punch that keeps you full and satisfied.
    This is a wonderful way to make your snack even heartier!

  • Dairy-Free: Use cashew or tahini-based hummus for a creamy, dairy-free alternative that still packs a flavorful punch.
    This swap keeps the creamy goodness while accommodating dietary preferences!

  • Herb Infusion: Mix in fresh herbs like parsley or mint to give your pockets a refreshing twist.
    These herbs add vibrant flavors that elevate the overall experience.

  • Greek Style: Swap feta for a dollop of tzatziki sauce to bring in that classic Mediterranean flavor profile.
    This variation offers a cool and tangy contrast to the fillings!

  • Crunchy Twist: Add sunflower seeds or walnuts for an unexpected crunch that enhances both flavor and texture.
    A little crunch goes a long way in keeping your palate interested!

  • Flavorful Pita: Try using flavored pita bread, such as garlic or spinach, to instantly change up the taste of your pockets.
    This small change can lead to a big flavor impact, giving you different taste adventures!

Explore these variations to make your Mini Pita Pockets with Hummus even more exciting for every palate! And remember, the sky’s the limit when it comes to customizing your delicious creations!

Make Ahead Options

These Mini Pita Pockets with Hummus are fantastic for meal prep, allowing you to enjoy quick and healthy snacks throughout the week! You can prepare the filling—sliced cucumbers, halved cherry tomatoes, crumbled feta, and baby spinach—up to 3 days in advance. Simply store them in an airtight container in the refrigerator to maintain their freshness and prevent wilting. The hummus can also be pre-portioned into small containers for easy access. When you’re ready to serve, warm the mini pitas in a skillet for about 30 seconds on each side, then simply fill with the prepped ingredients. This way, you’ll have delicious and satisfying Mini Pita Pockets with Hummus ready in minutes!

What to Serve with Mini Pita Pockets with Hummus?

Create a delightful meal that complements these vibrant, nutritious pockets with fresh and flavorful sides.

  • Crispy Kale Chips: The crunchy texture pairs beautifully with the soft mini pitas, adding a satisfying bite while still keeping things healthy.
  • Mediterranean Quinoa Salad: Light and zesty, this salad brimming with flavors enhances the Middle Eastern vibe of your meal.
  • Roasted Red Pepper Dip: This smoky dip adds depth and a touch of sweetness, elevating your snacking experience alongside the hummus.
  • Feta and Olive Platter: Enjoy a simple yet elegant cheese board that brings a variety of tastes to your table, perfect for sharing.
  • Chilled Gazpacho: A refreshing, raw vegetable soup that offers a vibrant contrast to the warm mini pitas for a well-rounded meal.
  • Fruit Skewers: Bright, juicy pieces of seasonal fruit provide a sweet finish and contrast the savory flavors of your pita pockets.
  • Sparkling Water with Mint: This refreshing drink cleanses the palate effectively, making each bite of your mini pita pockets even more enjoyable.
  • Lemon Sorbet: As a light and refreshing dessert, it rounds out the meal with a sweet, citrusy flavor that hints at summer bliss.

Mini Pita Pockets with Hummus

Mini Pita Pockets with Hummus Recipe FAQs

How do I choose the best cucumbers for my Mini Pita Pockets?
Absolutely! Look for cucumbers that are firm, unblemished, and have a vibrant green color. Avoid those with yellowing or dark spots, as they may be overripe and have a watery texture. It’s always best to opt for organic cucumbers if possible, as they tend to have better flavor and fewer pesticides.

How long can I store leftover Mini Pita Pockets in the fridge?
You can store leftover mini pita pockets in an airtight container in the fridge for up to 3 days. Make sure to keep the pitas and fillings separated to ensure that the veggies stay crunchy and fresh. When you’re ready to enjoy them, a quick zap in the microwave for about 15-20 seconds can revive their deliciousness!

Can I freeze Mini Pita Pockets? If so, how?
Absolutely! To freeze your mini pita pockets, it’s best to freeze the pitas and fillings separately. Place the pitas in a freezer-safe bag, removing as much air as possible, and they can stay fresh for up to 1 month. For the fillings, store them in an airtight container or a separate freezer bag. When you’re ready to enjoy, simply thaw the fillings in the fridge overnight, then reheat the pitas in the microwave for about 15-20 seconds.

What should I do if my pitas tear while opening them?
Very common! If your pitas tear, don’t worry. Just use some tortilla or lettuce leaves as an alternative wrap for your fillings—this will actually create a fun, fresh way to enjoy the same delicious taste of your Mini Pita Pockets with Hummus without losing any flavor. You can also try warming your pitas for a shorter period or using a gentler touch when opening them next time!

Are Mini Pita Pockets suitable for kids?
Yes, indeed! They are a fantastic option for kids, as they can pick their favorite fillings and enjoy a hands-on meal. Be mindful of any allergies, especially to dairy since feta cheese is involved. If you’re serving these to young children, you might want to try a cheese alternative or leave it out completely.

What are some other filling ideas for my Mini Pita Pockets?
The more the merrier! Feel free to get creative with your fillings. You can include roasted red peppers, avocado, grilled chicken, or even chickpeas for added protein. Fresh herbs like cilantro or basil can also elevate the flavor profile. Experiment with different hummus varieties too—spicy hummus, roasted garlic, or even beet hummus can make your Mini Pita Pockets a unique and delightful experience every time!

Delicious Mini Pita Pockets with Hummus for Quick Snacking

Mini Pita Pockets with Hummus are quick, healthy, and delicious, filled with fresh veggies and creamy hummus.

  • skillet

For the Pockets

  • 4 pieces Mini whole wheat pitas

For the Filling

  • 1 cup Hummus (Any variety you love)
  • 1 medium Cucumber (Thinly sliced)
  • 1 cup Cherry tomatoes (Halved)
  • 1/2 cup Feta cheese (Crumble)
  • 1 cups Fresh baby spinach (A handful)

Step-by-Step Instructions

  1. Gather all your ingredients, rinse the cucumber and cherry tomatoes, slice the cucumber thinly, and halve the cherry tomatoes.
  2. In a dry skillet, heat over medium and toast the mini whole wheat pitas for about 30 seconds on each side until warm and slightly crisp.
  3. Gently open each mini pita and scoop a generous dollop of hummus inside.
  4. Layer in the sliced cucumbers, halved cherry tomatoes, crumbled feta cheese, and fresh baby spinach.
  5. Close each mini pita pocket and serve immediately while warm.

Assemble just before serving for the best taste experience. Store leftovers in airtight containers, keeping veggies separate.

Sandwiches
Mediterranean
Healthy Snack, Hummus, Mini Pita Pockets, quick lunch, Vegetarian

Filed Under: Sandwiches

Savory Chicken Pesto Sandwich That Will Wow Your Taste Buds

August 23, 2025 by grace bellamy Leave a Comment

On a sunny afternoon, I found myself craving something truly delightful—a burst of flavor in every bite. That’s when the idea of creating a Chicken Pesto Sandwich hit me. This recipe, featuring tender shredded chicken and vibrant, homemade basil pesto, is not only a treat for your taste buds but also a quick and satisfying solution for busy days. With a prep time of just 10 minutes, it’s perfect for those who want to skip the fast food and embrace wholesome goodness. Plus, every bite offers a luscious combination of arugula, fresh mozzarella, and juicy tomatoes, transforming a simple meal into a gourmet experience. Are you ready to elevate your lunchtime routine with this fresh twist? Let’s dive into the recipe!

Chicken Pesto Sandwich

Why will you love this Chicken Pesto Sandwich?

Freshness in every layer: Each bite bursts with vibrant flavors from homemade pesto, juicy tomatoes, and peppery arugula—no more boring sandwiches!

Quick preparation: With just 10 minutes of prep time, you’ll have a gourmet meal ready in no time, making your lunch break feel special.

Creamy indulgence: The addition of Greek yogurt not only makes it creamy but also adds a healthy twist, keeping the flavor rich without the guilt.

Versatile delight: Customize it with your favorite veggies or add extra spices; this sandwich is your canvas for creativity!

Crowd-pleaser: Whether serving for a family gathering or an intimate lunch, this Chicken Pesto Sandwich will surely impress everyone at the table. Don’t forget to check out our Basil Pesto Recipe for an extra flavor kick!

Chicken Pesto Sandwich Ingredients

• Get ready to create a flavor-packed feast!

For the Chicken and Pesto

  • Shredded chicken breast – a lean protein that keeps this sandwich light yet filling.
  • Basil leaves – fresh basil is essential for that vibrant flavor in your homemade pesto!
  • Garlic – adds a punch of flavor that complements the pesto perfectly.
  • Pine nuts – these lend a slightly sweet, nutty flavor while adding that classic pesto texture.
  • Parmesan cheese – a must-have for a rich, savory taste in your chicken pesto mixture.
  • Kosher salt – enhances all the flavors, making every ingredient pop.
  • Black pepper – adds a subtle kick to balance the creaminess of the chicken and yogurt.
  • Olive oil – helps to emulsify the pesto, creating that creamy consistency we all love.

For the Sauce

  • Greek yogurt – provides a creamy texture and a healthy twist that pairs beautifully with pesto.

For the Sandwich

  • Baguette – the perfect vessel for holding all those delicious ingredients together.
  • Arugula leaves – adds a peppery freshness that elevates the entire sandwich.
  • Tomato slices – juicy and refreshing, these add sweetness and moisture.
  • Fresh mozzarella cheese slices – creamy and mild, they create a delightful contrast to the bold pesto.

Let’s embark on this flavorful journey and create a Chicken Pesto Sandwich that’s sure to impress!

Step‑by‑Step Instructions for Chicken Pesto Sandwich

Step 1: Make the Pesto
In a food processor or blender, combine 1 cup of fresh basil leaves, 2 cloves of garlic, 1/3 cup of pine nuts, and 1/3 cup of grated Parmesan cheese. Season with 1/2 teaspoon of Kosher salt and 1/4 teaspoon of black pepper. Blend the mixture until finely chopped, stopping occasionally to scrape down the sides. You want a vibrant, flavorful paste that will be the heart of your Chicken Pesto Sandwich.

Step 2: Emulsify with Olive Oil
With the motor running, slowly drizzle in 1/2 cup of olive oil while blending. Continue until the pesto is smooth and creamy, resembling a luscious dressing. Once ready, transfer this aromatic sauce into a bowl and set it aside. The rich green color should be inviting, hinting at the fresh flavors to come in your sandwich.

Step 3: Combine Chicken and Pesto
In a medium mixing bowl, add 2 cups of shredded chicken breast and pour in the freshly made basil pesto along with 2 cups of Greek yogurt. Stir the mixture well until all the chicken is evenly coated in the creamy pesto blend. This step creates a delightful filling that will add depth to your Chicken Pesto Sandwich, so taste and adjust with more salt or pepper if needed.

Step 4: Toast the Baguette
If you prefer a warm, crispy base for your sandwich, preheat your oven to 350°F (175°C) or turn on your toaster. Slice the baguette into individual sandwich lengths and toast them for about 5-7 minutes until golden brown and slightly crispy. The smell of the baking bread will help build anticipation for your flavorful Chicken Pesto Sandwich.

Step 5: Layer the Sandwich
Take the bottom half of each toasted baguette and layer it with a handful of fresh arugula leaves, followed by slices of juicy tomatoes. Next, add a few slices of fresh mozzarella cheese to create a delicious contrast. This vibrant assembly of ingredients adds texture and freshness, setting the stage for your savory filling.

Step 6: Add the Chicken Pesto Mixture
Generously scoop the creamy chicken pesto mixture onto each sandwich, allowing it to mound on top of the layered veggies. The bright colors and creamy texture will entice you with every bite of your Chicken Pesto Sandwich. Make sure to evenly distribute the filling among the baguette halves for maximum enjoyment.

Step 7: Close and Serve
Finish your masterpiece by placing the top half of the baguette over the filling. Press down gently to compress the layers slightly. Cut the sandwich in half if desired and serve immediately to enjoy the fresh flavors and textures at their peak. Savor your homemade Chicken Pesto Sandwich, crafted with love and ready to delight!

Chicken Pesto Sandwich

Tips for the Best Chicken Pesto Sandwich

  • Homemade Pesto Perfection: Use fresh basil and quality ingredients for the pesto. Pre-made versions can lack the vibrant flavor that makes your Chicken Pesto Sandwich shine!

  • Chicken Variations: For added flavor, consider using rotisserie chicken or marinating your own chicken before shredding. This gives extra depth to your sandwich.

  • Cheese Choices: Feel free to experiment with different cheeses like goat cheese or smoked mozzarella. Each will give a unique twist to your Chicken Pesto Sandwich.

  • Don’t Overload: Be generous, but not excessive with the filling. Too much can make your sandwich messy and difficult to enjoy.

  • Toast It Right: To achieve that perfect crunch, toast the baguette until golden brown but be careful not to burn it; burnt bread can overshadow the flavors of your Chicken Pesto Sandwich.

Make Ahead Options

These Chicken Pesto Sandwiches are a fantastic choice for meal prep enthusiasts! You can prepare the chicken pesto mixture up to 3 days in advance by combining the shredded chicken, basil pesto, and Greek yogurt in an airtight container (this allows the flavors to meld beautifully). Additionally, you can wash and slice the tomatoes and cheese as well as store the arugula in the refrigerator to maintain freshness. When you’re ready to serve, simply toast the baguette pieces for about 5-7 minutes and layer them with your prepped ingredients. Finish off by adding the chicken pesto mixture, and you’ll enjoy a delicious sandwich with minimal effort, just as fresh and flavorful as if you had made it that day!

Chicken Pesto Sandwich Variations

Explore these creative tweaks to make your Chicken Pesto Sandwich even more delightful!

  • Dairy-Free: Swap Greek yogurt for dairy-free yogurt or avocado for a creamy texture without dairy.
    For those looking for a rich taste without the lactose, avocado adds a smooth, buttery mouthfeel.

  • Spicy Kick: Add sliced jalapeños or a dash of red pepper flakes to the chicken filling for a bit of heat.
    Elevate your sandwich’s flavor profile with just a small amount of spice to make it unforgettable.

  • Crunchy Addition: Include toasted walnuts or almonds in the pesto for extra crunch and richness.
    These nutty additions complement the creamy pesto beautifully, creating satisfying texture in every bite.

  • Herb Swap: Use cilantro or parsley instead of basil for a fresh flavor twist in your pesto.
    Experimenting with different herbs can transform your Chicken Pesto Sandwich into a new culinary adventure.

  • Grilled Veggies: Add grilled zucchini or bell peppers for a smoky, savory layer of flavor.
    These veggies not only enhance the taste but also add beautiful colors to your already vibrant sandwich!

  • Whole Grain: Use whole grain or multigrain baguettes for a heartier base packed with nutritious grains.
    This healthier swap contributes a richer flavor and extra fiber, making each bite even more satisfying.

  • Caprese Style: Replace mozzarella with burrata for an ultra-rich, creamy experience that elevates your sandwich.
    The luxurious texture of burrata provides a delicious twist that will impress anyone who tries it!

  • Pesto Variations: Try sun-dried tomato or arugula pesto for an exciting variation on the classic flavor.
    Each unique pesto brings its charm, offering a new taste journey without losing that beloved sandwich essence.

Don’t hesitate to get creative! Your imagination can transform this Chicken Pesto Sandwich into your ideal meal.

What to Serve with Chicken Pesto Sandwich

Elevate your meal with delightful sides that perfectly complement the vibrant flavors of this irresistible sandwich.

  • Crispy Sweet Potato Fries: Their earthy sweetness adds a delightful contrast, making each bite intriguing and satisfying. The crunchiness pairs perfectly with the creamy sandwich.
  • Homemade Coleslaw: A fresh, tangy crunch brings brightness to your plate while enhancing the overall meal experience. It’s refreshing, with flavors that mingle beautifully with the pesto.
  • Pesto Pasta Salad: Use your leftover homemade pesto to dress pasta; it ties together the flavors while offering another layer of that delicious basil goodness. This dish can be served warm or chilled.
  • Roasted Vegetables: Toss seasonal veggies in olive oil and roast until golden. Their tender, caramelized sweetness perfectly balances the sandwich’s flavors.
  • Zesty Mixed Green Salad: A light salad with a citrus vinaigrette can enhance the sandwich’s richness and add freshness to each bite. Consider arugula, spinach, and a touch of feta for extra zest.
  • Lemonade or Iced Tea: A refreshing drink option like lemonade adds a sweet and tangy twist, perfect for washing down the savory flavors of the sandwich.
  • Chocolate Chip Cookies: Don’t forget a sweet finish! A warm chocolate chip cookie offers a comforting end to your meal, satisfying sweet cravings after the rich savory tilt of the sandwich.

How to Store and Freeze Chicken Pesto Sandwich

Fridge: Store any leftover Chicken Pesto Sandwich in an airtight container for up to 3 days. Make sure to keep the sandwich components separate to maintain freshness.

Freezer: If you want to enjoy a Chicken Pesto Sandwich later, assemble it without the fresh veggies, wrap it tightly in plastic wrap, and freeze for up to 1 month.

Reheating: To reheat, remove from the freezer and let it thaw in the fridge overnight. Pop the sandwich in a preheated oven at 350°F (175°C) for about 10-15 minutes until warmed through.

Assembly Tip: Consider adding the fresh ingredients like arugula and tomatoes just before serving to keep the flavors vibrant and crisp!

Chicken Pesto Sandwich

Chicken Pesto Sandwich Recipe FAQs

How do I choose the right basil leaves?
Absolutely! When selecting basil for your Chicken Pesto Sandwich, look for vibrant green leaves without any dark spots or browning. The leaves should be firm and fragrant, indicating freshness. If possible, try to use young, tender basil leaves as they have a milder flavor that’s perfect for pesto.

How long can I store leftover Chicken Pesto Sandwich?
Very! You can store any leftover Chicken Pesto Sandwich in an airtight container in the refrigerator for up to 3 days. Ensure you separate the ingredients if possible, especially the fresh veggies, to maintain their crispness. Enjoy your tasty creation all week!

Can I freeze the Chicken Pesto Sandwich?
Of course! To freeze your Chicken Pesto Sandwich, assemble it without the fresh veggies. Wrap it tightly in plastic wrap or aluminum foil, and then place it in a freezer-safe bag. You can freeze the sandwich for up to 1 month. When you’re ready to enjoy it again, thaw in the fridge overnight, then reheat in a preheated oven at 350°F (175°C) for about 10-15 minutes to warm it through.

What should I do if my pesto is too thick?
If you find that your pesto is too thick for your liking, don’t worry! Simply drizzle in a little more olive oil while blending until you reach your desired consistency. The key is to reach that perfect balance where it’s spreadable but still holds its shape in your Chicken Pesto Sandwich.

Can I make this recipe dairy-free?
Absolutely! You can substitute the Parmesan cheese with nutritional yeast for a cheesy flavor without the dairy. Also, use a dairy-free yogurt alternative in place of Greek yogurt. Your Chicken Pesto Sandwich will still be creamy and delicious while accommodating those with dietary restrictions.

Are there any pet considerations with the ingredients?
Very! While chicken and basil are safe for most pets in small quantities, it’s always best to avoid giving them anything with garlic as it can be harmful. If you plan to share bits of your Chicken Pesto Sandwich with your furry friend, stick to the plain chicken and perhaps a sprinkle of basil as a treat, just to be safe!

Savory Chicken Pesto Sandwich That Will Wow Your Taste Buds

Delight in a Chicken Pesto Sandwich combining shredded chicken, fresh pesto, and vibrant toppings.

  • Food Processor
  • Blender
  • Mixing Bowl
  • Oven
  • toaster

For the Chicken and Pesto

  • 2 cups shredded chicken breast
  • 1 cup basil leaves (fresh)
  • 2 cloves garlic
  • 1/3 cup pine nuts
  • 1/3 cup Parmesan cheese (grated)
  • 1/2 teaspoon Kosher salt
  • 1/4 teaspoon black pepper
  • 1/2 cup olive oil

For the Sauce

  • 1 cup Greek yogurt

For the Sandwich

  • 1 boule baguette
  • 1 cup arugula leaves (fresh)
  • 1 cup tomato slices (juicy)
  • 1 cup fresh mozzarella cheese slices

Step-by-Step Instructions for Chicken Pesto Sandwich

  1. In a food processor or blender, combine basil leaves, garlic, pine nuts, and Parmesan cheese. Season with Kosher salt and black pepper. Blend until finely chopped.
  2. With the motor running, slowly drizzle in olive oil until the pesto is smooth and creamy. Transfer to a bowl and set aside.
  3. In a mixing bowl, combine shredded chicken and basil pesto with Greek yogurt. Stir until evenly coated.
  4. Preheat the oven to 350°F (175°C). Slice the baguette and toast for 5-7 minutes until golden brown.
  5. Layer the bottom half of each baguette with arugula, tomato slices, and mozzarella cheese.
  6. Scoop the chicken pesto mixture onto each sandwich, ensuring even distribution.
  7. Place the top half of the baguette over the filling, cut in half if desired, and serve immediately.

Use fresh ingredients for the best flavor. Consider variations like different cheeses or marinated chicken.

Sandwiches
Italian
Chicken Pesto Sandwich, flavorful, homemade, pesto, quick lunch, sandwich

Filed Under: Sandwiches

Crispy Baked Zucchini and Cheese: A Flavorful Twist

August 23, 2025 by grace bellamy Leave a Comment

As I stepped into my kitchen, the comforting aroma of garlic mingled with the anticipation of transforming simple zucchinis into something extraordinary. This Baked Zucchini and Cheese recipe has become my go-to when I need a quick yet satisfying dish that pleases both family and friends. Not only is it an absolute crowd-pleaser, but it’s also a fantastic way to sneak in some veggies without anyone batting an eye. With just a handful of ingredients, you can whip up a cheesy delight that’s crispy on the outside and tender on the inside. Whether you’re trying to break free from the fast food routine or simply want to add a healthy twist to your meals, this recipe is a delicious choice. Ready to bring the joy of homemade food back to your table? Let’s dive into this cheesy adventure together!

Baked Zucchini and Cheese

Why is Baked Zucchini and Cheese Amazing?

Crispy Texture: The perfect balance of a crunchy breadcrumb coating and soft, melted cheese creates a delightful eating experience.

Flavorful Simplicity: With just a handful of ingredients like garlic and oregano, this dish is bursting with flavor, yet incredibly easy to make.

Vegetable Boost: It’s a fantastic way to enjoy your veggies! Sneak in some healthy zucchini without anyone noticing, perfect for picky eaters.

Quick Preparation: In just 45 minutes, from prep to table, you can enjoy this delicious meal, making it ideal for busy weeknights.

Crowd-Pleasing Comfort: Serving it up will leave everyone wanting seconds, perfect for family dinners or entertaining friends!

Try it as a side to your favorite main dish, or enjoy it on its own as a light meal or snack!

Baked Zucchini and Cheese Ingredients

For the Zucchini
• 2 large zucchinis – slice them into 1/4-inch rounds for even cooking and crispy edges.

For the Cheese Mixture
• 1 cup shredded mozzarella cheese – this cheese melts beautifully, creating gooey layers in every bite.
• 1/2 cup grated Parmesan cheese – adds a nutty flavor that pairs perfectly with the zucchini.

For the Coating
• 1 cup breadcrumbs – use seasoned breadcrumbs for an extra flavor boost.
• 2 tablespoons olive oil – helps the zucchini crisp up in the oven while providing a rich taste.
• 1 teaspoon garlic powder – infuses the dish with a savory aroma; fresh garlic can be used as a substitution for a stronger taste.
• 1 teaspoon dried oregano – brings an herby note that enhances the overall flavor profile.
• 1/2 teaspoon salt – balances the dish and enhances the natural flavors of the ingredients.
• 1/4 teaspoon black pepper – adds a subtle kick to the blend.

For Garnish
• 1 tablespoon chopped fresh parsley – optional, but a sprinkle adds a fresh touch and brightens the dish’s presentation.

Gather these ingredients, and you’re well on your way to creating a mouthwatering Baked Zucchini and Cheese that will have everyone asking for seconds!

Step‑by‑Step Instructions for Baked Zucchini and Cheese

Step 1: Preheat the Oven
Begin by preheating your oven to 400°F (200°C). While the oven warms up, grab a baking sheet and grease it lightly with cooking spray or line it with parchment paper. This will ensure your crispy Baked Zucchini and Cheese doesn’t stick. The preparation will set the stage for a perfect bake!

Step 2: Prepare the Seasoned Oil
In a large mixing bowl, combine 2 tablespoons of olive oil with 1 teaspoon each of garlic powder, dried oregano, 1/2 teaspoon salt, and 1/4 teaspoon black pepper. Stir the mixture well to create a fragrant oil blend. This seasoned oil will coat your zucchini, enhancing the flavors and contributing to that delightful crispiness you’re aiming for.

Step 3: Coat the Zucchini Slices
Next, add your sliced zucchinis to the seasoned oil mixture. Use a spatula or your hands to gently toss the zucchini rounds until each piece is evenly coated. This step is crucial, as it allows all those wonderful flavors to meld into the zucchini, ensuring a tasty experience in your Baked Zucchini and Cheese!

Step 4: Mix the Cheese and Breadcrumbs
In another bowl, combine 1 cup of shredded mozzarella cheese, 1/2 cup of grated Parmesan cheese, and 1 cup of breadcrumbs. Mix thoroughly until the cheeses and breadcrumbs are evenly distributed. This cheesy coating will create a deliciously golden topping for your zucchini, adding that much-loved crunch to your dish.

Step 5: Coat Each Zucchini Slice
Now, take each zucchini slice and dip it into the cheese and breadcrumb mixture, ensuring it is fully coated. Gently press down to ensure the mixture sticks well, which will create a crispy exterior once baked. Place the coated slices back in the bowl until all are ready for the oven.

Step 6: Arrange on Baking Sheet
Carefully arrange the coated zucchini slices in a single layer on the prepared baking sheet. Make sure there is space between each slice to allow for even cooking and crisping. This layout is key to achieving that irresistible crunch in your Baked Zucchini and Cheese!

Step 7: Bake to Perfection
Slide the baking sheet into your preheated oven and bake for 20–25 minutes. Keep an eye on them, and look for the cheese to become bubbly and golden brown, while the zucchinis should be tender when pierced with a fork. The aroma will fill your kitchen, building excitement for the upcoming dish!

Step 8: Cool and Garnish
Once baked, remove the zucchini from the oven and allow them to cool for a few minutes. This brief rest lets the flavors settle and makes them easier to handle. For a delightful finishing touch, garnish with chopped fresh parsley for a pop of color. Your Baked Zucchini and Cheese is now ready to impress!

Baked Zucchini and Cheese

Expert Tips for Baked Zucchini and Cheese

Choosing the Right Zucchini: Look for firm, shiny zucchinis without blemishes. Thinner zucchinis will become tender in the oven while maintaining that crunch contrasted with the cheesy coating.

Mix Cheese Wisely: Combine mozzarella with Parmesan for a perfect melt and rich flavor. Avoid using low-fat cheese, as it may not melt well and can alter the texture of the Baked Zucchini and Cheese.

Ensure Even Coating: When coating the zucchini with the cheese mixture, gently press down to help the crumbs adhere better. This prevents clumps and ensures an even crunch when baked.

Watch Baking Time: Keep an eye on the zucchinis as they bake. Ovens vary; for the best results, start checking at the 20-minute mark to achieve that perfectly golden brown hue without burning.

Cool Before Serving: Let the crispy Baked Zucchini and Cheese rest for a few minutes after baking. This will help the coating set, making it easier to serve and enjoy without losing its crunch!

Baked Zucchini and Cheese Variations

Feel free to get creative! Here are delightful twists to customize your dish and make it even tastier.

  • Dairy-Free: Substitute cheese with vegan cheese for a plant-based twist. Nutritional yeast can also add a cheesy flavor without dairy.

  • Spicy Kick: Add red pepper flakes to the coating for a zesty heat that lingers. It’s a fun way to amp up the flavor and keep everyone guessing!

  • Herb Infusion: Mix in fresh herbs like basil or thyme with your garlic and oregano. This will elevate the dish and make it genuinely aromatic.

  • Nutty Addition: Stir in some chopped walnuts or almonds into your breadcrumb mixture. The nutty crunch will offer a delightful texture contrast and added heartiness.

  • Zucchini & Carrot Combo: Toss in thinly sliced carrots with your zucchini to enhance the sweetness and color. A beautiful addition for those colorful meals!

  • Panko Crunch: Use panko breadcrumbs for an even crispier coating! Panko offers a light, airy crunch, making each bite incredibly satisfying.

  • Cheese Lover’s Dream: Add extra types of shredded cheese such as cheddar or gouda for a deeper flavor profile. It creates a creamy delight that’s irresistible!

  • Garlic Lovers: If you adore garlic, switch the garlic powder for fresh minced garlic. Just be mindful when baking, as fresh garlic can brown faster!

These variations not only enhance your Baked Zucchini and Cheese but also allow you to tailor the recipe to your family’s preferences. Pair it with a refreshing salad or enjoy it alongside an easy weeknight pasta for a complete meal! If you’re looking for even more delicious sides, try serving it with a classic Caesar salad or pair with lemon garlic chicken.

Make Ahead Options

These Baked Zucchini and Cheese are perfect for meal prep enthusiasts! You can slice the zucchinis and toss them in the seasoned oil mixture up to 24 hours in advance, storing them in an airtight container in the refrigerator. Additionally, you can prepare the cheese and breadcrumb mixture and keep that separate, which will maintain its crunchiness. When you’re ready to enjoy your cheesy delight, simply coat the prepped zucchini slices with the cheese mixture and bake as directed. This ensures that the dish is just as delicious and saves you time on busy weeknights, allowing you to bring a homemade touch to your table effortlessly!

How to Store and Freeze Baked Zucchini and Cheese

Fridge: Store leftover Baked Zucchini and Cheese in an airtight container for up to 3 days. Let it cool completely before sealing to preserve its texture.

Freezer: If you want to freeze it, wrap individual portions tightly in plastic wrap, then place them in a freezer-safe bag. They’ll stay fresh for up to 2 months.

Reheating: To reheat, place the Baked Zucchini and Cheese in a preheated oven at 350°F (175°C) for about 15 minutes or until warmed through. This will help regain some crispiness!

Thawing: If frozen, let the portions thaw in the fridge overnight before reheating, which ensures even heating and better texture for this delightful dish.

What to Serve with Baked Zucchini and Cheese

Elevate your meal with delightful sides that enhance the comforting flavors of your baked creation.

  • Creamy Mashed Potatoes: These smooth potatoes add a rich, buttery contrast, perfect for balancing the crispy zucchini.

  • Fresh Garden Salad: A crisp salad with vibrant greens and a light vinaigrette brings freshness, cutting through the richness of the dish.

  • Garlic Bread: Warm, toasted garlic bread pairs beautifully, offering a satisfying crunch and a burst of flavor with every bite.

  • Roasted Cherry Tomatoes: The sweetness from roasted tomatoes complements the zucchini, adding depth and a touch of umami to the meal.

  • Herbed Quinoa: Light and fluffy quinoa infused with herbs creates a hearty, nutritious side that merges well with the cheesy goodness.

  • White Wine: A chilled glass of Sauvignon Blanc or Chardonnay serves as a delightful accompaniment, enhancing the flavors of the dish.

  • Lemon Sorbet: To cleanse the palate, a refreshing lemon sorbet can be a perfect, light dessert after your savory zucchini delight.

  • Steamed Broccoli: Bright green broccoli, lightly seasoned, offers a fresh and crunchy contrast to the baked zucchini, adding a pop of color to your plate.

Baked Zucchini and Cheese

Baked Zucchini and Cheese Recipe FAQs

How do I choose the best zucchini?
Absolutely! When selecting zucchinis, look for firm, shiny ones without blemishes or dark spots. The ideal zucchinis are smaller and have a vibrant green color, as they tend to be more tender and flavorful. Larger zucchinis can be a bit tougher, so opt for the medium-sized ones if possible!

How should I store leftover Baked Zucchini and Cheese?
Leftover Baked Zucchini and Cheese can be stored in an airtight container in the refrigerator for up to 3 days. Be sure to let it cool completely before sealing to maintain its delicious texture. When reheating, pop it into a preheated oven at 350°F (175°C) for about 15 minutes to help restore some of that original crispiness!

Can I freeze Baked Zucchini and Cheese? How?
Absolutely! To freeze this tasty dish, wrap individual portions tightly in plastic wrap, then place them in a freezer-safe bag. This method keeps them fresh for up to 2 months. When ready to enjoy, thaw in the fridge overnight before reheating in the oven!

What if my zucchini feels too watery after baking?
Very common! If your zucchini is releasing excess water, it may be due to slicing thickness or cooking time. Be sure to slice them into 1/4-inch rounds for even cooking, and if you notice significant moisture when pulling them from the oven, you can place them on a paper towel for a couple of minutes to absorb any excess liquid before serving.

Is this recipe suitable for people with dairy allergies?
While this Baked Zucchini and Cheese recipe contains dairy products, you can easily make it dairy-free! Substitute the mozzarella and Parmesan with nutritional yeast for a cheesy flavor or try using dairy-free cheese alternatives available on the market. Just be sure to check for any personal allergies to specific ingredients as you experiment with options!

Can I add other vegetables to this recipe?
The more, the merrier! Feel free to mix in other veggies like sliced bell peppers, eggplant, or even mushrooms for a delightful twist! Just make sure to adjust the baking time as needed, especially if adding more moisture-rich vegetables. Enjoy experimenting and making this Baked Zucchini and Cheese your own!

Crispy Baked Zucchini and Cheese: A Flavorful Twist

This Baked Zucchini and Cheese is a quick, satisfying dish that incorporates veggies into a cheesy delight, perfect for family and friends.

  • Oven
  • Baking Sheet
  • Mixing Bowl
  • spatula

For the Zucchini

  • 2 large zucchinis (slice them into 1/4-inch rounds for even cooking and crispy edges.)

For the Cheese Mixture

  • 1 cup shredded mozzarella cheese (this cheese melts beautifully.)
  • 1/2 cup grated Parmesan cheese (adds a nutty flavor.)

For the Coating

  • 1 cup breadcrumbs (use seasoned breadcrumbs for extra flavor.)
  • 2 tablespoons olive oil (helps the zucchini crisp up.)
  • 1 teaspoon garlic powder (infuses the dish with a savory aroma.)
  • 1 teaspoon dried oregano (brings an herby note.)
  • 1/2 teaspoon salt (balances the dish.)
  • 1/4 teaspoon black pepper (adds a subtle kick.)

For Garnish

  • 1 tablespoon chopped fresh parsley (optional, for a fresh touch.)

Step-by-Step Instructions

  1. Preheat your oven to 400°F (200°C) and prepare a baking sheet.
  2. Combine olive oil, garlic powder, oregano, salt, and pepper in a mixing bowl.
  3. Add zucchini slices to the oil mixture and toss to coat.
  4. In another bowl, mix mozzarella, Parmesan, and breadcrumbs.
  5. Dip each zucchini slice in the cheese mixture, pressing to ensure it sticks.
  6. Arrange the coated slices on the baking sheet.
  7. Bake for 20-25 minutes until golden brown and crispy.
  8. Let them cool for a few minutes and garnish with parsley before serving.

For best results, use firm zucchinis and avoid low-fat cheese to ensure proper melting.

Side Dishes
American
Baked Zucchini, Cheese, crispy, Easy, Healthy, Vegetarian

Filed Under: Sandwiches

Delicious Chicken Avocado Melt Sandwich in Just 10 Minutes

August 20, 2025 by grace bellamy Leave a Comment

As I stood in my kitchen, a tantalizing aroma wafted through the air, instantly transporting me to a cozy café on a sun-drenched patio. That’s the magic of the Chipotle Chicken Avocado Melt Sandwich. This delightful creation is more than just a meal; it offers a savory escape from the mundane, combining smoky chicken with creamy avocado and a zesty chipotle kick. With just ten minutes of prep and cook time, it’s perfect for busy days when you crave something special without the lengthy effort. It’s a sure-fire crowd-pleaser and a great way to elevate your lunch game. Plus, it’s a hearty option that doesn’t compromise on flavor or satisfaction. Are you ready to take your taste buds on a little adventure? Let’s dive into this delicious recipe together!

What makes this sandwich irresistible?

Quick and Easy: With just a total of 10 minutes from start to finish, this Chicken Avocado Melt Sandwich is perfect for busy weekdays. No more settling for fast food when you can whip up this gourmet delight in your own kitchen.

Flavor Explosion: The smoky essence of chicken harmonizes beautifully with the smooth avocado and the zesty chipotle sauce. It’s a symphony of flavors that keeps your taste buds intrigued!

Crowd-Pleasing Comfort: Whether you’re sharing with friends or enjoying a solo meal, this sandwich is bound to impress. Serve it alongside some crispy sweet potato fries or a fresh salad for a balanced meal.

Versatile Ingredients: Feel free to customize by adding your favorite toppings or switching up the proteins; the possibilities are endless! Check out my other easy sandwich recipes for more inspiration.

Satisfying Texture: The contrast of the crunchy sourdough with the creamy avocado and melted cheese creates a delightful eating experience that will have you coming back for seconds.

Chicken Avocado Melt Sandwich Ingredients

For the Sandwich
• Olive oil – Use it to achieve that golden, crispy crust on your sourdough.
• Sourdough bread – Its hearty texture perfectly holds all the fillings.
• Avocado – Adds a creamy richness that balances the flavors beautifully.
• Smoked chicken breast – Offers a deep, savory layer that really elevates the dish.
• Peppadew peppers – These sweet and tangy bites add a delightful kick!
• Fresh chopped cilantro – Gives a fresh burst of flavor that brightens the sandwich.
• Chao creamy original – A melty, dairy-free cheese option that adds creaminess.

For the Sauce
• Chipotle sauce – Use this to infuse that smoky, spicy flavor into your Chicken Avocado Melt Sandwich.
• Chipotle adobo sauce – A small amount intensifies the depth of flavor in your sauce.
• Mayonnaise – Adds creaminess and acts as a base for your flavor-packed sauce.
• Lemon juice – A splash brightens up the sauce and balances the richness.
• Garlic – Freshly minced garlic gives your sauce a bold punch.
• Coarse salt – Enhances all the flavors and ties the dish together.

Step‑by‑Step Instructions for Chicken Avocado Melt Sandwich

Step 1: Prepare the Chipotle Sauce
In a small bowl, mix together the mayonnaise, chipotle adobo sauce, lemon juice, minced garlic, and coarse salt until smooth and well combined. This flavorful sauce will be the star of your Chicken Avocado Melt Sandwich, so set it aside to meld the flavors while you move on to the next steps.

Step 2: Heat the Skillet
Place a large skillet on the stove over medium-high heat, allowing it to warm up for about 2 minutes. A properly heated skillet is essential for achieving that perfect golden crust on your sandwich. You’ll know it’s ready when you can feel the heat radiating and see a light shimmer on the surface.

Step 3: Brush the Bread with Olive Oil
Take the olive oil and brush it generously onto the outer sides of each slice of sourdough bread. This step is crucial for creating a crispy, delicious coating when you cook the sandwich. The golden color will enhance the visual appeal and improve the flavor of your Chicken Avocado Melt Sandwich.

Step 4: Assemble the Sandwich
Once your skillet is hot, place the oil-brushed side of one slice of bread down in the skillet. Layer the sandwich by adding a slice of Chao creamy original cheese first, followed by the smoked chicken, avocado slices, Peppadew peppers, and chopped cilantro. Finally, spread a generous amount of the prepared chipotle sauce on the inner side of the second slice of bread before placing it on top.

Step 5: Cook Until Golden
Cook the sandwich in the skillet for about 3-4 minutes, or until the bottom slice of bread is golden brown and the cheese has begun to melt. Carefully check the sandwich midway to prevent burning, and feel free to press down gently with a spatula to ensure even heating.

Step 6: Flip and Toast the Other Side
Using a spatula, gently flip the sandwich over and cook for an additional 3-4 minutes. The goal is to achieve a crispy crust on both sides while the cheese melts perfectly inside. Keep an eye on the color and aroma to ensure the Chicken Avocado Melt Sandwich is toasty and inviting.

Step 7: Slice and Serve
Once both sides are beautifully golden and the cheese has fully melted, remove the sandwich from the skillet and let it cool for a moment. Slice it in half to reveal the delicious layers inside, and serve warm while the flavors are still vibrant and lively, ready to delight your taste buds!

How to Store and Freeze Chicken Avocado Melt Sandwich

Fridge: Store any leftover Chicken Avocado Melt Sandwich in an airtight container for up to 2 days. Reheat gently in a skillet to maintain crispness.

Freezer: For longer storage, wrap the sandwich tightly in plastic wrap and then in foil. It can be frozen for up to 1 month. Reheat from frozen in the oven for best results.

Reheating: When ready to enjoy, reheat the sandwich in a skillet over medium-low heat, allowing the cheese to melt and the bread to crisp up again, ensuring a delightful eating experience.

Avoid sogginess: If possible, store sauce separately to prevent the bread from becoming soggy, which helps maintain the perfect texture upon reheating.

What to Serve with Chipotle Chicken Avocado Melt

Imagine savoring a vibrant meal that perfectly complements the bold flavors of your savory creation, leaving you longing for each delicious bite.

  • Crispy Sweet Potato Fries: These golden fries add a sweet, crunchy contrast that pairs beautifully with the smoky richness of the sandwich. Each bite offers a delightful balance that enhances your meal.

  • Zesty Coleslaw: A light and crunchy coleslaw with a tangy dressing brightens up the heartiness of your sandwich, providing a refreshing crunch. This adds a fantastic texture that keeps things interesting on your plate.

  • Simple Green Salad: Toss together mixed greens, cherry tomatoes, and a lemon vinaigrette. This fresh salad lifts the flavors and lightens up the meal, keeping it vibrant and satisfying.

  • Avocado and Tomato Salad: Combine diced avocado with juicy tomatoes and a sprinkle of salt. This dish enhances the creaminess of your Chicken Avocado Melt Sandwich, creating a harmonious flavor profile.

  • Roasted Corn on the Cob: The sweetness of roasted corn provides an irresistible contrast to the savory components of the sandwich. It’s a fun and tasty side that brings summer vibes to your table.

  • Iced Lemonade: Refresh your palate with a glass of ice-cold lemonade; its tartness complements the smoky chipotle flavors beautifully. This drink offers a cooling counterpoint that is simply irresistible.

  • Chocolate Chip Cookies: For dessert, indulge in warm chocolate chip cookies; the rich sweetness pairs wonderfully with the savory flavors of your sandwich, creating a delightful finish to your meal.

  • Sparkling Water with Lime: For a fizzy refreshment, serve sparkling water garnished with lime slices. The effervescence adds a light, zesty note that enhances the overall meal experience.

Make Ahead Options

These Chicken Avocado Melt Sandwiches are perfect for meal prep! You can prepare the chipotle sauce and sliced ingredients (like the avocado, chicken, and Peppadew peppers) up to 24 hours in advance by storing them separately in airtight containers in the refrigerator to maintain their freshness and flavor. Additionally, you can brush the sourdough with olive oil and stack the fillings on one slice of bread (without toasting) up to 3 days ahead, ensuring a quick assembly when you’re ready to cook. When you’re set to enjoy your melt, simply assemble and cook as instructed, and you’ll have a delicious homemade sandwich ready to eat with minimal effort—perfect for busy weeknights!

Expert Tips for Chicken Avocado Melt Sandwich

  • Perfectly Crispy Bread: Brush enough olive oil on the bread to achieve that golden, crunchy crust without overdoing it, which can make it greasy.

  • Layering Sequence Matters: Start with cheese at the bottom to create a moisture barrier, preventing the bread from getting soggy and keeping your Chicken Avocado Melt Sandwich irresistibly crisp.

  • Watch the Heat: Medium-high heat is key. Too high can burn the bread before the cheese melts, while too low will leave everything lukewarm and unappetizing.

  • Taste as You Go: Adjust the chipotle sauce to your spice preference. Adding an extra drop can give your Chicken Avocado Melt Sandwich just the right kick!

  • Customize Your Fillings: Don’t hesitate to mix and match ingredients. Adding sliced tomatoes or your favorite greens can elevate your sandwich even more!

Chicken Avocado Melt Sandwich Variations

Feel free to mix up this delightful Chicken Avocado Melt Sandwich any way you like to create your perfect bite!

  • Dairy-Free: Substitute the Chao cheese with a dairy-free mozzarella or omit it altogether for a lighter option. You’ll still enjoy a hearty sandwich!

  • Add Extra Veggies: Toss in some spinach or arugula for a fresh, crisp texture that brightens every flavor in your melt.

  • Spicy Kick: Incorporate sliced jalapeños or a splash of hot sauce to the chipotle sauce for an added layer of heat. Your taste buds will be dancing!

  • Protein Swap: Switch the smoked chicken for turkey or even grilled vegetables for a delightful vegetarian alternative that still hits the spot.

  • Sourdough Alternative: Use whole grain or rye bread if you’re looking to change things up while maintaining that delightful crunch and flavor.

  • Avocado Upgrade: Try using roasted or grilled avocados for a deeper, more complex flavor that pairs beautifully with other ingredients.

  • Herb Infusion: Add fresh basil or parsley in place of cilantro to create a different aromatic experience that transforms the sandwich’s character entirely.

  • Chipotle Variation: Experiment with different chipotle sauces or even barbecue sauce for a fun twist, providing a sweet touch to the smokiness.

Let your creativity run wild as you enjoy these variations! And if you’re looking for more delicious sandwich ideas, check out my other easy sandwich recipes for plenty of inspiration.

Chipotle Chicken Avocado Melt Recipe FAQs

What type of avocado is best for this sandwich?
Absolutely! Look for ripe avocados that yield slightly when gently squeezed. The ideal avocado should be dark green and free of dark spots. Avoid overripe avocados, which may have a mushy texture that won’t hold up in your delicious Chicken Avocado Melt Sandwich.

How long can I store the Chicken Avocado Melt Sandwich leftovers?
Very! You can store any leftover Chicken Avocado Melt Sandwich in an airtight container in the refrigerator for up to 2 days. When you’re ready to enjoy, reheat it gently in a skillet over medium heat to keep that satisfying crispiness intact.

Can I freeze the Chicken Avocado Melt Sandwich?
Of course! To freeze, wrap the sandwich tightly in plastic wrap, then in aluminum foil to prevent freezer burn. It can be frozen for up to 1 month. For the best results, reheat from frozen in the oven at 350°F (175°C) for about 20-25 minutes or until heated through and crispy.

What should I do if my sandwich is soggy after reheating?
Very good question! If you find your Chicken Avocado Melt Sandwich is soggy, it may be due to storing it improperly. To avoid this, try to store the sauce separately if possible, and when reheating, place the sandwich in a skillet over medium-low heat. This allows the bread to crisp back up while the cheese melts inside. Make sure to press down gently with a spatula while reheating for an even heating process.

Are there any dietary concerns I should consider with this recipe?
Absolutely! If you’re preparing this sandwich for someone with dietary restrictions, make sure to check for allergies to specific ingredients, such as garlic or any of the sauces used. Additionally, if you’re making this for pets, keep in mind that onion and garlic can be harmful to them, so make sure to leave those ingredients out if they’re included in the sauce portion.

Can I use a different type of bread for this recipe?
You bet! While sourdough is a fantastic choice for its crusty texture and flavor, feel free to customize! Whole grain bread, ciabatta, or even gluten-free variations work wonderfully in your Chicken Avocado Melt Sandwich. The more the merrier when it comes to sandwich creativity!

Delicious Chicken Avocado Melt Sandwich in Just 10 Minutes

This Chicken Avocado Melt Sandwich is a quick and flavorful meal combining smoky chicken, creamy avocado, and zesty chipotle sauce.

  • large skillet

For the Sandwich

  • 2 tablespoons olive oil (for brushing)
  • 4 slices sourdough bread
  • 1 medium avocado (sliced)
  • 8 ounces smoked chicken breast (sliced)
  • 4 tablespoons Peppadew peppers (sliced)
  • 2 tablespoons fresh chopped cilantro
  • 4 slices Chao creamy original (dairy-free cheese)

For the Sauce

  • 4 tablespoons chipotle sauce
  • 1 tablespoon chipotle adobo sauce
  • 2 tablespoons mayonnaise
  • 1 tablespoon lemon juice
  • 2 cloves garlic (freshly minced)
  • 1 teaspoon coarse salt

Step-by-Step Instructions for Chicken Avocado Melt Sandwich

  1. In a small bowl, mix together the mayonnaise, chipotle adobo sauce, lemon juice, minced garlic, and coarse salt until smooth and well combined.
  2. Place a large skillet on the stove over medium-high heat, allowing it to warm up for about 2 minutes.
  3. Brush the outer sides of each slice of sourdough bread with the olive oil.
  4. In the hot skillet, place the oil-brushed side of one slice of bread down, then layer with Chao creamy original cheese, smoked chicken, avocado slices, Peppadew peppers, and cilantro. Spread chipotle sauce on the inner side of the second slice before placing it on top.
  5. Cook the sandwich for about 3-4 minutes, until the bread is golden brown and the cheese begins to melt.
  6. Gently flip the sandwich over and cook for an additional 3-4 minutes to achieve a crispy crust on both sides.
  7. Remove the sandwich from the skillet, let it cool, then slice in half and serve warm.

For best results, store sauce separately if making ahead to avoid sogginess when reheating.

Sandwiches
American
Chicken Avocado Melt Sandwich, comfort food, easy lunch, gourmet sandwich, quick sandwich, savory sandwich

Filed Under: Sandwiches

Irresistible Caramelized Onion and Apple Grilled Cheese Bliss

July 24, 2025 by grace bellamy Leave a Comment

As I hovered over the stove, the sweet aroma of caramelized onions began to fill my kitchen, whisking me away to chilly autumn evenings wrapped in cozy sweaters. That’s when I knew it was time to create the Irresistible Caramelized Onion and Apple Grilled Cheese—a heartwarming fusion of flavors that makes the perfect comfort food. With just a few ingredients, this easy dinner elevates traditional grilled cheese into something truly special. Imagine biting into crispy sourdough, where the melty sharp cheddar and juicy Granny Smith apples dance together with the rich sweetness of caramelized onions. Not only is this dish a crowd-pleaser, but it fills your home with an inviting warmth, making it ideal for gatherings or a simple weeknight meal. Curious how these layers of deliciousness come together? Let’s dive into the recipe!

Why Is This Grilled Cheese Irresistible?

Comforting Yet Gourmet: The Irresistible Caramelized Onion and Apple Grilled Cheese takes an everyday classic and infuses it with delightful flavors, making it perfect for cozy nights in or impressive gatherings.

Simple Ingredients: You’ll love the ease of making this dish! With just a handful of ingredients—think sweet onions, tart apples, and sharp cheddar—it comes together effortlessly.

Unique Flavor Combination: The marriage of caramelized onions and juicy apples creates an unforgettable taste, reminiscent of autumn bliss. Pair it with ideas like warm tomato soup or a light salad to round out your meal.

Customizable Options: Feel free to explore different cheeses like Gruyère or swap sourdough for whole grain bread. It’s an adaptable recipe that accommodates diverse tastes and dietary needs!

Captivating Aroma: As it cooks, the heavenly scent will envelop your kitchen, enticing everyone to the table—a comforting embrace that invites connection and joy!

Irresistible Caramelized Onion and Apple Grilled Cheese Ingredients

  • For the Bread
    • Sourdough Bread – Provides a crunchy and chewy texture. Substitution Note: Can use whole grain bread for a healthier option.

  • For the Filling
    • Granny Smith Apples – Adds tartness that beautifully contrasts the sweetness of the onions. Substitution Note: Fuji or Honeycrisp apples can also be used for sweetness.
    • Sweet Onions – Caramelizes well, enhancing depth of flavor. Substitution Note: Any sweet variety of onion works best.
    • Sharp Cheddar Cheese – Melts beautifully and offers rich flavor. Substitution Note: Gruyère can be used for a more gourmet touch.

  • For Cooking
    • Unsalted Butter – Ensures a golden-brown crust during grilling. Substitution Note: Margarine can be used but may change the flavor.
    • Olive Oil – Prevents butter from burning and helps achieve a crispy texture.
    • Salt and Pepper – Essential for seasoning and enhancing flavors.

This Irresistible Caramelized Onion and Apple Grilled Cheese comes together in perfect harmony, making it a wonderful comfort food to warm your soul!

Step‑by‑Step Instructions for Irresistible Caramelized Onion and Apple Grilled Cheese

Step 1: Prepare Ingredients
Start by thinly slicing the sweet onions and Granny Smith apples to ensure even cooking. Aim for about 1/4-inch thickness for both, which helps them cook quickly. This preparation will set the stage for your Irresistible Caramelized Onion and Apple Grilled Cheese, making the assembly smooth and hassle-free.

Step 2: Caramelize Onions
In a large skillet, heat 1 tablespoon of olive oil and 1 tablespoon of unsalted butter over medium heat. Once the butter is melted and bubbling, add the sliced sweet onions. Cook for 15-20 minutes, stirring occasionally, until the onions turn a rich, golden brown, releasing a sweet aroma that fills your kitchen. This step is crucial for developing the flavors in your grilled cheese.

Step 3: Cook Apples
Once your onions have caramelized to perfection, add the sliced Granny Smith apples to the skillet. Season lightly with salt and pepper, then sauté for about 5-7 minutes. The apples should become tender yet retain some firmness, allowing their tartness to beautifully contrast the sweetness of the onions while joining in the delightful medley of flavors.

Step 4: Assemble Sandwich
Layer your assembled masterpiece by placing a slice of sourdough bread on a clean surface. Spread a generous portion of sharp cheddar cheese on top, followed by the luscious caramelized onions and apple mixture. Finally, add another slice of cheese on top to ensure gooeyness, then crown it with another slice of sourdough.

Step 5: Grill Sandwich
In the same skillet, melt the remaining tablespoon of butter over medium heat. Carefully place the assembled sandwich into the skillet and grill for about 3-4 minutes on one side, or until it turns a beautiful golden brown. Gently press down with a spatula to help the cheese melt and the bread crisp up nicely.

Step 6: Flip and Finish
Once the first side is golden and crispy, carefully flip the sandwich and grill for an additional 3-4 minutes. Look for the cheese to become melty and ooze slightly from the sides, ensuring all the delightful flavors of the Irresistible Caramelized Onion and Apple Grilled Cheese meld together perfectly.

Step 7: Serve
Remove the sandwich from the skillet and allow it to sit for a minute before cutting. Slice diagonally for a visually appealing presentation and plate it with fresh fruit or a light salad for a complete meal. Each bite should be a delightful combination of crispy bread, melty cheese, and sweet-tart filling!

Irresistible Caramelized Onion and Apple Grilled Cheese Variations

Feel free to explore these delightful twists to make our grilled cheese even more special!

  • Cheese Swap: Opt for Gruyère for a nutty, upscale flavor that melts just beautifully. This substitution adds a touch of gourmet flair that will impress your guests.

  • Gluten-Free: Use gluten-free bread to accommodate dietary needs without sacrificing flavor and texture. There’s no reason to miss out on this comforting classic!

  • Herb-Infused: Add fresh thyme or rosemary to the caramelized onions for an aromatic boost. These herbs awaken your senses and elevate the enjoyment of each bite.

  • Apple Twist: Try Honeycrisp apples for extra sweetness and crunch, or mix in some dried cranberries for a festive autumn touch. They create a pleasing contrast against the rich cheese.

  • Spice it Up: Incorporate a hint of red pepper flakes to add heat to your grilled cheese. Just a pinch can transform this comfort food into a spicy delight that keeps it exciting.

Pairing this sandwich with a light salad dressed with vinaigrette can round out your meal just perfectly. If you’re looking for something soothing on those chilly nights, a warm bowl of tomato soup served alongside complements the richness of the grilled cheese like magic!

  • Texture Upgrade: Swap in ciabatta or brioche for a softer, more luxurious bread experience. You’ll love the little twist that adds to the classic crunch.

  • Balsamic Drizzle: Finish with a drizzle of balsamic reduction on the sandwich just before serving. The tangy sweetness enhances the savory flavors beautifully.

No matter how you choose to customize your Irresistible Caramelized Onion and Apple Grilled Cheese, each variation offers a unique take that promises deliciousness in every bite!

How to Store and Freeze Irresistible Caramelized Onion and Apple Grilled Cheese

  • Room Temperature: Enjoy your grilled cheese fresh off the skillet for the best flavor. If necessary, leave it out for no more than 2 hours to maintain its taste and quality.

  • Fridge: Store any leftover Irresistible Caramelized Onion and Apple Grilled Cheese in an airtight container for up to 3 days. This helps keep the sandwich fresh and prevents it from drying out.

  • Freezer: For longer storage, wrap the assembled, uncooked sandwiches tightly in plastic wrap and aluminum foil or place them in a freezer-safe bag. They can be frozen for up to 1 month.

  • Reheating: To reheat, place the sandwich in a skillet over medium-low heat, pressing down gently. Grill each side for about 4-5 minutes until the cheese is gooey again and the bread is crispy. Enjoy the comforting flavors!

What to Serve With Irresistible Caramelized Onion and Apple Grilled Cheese

Elevate your grilled cheese experience with delightful pairings that complement its rich, comforting flavors.

  • Light Salad: A crisp salad with mixed greens and a tangy vinaigrette provides a refreshing contrast to the warm sandwich, balancing the richness beautifully.

  • Tomato Soup: This classic duo never disappoints! The creamy, tangy soup hugs the savory grilled cheese, making for a cozy meal perfect for chilly days.

  • Sweet Potato Fries: Crispy sweet potato fries add a touch of sweetness and a fun crunch, creating a delightful textural contrast to the melty grilled cheese.

  • Roasted Vegetables: The earthy flavors of roasted vegetables, like Brussels sprouts or carrots, complement the sweet onions and apples, enhancing the whole meal.

  • Cranberry Sauce: A dollop of tangy cranberry sauce brings a burst of flavor that harmonizes with the savory cheese and sweet apples, perfect for autumn-inspired dinners.

  • Apple Cider: Pair your meal with a chilled apple cider to echo the apple notes in the sandwich while adding a refreshing, fizzy element.

Each of these suggestions enhances the heartwarming vibe of your Irresistible Caramelized Onion and Apple Grilled Cheese, making every bite a cozy delight!

Make Ahead Options

These Irresistible Caramelized Onion and Apple Grilled Cheese sandwiches are perfect for busy home cooks looking to save time during the week! You can caramelize the onions and slice the Granny Smith apples up to 3 days in advance. Simply refrigerate them in an airtight container to maintain their freshness. When you’re ready to enjoy, take the prepped components out, layer them between slices of sourdough with cheese, and grill as directed. This means you can have a comforting, delicious meal ready in minutes without the fuss of starting from scratch each time!

Helpful Tricks for Irresistible Grilled Cheese

  • Patience is Key: Caramelizing onions requires low heat and time. Rushing this step may lead to burnt bits instead of sweet perfection.

  • Cheese Choice Matters: Use a good melting cheese, like sharp cheddar. Avoid pre-shredded cheese; it contains anti-caking agents that won’t melt properly in your Irresistible Caramelized Onion and Apple Grilled Cheese.

  • Butter & Oil Combo: Mixing butter with olive oil not only prevents burning but also gives you that beautiful crisp and flavor.

  • Don’t Overstuff: While it’s tempting to add more ingredients, be careful not to overload the sandwich, as it may fall apart during grilling.

  • Press Down Gently: Pressing the sandwich with a spatula while grilling encourages even melting and a perfectly toasted crust without burning the bread.

Irresistible Caramelized Onion and Apple Grilled Cheese Recipe FAQs

What type of onions should I use for this recipe?
I recommend using sweet onions like Vidalia or Walla Walla for the best caramelization. These varieties will enhance the flavor profile with their natural sweetness. If you can’t find them, any sweet onion will work, just avoid strong-tasting varieties like yellow or red onions.

How should I store leftover grilled cheese?
Store any leftover Irresistible Caramelized Onion and Apple Grilled Cheese in an airtight container in the fridge for up to 3 days. This keeps the sandwich fresh and prevents it from drying out. When you’re ready to reheat, I suggest using a skillet over medium-low heat for the best results!

Can I freeze assembled grilled cheese sandwiches?
Absolutely! To freeze, wrap the assembled but uncooked sandwiches tightly in plastic wrap and then in aluminum foil. They can be stored in the freezer for up to 1 month. When you’re ready to enjoy, just thaw in the refrigerator overnight and grill as usual!

What can I do if my onions are burning while caramelizing?
If you notice any burning, your heat might be too high. Lower it slightly and add a splash of water to the skillet, which helps deglaze the pan and gives you more time to achieve that golden-brown sweetness. Remember, patience is key when caramelizing onions!

Are there any dietary considerations I should keep in mind?
Yes! If you are making this for someone with dietary restrictions, consider using gluten-free bread and a dairy-free cheese option. You can explore various cheese alternatives that melt well to accommodate different dietary needs without compromising flavor.

Irresistible Caramelized Onion and Apple Grilled Cheese Bliss

Experience the ultimate comfort food with this Irresistible Caramelized Onion and Apple Grilled Cheese, combining sweet onions and tart apples.

  • skillet

For the Bread

  • 4 slices Sourdough Bread (Can use whole grain bread for a healthier option.)

For the Filling

  • 2 medium Granny Smith Apples (Fuji or Honeycrisp apples can also be used for sweetness.)
  • 1 large Sweet Onions (Any sweet variety of onion works best.)
  • 8 ounces Sharp Cheddar Cheese (Gruyère can be used for a more gourmet touch.)

For Cooking

  • 2 tablespoons Unsalted Butter (Margarine can be used but may change the flavor.)
  • 1 tablespoon Olive Oil
  • to taste Salt
  • to taste Pepper

Step-by-Step Instructions

  1. Start by thinly slicing the sweet onions and Granny Smith apples to ensure even cooking. Aim for about 1/4-inch thickness for both.
  2. In a large skillet, heat 1 tablespoon of olive oil and 1 tablespoon of unsalted butter over medium heat. Add the sliced sweet onions. Cook for 15-20 minutes until golden brown.
  3. Add the sliced Granny Smith apples to the skillet. Season lightly with salt and pepper, then sauté for about 5-7 minutes.
  4. Layer the sandwich by placing a slice of sourdough bread, followed by cheddar cheese, caramelized onions, apples, and another slice of cheese, topped with another sourdough slice.
  5. Melt the remaining tablespoon of butter in the same skillet. Grill the sandwich for about 3-4 minutes on one side until golden brown.
  6. Carefully flip the sandwich and grill for another 3-4 minutes until the cheese is melted and the bread is crispy.
  7. Remove the sandwich and let it sit for a minute before cutting. Slice diagonally and serve with fresh fruit or a salad.

For the best flavor, enjoy your grilled cheese fresh off the skillet. Leftovers can be stored in an airtight container for up to 3 days.

Sandwiches
American
apple, autumn, caramelized onion, comfort food, easy dinner, grilled cheese

Filed Under: Sandwiches

Irresistibly Crunchy Fried Chicken Street Corn Tacos Recipe

June 29, 2025 by grace bellamy Leave a Comment

There’s something incredibly satisfying about biting into a taco that combines bold flavors and comforting textures. I remember the day I craved something beyond the typical weeknight dinner—a vibrant, street food-inspired meal that would tantalize my taste buds. Enter these Fried Chicken Street Corn Tacos! A crispy, golden taco filled with crunchy fried chicken, smoky bacon, and that heavenly creamy jalapeño-lime ranch sauce, all wrapped in a perfectly pan-fried tortilla. It’s a feast that brings both joy and nostalgia, reminding me of summer nights spent at food truck fiestas.

Not only is this recipe a flavor explosion, but it’s also deceptively easy to make, making it perfect for impressing friends or treating yourself after a long day. The secret? A simple marinade technique that ensures tender chicken with a delightfully crispy coating, paired with a refreshing street corn salad that adds sweetness to the mix. Whether it’s for taco Tuesday or simply to elevate your dinner game, these Fried Chicken Street Corn Tacos are bound to become a family favorite. So, roll up your sleeves and let’s dive into this delicious adventure!

Why are Fried Chicken Street Corn Tacos a must-try?

Flavors That Pop: The vibrant mix of fried chicken, bacon, and creamy jalapeño sauce creates a fiesta of flavors.

Quick & Easy: With simple steps, you can whip up these tacos in no time—perfect for busy weeknights!

Crowd-Pleasing: These tacos are sure to be a hit at gatherings, bringing smiles to everyone’s faces.

Ultimate Comfort: The combination of crispy textures and rich flavors makes every bite feel indulgent.

Versatile Ingredients: Swap out the chicken for store-bought tenders for a quicker option, or experiment with toppings based on your preferences.

You’ll love this recipe, especially on a taco night, where everyone can personalize their tacos! Try pairing it with a Street Corn Chicken Rice Bowl for an extra treat!

Fried Chicken Street Corn Tacos Ingredients

Get ready to create a flavor-packed taco night with these mouthwatering ingredients!

For the Chicken

  • Chicken Tenders – The main protein that provides juiciness and flavor.
  • Bacon – Adds a smoky, salty crunch to elevate your tacos.
  • Pickle Juice – Use this to marinate the chicken for a tangy kick and tender texture.
  • Buttermilk – Ensures the chicken stays moist and helps the coating stick.
  • All-Purpose Flour – Forms the crispy coating for the chicken.
  • Cornstarch – Mix this in for an extra crispy texture.
  • Garlic Powder – Enhances the overall flavor of the chicken coating.
  • Paprika – Adds a beautiful color and depth of flavor.
  • Salt – Essential for bringing out the flavors.
  • Onion Powder – Another layer of flavor for the chicken.
  • Black Pepper – A great seasoning that complements the other spices.
  • Cayenne Powder – Use this for a hint of heat.
  • Hot Sauce – Incorporate this into the coating for added flavor.
  • Peanut Oil/Vegetable Oil – For frying the chicken until golden brown.

For the Tacos

  • Flour Tortillas – The perfect vessel to hold all the delicious fillings.
  • Street Corn Salad – Adds a sweet crunch that pairs wonderfully with the fried chicken.
  • Chuy’s Creamy Jalapeno Copycat Sauce – A tangy, creamy sauce that takes these tacos over the top.
  • Lime Wedges – Serve these on the side for a burst of fresh citrus flavor.

Full measurements are in the recipe card below.

How to Make Fried Chicken Street Corn Tacos

  1. Marinate Chicken: Submerge the chicken tenders in a mix of pickle juice and buttermilk. Let them soak for at least 2 hours or overnight for the best flavor and tenderness.

  2. Prepare Flour Mixture: In a large bowl, combine the all-purpose flour, cornstarch, garlic powder, paprika, salt, onion powder, black pepper, cayenne powder, and some hot sauce. This will create a flavorful coating for your chicken.

  3. Prepare Wet Mixture: In a separate bowl, mix together more buttermilk and hot sauce. This will keep your coating moist and delicious.

  4. Fry Chicken: Dip each marinated chicken tender first into the flour mixture, then into the buttermilk/hot sauce mix, and back into the flour mixture. Fry in hot oil at 350°F until golden brown, about 5-7 minutes, until the internal temperature reaches 165°F.

  5. Pan-fry Tortillas: In a skillet, heat a splash of neutral oil on medium heat. Fry each flour tortilla until golden brown and pliable, about 30 seconds per side.

  6. Assemble Tacos: Warm up the tortillas and fill them with crispy fried chicken, a generous scoop of street corn salad, and drizzle with creamy jalapeño sauce. Serve with lime wedges on the side for a fresh kick.

Optional: Garnish with chopped cilantro for extra freshness.

Exact quantities are listed in the recipe card below.

Expert Tips for Fried Chicken Street Corn Tacos

  • Marination Magic: Allow the chicken to marinate overnight if possible. This enhances flavor and tenderness, resulting in juicy fried chicken.

  • Double-Dip Delight: For extra crunch, consider a double-dip in the wet and dry mixtures before frying. This yields a thicker, crispier coating for your tacos.

  • Temperature Check: Use a thermometer to ensure your oil is at 350°F before frying. This prevents greasy chicken while ensuring a golden, crispy texture.

  • Skillet Secret: When pan-frying tortillas, don’t skip this step! It adds an essential layer of flavor and prevents them from tearing when filled.

  • Avoid Crowding: Fry chicken in small batches to keep the oil temperature steady. Crowding the pan can lead to soggy chicken instead of the crunchy goodness you desire.

  • Sauce it Right: Drizzle or dollop on the creamy jalapeño sauce just before serving to keep the tacos fresh and flavorful. Enjoy crafting these Fried Chicken Street Corn Tacos!

What to Serve with Fried Chicken Street Corn Tacos?

These tacos are a festive centerpiece, bursting with flavor and perfect for a delicious meal that’ll leave your guests asking for more!

  • Zesty Lime Rice: This bright side dish adds a refreshing touch that complements the rich flavors of the tacos beautifully.
  • Spicy Black Beans: Their earthy depth and creamy texture balance the crispiness of the chicken and corn, adding a satisfying bite.
  • Tangy Coleslaw: A crunchy, tangy coleslaw enhances the taco experience, making each bite feel vibrant and lively.
  • Guacamole: Creamy and rich, this avocado delight provides a smooth contrast against the crispy chicken, elevating every taco.
  • Corn Salsa: This colorful mix of sweet corn, diced tomatoes, and zesty lime pairs perfectly, echoing the street corn salad in your tacos.
  • Watermelon Salad: A refreshing cut of sweetness with a hint of mint offers a light, palate-cleansing side to round out your meal.
  • Margaritas: A classic pairing, these citrusy cocktails add a festive flair, helping to cool down the heat from the jalapeño sauce.
  • Churros: For dessert, these sugary, crunchy treats are a sweet finish to your taco night, making it utterly unforgettable!

How to Store and Freeze Fried Chicken Street Corn Tacos

Fridge: Store leftover tacos in an airtight container for up to 3 days. Keep the components separate if possible to maintain crispiness.

Freezer: For longer storage, wrap individual fried chicken tacos tightly in foil and place them in a freezer bag. They can be frozen for up to 2 months.

Reheating: To reheat, thaw overnight in the fridge, then bake at 350°F for about 10-15 minutes to ensure the chicken stays crispy.

Assemble Fresh: When ready to eat, consider adding fresh street corn salad and creamy jalapeño sauce just before serving for the best flavor experience.

Fried Chicken Street Corn Tacos Variations

Feel free to shake things up with these tasty twists and substitutions that will make your tacos even more exciting!

  • Gluten-Free: Substitute regular tortillas with gluten-free tortillas and use a gluten-free flour blend for coating to maintain that crunch.
  • Spicy Kick: Add diced jalapeños to the street corn salad or opt for spicier hot sauce for a bolder flavor. Spice-lovers will appreciate the extra heat!
  • Vegetarian: Swap chicken for fried eggplant or cauliflower bites seasoned with similar spices, keeping the fried flavor profile intact. It’s a delightful vegetarian twist!
  • Quesadilla Style: Make quesadillas instead by placing chicken, street corn salad, and creamy sauce in tortillas, grilling until golden. Perfect for a quick meal!
  • Crispy Tofu: For a plant-based option, marinate and fry tofu in the same flavorful coating for a fantastic taco alternative that’s full of texture.
  • Smoky Flavor: Infuse smoked paprika or chipotle powder into the coating mix to add a new level of smokiness that beautifully complements the bacon.
  • Loaded Tacos: Pile on toppings like avocado slices, fresh cilantro, or crumbled queso fresco for an extra layer of flavor and visual appeal.
  • Salsa Verde: Swap out the creamy sauce for salsa verde to add a fresh, tangy component that brings a different vibe altogether. Fresh and zesty!

Fried Chicken Street Corn Tacos Recipe FAQs

What type of chicken is best for these tacos?
Using chicken tenders is ideal as they cook quickly and remain tender. If you’re short on time, you can also use store-bought chicken tenders for a convenient option. They’ll still give you that crispy deliciousness!

How do I store leftover Fried Chicken Street Corn Tacos?
For best results, store the components separately: the fried chicken, tortillas, and street corn salad in airtight containers. This approach keeps everything fresh and allows the taco ingredients to maintain their textures. They should be consumed within 3 days for the best taste.

Can I freeze Fried Chicken Street Corn Tacos?
Absolutely! To freeze, wrap each taco tightly in foil and place them in a freezer-safe zip-top bag. They can be stored for up to 2 months. When ready to enjoy, thaw in the refrigerator overnight and reheat in the oven at 350°F for 10-15 minutes to maintain that crispy goodness.

What should I do if my chicken coating isn’t crispy?
If your chicken coating turns out soggy, it could be due to overcrowding the frying pan or the oil not being hot enough. Always maintain oil temperature at 350°F and fry in small batches. For extra crunch, consider a double-dip in the flour mixture before frying!

Can I modify the recipe for dietary restrictions?
Of course! For gluten-free options, substitute regular flour with a gluten-free flour blend. If you’re cooking for someone with egg allergies, you can simply omit the hot sauce used in the wet mixture. Always check any pre-made ingredients, like sauces, for allergens.

How can I ensure my fried chicken is tender?
To achieve perfectly tender fried chicken, marinate it in a mixture of pickle juice and buttermilk for at least 2 hours, or overnight if you can. This technique not only adds flavor but also helps to tenderize the chicken for a melt-in-your-mouth texture!

[tasty-recipe id=”2216″]

Filed Under: Sandwiches

Crispy Bang Bang Chicken Sliders: Easy, Flavor-Packed Delight

June 25, 2025 by Rauz Karoline Leave a Comment

Did you know that sliders have become the ultimate gathering food? Picture this: it’s game day, friends are over, and the aroma of crispy fried chicken wafts through the air. That’s the magic of my Bang Bang Chicken Sliders! This recipe combines tender, pan-fried chicken cutlets topped with gooey mozzarella cheese and a naughty drizzle of sweet and spicy Bang Bang Sauce. It’s messy, it’s delicious, and it’s the perfect centerpiece for your next get-together or a cozy dinner at home.

These sliders are not just quick to whip up; they’re also a major crowd-pleaser! Whether you choose to air fry, pan-fry, or bake, you can savor that crispy goodness in no time. The beauty of this recipe lies in its versatility—you can even utilize pre-cooked chicken tenders for an even easier option.

So, are you ready to dive into a dish that will elevate your hosting game while still feeling effortless? Scroll down for the full recipe, and let’s make these bangin’ sliders together!

Why are Bang Bang Chicken Sliders so irresistible?

Flavor explosion: These sliders deliver a mouthwatering blend of crispy chicken, melted mozzarella, and an irresistible Bang Bang sauce that packs a punch.
Effortless preparation: With options for pan-frying, air frying, or baking, you can easily customize the method that fits your kitchen routine.
Ultimate crowd-pleaser: Perfect for parties or game days, these sliders are sure to satisfy everyone’s cravings and make you the star of the show!
Make-ahead magic: Prepare the chicken and sauce beforehand for a stress-free assembly that lets you enjoy every moment with your guests.
Flexibility with ingredients: Use thin-sliced chicken for a quick cook or opt for pre-cooked chicken tenders for even faster sliders that don’t compromise on taste.
Dipping delight: Serve extra Bang Bang Sauce on the side for guests who love to dip—it’s a little something extra that everyone will adore!

For more delectable ideas, check out my Bang Bang Chicken Bowl for another crowd-pleasing dish!

Bang Bang Chicken Sliders Ingredients

• Get ready to whip up something delicious!

For the Chicken

  • Chicken Cutlets – Thin-sliced for quick cooking and extra crispness. You can also substitute with pre-cooked frozen chicken tenders for a speedy approach!

For the Bang Bang Sauce

  • Mayonnaise – Forms the creamy base of the sauce to complement the flavors.
  • Sriracha – Adds heat; adjust according to your spice preference for those Bang Bang Chicken Sliders!
  • Sweet Chili Sauce – Provides a delightful sweetness to balance the spice.
  • Honey – Enhances sweetness while bringing all the flavors together.

For Assembly

  • Mozzarella Cheese – Melts beautifully over the chicken, adding a rich, creamy texture.
  • Slider Buns – Perfect size for holding all the deliciousness together!

For Frying

  • Canola Oil, Vegetable Oil, or Avocado Oil – Choose one for frying and achieving that perfect golden crisp.
  • Olive Oil – Not recommended for frying due to its low smoke point; stick to the others for best results.

Now that you have everything ready, let’s move on to creating these fantastic sliders!

Step-by-Step Instructions for Bang Bang Chicken Sliders

Step 1
Start by preparing your chicken cutlets. Heat about an inch of canola oil in a large skillet over medium-high heat until shimmering, which typically takes about 5-7 minutes. Carefully add the chicken cutlets to the hot oil, frying them for about 3-4 minutes per side or until they are golden brown and crispy. Ensure they are cooked through and no longer pink in the center. Once done, transfer them to a plate lined with paper towels to drain excess oil.

Step 2
While the chicken is frying, it’s time to whip up the Bang Bang sauce that will elevate your Bang Bang Chicken Sliders. In a mixing bowl, whisk together mayonnaise, sriracha, sweet chili sauce, and honey. Adjust the sriracha according to your spice preference for the perfect balance of heat and sweetness. Once well combined, cover the bowl and refrigerate the sauce to let the flavors meld together while your chicken finishes cooking.

Step 3
Assemble your sliders as soon as your chicken cutlets are ready. Start by placing a crispy cutlet on the bottom half of each slider bun. Immediately top the hot chicken with a slice of mozzarella cheese, allowing it to melt slightly from the heat. Drizzle a generous amount of your prepared Bang Bang sauce over the cheese, ensuring every bite will be packed with that sweet and spicy flavor.

Step 4
To serve your Bang Bang Chicken Sliders, place the top half of the slider buns over the sauced cutlets. You can either serve them as they are or offer extra Bang Bang sauce on the side as a delightful dipping option for your guests. These sliders are best enjoyed immediately while the chicken is crisp, the cheese is warm, and the sauce is fresh and vibrant—perfect for any gathering or a cozy night in!

Make Ahead Options

These Bang Bang Chicken Sliders are perfect for meal prep enthusiasts! You can prepare the chicken cutlets up to 24 hours in advance by frying them and storing in an airtight container in the refrigerator to maintain their crispiness. The Bang Bang Sauce can also be made ahead and refrigerated for up to 3 days—just give it a stir before using. When you’re ready to serve, simply reheat the chicken cutlets in a 325-degree oven for about 10-15 minutes until warmed through. Assemble your sliders and drizzle them with the freshly prepared sauce right before serving for the best quality and flavor. This makes for an effortless and delicious meal, saving you time for other fun activities!

Tips for the Best Bang Bang Chicken Sliders

  • Oil Temperature: Ensure your oil is hot enough before frying to prevent greasy chicken cutlets. Aim for around 350°F for optimal crispiness.
  • Even Cooking: Use thin-sliced chicken breasts for faster cooking and an even crisp. This avoids any raw spots, ensuring perfectly cooked Bang Bang Chicken Sliders.
  • Make Ahead: Fry chicken and prepare the sauce ahead of time. Store them separately in the refrigerator and assemble just before serving for ease.
  • Keep Warm: If you’re preparing for a gathering, keep cooked chicken cutlets warm in a low-temperature oven while you fry the rest.
  • Freshness Factor: Allow the Bang Bang Sauce to rest at room temperature before serving. This enhances the flavors and makes for a more enjoyable dish.
  • Dipping Options: Consider offering additional Bang Bang sauce on the side for dipping; it provides extra flavor and is a hit with guests!

What to Serve with Bang Bang Chicken Sliders?

Imagine a gathering filled with laughter, lively conversations, and the enticing aroma of delicious food—the perfect backdrop for your sliders to shine!

  • Crispy French Fries: The classic pairing of crispy fries adds a satisfying crunch and makes the meal feel even more indulgent. Dip them into extra Bang Bang sauce for a fun twist!
  • Coleslaw: A refreshing, crunchy coleslaw balances the sliders’ richness, providing a tangy contrast and keeping the meal light and bright.
  • Corn on the Cob: Sweet, juicy corn enhances the experience with its natural sweetness, making every bite harmonious with the spicy sliders.
  • Potato Salad: A creamy, rich potato salad serves as a comforting side dish that complements the flavors and textures of the sliders beautifully.
  • Sweet and Spicy Pickles: Briny and spicy pickles cut through the richness, adding a delightful zing to your plate that guests will love. Serve them alongside for a burst of flavor!
  • Chilled Beer or Craft Soda: Select an ice-cold beer or a refreshing craft soda to wash down the sliders, enhancing the overall experience while elevating the party vibe.
  • Buffalo Cauliflower Bites: For a veggie-packed option, these spicy bites are a great accompaniment that mirrors the sliders’ flavors without stealing the show.
  • Chocolate Chip Cookies: End the meal on a sweet note with warm, gooey chocolate chip cookies, providing the perfect contrast to the sliders savoriness.

With these delicious accompaniments, your Bang Bang Chicken Sliders will be part of a memorable meal that keeps everyone coming back for seconds!

Bang Bang Chicken Sliders Variations

Feel free to experiment with these fun twists and substitutions for your sliders to create an even more exciting flavor experience!

  • Turkey Option: Use turkey cutlets instead of chicken for a leaner option that still packs a punch.

  • Spicy Upgrade: Add sliced jalapeños or a dash of cayenne pepper to the Bang Bang sauce for an extra kick of heat. It’ll take your sliders to a whole new level!

  • Vegetarian Delight: Swap chicken for crispy eggplant or zucchini slices to keep those satisfying textures while catering to vegetarians.

  • Cheese Twist: Experiment with different cheeses such as pepper jack for a spicier flavor, or cheddar for a richer taste that melts beautifully.

  • Sweet Heat: Incorporate diced pineapple or mango into the Bang Bang sauce for a touch of sweetness that perfectly balances the spices. You’ll be amazed by the tropical twist!

  • Herb Flavor Infusion: Stir in fresh chopped herbs like cilantro or basil into the sauce to add freshness and complexity to every bite.

  • Bun Swap: Try using slider buns made from whole grain or brioche for a healthier choice or a sweeter bite that elevates your sliders.

  • Fry-Free Method: Use an air fryer for that crispy finish without the oil, perfect for a lighter take on this flavorful classic!

How to Store and Freeze Bang Bang Chicken Sliders

Refrigerator: Store leftover Bang Bang Chicken Sliders in an airtight container for up to 3 days, separating the chicken and sauce to keep everything fresh.

Freezer: If you want to freeze the chicken cutlets, wrap them tightly in plastic wrap and then in aluminum foil or place them in a freezer-safe bag. They can last for up to 3 months.

Reheating: To reheat refrigerated chicken cutlets, warm them in a 325°F oven for about 10-15 minutes. For frozen cutlets, thaw overnight in the fridge before reheating.

Sauce Storage: Store the Bang Bang Sauce in a sealed container in the fridge for up to a week. Allow it to come to room temperature before serving again; the flavors really shine at that stage!

Bang Bang Chicken Sliders Recipe FAQs

How do I select the perfect chicken cutlets for my Bang Bang Chicken Sliders?
Absolutely! Look for thin-sliced chicken breasts that are even in thickness, as they cook quickly and evenly. If you’re in a hurry, you can also use pre-cooked frozen chicken tenders, which save time and still deliver on taste!

What’s the best way to store leftovers from my Bang Bang Chicken Sliders?
To keep your sliders fresh, store the chicken and Bang Bang Sauce separately in airtight containers in the refrigerator. They’ll last up to 3 days this way. When you’re ready to eat, assemble the sliders right before serving for the best texture and flavor!

Can I freeze the Bang Bang Chicken cutlets? If so, how?
Yes, you can! First, wrap the cooled chicken cutlets tightly in plastic wrap, followed by a layer of aluminum foil to prevent freezer burn. Place them in a freezer-safe bag, and they’ll last up to 3 months. When you’re ready to enjoy, thaw them overnight in the fridge and reheat in a 325°F oven for about 10-15 minutes.

I’m new to frying; how do I ensure my chicken cutlets don’t turn out greasy?
Very! Begin by heating your oil to around 350°F before adding the chicken. This helps create a crispy crust and prevents the chicken from soaking up too much oil. If you don’t have a thermometer, you can test the oil by dropping in a small piece of bread; it should sizzle and turn golden brown when the oil is ready.

Can anyone enjoy these sliders, including those with dietary restrictions?
Of course! For gluten-free guests, use gluten-free slider buns or lettuce wraps instead. Those with egg allergies can substitute the mayonnaise in the Bang Bang Sauce with an egg-free version or Greek yogurt for a healthier alternative.

How can I make these sliders in advance for a party?
Absolutely! You can prep the chicken and Bang Bang Sauce a day ahead. Simply fry the chicken, and keep it warm in a low-temperature oven. Store the sauce in the refrigerator. On the day of your gathering, just assemble the sliders just before serving, and you’ll be the star of the show!

[tasty-recipe id=”2119″]

Filed Under: Sandwiches

Deliciously Easy Tortilla Pinwheels for Effortless Entertaining

June 21, 2025 by Rauz Karoline Leave a Comment

Did you know that some of the best snacks can come together in just ten minutes? As a fan of quick and tasty bites, I was thrilled to discover these Easy Ham and Cheese Tortilla Pinwheels. Imagine combining cream cheese, savory ham, and zesty ranch seasoning all wrapped up in a soft tortilla—what’s not to love? Perfect for game day, Easter, or any casual gathering, this no-cook appetizer is guaranteed to please guests of all ages.

What I adore about these Tortilla Pinwheels is their versatility; you can easily swap out ingredients based on what you have on hand or your family’s preferences. Plus, they’re an absolute breeze to prepare, making them the ideal choice for anyone tired of fast food and seeking something homemade. Whether you’re hosting a party or just looking for a delightful snack to enjoy with the family, these are a definite win.

Now, are you ready to roll up some deliciousness? Let’s dive into the recipe and bring these tasty treasures to your table!

Why Choose Tortilla Pinwheels as Your Snack?

Simplicity Meets Flavor: These Tortilla Pinwheels are incredibly easy to whip up, needing just a handful of ingredients and minimal prep time.

Flavor Explosion: The combination of creamy cheese, savory ham, and zesty ranch will have your taste buds dancing with joy.

Versatile Options: Customize these roll-ups with whatever meats, cheeses, or veggies you have handy to suit your family’s tastes.

Perfect for Any Occasion: Whether it’s game day, Easter, or a casual get-together, this appetizer is a hit with guests young and old.

Make-Ahead Magic: Prepare them in advance and store in the fridge—ideal for busy hosts looking to impress!

For more crowd-pleasing ideas, check out our guide on easy appetizer recipes.

Tortilla Pinwheels Ingredients

Get ready to roll with these delightful Tortilla Pinwheels!

For the Filling
• Cream Cheese – This creamy base is essential for a smooth filling; make sure it’s at room temperature for easy mixing (2 bricks, 16 ounces).
• Hidden Valley® Original Ranch® Seasoning Mix – A classic choice that adds robust flavor; consider homemade ranch for a tailored taste (1 packet, 1.5 ounces).
• Shredded Sharp Cheddar Cheese – Provides a sharp, cheesy goodness; feel free to swap it out for your favorite cheese.

For the Wrap
• Flour Tortillas – Soft and pliable, they’re crucial for holding all the delicious fillings (8-10 inch tortillas work best).

For the Protein
• Finely Chopped Ham – Adds savory notes; switch it up with chicken or turkey for a different spin.

For Freshness
• Chopped Green Onion – Offers a burst of fresh flavor; don’t skip this for those vibrant bites!

These simple ingredients come together to create the perfect Tortilla Pinwheels that are a hit with everyone!

Step-by-Step Instructions for Easy Tortilla Pinwheels

Step 1
Begin by preparing the filling for your delicious Tortilla Pinwheels. In a medium bowl, combine the softened cream cheese with the Hidden Valley® Original Ranch® seasoning mix and shredded sharp cheddar cheese. Use a sturdy spatula to blend the mixture until it’s smooth and creamy—this should take about 2-3 minutes. You want to ensure the ranch flavor is evenly distributed throughout the filling, creating that savory base that brings everything together.

Step 2
Next, it’s time to assemble the tortillas. Take one flour tortilla and place it on a clean surface. Using a spatula, spread an even layer of the cream cheese mixture over the entire surface of the tortilla, approximately ¼-inch thick. Make sure you reach the edges to ensure that every bite of your Tortilla Pinwheels is flavorful. Repeat this process for each tortilla, laying them out in a single layer as you go.

Step 3
Now, sprinkle the finely chopped ham and chopped green onion across the cream cheese mixture on each tortilla. Distribute them evenly to ensure a good balance of flavors in each bite. Press them lightly into the cream cheese so they adhere well when rolled. This step adds delightful texture and freshness to your Tortilla Pinwheels, making them irresistible.

Step 4
Tightly roll each tortilla away from you, starting from one edge and working to the other. As you roll, apply gentle pressure to keep the filling intact, ensuring a snug roll. Once rolled up, place the tortillas seam side down on a cutting board. For best results, refrigerate the rolled tortillas for about 1-2 hours. This chilling time helps the tortillas set, making it easier to slice them into neat pinwheels.

Step 5
Finally, it’s time to slice and serve your Tortilla Pinwheels. Remove the rolled tortillas from the refrigerator and use a sharp knife to cut them into ½-inch slices. Arrange the wheel-shaped pieces on a serving platter, showcasing their colorful layers. These delightful bites are now ready to be enjoyed at your next gathering or family snack-time!

What to Serve with Tortilla Pinwheels?

Imagine a gathering where every bite brings a smile, and your Tortilla Pinwheels are just the start of the feast!

  • Crunchy Veggie Platter: Fresh veggies like carrots, cucumbers, and bell peppers pair perfectly, adding a satisfying crunch and a pop of color to your appetizer spread.
  • Zesty Salsa: A side of tangy salsa brings a vibrant flavor that complements the creamy filling of the pinwheels, inviting guests to dive in for more.
  • Creamy Spinach Dip: This rich, indulgent dip has the depth of flavor to balance the lighter pinwheels, creating a delightful contrast with every bite.
  • Guacamole: The buttery richness of guacamole combines beautifully with the savory elements of the pinwheels, creating a harmonious blend of flavors.
  • Chilled Fruit Salad: A refreshing fruit salad with melons and berries cleanses the palate and offers a sweet balance alongside the savory appetizers.
  • Sparkling Lemonade: A fizzy drink like sparkling lemonade is a light, refreshing beverage option that accentuates the flavors of your pinwheels beautifully.
  • Mini Caprese Skewers: These little bites of fresh mozzarella, tomatoes, and basil add an Italian flair and provide a colorful contrast to your spread.

With these delightful pairings, your dining experience will be filled with vibrant flavors, textures, and smiles!

Tips for the Best Tortilla Pinwheels

• Soften Cream Cheese: Ensure your cream cheese is at room temperature for easy mixing and a creamy filling texture.

• Right Tortilla Size: Use 8-10 inch flour tortillas for optimal wrapping and to keep your Tortilla Pinwheels intact.

• Edge-to-Edge Spread: Spread the cream cheese mixture all the way to the edges of the tortilla to help create a seal when rolling.

• Chill for Success: Refrigerate the rolled tortillas for at least 1-2 hours before slicing; this helps them maintain their shape.

• Avoid Sogginess: If you find your tortillas turn out soggy, give them a quick toast in the skillet before adding fillings.

• Flavor Adjustments: If the ranch flavor is too strong, try reducing the ranch seasoning to strike the perfect balance in your Tortilla Pinwheels.

Tortilla Pinwheels Variations & Substitutions

Feel free to mix and match ingredients for your own delicious spin on these Tortilla Pinwheels!

  • Dairy-Free: Use dairy-free cream cheese and your favorite non-dairy cheese alternatives for a tasty, creamy filling.

  • Spicy Kick: Add diced jalapeños or a spicy ranch seasoning mix for a fiery twist that will awaken your taste buds.

  • Veggie Delight: Swap in finely chopped bell peppers or spinach instead of ham for a colorful and fresh option that’s equally satisfying.

  • Mediterranean Twist: Incorporate feta cheese, olives, and sun-dried tomatoes for a Mediterranean flair that transports your taste buds.

  • Sweet Surprise: Spread a thin layer of honey or fruit preserves under the cream cheese for a delicious sweet-and-savory combination in every bite.

  • Leafy Greens: Layer in some arugula or mixed greens before rolling for added crunch and nutrition. It adds a lovely freshness to the flavors!

  • Herby Goodness: Mix fresh herbs like dill or basil into the cream cheese for a garden-fresh infusion, enhancing all those creamy flavors.

  • Breakfast Spin: Substitute the ham with cooked and crumbled sausage or bacon for a delightful breakfast variation that’s perfect any time of day.

Get creative and enjoy your culinary adventure with these versatile Tortilla Pinwheels!

How to Store and Freeze Tortilla Pinwheels

Fridge: Store your Tortilla Pinwheels in an airtight container for up to 4 days, making them a perfect make-ahead snack for busy days.

Freezer: For long-term storage, wrap the whole roll-ups tightly in plastic wrap and freeze them for up to 1 month.

Thawing: When ready to enjoy, simply thaw the frozen pinwheels in the refrigerator overnight before slicing and serving.

Make Ahead Options

These Easy Tortilla Pinwheels are perfect for meal prep, making them an ideal choice for busy hosts! You can prepare the filling (cream cheese mixture) up to 24 hours in advance and store it in an airtight container in the refrigerator. Additionally, you can roll the tortillas and refrigerate them for up to 3 days before serving. To maintain their quality, ensure they are tightly wrapped to prevent any drying out and keep the flavors fresh. When you’re ready to serve, simply slice the chilled roll-ups into pinwheels and arrange them on a platter. This way, you’ll have a delicious, crowd-pleasing appetizer ready with minimal effort!

Easy Ham and Cheese Tortilla Pinwheels Recipe FAQs

How to keep tortilla pinwheels from getting soggy?
Absolutely! To prevent sogginess, it’s recommended to lightly toast the tortillas in a skillet before adding the fillings. This creates a barrier that helps keep moisture at bay. Additionally, ensure that your cream cheese mixture is not overly wet—too much liquid can contribute to sogginess!

How to roll a tortilla into a circle?
Very! Start by placing your filling spread evenly across the tortilla, leaving about ¼-inch at the edges. Then, begin rolling from one edge, keeping it tight but not too tight to avoid squeezing out the filling. As you roll, give it a gentle squeeze to ensure everything stays intact. Just keep the roll even, and you’ll end up with a perfect circle!

What are the two ingredient pinwheels?
One common variation for two-ingredient pinwheels includes simply using cream cheese and your choice of deli meat (like ham or turkey). This keeps it super simple and allows you to whip up a quick snack without a lot of fuss. Another option is cream cheese and spinach for a veggie-centered treat!

How far in advance can I make puff pastry pinwheels?
You can prepare puff pastry pinwheels up to a day in advance. Simply assemble them, wrap tightly in plastic wrap, and refrigerate until you’re ready to bake. This gives you the flexibility to have an impressive appetizer ready for your gathering without the last-minute rush!

How to make wraps not soggy overnight?
To keep wraps from becoming soggy overnight, store them in an airtight container layered with paper towels. The paper towels will absorb excess moisture, maintaining a fresh texture. Additionally, you can reduce any creamy or wet fillings, opting for drier ingredients if possible.

How to keep pinwheels from unraveling?
To prevent unraveling, roll the tortillas tightly and make sure the cream cheese mixture goes all the way to the edges before sealing them. Chilling the assembled pinwheels in the fridge for 1-2 hours not only helps them set but also keeps the edges from unrolling when you slice them. If you’re concerned about them staying together, you can also secure them with toothpicks while serving!

[tasty-recipe id=”2086″]

Filed Under: Sandwiches

Irresistibly Easy Breakfast Burritos with Zesty Salsa Delight

May 21, 2025 by grace bellamy Leave a Comment

I still remember the first time I stumbled upon that little bodega in Reston, VA. The air was fragrant with sizzling sausage and something magical that could only be described as comfort wrapped in a tortilla. From the moment I took that first bite of their breakfast burrito—bursting with spicy sausage, smoky scrambled eggs, and gooey cheese—I knew I had discovered a gem. Since then, I’ve been on a mission to recreate that comforting experience in my own kitchen.

Today, I’m excited to share my version of these Bodega-Style Breakfast Burritos, complete with a vibrant homemade avocado-tomato salsa that takes the flavor to new heights. Whether you’re looking for a quick morning pick-me-up, a satisfying dinner, or a way to impress family and friends, these burritos are sure to please. With their delightful blend of textures and flavors, they’ve quickly become a family favorite. So, let’s dive in and bring a bit of that bodega magic into our homes!

Why are Breakfast Burritos a Must-Try?

Bursting with flavors, these breakfast burritos blend savory sausage, smoky eggs, and gooey cheese, delivering a delicious start to your day. Quick and easy, they come together in under 30 minutes, perfect for busy mornings or a cozy weekend brunch. Customizable for every palate, you can tweak the spice levels and add favorite ingredients. Satisfying and hearty, these burritos will have everyone at your table begging for more! Don’t forget to serve them with a zesty avocado-tomato salsa for an extra flavor punch.

Breakfast Burrito Ingredients

For the Avocado-Tomato Salsa
• Large Avocado – Adds creaminess and body to the salsa; halve, pit, dice, and scoop.
• Diced Seeded Tomatoes – Provide freshness and acidity; use 1/2 cup diced tomato for vibrant flavor.
• Small Shallot – Provides a balanced onion flavor; approximately 2 tablespoons minced.
• Clove Garlic – Enhances flavor; mince it fine for a zesty kick.
• Jalapeño Pepper – Adds heat; seed and mince carefully to control spice levels.
• Fresh Lime Juice – Provides acidity and brightens flavors; extract juice from 1 lime.
• Salt – Enhances the other flavors in the salsa; add to taste for perfect balance.
• Ground Cumin – A key spice that adds warmth; use 1/4 teaspoon for depth.
• Fresh Chopped Cilantro – Offers a fresh, herbal note that balances the richness of the avocado.

For the Burritos
• Large Eggs – The base for scrambled eggs, providing protein and flavor; use 4 eggs for a hearty filling.
• Smoked Paprika – Adds a smoky flavor and vibrant color; 1/4 teaspoon will do the trick.
• Salt – Season the eggs to enhance taste; use 1/4 teaspoon for perfect seasoning.
• Spicy Sausage – The main protein adding savory flavor; ½ lb of your choice, like chorizo or Italian sausage.
• Shredded Monterey Jack Cheese – Melts beautifully and complements the other flavors; 1 and 1/3 cups is recommended.
• 10-inch Tortillas – The perfect wrap for the burrito; you will need 4 tortillas to pack in all the goodness.
• Vegetable Oil – Used for cooking the burrito in the pan and for browning; a light coat will suffice.

Full measurements are in the recipe card below.

How to Make Breakfast Burritos

  1. Make the Salsa: Start by dicing the avocado and placing it in a mixing bowl. Add diced tomatoes, minced shallot, minced garlic, jalapeño, lime juice, salt, cumin, and cilantro. Mix until well combined and set aside.
  2. Prepare the Eggs: In a bowl, whisk together 4 large eggs with smoked paprika and a pinch of salt. This will add flavor and color to your fluffy eggs.
  3. Cook the Sausage: Heat a nonstick pan over medium-high. Add the spicy sausage and cook until browned, stirring frequently for about 4-5 minutes. Once cooked, remove with a slotted spoon but keep the flavorful drippings in the pan.
  4. Scramble the Eggs: Lower the heat to low and pour in the egg mixture. Cook gently, stirring occasionally until the eggs are just cooked through, about 3-4 minutes. Remove from heat.
  5. Assemble the Burritos: Lay out your 10-inch tortillas on a clean surface. Spoon about ¼ cup of the avocado salsa onto each tortilla, followed by a quarter of the sausage, a quarter of the scrambled eggs, and about ⅓ cup of shredded cheese.
  6. Wrap the Burritos: Fold the sides of the tortilla over the filling, then roll it tightly from the bottom up, tucking in the edges as you go.
  7. Cook the Burritos: Heat your pan with a light coating of vegetable oil over medium heat. Place the burritos seam-side down and cook, covered, until golden brown, for about 3 minutes. Flip and cook for an additional 2-3 minutes until both sides are crispy and golden.
  8. Serve: Slice the burritos in half if desired and serve warm with remaining avocado salsa on the side.

Optional: Top with a sprinkle of fresh cilantro for added freshness.

Exact quantities are listed in the recipe card below.

Helpful Tricks for Breakfast Burritos

  • Salsa Freshness: Use ripe avocados and fresh ingredients for the best flavor in your avocado-tomato salsa; quality makes a big difference!
  • Eggs Technique: Scramble the eggs over low heat to achieve that fluffy texture; avoid overcooking for a creamy finish in your burritos.
  • Sausage Flavor: Keep the sausage drippings in the pan for cooking the eggs. This simple trick enhances the overall flavor of your breakfast burritos.
  • Tortilla Quality: Choose large, flour tortillas for a better wrap and to contain the delicious fillings; smaller ones can lead to spills!
  • Customize Spice: Adjust the jalapeño quantity based on your family’s spice tolerance, especially for children; it’ll keep the breakfast burritos enjoyable for everyone.

How to Store and Freeze Breakfast Burritos

Room Temperature: Store leftover breakfast burritos at room temperature for up to 2 hours; they are best enjoyed fresh but can be eaten slightly warm.

Fridge: Keep burritos wrapped in foil or placed in an airtight container in the fridge for up to 3 days; reheat in the microwave or oven for best results.

Freezer: Freeze any unassembled burritos by wrapping tightly in plastic wrap and aluminum foil for up to 3 months; skip the salsa before freezing if unsure about texture.

Reheating: To reheat frozen breakfast burritos, thaw overnight in the fridge, then warm in the microwave or oven until heated through; enjoy them warm for a comforting meal!

What to Serve with Breakfast Burritos?

Creating a delightful meal experience is just as important as the dish itself.

  • Crispy Hash Browns: The golden crunch of hash browns provides a satisfying contrast to the soft burrito texture. A sprinkle of seasoning elevates their flavor!
  • Fresh Fruit Salad: A colorful mix of seasonal fruits adds brightness and a refreshing sweetness that balances the savory burritos. Think juicy oranges, tart apples, and ripe berries.
  • Zesty Breakfast Potatoes: Roasted or sautéed with bell peppers and onions, these potatoes bring a satisfying heartiness that complements the spices in your burrito.
  • Smooth Avocado Toast: The creamy goodness of avocado toast offers a delightful counterpart to the bold flavors of the burritos, making for an extra boost of healthy fats at breakfast.
  • Spicy Pickled Jalapeños: For those who crave heat, pickled jalapeños provide an exciting kick that enhances each bite of the burrito. They’re a simple and zesty addition!
  • Iced Cold Brew: Paired with your meal, an iced cold brew coffee brings a refreshing jolt and brightens the flavor palette, creating the perfect breakfast vibe!
  • Homemade Salsa Verde: A vibrant, tangy salsa verde can add a new dimension to your burrito experience, brightening the flavors and making each bite sing!
  • Caramelized Onions: Sweet, tender caramelized onions take your breakfast burrito to the next level, adding depth and a hint of sweetness that harmonizes beautifully.
  • Cilantro Lime Rice: Serve some fluffy cilantro lime rice on the side for a burst of freshness, creating a deliciously cohesive Tex-Mex experience.
  • Churros for Dessert: End your meal with a sweet touch! Lightly dusted with cinnamon sugar, churros make for a perfect dessert that everyone will adore.

What to Serve with Breakfast Burritos?

Indulging in these flavorful bundles opens the door to a world of delightful pairings that elevate any meal.

  • Fresh Fruit Salad: A colorful medley of seasonal fruits adds a refreshing sweetness to balance the savory burritos.
  • Crisp Green Salad: Lightly dressed greens introduce a crunchy contrast and brighten the plate, making each bite feel vibrant.
  • Zesty Mexican Street Corn: Charred corn coated in lime and cotija cheese creates a creamy, tangy side that pairs perfectly with the burritos.
  • Spicy Black Beans: Rich, hearty black beans seasoned with spices offer a protein-packed side that complements the burritos’ flavor journey.
  • Savory Breakfast Potatoes: Crispy, seasoned potatoes provide a hearty texture that rounds out your meal and fills you up with warmth.
  • Chilled Horchata: This sweet, refreshing rice milk drink soothes the spiciness of the burritos beautifully, making it a delightful beverage choice.
  • Classic Margarita: Serve up a smooth margarita to elevate the festive atmosphere and perfectly balance the burritos with its citrus notes.
  • Chocolate Chip Cookies: For dessert, warm cookies bring a classic sweetness, offering a nostalgic finish to your satisfying meal.

FAQs About Breakfast Burritos

These questions can help you master your breakfast burritos and make the most of this delicious recipe!

What should I put in a breakfast burrito?

Include ingredients like eggs, sausage, cheese, and your choice of veggies or salsas for added flavor.

What does a breakfast burrito contain?

Typically, breakfast burritos are filled with scrambled eggs, meats like sausage or bacon, and fresh toppings like cheese and salsa.

Is a burrito healthy for breakfast?

Depending on the ingredients and portion size, breakfast burritos can be a balanced meal, providing protein and veggies.

What is the secret to the best burrito?

Using fresh ingredients, balancing flavors, and knowing how to properly wrap the burrito for a secure seal are key!

What does McDonald’s put in their breakfast burritos?

They often include scrambled eggs, sausage, cheese, and peppers, wrapped luxuriously in a soft tortilla.

Do you toast a burrito?

Yes! Toasting a burrito can enhance its texture, creating a delightful crispy layer—so don’t skip that step!

[tasty-recipe id=”1196″]

Filed Under: Sandwiches

Smoked Brisket Grilled Cheese Sandwich

January 14, 2025 by grace bellamy Leave a Comment

Smoked Brisket Grilled Cheese Sandwich Recipe

A mouthwatering smoked brisket grilled cheese sandwich, golden-brown crispy bread, oozing melted cheese, tender smoky brisket chunks, garnished with fresh herbs, served on a rustic wooden board, with a side of dipping sauce and pickle slices, warm and inviting atmosphere.

Grilled cheese gets a new twist with this ultimate comfort food mashup. It turns leftover slow cooker barbequed beef ribs into a delicious sandwich. By mixing tender smoked brisket with melted cheese, you’ll make a gourmet version of the classic grilled cheese.

Your bbq beef ribs become the main attraction in this indulgent recipe. It’s a great way to use leftovers to make a tasty meal. The slow cooker recipes you’ve learned can now be showcased in this innovative sandwich. It promises rich flavors and amazing textures.

Key Takeaways

  • Transform leftover brisket into a gourmet sandwich
  • Perfect for using slow-cooked meats creatively
  • Combines classic comfort food with barbecue techniques
  • Quick and easy preparation in under 10 minutes
  • Versatile recipe adaptable to different cheese combinations
  • Ideal for lunch, dinner, or casual entertaining

The Perfect Marriage of Smoked Brisket and Grilled Cheese

Turning a classic comfort food into a gourmet dish takes creativity and the right ingredients. Smoked brisket makes the grilled cheese sandwich a whole new level of delicious. It creates a mix of flavors that will excite your taste buds.

A mouthwatering smoked brisket grilled cheese sandwich, featuring layers of tender smoked brisket, melted gooey cheese, and crispy golden-brown bread, served on a rustic wooden cutting board with a side of tangy pickles and a smoky dipping sauce, natural light highlighting the delicious textures and colors.

Why Leftover Brisket Makes the Best Sandwiches

Leftover crockpot ribs or smoked beef ribs change the game for sandwich fans. These meats are tender and full of flavor, adding depth that fresh meats can’t. When you slice them thin and put them between crispy bread, it’s pure magic.

  • Leftover meats develop more intense flavors over time
  • Tender texture makes slicing and layering easy
  • Reduces food waste by repurposing previous meals

History of Elevated Grilled Cheese Sandwiches

“A great sandwich is an art form that transforms simple ingredients into something extraordinary.”

Chefs and home cooks have been making the classic grilled cheese their own for years. From simple cheese between bread to fancy creations, it shows our love for new flavors and creativity.

Benefits of Using Smoked Brisket

Smoked brisket adds special benefits to your sandwich:

  1. Rich, smoky flavor that goes well with melted cheese
  2. It’s packed with protein and very satisfying
  3. It works well with many types of cheese

By using smoked brisket, you’re not just making a sandwich. You’re creating a special experience that celebrates texture, flavor, and creativity.

Smoked Brisket Grilled Cheese Sandwich

Essential Ingredients for Your Brisket Grilled Cheese

Creating the ultimate brisket grilled cheese sandwich starts with the right ingredients. Your journey begins with understanding the key components. These elements turn an ordinary sandwich into a mouthwatering masterpiece.

Selecting the Perfect Bread

Your bread choice is crucial. Choose sturdy options that can handle tender beef ribs and rich flavors:

  • Texas Toast (thick-cut, 1-inch slices)
  • Sourdough bread
  • Italian bread
  • Artisan white bread

Crafting the Ideal Cheese Combination

The right cheese blend elevates smoky beef ribs. Consider these delicious combinations:

  • Sharp Cheddar (white and yellow)
  • Monterey Jack
  • Gruyère
  • Provolone

“Great cheese melts are the secret to an unforgettable grilled sandwich” – BBQ Pitmaster

Brisket Quality and Preparation

For fall-off-the-bone ribs transformed into a sandwich, focus on these preparation tips:

  1. Use leftover smoked brisket (2-3 slices recommended)
  2. Shred meat finely for even distribution
  3. Warm brisket before assembling sandwich
  4. Add a drizzle of BBQ sauce for extra flavor

A visually appealing arrangement of brisket slices, melted gooey cheese, fresh sourdough bread, a dollop of barbecue sauce, and vibrant fresh herbs on a rustic wooden surface, with warm, inviting lighting highlighting the textures and colors.

Remember, the key to an exceptional brisket grilled cheese is balancing textures and flavors. Choose ingredients that complement each other. This creates a harmonious, delicious experience.

How to Make a Smoked Brisket Grilled Cheese Sandwich

Making the ultimate meat lover’s delight needs precision and passion. This smoked brisket grilled cheese sandwich turns leftover slow cooker barbequed beef ribs into a masterpiece. It will make your taste buds dance with joy.

To start your sandwich journey, gather these key ingredients:

  • 8 slices of thick Texas toast
  • 16 ounces of BBQ brisket
  • 8 ounces of shredded sharp cheddar cheese
  • 5 tablespoons of butter
  • 1 sweet yellow onion

Getting your sandwich right is all about preparation. Follow these easy steps:

  1. Soften butter at room temperature
  2. Spread butter generously on one side of each bread slice
  3. Layer cheese on the non-buttered side
  4. Add warm, shredded brisket
  5. Top with additional cheese
  6. Close sandwich with second bread slice

Cooking is where the magic happens. Use a cast-iron skillet on medium-low heat. Cook each side for 3-4 minutes until golden brown and cheese melts. You want a crispy outside and a gooey inside.

“A great sandwich is an art form that combines texture, temperature, and taste.” – Culinary Expert

Pro tip: Let your sandwich rest for 1-2 minutes after cooking. This lets the cheese set and flavors meld. Enjoy it hot and crispy for the best experience.

Best Cheese Combinations and Melting Techniques

Creating the perfect smoked brisket grilled cheese sandwich starts with the right cheese. Your choice can turn a simple sandwich into a masterpiece. This is true, even with leftover bbq beef ribs or crockpot ribs.

Working with Different Cheese Types

Not all cheeses melt the same. For your slow cooker recipes with brisket, try these top cheese combinations:

  • Sharp Cheddar: Provides robust flavor
  • Monterey Jack: Offers smooth melting
  • Gruyère: Creates exceptional creamy texture
  • Pepper Jack: Adds a spicy kick

Temperature Control for Perfect Melting

To get the cheese just right, you need precision. Use medium-low heat for even melting without burning the bread. Pro tip: Two slices of cheddar and two slices of Monterey Jack make the best blend.

Achieving the Golden-Brown Crust

The secret to a crispy crust is in your cooking method. Spread a thin layer of mayonnaise on the bread’s outside instead of butter. This makes a beautifully golden-brown crust that goes great with your smoky brisket.

“The right cheese can elevate a simple sandwich to a gourmet experience.” – Culinary Expert

With these tips, you’ll make your leftover brisket into a delicious grilled cheese sandwich. It’s sure to wow anyone.

Tips for Reheating and Preparing Leftover Brisket

Turning leftover smoked beef ribs into a tasty grilled cheese sandwich needs some prep. Your braised ribs can become tender again with the right reheating method.

Here are some expert tips for reviving your leftover brisket:

  • Store leftover brisket in an airtight container to keep it moist
  • Reheat slowly on the stovetop for the best texture
  • Add a splash of beef broth or BBQ sauce to prevent drying out
  • Use medium-low heat to warm the meat gently

When preparing your brisket for a grilled cheese, consider these key steps:

  1. Chop or shred about ½ cup of leftover brisket
  2. Spritz with water if using a microwave to keep it moist
  3. Choose at least two cheese varieties for maximum flavor
  4. Consider adding extras like red onions or jalapeños

“The secret to great leftover brisket is gentle reheating and adding moisture” – BBQ Pitmaster

Pro tip: Your reheated brisket can make many dishes beyond grilled cheese. Try it in omelets or on pizza for a delicious and efficient meal.

Serving Suggestions and Pairings

Your smoked brisket grilled cheese sandwich needs the perfect sides to make it special. The right pairings can turn a simple lunch into a memorable meal. It’s all about creating a culinary experience you’ll never forget.

Wine and Beer Recommendations

Choosing the right drinks is key when enjoying tender beef ribs. Here are some top picks:

  • Barbera wine: A medium-bodied red that cuts through the richness
  • Crisp Pilsner: Refreshes the palate between bites of smoky beef ribs
  • Bold Cabernet Sauvignon: Matches the intense meat flavors

Side Dish Options

These sides will enhance your sandwich with their smoky flavors:

  1. Smoked Tomato Bisque: The ultimate soup pairing
  2. Southern Style Coleslaw: Adds a fresh crunch
  3. Smoked Baked Beans: A classic BBQ companion
  4. Garlic and Rosemary Smoked Potatoes: Adds depth to your meal

Sauce and Condiment Choices

Boost your sandwich’s flavor with these options:

  • Homemade BBQ sauce
  • Specialty mustards
  • Quick Pickled Red Onions
  • Garlic aioli

“The right pairing can transform a good meal into an unforgettable dining experience.” – BBQ Enthusiast

Each choice is carefully made to make your smoked brisket grilled cheese a true delight. It will excite every taste bud you have.

Conclusion

Your journey through the world of smoked brisket grilled cheese sandwiches doesn’t end here. You’ve learned how to make slow cooker barbequed beef ribs and found creative slow cooker recipes. This sandwich is more than just a meal; it’s a celebration of flavor and texture.

Each bite is a story of careful preparation. From choosing the perfect bread to getting that golden-brown crust. It’s packed with nearly 1,000 calories, 69 grams of protein, and a mix of cheeses that make it special.

This sandwich is perfect for anyone who loves to cook. It’s a mix of traditional comfort food and gourmet cooking. It’s great for family dinners, game day, or just treating yourself.

Now it’s your turn to make this sandwich. Fire up the skillet and gather your ingredients. You’ll create a sandwich that will become a favorite in your kitchen. The magic of turning leftover brisket into a grilled cheese is just a few steps away.

FAQ

Can I use any type of bread for a smoked brisket grilled cheese sandwich?

You can pick from many bread types, but choose a sturdy one. Sourdough, Texas toast, or thick-cut artisan bread are great. They give a crispy outside and a strong base for your sandwich.

How do I prevent my brisket from drying out when reheating for a grilled cheese?

To keep brisket moist, reheat it gently. Add beef broth or BBQ sauce in a skillet. Or, use a low oven with foil to cover it. This way, it stays moist and doesn’t dry out.

What are the best cheese combinations for a smoked brisket grilled cheese?

Great cheese combos include sharp cheddar with smoked gouda. Or, try a mix of monterey jack and pepper jack. Gruyère and white cheddar also work well. These cheeses melt beautifully and add a creamy texture.

Can I make this sandwich with store-bought brisket?

Yes, you can! Store-bought brisket from the deli counter works well. Just make sure it’s moist and well-seasoned for the best taste.

What’s the best way to get a perfectly crispy golden-brown crust?

Butter or mayonnaise on the bread helps get a golden crust. A cast-iron skillet is best for even heat. Cook on medium-low to melt the cheese and get a crispy crust.

How long can I store leftover brisket for sandwiches?

Cooked brisket can stay in the fridge for 3-4 days. Keep it in an airtight container to keep it moist. You can freeze it for up to 2-3 months, wrapped well to avoid freezer burn.

What are some good wine or beer pairings for this sandwich?

For wine, try a bold Barbera or a medium-bodied Zinfandel. Beer fans might like a crisp Pilsner, a hoppy IPA, or a rich amber ale. These drinks match the smoky brisket and balance the sandwich’s richness.

Filed Under: Sandwiches

RecipeCrown

Hello, beautiful people! I’m Grace Bellamy, a foodie, traveler, and writer with wanderlust in my soul. Whether crafting recipes in my kitchen or exploring flavors around the globe, my greatest joy is helping you create healthier, happier lives, one delicious bite at a time.