
As I rummaged through my pantry the other day, I stumbled upon a treasure trove of Chips Ahoy cookies, just waiting to become something spectacular! That’s when the idea of making Monster Sandwich Cookies hit me—a delightfully fun twist on classic cookies that’s sure to enchant both kids and adults alike. These sweet treats pack a playful punch, combining creamy, colorful frosting with those iconic crunchy cookies, making them the perfect addition to any Halloween gathering or a cozy family night in. With just 20 minutes of prep, you’ll create a crowd-pleasing dessert that’s as enjoyable to make as it is to eat. So, are you ready to unleash your inner pastry monster and whip up a batch of these adorable cookies? Let's dive in!
Why Are These Monster Cookies So Fun?
Endless creativity: With vibrant food coloring, you can customize your frosting to match any holiday theme!
Quick and easy: In just 20 minutes, you can whip up these delightful treats—perfect for those with busy schedules.
Family fun: Get everyone involved in assembling the cookies; kids love creating their own spooky designs with candy eyes!
Crowd-pleaser: Whether for a party, potluck, or a cozy night at home, these cookies will thrill both kids and adults alike.
Perfect for storage: They can easily be made ahead of time and stored, ensuring you always have a treat on hand. Check out how to make them last with our tips for cookie storage!
Monster Sandwich Cookies Ingredients
Here’s everything you need to whip up these delightful Monster Sandwich Cookies!
For the Cookies
- Chips Ahoy Cookies – 36-40 pieces are the perfect crunchy base for your delightful sandwiches.
For the Frosting
- Unsalted butter – 1 cup (2 sticks) softened makes for a creamy and smooth frosting.
- Powdered sugar – 4 cups provide that sweet, fluffy texture we all adore.
- Milk or heavy cream – 2-3 tablespoons help achieve the right consistency for spreading.
- Vanilla – 2 teaspoons add a deliciously sweet depth to your frosting.
For the Decoration
- Food coloring – Use vibrant Halloween colors to make your Monster Sandwich Cookies festive and fun!
- Candy eyes – Essential for giving your cookies character and a spooky touch.
Step‑by‑Step Instructions for Monster Sandwich Cookies
Step 1: Prepare the Frosting
In a medium bowl, using an electric mixer, beat 1 cup of softened unsalted butter and 4 cups of powdered sugar together on medium speed until the mixture is light and fluffy, about 2-3 minutes. Add 2 teaspoons of vanilla and 2-3 tablespoons of milk or heavy cream to achieve a creamy consistency. Mix until everything is well combined, then set the bowl aside to focus on the colorful frosting.
Step 2: Color the Frosting
Divide the fluffy frosting into separate bowls based on how many colors you'd like to use for your Monster Sandwich Cookies. Add vibrant food coloring to each bowl, stirring well until the colors are bright and vivid. Feel free to mix and create custom colors to embody the spirit of Halloween! This is where your creativity can shine, so have fun with it!
Step 3: Prepare the Cookies
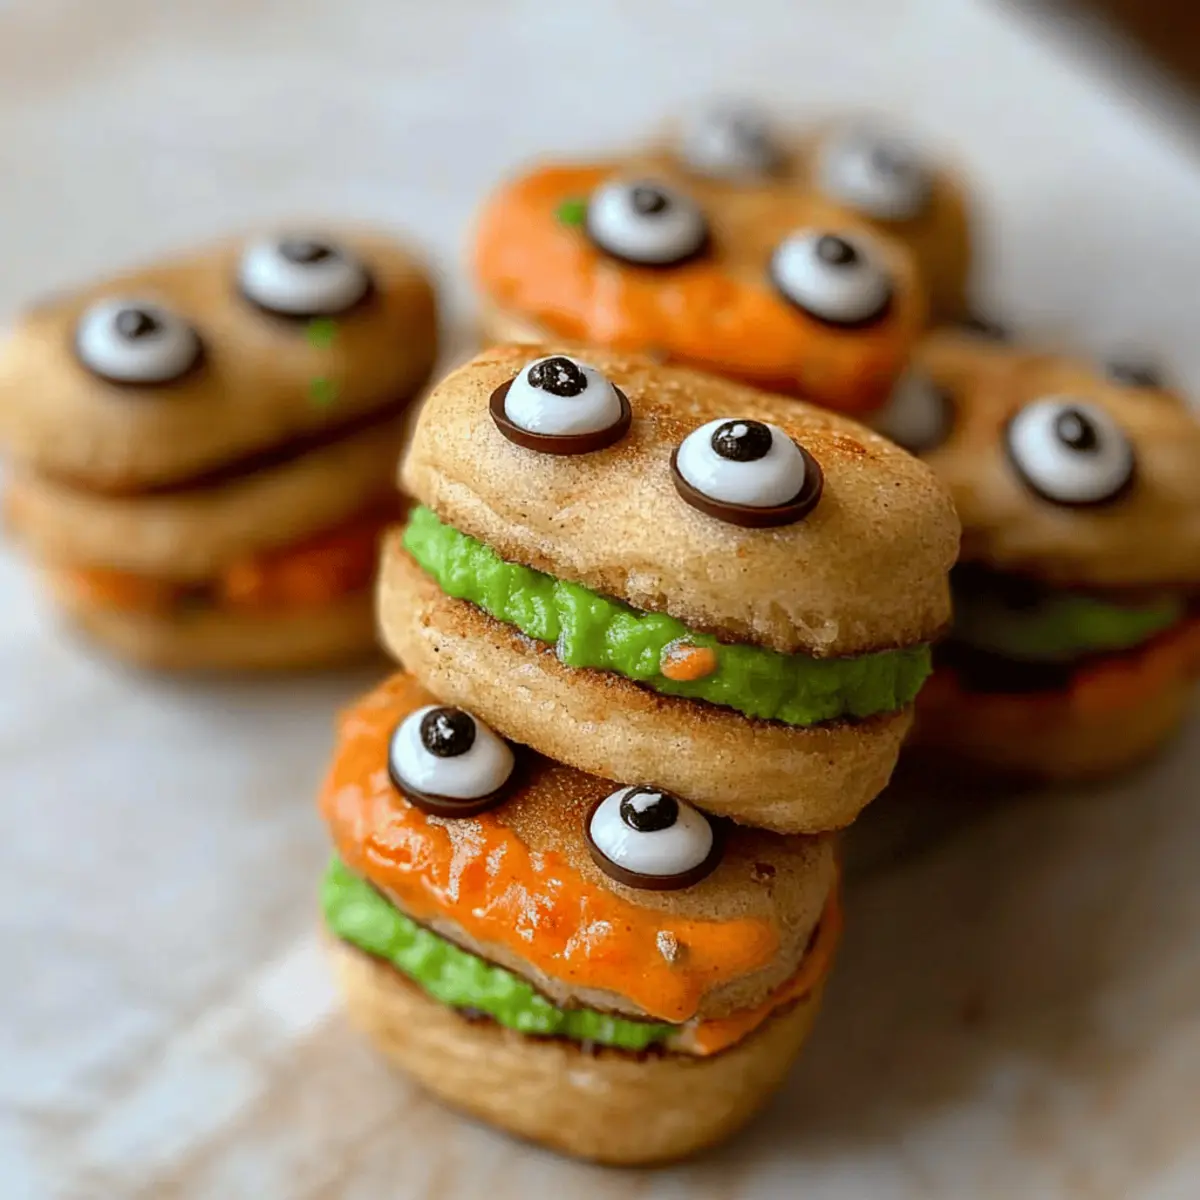
Take 36-40 Chips Ahoy cookies and match them into pairs based on size—this ensures uniformity for your cookie sandwiches. Once matched, flip one cookie in each pair upside down so that the flat side is facing up. This is where the exciting assembly begins, and you'll see how delightful these Monster Sandwich Cookies can be!
Step 4: Assemble the Cookie Sandwiches
Using a piping bag or a knife, generously pipe or spread a dollop of your colorful frosting onto the flat side of the upside-down cookie. Gently press the matching cookie on top to create a perfect sandwich, ensuring the frosting peeks out from the edges—this adds to the fun, monstrous look of your cookies!
Step 5: Add Candy Eyes
While the frosting is still soft, it’s the perfect time to add the finishing touches! Press candy eyes into the sides of the frosting on each assembled Monster Sandwich Cookie. Position the eyes according to your wild imagination—this is where your cookies truly come to life with their spooky personalities and playful charm!

Expert Tips for Monster Sandwich Cookies
-
Frosting Consistency: Ensure the frosting is creamy, not too thick or runny. This will make it easier to pipe and spread on the cookies.
-
Colorful Creations: Use gel food coloring for more vibrant hues. Liquid food coloring may dilute the frosting too much.
-
Cookie Pairing: Match cookies carefully by size to avoid uneven sandwiches; this keeps them looking neat and festive!
-
Assembly Time: Work quickly when pressing in candy eyes; the frosting will set as it sits, which may make them harder to attach later.
-
Storage Tips: Store your Monster Sandwich Cookies in an airtight container, but refrigerate if you have added candy eyes to keep them from melting in humidity.
What to Serve with Monster Sandwich Cookies
Delightful and whimsical, these cookies bring joy to any gathering and can be complemented by a variety of tasty treats.
-
Warm Milk: A classic partner, warm milk soothes and enhances the sweetness of your Monster Sandwich Cookies.
-
Spooky Fruit Salad: Combine seasonal fruits like oranges, apples, and grapes for a fresh, fruity contrast to the cookies’ sweetness. Kids love the vibrant look!
-
Pumpkin Spice Latte: The cozy flavors of this seasonal drink perfectly match the festive spirit of your cookies, making for a comforting pairing.
-
Vanilla Ice Cream: Creamy, cold vanilla ice cream adds a delightful chill to the warm flavors of the cookies, creating an indulgent dessert experience.
-
Hot Cocoa: Cozy up with some rich hot cocoa, the chocolatey richness harmonizes beautifully with the sweet frosting and crunchy textures.
-
Cinnamon Sugar Popcorn: Add a crunch with sweet and spicy popcorn; it offers a fun, festive crunch that balances the soft cookie texture.
-
Chocolate Dipped Pretzels: The salty-sweet combo makes for a perfect snack to enjoy alongside your cookies, bringing a delightful mix of flavors and textures.
-
Milkshakes: A fun, thick milkshake can be a playful addition, perfect for dunking those Monster Sandwich Cookies and getting extra creamy goodness.
Make Ahead Options
These Monster Sandwich Cookies are perfect for meal prep enthusiasts looking to save time during busy weeks! You can prepare the colorful frosting up to 3 days in advance, storing it in airtight containers in the refrigerator. To maintain quality, make sure to cover the frosting closely to prevent it from drying out. You can also assemble the cookies up to 24 hours ahead of time; just store the finished sandwiches in an airtight container at room temperature. When you’re ready to serve, simply add the candy eyes just before enjoying—they'll keep your cookies looking fresh and spooky! Enjoy these delightful treats without the last-minute rush!
Monster Sandwich Cookies Variations
Feel free to let your imagination run wild and customize these delightful cookies to suit your taste!
-
Gluten-Free: Substitute regular Chips Ahoy with gluten-free cookies and enjoy the same spooky delight without the gluten.
-
Nutty Flavor: Add a spoonful of almond or peanut butter to the frosting for a nutty twist that’s sure to enhance the flavors. Your friends will love this crunchy surprise!
-
Chocolate Lovers: Use chocolate frosting instead of vanilla, or fold in mini chocolate chips for an extra cocoa hit. A chocolatey delight awaits!
-
Spicy Kick: Incorporate a dash of cayenne or cinnamon into your frosting for a surprising warm flavor that adds an exciting twist. It’s a delightful way to bring some heat to classic sweetness!
-
Fruit Fusion: Consider adding lemon or orange zest to the frosting for a zesty burst of freshness, creating a delicious balance with the sweetness of the cookies. Your taste buds will be grateful!
-
Vegan Version: Replace butter with coconut oil and use plant-based milk in the frosting. Use vegan cookies for a treat everyone can enjoy!
-
Rainbow Delight: Layer multiple colors of frosting in each sandwich to make a tie-dye effect, adding a visual feast alongside the delicious flavor. It’s an art project you can eat!
-
Crunchy Topping: Sprinkle crushed candy corn or Halloween sprinkles on top before the frosting sets for a cheerful, crunchy finish that captures the spirit of the season. Perfect for hosting your next Halloween bash!
Whether you’re celebrating spooky season or just in the mood for a treat, each variation offers a unique twist on these beloved cookies. And if you’re keen to whip up something special that pairs perfectly with your cookies, check out our tips for cookie storage or explore how to create an enchanting atmosphere with spooky treats. Happy baking!
How to Store and Freeze Monster Sandwich Cookies
Airtight Container: Store your Monster Sandwich Cookies in an airtight container at room temperature for up to 3 days to maintain their delicious freshness.
Refrigeration: For longer storage, keep the cookies in the fridge for up to a week. This helps preserve the frosting, especially if you've added candy eyes.
Freezer: If you'd like to freeze your cookies, place them in a single layer on a baking sheet until frozen. Then, transfer them to a freezer-safe bag, where they can be stored for up to 2 months.
Reheating: To enjoy, simply let them thaw at room temperature. If desired, you can gently warm them in the microwave for a few seconds to refresh that soft, gooey texture.

Monster Sandwich Cookies Recipe FAQs
What's the best way to choose the right Chips Ahoy cookies?
Absolutely! When selecting Chips Ahoy cookies, look for those without any visible damage or cracks. Check the expiration date to ensure freshness, as this will affect the flavor and texture of your Monster Sandwich Cookies. If possible, choose ones with a slightly soft texture, as they will sandwich better with the frosting.
How should I store my Monster Sandwich Cookies?
For optimal freshness, store your Monster Sandwich Cookies in an airtight container at room temperature for up to 3 days. If you’ve added candy eyes, it’s best to refrigerate them, where they can last up to a week. Just remember, humidity can affect the frosting, so keep them sealed tight!
Can I freeze Monster Sandwich Cookies?
Definitely! To freeze your Monster Sandwich Cookies, place them in a single layer on a baking sheet until they are frozen completely. Then, transfer them to a freezer-safe bag, ensuring all the air is removed to prevent freezer burn. They’ll stay delicious for up to 2 months. When you're ready to enjoy, simply thaw at room temperature or warm them briefly in the microwave for that fresh-baked taste!
What if the frosting is too thick or too runny?
No worries! If your frosting is too thick, add milk or heavy cream one tablespoon at a time until you reach the desired consistency. Conversely, if it’s too runny, you can gradually add more powdered sugar until it thickens up. Aim for a creamy yet spreadable consistency that holds its shape when piped.
Are there any dietary considerations for my guests?
Very! If you’re serving these Monster Sandwich Cookies to guests, it's wise to consider allergies. Chips Ahoy cookies contain wheat and dairy, so be mindful of any gluten or lactose intolerances. You can also explore gluten-free cookie options or dairy-free butters to accommodate various dietary needs while still keeping the fun factor strong!

Deliciously Spooky Monster Sandwich Cookies for Halloween Fun
Ingredients
Equipment
Method
- In a medium bowl, using an electric mixer, beat 1 cup of softened unsalted butter and 4 cups of powdered sugar together on medium speed until light and fluffy, about 2-3 minutes. Add 2 teaspoons of vanilla and 2-3 tablespoons of milk or heavy cream to achieve creamy consistency.
- Divide the frosting into separate bowls based on colors desired. Add food coloring to each bowl, stirring well until colors are bright and vivid.
- Take 36-40 Chips Ahoy cookies, match them into pairs based on size, and flip one cookie of each pair upside down.
- Using a piping bag or knife, pipe or spread a dollop of colorful frosting onto the flat side of the upside-down cookie. Press the matching cookie on top to create a sandwich.
- While the frosting is still soft, press candy eyes into the sides of the frosting on each assembled cookie.


Leave a Reply