
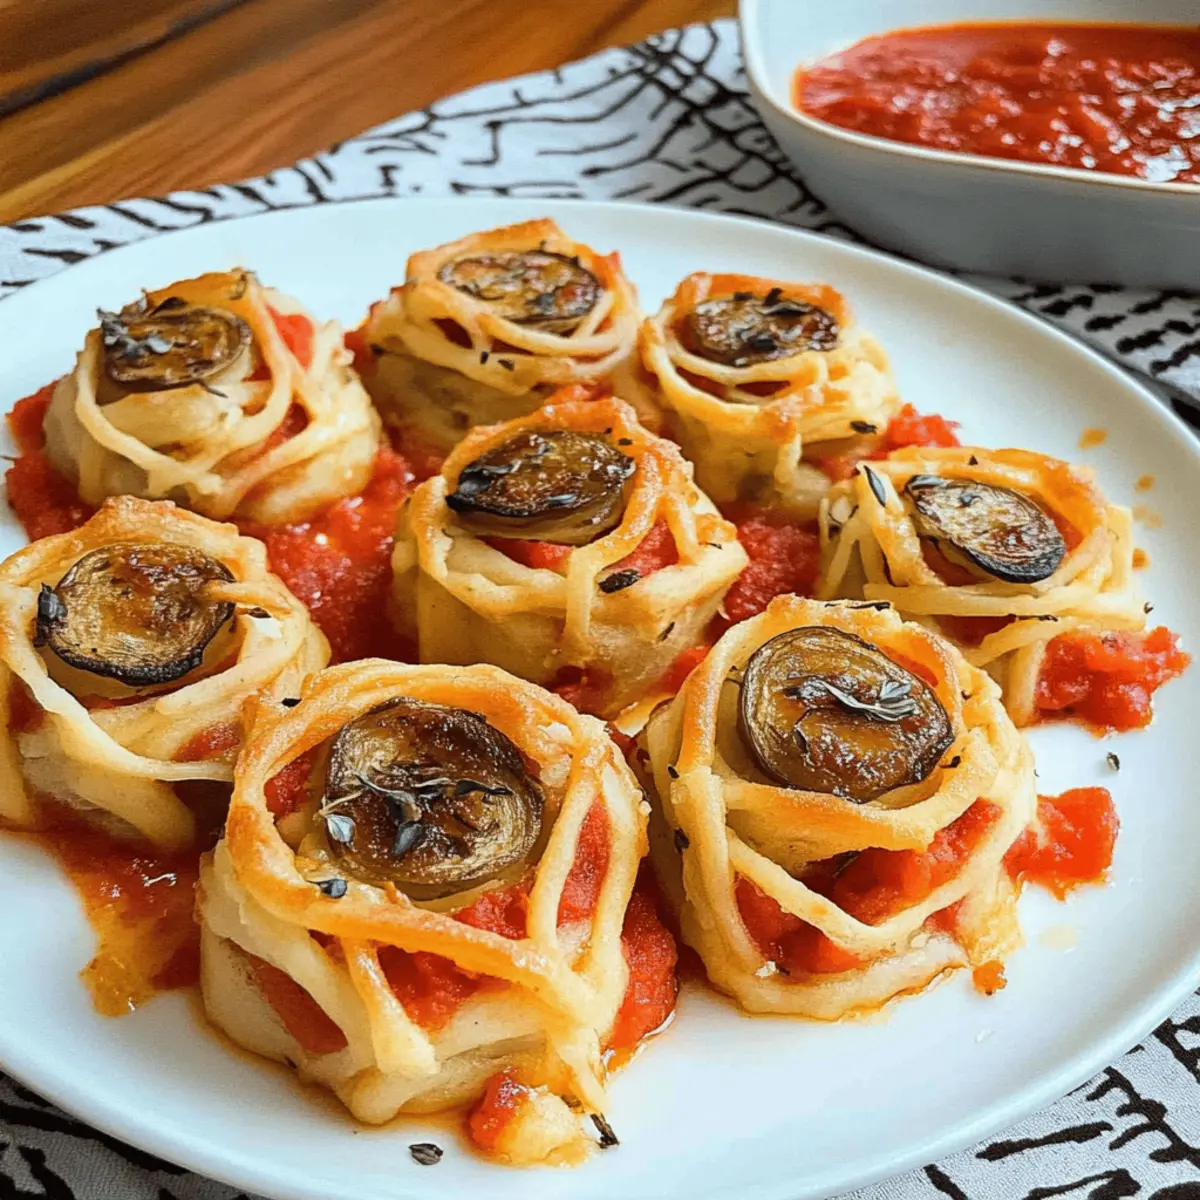
As the sun dips low and autumn leaves start swirling, the excitement of Halloween creeps into my kitchen. There's something wonderfully whimsical about Halloween Mummy Meatballs that brings a smile to all ages. These spooky little bites are not only a fun way to get everyone involved in the cooking process, but they're also super quick to whip up—perfect for those busy pre-trick-or-treating nights! With just a handful of ingredients, including crescent roll dough and your favorite meatballs, you can create a dish that truly impresses guests and family alike. Whether you serve them on a bed of pasta or with tasty dipping sauces, these mummies are bound to steal the show. Ready to turn your kitchen into a frightfully delightful food scene? Let’s dive in!
Why Everyone Loves Halloween Mummy Meatballs?
Quick and Easy: With just 30 minutes from start to finish, these delightful bites fit perfectly into your hectic Halloween schedule.
Creepy and Cute: The spooky appearance of these mummies is sure to captivate both kids and adults!
Customizable Flavor: Feel free to use your favorite meatballs or experiment with different sauces to create a dish that satisfies everyone’s tastes.
Hands-On Fun: This recipe is a fantastic way to get the whole family involved, making lasting memories in the kitchen.
Crowd-Pleasing Appeal: Perfect as an appetizer for parties, they’re destined to become a Halloween favorite that keeps your guests coming back for more!
Ready to impress? Serve these Halloween Mummy Meatballs on a spooky platter and watch as they disappear!
Halloween Mummy Meatballs Ingredients
Get ready to create some spooky deliciousness!
For the Mummies
- Meatballs – Use about 16 meatballs, approximately 1.5 inches wide, for the perfect spooky base!
- Crescent Roll Dough – ½ package (14 oz) provides the bandages that make these Halloween Mummy Meatballs fun and festive!
For the Eyes
- Pepperoni – 3 slices work wonderfully, but feel free to get creative with other eye options like olives for a healthier twist!
For Serving
- Dipping Sauce – Choose your desired sauce for serving; marinara or a tangy ranch dressing could complement the meatballs beautifully.
Have everything ready? Let’s wrap those meatballs in some dough and make Halloween a hit!
Step‑by‑Step Instructions for Halloween Mummy Meatballs
Step 1: Preheat the Oven
Begin by preheating your oven to 400°F (200°C). This step is crucial to ensure that your Halloween Mummy Meatballs bake evenly and achieve that delightful golden-brown color. While the oven heats up, you can prepare the crescent roll dough, making your workflow smoother and more efficient.
Step 2: Prepare the Dough
Unwrap the crescent dough and slice half of the package into thin strips, about ¼ inch wide. These strips will create the bandages that give your meatballs their spooky mummy look. Lay the strips out on your work surface, making it easy to grab them as you wrap the meatballs.
Step 3: Wrap the Meatballs
Take one to two strips of dough and carefully wrap them around each meatball. Begin at the top, holding one end in place with your hand, and gently pull the dough to stretch it around in a haphazard pattern. Make sure to press the dough into itself to secure the strips, ensuring each mummy is tightly wrapped and ready for baking.
Step 4: Repeat the Process
Continue wrapping all the meatballs with the remaining dough strips, using additional leftovers to layer on more bandages if you desire a fuller mummy look. Be creative as you go—no two mummies need to look the same! Once wrapped, place them on a baking sheet lined with parchment paper for an easier cleanup.
Step 5: Bake the Mummies
Slide your baking sheet into the preheated oven and bake the Halloween Mummy Meatballs for about 12-15 minutes. Keep an eye on them, looking for that perfect golden brown color on the dough. You’ll know they’re ready when the meatballs are heated through and the dough is crispy.
Step 6: Prepare the Eyes
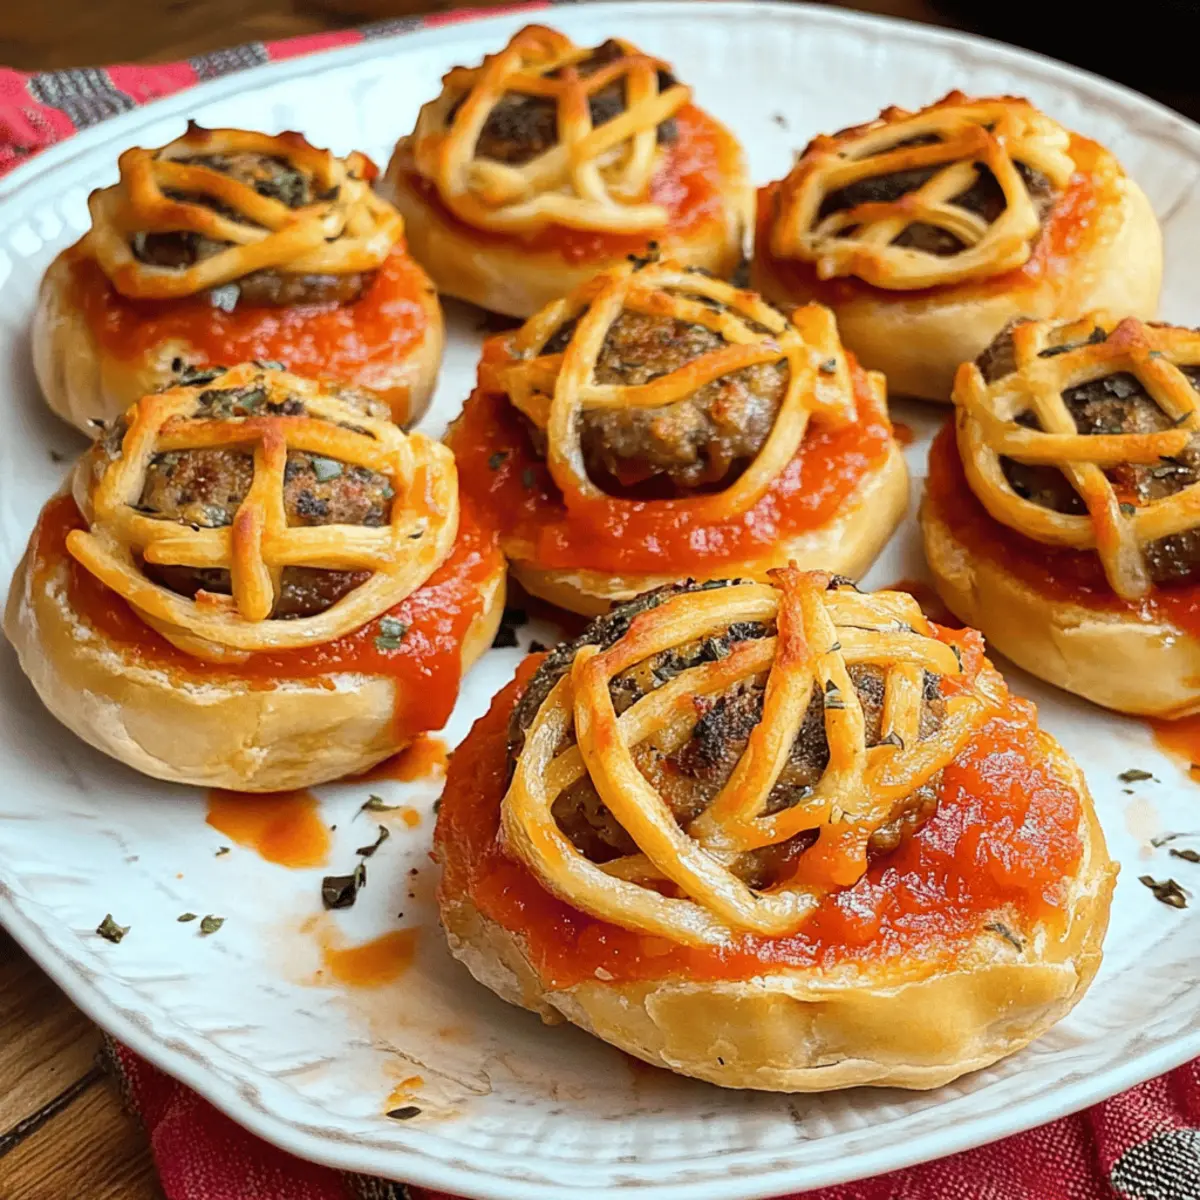
While the meatballs are baking, take the time to cut small circles from the pepperoni slices to use as eyes for your mummies. This is a great chance to enlist kids or family members to help out! The eye details will add a fun final touch to your spooky creations, so ensure you have enough for each meatball.
Step 7: Attach the Eyes
After the meatballs have cooled slightly, take a little bit of sauce or a drop of water and adhere two pepperoni eyes on each mummy. Use your fingers for precision, ensuring each mummy has its unique expression. This step is perfect for bringing your Halloween Mummy Meatballs to life!
Step 8: Serve and Enjoy
Now that your mummies look fabulous, serve them warm on a platter, optionally atop a bed of pasta or alongside your favorite dipping sauce. Whether it’s marinara or ranch dressing, these Halloween Mummy Meatballs are sure to impress all your guests and become a festive highlight of your Halloween festivities!

Halloween Mummy Meatballs Variations
Feel free to let your creative side shine as you personalize these spooky delights!
-
Gluten-Free: Substitute crescent roll dough with gluten-free dough options to cater to gluten sensitivities.
-
Spicy Twist: Add some crushed red pepper flakes to the sauce for a kick that will wake up your taste buds!
-
Cheesy Mummies: Sprinkle finely shredded cheese underneath the dough for extra gooeyness and a delicious flavor burst.
-
Veggie Option: Swap meatballs for roasted chickpeas or zucchini rounds for a fabulous vegetarian twist. They’ll still be creepy and utterly delicious!
-
Taco-Inspired: Use taco-seasoned meatballs and top them with jalapeño slices for an exciting and spicy adventure. Your guest's taste buds will be in for a surprise!
-
Herb-Infused Dough: Incorporate dried herbs like oregano or basil into your dough for an aromatic flavor that adds depth to your mummies.
-
Nutty Crust: For texture, create a crust with crushed nuts mixed into the dough wrap; it’ll add a satisfying crunch.
-
Extra Eyes: If you're feeling extra playful, use slices of olives or even mini cherry tomatoes as alternative eyeball options to make your mummies even more fun!
No matter how you choose to mix things up, these variations ensure everyone at your table delights in the spooky festivities. You can even pair them with a vibrant Halloween-themed salad or some deliciously creamy Pumpkin Pasta to complete your meal!
Make Ahead Options
These Halloween Mummy Meatballs are perfect for meal prep enthusiasts wanting to save time before the Halloween festivities! You can prepare the meatballs and wrap them in crescent dough up to 24 hours in advance; simply refrigerate them on a baking sheet, covered tightly with plastic wrap, to keep them fresh. When you’re ready to serve, preheat the oven and bake the mummies directly from the fridge for about 15-18 minutes until the dough is golden brown and the meatballs are heated through. Just remember to prepare the pepperoni eyes right before serving to ensure they stay vibrant and fun! You’ll have a delightful dish that’s just as delicious and ready to impress guests with minimal last-minute effort.
Expert Tips for Halloween Mummy Meatballs
-
Dough Consistency: Use fresh, refrigerated crescent roll dough for the best wrap consistency. Avoid overworking it to maintain its flakiness.
-
Even Baking: Make sure meatballs are spaced apart on the baking sheet to allow even heat distribution, ensuring a perfect golden brown on all sides.
-
Creative Eyes: If you want to switch things up, consider using sliced olives or even small pieces of mozzarella instead of pepperoni for your Halloween Mummy Meatballs' eyes.
-
Keep It Light: For a lighter version, substitute turkey or chicken meatballs, reducing calories while still delivering delicious flavor.
-
Serving Options: Serve with a selection of sauces, like spicy marinara or creamy ranch, to cater to all tastes at your Halloween gathering.
-
Cooking Timing: Regularly check on the meatballs as they bake; overcooking can lead to dry meatballs, while the perfect bake will keep them juicy and flavorful!
What to Serve with Halloween Mummy Meatballs
Treat your guests to a fun and flavorful feast that complements these spooky bites, creating a memorable meal for all ages.
-
Pasta Skillet: Serve over a bed of buttery spaghetti for a comforting and filling side. The pasta absorbs the delicious meatball juices, tying the meal together beautifully.
-
Garlic Breadsticks: Warm, crispy breadsticks with a hint of garlic make the perfect vehicle for any leftover dipping sauce. Their crunchy texture contrasts nicely with the softness of the meatballs.
-
Crispy Salad: A fresh garden salad with crunchy vegetables like cucumbers and carrots adds a refreshing contrast. The brightness of the veggies balances the rich flavors of the mummies while keeping everything light.
-
Cheesy Cauliflower Bake: This creamy, cheesy dish can add a decadent touch to your Halloween spread. The subtle flavor of cauliflower pairs well with the savory meatballs, creating a balanced meal.
-
Roasted Brussels Sprouts: Caramelized Brussels sprouts provide a delightful earthy element that enhances your Halloween Mummy Meatballs. Their crispy edges and tender insides make them a delicious addition.
-
Spooky Punch: A fun Halloween-themed drink, like a fruity punch with floating eyeball-shaped ice cubes, is sure to wow your guests. The refreshing flavors will cleanse their palates and keep everyone hydrated during the festivities.
-
Chocolate Graveyard Cupcakes: For dessert, serve these playful cupcakes topped with crumbled cookies to resemble dirt and gummy worms. The rich chocolate flavor complements the savory meatballs, adding a sweet surprise to the spooky night.
Bring your Halloween celebration to life with these perfect pairings that will complement the delightful Halloween Mummy Meatballs!
How to Store and Freeze Halloween Mummy Meatballs
Fridge: Store leftover Halloween Mummy Meatballs in an airtight container in the fridge for up to 3 days. This helps maintain their fresh taste and prevents drying.
Freezer: If you want to enjoy them later, freeze the wrapped meatballs (uncooked or cooked) for up to 2 months. Use freezer-safe bags, removing as much air as possible for best results.
Reheating: To reheat, place thawed meatballs back in the oven at 350°F (175°C) for about 10–12 minutes, or until heated through, bringing back that delightful crispness.
Serving Tips: Consider serving with fresh dipping sauce after reheating to brighten flavors and enhance your Halloween Mummy Meatballs experience!

Halloween Mummy Meatballs Recipe FAQs
How do I select the best meatballs for this recipe?
Absolutely! For Halloween Mummy Meatballs, choose bite-sized meatballs, ideally around 1.5 inches in diameter. You can opt for beef, turkey, or chicken varieties, depending on your preference or dietary considerations. Look for meatballs that are well-seasoned and have a good structure to hold up during baking—homemade or store-bought will work beautifully!
How long can I store leftovers in the fridge?
Very! Leftover Halloween Mummy Meatballs can be stored in an airtight container in the fridge for up to 3 days. Just be sure to let them cool before sealing. To reheat, you can pop them back in the oven or microwave for a quick snack.
Can I freeze Halloween Mummy Meatballs?
Absolutely! You can freeze both uncooked and cooked Halloween Mummy Meatballs. To freeze uncooked, simply wrap them tightly in plastic wrap and place them in a freezer-safe bag, removing as much air as possible. They can be frozen for up to 2 months. When ready to cook, bake them directly from the freezer, adding an extra few minutes to the cooking time. If you’ve cooked them, cool them completely before placing them in the freezer.
What if my dough isn't sticking well to the meatballs?
No worries! If you find the crescent dough isn't adhering to your meatballs, try lightly moistening the meatball’s surface with a bit of water or sauce just before wrapping. Press the dough firmly and ensure the edges overlap slightly to help them stick together, creating that fun mummy effect. If it continues to be tricky, feel free to cut larger strips of dough for better coverage.
Can I make these Halloween Mummy Meatballs gluten-free?
The more the merrier! To accommodate gluten-free diets, you can substitute traditional crescent roll dough with gluten-free dough options. Look for gluten-free puff pastry or even gluten-free biscuit dough, which can create equally fun and delicious mummies while being suitable for those with gluten sensitivities.
Are these meatballs safe for my pet?
No! While the ingredients in Halloween Mummy Meatballs are delicious for humans, please avoid sharing them with your pets. Meatballs can contain seasonings and ingredients, like garlic or onion, that are harmful to dogs and cats. Stick to pet-safe treats for your furry friends, and enjoy these spooky bites yourself!
Halloween Mummy Meatballs That Will Wow Your Guests
Ingredients
Equipment
Method
- Preheat your oven to 400°F (200°C).
- Unwrap the crescent dough and slice half of the package into thin strips, about ¼ inch wide.
- Take one to two strips of dough and carefully wrap them around each meatball.
- Continue wrapping all the meatballs with the remaining dough strips.
- Place the wrapped meatballs on a baking sheet lined with parchment paper.
- Slide your baking sheet into the preheated oven and bake for about 12-15 minutes.
- While baking, cut small circles from the pepperoni slices to use as eyes.
- After cooling slightly, use sauce or water to attach two pepperoni eyes to each mummy.
- Serve the mummies warm on a platter with optional pasta or dipping sauce.


Leave a Reply