
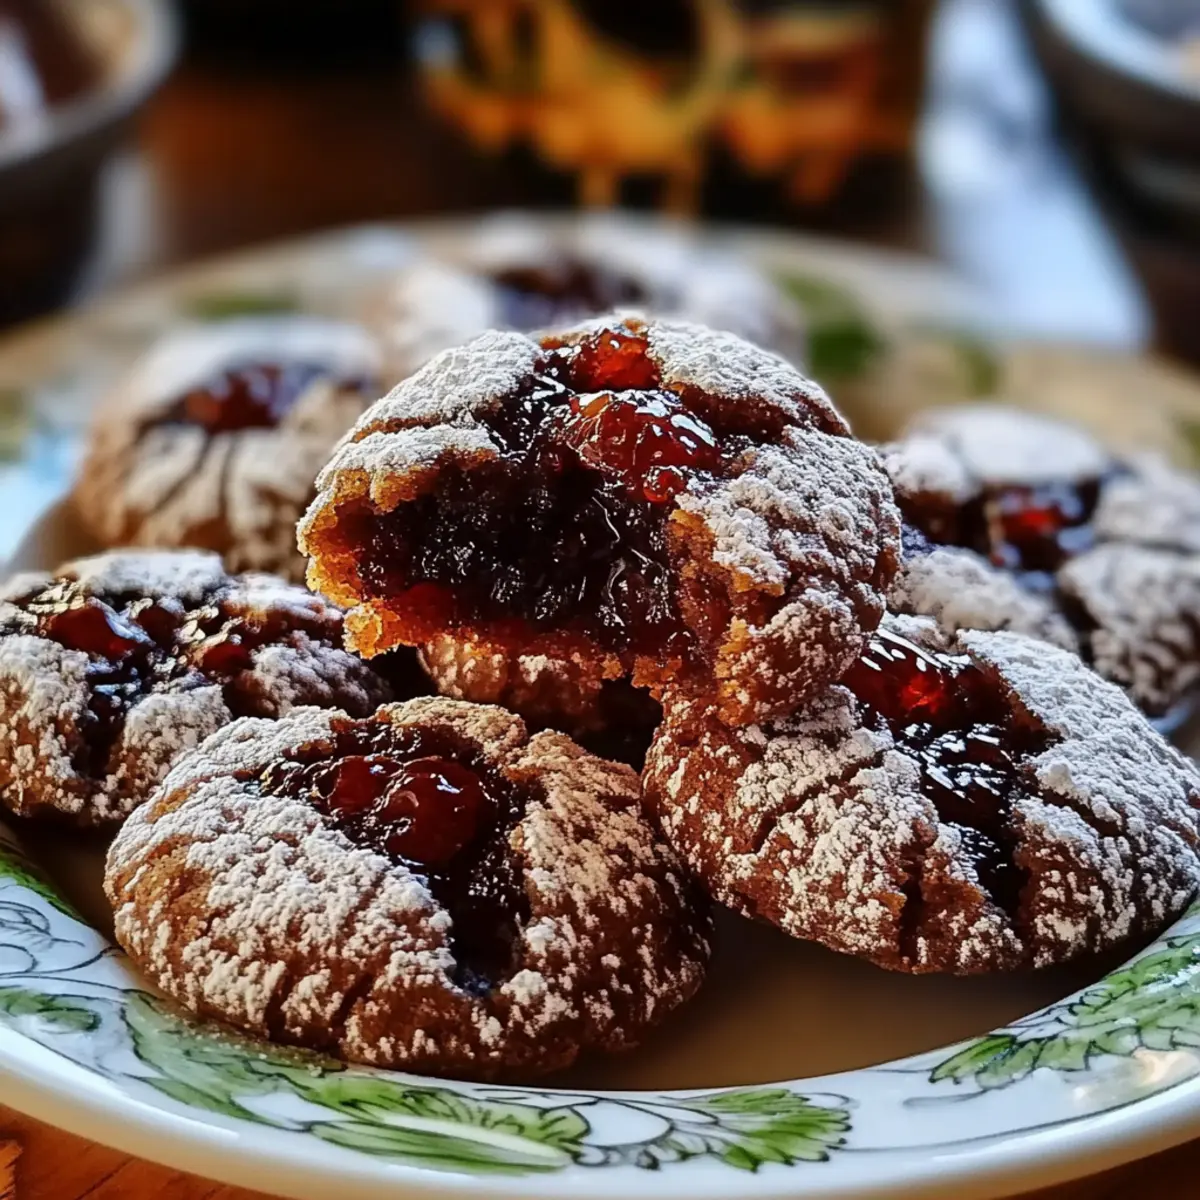
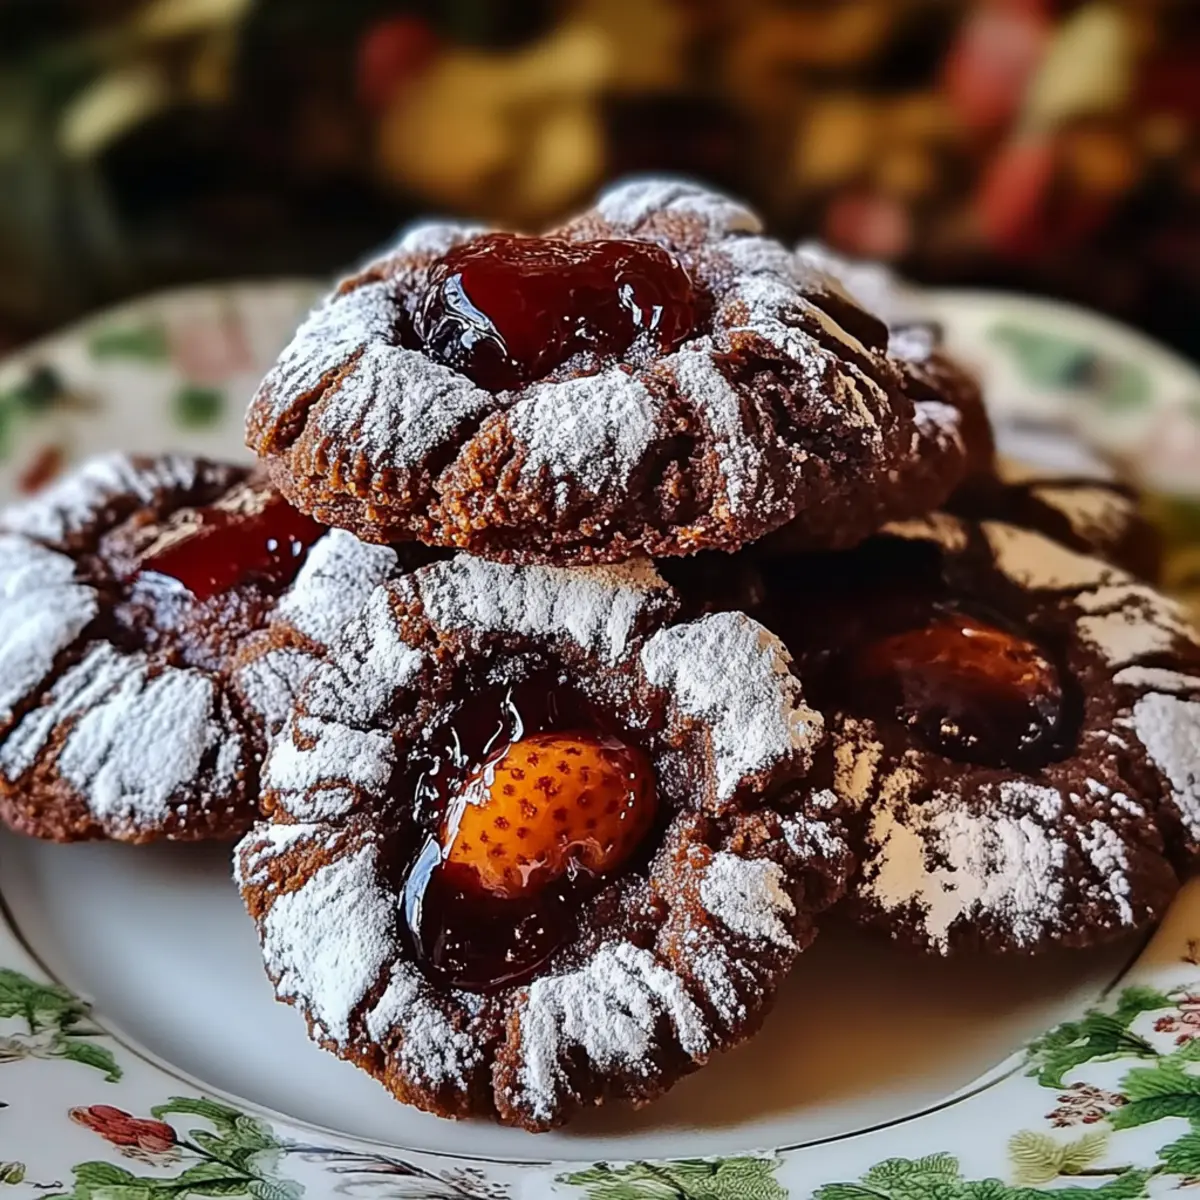
As I flipped through my well-loved recipe book, a nostalgic wave washed over me when I stumbled upon chocolate thumbprint cookies. These delightful treats evoke the warmth of cozy afternoons spent baking with loved ones, creating memories one sweet bite at a time. This recipe stands out not only for its melt-in-your-mouth texture but also for its versatility—whether you're using rich chocolate chips or a bursting jam filling, each cookie offers a moment of joy. Plus, they’re perfect for cookie exchanges or casual gatherings, guaranteed to impress without taking hours to prepare. So, are you ready to whip up a batch of these scrumptious chocolate thumbprint cookies that will leave your kitchen filled with the inviting aroma of baking?

Why Are Chocolate Thumbprint Cookies Irresistible?
Deliciously Unique: Each cookie is a delightful surprise, filled with either rich chocolate or luscious jam—perfect for every palate.
Quick and Easy: With just 40 minutes from start to finish, you can enjoy fresh-baked cookies without spending hours in the kitchen.
Impressive Presentation: The thumbprint design not only makes each cookie eye-catching but also creates a perfect vessel for your favorite fillings.
Crowd Pleaser: These cookies are sure to be a hit at parties or family gatherings, appealing to both kids and adults alike.
Memory Maker: Each bite will whisk you back to nostalgic baking moments, making these cookies more than just a treat; they're a cherished experience.
Dive into more delightful sweets by checking out our easy baking recipes that bring joy to your kitchen!
Chocolate Thumbprint Cookies Ingredients
For the Dough
- 1 cup unsalted butter, softened – This provides a rich, creamy base for your cookies.
- ⅔ cup granulated sugar – Adds sweetness and helps create a light texture.
- ⅓ cup packed brown sugar – Brings in moisture and a deep caramel flavor.
- 1 teaspoon vanilla extract – Enhances the overall flavor with a lovely aroma.
- 2 cups all-purpose flour – The main structure of your cookies, lending them that classic texture.
- ¼ cup unsweetened cocoa powder – Gives the cookies their chocolatey richness.
- ½ teaspoon salt – Balances the sweetness and enhances the chocolate flavors.
- ½ teaspoon baking powder – Helps the cookies rise slightly for a soft texture.
For the Filling
- ½ cup chocolate chips – Ideal for a decadent filling that melts beautifully.
- or favorite jam – Choose your preferred flavor to add a fruity twist.
For Dusting (optional)
- Additional powdered sugar – A light dusting can elevate the presentation and add a hint of sweetness.
Get ready to indulge in these delightful Chocolate Thumbprint Cookies that promise to warm your heart and satisfy your sweet tooth!
Step‑by‑Step Instructions for Chocolate Thumbprint Cookies
Step 1: Preheat the Oven
Start by preheating your oven to 350°F (175°C) and lining a baking sheet with parchment paper. This is essential for creating the perfect baking environment for your Chocolate Thumbprint Cookies, ensuring they crisp nicely on the edges while remaining soft in the center.
Step 2: Cream the Butter and Sugars
In a large mixing bowl, combine 1 cup of softened unsalted butter, ⅔ cup granulated sugar, and ⅓ cup packed brown sugar. Cream these ingredients together using an electric mixer on medium speed for about 2–3 minutes until the mixture turns light and fluffy, signaling that your base is ready for the heavenly cookies.
Step 3: Add Vanilla
Introduce 1 teaspoon of vanilla extract to the creamed mixture and mix until fully incorporated. The vanilla will add a delightful aroma and depth of flavor to your Chocolate Thumbprint Cookies, elevating them beyond the ordinary as you prepare the dough.
Step 4: Combine Dry Ingredients
In a separate bowl, whisk together 2 cups of all-purpose flour, ¼ cup unsweetened cocoa powder, ½ teaspoon salt, and ½ teaspoon baking powder. This mixture should be uniform and free of lumps, as it will bring structure and texture to your delicious cookies when combined with the wet ingredients.
Step 5: Mix Wet and Dry Ingredients
Gradually add the dry ingredient mix to the wet mixture, mixing at low speed until just combined. The dough may appear slightly crumbly but should hold together when pressed. This signifies a perfectly textured dough for your Chocolate Thumbprint Cookies, ready for shaping.
Step 6: Form the Dough Balls
Using tablespoons, scoop out portions of dough and roll them into balls. Place each dough ball on the prepared baking sheet, spacing them about 2 inches apart. This spacing ensures that each cookie has room to expand as they bake, yielding beautifully shaped thumbprint cookies.
Step 7: Create Indentations
Using your thumb or the back of a teaspoon, gently press into the center of each dough ball to create a small indentation. Be careful not to press all the way through; you want to form a well for your filling to sit in. This step is what makes them Classic Chocolate Thumbprint Cookies.
Step 8: Fill the Indentations
If you’re using chocolate chips, place a few in each indentation; if you prefer jam, fill the wells with your favorite flavor. The filling will melt and blend with the cookie during baking, creating a delightful flavor combination with each bite.
Step 9: Bake the Cookies
Bake the cookies in the preheated oven for 12–15 minutes, or until the edges appear slightly firm while the centers are still soft. Once baked, they will develop a beautiful color and structure, letting you know they’re ready to cool.
Step 10: Cool and Dust
Allow the cookies to cool on the baking sheet for a few minutes before transferring them to a wire rack to cool completely. If desired, dust the cooled cookies lightly with powdered sugar for an elegant finish—perfect for enjoying or sharing with loved ones!

What to Serve with Chocolate Thumbprint Cookies
As you indulge in these soft and delightful treats, consider pairing them with these perfect accompaniments to elevate your dessert experience.
-
Fresh Berries: Juicy strawberries or raspberries add a refreshing burst of flavor, balancing the richness of the cookies beautifully. The combination of chocolate and fruit is timeless.
-
Whipped Cream: A dollop of lightly sweetened whipped cream adds a luscious touch, making each bite even more decadent and creamy without overpowering the chocolate.
-
Vanilla Ice Cream: The warm, melting cookies with a scoop of velvety vanilla ice cream create a delightful contrast in temperature and texture, perfect for a cozy evening treat.
-
Espresso or Coffee: A bold cup of freshly brewed coffee or espresso complements the sweetness of the cookies while enhancing the rich chocolate flavor, creating a delightful pairing for dessert.
-
Chocolate Sauce Drizzle: For those who can’t get enough chocolate, a rich chocolate sauce drizzle not only looks enticing but also intensifies the chocolate experience with each bite.
-
Mint Tea: A soothing cup of mint tea offers herbal freshness, which contrasts nicely with the sweet richness of the cookies, creating a balanced flavor profile for your palate.
-
Caramel Sauce: Sweet and salty caramel sauce provides a fantastic layer of richness, enhancing the chocolate flavor while adding a delightful creaminess to the cookies.
Imagine this array of treats as you enjoy your homemade Chocolate Thumbprint Cookies; each pairing offers a unique twist that will delight your family and friends!
How to Store and Freeze Chocolate Thumbprint Cookies
Room Temperature: Store freshly baked cookies in an airtight container at room temperature for up to 3 days to maintain their softness and flavor.
Fridge: For longer freshness, you can refrigerate the cookies, but be sure to keep them in a sealed container for up to a week.
Freezer: To freeze Chocolate Thumbprint Cookies, place them in a single layer in a freezer-safe container with parchment paper between layers. They will keep well for up to 3 months.
Reheating: When ready to enjoy, simply thaw at room temperature or warm in the microwave for a few seconds to restore that fresh-baked warmth.
Chocolate Thumbprint Cookies Variations
Get ready to explore delightful twists on your chocolate thumbprint cookies that are just waiting to be tried!
- Gluten-Free: Substitute all-purpose flour with a gluten-free blend to make these cookies suitable for gluten-sensitive friends.
- Nutty Delight: Add ½ cup of finely chopped nuts, like walnuts or almonds, to the dough for an extra crunchy texture and a hint of richness.
- Minty Fresh: Incorporate ½ teaspoon of peppermint extract into your dough for a refreshing twist that pairs beautifully with chocolate.
- Spicy Touch: Mix in a pinch of cayenne pepper or cinnamon for a warm, spicy kick that adds complexity to the cookie's flavor profile.
- Fruit-Filled: Use fruit preserves instead of jam, like apricot or raspberry, to bring a different fruity zest that complements the chocolate.
- Chewy Coconut: Fold in ½ cup of shredded coconut to the dough to add a chewy texture that contrasts with the soft, chocolatey cookie.
- Coffee Infusion: Add 1 tablespoon of instant coffee or espresso powder to the dough for a mocha-inspired flavor that coffee lovers will adore.
- Caramel Surprise: Stick a gooey caramel candy in the center instead of chocolate chips to create a melt-in-your-mouth moment everyone will cherish.
Feel inspired? Dive into more creative recipes that tantalize your taste buds with our wonderful selection of easy baking recipes perfect for every occasion!
Make Ahead Options
Chocolate Thumbprint Cookies are absolutely perfect for meal prep! You can make the dough up to 24 hours in advance by preparing it through Step 5. Once the dough is mixed, simply wrap it tightly in plastic wrap and refrigerate; this helps the flavors meld beautifully. When you’re ready to bake, allow the dough to sit at room temperature for about 10-15 minutes for easy handling. Scoop and shape the cookies, create the indentations, fill with chocolate chips or jam, and bake as directed. This way, you’ll enjoy fresh cookies with minimal effort, making busy weeknights a little sweeter!
Tips for the Best Chocolate Thumbprint Cookies
-
Butter Temperature: Make sure your butter is softened, not melted, for the right cookie texture. Heat can lead to flat cookies instead of light and fluffy ones.
-
Indentation Depth: When creating the thumbprint, press firmly but don’t go all the way through. You need a pocket for filling, but too deep can lead to breakage.
-
Filling Choice: Whether using chocolate chips or jam, choose flavors you love—this will elevate your chocolate thumbprint cookies and ensure every bite is delightful.
-
Baking Time: Keep a close eye on your cookies as they bake. Remove them when the edges are firm yet the centers are soft to achieve the perfect melt-in-your-mouth texture.
-
Cooling Properly: Don’t skip the cooling stage! It helps the cookies set and enhances their structure, making them less likely to crumble when handled.
Chocolate Thumbprint Cookies Recipe FAQs
How do I select the best ingredients for Chocolate Thumbprint Cookies?
Absolutely! For the best chocolate thumbprint cookies, make sure your butter is at room temperature—it should feel soft but not melted. When purchasing vanilla extract, opt for pure over imitation for a richer flavor. If you choose to fill your cookies with jam, select high-quality fruit preserves that you love, as this will enhance the overall taste of the cookies.
How should I store my Chocolate Thumbprint Cookies?
To keep your cookies fresh, store them in an airtight container at room temperature for up to 3 days. This will help retain their soft and chewy texture. If you want them to last longer, place them in the fridge in a sealed container for up to a week.
Can I freeze Chocolate Thumbprint Cookies?
Certainly! To freeze chocolate thumbprint cookies, allow them to cool completely, then layer them in a freezer-safe container with sheets of parchment paper in between to prevent sticking. They can be stored in the freezer for up to 3 months. When you're ready to enjoy them, simply thaw at room temperature or warm them in the microwave for a few seconds to regain that fresh-baked goodness.
What should I do if my cookie dough is too crumbly?
Very often, a crumbly dough is a sign of insufficient moisture. If your dough doesn’t hold together easily, try adding a teaspoon of milk or water, a little at a time, until it binds properly. Mixing at too high a speed or over-mixing can also lead to dry dough. Remember to mix just until combined—short and sweet, like these cookies!
Are Chocolate Thumbprint Cookies suitable for people with allergies?
If you're baking for someone with allergies, consider substituting the butter with a dairy-free alternative and using gluten-free all-purpose flour. However, these substitutions can change the texture slightly. Always check labels for potential allergens, especially if you’re using chocolate chips or jam. Just be aware that some chocolate contains dairy and gluten.
Can pets have Chocolate Thumbprint Cookies?
Absolutely not! Chocolate is toxic to pets, especially dogs and cats. While these cookies are an irresistible treat for us, it's important to keep them away from our furry friends to ensure their safety. Instead, consider making homemade pet-friendly treats using ingredients like peanut butter and pumpkin—your pets will love you for it!
Irresistibly Soft Chocolate Thumbprint Cookies You’ll Love
Ingredients
Equipment
Method
- Preheat your oven to 350°F (175°C) and line a baking sheet with parchment paper.
- In a large mixing bowl, cream together the softened unsalted butter, granulated sugar, and brown sugar for about 2–3 minutes until light and fluffy.
- Add the vanilla extract to the creamed mixture and mix until fully incorporated.
- In a separate bowl, whisk together all-purpose flour, cocoa powder, salt, and baking powder.
- Gradually add the dry ingredients to the wet mixture, mixing on low speed until just combined.
- Scoop out portions of dough and roll them into balls, placing them on the prepared baking sheet.
- Using your thumb or the back of a teaspoon, press into the center of each dough ball to create a small indentation.
- Fill the indentations with chocolate chips or your favorite jam.
- Bake the cookies for 12–15 minutes until the edges are slightly firm and the centers are soft.
- Allow the cookies to cool on the baking sheet for a few minutes before transferring to a wire rack to cool completely.


Leave a Reply