
How to Make Perfect Pineapple Bliss Bars at Home
A vibrant, tropical dessert scene featuring layers of golden pineapple bliss bars on a decorative plate, garnished with fresh pineapple slices and tropical flowers, surrounded by lush green leaves and a hint of coconut flakes, with soft natural sunlight illuminating the delicious texture and bright colors.
Every summer, my kitchen turns into a tropical paradise. These pineapple bliss bars are my secret. They make you feel like you're on a sun-soaked beach with just one bite. These treats are more than a recipe; they're an experience.
Pineapple bliss bars have a buttery shortbread crust and a tangy pineapple filling. They're small, but they pack a big flavor punch. Each serving has 200-250 calories of tropical joy.
Whether you're an experienced baker or new to the kitchen, this recipe is for you. It will help you make irresistible pineapple bliss bars. Get ready to wow your friends and family with a dessert that's as beautiful as it is tasty.
Understanding Pineapple Dessert Bars
Pineapple treats have a rich history that spans tropical regions and culinary traditions. These island-inspired flavors bring a taste of sunshine to your dessert table. They capture the essence of warm, vibrant cuisines.
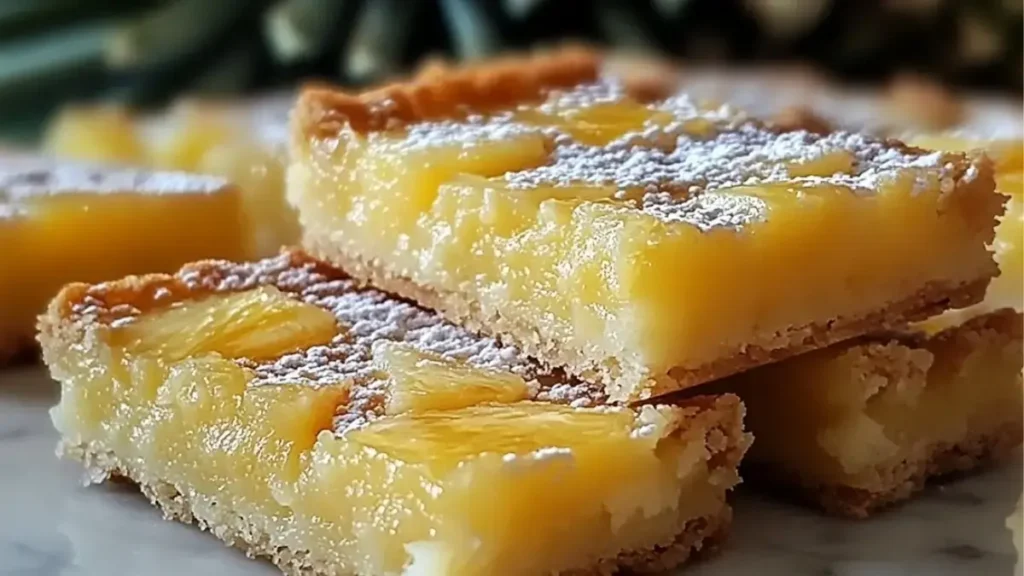
"A vibrant arrangement of pineapple bliss bars on a rustic wooden table, showcasing layers of creamy yellow pineapple filling, a crumbly coconut crust, and topped with shredded coconut and fresh pineapple slices, surrounded by tropical leaves and bright hibiscus flowers, with soft natural lighting illuminating the scene."
Origins and Evolution
The journey of pineapple treats began in tropical regions where this golden fruit reigned supreme. Mid-20th century innovations like canned pineapple made these desserts more accessible. This change allowed home cooks across the United States to enjoy them.
- Originated in tropical culinary traditions
- Popularized by canned fruit innovations
- Became a staple in American home baking
What Makes Them Special
Pineapple Bliss Bars are special because of their sweet and tangy flavors. These island-inspired flavors create a perfect balance. This balance transforms a simple dessert into a tropical experience.
"A bite of Pineapple Bliss Bars is like a mini vacation for your taste buds!"
Key Characteristics
The magic of these pineapple treats lies in their distinctive attributes:
- Buttery, crumbly crust
- Intense pineapple flavor
- Perfect balance of sweetness and tartness
- Smooth, rich texture
Whether you're a dessert enthusiast or a casual baker, Pineapple Bliss Bars offer a delightful culinary adventure. They bring the taste of tropical paradise right to your kitchen.
Essential Ingredients and Equipment
A vibrant flat lay composition of ingredients for pineapple bliss bars: fresh pineapple slices, crushed graham crackers, melted butter in a bowl, sweetened condensed milk, coconut flakes, and a sprinkle of powdered sugar. Arrange these elements on a rustic wooden table with a light, airy background to evoke a tropical feel.
Making tasty fruit-based sweets needs the right ingredients. Your Pineapple Bliss Bars will be amazing with the best ingredients. Let's look at what makes these treats special.
Core Ingredients
- Unsalted butter (225g)
- Caster sugar (200g)
- Plain flour (250g)
- Crushed pineapple (396g)
- Large eggs (2)
- Crème fraîche (115g)
- Optional: Desiccated coconut (30g)
Your baking adventure starts with top-notch ingredients. Choosing fresh, quality ingredients makes your Pineapple Bliss Bars full of tropical taste and texture.
Essential Baking Equipment
- 9x13 inch baking tray
- Mixing bowls
- Electric mixer
- Measuring cups and scales
- Parchment paper
"Baking is about precision and passion – choose your ingredients wisely!"
Pro tip: Make sure to drain your pineapple well. This helps avoid too much moisture in your bars. Fresh ingredients and careful prep make your fruit-based sweets irresistible.
Preparing the Perfect Buttery Crust
Making a delicious crust is key for your Pineapple Bliss Bars. These treats need a crisp, golden base to match their tropical filling.
Mastering the Mixing Technique
Your crust starts with top-notch ingredients. Here's how to mix them:
- Use 1½ cups of all-purpose flour
- Add ½ cup granulated sugar
- Incorporate ¾ cup cold unsalted butter
- Sprinkle ¼ teaspoon salt for balanced flavor
For a no-bake snack texture, keep your butter cold. Blend ingredients quickly with a pastry cutter or your fingers. Aim for coarse crumbs.
"The secret to a perfect crust is cold butter and minimal handling" - Pastry Chef's Wisdom
Pre-Baking Essentials
Pre-baking your crust stops it from getting soggy. Press the mix into a 9x13-inch baking dish. Make sure it's even. Bake at 350°F for 10-15 minutes until it's lightly golden.
Troubleshooting Crust Challenges
- Crumbly Crust: Add a tablespoon of cold water if it's too dry
- Uneven Baking: Rotate the pan halfway through pre-baking
- Tough Texture: Don't overwork the dough
Follow these steps for a buttery, golden crust. It will make your Pineapple Bliss Bars a hit this summer.
Creating the Tropical Pineapple Filling
Making a great tropical dessert starts with the pineapple filling. It's the core of your Pineapple Bliss Bars. It turns simple ingredients into a tasty treat.
- Drain the crushed pineapple well to avoid a watery mix
- Choose fresh, quality ingredients for the best taste
- Measure everything carefully for consistent results
Here's what you'll need for your tropical dessert:
- 1 cup crushed pineapple (well-drained)
- 2 large eggs
- 1 cup granulated sugar
- 3 tablespoons all-purpose flour
- 1 teaspoon vanilla extract
- ½ teaspoon baking powder
"The secret to amazing pineapple treats is in the details of preparation." - Pastry Chef Recommendation
Start by whisking the eggs and sugar until they're light and fluffy. Gently fold in the drained pineapple. Make sure to remove as much moisture as you can. This is key to avoiding a soggy texture in your desserts.
The secret to a perfect filling is finding the right mix of sweetness and texture. Taste and adjust the sugar as needed. Remember, the pineapple's natural sweetness will come through.
Baking and Assembly Process
Making the perfect summer treats needs precision and care. Your Pineapple Bliss Bars will turn into a delicious tropical treat. This happens through careful baking and assembly.
Temperature and Timing Guidelines
When baking these island-inspired flavors, follow these critical steps:
- Preheat your oven to 350°F
- Bake the crust for 12 minutes initially
- Add the pineapple filling
- Bake for an additional 25-27 minutes
Visual Doneness Indicators
Knowing when your bars are perfectly baked is an art. Look for these key signs:
- Golden edges around the filling
- Slightly firm center
- Coconut topping turning light brown
- Edges pulling slightly away from the pan
Pro tip: Avoid overbaking to maintain the bars' delicate, soft texture.
Cooling and Setting Methods
The final stage of creating your summer delights is crucial for texture and flavor. Allow the bars to cool completely in the pan. This resting period helps the filling set properly and intensifies the island-inspired flavors.
- Remove from oven
- Let stand at room temperature
- Cool for 1-2 hours
- Cut into 16 perfect squares
Patience is key when preparing these delectable treats!
Storage and Freshness Tips
Keeping your homemade fruit-based sweets fresh is key. Your Pineapple Bliss Bars can stay delicious with the right storage tips.
For short-term, store them at room temperature in an airtight container. They'll stay tasty for up to two days. For longer storage, refrigeration is best.
"Proper storage is the secret to enjoying your Pineapple Bliss Bars at their peak flavor!" - Baking Enthusiasts
Refrigeration and Freezing Guidelines
- Refrigerator storage: Up to 5 days in a sealed container
- Freezer storage: Up to 2 months when properly wrapped
- Thawing: Move from freezer to refrigerator overnight
Freezing tips include:
- Wrap individual bars in plastic wrap
- Place in a freezer-safe container
- Add a layer of parchment between bars to prevent sticking
Pro tip: Avoid adding powdered sugar before freezing to maintain the best texture when thawing.
Follow these tips to keep your Pineapple Bliss Bars fresh. They'll be ready for you whenever you need a sweet treat!
Creative Variations and Customizations
Make your Pineapple Bliss Bars even better with fun twists. You can make them vegan or gluten-free. These changes will make your recipe truly unique.
Coconut-Infused Tropical Delight
Add shredded coconut to both the crust and filling for a tropical twist. It's like a beach vacation in every bite. Here's how to do it:
- Sprinkle toasted coconut flakes on top of the filling
- Mix unsweetened coconut into the crust mixture
- Drizzle coconut cream over the finished bars
Gluten-Free Adaptations
Looking for gluten-free bars? Easy swaps can keep the taste and texture great. Try these:
- Almond flour for a nutty undertone
- Gluten-free oat flour for a classic base
- Coconut flour for added tropical sweetness
Tropical Flavor Enhancements
Try new flavors to make your vegan bars stand out. Here are some ideas:
- Add lime zest for a citrusy kick
- Incorporate passion fruit puree into the filling
- Sprinkle toasted macadamia nuts on top
Pro tip: When making gluten-free bars, always check that your ingredients are certified gluten-free to avoid cross-contamination.
Serving Suggestions and Presentation Ideas
Turn your Pineapple Bliss Bars into a stunning tropical dessert. It will wow your guests. These summer treats are more than just a snack. They're a blank canvas for your creativity.
- Slice bars into elegant diamond or triangular shapes
- Garnish with fresh pineapple mint leaves
- Dust with powdered sugar for a sophisticated finish
- Pair with complementary beverages like coconut rum cocktails
"A beautifully presented dessert tells a story before the first bite is taken."
For summer parties, make a colorful dessert platter. Put these bars in the middle. Add tropical fruits like mango slices or passion fruit. It will look amazing and show off their bright colors.
Pro tip: Chill these bars a bit for a cooler treat. Add a scoop of coconut sorbet next to each bar. It makes the dessert feel fancy and special.
Conclusion
Your journey into making pineapple bliss bars has been a fun trip into island flavors. These treats turn simple ingredients into a memorable dessert. They capture the essence of tropical sunshine in every bite.
With just one hour of preparation and cooking, you can make a dessert that feels like a beachside getaway. The pineapple bliss bars mix sweet and tangy perfectly. They're a great recipe for anyone who loves baking.
The real magic of these bars comes from the love and creativity you put into making them. Each batch is a chance to try new things, like toasted coconut or creative garnishes. This makes the dessert truly yours.
Whether you're having a summer party or just want a taste of the tropics, these bars are perfect. Enjoy baking and let these bars become a favorite in your home.
FAQ
Are Pineapple Bliss Bars suitable for people with dietary restrictions?
Yes, they are! You can make them gluten-free and vegan. Use almond or coconut flour for gluten-free. Replace butter with coconut oil or vegan margarine for dairy-free.
How long can I store Pineapple Bliss Bars?
Store them in an airtight container in the fridge for 5-7 days. Freeze for up to 3 months for a tropical treat anytime.
Can I use fresh pineapple instead of canned?
You can use fresh pineapple. Just drain it well to avoid a soggy bar.
Are these bars kid-friendly?
Yes! They're sweet, fruity, and fun for kids. Kids can help make them, too.
Can I make these bars ahead of time?
Absolutely! Make them 1-2 days before. It lets the flavors get even better.
Are Pineapple Bliss Bars healthy?
They're a sweet treat but have some health benefits. Pineapple adds vitamin C and manganese. Use whole grain flour and less sugar for a healthier version.
What equipment do I need to make these bars?
You'll need a 9x13 inch baking pan, bowls, cups, and an oven. Parchment paper makes them easy to remove and clean.
How can I add more tropical flavor to the bars?
Add shredded coconut to the crust. Use lime zest in the filling. Top with toasted coconut flakes for extra island flavor.


Leave a Reply