
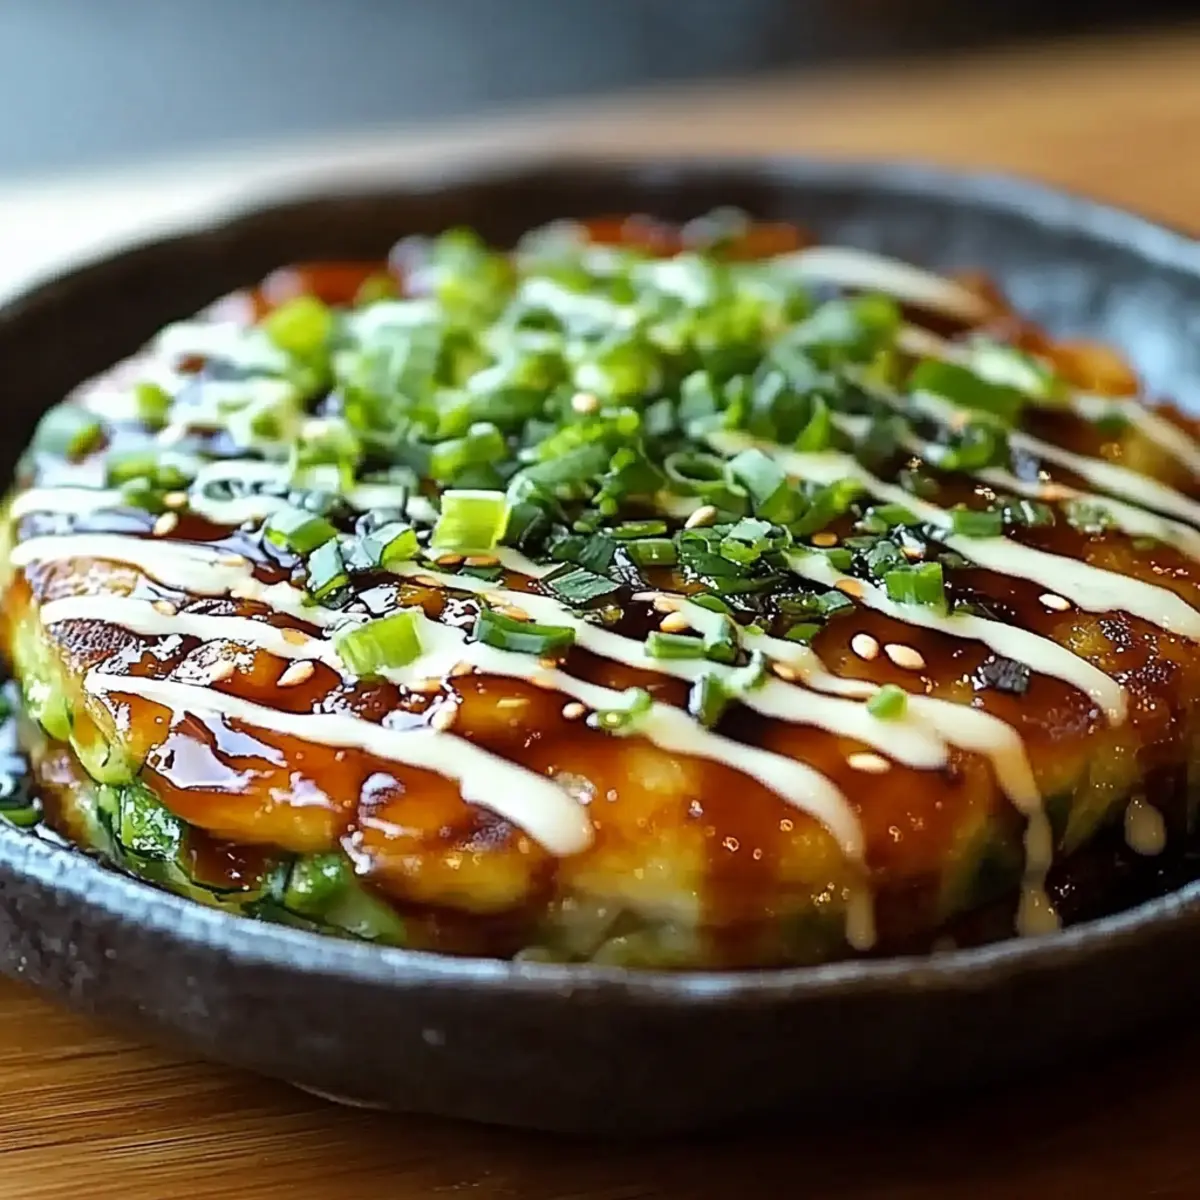
As I stood in front of the sizzling skillet, the aroma of cabbage and savory batter filled the air, transporting me to the bustling streets of Japan. Making Okonomiyaki, the beloved savory pancake, has become a cherished experience in my kitchen, merging convenience and creativity effortlessly. This recipe not only allows for quick prep but also invites you to explore a medley of customizable ingredients, making it a fun crowd-pleaser that can easily suit your palate. Whether you crave hearty meat, fresh veggies, or a delightful vegetarian twist, you’ll find joy in crafting your version of this traditional dish. Are you ready to flip some pancakes and unleash your inner chef? Let’s dive into this delicious journey!

Why is Okonomiyaki so special?
Versatility at its finest: Okonomiyaki encourages endless customization, letting you mix and match ingredients like meats, cheese, or vegetables based on your cravings. Quick prep means you can whip this up in just 35 minutes, making it perfect for weeknight dinners. Cultural delight: This dish is rooted in Japanese street food culture, making it an exciting culinary adventure. Vegetarian options abound, so everyone can join in on the fun. Crowd-pleaser: With its savory flavors and beautiful presentation, Okonomiyaki is sure to impress your family and friends—just watch them come back for seconds! Grab your skillet and experience this delightful dish; it pairs wonderfully with a fresh salad or some pickled ginger.
Okonomiyaki Ingredients
Uncover what makes this dish so delightful!
For the Batter
• All-purpose flour – A staple base that gives the pancake its heartiness.
• Dashi or water – Use dashi for authentic flavor, or water for a mild taste.
• Egg – Binds the ingredients together, but an egg substitute works for a vegetarian option.
For the Filling
• Shredded cabbage – Provides crunch and a hint of sweetness to the pancakes.
• Chopped green onions – Adds a fresh bite and bright color.
• Grated cheese (optional) – Melts beautifully for an extra creamy texture.
• Cooked meat (optional) – Choose pork, chicken, or shrimp to add protein and heartiness.
• Diced vegetables (optional) – Customize with carrots, bell peppers, or mushrooms for added nutrition.
For the Toppings
• Okonomiyaki sauce – A sweet and savory drizzle that elevates the dish.
• Japanese mayonnaise – For a creamy finish, use Kewpie for authenticity.
• Aonori (seaweed flakes) – Adds a salty, umami kick as a final touch.
• Bonito flakes (optional) – Garnish for a smoky flavor and aesthetic appeal.
With these ingredients, you have all the essentials for a delicious Okonomiyaki, ready to satisfy your cravings!
Step‑by‑Step Instructions for Okonomiyaki
Step 1: Prepare the Batter
In a large mixing bowl, combine 2 cups of all-purpose flour with 1 cup of dashi or water. Stir vigorously until the batter becomes smooth and lump-free. The goal is to create a thick and creamy consistency, so take your time to mix well. This is the foundation of your delicious Okonomiyaki, setting the stage for all the flavorful ingredients to come.
Step 2: Add Fillings
Next, crack 1 egg into the bowl with the batter and add 2 cups of shredded cabbage and ½ cup of chopped green onions. If you’re using additional ingredients like cooked meat or diced vegetables, fold them in now. Mix gently until everything is evenly distributed throughout the batter, ensuring each bite of your Okonomiyaki is packed with flavor and texture.
Step 3: Preheat the Skillet
Set a skillet or griddle over medium heat and let it warm up for about 2-3 minutes. Once hot, drizzle a little oil over the surface and spread it evenly to prevent sticking. You want the skillet to be sizzling, as this will ensure a crispy golden crust on your Okonomiyaki. Keep an eye on the heat; a steady medium is key for perfect cooking.
Step 4: Cook the First Side
Pour a ladleful of the batter mixture onto the skillet, shaping it into a round pancake about 1-inch thick. Let it cook undisturbed for 3-5 minutes until the bottom is beautifully golden brown. You’ll notice the edges firming up; this is a good sign! A little patience here will reward you with that perfect crispy texture everyone loves.
Step 5: Flip and Finish Cooking
Using a large spatula, carefully flip the pancake over and allow it to cook for another 3-5 minutes on the other side. You’re looking for a similar golden-brown color and a cooked-through center. As it cooks, you’ll get an aroma wafting through your kitchen that’s simply irresistible. This step ensures your Okonomiyaki is just right!
Step 6: Serve and Top
Once cooked, remove the Okonomiyaki from the skillet and place it on a serving plate. Now it’s time to elevate your pancake! Drizzle with okonomiyaki sauce and Japanese mayonnaise for a delectable finish. The combination of flavors will make this dish even more tempting, inviting everyone to dig in right away.
Step 7: Garnish for the Final Touch
To make your Okonomiyaki truly shine, sprinkle aonori (seaweed flakes) on top, and if desired, add bonito flakes for an extra layer of flavor. This step not only adds visual appeal but also enhances the umami taste. Your handcrafted Okonomiyaki is now ready to impress your family and friends, showcasing a beautiful blend of colors and textures.
Step 8: Repeat the Process
Continue with the remaining batter, adjusting the heat as necessary to maintain a steady cooking temperature. Each pancake will be a delightful, unique creation. Encourage your loved ones to join in the fun, customizing their Okonomiyaki with favorite toppings or additional ingredients, making this a memorable cooking experience for all!
Okonomiyaki Variations & Substitutions
Feel free to get creative and make this Okonomiyaki truly yours with these exciting twists!
- Gluten-Free: Substitute all-purpose flour with a 1:1 gluten-free flour blend for a celiac-friendly version.
- Vegan: Use a flaxseed or chia egg in place of the regular egg, and omit any meat for a delightful plant-based treat.
- Spicy Kick: Add chopped jalapeños or a few dashes of Sriracha to the batter for a fiery flavor boost that awakens your taste buds!
- Different Cheeses: Swap out the grated cheese with mozzarella for a gooey texture or vegan cheese for a dairy-free option.
- Savory Seaweed: Incorporate chopped nori sheets into the filling for an extra umami punch, enhancing its sea-salted flavor.
- Additional Veggies: Mix in grated zucchini or finely chopped spinach for added moisture and nutrition, making it even more wholesome.
- Protein Boost: Throw in diced tofu or tempeh for a hearty vegetarian protein twist that everyone will love.
- Herb Infusion: Fresh herbs like cilantro or basil can be mixed into the batter for a fragrant twist, elevating the flavor profile beautifully.
Feel inspired? With these variations, your Okonomiyaki can become a delicious canvas for your culinary creativity! If you're looking for more ideas, consider pairing this dish with a refreshing side salad or some pickled ginger for that perfect crunch. Happy cooking!
Tips for the Best Okonomiyaki
• Ingredient Balance: Ensure a good mix of flour and liquid; too much liquid can make the pancakes soggy. Aim for a thick, but pourable batter.
• Temperature Control: Keep the skillet at medium heat for even cooking. Too hot, and the outside burns before the center cooks through.
• Don’t Rush the Flip: Wait until the edges appear set and golden before flipping to achieve that perfect crispy exterior; patience is key!
• Customization: Experiment with fillings! Use seasonal veggies or your favorite protein; the beauty of Okonomiyaki is its adaptability.
• Serving Suggestions: Serve your Okonomiyaki immediately for the best taste and texture. Pair it with pickled ginger for a refreshing contrast.
What to Serve with Okonomiyaki
Pairing your Okonomiyaki with the right sides can elevate your meal experience and create a delightful balance of flavors and textures.
-
Pickled Ginger: A tangy contrast that cuts through the richness of the pancakes, leaving your palate refreshed. It’s the perfect palette cleanser between bites!
-
Japanese Salad: Fresh greens tossed with a light sesame dressing provide a crisp, refreshing contrast, enhancing the savory elements of your Okonomiyaki.
-
Miso Soup: This warm, umami-rich broth complements the flavors beautifully while adding a cozy aspect to your meal. Serve it alongside for a comforting feast.
-
Steamed Edamame: Lightly salted and protein-packed, edamame adds a satisfying crunch and a hint of nuttiness that pairs harmoniously with the savory pancake.
-
Sake or Green Tea: Although not a food, these beverages enhance your dining experience by offering warmth and complementing the Japanese flavor profiles.
-
Fruit Sorbet: For dessert, a refreshing fruit sorbet provides a light and sweet finish to your meal, cleansing the palate beautifully. It’s the perfect sweet surprise after hearty pancakes!
With these delightful pairings, your Okonomiyaki feast will be a memorable culinary experience!
How to Store and Freeze Okonomiyaki
Fridge: Store any leftover Okonomiyaki in an airtight container for up to 2 days to maintain freshness. Reheat gently in a skillet for the best results.
Freezer: For longer storage, freeze cooked Okonomiyaki in a single layer on a baking sheet. Once firm, wrap individually and keep in a freezer bag for up to 1 month.
Reheating: To enjoy frozen Okonomiyaki, thaw overnight in the fridge and then reheat on a skillet over medium heat until heated through, about 5-7 minutes.
Serving Tip: Enjoy your Okonomiyaki warm, drizzled with sauce and mayonnaise, just like when it was freshly made!
Make Ahead Options
These Okonomiyaki are perfect for meal prep enthusiasts! You can prepare the batter up to 24 hours in advance by mixing the flour, dashi (or water), egg, and shredded cabbage, then storing it in an airtight container in the refrigerator. Just be sure to stir it well before cooking to ensure everything is evenly combined. You can also chop the green onions and any additional fillings (like meat or vegetables) a day ahead for convenience. When you're ready to serve, simply preheat your skillet and cook the batter for a quick meal that’s just as delicious as freshly made. This thoughtful prep makes weeknight dinners a breeze, letting you enjoy more quality time with your loved ones.

Okonomiyaki Recipe FAQs
What type of cabbage should I use for Okonomiyaki?
Absolutely! For Okonomiyaki, green cabbage is a classic choice due to its tender crunch and mild flavor. You can also experiment with other types like Napa cabbage for a slightly sweeter taste.
How can I store leftover Okonomiyaki?
Great question! Store any leftover Okonomiyaki in an airtight container in the refrigerator for up to 2 days. Reheating it in a skillet is best for maintaining that lovely crispy texture.
Can I freeze Okonomiyaki? How do I do it?
Yes, you can freeze Okonomiyaki! First, let the pancakes cool completely. Then, place them in a single layer on a baking sheet and freeze until firm. After that, wrap each pancake individually and put them in a freezer bag for up to 1 month. When you're ready to enjoy, thaw overnight in the fridge and reheat on a skillet for about 5-7 minutes.
What can I use instead of an egg for a vegetarian version?
Very much so! If you're looking for a vegetarian option, you can use a flaxseed meal substitute. Mix 1 tablespoon of flaxseed meal with 3 tablespoons of water and let it sit for about 5 minutes until it thickens. This will work wonderfully as a binding ingredient in your Okonomiyaki.
How do I know when to flip my Okonomiyaki?
Keep an eye on those edges! Wait until the edges of the pancake appear set and golden brown before you flip. This usually takes about 3-5 minutes. Patience is key here to achieve that perfect crispy texture!
What should I do if my Okonomiyaki batter is too watery?
If you find your batter is too watery, which can happen when adding too many vegetables, don't worry! Simply mix in a little more flour until you reach a thick yet pourable consistency. This will ensure your Okonomiyaki holds its shape and has that delightful hearty bite.
Okonomiyaki Recipe FAQs

Delicious Okonomiyaki: Homemade Japanese Savory Pancakes
Ingredients
Equipment
Method
- In a large mixing bowl, combine 2 cups of all-purpose flour with 1 cup of dashi or water. Stir until smooth and lump-free.
- Add 1 egg, 2 cups of shredded cabbage, and ½ cup of chopped green onions to the batter. Mix gently.
- Preheat the skillet over medium heat for 2-3 minutes. Drizzle with oil to prevent sticking.
- Pour a ladleful of batter onto the skillet, shaping it into a round pancake about 1-inch thick. Cook for 3-5 minutes until golden brown.
- Carefully flip the pancake and cook for another 3-5 minutes until browned and cooked through.
- Remove from skillet, drizzle with okonomiyaki sauce and Japanese mayo, and serve.
- Sprinkle aonori (seaweed flakes) on top and add bonito flakes if desired.
- Continue with the remaining batter, adjusting heat for even cooking.


Leave a Reply