
“Imagine walking into a cozy kitchen filled with the warm scent of vanilla and freshly baked cake. Today, I’m excited to share my delicious Cheetah Print Heart Cake recipe, a delightful spin on the classic heart-shaped cake that brings a little fun and flair to any occasion. Not only is this stunning dessert a real showstopper, but it also invites creativity into your baking routine. The unique cheetah print design offers a playful twist while ensuring you get to enjoy the rich, buttery flavor that comforts the soul. Whether you’re celebrating a special day or simply want to impress friends and family, this cake is sure to be a hit. Are you ready to dive into this delightful adventure of baking and create something truly unforgettable?”
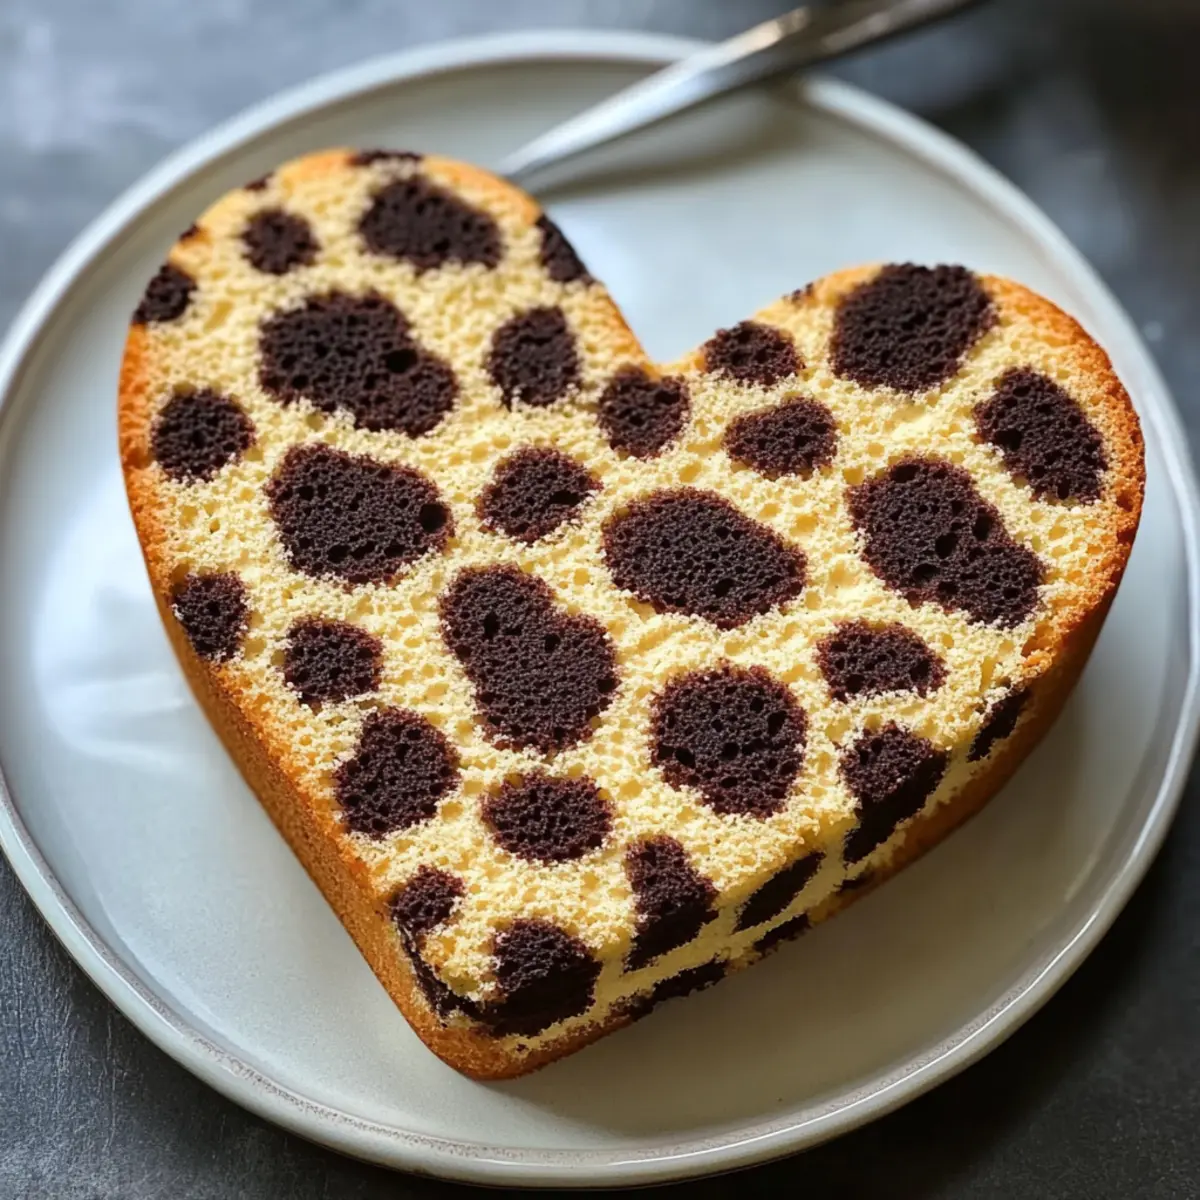
Why is Cheetah Print Heart Cake Unforgettable?
Vibrant Design: This cake leaps off the plate with its stunning cheetah print, making it a perfect centerpiece for any celebration.
Deliciously Buttery: Each slice promises a rich, buttery flavor that will have your taste buds dancing with delight.
Fun to Make: The baking process invites creativity, allowing you to showcase your artistic flair with the unique color combinations.
Great for Occasions: Ideal for birthdays, anniversaries, or just because, this cake caters to those who love a bit of whimsy in their treats.
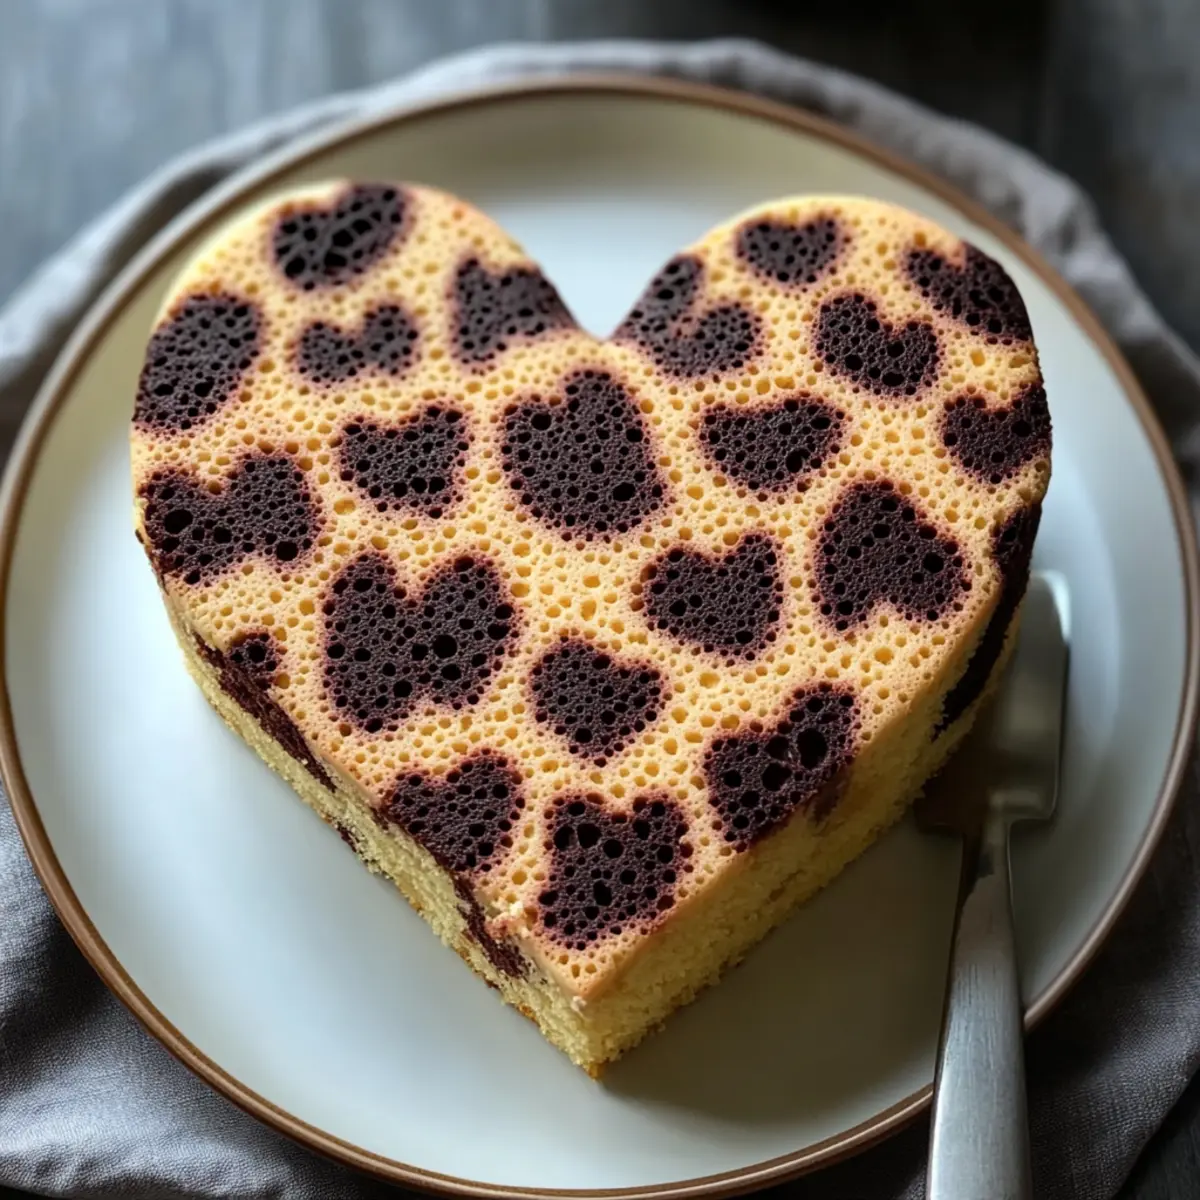
Surprise Element: The hidden heart shapes add an element of surprise that will amaze your loved ones, creating memorable moments around the table.
If you enjoy playful desserts, you might also want to check out my Carrot Cake Cheesecake for another delightful twist on a classic!
Cheetah Print Heart Cake Ingredients
For the Cake
• All-purpose flour – 2 ¾ cups (345 g) provides the structure needed for a moist cake.
• Cornstarch – 1 tablespoon helps create a lighter texture by softening the flour's gluten.
• Baking powder – 2 ¼ teaspoon ensures your cake rises beautifully, giving it that dreamy fluffiness.
• Baking soda – ½ teaspoon works in tandem with baking powder for the ultimate lift.
• Fine sea salt – ½ teaspoon enhances the cake's overall flavor profile.
• Unsalted butter – 1 cup (225 g), softened to room temperature, contributes richness to the batter.
• Granulated sugar – 1 ¾ cups (350 g) sweetens the cake while helping it achieve that perfect moist crumb.
• Eggs – 4 large, room temperature eggs provide stability and add moisture to the batter.
• Pure vanilla extract – 2 teaspoon infuses the cake with a lovely, fragrant flavor that complements everything.
• Whole milk – 1 ¼ cups (300 ml), also at room temperature, ensures the batter blends smoothly.
• Sour cream – ½ cup (120 ml), room temperature, adds tanginess and moisture for a tender cake.
For the Food Coloring
• Gel food coloring: golden yellow – adds that vibrant hue to your cheetah design.
• Gel food coloring: brown – creates the distinct cheetah spots for a playful appearance.
• Gel food coloring: black – provides depth and contrast for a striking look.
For the Buttercream Frosting
• Unsalted butter – 1 ½ cups (340 g), softened, is the base for the creamy frosting.
• Powdered sugar – 5–6 cups (600–720 g), sifted, sweetens the frosting and gives it that fluffy texture.
• Heavy cream or whole milk – ¼ cup (60 ml) plus extra as needed allows you to achieve the perfect spreadable consistency.
Time to bring your kitchen to life with this creative Cheetah Print Heart Cake! Enjoy baking!
Step‑by‑Step Instructions for Cheetah Print Heart Cake
Step 1: Preheat and Prepare Pans
Preheat your oven to 350°F (175°C) to ensure even baking. Grease and flour two heart-shaped pans (or use baking spray) and line them with parchment paper for easy cake removal. This preparation is essential for your Cheetah Print Heart Cake to come out perfectly shaped and ready for frosting.
Step 2: Mix Dry Ingredients
In a medium bowl, whisk together 2 ¾ cups of all-purpose flour, 1 tablespoon of cornstarch, 2 ¼ teaspoons of baking powder, ½ teaspoon of baking soda, and ½ teaspoon of fine sea salt. This mixture will provide the necessary leavening and structure, so set it aside while you focus on the wet ingredients for a smooth batter.
Step 3: Cream Butter and Sugar
In a large mixing bowl, beat 1 cup of softened unsalted butter on medium speed until creamy, about 2 minutes. Gradually add 1 ¾ cups of granulated sugar, continuing to beat until the mixture is light and fluffy, around 3–4 minutes. Then, incorporate 4 large room temperature eggs one at a time, ensuring each egg is fully combined before adding the next along with 2 teaspoons of pure vanilla extract.
Step 4: Combine Wet Ingredients
In a separate container, whisk together 1 ¼ cups of whole milk and ½ cup of sour cream until completely smooth. This will ensure a creamy texture for your batter, contributing to the moistness of the Cheetah Print Heart Cake, so take your time to blend them well.
Step 5: Add Dry Ingredients to Wet
Gradually add the dry ingredient mixture to the wet ingredients in three alternating parts, starting and ending with the dry mixture. Mix on low speed until just combined, ensuring there are no streaks of flour remaining. Be careful not to overmix, as this can affect the cake's delicate structure.
Step 6: Divide and Color Batter
Reserve about 2 cups of the plain batter in a separate bowl. Then, divide the remaining batter evenly into three smaller bowls: tint one golden yellow, another a medium brown, and the last black or very dark brown using gel food coloring. This will create the vibrant cheetah print design for your cake.
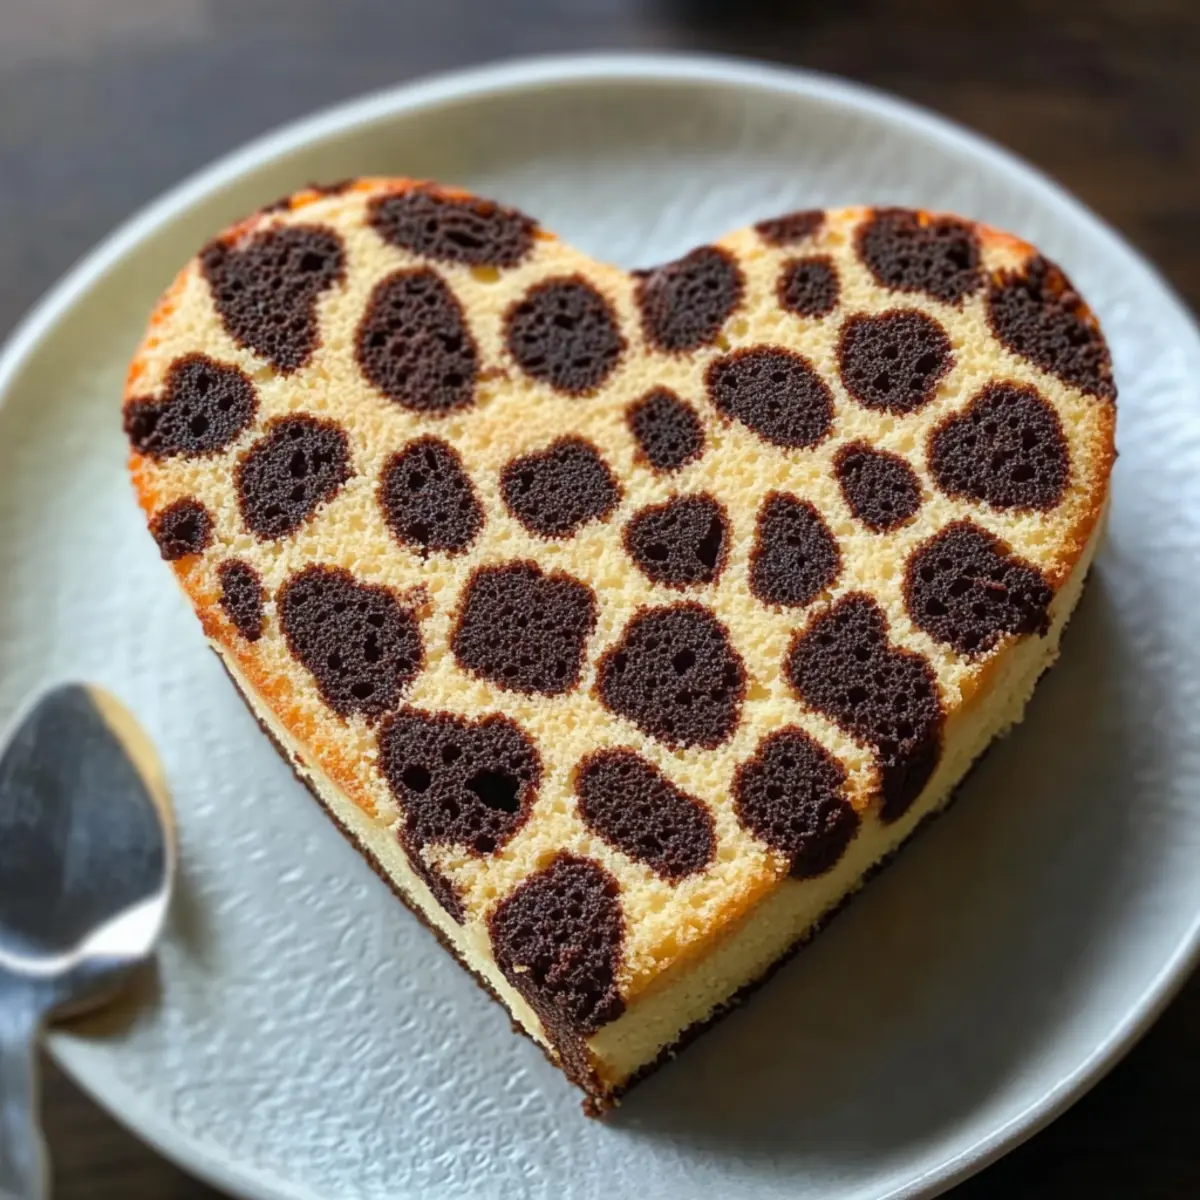
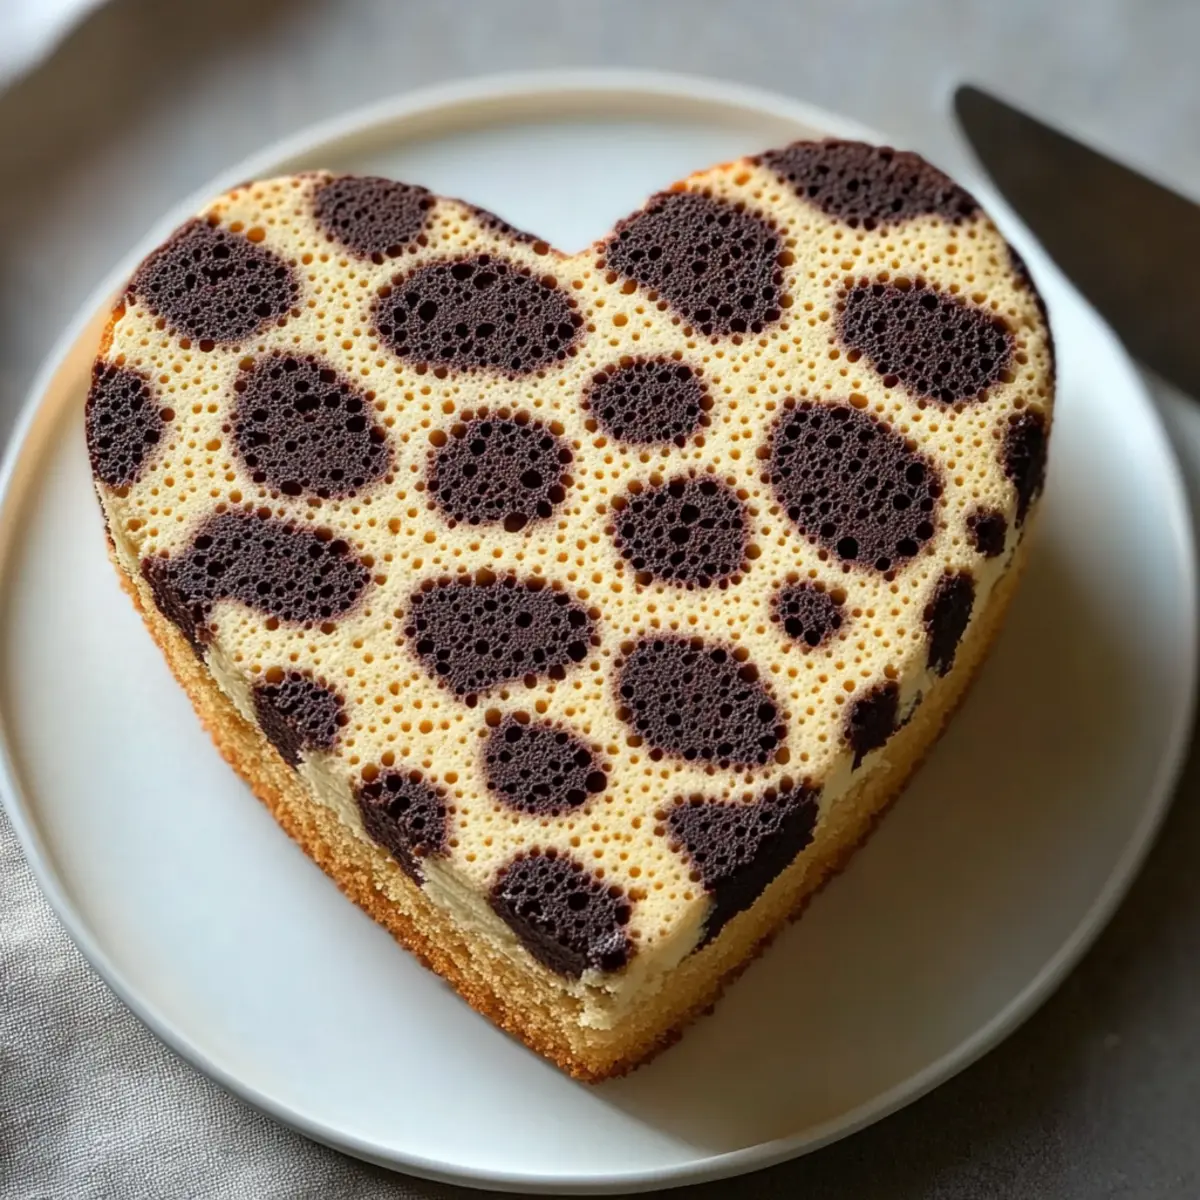
Step 7: Create Surprise Heart Centers
Pour half of the reserved plain batter into a lined 9×13 inch pan as a base. Pipe irregular blobs of the brown and black batters on top, then spoon a thin layer of the golden yellow batter over it. Bake this layer in the preheated oven for 12–16 minutes, watching for a slight golden color, then allow it to cool completely before cutting out heart shapes with a cookie cutter.
Step 8: Prepare Main Cake Layers
In the prepared heart-shaped pans, dollop the yellow, brown, and black batters randomly. Gently swirl the colors together with a knife to form distinct spots, creating the playful cheetah print pattern. Alternatively, stand your heart cut-outs upright in the pans and layer the marbled batter around them for a surprise effect.
Step 9: Bake the Cakes
Bake your heart-shaped cakes at 350°F (175°C), checking after 25–32 minutes for two 8-inch pans, or 40–50 minutes for a single deep 9-inch pan. The cakes should spring back when lightly pressed, and a toothpick inserted in the center should come out clean. Allow them to cool in the pans for 10–15 minutes.
Step 10: Trim and Chill Layers
Once the cakes are cooled, trim the tops if they are domed to ensure even stacking. For easier frosting later, chill the cake layers in the fridge for 20–30 minutes. This helps the buttercream adhere better when you assemble your Cheetah Print Heart Cake.
Step 11: Make Vanilla Buttercream
Prepare the buttercream frosting by beating 1 ½ cups of softened unsalted butter until smooth and creamy. Gradually add sifted powdered sugar along with a pinch of salt. Mix in ¼ cup of heavy cream or whole milk to achieve a medium-thick, spreadable consistency, beating for 3–4 minutes until fluffy.
Step 12: Tint the Buttercream
Reserve some ivory buttercream for filling and crumb coating the cake. Tint the remaining buttercream with golden tan, then divide this mixture to tint half medium brown and a quarter black. These colors will enhance the natural look of your Cheetah Print Heart Cake's design.
Step 13: Assemble the Cake
On a cake board, place a dab of buttercream to help hold the cake in place. Layer the first heart cake, spreading a generous layer of buttercream on top, then stack the second layer on. Apply a thin crumb coat to the top and sides to seal in crumbs, and chill briefly to set.
Step 14: Apply Base Coat of Frosting
Spread an even base coat of golden tan buttercream over the entire cake using an offset spatula, smoothing it out as you go. Chill the cake until the frosting is set, which will make adding the final decorative touches easier.
Step 15: Decorate the Cake
Pipe irregular spots of brown buttercream onto the cake and outline them with black buttercream, filling in any gaps as needed. Clean up the edges with a cake scraper to define the heart shape, giving your Cheetah Print Heart Cake a polished look.
Step 16: Chill and Slice
Chill the finished cake for 30–45 minutes so the frosting sets nicely. When you’re ready to serve, use a warm knife to slice through, creating clean edges that reveal the surprise hearts inside. Your delightful Cheetah Print Heart Cake is now ready to impress!
Cheetah Print Heart Cake Variations
Feel free to explore and customize your Cheetah Print Heart Cake with these creative twists and substitutions!
-
Gluten-Free: Use a gluten-free flour blend to make this cake suitable for gluten sensitivities without sacrificing flavor or texture.
-
Dairy-Free: Substitute the butter with vegan butter and use almond or coconut milk for a delightful dairy-free version. Your cake will still come out rich and flavorful!
-
Chocolatey Twist: Add ½ cup of cocoa powder to the dry ingredients to create a chocolate version of this cake, blending wonderfully with the vibrant colors.
-
Fruity Surprise: Incorporate fresh berries like raspberries or chopped strawberries within the cake layers for a burst of fruity flavor alongside the rich taste of vanilla.
-
Spicy Boost: Spice things up by adding a pinch of cinnamon or cayenne pepper to the batter to offer a warm kick that beautifully contrasts with the sweet frosting.
-
Nutty Crunch: Fold in ½ cup of chopped walnuts or pecans into the batter for delightful texture and flavor that complements the cake's rich base.
-
More Colorful: Play with different gel food colors! This vibrant cake can have a rainbow print, simply replacing the shades to make your cake a festive delight.
-
Caramel Drizzle: Top with a homemade or store-bought caramel drizzle for an additional layer of sweetness that pairs perfectly with the buttercream frosting.
By experimenting with these variations, you can craft a Cheetah Print Heart Cake that’s uniquely yours! If you're interested in more creative baking ideas, check out my delightful Pineapple Cake Recipe for a refreshing twist or my decadent Apple Pecan Cake with Caramel Glaze that’s sure to impress!
Make Ahead Options
Prepare your Cheetah Print Heart Cake in advance to save time on busy days! You can bake the heart layers and the surprise heart centers up to 3 days ahead. Once cooled, wrap the layers tightly in plastic wrap and refrigerate them to keep them fresh. You can also make the vanilla buttercream and store it in an airtight container for up to 1 week in the fridge; just give it a quick whip before using. For the final touches, assemble the cake closer to the serving time; simply layer the chilled cakes with the buttercream and decorate as desired for a show-stopping dessert that’s just as delicious as if made fresh!
Tips for the Best Cheetah Print Heart Cake
-
Room Temperature Ingredients: Ensure your eggs, milk, and butter are at room temperature to create a smooth, cohesive batter for your Cheetah Print Heart Cake.
-
Don’t Overmix: Mix the batter on low speed until just combined. Overmixing can lead to a dense cake, losing the airy texture you want.
-
Chill Cake Layers: Refrigerate your cake layers for 20–30 minutes before frosting. This makes it easier to handle and helps the buttercream stick beautifully.
-
Pipe with Confidence: Use a piping bag for the decorative frosting. Don’t worry about perfection; the charm of this cake lies in its playful, wild look!
-
Cut with Warm Knife: When slicing, run your knife under hot water and dry it off. This ensures clean cuts and beautifully reveals the surprise heart centers!
How to Store and Freeze Cheetah Print Heart Cake
Room Temperature: Store leftover cake at room temperature for up to 2 days, covered with a cake dome or plastic wrap to keep it moist.
Fridge: If you want to keep the cake fresh longer, refrigerate it for up to 5 days. Ensure it’s tightly wrapped or placed in an airtight container to prevent drying out.
Freezer: You can freeze the Cheetah Print Heart Cake for up to 3 months. Wrap individual slices in plastic wrap and then place them in a zip-top bag for optimal freshness.
Reheating: To enjoy frozen slices, thaw them in the fridge overnight. For a warm treat, microwave on low in 15-20 second intervals until warmed through.
What to Serve with Cheetah Print Heart Cake
Imagine gathering with loved ones, surrounded by the sweet aroma of a vibrant cake, where every bite brings joy and delight.
- Fresh Berries: A medley of juicy strawberries, raspberries, and blueberries adds a refreshing burst of tartness that beautifully balances the cake's sweetness.
- Whipped Cream: Light and airy, a dollop of freshly whipped cream creates a luscious contrast to the cake's rich texture, inviting indulgence.
- Chocolate Ganache: Drizzling warm, silky chocolate ganache over each slice elevates the dessert, offering a decadent finish that chocolate lovers will adore.
- Vanilla Ice Cream: Serve a scoop of creamy vanilla ice cream alongside the cake for a classic combination that delights the palate with every forkful.
- Mint Sprigs: Add a sprig of fresh mint as a garnish; its vibrant green color enhances the cake's presentation while imparting a hint of freshness.
- Sparkling Lemonade: Quench your thirst with bubbly, tangy lemonade; its effervescence complements the cake’s sweetness and adds a cheerful touch to any gathering.
- Coffee or Tea: A cup of freshly brewed coffee or a soothing herbal tea pairs beautifully, offering a comforting contrast that rounds out your dessert experience.
- Chilled White Wine: Consider serving a light, crisp white wine, like a Sauvignon Blanc, which can accentuate the cake's flavors and keep the celebration going.
- Chocolate-Covered Strawberries: For a touch of extravagance, chocolate-covered strawberries provide a sweet and sophisticated accompaniment, echoing the cake's playful spirit.
- Caramel Sauce: A drizzle of warm caramel sauce creates a delightful contrast, adding a sweet and gooey element that will enchant your guests.
Cheetah Print Heart Cake Recipe FAQs
What is the best way to select ripe ingredients for this recipe?
Absolutely! For the perfect Cheetah Print Heart Cake, ensure your unsalted butter and eggs are at room temperature. This makes the batter creamy and helps it rise well. When selecting eggs, look for ones that are clean and free from cracks. The milk and sour cream should also be fresh without any sour smell.
How should I store leftover Cheetah Print Heart Cake?
Very! You can store leftover cake at room temperature for up to 2 days. Just cover it with a cake dome or plastic wrap to keep it moist. If you want to store it for longer, keep it in the fridge, wrapped tightly, for up to 5 days. This way, each slice stays delicious and flavorful!
Can I freeze the Cheetah Print Heart Cake?
Definitely! You can freeze this delightful cake for up to 3 months. I recommend slicing the cake first — wrap each slice tightly in plastic wrap to protect its moisture, and then place them in a zip-top freezer bag. When you're ready to enjoy, thaw in the fridge overnight and reheat slightly in the microwave if you prefer it warm.
What should I do if my cake layers dome while baking?
If your cake layers domed, don't worry! Just wait for them to cool and gently level the tops with a serrated knife. It's a simple fix that will ensure your cake layers stack beautifully. To minimize doming in the future, make sure your oven temperature is accurate, and consider using cake strips around your pans.
Is this cake suitable for those with dietary restrictions, such as allergies to certain ingredients?
Absolutely! The Cheetah Print Heart Cake contains common allergens like eggs, dairy, and gluten. If you need a gluten-free version, you can substitute the all-purpose flour with a gluten-free blend. For dairy-free options, try using plant-based butter and milk alternatives. Just be sure to check food coloring ingredients for any allergens if you have dietary concerns!
Cheetah Print Heart Cake: A Fun Twist for Your Sweet Tooth
Ingredients
Equipment
Method
- Preheat your oven to 350°F (175°C) and prepare two heart-shaped pans by greasing and flouring them.
- In a medium bowl, whisk together the dry ingredients: flour, cornstarch, baking powder, baking soda, and salt.
- In a large mixing bowl, beat the softened butter until creamy. Gradually add sugar and beat until light and fluffy.
- In another bowl, whisk together the milk and sour cream until smooth for a creamy batter.
- Gradually combine the dry ingredients with the wet ingredients, mixing on low speed until just combined.
- Reserve 2 cups of the plain batter, then divide the remaining batter into three bowls and tint with food coloring.
- Pour half of the reserved plain batter into a lined 9×13 inch pan and pipe blobs of colored batter on top before baking.
- In the heart-shaped pans, dollop the batters randomly and swirl them to create a playful pattern.
- Bake the cakes at 350°F, checking for doneness after 25-32 minutes.
- Cool the cakes in the pans for 10-15 minutes before transferring to a wire rack.
- Trim the tops of the cooled cakes for even stacking and chill layers for 20-30 minutes.
- For the buttercream, beat the butter until smooth, gradually adding powdered sugar and cream until fluffy.
- Reserve some buttercream for filling, then tint the rest in the desired colors.
- Assemble the cake on a board with a layer of buttercream, stacking the layers and applying a crumb coat.
- Spread a base coat of frosting over the entire cake, smoothing it out evenly.
- Decorate with piped spots of brown and outlines of black buttercream for a whimsical finish.
- Chill the cake before slicing to ensure clean edges when serving.


Leave a Reply