
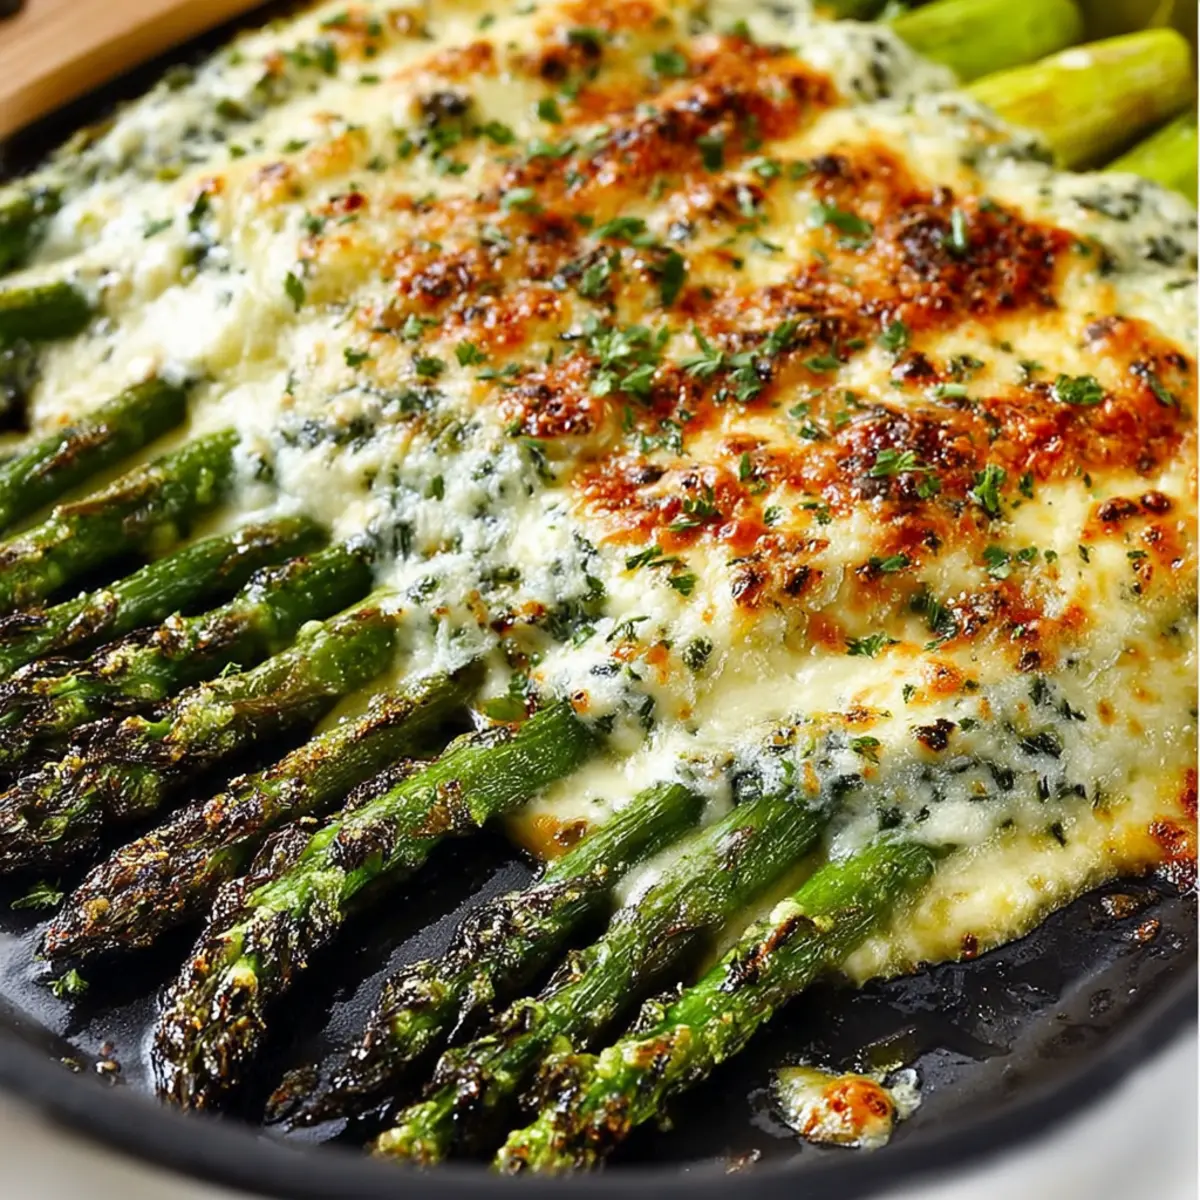
One sunny afternoon, while I was sifting through my favorite seasonal recipes, I stumbled upon the memory of my kiddo’s first taste of asparagus. It was the classic "try one bite" moment, where curiosity crept in, guided by the glorious aroma of something cheesy bubbling in the oven. That’s when I discovered the magic of Cheesy Baked Asparagus—a dish that turned a vegetable once deemed “yucky” into a family-favorite side!
This mouthwatering recipe not only brings out the best in tender asparagus, but it also delivers a comforting, rich flavor thanks to a luscious blend of Monterey and Parmesan cheeses. And the best part? It’s ready in under 20 minutes, making it the perfect solution for those busy weeknight dinners!
So whether you're serving it alongside juicy chicken or succulent pork chops, this cheesy delight is sure to win over even the pickiest eaters at your table. Let’s dive into this delectable dish that promises simplicity, flavor, and a sprinkle of nostalgia!

Why is Cheesy Baked Asparagus a Must-Try?
Quick and Easy: This dish takes just under 20 minutes from prep to table, fitting perfectly into your busiest evenings.
Kid-Approved: Who says veggies can’t be fun? The cheesy topping makes this asparagus an instant hit, even with picky eaters!
Rich, Creamy Flavor: A delightful blend of Monterey and Parmesan cheeses delivers a taste that feels indulgent without the guilt.
Versatile Side: Perfectly complements a variety of main dishes, from grilled chicken to juicy steaks. For more quick and delicious recipes, check out my Baked Feta Pasta for a complete meal idea!
Nostalgia Factor: This takes you back to childhood moments of discovering the joy of veggies with a cheesy twist!
Cheesy Baked Asparagus Ingredients
You'll fall in love with this dish!
For the Casserole
• Asparagus – This is the star of the dish, packed with vitamins and offers a delightful crunch.
• Heavy Whipping Cream – Provides a creamy texture; for a lighter version, use dairy-free whipping cream.
• Salt – Enhances all the flavors beautifully; adjust to taste.
• Black Pepper – Adds a hint of spice; freshly cracked for best flavor.
For the Cheese Topping
• Monterey Cheese – Melts perfectly to create a gooey, cheesy layer that ties the dish together.
• Grated Parmesan Cheese – Brings an extra punch of flavor and a delightful crust when baked.
Full measurements are in the recipe card below.
Step-by-Step Instructions for Cheesy Baked Asparagus
Step 1
Preheat your oven to 400 degrees Fahrenheit. This temperature is crucial for achieving that perfectly bubbly and golden cheesy topping in your Cheesy Baked Asparagus. As the oven warms up, gather your ingredients and prep your baking dish. A 9x13-inch oven-safe dish is ideal for this recipe, allowing plenty of room for the asparagus to lay flat and cook evenly.
Step 2
Pour the heavy whipping cream into the prepared baking dish. This creamy base will help to keep your asparagus moist while it bakes and will meld beautifully with the cheeses. Make sure to spread it evenly across the bottom of the dish. As you layer the ingredients, the creaminess will soak into the asparagus, enhancing its flavor as it cooks.
Step 3
Place the trimmed asparagus spears into the dish, ensuring they are evenly coated with the whipping cream. Season the asparagus with salt and pepper to taste. This simple seasoning will elevate the dish by highlighting the natural flavors of the vegetable. Arrange the asparagus in a single layer for even cooking, allowing each piece to soak up the creamy goodness.
Step 4
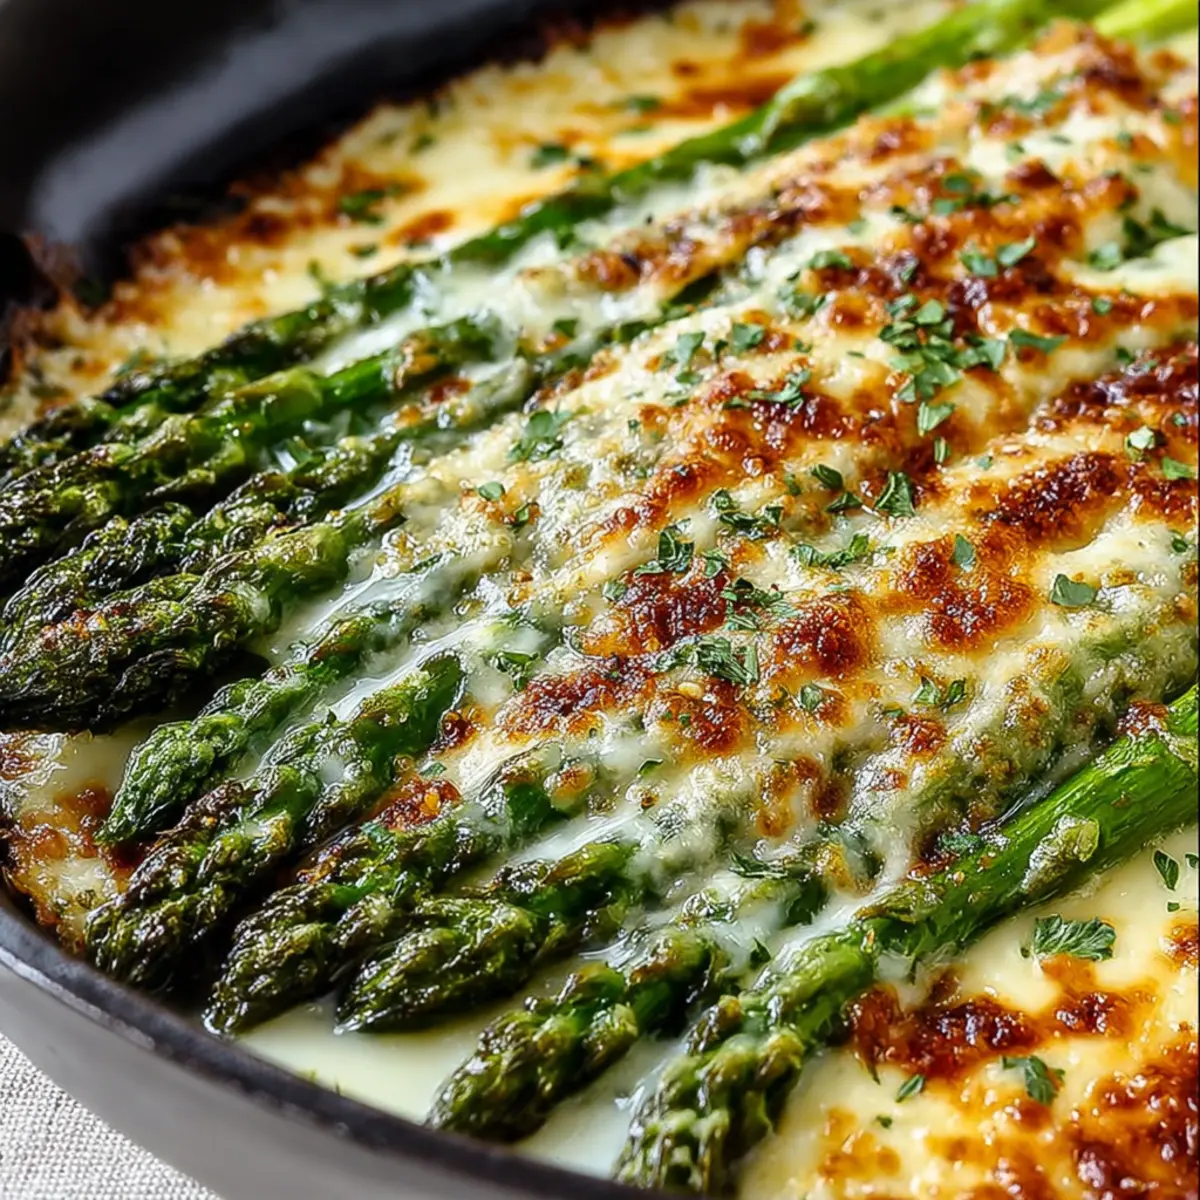
Next, sprinkle the shredded Monterey cheese generously over the asparagus, followed by a dusting of grated Parmesan cheese. This delightful cheesy topping will melt into a gooey, luscious layer; make sure each spear is covered for maximum cheesy goodness. The combination of these two cheeses not only adds flavor but also creates a nice crust when baked, making your Cheesy Baked Asparagus truly irresistible.
Step 5
Transfer the baking dish to your preheated oven and bake for 15 to 20 minutes. Keep an eye on it, and look for the cheese to become bubbly and golden brown. The asparagus should also be tender, with a slight crispness remaining. When it’s done, the dish will look inviting and smell utterly delicious—perfect for serving alongside your favorite main course!

What to Serve with Cheesy Baked Asparagus?
Creating a delightful meal is all about harmonious flavors and textures that elevate each dish to its full potential.
-
Juicy Grilled Chicken: This protein-packed classic brings a savory edge that balances the creamy asparagus beautifully.
-
Garlic Herb Roasted Potatoes: Crispy on the outside and fluffy on the inside, these potatoes add the perfect starchy complement to your cheesy veggies.
-
Zesty Quinoa Salad: Light and fresh, the tangy flavors of a quinoa salad add a refreshing contrast to the richness of the baked asparagus.
-
Tender Pork Chops: The subtle sweetness of perfectly seared pork chops makes for a mouthwatering pairing, enhancing the overall meal experience.
-
Creamy Risotto: Indulging in a rich, creamy risotto brings an elegant touch, and its velvety texture pairs wonderfully with the crunchy asparagus.
-
Lemon Garlic Shrimp: The bright acidity from the shrimp’s marinade heightens the flavors of the dish, making for a lively and vibrant meal.
-
Savory Stuffed Peppers: Filled with grains, cheese, and spices, these peppers offer a colorful, interesting texture to accompany your cheesy side.
-
Refreshing White Wine: A crisp, chilled Sauvignon Blanc brings notes of citrus that elevate the dish and cleanse the palate between bites.
-
Classic Chocolate Mousse: For dessert, a rich chocolate mousse provides a sweet closure that perfectly contrasts with the savory asparagus.
Cheesy Baked Asparagus Variations
Feel free to get creative with this recipe and make it your own with these delightful twists!
-
Dairy-Free: Swap heavy whipping cream for coconut cream or a dairy-free alternative to accommodate lactose intolerance.
-
Herb-Infused: Add a sprinkle of fresh or dried herbs like thyme or oregano for an aromatic touch that enhances flavors. Fresh herbs bring a garden-like brightness to every cheesy bite.
-
Garlic Lovers: Toss in minced garlic before baking to add a rich, savory depth to your cheesy goodness. Garlic’s aroma will wrap around the asparagus, creating an irresistible allure.
-
Spicy Kick: Incorporate a pinch of red pepper flakes for those who enjoy a little heat. This adds a delightful contrast to the creamy cheese, tempting those who crave bold flavors.
-
Bread Crumb Topping: For a crispy finish, sprinkle some seasoned breadcrumbs over the top before baking. This gives an added crunch that makes each bite even more satisfying.
-
Cheese Lovers’ Dream: Mix in some crumbled feta or goat cheese alongside Monterey and Parmesan for an extra rich flavor explosion. The tanginess of these cheeses complements the asparagus perfectly.
-
Veggie Boost: Add in some cherry tomatoes or bell peppers for a burst of color and additional nutrients. This twist not only enhances the dish visually but also brings a sweet contrast to the savory richness.
-
Zesty Lemon: Drizzle with fresh lemon juice before baking for a bright, refreshing zing that elevates the entire dish. The acidity of lemon perfectly balances the creaminess, creating a harmonious blend of flavors.
Make Ahead Options
These Cheesy Baked Asparagus are perfect for meal prep enthusiasts! You can prepare the asparagus and cream mixture up to 24 hours in advance, placing it in the baking dish and covering it tightly with plastic wrap to keep everything fresh. Simply season the asparagus with salt and pepper, then sprinkle the cheese topping before baking. This ensures that your dish maintains its cheesy goodness while saving time on busy weeknights. When you're ready to enjoy this delightful side, just pop it in the oven at 400 degrees for 15-20 minutes until the cheese is bubbly and the asparagus is tender. With this method, you’ll have a delicious dish ready to impress with minimal effort!
Expert Tips for Cheesy Baked Asparagus
- Choose Fresh Asparagus: Look for bright green, firm stalks with closed tips. Avoid dull or wilted asparagus for the best flavor.
- Avoid Soggy Asparagus: Ensure the asparagus is dry before placing it in the baking dish; this helps it roast beautifully instead of becoming watery.
- Customize Your Cheese: Experiment with different cheeses like cheddar or gouda for a new twist on your Cheesy Baked Asparagus!
- Monitor Baking Time: Every oven is different, so check on your dish around the 15-minute mark to prevent overcooking. You want bubbly cheese with tender asparagus.
- Store Leftovers Properly: Keep any leftovers in an airtight container in the fridge for 3-5 days. Reheat gently in the oven for the best results.
How to Store and Freeze Cheesy Baked Asparagus
Fridge: Store leftovers in an airtight container for up to 3-5 days. This helps maintain the cheesy goodness while keeping the asparagus fresh.
Freezer: You can freeze Cheesy Baked Asparagus for up to 2 months. Wrap it tightly in plastic wrap and then foil to avoid freezer burn.
Reheating: For the best results, reheat in the oven at 400 degrees Fahrenheit until heated through, about 10-15 minutes. This will revive the dish’s creamy texture and bubbly cheese.
Room Temperature: Let the dish cool completely before storing. Never leave at room temperature for more than 2 hours to ensure food safety.
Cheesy Baked Asparagus Recipe FAQs
What kind of asparagus should I use for this recipe?
Absolutely! When selecting asparagus, look for bright green spears that feel firm and have closed tips. Avoid stalks with dark spots or those that seem wilted, as they won't provide the best flavor or texture for your Cheesy Baked Asparagus.
How do I store leftovers?
Very simply! Store your leftover Cheesy Baked Asparagus in an airtight container in the fridge. It will stay fresh for up to 3-5 days. When you’re ready to enjoy it again, pop it in the oven at 400 degrees until it's heated through—about 10-15 minutes should do the trick!
Can I freeze Cheesy Baked Asparagus?
Yes, you can absolutely freeze it for later! Wrap your cooled Cheesy Baked Asparagus tightly in plastic wrap, followed by aluminum foil to prevent freezer burn. It can last in the freezer for up to 2 months. When you’re ready to enjoy, thaw it in the fridge overnight and reheat it in the oven.
What if my asparagus becomes soggy?
Ah, soggy asparagus can be a bummer! To avoid this, make sure the asparagus is dry before baking. Additionally, don’t skip the step of arranging them in a single layer in the baking dish; this allows each spear to roast nicely, keeping them tender but not waterlogged.
Is there a dairy-free option for this recipe?
Yes, indeed! You can substitute the heavy whipping cream with a dairy-free whipping cream alternative to make this dish suitable for those with dairy sensitivities. Just be sure to check the consistency, as some brands may vary.
Can I adjust the cheese types?
Absolutely! If you want to switch things up, try using different cheese varieties like cheddar or gouda on top. Each will bring a unique flavor profile to your Cheesy Baked Asparagus while keeping that delightful gooey texture!
Irresistibly Cheesy Baked Asparagus: A Must-Try Side Dish
Ingredients
Method
- Preheat your oven to 400 degrees Fahrenheit. Gather your ingredients and prep your baking dish.
- Pour the heavy whipping cream into the prepared baking dish, spreading it evenly.
- Place the trimmed asparagus into the dish and season with salt and pepper.
- Sprinkle the shredded Monterey cheese followed by the grated Parmesan cheese over the asparagus.
- Transfer to the oven and bake for 15 to 20 minutes until the cheese is bubbly and golden brown.
Nutrition
Notes
- Choose fresh asparagus for the best flavor.
- Ensure the asparagus is dry before baking.
- Experiment with different cheeses like cheddar or gouda.
- Monitor your baking time for the best results.
- Store leftovers properly in an airtight container.

Leave a Reply