
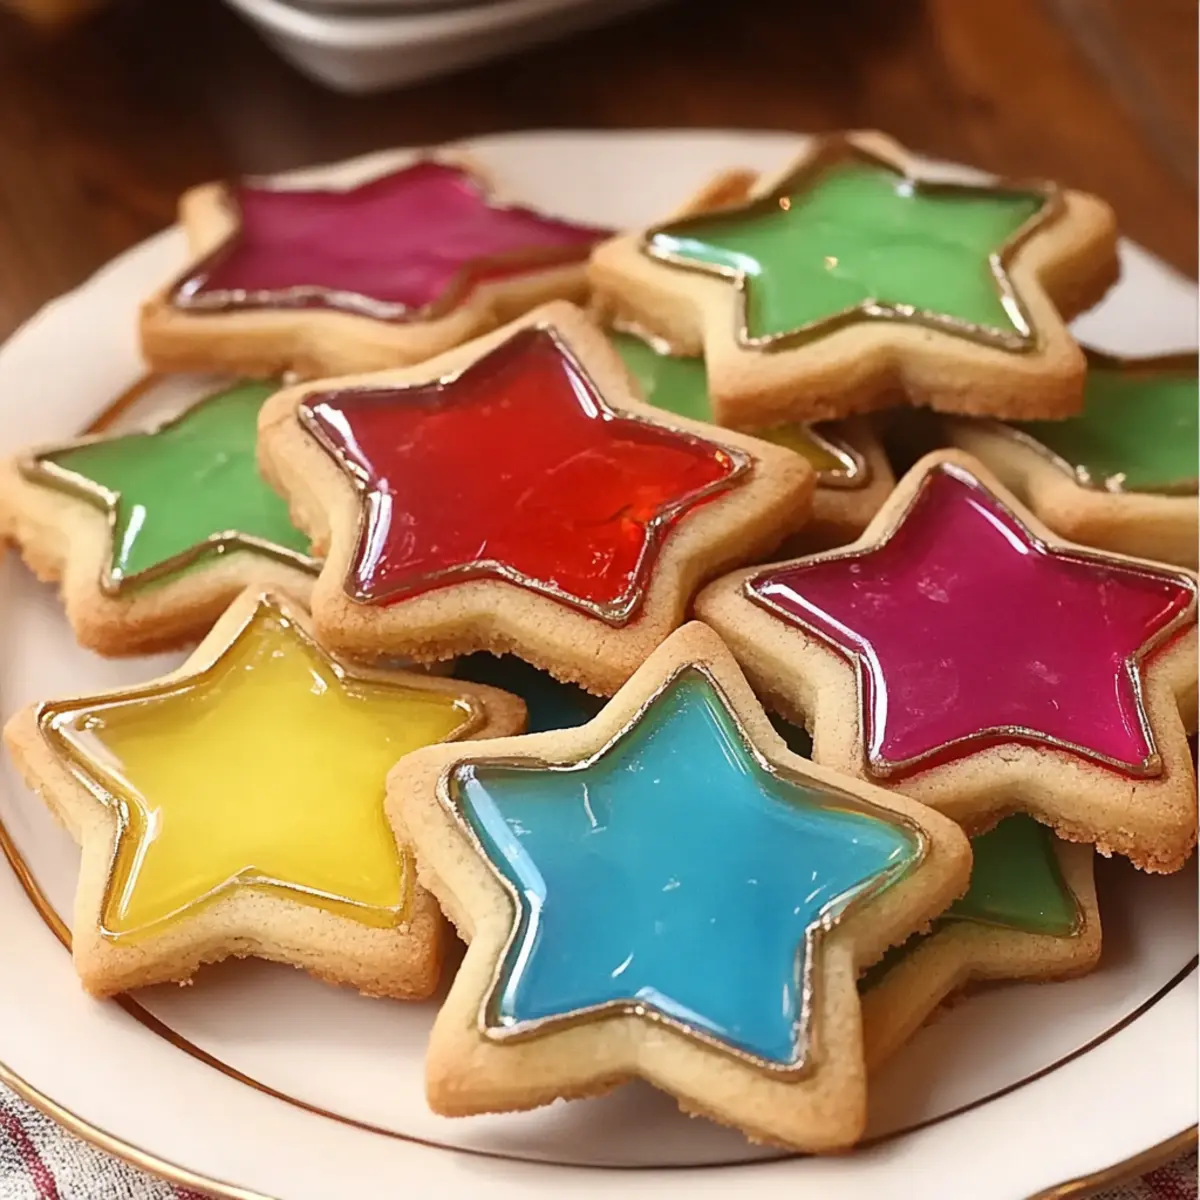
As I sifted through the vibrant colors of crushed hard candies scattered on my kitchen counter, it hit me: these aren't just ingredients; they're the building blocks of joy. My Stained Glass Cookies transform a simple baking session into an exquisite art project, enchants with their shimmering candy centers while providing a delightful crunch. This recipe is not only fun to make but also a fantastic way to captivate your friends and family—perfect for gatherings or chilly afternoons at home. With just a little chilling time and minimal prep, you'll see how easy it is to create something stunning that will keep everyone coming back for more. Curious how to make these dazzling treats? Let’s dive into the recipe!

Why are Stained Glass Cookies a must-try?
Spectacular Visual Appeal: These cookies sparkle like little masterpieces, boasting a stunning array of colors that will leave everyone in awe.
Easy to Make: With just a few simple steps, you can create these beautiful treats, making them perfect for bakers of all skill levels.
Perfect for Any Occasion: Whether it’s a holiday gathering, a birthday party, or a cozy afternoon tea, these cookies provide the ideal centerpiece that’s sure to impress your guests.
Customize to Your Taste: Feel free to swap out the hard candies for your favorite flavors, allowing you to make each batch uniquely yours.
Sweet Crunch: The combination of buttery cookie and melted candy delivers a delightful texture that will have everyone reaching for seconds!
Not sure where to start? Check out my guide on basic cookie decorating tips to make these cookies even more spectacular!
Stained Glass Cookies Ingredients
• Get ready to create colorful delights!
For the Cookie Dough
- All-purpose flour – 2 ½ cups for a chewy texture that holds just right.
- Baking powder – 1 teaspoon to ensure your cookies have that perfect lift.
- Salt – ½ teaspoon to enhance the sweetness of the cookies.
- Unsalted butter – 1 cup, softened, for richness and creaminess that makes these cookies irresistible.
- Granulated sugar – 1 cup to provide the classic sweetness we all love.
- Large egg – 1, binding everything together for that tender bite.
- Vanilla extract – 2 teaspoons for warm, aromatic flavor.
- Almond extract (optional) – ½ teaspoon to add a touch of nutty essence if you’re feeling adventurous.
For the Filling
- Assorted hard candies – Crush your favorites for that stunning stained glass effect; choose vibrant colors for extra visual appeal.
Whether you're baking these Stained Glass Cookies for a special occasion or just a cozy day at home, you'll absolutely love how fun and rewarding this recipe is!
Step‑by‑Step Instructions for Stained Glass Cookies
Step 1: Whisk the Dry Ingredients
In a medium bowl, whisk together 2 ½ cups of all-purpose flour, 1 teaspoon of baking powder, and ½ teaspoon of salt until well combined. This mixture will provide the foundation for your Stained Glass Cookies, ensuring they rise beautifully during baking. Set this aside as you prepare the wet ingredients.
Step 2: Cream the Butter and Sugar
In a separate large mixing bowl, cream together 1 cup of softened unsalted butter and 1 cup of granulated sugar using an electric mixer. Beat on medium speed for about 3-4 minutes until the mixture is light and fluffy. This step is crucial to create a tender texture in your cookies, so take your time to mix well!
Step 3: Mix in the Egg and Extracts
Add 1 large egg, 2 teaspoons of vanilla extract, and ½ teaspoon of almond extract (if using) to the butter mixture. Mix on low speed until the ingredients are well incorporated—about 1-2 minutes. This will enhance the flavor of your Stained Glass Cookies, offering delightful sweetness and aroma.
Step 4: Combine Dry and Wet Ingredients
Gradually add the flour mixture to the wet ingredients, mixing on low speed until just combined. Avoid overmixing to keep your Stained Glass Cookies tender and delicious. You’ll know it’s ready when the dough starts to come together and forms a soft ball without any dry flour remaining.
Step 5: Chill the Dough
Divide the dough in half and shape each half into a disc. Wrap them in plastic wrap and refrigerate for at least 1 hour, or until firm. This chilling step helps develop the flavors and makes the dough easier to roll out later, ensuring your Stained Glass Cookies hold their shape.
Step 6: Preheat the Oven
Preheat your oven to 350°F (175°C) and line baking sheets with parchment paper. This will prepare your baking surface for the cookies and prevent sticking, ensuring a perfect batch of Stained Glass Cookies once they come out of the oven.
Step 7: Roll Out the Dough
On a lightly floured surface, roll out one disc of chilled dough to about ¼ inch thick. Use cookie cutters to cut out shapes, ensuring to use a smaller cutter in the center for the ‘glass’ effect. You should see a nice, even thickness in your cookie silhouettes, ready to dazzle.
Step 8: Fill the Centers
Crush your assorted hard candies into small pieces and fill the centers of each cookie cutout generously. The vibrant colors of the candy will create that stunning stained glass effect when they melt, adding beauty and sweetness to your Stained Glass Cookies.
Step 9: Bake the Cookies
Bake the cookies in your preheated oven for 8-10 minutes, or until the edges are lightly golden, and the candy has melted into a glossy filling. Keep an eye on them, as the visual cue of golden edges indicates they are done and ready for cooling.
Step 10: Cool and Transfer
Allow the Stained Glass Cookies to cool completely on the baking sheets for a few minutes before carefully transferring them to a wire rack. This will ensure they hold their shape while cooling, and you'll be left with beautiful, shiny cookies ready to enjoy.

Stained Glass Cookies Variations
Feel free to get creative with this recipe and tailor it to your taste buds!
-
Gluten-Free: Substitute all-purpose flour with a 1:1 gluten-free baking blend for a deliciously safe option.
-
Vegan: Replace the egg with a flaxseed meal (1 tablespoon flaxseed mixed with 2.5 tablespoons water) and use vegan butter. You won’t miss a beat!
-
Chocolate-Dipped: After baking, dip the edges of cooled cookies in melted dark chocolate for an extra indulgent treat. The combination of chocolate and candy creates a flavor explosion!
-
Spiced Up: Add 1 teaspoon of cinnamon or ginger to the dry ingredients for a warm spiced flavor that’s perfect for the holidays. It elevates the cookie to new aromatic heights!
-
Nutty Addition: Mix in ½ cup of finely chopped nuts, like walnuts or almonds, into the cookie dough for delightful crunch and flavor. This twist adds complexity to each bite!
-
Citrus Zest: Incorporate the zest of one orange or lemon into the dough for bright, zesty notes that enhance the cookies' vibrancy. The citrus kick will surprise and delight!
-
Heat It Up: For a spicy kick, add a pinch of cayenne pepper to the dough, or use spicy candies in the filling. It’s a sweet ‘n’ spicy surprise that will keep everyone guessing.
-
Layered Colors: Use different colored hard candies to create themed cookies, such as red and green for Christmas or pastel shades for spring. It makes your baking not just tasty but visually striking!
These variations not only cater to different dietary needs but also make your baking experience even more exciting. Happy baking! Want some extra inspiration? Consider exploring my guide on creative decorating techniques to elevate your cookies even more!
How to Store and Freeze Stained Glass Cookies
Room Temperature: Store your Stained Glass Cookies in an airtight container at room temperature for up to 3 days. This keeps them fresh while maintaining their delightful crunch.
Fridge: For longer freshness, you can refrigerate the cookies in an airtight container for up to a week. Just be aware that this may slightly alter the texture.
Freezer: To freeze, wrap each cookie individually in plastic wrap and place them in a freezer-safe bag. They will stay delicious for up to 2 months.
Reheating: When ready to enjoy, let the cookies thaw at room temperature for about 30 minutes. You can reheat them briefly in the oven at 300°F (150°C) for a few minutes to revive their crunch.
Expert Tips for Stained Glass Cookies
Chill the Dough Well: Ensure your dough chills for at least 1 hour. This helps the cookies maintain their shape while baking and enhances their texture.
Choose Candy Wisely: Avoid using soft candies like gummy bears; they don't melt properly. Stick to hard candies for the best stained glass effect in your Stained Glass Cookies.
Watch the Bake Time: Keep an eye on your cookies while baking. Once the edges are golden and the candy has fully melted, remove them to avoid overbaking.
Use a Light Touch: When transferring cookies to a wire rack, be gentle! They can be fragile—especially when the candy is still warm.
Experiment with Flavors: Don’t hesitate to mix up the extracts! Try using different flavor combinations with the vanilla and almond extracts to create uniquely flavored cookies.
Cut Shapes with care: Use clean, sharp cookie cutters and make sure to press down firmly. This helps create neat edges that will showcase the beautiful stained glass effect.
Make Ahead Options
These Stained Glass Cookies are perfect for busy home cooks who want to save time without sacrificing flavor! You can prepare the cookie dough up to 3 days in advance by following your regular mixing steps and then chilling it (wrapped in plastic wrap) in the refrigerator. This not only allows the flavors to develop but also keeps the dough fresh. If you prefer, you can also cut out the cookie shapes and store them in the fridge, layering them between sheets of parchment paper for up to 24 hours. When you’re ready to bake, simply fill the centers with crushed hard candies and follow the bake instructions. These cookies will come out just as delicious and dazzling, ensuring you have beautiful treats ready for any occasion!
What to Serve with Stained Glass Cookies?
Indulge in the sweet delights of a joyful baking session and discover a world of flavors to complement your Stained Glass Cookies.
-
Creamy Vanilla Ice Cream: The cool, creamy texture of vanilla ice cream contrasts beautifully with the crunchy cookie, enhancing each sugary bite. A scoop of ice cream topped with a sprinkle of colorful cookie crumbs makes for a delightful presentation.
-
Fruit Salad Medley: A refreshing mix of seasonal fruits provides a bright and juicy counterpart to the cookie's sweetness. The natural acidity of fruits balances the sugary flavors, making it a light, enjoyable addition to your dessert table.
-
Chocolate Ganache Dip: Dive into decadence with a rich chocolate ganache that pairs well with the brightness of the stained glass effect. This luscious dip adds an extra level of indulgence, perfect for those who crave a little more chocolate in their life.
-
Almond Milk Latte: Warm up your afternoon with a smooth almond milk latte. Its nutty flavors complement the cookies seamlessly, creating a cozy pairing that feels like a comforting hug.
-
Fresh Lemonade: A glass of icy fresh lemonade serves as a zesty, tart contrast that cuts through the sweetness of the cookies. With each sip, you’ll feel invigorated, making it a refreshing option for gatherings.
-
Chocolate-Covered Strawberries: Elegantly dipped strawberries bring a touch of romance and sophistication to your dessert spread. The combination of chocolate and fruit not only looks stunning next to your cookies but offers a deliciously rich contrast as well.
Elevate your enjoyment of Stained Glass Cookies by mixing and matching these delightful pairings that promise a festive experience!

Stained Glass Cookies Recipe FAQs
What kind of hard candies work best for Stained Glass Cookies?
Absolutely! Hard candies like Jolly Ranchers or Life Savers work wonderfully for the ‘glass’ filling. Avoid soft candies such as gummy bears or chocolates, as they don’t melt properly and won't give that beautiful stained glass effect.
How long can I store Stained Glass Cookies at room temperature?
You can store your Stained Glass Cookies in an airtight container at room temperature for up to 3 days. This way, they'll maintain that delightful crunch which makes them so enjoyable!
Can I refrigerate my Stained Glass Cookies?
Yes! If you want to extend their freshness, you can refrigerate the cookies for up to a week in an airtight container. Just keep in mind that refrigeration may slightly change their texture, making them a bit softer.
How do I freeze Stained Glass Cookies?
To freeze your cookies, wrap each one individually in plastic wrap, then place them into a freezer-safe bag. They can be kept frozen for up to 2 months. When you're ready to enjoy, simply thaw them at room temperature for about 30 minutes. For a warm treat, you can reheat them briefly in the oven at 300°F (150°C) for a few minutes to restore their crunch.
What should I do if the candy spills over the edges while baking?
Very! If the candy spills during baking, you can simply break off the excess once the cookies have cooled. To prevent this from happening next time, be sure to fill the centers of your cutouts generously, but not overly full—aim for about ¾ full to allow room for melting.
Can my pets have Stained Glass Cookies?
It's best to avoid giving your pets any cookies that contain sugar or butter, as these ingredients can be harmful to them. Always make special treats for your furry friends that are designed specifically for their diets!
Delicious Stained Glass Cookies for a Sweet Surprise
Ingredients
Equipment
Method
- Whisk together the all-purpose flour, baking powder, and salt until well combined.
- Cream together the softened unsalted butter and granulated sugar until light and fluffy.
- Mix in the egg, vanilla extract, and almond extract until well incorporated.
- Gradually add the flour mixture to the wet ingredients, mixing until just combined.
- Divide the dough in half, wrap in plastic wrap, and refrigerate for at least 1 hour.
- Preheat the oven to 350°F (175°C) and line baking sheets with parchment paper.
- Roll out one disc of chilled dough to about ¼ inch thick and cut shapes.
- Fill the centers of each cookie cutout with crushed hard candies.
- Bake the cookies for 8-10 minutes until edges are golden and candy has melted.
- Allow cookies to cool on the baking sheets before transferring to a wire rack.


Leave a Reply