
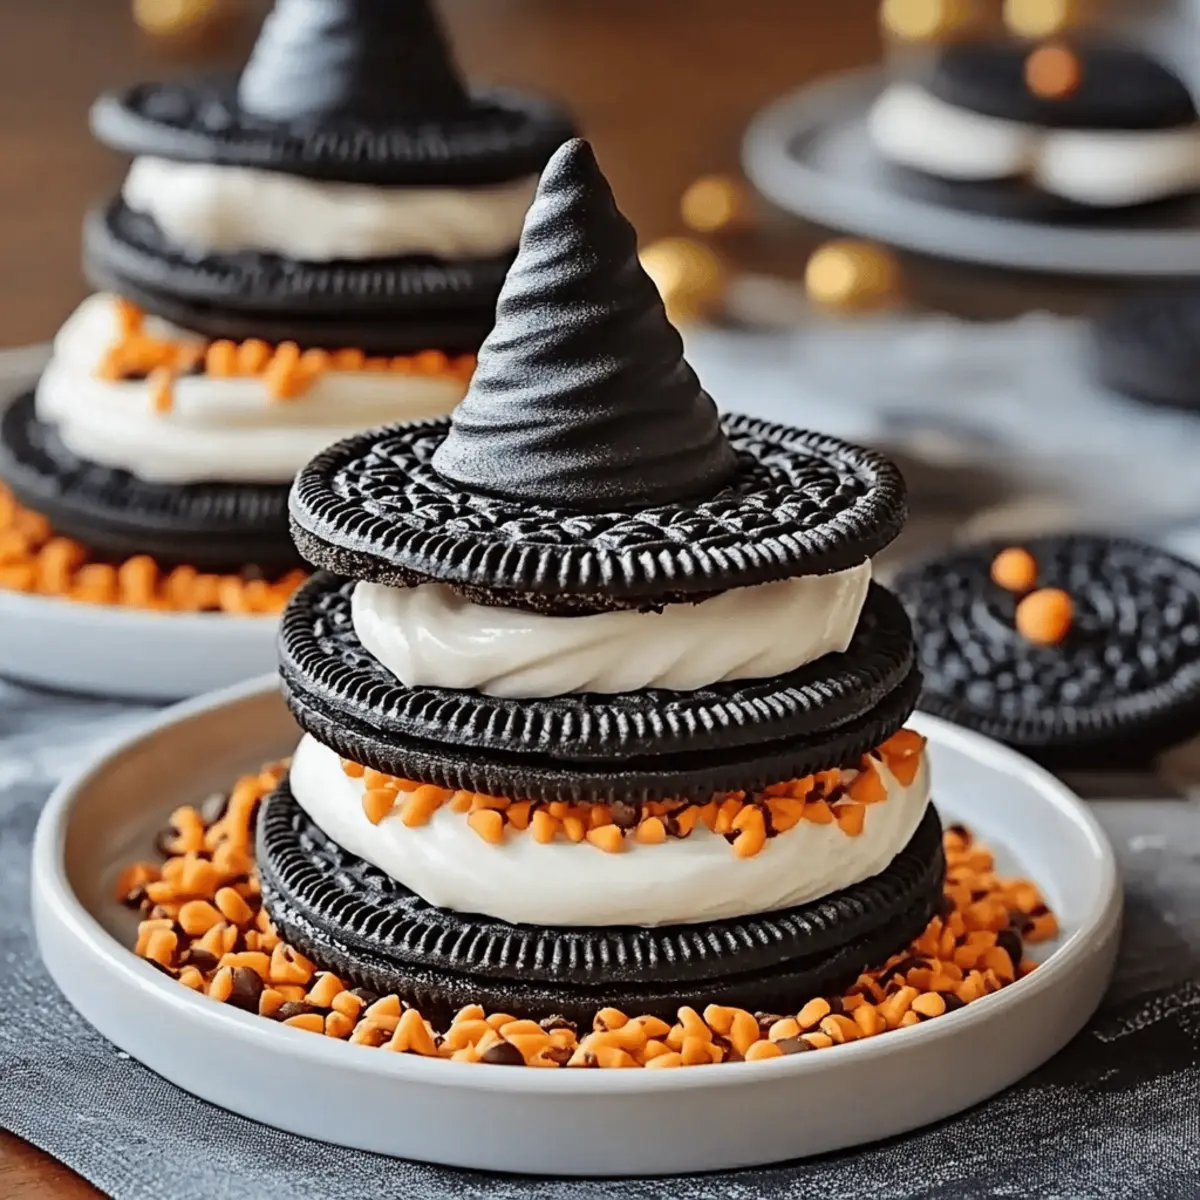
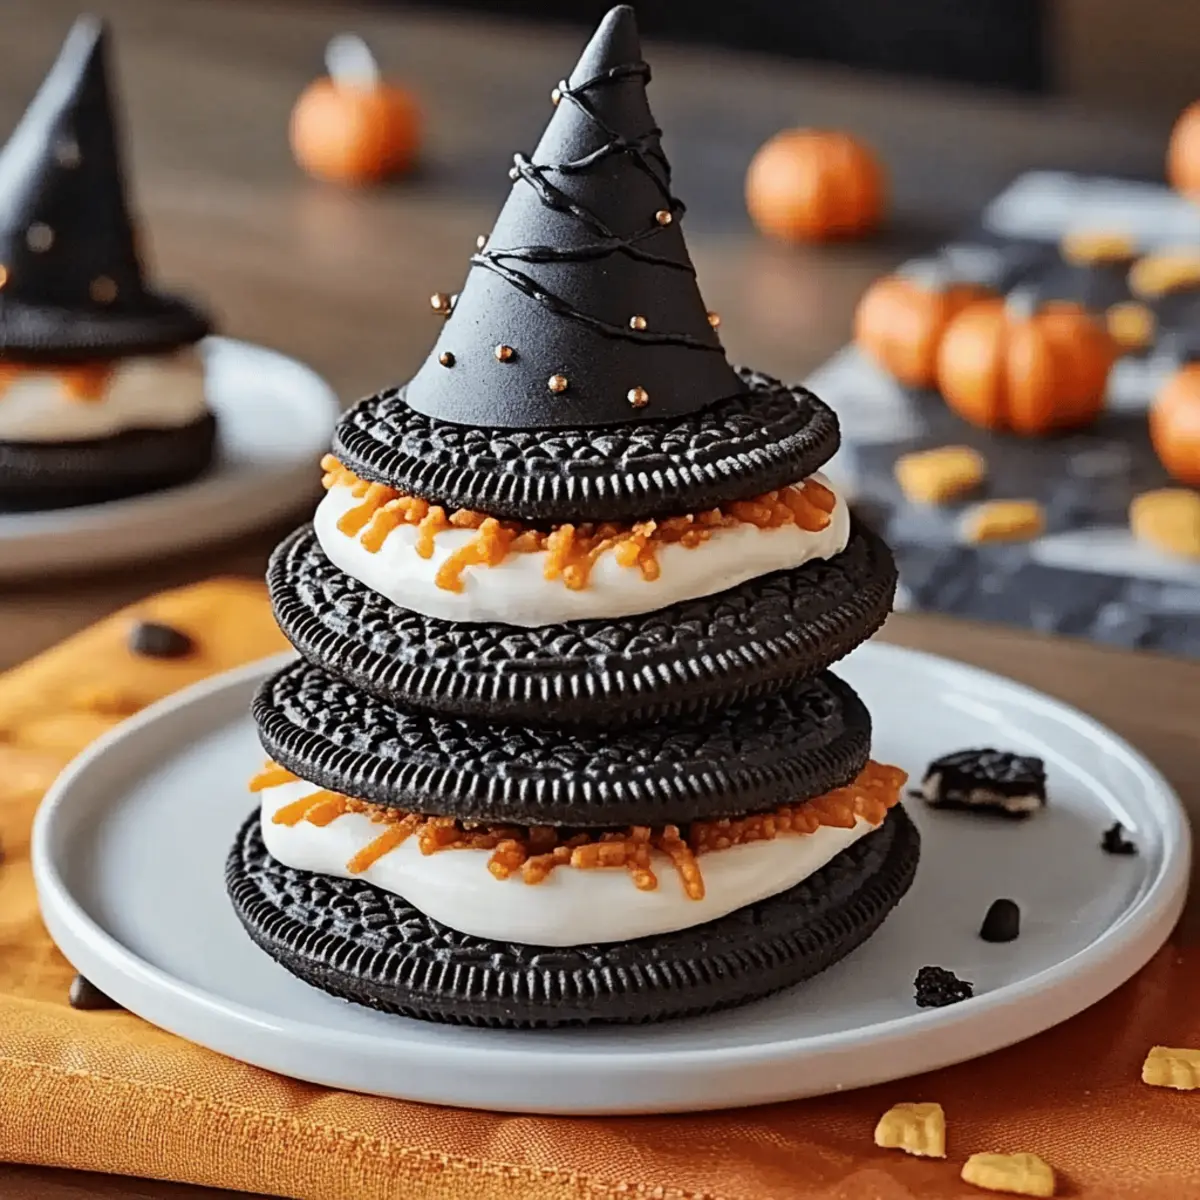
As Halloween approaches, I can’t help but feel a spark of excitement in the kitchen! There's something magical about crafting spooky treats, and these Oreo Witch Hat Cookies are a delightful way to get into the spirit. This fun, no-bake recipe combines the iconic Oreo cookie with creamy, chocolatey toppings to create a whimsical dessert that’s bound to impress all your ghoulish guests. Perfect for last-minute parties, these cookies come together swiftly, requiring just 20 minutes of prep time—who knew Halloween treats could be so easy? Plus, their playful decor makes them a hit with kids and adults alike! Ready to bring a bit of enchantment to your dessert table? Let’s dive in!

Why Are These Cookies So Special?
Easy Assembly: With no baking required, these Oreo Witch Hat Cookies come together in a flash, making them an excellent choice for spontaneous gatherings or Halloween parties.
Decadent Layers: The rich chocolate kisses layered on top of creamy Oreos are an irresistible treat that everyone will love, ensuring your dessert table is a hit!
Festive Appeal: The colorful sprinkles add a pop of fun, making these cookies not just delicious but also visually appealing—perfect for impressing guests.
Versatile Base: Feel free to experiment! Switch up the sprinkles or use different flavored Oreos for a unique twist, just like you might with Cucumber Sandwiches for a fun take on a classic.
Family Fun: Involve the kids in the decoration process—creating these cookies becomes a delightful Halloween activity that sparks creativity and laughter.
Grab your ingredients and get ready to make some enchanting treats that everyone can't resist!
Oreo Witch Hat Cookies Ingredients
Prepare to create these magical treats!
For the Cookies
- Oreo cookies – 1 package (15.6 oz) for that delicious chocolate base that everyone loves.
- Chocolate kisses – 12 oz to create the iconic witch hats that add a decadent touch.
- Butter – ½ cup (softened) for a rich, creamy filling that binds the cookies together.
For the Decoration
- White chocolate chips – ½ cup to drizzle over the cookies for a stylish touch; melts easily for decorating!
- Colorful sprinkles – ¼ cup to sprinkle on top while the chocolate is still wet, giving your cookies a festive flair!
- Powdered sugar – 1 cup to mix with butter, creating a sweet filling that's irresistibly creamy.
Let your creativity run wild with these Oreo Witch Hat Cookies and make this Halloween an unforgettable celebration!
Step‑by‑Step Instructions for Oreo Witch Hat Cookies
Step 1: Preheat and Prepare
Preheat your oven to 350°F (175°C) to ensure your kitchen is ready for some cookie magic. While it heats up, gather and prepare your workspace, setting out a baking sheet lined with parchment paper to catch any chocolate drips later.
Step 2: Separate the Oreos
Carefully twist apart the Oreo cookies, setting aside one half of each cookie. You’ll only need the cream-less side for your delicious Oreo Witch Hat Cookies. Keep the other halves for snacking or another recipe, if desired—no cookie left behind!
Step 3: Make the Filling
In a medium mixing bowl, combine the softened butter and powdered sugar. Using a hand mixer, beat this mixture until fluffy and creamy, about 2-3 minutes. This sweet filling will add richness to your cookies, making each bite decadently delightful.
Step 4: Assemble the Cookies
Spread a generous dollop of your creamy filling onto the cream-less side of one Oreo half. Gently press another half on top to create a sandwich. Repeat this process with the remaining Oreos, assembling about 24 sandwiches that will soon be dressed for Halloween!
Step 5: Melt the Chocolate Kisses
Unwrap the chocolate kisses and place them in a microwave-safe bowl. Microwave in 15-second intervals, stirring in between, until they are almost completely melted and smooth, about 30-45 seconds total. They should be soft enough to drizzle but not too runny.
Step 6: Top with Chocolate
Using a spoon, place a melted chocolate kiss right in the center of each Oreo sandwich, allowing the chocolate to flow slightly down the sides, resembling a witch's hat. This step adds not only sweetness but a whimsical touch to your Oreo Witch Hat Cookies.
Step 7: Drizzle White Chocolate
Melt the white chocolate chips in a microwave-safe bowl, using the same method as before (about 30 seconds). Once smooth, drizzle the white chocolate over each cookie, ensuring to cover the chocolate kisses. Work quickly to ensure every cookie gets a fair share of that delicious drizzle!
Step 8: Add Colorful Sprinkles
Before the white chocolate sets, sprinkle the colorful sprinkles generously atop each cookie. This bright touch will make your Oreo Witch Hat Cookies festive and fun, ensuring they stand out at your Halloween gathering.
Step 9: Cool and Serve
Transfer your decorated cookies to a wire rack, allowing them to cool completely. This will help the chocolate set properly. Once cooled, they are ready to be served and enjoyed! These Oreo Witch Hat Cookies are sure to enchant all your guests.
Expert Tips for Oreo Witch Hat Cookies
-
Storage Matters: Store your cookies in an airtight container to keep them fresh and prevent the chocolate from melting or becoming sticky.
-
Perfect Melting: Melt chocolate kisses slowly in the microwave. If overheated, they can become grainy; aim for a nice, smooth texture for the best Oreo Witch Hat Cookies.
-
Sprinkle Sparingly: Don’t overload on sprinkles! A light dusting enhances the visual appeal without overpowering the cookie's flavor.
-
Uniform Size: For even cookies, try to use similar-sized Oreo halves. This ensures each guest gets a well-proportioned treat that looks fantastic.
-
Cooling Tips: Allow ample cooling time on the wire rack. This helps the chocolate set properly and retains the cookie's structure when served.
How to Store and Freeze Oreo Witch Hat Cookies
Room Temperature: Store your Oreo Witch Hat Cookies in an airtight container at room temperature for up to 3 days to keep them fresh and tasty.
Fridge: For longer freshness, keep the cookies in the refrigerator; they can last up to a week, but make sure they’re sealed properly to prevent drying out.
Freezer: You can freeze the cookies for up to 2 months. Separate layers with parchment paper in an airtight container to avoid sticking and preserve the flavors.
Reheating: To enjoy them warm, let them sit at room temperature for 30 minutes, then briefly microwave for 10-15 seconds, giving your Oreo Witch Hat Cookies a delightful soft texture again!
What to Serve with Tasty Oreo Witch Hat Cookies
Indulge in a delightful array of pairings that elevate your spooky treat experience to new heights.
-
Chilled Milk: Nothing beats the classic duo of cookies and milk! A glass of icy cold milk complements the Oreos perfectly, balancing sweetness with creaminess.
-
Pumpkin Spice Latte: Embrace the season with a warm, spiced beverage. The flavors of pumpkin spice enhance the chocolate’s richness, creating a cozy vibe.
-
Gummy Worms: Add a playful touch to your dessert table. These chewy candies invite a bit of fun, perfect for Halloween-themed gatherings.
-
Fruit Platter: Fresh fruits like strawberries and grapes offer a refreshing counterpoint to the sweet cookies. This mix of flavors provides a colorful, healthy option.
-
Creamy Cheesecake Dip: Whip up a quick dip with cream cheese, vanilla, and powdered sugar. It offers a smooth, sweet counterpart for those who crave extra indulgence.
-
Halloween-themed Punch: Serve up a fruity punch with slivers of citrus and floating gummy bats. It ties nicely into the festive theme while providing a refreshing drink.
-
Chocolate Mousse: Its luxurious texture and deep chocolate flavor will leave guests wanting more. This decadent dessert pairs wonderfully with the rich oreo cookies, enhancing the overall treat experience.
Make your spooky gathering complete by showcasing these delicious treats alongside your Oreo Witch Hat Cookies!
Make Ahead Options
These delightful Oreo Witch Hat Cookies are perfect for meal prep! You can prepare the Oreo sandwiches and fill them with the creamy butter-sugar mixture up to 3 days in advance; just store them in an airtight container to keep them fresh. The melted chocolate kisses can also be ready up to 24 hours ahead; simply top the cookies and refrigerate them until you're ready to serve. When it’s time to finish, drizzle the melted white chocolate and add the colorful sprinkles right before serving to ensure they look vibrant. This method keeps your cookies just as delicious while saving you time amidst your busy schedule!
Oreo Witch Hat Cookies Variations
Feel free to make these enchanting cookies your own with a few simple adjustments!
-
Gluten-Free: Swap regular Oreos for gluten-free versions to accommodate those with gluten sensitivities without sacrificing taste!
-
Nutty Addition: Add ¼ cup of finely chopped nuts (like almonds or walnuts) into the creamy filling for a crunchy surprise in every bite.
-
Minty Twist: Use mint-flavored chocolate kisses for a refreshing peppermint twist that will enchant your taste buds this Halloween.
-
Spicy Kick: Mix a pinch of cayenne pepper into the melted chocolate to give your cookies a spicy, grown-up flavor that's both surprising and delightful.
-
Color Variations: Customize the sprinkles to match any occasion! Think pastels for spring or red and green for Christmas, just like you might do with Cucumber Sandwiches for other festive treats!
-
Dairy-Free: Substitute butter with coconut oil and use dairy-free chocolate kisses to create a vegan-friendly version that everyone can enjoy.
-
Chocolate Lovers: For extra decadence, dip the oreo sandwiches in the melted chocolate instead of just topping them; double the chocolate, double the fun!
-
Fruit Fusion: Add some crushed freeze-dried strawberries into the filling for a fruity twist that complements the rich chocolate beautifully.

Oreo Witch Hat Cookies Recipe FAQs
How do I choose the best Oreos for this recipe?
When selecting Oreos, look for fresh packages that aren't damaged or expired. You want the cookies to remain intact and ready for assembling; avoid any with dark spots or cracks which might make them difficult to work with.
What’s the best way to store leftover Oreo Witch Hat Cookies?
Absolutely! Store your cookies in an airtight container at room temperature for up to 3 days. If you want to keep them fresh for longer, you can refrigerate them for up to a week. Just ensure they're sealed tightly to maintain their delicious taste and texture.
Can I freeze Oreo Witch Hat Cookies?
Yes, you can! To freeze, carefully separate the cookies with layers of parchment paper in an airtight container. This prevents them from sticking together and keeps the flavors intact. They can be frozen for up to 2 months. When you're ready to enjoy, let them thaw in the fridge for a few hours or at room temperature for about 30 minutes.
What should I do if my chocolate kisses aren’t melting smoothly?
If you find your chocolate kisses becoming grainy while melting, it's likely that they were overheated. Try melting them in shorter bursts; microwave them in 15-second intervals, stirring in between until they’re mostly melted—then let the residual heat melt the rest. If you need an alternative, you could also use a double boiler to control the heat better.
Are these cookies suitable for kids with allergies?
You may want to check the packaging for allergens! Oreo cookies contain wheat and may have traces of nuts, so always read the labels carefully if allergies are a concern. If making these for someone with dietary restrictions, consider using gluten-free Oreos and dairy-free chocolate to make them more inclusive.
How can I make these cookies more festive?
Very! You can switch up the sprinkles for themed ones according to your celebration or even use different-flavored Oreos to infuse creativity into your treats. For Halloween, try adding edible googly eyes or themed candy to make them even spookier!
Deliciously Spooky Oreo Witch Hat Cookies for Halloween Fun
Ingredients
Equipment
Method
- Preheat your oven to 350°F (175°C) and prepare your baking sheet with parchment paper.
- Twist apart the Oreo cookies, using the cream-less sides for the recipe.
- In a medium mixing bowl, combine softened butter and powdered sugar, and beat until fluffy.
- Spread filling on one Oreo half, sandwich it with another half, and repeat for all Oreos.
- Melt the chocolate kisses in a microwave-safe bowl until smooth.
- Place a melted chocolate kiss on each Oreo sandwich, letting it flow slightly down the sides.
- Melt white chocolate chips and drizzle over each cookie.
- Sprinkle colorful sprinkles on top before the white chocolate sets.
- Cool the cookies on a wire rack before serving.


Leave a Reply