
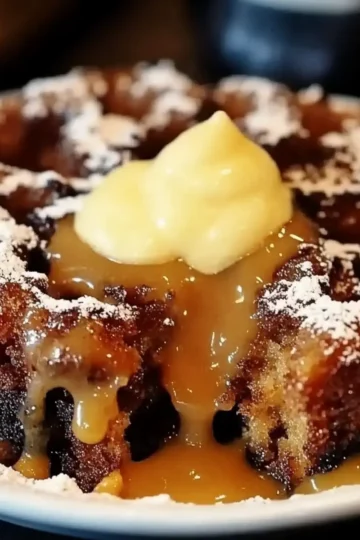
As I stirred the bubbling pot of honey on my stovetop, a sweet nostalgia washed over me, reminding me of my childhood days spent in my grandmother's kitchen. This Burnt Honey Pie is a delightful homage to those moments, transforming simple ingredients into an unforgettable dessert experience. Not only is it a show-stopping centerpiece for any gathering, but this recipe is also surprisingly easy to whip up—perfect for those of us who want to impress without the stress. With a luscious filling enriched by the depth of burnt honey and a touch of warm nutmeg, it's a comforting dessert that's bound to melt hearts. Are you ready to dive into the divine sweetness of this pie? Let’s get baking!

Why is Burnt Honey Pie so special?
Unique Flavor Explosion: The burnt honey gives this pie its distinctive, rich flavor that sets it apart from ordinary desserts.
Simple Ingredients: With just a few pantry staples like honey, cream, and eggs, this pie is an accessible treat for all skill levels.
Effortless Elegance: Impress your guests with a gourmet dessert that looks and tastes incredible, yet requires minimal effort.
Nostalgic Comfort: Reminiscent of cherished family gatherings, this pie brings warmth and delight to any table, making it perfect for cozy evenings.
Whether you're enjoying it solo or sharing it with loved ones, just like my favorite Chicken Pot Pie, this Burnt Honey Pie is bound to be a crowd-pleaser!
Burnt Honey Pie Ingredients
• Here's everything you need to create this delightful dessert!
For the Filling
• Honey – The star ingredient that gives this pie its unique, deep flavor; burnt to perfection for an irresistible sweetness.
• Heavy cream – Adds a rich, velvety texture that makes each bite melt in your mouth.
• Whole milk – Balances the richness of the cream and helps to create a light custard consistency.
• Large eggs – Essential for binding the filling together, giving it that lovely, custardy structure.
• Granulated sugar – A pinch of sweetness that enhances the flavors and helps to caramelize the honey.
• Sea salt – Just the right amount complements the sweetness and elevates the overall flavor.
• Ground nutmeg – Adds a warm, spiced note that perfectly offsets the sweetness of the honey.
• All-purpose flour – Thickens the filling slightly, ensuring it sets beautifully in the crust.
For the Crust
• Pre-made pie crust – A time-saver, giving you a perfectly baked base without the fuss of making it from scratch!
Gather these ingredients, and you're well on your way to creating a stunning Burnt Honey Pie that will make your taste buds dance!
Step‑by‑Step Instructions for Burnt Honey Pie
Step 1: Preheat the Oven
Begin by preheating your oven to 350°F (175°C) so it's perfectly ready for baking your Burnt Honey Pie. This ensures even cooking for that delightful custard filling. Set a timer for later as you’ll want to keep track of the baking time.
Step 2: Burn the Honey
In a medium saucepan over medium heat, pour in 1 cup of honey and let it bubble away for about 10–15 minutes. Stir occasionally until the honey transforms into a deep amber color and smells fragrant. This caramelization process is crucial for developing the rich flavor that will define your pie.
Step 3: Mix the Cream and Milk
Once your honey has reached that gorgeous amber hue, remove the saucepan from heat. Carefully whisk in 1 cup of heavy cream and 1 cup of whole milk, mixing until well combined. You’ll notice a luscious mixture developing; this is the base for your Burnt Honey Pie filling.
Step 4: Whisk the Eggs
In a separate mixing bowl, whisk together 3 large eggs, ½ cup of granulated sugar, ½ teaspoon of sea salt, ¼ teaspoon of ground nutmeg, and 1 tablespoon of all-purpose flour until smooth and frothy. This mixture will add structure and sweetness to your filling, balancing the flavors.
Step 5: Combine Mixtures
Gradually pour the warm honey mixture into the egg mixture while whisking continuously. This step incorporates the rich flavors without scrambling the eggs. Aim for a smooth, well-blended filling that combines the sweet and savory elements.
Step 6: Pour into Crust
Next, take your pre-made pie crust and carefully pour the luscious filling into it, ensuring no bubbles form. The crust will cradle the filling as it bakes, creating a delightful dessert that outdoor gatherings and cozy nights alike will savor.
Step 7: Bake the Pie
Place your pie in the preheated oven and bake for 35–40 minutes. You'll know it’s done when the edges are set, and the center has a slight jiggle. The aroma of burnt honey will fill your kitchen, adding to the anticipation of enjoying this treat.
Step 8: Cool Before Serving
After removing the Burnt Honey Pie from the oven, allow it to cool completely at room temperature. This helps the filling firm up for easier slicing. Once it’s cool, you can either serve it right away or refrigerate it for later, enhancing that sweet flavor.

How to Store and Freeze Burnt Honey Pie
Fridge: Store your Burnt Honey Pie in an airtight container in the refrigerator for up to 3 days. This keeps the pie fresh and prevents it from absorbing other odors.
Freezer: If you need to store it for longer, wrap individual slices tightly in plastic wrap and then in aluminum foil. It will last in the freezer for up to 2 months.
Reheating: To enjoy your Burnt Honey Pie again, thaw it in the fridge overnight and reheat slices in a preheated oven at 350°F (175°C) for about 10 minutes, or until warm.
Let it Cool: Always allow the pie to cool completely at room temperature before storing, as this helps maintain its texture and taste.
What to Serve with Burnt Honey Pie
As the sweet aroma of burnt honey fills your kitchen, it’s time to curate a delightful feast that enhances this scrumptious dessert.
- Creamy Vanilla Ice Cream: The cool creaminess of vanilla ice cream beautifully contrasts the warm, rich flavors of the pie, creating a classic pairing.
- Fresh Berries: Juicy strawberries or blueberries add a burst of freshness, balancing the pie’s sweetness with tart, fruity notes. They also bring a vibrant pop of color to your plate.
- Whipped Cream: A fluffy dollop of lightly sweetened whipped cream offers a light texture that complements the dense filling, making each bite heavenly. It’s a must-have for indulgent decadence!
- Salted Caramel Sauce: Drizzling salted caramel over each slice elevates the flavor profile, adding a savory twist to the sweetness. It's a decadent touch that will impress your guests.
- Coffee or Espresso: A warm mug of rich coffee or a shot of espresso pairs perfectly, cutting through the sweetness with its bold flavors. Enjoy this classic combination!
- Chocolate Tart: For a more sophisticated finish, serve alongside a dark chocolate tart. The chocolaty bitterness pairs harmoniously with the honey’s sweetness for a delightful dessert experience.
Make Ahead Options
These Burnt Honey Pies are perfect for meal prep enthusiasts looking to save time on busy weeknights! You can prepare the filling up to 24 hours in advance by making it and placing it in an airtight container in the refrigerator; this allows the flavors to meld beautifully while maintaining that rich taste. The pre-made pie crust can also be assembled and stored, covered with plastic wrap, for up to 3 days in the fridge. When you're ready to serve, simply pour your filling into the crust and bake as directed. This method keeps your pie just as delicious, ensuring you can enjoy delightful homemade dessert with minimal fuss!
Expert Tips for the Best Burnt Honey Pie
• Honey Quality Matters: Use high-quality, flavorful honey for a more pronounced taste. Avoid cheap or overly processed honey that lacks richness.
• Watch the Color: Keep an eye on the honey as it heats; if it turns too dark too quickly, it may taste bitter. You want a deep amber, not black!
• Temperature Control: Allow the honey mixture to cool slightly before adding it to the eggs. This prevents cooking the eggs, ensuring a smooth filling.
• Bake with Love: Don’t skip the cooling step! Allowing the pie to cool completely will help it set properly—your patience will be rewarded with perfect slices.
• Serve with Flair: For an extra touch, drizzle some fresh honey or add a dollop of whipped cream on top when serving your Burnt Honey Pie.
Burnt Honey Pie Variations & Substitutions
Feel free to let your creativity shine by customizing this delightful pie with these tempting twists!
- Dairy-Free: Substitute the heavy cream and whole milk with coconut milk and a plant-based cream for a creamy, dairy-free alternative.
- Spiced Delight: Add a teaspoon of cinnamon or ginger to the filling for a warm, spiced kick that complements the burnt honey beautifully.
- Nutty Crust: Swap the pre-made pie crust for a crushed almond or pecan crust for an extra layer of flavor and crunch.
- Chocolate Indulgence: Drizzle melted dark chocolate on top before serving to transform the pie into an elegant dessert that chocolate lovers will adore.
- Fruit Fusion: Incorporate fresh berries into the filling for a pop of color and added freshness. Raspberries or blueberries work particularly well with the sweetness of the honey.
For a truly special dessert experience, consider pairing it with a scoop of vanilla ice cream to enhance that luscious filling. Or, if you're in the mood for a warm combination, try serving it with a side of Chicken Pot Pie to make the meal even cozier.
- Reduced Sugar: Reduce the granulated sugar or omit it entirely for a less sweet pie, letting the honey's sweetness shine through on its own.
- Zesty Twist: Add a tablespoon of lemon juice to the filling for a hint of citrus that beautifully balances the sweet richness of the pie.
With these variations, your Burnt Honey Pie will always be a unique treat, perfect for sharing or savoring all by yourself!

Burnt Honey Pie Recipe FAQs
What is the best honey to use for Burnt Honey Pie?
Absolutely, the quality of honey matters greatly! I recommend using a high-quality, flavorful honey like wildflower or clover honey. These options have rich, complex flavors that will shine through in your pie, offering a delightful contrast to the creamy filling. Avoid overly processed honeys, which can lack the depth of flavor.
How do I store Burnt Honey Pie?
For maximum freshness, store your Burnt Honey Pie in an airtight container in the refrigerator where it will last for up to 3 days. If possible, keep it on a pie plate covered tightly with plastic wrap. This method helps prevent it from absorbing other odors, maintaining its sweet flavor and creamy texture for when you’re ready to indulge.
Can I freeze Burnt Honey Pie?
Yes, you can! To freeze your Burnt Honey Pie, I recommend wrapping individual slices tightly in plastic wrap, followed by aluminum foil to prevent freezer burn. This way, it will keep well for up to 2 months. When you’re ready to enjoy, thaw them in the fridge overnight, and then reheat at 350°F (175°C) for about 10 minutes.
What should I do if my Burnt Honey filling doesn’t set?
Oh no! If your filling doesn’t set properly, it might be due to a couple of reasons. First, make sure you didn’t skip the whisking step while adding the honey mixture to the egg mixture; continuous whisking is crucial to prevent scrambling. If it still doesn't set, next time, try baking it a little longer. An extra 5-10 minutes in the oven can often help firm up the custard. Always ensure that the edges are set and the filling has only a slight jiggle in the center before removing it from the oven.
Is Burnt Honey Pie safe for those with allergies?
A great question! This pie contains common allergens like eggs and dairy. If you or your guests have allergies, consider substitutions: use a dairy-free cream, like coconut cream, and an egg replacer, such as flaxseed meal or applesauce, to cater to dietary restrictions. Always be sure to check the specific allergy lists relevant to those you'll be serving, as safety first is key in any kitchen!

Irresistibly Sweet Burnt Honey Pie for Cozy Evenings
Ingredients
Equipment
Method
- Preheat your oven to 350°F (175°C).
- In a medium saucepan, heat honey over medium heat for 10–15 minutes until deep amber and fragrant.
- Remove from heat and whisk in heavy cream and whole milk until well combined.
- In another bowl, whisk together eggs, sugar, sea salt, nutmeg, and flour until smooth.
- Gradually pour the warm honey mixture into the egg mixture while whisking continuously.
- Pour the filling into the pre-made pie crust carefully.
- Bake for 35–40 minutes until the edges are set and the center has a slight jiggle.
- Allow the pie to cool completely at room temperature before serving.


Leave a Reply