
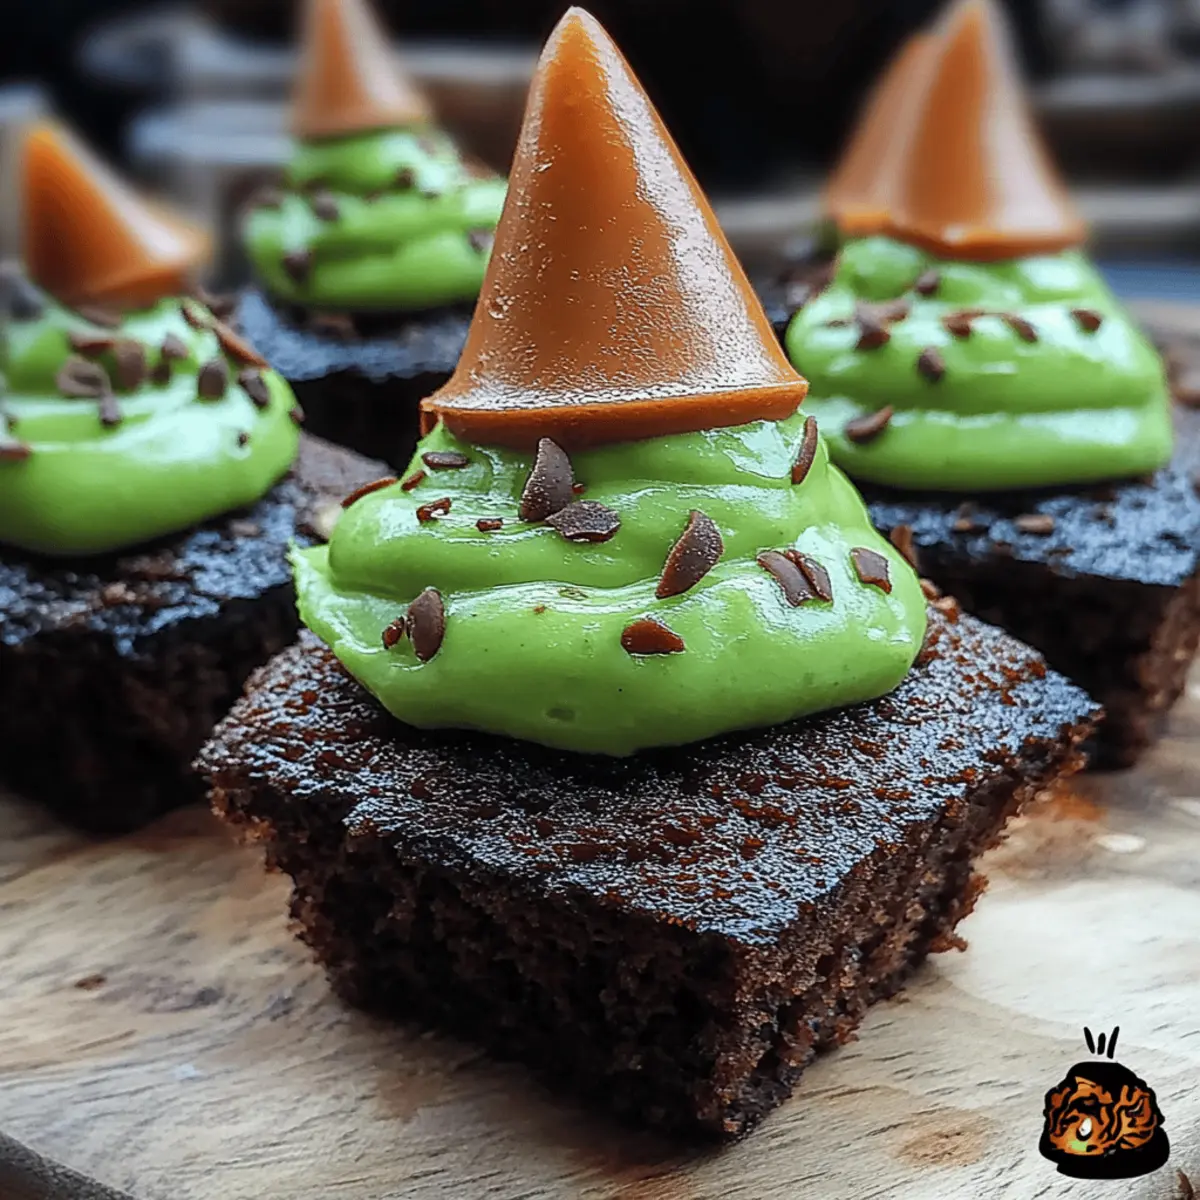
As I rummaged through my cupboards, a delightful idea for Halloween struck me like a bolt of lightning—Wicked Witch Hat Brownies! This playful twist on traditional brownies not only satisfies your sweet cravings but also adds a festive flair to your fall gatherings. With easy-to-follow steps and minimal prep time, they promise to be a crowd-pleaser, perfect for both kids and adults who relish homemade desserts over fast food. The combination of rich, fudgy brownies topped with whimsical witch hats made from chocolate ice cream cones is nothing short of enchanting. Ready to stir up some Halloween magic in your kitchen? Let’s get baking!
Why Are These Brownies So Special?
Whimsical Fun: These Wicked Witch Hat Brownies bring a magical twist to your dessert table, making them a hit at any Halloween gathering.
Decadent Richness: Each brownie is rich and fudgy, satisfying even the strongest chocolate cravings with every bite.
Quick and Easy: With just 50 minutes total time, you'll be in and out of the kitchen in no time, which leaves plenty of room for festive fun!
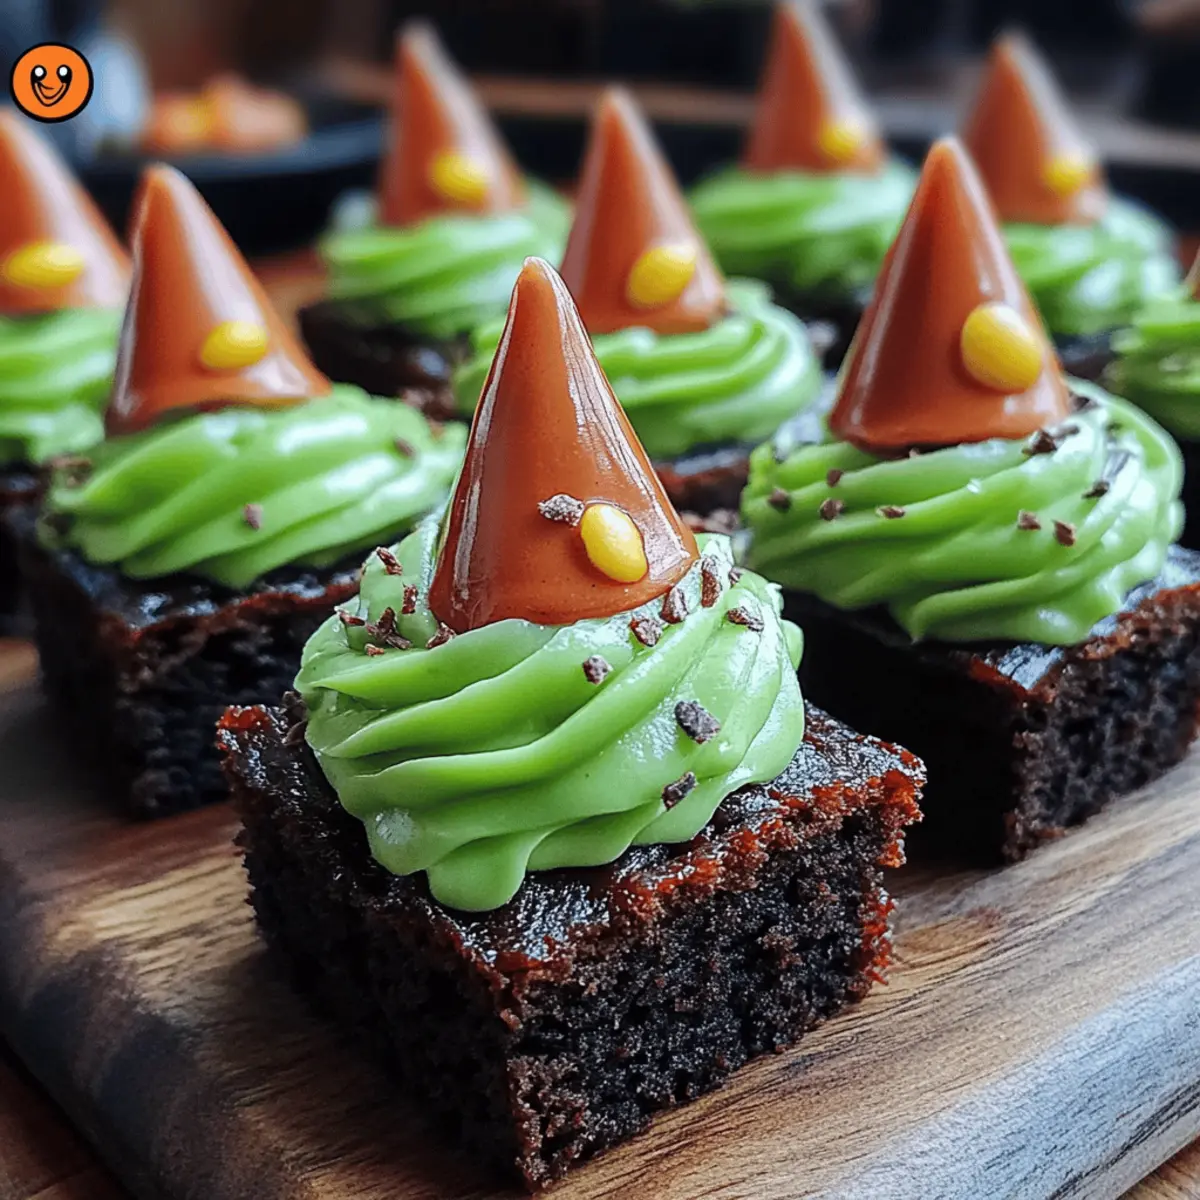
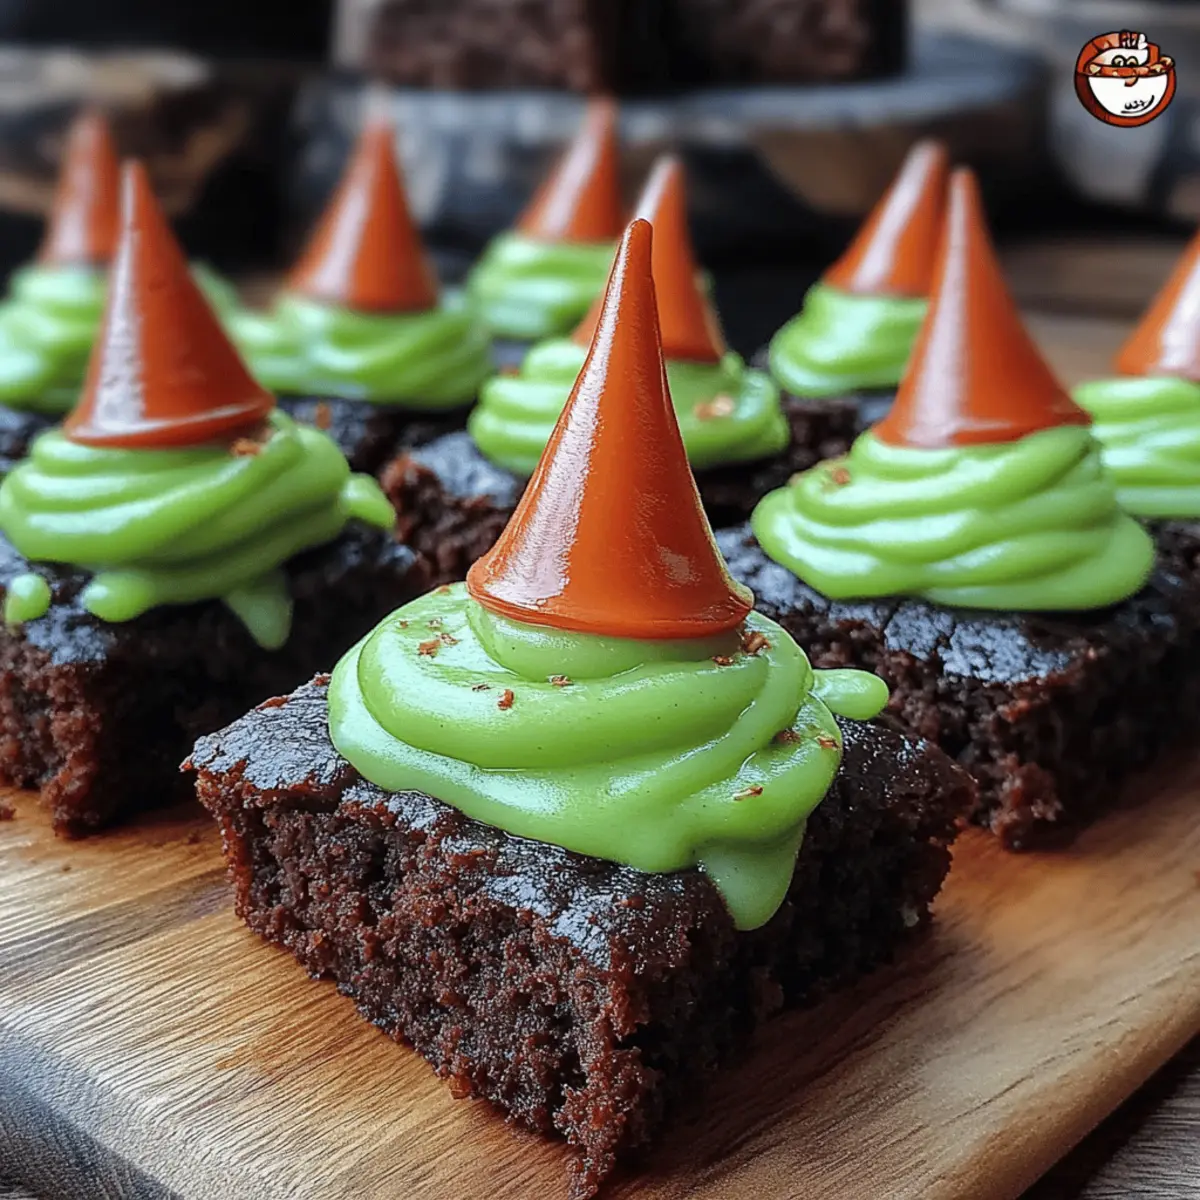
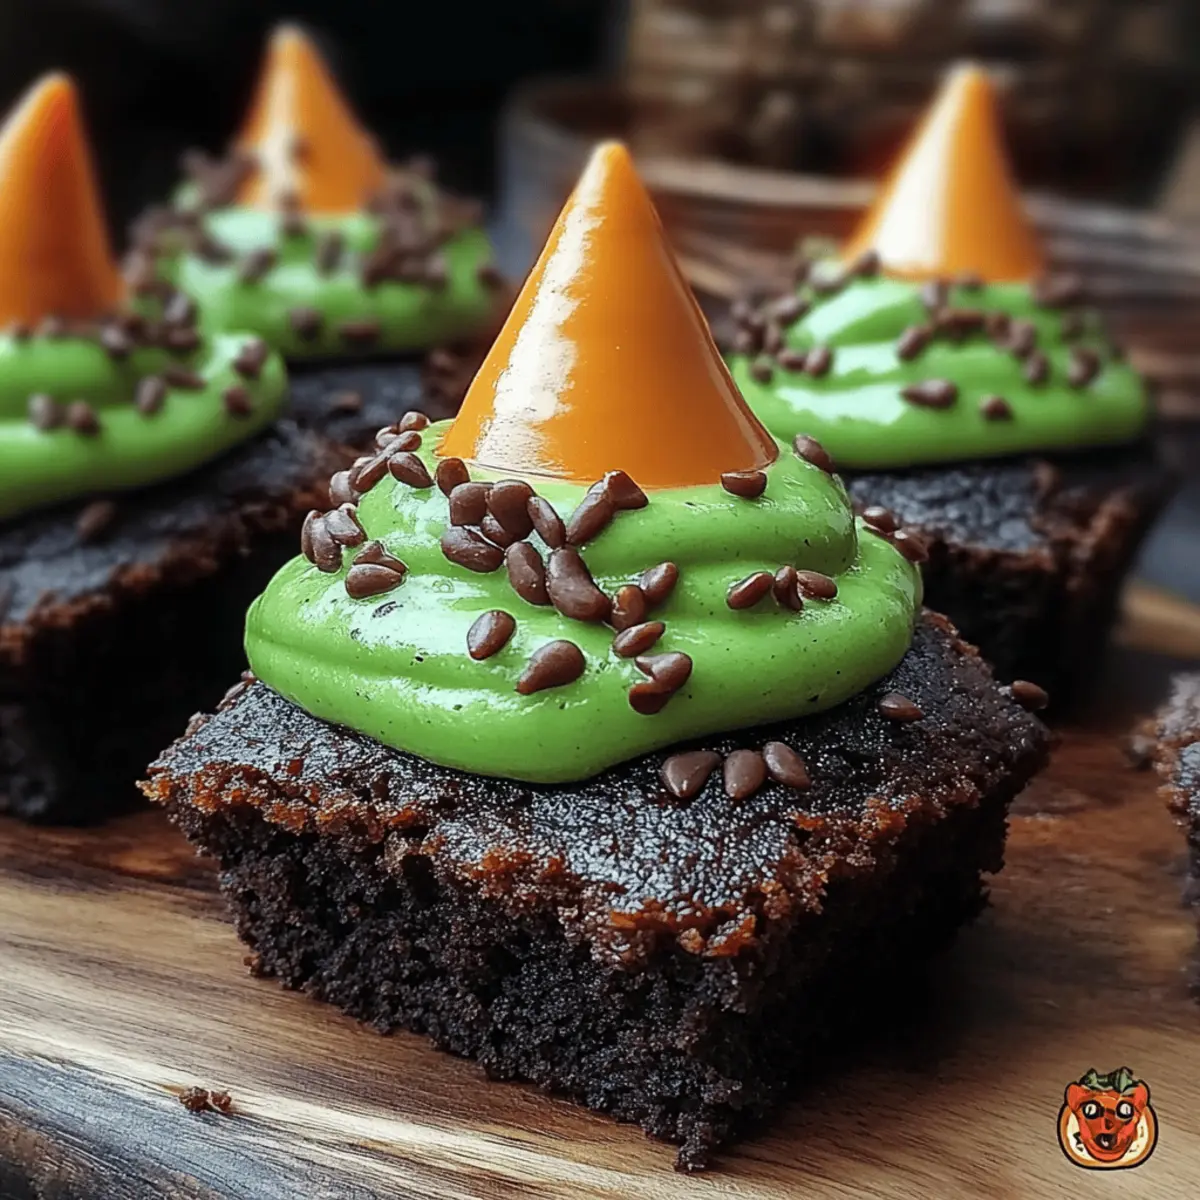
Creative Presentation: Topped with chocolate ice cream cones, these brownies add a unique visual flair, turning a classic treat into an eye-catching centerpiece.
Perfect for Everyone: Whether for kids' parties or adult gatherings, these brownies appeal to all ages and can be personalized with your favorite sprinkles or toppings!
Looking for more festive ideas? Be sure to check out our collection of easy Halloween recipes.
Wicked Witch Hat Brownies Ingredients
For the Brownies
• Unsalted butter – 1 cup (225g) adds a rich, creamy flavor to your batter.
• Granulated sugar – 2 cups (400g) sweetens the brownies, balancing the cocoa’s bitterness.
• Large eggs – 4 provide structure and moisture for these delicious brownies.
• Vanilla extract – 1 teaspoon enhances the flavor profile of the chocolate.
• All-purpose flour – 1 cup (125g) gives the brownies their desired consistency.
• Unsweetened cocoa powder – 1 cup (90g), the star ingredient that makes these brownies rich and fudgy.
• Salt – ½ teaspoon enhances all the flavors in your Wicked Witch Hat Brownies.
• Baking powder – ½ teaspoon helps the brownies rise slightly for a soft texture.
For the Witch Hats
• Chocolate ice cream cones – 12 create whimsical witch hats that really steal the show.
For the Frosting
• Powdered sugar – 2 cups (300g) ensures a smooth and sweet topping for your brownies.
• Milk – ¼ cup (60ml) adds creaminess to the frosting for that perfect spreadability.
• Vanilla extract (for frosting) – 1 teaspoon gives a lovely aroma and flavor to the icing.
• Green food coloring – Use to create a spooky hue on your frosting for those witchy vibes!
• Halloween-themed sprinkles – These fun embellishments make the dessert extra festive and delightful.
Gather these ingredients and let your creativity shine as you create these enchanting Wicked Witch Hat Brownies!
Step‑by‑Step Instructions for Wicked Witch Hat Brownies
Step 1: Melt the Butter
Begin by melting 1 cup (225g) of unsalted butter in a medium saucepan over low heat for about 5 minutes. Once fully melted, remove it from the heat and let it cool for a few minutes until it's just warm. This will ensure a rich base for your Wicked Witch Hat Brownies.
Step 2: Mix the Wet Ingredients
In a large mixing bowl, combine the melted butter with 2 cups (400g) of granulated sugar. Stir the mixture until it’s smooth and creamy. Next, add in 4 large eggs one at a time, mixing well after each addition to incorporate them fully. Stir in 1 teaspoon of vanilla extract to enhance the flavor of the brownies.
Step 3: Combine Dry Ingredients
In a separate bowl, whisk together 1 cup (125g) of all-purpose flour, 1 cup (90g) of unsweetened cocoa powder, ½ teaspoon of salt, and ½ teaspoon of baking powder. Gradually mix this dry mixture into the wet ingredients from your large bowl, stirring until just combined. Be careful not to overmix; your brownies will maintain their richness!
Step 4: Bake the Brownies
Pour the brownie batter into a prepared 9x13 inch baking pan, spreading it evenly. Preheat your oven to 350°F (175°C) and bake the brownies for 25-30 minutes. To check for doneness, insert a toothpick into the center; it should come out with a few moist crumbs, indicating a fudgy texture perfect for the Wicked Witch Hat Brownies.
Step 5: Cool the Brownies
Once baked, remove the brownies from the oven and allow them to cool completely in the pan on a wire rack. This cooling process will take about 20-30 minutes and ensures they set properly, making them easier to cut into squares later.
Step 6: Prepare the Witch Hats
If desired, take chocolate ice cream cones and dip the tops in melted chocolate. Then, sprinkle them with Halloween-themed sprinkles for a festive touch. This optional step adds a delightful witchy appearance to your cones, which will be placed on top of the brownies.
Step 7: Make the Frosting
In a mixing bowl, combine 2 cups (300g) of powdered sugar, ¼ cup (60ml) of milk, and 1 teaspoon of vanilla extract for the frosting, mixing until smooth. Add green food coloring until you reach your desired spooky shade. The frosting should be spreadable but thick enough to stay on the brownies.
Step 8: Frost the Brownies
Spread a generous layer of the green frosting over the top of each brownie square once they are completely cool. This vibrant layer will serve as the base for your witch hats and add a light sweetness that complements the brownies.
Step 9: Assemble the Witch Hats
To complete your Wicked Witch Hat Brownies, place an upside-down chocolate ice cream cone on top of each frosted brownie. This will create the look of a witch’s hat. Add additional Halloween-themed sprinkles on top for a final festive garnish, bringing your spooky desserts to life!
Wicked Witch Hat Brownies Variations
Embrace your creativity with these fun variations that will make your Wicked Witch Hat Brownies even more delightful!
- Nut Butter: Substitute half the butter with creamy nut butter for an added layer of flavor and a hint of nuttiness.
- Gluten-Free: Use gluten-free all-purpose flour instead of regular flour to make these brownies accessible for everyone. Your loved ones won’t even notice the difference!
- Minty Fresh: Add a few drops of mint extract to the brownie batter for a refreshing twist that beautifully contrasts the chocolate.
- Spicy Kick: Mix in a pinch of cayenne pepper or chili powder for a surprising spicy kick that'll keep taste buds intrigued. It's a fun and daring option that can spark conversations at your gathering!
- Caramel Drizzle: Drizzle melted caramel over the frosted brownies before adding the witch hats for an extra layer of decadence and flavor that complements the chocolate beautifully.
- Brownie Bites: Pour the brownie batter into mini muffin tins instead of a large pan for delightful bite-sized treats. These adorable little morsels are perfect for parties or just for snacking!
- Halloween Mix-Ins: Fold in your favorite Halloween candy pieces into the brownie batter or topping for a playful crunch. You can choose anything from candy corn to chocolate-covered pretzels.
- Vegan Version: Substitute the eggs with flax eggs and the butter with vegan margarine for a delicious vegan adaptation that everyone can enjoy!
Looking for more creative ideas? Try adding some seasonal flair with our tasty easy Halloween recipes or explore festive Halloween dessert ideas that can spice up your celebrations even further!
Expert Tips for Wicked Witch Hat Brownies
Quality Ingredients: Choose high-quality cocoa powder for a richer chocolate flavor in your Wicked Witch Hat Brownies, enhancing the overall taste.
Don’t Overmix: When combining wet and dry ingredients, mix just until incorporated. Overmixing can lead to dense brownies instead of fudgy ones.
Cooling Time: Ensure your brownies cool completely before frosting. This prevents the frosting from melting and creates a beautiful, layered effect.
Sprinkle Options: Get creative with your Halloween-themed sprinkles! Mix and match colors and shapes for a festive touch that adds to the visual appeal.
Storage Tips: Store your brownies in an airtight container at room temperature for up to 3 days to keep them fresh and fudgy, perfect for enjoying later!
How to Store and Freeze Wicked Witch Hat Brownies
Room Temperature: Store your brownies in an airtight container at room temperature for up to 3 days to keep them fresh and fudgy.
Fridge: If you'd like to prolong their shelf life, you can refrigerate the brownies for up to 1 week. Just be sure to wrap them tightly to prevent drying out.
Freezer: For longer storage, freeze the brownies in an airtight container for up to 3 months. Thaw in the fridge overnight before serving.
Reheating: If you prefer warm brownies, microwave individual squares for 10-15 seconds before enjoying, making them delightfully gooey again!
Make Ahead Options
These Wicked Witch Hat Brownies are perfect for meal prep, making your Halloween festivities a breeze! You can prepare the brownie batter up to 24 hours in advance; simply store it in the refrigerator in an airtight container to maintain its freshness. Additionally, you can bake the brownies a day ahead and let them cool completely before refrigerating them. For the witch hats, dip the ice cream cones in melted chocolate and sprinkles up to 3 days ahead, allowing them to harden at room temperature. When you’re ready to serve, spread the green frosting over the brownies, assemble the hats, and you’ll have a delightful treat that’s just as delicious as if it were freshly made!
What to Serve with Wicked Witch Hat Brownies
Elevate your Halloween festivities with these delicious brownie treats that spark joy with every bite!
-
Spooktacular Milkshakes: Serve rich chocolate or vanilla milkshakes with a touch of Halloween magic. The creamy texture pairs perfectly with the fudgy brownies.
-
Festive Fruit Salad: A light and refreshing fruit salad with autumn fruits like pears and pomegranates adds a burst of color and sweetness to balance the chocolatey richness.
-
Pumpkin Spice Whipped Cream: This seasonal twist on whipped cream makes a delightful topping for your brownies, enhancing the fall flavors while adding lightness and creaminess to each bite.
-
Candied Apples: The crunchy, sweet glaze of candy-coated apples creates a delightful contrast to the soft brownies. Plus, they’re fun and festive!
-
Hot Cocoa Bar: Set up a cozy hot cocoa station with marshmallows, whipped cream, and toppings for a comforting drink that pairs beautifully with the brownies.
-
Gingerbread Cookies: Offer these spiced cookies as a zesty sidekick to your brownies, providing a contrasting flavor that captures the spirit of the season.
-
Coffee or Espresso: A rich cup of coffee or a festive pumpkin spice latte elevates the dessert experience, enhancing chocolate's deep flavors and creating a warm atmosphere.
-
Spider Web Cheesecake: For an impressive dessert spread, consider serving an alluring cheesecake adorned with a spider web design; its creaminess beautifully complements the brownies' texture.
These delightful pairings will not only enhance your Wicked Witch Hat Brownies but also create an enchanting Halloween dining experience!
Wicked Witch Hat Brownies Recipe FAQs
How do I select ripe ingredients for my Wicked Witch Hat Brownies?
Absolutely! The key to delicious brownies is using fresh ingredients. Look for unsalted butter that’s creamy and smooth without any discoloration. For eggs, choose ones that are clean and free of cracks. Opt for granulated sugar that’s dry and free-flowing. Fresh vanilla extract should have a rich aroma, while cocoa powder should be a deep, dark color, indicating freshness.
What’s the best way to store Wicked Witch Hat Brownies?
Very simple! Store your brownies in an airtight container at room temperature for up to 3 days to keep them fresh and fudgy. If you want to extend their shelf life, you can refrigerate them for up to 1 week, but make sure to wrap them tightly to prevent them from drying out. I often place a slice of bread in the container to help maintain moisture.
Can I freeze Wicked Witch Hat Brownies?
Of course! To freeze your brownies, first, allow them to cool completely, and then cut them into squares. Place them in an airtight container or wrap them tightly in plastic wrap, followed by aluminum foil, to ensure they don’t get freezer burn. They can be frozen for up to 3 months! When ready to enjoy, thaw them in the fridge overnight or let them sit at room temperature for a couple of hours.
What should I do if my brownies turn out dry or crumbly?
Cooking time varies from oven to oven; you may have overbaked them. Always check doneness by inserting a toothpick; it should come out with a few moist crumbs rather than dry. If your brownies are already baked and dry, you can try warming them up in the microwave with a scoop of ice cream or serve them with whipped cream to add moisture back.
Are there any allergy considerations for Wicked Witch Hat Brownies?
Certainly! These brownies contain gluten from all-purpose flour, dairy from butter and milk, and eggs, which may not be suitable for those with allergies. You can swap in gluten-free flour, dairy-free butter, and aquafaba (chickpea water) as an egg substitute for a vegan option. Always check ingredient labels to ensure they meet dietary restrictions, particularly if serving to children or guests with allergies.
How can I customize my Wicked Witch Hat Brownies?
You can personalize these delightful treats by adding your preferred toppings! Substitute the Halloween sprinkles for any seasonal flavored sprinkles or swap out the green food coloring for orange or purple for different occasions. Alternatively, add nuts, chocolate chips, or even a swirl of caramel on top of the frosting for a unique twist that speaks to your tastes and style.
Wicked Witch Hat Brownies: Spooktacular Treats to Delight!
Ingredients
Equipment
Method
- Begin by melting 1 cup of unsalted butter in a medium saucepan over low heat for about 5 minutes.
- Combine melted butter with 2 cups of granulated sugar in a large mixing bowl.
- Add 4 large eggs one at a time, mixing well after each addition. Stir in 1 teaspoon of vanilla extract.
- In a separate bowl, whisk together 1 cup of all-purpose flour, 1 cup of unsweetened cocoa powder, ½ teaspoon of salt, and ½ teaspoon of baking powder.
- Gradually mix the dry mixture into the wet ingredients, stirring until just combined.
- Pour the brownie batter into a prepared 9x13 inch baking pan and bake at 350°F for 25-30 minutes.
- Allow the brownies to cool completely in the pan on a wire rack.
- Prepare the witch hats by dipping chocolate ice cream cones in melted chocolate and sprinkling with Halloween-themed sprinkles.
- In a mixing bowl, combine 2 cups of powdered sugar, ¼ cup of milk, and 1 teaspoon of vanilla extract. Mix until smooth and add green food coloring.
- Spread a layer of green frosting over the cooled brownies and place the witch hats on top.
- Garnish with additional Halloween-themed sprinkles.


Leave a Reply