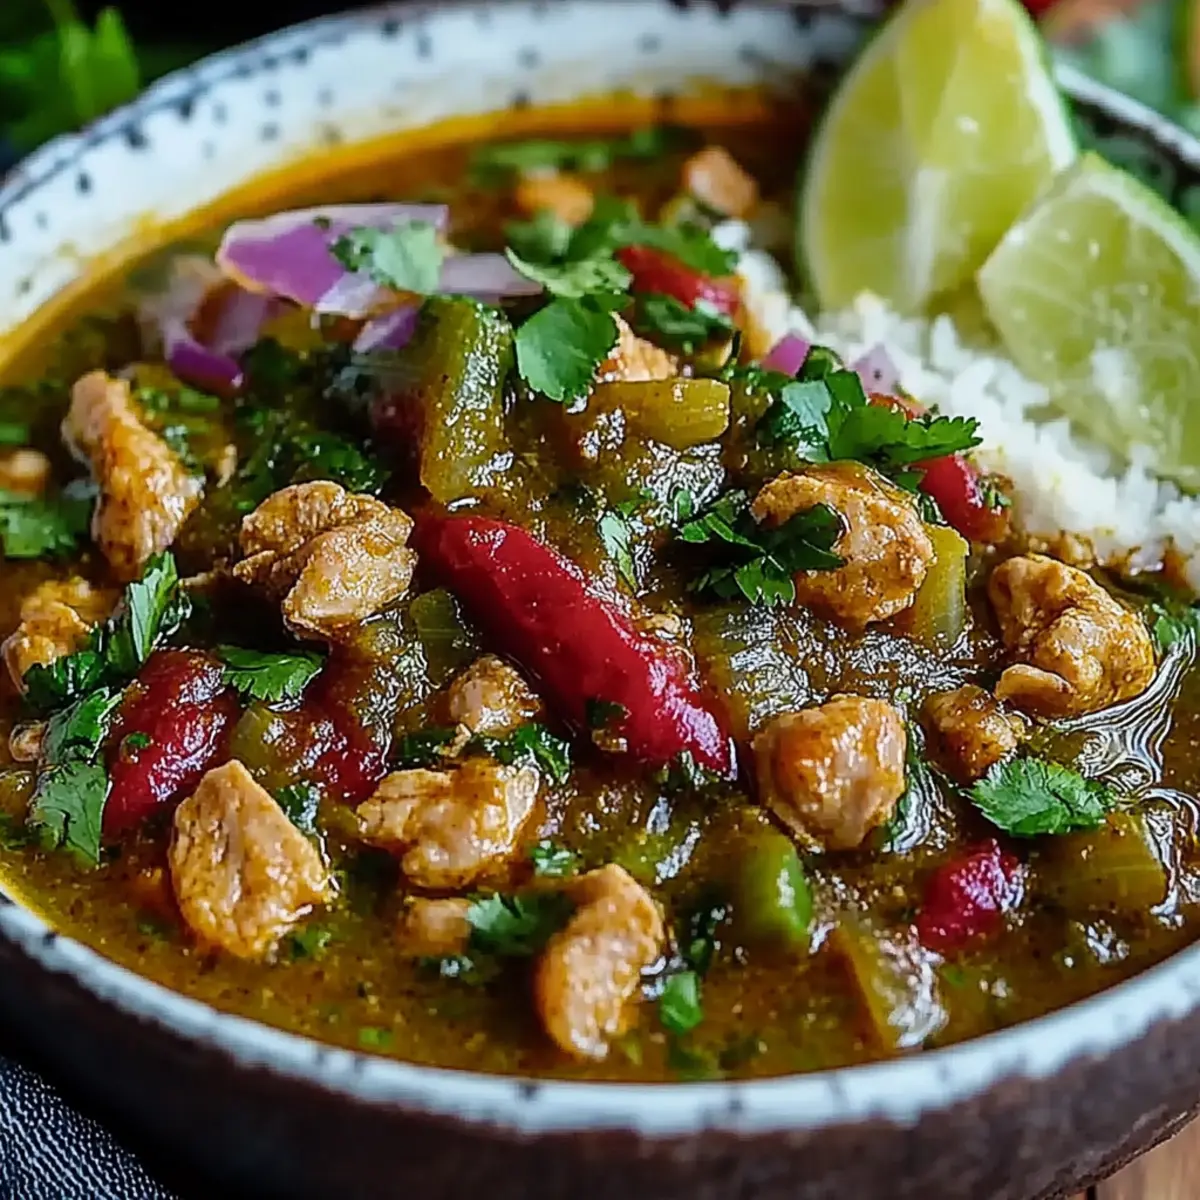
RecipeCrown

  • Home
  • Breakfast
  • Main Dishes
  • Dessert
  • About
  • Contact
menu icon
go to homepage
  • Home
  • Breakfast
  • Main Dishes
  • Dessert
  • About
  • Contact
search icon
Homepage link
  • Home
  • Breakfast
  • Main Dishes
  • Dessert
  • About
  • Contact
×

Creamy Beef Stroganoff Pasta Bake Recipe

April 22, 2025 by grace bellamy Leave a Comment

Don't you love that magical moment when leftover roast beef transforms into something so delicious that your family thinks it's a brand-new meal? That's precisely what happens with this Beef Stroganoff Pasta Bake. I'm talking about the classic flavors of Russian Stroganoff (yes, named after the actual Count Stroganoff!) reimagined as a golden-topped pasta bake that's surprisingly kind to your waistline. Think earthy mushrooms, tender beef chunks, and perfectly cooked pasta all hugging each other in a creamy, tangy sauce that hits all those comfort food notes without the guilt trip afterward. And the best part? You can have this on your table in just 30 minutes.

Traditional stroganoff usually loads up on heavy cream and butter (which, let's be honest, tastes amazing), but this clever version keeps all that luxurious flavor while cutting way back on calories. When that Parmesan topping gets all golden and slightly crispy under the broiler… oh my goodness! It creates this beautiful contrast with the creamy sauce underneath that makes this dish feel special enough for company but simple enough for a Tuesday night dinner.

Recipe Highlights

  • Flavor: Think deeply savory mushrooms, juicy beef, and a tangy, creamy sauce that wraps around every bit of pasta. Your taste buds will thank you!
  • Skill level: Got basic cooking skills? You've got this. Nothing fancy here - just straightforward techniques perfect for home cooks of all levels.
  • Prep-tip: Cook your pasta while you're making the sauce to save time. Oh, and grab a cup before you drain it - that starchy pasta water is liquid gold for adjusting your sauce!
  • Time-Saving Tip: Using leftover roast beef is the real shortcut here - no waiting around for meat to cook means dinner's ready in a flash.

Why You'll Love Beef Stroganoff Pasta Bake Recipe

  • Gives yesterday's roast beef a tasty second chance at deliciousness
  • Delivers all that creamy comfort food satisfaction without the calorie overload
  • Ready in half an hour (including that quick 5-minute broil at the end)
  • Works just as well with ground beef, chicken, or turkey if that's what you have on hand
  • Hits that perfect sweet spot between tangy and savory
  • Creates two different eating experiences in one dish: creamy goodness and crispy topping

Beef Stroganoff Pasta Bake Ingredients

For the Base:

  • Onions: Two thinly sliced onions that slowly soften and sweeten as they cook, creating that flavor foundation every good dish needs.
  • Mushrooms: 14oz/400g of chestnut (crimini) mushrooms that bring that earthy, meaty flavor that's non-negotiable for a proper stroganoff.
  • Beef broth: 1⅓ cups (300ml) to create that savory backbone. I really like using Knorr beef stockpot here for that rich flavor.
  • Worcestershire sauce: One tablespoon of this magic potion adds that depth that makes people go "Hmm, what IS that flavor?"
  • Dijon mustard: One tablespoon brings that signature tang. Whole grain works great too if that's what's in your fridge.
  • Cornstarch slurry: Just a tablespoon of cornstarch mixed with two tablespoons water - it's amazing how this simple mix thickens everything so perfectly.
  • Quark cheese: One cup (240g) that creates creaminess while keeping things lighter than traditional cream.
  • Sour cream: Half cup (120g) for that classic stroganoff flavor - the reduced-fat kind works perfectly fine here.
  • Rigatoni pasta: 14oz (400g) of those lovely tubes that catch all the sauce. The ridges are perfect sauce-grabbers!
  • Reserved pasta water: Keep about a quarter cup handy - it's your safety net if the sauce needs loosening up.
  • Parmesan cheese: Three tablespoons that will transform into that irresistible golden crust.
  • Flat-leaf parsley: A handful chopped up to add that fresh pop of color and flavor.

For the Protein:

  • Leftover roast beef: 1½ cups (350g) with any big chunks of fat trimmed off. Pro tip: if you've got leftover gravy too, throw that in for extra flavor!

You'll find exact measurements in the recipe card below.

How to Make Beef Stroganoff Pasta Bake

  1. Get the pasta going: Cook that rigatoni in salted water until it still has a bit of bite to it. Remember to save some of that starchy cooking water before draining!
  2. Start your flavor base: Spray a large pan with cooking spray and cook those thinly sliced onions over medium-low heat for about 5 minutes until they start getting soft and translucent. Add your mushrooms and keep cooking for another 5 minutes until everything is soft and starting to get some color.
  3. Build your sauce: Pour in the beef broth and Worcestershire sauce, letting it come to a gentle simmer. Stir in that Dijon mustard and cornstarch mixture, then cook for a minute or two until you notice it thickening up.
  4. Make it creamy: Turn the heat down to low (this is important!) and stir in your quark and sour cream until everything's smooth and incorporated. You don't want the sauce to boil after adding the dairy or it might separate.
  5. Add your beef: Gently fold in your leftover roast beef (and any leftover gravy if you're lucky enough to have some). Give it a taste and add salt and pepper as needed.
  6. Bring it all together: Add your cooked rigatoni to the sauce, stirring until every single piece is well-coated in that creamy goodness. If it looks too thick, add a spoonful of that reserved pasta water at a time until it's just right.
  7. Get ready for the magic: Transfer everything to an oven-safe baking dish. Sprinkle evenly with that Parmesan cheese and a little crack of black pepper.
  8. Get that golden crust: Place under a preheated broiler for about 5 minutes until the top gets that beautiful golden, slightly crispy crust that makes everyone fight for the corner pieces.
  9. Finish with freshness: Sprinkle with that chopped parsley and serve it up while it's still hot and bubbling.

Ground Beef Variation

No leftover roast beef hanging around? No problem! Here's how to adapt using ground beef:

  1. Brown your beef: In a large pan, cook about 1 pound (450g) of 5% fat ground beef until it's nicely browned. Take the beef out, drain off any excess liquid, and give the pan a quick wipe.
  2. Follow the base recipe: Cook those onions and mushrooms just like in the main recipe.
  3. Add a flavor boost: When you're adding the mustard, throw in a tablespoon of tomato paste too for some extra depth.
  4. Bring back the beef: Add your browned ground beef at the same point you'd normally add the leftover roast beef.
  5. Taste test: Ground beef usually needs a bit more salt than the leftover roast version, so make sure to taste and adjust.

More Variations

  • Switch up the protein: Leftover chicken or turkey work beautifully here for a lighter twist.
  • Go vegetarian: Double up on mushrooms (maybe throw in some wild mushrooms if you're feeling fancy) and skip the meat entirely.
  • Pasta options: Any short pasta shape works great - grab whatever's in your pantry, whether it's penne, fusilli, or bow ties.
  • Quick version: Not feeling the broiler step? Just serve it straight from the pan for an even faster dinner.
  • Veggie boost: Toss in some frozen peas, roasted red peppers, or wilted spinach for extra color and nutrients.
  • Richer version: If you're not counting calories, use all sour cream instead of the quark-sour cream mix for a more indulgent dish.
  • Flavor bomb: Add a teaspoon or two of porcini mushroom powder to your beef stock for an incredible depth of flavor that'll make people think you spent hours cooking.

How to Store Beef Stroganoff Pasta Bake

  • Refrigerator: Pop leftovers in an airtight container for up to 2 days. Just know that the pasta will keep soaking up sauce, so it might not be quite as creamy when you reheat it.
  • Freezing: I wouldn't recommend freezing this one - the dairy tends to separate when thawed, and the texture just isn't the same.
  • Reheating: Warm refrigerated leftovers in a microwave at 50% power, giving it a stir occasionally. If it seems a bit dry, a splash of milk or broth works wonders.

Expert Tips for Perfect Beef Stroganoff Pasta Bake

  • Don't overcook the pasta: Aim for about 1-2 minutes less than the package says since it'll continue cooking a bit under the broiler.
  • Sauce too thick? That reserved pasta water is your best friend - add it a spoonful at a time until you hit that perfect consistency.
  • Got gravy? If you have leftover beef gravy, throw it in with the beef for an amazing flavor boost.
  • Prevent dairy disasters: Make sure your sauce isn't boiling when you add the dairy, and keep stirring as you mix it in.
  • Prep ahead: You can make everything up to the broiling step earlier in the day, stick it in the fridge, and just finish it under the broiler right before dinner.
  • Complete the meal: A simple green salad with a squeeze of lemon and a drizzle of olive oil is all you need on the side.

FAQs About Beef Stroganoff Pasta Bake

What is the best pasta to use with beef stroganoff?

Short pasta shapes with ridges or tubes are your best bet since they really grab onto that creamy sauce. Rigatoni is my go-to because those big tubes hold sauce both inside and out, but penne, fusilli, or farfalle work great too. I'd skip the long pastas like spaghetti or linguine - they just don't give you the right texture for a pasta bake.

What is the sauce in beef stroganoff made of?

Traditional stroganoff sauce combines beef stock, sour cream, and mustard for that creamy, tangy flavor we all love. This lighter version cleverly uses a mix of quark and reduced-fat sour cream to keep all that creaminess while dialing back the calories. The Worcestershire sauce, Dijon mustard, and that simple cornstarch slurry work together to create the perfect texture and depth.

Can you cook beef stroganoff in the oven?

Absolutely! While classic stroganoff is usually made entirely on the stovetop, this pasta bake version takes advantage of the broiler to create that gorgeous golden Parmesan crust that adds such a wonderful contrast to the creamy sauce. The dish comes together on the stovetop first, then gets that final 5-minute broil for the finishing touch.

What cut of meat is best for beef stroganoff?

For this leftover roast version, any tender, pre-cooked beef works beautifully. If you're cooking beef specifically for stroganoff, traditionalists would say tenderloin (though that can get pricey!); sirloin and ribeye make excellent alternatives. For the ground beef variation, I recommend lean (5%) ground beef to keep it slimming-friendly without sacrificing flavor.

Nutritional Information

This slimming-friendly beef stroganoff pasta bake contains approximately:

  • Calories: 423 per serving
  • Carbohydrates: 61g
  • Protein: 31g
  • Fat: 6g
  • Servings: 6 portions

These values are approximate and will vary depending on the specific ingredients you use.


Isn't it amazing how leftover roast beef can become something completely new and crave-worthy? This comforting, creamy pasta bake brings together earthy mushrooms, that tangy sauce, and that gorgeous golden Parmesan crust to create a dish that feels totally indulgent while staying surprisingly light on calories. Whether you're following a slimming plan or just looking for a delicious way to use up Sunday's roast, this pasta bake delivers restaurant-quality flavor with minimal effort.

Have you tried this recipe? Drop a comment below and let me know how you made it your own! Did you add extra veggies? Try a different cheese on top? I'd love to hear how it turned out for you.

Looking for more comfort food classics with a healthy twist? Check out our One-Pot Chicken Stroganoff for another quick and satisfying meal solution.

Print

Creamy Beef Stroganoff Pasta Bake: A Slimming-Friendly Comfort Classic

Beef Stroganoff Pasta Bake recipe
Print Recipe
Pin Recipe

5 Stars 4 Stars 3 Stars 2 Stars 1 Star

No reviews

A slimming-friendly pasta bake transforming leftover roast beef into a creamy and comforting dish with mushrooms, tangy sauce, and a golden parmesan crust.

  • Author: grace bellamy
  • Prep Time: 10 minutes
  • Cook Time: 20 minutes
  • Total Time: 30 minutes
  • Yield: 6 portions
  • Category: Main Course
  • Method: Oven-baked
  • Cuisine: Russian
  • Diet: Low Calorie

Ingredients

  • Onions: Two thinly sliced onions
  • Mushrooms: 14oz/400g of chestnut mushrooms
  • Beef broth: 1⅓ cups (300ml)
  • Worcestershire sauce: One tablespoon
  • Dijon mustard: One tablespoon
  • Cornstarch slurry: One tablespoon cornstarch mixed with two tablespoons water
  • Quark cheese: One cup (240g)
  • Sour cream: Half cup (120g)
  • Rigatoni pasta: 14oz (400g)
  • Reserved pasta water: About a quarter cup
  • Parmesan cheese: Three tablespoons
  • Flat-leaf parsley: A handful chopped
  • Leftover roast beef: 1½ cups (350g)

Instructions

  1. Get the pasta going: Cook rigatoni in salted water until al dente, reserve some cooking water before draining.
  2. Start your flavor base: Cook onions in a large pan with cooking spray over medium-low heat for about 5 minutes. Add mushrooms and cook for another 5 minutes.
  3. Build your sauce: Add beef broth and Worcestershire sauce, simmer, then stir in Dijon mustard and cornstarch slurry until it thickens.
  4. Make it creamy: Turn heat to low, add quark and sour cream, stir until smooth.
  5. Add your beef: Fold in leftover roast beef, season with salt and pepper.
  6. Bring it all together: Add cooked rigatoni and reserved pasta water as needed for sauce consistency.
  7. Get ready for the magic: Transfer to an oven-safe dish, sprinkle Parmesan.
  8. Get that golden crust: Broil for about 5 minutes until golden.
  9. Finish with freshness: Sprinkle with chopped parsley and serve hot.

Notes

  • Don't overcook the pasta, it continues cooking under the broiler.
  • Sauce too thick? Add reserved pasta water gradually.
  • If you have leftover beef gravy, add it with the beef for extra flavor.
  • Avoid boiling the sauce when adding dairy to prevent separation.
  • Prepare ahead and broil right before serving for quick meal prep.
  • Complete with a simple green salad on the side.

Nutrition

  • Serving Size: Approximately 1 portion
  • Calories: 423
  • Sugar: N/A
  • Sodium: N/A
  • Fat: 6g
  • Saturated Fat: N/A
  • Unsaturated Fat: N/A
  • Trans Fat: N/A
  • Carbohydrates: 61g
  • Fiber: N/A
  • Protein: 31g
  • Cholesterol: N/A

Did you make this recipe?

Share a photo and tag us — we'd love to see your creation!

Recipe

15-Minute Haloumi Pomegranate and Rocket Salad

April 22, 2025 by grace bellamy Leave a Comment

Picture this: golden, crispy haloumi coated in aromatic za'atar, nestled among peppery rocket leaves and topped with glistening pomegranate jewels. This Haloumi Pomegranate and Rocket salad recipe is a feast for your eyes and taste buds! The magic happens when warm, salty cheese meets cool, crisp veggies, creating a delightful texture party in your mouth. The best part? You can whip it up in just 15 minutes, bringing restaurant-worthy flavors to your table with hardly any effort.

Looking for something to wow your dinner guests or brighten up your lunch routine? This salad does the heavy lifting for you. It's deceptively simple yet looks like you spent hours in the kitchen. The sweet-tart pomegranate molasses dressing pulls everything together with a flavor that'll have friends begging for your recipe (sharing is up to you!).

Recipe Highlights

  • Flavor: Salty, crispy haloumi creates fireworks when paired with sweet pomegranate seeds and the warm, earthy notes of za'atar and cumin.
  • Skill level: Total beginner-friendly but looks like you graduated from culinary school – perfect for impressing guests without breaking a sweat.
  • Prep-tip: Pat that haloumi completely dry before adding oil and za'atar – this simple step makes the difference between good and mind-blowing crispiness.
  • Time-Saving Tip: Grab pre-seeded pomegranate from the store and cut your prep time in half (no one needs to know!).

Why You'll Love Haloumi Pomegranate and Rocket Salad Recipe

  • Ready in 15 minutes flat – perfect for those "I need something impressive NOW" moments
  • Every bite offers a different experience – crispy, crunchy, juicy, and tender all in one fork-full
  • Naturally gluten-free with vegetarian protein that actually satisfies
  • Looks like you spent hours arranging it, when really you just tossed it together
  • Works as an appetizer, side dish, or light main – your call!
  • Those festive colors make it perfect for holiday tables when you want to look like you tried

Haloumi Pomegranate and Rocket Salad Ingredients

For the Salad:

  • Haloumi cheese (2 × 250g blocks): The real MVP here – gets all golden and crispy outside while staying soft and squeaky inside.
  • Olive oil (1 tbsp): Helps that za'atar stick to the cheese and gets everything nicely browned.
  • Za'atar (2 tbsp): This Middle Eastern spice blend is like a flavor bomb of herbs, sesame seeds, and sumac that transforms the haloumi.
  • Rocket leaves (150g): Brings that peppery bite that stands up to the stronger flavors without backing down.
  • Fennel bulb (1 large): Adds refreshing crunch and subtle licorice notes that cut through the richness of the cheese.
  • Walnut halves (50g): Toasting these brings out their nutty personality and adds satisfying crunch.
  • Pomegranate seeds (50g): Little bursts of sweet-tart juice that pop in your mouth and make the salad look like jewelry.
  • Dill (½ small bunch): Those feathery green bits add brightness and a distinctive flavor that wakes up the whole dish.

For the Dressing:

  • Walnut oil (4 tbsp): Creates a rich, nutty base that plays well with the other flavors.
  • Pomegranate molasses (2 tbsp): This sweet-tart syrup is like magic in a bottle – gives the dressing its wow factor.
  • Cumin seeds (2 tsp): When toasted and crushed, they add warm, earthy notes that make the whole salad sing.

I've included exact measurements in the recipe card below if you're the measuring type.

How to Make Haloumi Pomegranate and Rocket Salad

1. Prepare the Dressing

  1. Toast the cumin seeds: Toss them in a dry pan over medium heat for 1-2 minutes until they smell amazing (your kitchen will thank you).
  2. Crush the seeds: Use a mortar and pestle if you're feeling fancy, or just press them with the flat side of a knife – no special equipment needed.
  3. Mix the dressing: Whisk together the walnut oil, pomegranate molasses, those freshly crushed cumin seeds, and a pinch of salt and pepper until they become friends.
  4. Set aside: Let the dressing hang out while you prep everything else – it gets better as it sits, like most of us.

2. Prepare the Haloumi

  1. Slice the haloumi: Cut each block into 6-8 slices about 1cm thick – aim for even pieces so they cook at the same rate.
  2. Pat dry: This step seems fussy but makes ALL the difference – use paper towels to really dry those slices.
  3. Oil the cheese: Brush both sides with olive oil – think of it as sunscreen for your haloumi before it hits the heat.
  4. Apply za'atar coating: Spread za'atar on a plate and press each side of the haloumi into it – like breading, but way easier.

3. Cook the Haloumi

Pan-fry method:

  1. Heat a non-stick frying pan over medium-high heat.
  2. Cook those spiced haloumi slices for just 1 minute per side – you're looking for golden and crisp, not sad and rubbery.
  3. Transfer to a paper towel-lined plate to catch any excess oil.

Air fryer method:

  1. Preheat your air fryer to 200°C (392°F) for 2 minutes.
  2. Place the haloumi slices in a single layer – no crowding or they'll steam instead of crisp.
  3. Cook for 8 minutes, flip, then another 2-5 minutes until they're golden and tempting.

4. Assemble the Salad

  1. Prepare the base: Scatter rocket leaves across your serving plate – don't pack them down, let them breathe.
  2. Layer vegetables: Sprinkle those thin fennel slices throughout the rocket like confetti.
  3. Add the haloumi: Place your warm, crispy cheese slices on top while they're still slightly hot – that contrast with the cool greens is what makes this special.
  4. Sprinkle toppings: Scatter the toasted walnuts and pomegranate seeds over everything – this is where it starts looking like something from a food magazine.
  5. Finish with herbs: Add fresh dill throughout – those feathery bits make everything look prettier.
  6. Dress the salad: Drizzle with your pomegranate-cumin dressing right before serving – timing matters here!

Variations

  • Mediterranean twist: Swap in feta for haloumi and throw in some sliced cucumber, black olives, and fresh mint.
  • Citrus kick: Add orange or pink grapefruit segments for juicy brightness that plays well with the cheese.
  • Heartier version: Mix in cooked quinoa or bulgur wheat when you need something more substantial.
  • Nut switch-up: Try pistachios or pine nuts instead of walnuts – each brings its own personality to the party.
  • Herb adventures: Replace dill with mint, parsley, or a mix of whatever's looking good in your herb garden or grocery store.
  • Veggie boost: Thinly sliced radishes or roasted bell peppers add extra color and crunch if you're feeling ambitious.

How to Store Haloumi Pomegranate and Rocket Salad

  • Prep ahead components: Store cooked haloumi, undressed greens, and dressing separately in airtight containers in the fridge for up to 2 days.
  • Assembled salad: This one's best enjoyed right after you make it – the greens wilt and the haloumi loses its magic once dressed and sitting around.
  • Reviving leftover haloumi: If you do have leftover cheese, a quick warm-up in a dry skillet brings back some of its former glory before adding to fresh greens.

How to Make Dietary Adaptations

Vegan Version:

  • Swap haloumi for firm tofu or thick slices of grilled bread brushed with olive oil and za'atar.
  • No pomegranate molasses? Mix maple syrup with lemon juice for a similar sweet-tart effect.
  • Keep everything else the same to maintain those exciting texture contrasts.

Nut-Free Option:

  • Replace walnuts with toasted pumpkin or sunflower seeds for that essential crunch factor.
  • Use extra virgin olive oil instead of walnut oil.
  • Add a teaspoon of honey to the dressing to make up for the missing nutty flavors.

FAQs About Haloumi Pomegranate and Rocket Salad Recipe

Does pomegranate go with haloumi?

Like they were made for each other! Those sweet-tart pomegranate seeds perfectly balance the salty haloumi. The juice pops against the chewy cheese, creating that "wow" moment in every bite. Plus, those ruby red seeds make the whole dish look gorgeous without any extra effort.

Can you eat haloumi raw in salad?

Technically yes, but why would you? Raw haloumi is super firm, extra salty, and squeaks like a dog toy. Cooking creates that golden crust while softening the inside – it's a total transformation. If you're in a no-cook situation, try slicing it paper-thin instead.

What cheese goes well with pomegranate salad?

Beyond haloumi, several cheeses play nicely with pomegranate: crumbled feta brings similar saltiness with a creamier texture; goat cheese adds tangy creaminess; and ricotta salata gives you that firm, salty bite without needing to cook anything.

What goes well with haloumi in a salad?

Haloumi makes friends easily with ingredients that balance its salty density. Think acidic elements like lemon or vinaigrette, sweet touches like honey or fruit, crunchy veggies, and fresh herbs. Grilled veggies like zucchini or eggplant make particularly good buddies with this cheese.

Recipe Details

Prep Time: 10 minutes
Cook Time: 5 minutes
Total Time: 15 minutes
Servings: 6
Calories: 457 per serving

Equipment Needed:

  • Non-stick frying pan or air fryer
  • Sharp knife and cutting board
  • Small bowl for dressing
  • Large serving platter or individual plates

Nutritional Information (per serving):

  • Calories: 457
  • Fat: 36g (Saturates: 17g)
  • Carbohydrates: 8g (Sugars: 7g)
  • Fiber: 4g
  • Protein: 23g
  • Salt: 2.8g

This haloumi pomegranate salad is like the party outfit of food – it makes an entrance! The bright colors and contrasting textures create a dish that people can't help but comment on. I love serving this when I want to look like I put in way more effort than I actually did. It works beautifully as a starter for dinner parties or as a light meal with some crusty bread on the side.

Have you tried the haloumi-pomegranate combo before? Once you do, it might just become your go-to impressive-but-easy salad. It's been my secret weapon for potlucks where I want to stand out without spending hours in the kitchen!

Looking for more quick salad ideas? Check out our Chicken Salad Recipe for another delicious option when you're short on time.

Print

15-Minute Za'atar Haloumi Pomegranate and Rocket Salad

Haloumi Pomegranate and Rocket Salad
Print Recipe
Pin Recipe

5 Stars 4 Stars 3 Stars 2 Stars 1 Star

No reviews

This 15-minute Za'atar Haloumi Pomegranate and Rocket Salad features golden, crispy haloumi cheese coated in za'atar, combined with rocket leaves, pomegranate seeds, and a walnut pomegranate molasses dressing.

  • Author: grace bellamy
  • Prep Time: 10 minutes
  • Cook Time: 5 minutes
  • Total Time: 15 minutes
  • Yield: 6 servings
  • Category: Salad
  • Method: Pan-Fry or Air Fry
  • Cuisine: Mediterranean
  • Diet: Vegetarian

Ingredients

  • Haloumi cheese (2 × 250g blocks)
  • Olive oil (1 tbsp)
  • Za'atar (2 tbsp)
  • Rocket leaves (150g)
  • Fennel bulb (1 large)
  • Walnut halves (50g)
  • Pomegranate seeds (50g)
  • Dill (½ small bunch)
  • Walnut oil (4 tbsp)
  • Pomegranate molasses (2 tbsp)
  • Cumin seeds (2 tsp)

Instructions

  1. Prepare the dressing: Toast cumin seeds, crush them, and mix with walnut oil, pomegranate molasses, salt, and pepper. Set aside.
  2. Prepare the haloumi: Slice, pat dry, oil, and coat with za'atar.
  3. Cook the Haloumi using either pan-fry or air fryer method until golden and crisp.
  4. Assemble the salad: Lay rocket leaves on a plate, add fennel, haloumi, walnuts, and pomegranate seeds. Finish with dill and dressing.

Notes

  • Ready in 15 minutes flat – perfect for those "I need something impressive NOW" moments.
  • Every bite offers a different experience – crispy, crunchy, juicy, and tender all in one fork-full.
  • Naturally gluten-free with vegetarian protein that actually satisfies.

Nutrition

  • Serving Size: ⅙ of recipe
  • Calories: 457
  • Sugar: 7g
  • Sodium: 2.8g
  • Fat: 36g
  • Saturated Fat: 17g
  • Unsaturated Fat: 17g
  • Trans Fat: 0g
  • Carbohydrates: 8g
  • Fiber: 4g
  • Protein: 23g
  • Cholesterol: 50mg

Did you make this recipe?

Share a photo and tag us — we'd love to see your creation!

Recipe

Simple Savoury Mince Recipe: The Ultimate Comfort Food Ready in 40 Minutes

April 22, 2025 by grace bellamy Leave a Comment

Picture this: You're sitting down to a steaming bowl of rich, savory mince that instantly makes your shoulders relax. This beloved British classic has been warming homes for generations, and for good reason! Each spoonful delivers that perfect combo of thick, flavorful gravy and tender beef that somehow makes everything feel right with the world. The best part? This budget-friendly, one-pan wonder comes together in just 40 minutes - no wonder families have been making this recipe for over five decades.

What I love most about this humble dish is how incredibly adaptable it is. Cook basic savory mince tonight, transform it into cottage pie tomorrow, and whip up a hearty bolognese the day after. It's like the gift that keeps on giving - perfect for those chaotic weeknights when you're juggling a million things or when you're trying to get ahead with meal prep on Sunday afternoon.

Recipe Highlights

  • Flavor: Rich, deeply savory gravy that clings to every bite of tender beef and colorful veggies - comfort in a spoon!
  • Skill level: Total beginner-friendly - even if you've barely boiled water before, you'll nail this recipe with these foolproof steps.
  • Prep-tip: Get in there with your wooden spoon and break up that mince while it cooks - this simple step makes all the difference for the perfect texture.
  • Time-Saving Tip: Make a double batch and stash portions in your freezer - your future hungry self will thank you when dinner's ready in minutes on a crazy weeknight.

Why You'll Love This Simple Savoury Mince Recipe

  • You probably already have all 10 ingredients hanging out in your kitchen
  • Just one pan gets dirty - fewer dishes means more sofa time later!
  • From fridge to table in 40 minutes flat - quicker than food delivery
  • It's like the little black dress of recipes - so versatile you can create countless meals from it
  • Keeps your wallet happy while filling everyone's tummies
  • Sunday meal prep champion - cook once, eat well all week
  • Packs a protein punch with plenty of good-for-you nutrients
  • Works for picky eaters and special diets with a few simple tweaks

Simple Savoury Mince Recipe Ingredients

  • Minced Beef (500g, lean 5% fat): The star of our show! This protein powerhouse becomes melt-in-your-mouth tender when simmered. Not a beef fan? Turkey mince works beautifully, and my vegetarian friends swear by Quorn mince as a tasty alternative.
  • Olive Oil (1 tablespoon): Just enough to get things sizzling. Any cooking oil in your pantry will do the trick.
  • Onion (1, finely chopped): The backbone of flavor that brings a sweet-savory foundation. Red onions offer a slightly sweeter profile if you prefer them.
  • Garlic (2 cloves, finely chopped): Let's be honest - I often throw in an extra clove because… well, it's garlic! If you're in a pinch, about ½ teaspoon of garlic powder will work too.
  • Dried Italian Herbs (2 teaspoons): This little shortcut adds so much flavor! Don't have the blend? Just grab some dried thyme, oregano, and a pinch of rosemary from your spice rack.
  • Plain Flour (2 tablespoons): The magical thickener that transforms your sauce from watery to wonderful. Nothing fancy needed!
  • Beef Stock (450ml): The liquid gold that brings everything together. Homemade stock is amazing if you've got it, but a good-quality store-bought one works beautifully too.
  • Tomato Purée/Paste (3 tablespoons): This concentrated little powerhouse adds rich depth and a touch of tanginess that balances all the savory elements.
  • Marmite (1 teaspoon): My secret flavor bomb! Don't worry if you normally avoid Marmite on toast - it won't taste "Marmite-y" but adds incredible depth to the dish. No Marmite in your pantry? Grab Vegemite or splash in 1-2 tablespoons of Worcestershire sauce instead.
  • Frozen Mixed Vegetables (200g): The easy way to add color, nutrients, and texture all at once. Those little peas, carrots, and green beans bring the whole dish to life.
  • Salt & Pepper (¼ teaspoon each): Just enough to make all the other flavors pop.

Exact measurements are in the recipe card below.

How to Make Simple Savoury Mince Recipe

1. Create the Aromatic Base

Get your large, deep skillet hot with the olive oil - you'll know it's ready when it shimmers slightly. Toss in your chopped onions and let them cook for 5-6 minutes. You want them soft and translucent, not brown. Add the garlic and cook for just 30 seconds until it smells amazing. Keep an eye on it - burnt garlic is bitter and will ruin your sauce!

2. Add Herbs and Brown the Beef

Sprinkle those dried herbs over your onion mixture and give it a quick stir - your kitchen should start smelling wonderful! Crank up the heat to medium-high and add your beef. Here's where your wooden spoon becomes your best friend - keep breaking up those meat clumps as it cooks. Think small, even pieces about the size of peas. Keep at it for 5-7 minutes until all the pink has disappeared.

3. Develop the Rich Sauce

This is where the magic happens! Sprinkle your flour evenly over the meat mixture - like you're dusting a cake - and stir continuously for exactly 60 seconds. This step cooks off that raw flour taste while setting you up for silky sauce success. Add your tomato purée and stir for another 30 seconds until everything looks glossy.

Now, pour in your beef stock bit by bit, stirring constantly to avoid lumps. Drop in that game-changing teaspoon of Marmite and stir until it disappears. Let everything come to a gentle bubble, then turn the heat down low. Let it simmer uncovered for 15 minutes, giving it the occasional stir. You'll notice it starting to thicken and develop that rich color that makes everyone's mouth water.

4. Incorporate Vegetables and Finish

Time for a color boost! Toss your frozen mixed vegetables straight into the pan - no need to defrost them first. Gently stir them through and let everything simmer together for another 6-8 minutes. The veggies should be tender but still have a slight bite and vibrant color - nobody likes mushy peas! Give it a taste and add a pinch more salt or pepper if needed.

Check your sauce consistency - it should coat the back of your spoon nicely. If it's looking a bit runny, mix a tablespoon of cornflour with a splash of cold water and stir this into your simmering sauce. Like magic, it'll thicken right up!

Expert Tips for Perfect Savoury Mince

  • The Flavor Secret: I once tried skipping the Marmite because I ran out… big mistake! This teaspoon transforms your mince from "nice dinner" to "what's in this? It's amazing!" It completely dissolves, leaving only richness behind, no weird taste.
  • Break It Up Properly: My mom always said the difference between good mince and great mince is how you break it up. Keep at it with your wooden spoon while it's browning - those little, even pieces create the perfect texture that soaks up all that delicious sauce.
  • The One-Minute Rule: I learned this the hard way - cook that sprinkled flour for exactly one minute. Less time and you'll taste raw flour, more time and you risk burning it. Set a timer on your phone if needed!
  • The Spoon Test: Want to know if your sauce is perfect? Dip in a spoon, flip it over, and run your finger through the sauce on the back. If the line stays clear without the sauce running back together, you've nailed it!
  • Gentle Bubbles Only: Keep your simmer lazy and gentle during that 15-minute reduction time. Aggressive boiling toughens the meat and reduces the sauce too quickly. You want those occasional "blup… blup…" bubbles, not a rolling boil.

Variations

Transform into Classic Bolognese

When you're craving pasta but still want that familiar comfort, go bolognese! Add an extra 3 tablespoons of tomato paste and another tablespoon of Italian herbs. Pour in 200ml of passata and let it simmer for 10 more minutes. Serve over al dente spaghetti with freshly grated Parmesan. My kids practically lick their plates clean with this version!

Create Hearty Chili Con Carne

For those nights when you want a bit of spice, turn your mince into chili! After browning the beef, add 1 tablespoon chili powder (adjust to your heat preference), 2 teaspoons ground cumin, and 1 teaspoon smoked paprika. Toss in a drained can of kidney beans along with your veggies. Serve with fluffy rice, a dollop of sour cream, and a squeeze of lime.

Make the Perfect Cottage Pie

This is Sunday dinner gold! Prepare your basic savory mince, then transfer it to an ovenproof dish. Top with about 750g of mashed potatoes, create some texture with a fork for those crispy bits everyone fights over, sprinkle with 50g grated cheddar, and bake at 200°C/180°C fan for 25-30 minutes until golden and bubbling.

Yorkshire Pudding Fill

This was my childhood favorite! Make or buy some large Yorkshire puddings, heat them up, and fill them with hot savory mince. Something magical happens when that gravy soaks into the bottom of the Yorkshire pudding. My nephew calls these "dinner boats" and gets ridiculously excited when they're on the menu.

Loaded Jacket Potatoes

Perfect for those nights when you need a hug in food form. Bake large potatoes until they're fluffy inside and crisp outside (about an hour at 200°C/180°C fan). Split them open, add a bit of butter to melt in, then pile on the hot savory mince. Top with grated cheese that gets all melty from the heat of the mince.

How to Store and Reheat Savoury Mince

Refrigeration

Once your mince has cooled down (within two hours of cooking), pop it into airtight containers and store in the fridge for up to 3 days. Here's a little secret - it often tastes even better the next day when all those flavors have had time to mingle and get friendly with each other.

Freezing

This is meal prep gold! Cool your mince completely, then portion it into freezer containers or bags. Squeeze out as much air as possible if using bags, label them with the date (trust me, in three months you won't remember when you made it), and freeze for up to 3 months.

Reheating

From refrigerated: Microwave on high for 2-3 minutes, giving it a stir halfway through. Make sure it's piping hot all the way through. Alternatively, warm it gently in a saucepan over medium-low heat, stirring occasionally. If it looks a bit thick, just add a splash of water or stock to loosen it up.

From frozen: The best way is to thaw it overnight in the fridge, then reheat as above. In a rush? Use the defrost setting on your microwave first, then heat until it's steaming hot throughout.

Serving Suggestions

Perfect Pairings

  • Crispy Roast Potatoes: The contrast of creamy mince with crispy potatoes is what dinner dreams are made of.
  • Buttery Mashed Potatoes: The mince gravy and smooth mash combine into something greater than the sum of its parts.
  • Steamed Rice: Perfect for soaking up every last drop of that delicious sauce.
  • Crusty Bread: Sometimes the simplest is best - tear off chunks and mop up that gravy. No judgment for plate-licking here!
  • Fresh Side Salad: When you want to balance your comfort food, a crisp green salad with a zingy dressing works beautifully.
  • Air Fryer Garlic Bread: That extra hit of garlicky goodness takes the meal up another notch.

Plating Tips

Want to make it look as good as it tastes? Use a ring mold to shape mashed potatoes or rice in the center of a warmed plate, then spoon the mince around it. Sprinkle with fresh herbs for color. It's the same delicious food but suddenly looks restaurant-worthy!

Nutritional Notes

Each serving of this savory mince (recipe serves 4) contains approximately:

  • Calories: 429 kcal
  • Protein: 35g - great for keeping you full and satisfied
  • Carbohydrates: 18g - lower than many comfort foods
  • Fat: 24g (can be reduced by using 5% fat beef)
  • Fiber: 4g, supporting digestive health
  • Iron: 3.5mg - particularly good for women and growing kids

Watching your calories? Go for the leanest beef you can find and bulk up the veggie content. Need a gluten-free version? Just swap the plain flour for cornstarch (mix 1 tablespoon with cold water before adding).

FAQs About Simple Savoury Mince Recipe

What is the secret ingredient in savory mince?

The game-changer is definitely Marmite! Just that one little teaspoon transforms the whole dish by adding a deep savory richness. The best part? Even if you're not a Marmite fan, you won't taste it specifically - it just makes everything else taste better. No Marmite at home? Vegemite works too, or splash in some Worcestershire sauce instead.

Is ground beef the same as mince?

Yes! It's just different names for the same thing. In the UK and Australia, we call it "mince" or "minced beef," while American recipes typically list "ground beef." They're identical products, just with different regional names.

What can you add to mince to make it taste better?

The real game-changers are umami-rich ingredients - that's your Marmite, Worcestershire sauce, mushrooms, or even a tiny bit of anchovy paste. Properly browning the meat makes a huge difference too - those caramelized bits are flavor gold! Don't skimp on aromatics like onions and garlic, and herbs add wonderful depth. Using stock rather than water as your liquid makes a big difference. And my grandmother's tip? Let it sit for 5-10 minutes after cooking - it always tastes better with that little rest.

Do you put garlic in savoury mince?

In my kitchen? Absolutely yes! While some minimal recipes might skip it, garlic adds that essential aromatic depth that makes savory mince so satisfying. The trick is adding it after your onions have softened and cooking it just briefly - about 30-60 seconds until you can smell that gorgeous aroma. If you're cooking for someone who finds garlic a bit much, garlic powder gives a milder flavor that still adds that special something.

The Versatility of Simple Savoury Mince

What makes this recipe my go-to weeknight hero? It's like the Swiss Army knife of dinner solutions! Start with this basic savory mince, and suddenly you've got the building blocks for a week's worth of different meals. No wonder busy home cooks have been passing this recipe down through generations - it's not just dinner, it's dinner possibilities.

Whether you're feeding hungry kids after soccer practice, meal prepping for your hectic work week, or looking for comfort food that won't break the bank, this savory mince has got your back. That rich, hearty sauce and tender beef create that satisfying "ahhh" moment with every bite - the food equivalent of slipping into your favorite sweater.

Master this recipe once, and you've added a reliable kitchen superhero to your cooking arsenal - ready to transform into everything from party-worthy cottage pies to simple pasta dishes when you're too tired to think. And the best part? It all starts with ingredients you probably already have sitting in your kitchen right now.

Check out more delicious comfort food recipes on our blog

Print

Simple Savoury Mince Recipe: The Ultimate British Comfort Food Ready in 40 Minutes

Delicious and Simple Savoury Mince recipe
Print Recipe
Pin Recipe

5 Stars 4 Stars 3 Stars 2 Stars 1 Star

No reviews

A comforting and versatile British classic, this Simple Savoury Mince recipe brings a rich, savory mince to your table in just 40 minutes. Perfect for weeknight dinners and adaptable into various dishes, it makes for a budget-friendly family favorite.

  • Author: grace bellamy
  • Prep Time: 10 minutes
  • Cook Time: 30 minutes
  • Total Time: 40 minutes
  • Yield: 4 servings
  • Category: Main Course
  • Method: Stovetop
  • Cuisine: British
  • Diet: Low Fat

Ingredients

  • Minced Beef (500g, lean 5% fat)
  • Olive Oil (1 tablespoon)
  • Onion (1, finely chopped)
  • Garlic (2 cloves, finely chopped)
  • Dried Italian Herbs (2 teaspoons)
  • Plain Flour (2 tablespoons)
  • Beef Stock (450ml)
  • Tomato Purée/Paste (3 tablespoons)
  • Marmite (1 teaspoon)
  • Frozen Mixed Vegetables (200g)
  • Salt & Pepper (¼ teaspoon each)

Instructions

  1. Get your large, deep skillet hot with the olive oil. Toss in your chopped onions and let them cook for 5-6 minutes. Add the garlic and cook for just 30 seconds.
  2. Sprinkle dried herbs over your onion mixture. Add your beef and keep breaking up the meat clumps as it cooks until all the pink has disappeared.
  3. Sprinkle the flour evenly over the meat mixture and stir continuously for exactly 60 seconds. Add your tomato purée and stir for another 30 seconds until glossy. Pour in the beef stock bit by bit, stirring constantly. Add Marmite and stir. Let it simmer uncovered for 15 minutes.
  4. Toss your frozen mixed vegetables straight into the pan, stir them through and let everything simmer for another 6-8 minutes. Add more salt or pepper if needed.

Notes

  • Don't skip the Marmite; it's the secret to a rich flavor.
  • Break the mince properly for the best texture.
  • Cook sprinkled flour for exactly one minute.
  • The sauce should coat the back of your spoon.

Nutrition

  • Serving Size: ¼ of recipe
  • Calories: 429 kcal
  • Fat: 24g
  • Carbohydrates: 18g
  • Fiber: 4g
  • Protein: 35g

Did you make this recipe?

Share a photo and tag us — we'd love to see your creation!

Recipe

Irresistibly Easy Taco Lasagna: Your New Family Favorite!

April 18, 2025 by grace bellamy Leave a Comment

There’s something magical about the comforting embrace of a warm, cheesy casserole, especially when it’s layered with the vibrant flavors of a taco. I still remember the first time I served my family Taco Lasagna—it was a chilly evening, and I could practically hear their stomachs grumble in anticipation. The aroma of sautéed onions and seasoned ground beef wafted through the house, drawing them to the kitchen like moths to a flame.

This easy Taco Lasagna recipe transforms the beloved elements of a classic taco into a crowd-pleasing, Mexican-inspired dish that comes together in a flash. It’s not just a meal; it’s a harmonious blend of flavors that invites everyone to the table, making it perfect for weeknights or gatherings with friends. The beauty of this recipe lies in its versatility—whether you prefer flour or corn tortillas, mild or spicy, this lasagna makes it incredibly easy to customize to your family’s taste. So, let’s dive into creating a savory masterpiece that promises to be a hit and a true family favorite!

Why is Taco Lasagna a Must-Try?

Comforting Layers: Every bite is a warm hug, thanks to the melty cheese and tasty meat.
Quick Preparation: This recipe comes together in just a handful of steps, making it perfect for busy weeknights.
Family-Friendly: Kids and adults alike will devour this dish, making it a perfect crowd-pleaser.
Versatile Options: Switch it up with corn tortillas or spice levels to suit your family's preferences.
Freezer-Friendly: Prep ahead by freezing before baking, so you always have a delicious meal ready! Check out my Chicken Taco Soup for more easy, hearty recipes!

Taco Lasagna Ingredients

Get ready to layer up the deliciousness!

For the Meat Mixture
• Ground Beef – a savory base that adds rich flavor to the lasagna.
• Olive Oil – perfect for browning the beef and sautéing aromatics.
• Red Onion – brings a hint of sweetness and depth to the dish.
• Garlic – elevates the flavor profile of the entire lasagna.
• Taco Seasoning – infuses classic taco flavor; feel free to use homemade!
• Water – keeps the meat mixture moist and helps blend flavors.
• Green Chilies (Optional) – add a touch of heat for those who like a kick.
• Black Beans – contributes texture, heartiness, and fiber to the mix.

For the Layers
• Flour Tortillas (6-inch) – forms the delicious layers; corn tortillas can be swapped in.
• Salsa – adds moisture and bursts of flavor; use your favorite brand!
• Sour Cream – provides creaminess and tang that balances the spices.
• Shredded Mexican Cheese Blend – melts beautifully for that cheesy goodness.

Check the recipe card below for full measurements.

How to Make Taco Lasagna

  1. Preheat your oven to 375°F (190°C) and grease a 9x13 inch baking dish to ensure easy removal of your cheesy creation.
  2. Brown the ground beef in a skillet over medium heat, breaking it into small pieces. Cook until it’s no longer pink, then drain any excess grease for a healthy balance.
  3. Sauté the chopped red onion in olive oil until it softens, about 4-5 minutes. Then, add minced garlic and cook for another minute until it becomes fragrant.
  4. Combine the cooked ground beef, taco seasoning, green chilies (if using), and black beans into the skillet. Pour in water and let it simmer on low heat, stirring occasionally for about 5 minutes.
  5. Line the baking dish with halved tortillas and a whole tortilla at the bottom, covering the base for stability.
  6. Layer with salsa, half of the meat mixture, sour cream, and a sprinkle of cheese. Repeat this process, creating another delicious layer.
  7. Top off the lasagna with any remaining salsa and a generous amount of cheese, ensuring a delightful cheesy crust.
  8. Bake in the preheated oven for 30-40 minutes, or until the cheese is melted and bubbly, turning a lovely golden brown.

Optional: Serve with fresh toppings like diced tomatoes or sliced jalapeños for an added flavor punch.

Exact quantities are listed in the recipe card below.

Expert Tips for Taco Lasagna

• Perfect Layers: Ensure even distribution of the meat and beans in each layer to avoid a soggy bottom. This helps maintain the structure of your Taco Lasagna.

• Tortilla Choice: If using corn tortillas, warm them slightly first to prevent cracking. Flour tortillas tend to hold up better in the baking process.

• Customize Spice: Feel free to adjust the level of taco seasoning based on your family’s taste; start with a little and add more if desired for your Taco Lasagna.

• Melted Cheese: For a perfectly melted cheese top, cover with foil for the first half of baking, then remove to get that lovely golden crust.

• Storage Tips: Store leftovers in an airtight container and consume within 2-3 days. This dish can also be frozen before baking for a quick future meal.

How to Store and Freeze Taco Lasagna

• Fridge: Store leftovers in an airtight container for up to 3 days. This Taco Lasagna tastes delightful both warm and cold, making it a versatile option for quick meals.

• Freezer: For long-term storage, freeze the unbaked assembled lasagna in an aluminum baking dish, tightly covered. It can be baked straight from frozen—perfect for busy weeknights!

• Reheating: To reheat, thaw in the refrigerator overnight, then warm in the oven or microwave until heated through. If baked from frozen, add about 15-20 minutes to the original baking time.

• Covering: When storing, always ensure it’s well covered to maintain moisture and prevent freezer burn. Enjoy every delicious layer again!

What to Serve with Taco Lasagna?

Cozy up your dinner table with delightful sides that elevate your Taco Lasagna experience.

  • Fresh Salad: A crisp green salad with a zesty lime vinaigrette adds a refreshing contrast to the rich flavors of the lasagna.
    Add crunchy cucumbers and sweet bell peppers to enhance the freshness.
  • Guacamole: Creamy guacamole perfectly complements the savory layers of Taco Lasagna.
    Scoop it up with tortilla chips for a delightful appetizer!
  • Mexican Rice: Fluffy Mexican rice, seasoned with cumin and cilantro, provides a comforting side that harmonizes beautifully with the casserole.
    It’s like having a fiesta on your plate!
  • Refried Beans: Creamy, savory refried beans are a classic pairing that enhances the overall Mexican vibe.
    Serve them warm, perhaps with a sprinkle of cheese on top.
  • Sour Cream Dipping Sauce: A side of sour cream garnished with fresh herbs offers a tangy touch.
    It allows everyone to customize their servings as they please.
  • Spicy Pickled Vegetables: Add a touch of tang and spice to your meal with a side of pickled jalapeños or carrots.
    Their crunchiness contrasts deliciously with the soft lasagna layers.
  • Fruit Salsa: A light fruit salsa, like mango or pineapple, adds a burst of sweetness that contrasts the savory elements beautifully.
    It's a delightful surprise that cleanses the palate between bites!
  • Chips and Salsa: Always a crowd-pleaser, serving tortilla chips with your favorite salsa makes for a fun, shared appetizer.
    It sets a lively tone for your taco-themed feast!
  • Pineapple Agua Fresca: Refreshing pineapple agua fresca provides a sweet, tropical balance to the meal.
    Serve it chilled for a perfect, thirst-quenching accompaniment.

Taco Lasagna Variations

Feel free to explore these delicious twists and substitutions that can make your Taco Lasagna even more irresistible!

  • Corn Tortillas: Swap flour tortillas for corn tortillas for a gluten-free option with a delightful crunch. Just warm them slightly before layering to keep them flexible.
  • Vegetarian Delight: Replace ground beef with sautéed mushrooms, lentils, or a mix of your favorite vegetables. Add extra spices to boost the flavor!
  • Spicy Kick: Add sliced jalapeños or switch the salsa for a spicy variety for a zesty punch. The heat makes a flavorful difference that spice lovers will adore.
  • Cheese Variation: Experiment with different cheeses like pepper jack for added spice or a four-cheese blend for a creamy and rich twist. Every bite will be an unforgettable delight!
  • Herbed Layers: Incorporate fresh herbs like cilantro or parsley in the cheese layer to brighten the flavors and add a fresh touch. The enhancement elevates the entire dish aesthetically and taste-wise.
  • Creamy Avocado: Instead of sour cream, use mashed avocado for a creamy layer that will surprise your taste buds and add a unique twist to the classic recipe.
  • Add More Beans: Mix in more beans such as pinto or kidney beans for extra fiber and protein. It'll also give you a heartier layer for a fulfilling meal.
  • Taco Toppings: Top with classic taco garnishes like chopped tomatoes, crispy lettuce, or olives for added crunch and flavor. Each bite can be unique with these delectable toppings!

FAQs About Taco Lasagna

Taco Lasagna is a family favorite, and I’m here to answer all your burning questions!

Can I use corn tortillas instead of flour?

Absolutely! Corn tortillas can bring a delightful texture and flavor; just warm them slightly to prevent cracking.

How do I adjust the spice level of Taco Lasagna?

You can easily customize spice levels by varying the amount of taco seasoning or adding jalapeños and green chilies to suit your taste.

How long can I store leftovers?

Store your Taco Lasagna in an airtight container in the fridge for 2-3 days, and it tastes great both warm and cold!

Can I freeze Taco Lasagna before cooking?

Definitely! Assembled but unbaked Taco Lasagna can be frozen for a quick meal later; just bake straight from frozen, adding extra time.

What toppings should I serve with Taco Lasagna?

Serve garnished with lettuce, diced tomatoes, jalapeños, sour cream, or guacamole for that authentic taco experience!

How do I know when my Taco Lasagna is done baking?

Your Taco Lasagna is ready when the cheese is melted and bubbly with a lightly golden brown top, usually in about 30-40 minutes.

Print

Irresistibly Easy Taco Lasagna: Your New Family Favorite!

Taco Lasagna
Print Recipe
Pin Recipe

5 Stars 4 Stars 3 Stars 2 Stars 1 Star

No reviews

There’s something magical about the comforting embrace of a warm, cheesy casserole, especially when it’s layered with the vibrant flavors of a taco. This easy Taco Lasagna recipe transforms the beloved elements of a classic taco into a crowd-pleasing, Mexican-inspired dish that comes together in a flash.

  • Author: grace bellamy
  • Prep Time: 15 minutes
  • Cook Time: 40 minutes
  • Total Time: 55 minutes
  • Yield: 8 servings 1x
  • Category: Dinner
  • Method: Baking
  • Cuisine: Mexican
  • Diet: Meat-based

Ingredients

Scale
  • 1 pound Ground Beef
  • 2 tablespoons Olive Oil
  • 1 Red Onion
  • 2 cloves Garlic
  • 2 tablespoons Taco Seasoning
  • ½ cup Water
  • 1 can Green Chilies (Optional)
  • 1 can Black Beans
  • 6 Flour Tortillas (6-inch)
  • 1 cup Salsa
  • 1 cup Sour Cream
  • 2 cups Shredded Mexican Cheese Blend

Instructions

  1. Preheat your oven to 375°F (190°C) and grease a 9x13 inch baking dish.
  2. Brown the ground beef in a skillet over medium heat until it’s no longer pink, then drain any excess grease.
  3. Sauté the chopped red onion in olive oil until it softens. Add minced garlic and cook for another minute.
  4. Combine the cooked ground beef, taco seasoning, green chilies, and black beans into the skillet. Pour in water and let it simmer on low heat for about 5 minutes.
  5. Line the baking dish with halved tortillas and a whole tortilla at the bottom.
  6. Layer with salsa, half of the meat mixture, sour cream, and a sprinkle of cheese. Repeat this process for another layer.
  7. Top off the lasagna with remaining salsa and cheese.
  8. Bake in the preheated oven for 30-40 minutes, until the cheese is melted and bubbly.

Notes

  • Ensure even distribution of the meat and beans in each layer.
  • If using corn tortillas, warm them slightly first.
  • Adjust taco seasoning based on your family’s taste.
  • Cover with foil for the first half of baking for a perfectly melted cheese top.
  • Store leftovers in an airtight container.

Nutrition

  • Serving Size: 1 slice
  • Calories: 350
  • Sugar: 3g
  • Sodium: 450mg
  • Fat: 20g
  • Saturated Fat: 8g
  • Unsaturated Fat: 10g
  • Trans Fat: 0g
  • Carbohydrates: 30g
  • Fiber: 6g
  • Protein: 22g
  • Cholesterol: 60mg

Did you make this recipe?

Share a photo and tag us — we'd love to see your creation!

Recipe

Easy Curried Sausages: The Retro Comfort Food Ready in 20 Minutes

April 16, 2025 by grace bellamy Leave a Comment

Remember walking into your kitchen as a kid and catching that first whiff of curry powder dancing through the air?

For me, a plate of curried sausages instantly brings back memories of family dinners and the golden, rich gravy pooling around those perfectly browned sausages.

This beloved dish has been winning hearts at dinner tables since the '80s, and honestly, it's still a lifesaver for those of us scrambling to get a tasty meal on the table after a long day.

Back in the day, many recipes had you boiling those sausages (talk about robbing them of flavor!). But this version?

We're cranking up the deliciousness by browning them first and letting their savory goodness become the foundation of an incredible curry sauce.

The best part? You'll have this on the table in 20 minutes using ingredients you probably already have. It's amazing how a few simple tweaks can turn ordinary sausages into tonight's dinner hero.

What Makes This Recipe Special

  • The Flavor Magic: Think juicy sausages swimming in a velvety, mildly spiced curry gravy, with sweet veggies that balance everything out. It's comfort food at its finest.
  • No Chef Skills Needed: If you can stir a pot, you can make this! The techniques are so straightforward, you'll nail it on your first try.
  • Game-Changing Tip: Don't skip cooking your curry powder for 30 seconds before adding liquid. I was shocked at how this tiny step makes the flavors pop!
  • One-Pan Wonder: Keep everything in the same pan as you cook. Not only will you build incredible flavor, but you'll also thank yourself when it's time to wash dishes.

Why This Will Become Your Go-To Weeknight Dinner

  • You'll have dinner on the table in 20 minutes flat (faster than delivery!)
  • No special shopping trip needed—your pantry probably has everything already
  • Just one pan to wash when you're done (you're welcome)
  • Works beautifully with whatever sides you have on hand—rice, potatoes, pasta, you name it
  • Make a double batch and freeze portions for those "I can't even" kind of days
  • Need gluten-free? No problem—just a couple simple swaps (more on that below)
  • Even picky eaters love this mild curry flavor—it's the dish that brings peace to the dinner table

What You'll Need for Curried Sausages Recipe

  • Sausages (600g/1.2lb): The real stars here—grab good quality ones with visible meat chunks. Trust me, this is where the magic starts.
  • Oil (½ tbsp): Just a splash to get things going.
  • Garlic (2 cloves): Because what good curry doesn't start with garlic? It adds that wonderful aromatic base.
  • Onion (1): Creates that sweet foundation for our curry and adds lovely texture.
  • Carrot (1): Brings natural sweetness, a pop of color, and sneaks in some veggies.
  • Curry Powder (1 tbsp+): The heart and soul of this dish! I love Keens mild curry powder, but use your favorite or adjust if you like it spicier.
  • Flour (3 tbsp): This transforms our sauce from liquid to luscious gravy.
  • Chicken Stock (2 cups): Please don't swap this for water—the stock brings so much depth that water just can't match.
  • Sugar (1 tsp): Just a touch to balance all those savory flavors.
  • Salt (½ tsp): Wakes up all the other flavors.
  • Black Pepper (½ tsp): Adds warmth without heat.
  • Peas (1 cup, frozen): That perfect pop of green that brightens the whole dish—plus, they're always in the freezer when you need them.

You'll find exact measurements in the recipe card at the end.

Let's Get Cooking!

  1. Get those sausages golden: Heat a splash of oil in a large skillet over medium-high heat. Drop in your sausages and let them sizzle until they're nicely browned all over (about 5-6 minutes). They'll finish cooking later, so no need to worry about the inside yet. Take them out and slice them diagonally if you'd like—it looks prettier and helps them soak up more sauce.
  2. Build your flavor foundation: See all those tasty brown bits in the pan? That's gold! Toss your garlic and onion right into the same skillet with those sausage drippings. Give them a couple of minutes to soften and become fragrant. Your kitchen should start smelling amazing about now.
  3. Wake up your curry powder: Here's the game-changer—add your curry powder directly to the onion mixture and stir constantly for 30 seconds. I used to skip this step until a friend showed me how it releases all those essential oils and transforms the flavor. Night and day difference!
  4. Create your gravy starter: Sprinkle your flour over everything and keep stirring for another 30 seconds. This quick cook prevents that raw flour taste nobody wants and sets up your gravy for success.
  5. Bring on the saucy goodness: Pour in your chicken stock a bit at a time, stirring constantly to avoid any lumps (nobody wants surprise flour balls in their dinner!). Add your carrots, a touch of sugar, salt, and pepper. Give it all a good stir.
  6. Bring it all together: Now welcome those sausages back to the pan along with your frozen peas. Let everything bubble gently for about 3 minutes until your sauce hugs a spoon and your sausages are cooked through.
  7. Get it on the table: Ladle this beauty over fluffy mashed potatoes, rice, or pasta. Then watch as everyone suddenly appears at the dinner table without being called twice!

Insider Tips That Make All the Difference

  • The sausage secret: I learned this the hard way—those cheap, uniformly pink sausages just don't cut it. Spend the extra dollar on sausages where you can actually see meat chunks. Your taste buds will high-five you.
  • Brown, don't boil: My grandmother used to boil her sausages, and I always wondered why mine tasted better. That golden-brown exterior is where all the magic happens. Don't rush this step!
  • Sauce too thick or thin? No worries! If your gravy gets too thick (it happens if you walk away for a minute!), just splash in a bit more stock. Too thin? Let it bubble away for an extra minute or two.
  • That 30-second curry cook: I was tempted to skip this step once when in a hurry. Big mistake! Those 30 seconds wake up all the flavor compounds in your curry powder. It's like the difference between instant and fresh-ground coffee.
  • Trust your taste buds: Every curry powder has its own personality. Before serving, grab a spoon and taste. Need more salt? A bit more curry powder? Make it yours!

Make It Your Own

  • Sneak in more veggies: Last week I tossed in some bell peppers and mushrooms from the back of my fridge, and my kids didn't even notice! Try adding corn, spinach, or green beans—whatever needs rescuing from your vegetable drawer.
  • Creamy dreamy version: Swap half the chicken stock for coconut milk, and you've got a whole new dish that tastes like it came from your favorite takeout spot.
  • The apple trick: My mother-in-law taught me this one—instead of sugar, toss in a finely diced apple. It adds natural sweetness plus little bursts of texture that keep things interesting.
  • Not a sausage fan?: No problem! This curry sauce plays well with chicken, turkey, or even those plant-based sausages. The sauce is so good it makes anything taste amazing.
  • Heat seekers: My partner loves spice, so sometimes I add a pinch of cayenne or a small diced chili to the onions. I keep it mild for the main pot and then sprinkle extra chili flakes at the table for those who want that kick.
  • Fresh finish: A handful of chopped parsley or cilantro scattered on top just before serving adds color and freshness that takes this comfort food to weekend-worthy status.

Saving Some for Later (If There's Any Left!)

  • Fridge friends: Pop any leftovers into an airtight container and they'll keep happily for up to 3 days. Here's a little secret—this dish actually tastes even better the next day after the curry flavors have had time to get friendly with everything else.
  • Freeze for future you: When I'm on top of my game, I make a double batch and freeze individual portions. Future me is always grateful on busy nights! They'll keep well for up to 3 months.
  • Bringing it back to life: When reheating, go low and slow on the stovetop with a splash of water or stock to loosen things up. Give it a stir now and then so nothing sticks to the pan. Microwave works too, but the stovetop gives more even results.

Need to Make It Gluten-Free? No Sweat!

My sister-in-law can't have gluten, so I've adapted this recipe many times for family dinners. It's surprisingly easy:

  1. Double-check your sausages first—many contain sneaky breadcrumbs or gluten-filled fillers. Most butcher shops can tell you which ones are safe.
  2. For the flour, you've got two easy options:
  • Mix 1.5 tablespoons of cornstarch with 2 tablespoons of cold water to make a slurry, then add it after your stock (this is my go-to method)
  • Or use 3 tablespoons of your favorite gluten-free flour blend the same way you'd use regular flour
  1. Don't forget to check your curry powder and stock labels—sometimes gluten hides in the most unexpected places.

I promise the gluten-free version tastes just as delicious. My sister-in-law actually asked if I'd "accidentally" used regular flour because the gravy was so thick and rich!

FAQs About Curried Sausages

Should you boil sausages for curried sausages?

Please don't! I made this mistake when I first started cooking. Boiling basically washes away all that wonderful flavor into the water and leaves you with sad, pale sausages. Browning them creates this gorgeous caramelized exterior that adds depth to the whole dish. Plus, those little browned bits left in the pan? They're flavor gold for your curry gravy. Take the extra few minutes to brown them—your taste buds will thank you.

What country are curried sausages from?

This dish has that wonderful "fusion before fusion was cool" story. Curried sausages became a dinner table staple in Australia, New Zealand, and the UK back in the 1980s. It's basically what happened when home cooks started experimenting with curry flavors from South Asia but applied them to familiar Western comfort foods. I love how it represents that moment when our parents' generation began getting more adventurous with international flavors while still keeping dinner approachable for the whole family.

What's the difference between devilled sausages and curried sausages?

It's all about that sauce! Curried sausages swim in a golden, earthy sauce where curry powder plays the lead role. Devilled sausages, on the other hand, go in a totally different direction with a reddish sauce that's tangy and rich from Worcestershire sauce, tomato, and mustard, often with a little chili kick. Both are delicious in their own way—curried sausages feel more warming and spice-forward, while devilled sausages have that tangy, slightly zingy profile. My dad was a devilled sausage fan, but mom always preferred curried!

What's the best rice for curried sausages?

I've tried many different types, and basmati or jasmine rice are hands-down the winners. They stay all fluffy and separate, perfect for soaking up that gorgeous curry sauce without turning into mush. When I'm feeling virtuous, I use brown basmati instead—it still has that great texture but brings extra fiber and nutrients to the table. That said, this dish is equally happy alongside mashed potatoes if that's more your style! (That's how my kids prefer it.)

The Perfect "I Don't Have Time But Still Want Something Delicious" Meal

There's something magical about dishes that manage to be quick, comforting, and still interesting enough that you don't feel like you're settling. For me, curried sausages tick all those boxes. I love how this humble meal bridges different food traditions while still feeling like home cooking at its best.

The first time I made this for my family, my teenager actually looked up from their phone and said, "Can we have this again tomorrow?" High praise indeed! That golden sauce coating tender veggies and juicy sausages just has a way of bringing everyone to the table.

What I appreciate most about this recipe is how forgiving it is. Had a crazy day? Stick to the basic recipe. Got a bit more time? Throw in whatever vegetables need using up in your fridge. Feeding someone who loves spice? Dial up the heat. It's less of a rigid recipe and more of a dinner strategy that you can bend to fit your life.

Have you tried making curried sausages at home? I'd love to hear your twists on this classic—drop a comment below with your favorite way to serve them!

Print

Easy Curried Sausages: The Retro Comfort Food Ready in 20 Minutes

Curried Sausages
Print Recipe
Pin Recipe

5 Stars 4 Stars 3 Stars 2 Stars 1 Star

No reviews

A quick and comforting dish featuring juicy sausages in a mildly spiced curry gravy, ready in just 20 minutes.

  • Author: grace bellamy
  • Prep Time: 5 minutes
  • Cook Time: 15 minutes
  • Total Time: 20 minutes
  • Yield: 4 servings
  • Category: Main Course
  • Method: Stovetop
  • Cuisine: Australian
  • Diet: Gluten Free

Ingredients

  • Sausages (600g/1.2lb): The real stars here—grab good quality ones with visible meat chunks. Trust me, this is where the magic starts.
  • Oil (½ tbsp): Just a splash to get things going.
  • Garlic (2 cloves): Because what good curry doesn't start with garlic? It adds that wonderful aromatic base.
  • Onion (1): Creates that sweet foundation for our curry and adds lovely texture.
  • Carrot (1): Brings natural sweetness, a pop of color, and sneaks in some veggies.
  • Curry Powder (1 tbsp+): The heart and soul of this dish! I love Keens mild curry powder, but use your favorite or adjust if you like it spicier.
  • Flour (3 tbsp): This transforms our sauce from liquid to luscious gravy.
  • Chicken Stock (2 cups): Please don't swap this for water—the stock brings so much depth that water just can't match.
  • Sugar (1 tsp): Just a touch to balance all those savory flavors.
  • Salt (½ tsp): Wakes up all the other flavors.
  • Black Pepper (½ tsp): Adds warmth without heat.
  • Peas (1 cup, frozen): That perfect pop of green that brightens the whole dish—plus, they're always in the freezer when you need them.

Instructions

  1. Get those sausages golden: Heat a splash of oil in a large skillet over medium-high heat. Drop in your sausages and let them sizzle until they're nicely browned all over (about 5-6 minutes). They'll finish cooking later, so no need to worry about the inside yet. Take them out and slice them diagonally if you'd like—it looks prettier and helps them soak up more sauce.
  2. Build your flavor foundation: See all those tasty brown bits in the pan? That's gold! Toss your garlic and onion right into the same skillet with those sausage drippings. Give them a couple of minutes to soften and become fragrant. Your kitchen should start smelling amazing about now.
  3. Wake up your curry powder: Here's the game-changer—add your curry powder directly to the onion mixture and stir constantly for 30 seconds. I used to skip this step until a friend showed me how it releases all those essential oils and transforms the flavor. Night and day difference!
  4. Create your gravy starter: Sprinkle your flour over everything and keep stirring for another 30 seconds. This quick cook prevents that raw flour taste nobody wants and sets up your gravy for success.
  5. Bring on the saucy goodness: Pour in your chicken stock a bit at a time, stirring constantly to avoid any lumps (nobody wants surprise flour balls in their dinner!). Add your carrots, a touch of sugar, salt, and pepper. Give it all a good stir.
  6. Bring it all together: Now welcome those sausages back to the pan along with your frozen peas. Let everything bubble gently for about 3 minutes until your sauce hugs a spoon and your sausages are cooked through.
  7. Get it on the table: Ladle this beauty over fluffy mashed potatoes, rice, or pasta. Then watch as everyone suddenly appears at the dinner table without being called twice!

Notes

  • The sausage secret: I learned this the hard way—those cheap, uniformly pink sausages just don't cut it. Spend the extra dollar on sausages where you can actually see meat chunks. Your taste buds will high-five you.
  • Brown, don't boil: My grandmother used to boil her sausages, and I always wondered why mine tasted better. That golden-brown exterior is where all the magic happens. Don't rush this step!
  • Sauce too thick or thin? No worries! If your gravy gets too thick (it happens if you walk away for a minute!), just splash in a bit more stock. Too thin? Let it bubble away for an extra minute or two.
  • That 30-second curry cook: I was tempted to skip this step once when in a hurry. Big mistake! Those 30 seconds wake up all the flavor compounds in your curry powder. It's like the difference between instant and fresh-ground coffee.
  • Trust your taste buds: Every curry powder has its own personality. Before serving, grab a spoon and taste. Need more salt? A bit more curry powder? Make it yours!

Nutrition

  • Serving Size: 1 serving
  • Calories: 350
  • Sugar: 5g
  • Sodium: 850mg
  • Fat: 22g
  • Saturated Fat: 7g
  • Carbohydrates: 20g
  • Fiber: 3g
  • Protein: 15g
  • Cholesterol: 60mg

Did you make this recipe?

Share a photo and tag us — we'd love to see your creation!

Recipe

Creamy One-Pot Chicken Stroganoff Ready in 30 Minutes

April 16, 2025 by grace bellamy Leave a Comment

Ever found yourself staring at a sink piled high with dinner dishes, wondering if there's a better way? I've been there too! That's why this One-Pot Chicken Stroganoff has become my weeknight savior. It transforms the classic Russian comfort food into a wallet-friendly family meal that's ready in just half an hour. The real magic? Everything—yes, even the egg noodles—cooks in one pot, soaking up all that savory goodness while saving you from extra cleanup.

I stumbled upon this recipe during one of those weeks when work was crazy and time was scarce. From the first bite, I was hooked. Tender chunks of chicken, earthy mushrooms, and that velvety, tangy sour cream sauce… it tastes like something from your favorite restaurant, yet it's so simple to throw together.

Recipe Highlights

  • Flavor: Creamy, tangy, and savory with earthy mushrooms and tender chicken in every bite.
  • Skill level: Perfect for beginners—if you can stir, you can make this!
  • Prep-tip: Cut your chicken into even pieces (about 1-inch) so they cook at the same rate and stay juicy.
  • Time-Saving Tip: Chop and measure everything before you start cooking—once you begin, this recipe moves fast!

Why You'll Love One-Pot Chicken Stroganoff

Let me tell you why this recipe has earned a permanent spot in my dinner rotation:

  • True one-pot cooking (no separate pot for noodles!)
  • Ready in just 30 minutes from start to finish
  • Budget-friendly protein alternative to traditional beef
  • Creamy, comforting flavor without heavy cream
  • Perfect for busy weeknights when time is limited
  • Freezer-friendly for meal prep (with a few tweaks)

One-Pot Chicken Stroganoff Ingredients

Base & Liquid Components

  • Chicken stock (2½ cups, reduced sodium): This forms the tasty foundation that cooks your noodles and creates the sauce. I go for reduced sodium so I can control how salty the final dish turns out.
  • White wine (½ cup dry, chardonnay recommended): Adds a lovely depth and balances the creamy elements. Don't worry about serving this to kids—the alcohol cooks off completely.
  • All-purpose flour (1 Tbsp): This is our thickening hero, creating that perfect sauce consistency without any dreaded lumps.

Protein & Main Ingredients

  • Chicken breasts (1 lb): Our lean protein star. You can swap in boneless, skinless thighs if you want something a bit richer.
  • Cremini mushrooms (12 oz, sliced): These bring that classic stroganoff earthiness and meaty texture. White button mushrooms work in a pinch, but cremini pack more flavor.
  • Egg noodles (6 oz, extra wide): The traditional stroganoff base. They cook right in the sauce, soaking up all those amazing flavors.

Aromatics & Seasonings

  • Olive oil (3 Tbsp, divided): We'll use this to cook the chicken and veggies separately to build layers of flavor.
  • Yellow onion (½, finely chopped): The aromatic foundation that starts our flavor party.
  • Garlic (3-4 cloves, minced): Because let's be honest, when doesn't garlic make things better?
  • Kosher salt (1 tsp, divided): We'll add this in stages to properly season each component.
  • Black pepper (¾ tsp, divided): Brings necessary seasoning and just a hint of heat.
  • Paprika (½ tsp): Adds a subtle smokiness and that gorgeous color.
  • Dried thyme (¼ tsp): Brings those classic herbal notes we all love.
  • Dried oregano (¼ tsp): Works alongside the thyme for more herbal complexity.
  • Red pepper flakes (⅛ tsp): Just enough to add a gentle warmth in the background without making things spicy.

Finishing Elements

  • Sour cream (3-4 Tbsp): This creates that signature stroganoff tang and creaminess. Full-fat gives the best texture, but light works too.
  • Whole-grain or dijon mustard (1 tsp): My secret weapon for adding depth and a subtle zing.
  • Fresh parsley (chopped): Brightens up the dish visually and adds a fresh flavor contrast.

Find exact measurements in the recipe card below.

How to Make One-Pot Chicken Stroganoff

1. Prepare Your Thickening Agent

Make the slurry: In a small bowl, whisk together 1 tablespoon flour and 1 tablespoon chicken stock until smooth. Set this aside.

This little step makes all the difference between a silky sauce and one with flour lumps. The cold stock helps dissolve the flour before it hits the hot pan—a trick I learned the hard way!

2. Cook the Chicken to Golden Perfection

Brown the chicken: Heat 1½ tablespoons olive oil in a large dutch oven or deep skillet over medium-high heat. Season your chicken pieces with ¼ teaspoon each salt and pepper, then add them to the hot pan. Cook for about 5 minutes until they're golden brown and just cooked through (internal temperature of 165°F). Transfer to a clean plate.

I've found that patience pays off here—don't crowd your pan or you'll end up steaming rather than browning the chicken. That slight caramelization creates incredible flavor that makes all the difference.

3. Build the Flavor Base with Vegetables

Sauté aromatics: Add the remaining 1½ tablespoons oil to the same pan. Toss in your mushrooms and onion along with the remaining ½ teaspoon black pepper, paprika, thyme, oregano, and red pepper flakes. Cook for 6-7 minutes, stirring occasionally, until the mushrooms release their moisture and begin to brown.

Add garlic: Stir in that minced garlic and cook for just 30 seconds, stirring frequently. I once let the garlic go too long and learned my lesson—burnt garlic can ruin a dish with its bitter taste!

4. Create Depth with Deglazing

Deglaze the pan: Pour in the wine and use a wooden spoon to scrape all those flavorful browned bits from the bottom of the pan. Let it simmer for about 2 minutes until reduced by half.

This is my favorite part—watching all those caramelized bits dissolve into the wine. That's pure flavor you'd otherwise lose down the drain!

5. Cook Noodles Directly in the Sauce

Build the sauce: Stir in the remaining chicken stock and bring to a simmer. Once it's bubbling away, add the remaining ¾ teaspoon salt and the uncooked egg noodles. Cook uncovered for approximately 8 minutes or until the noodles are tender, stirring occasionally to prevent sticking.

The first time I tried cooking noodles right in the sauce, I was skeptical. Now I'm a convert! The noodles absorb all that flavor while releasing starches that naturally thicken the sauce—it's like magic in a pot.

6. Perfect the Sauce Consistency

Thicken the sauce: Add the reserved chicken stock/flour mixture, stir well and cook for 1 minute until the sauce thickens noticeably.

You'll see the transformation happen quickly—suddenly the sauce will coat the back of a spoon beautifully.

7. Finish with Creamy Elements

Complete the dish: Turn off the heat. Return the cooked chicken to the pan, then add the sour cream and mustard. Stir gently to combine everything without breaking up the noodles.

I learned through messy trial and error that adding dairy off-heat prevents curdling while giving you that signature creamy stroganoff texture.

8. Garnish and Serve

Final touch: Sprinkle with freshly chopped parsley and additional black pepper to taste. Serve immediately while hot.

The bright green parsley isn't just pretty—it adds a fresh contrast that cuts through the richness of the dish.

Variations to Try

When I'm in the mood to switch things up, here are some of my favorite twists:

  • Dairy-Free Option: Substitute cashew cream for sour cream—just blend ½ cup soaked raw cashews with ¼ cup water until completely smooth.
  • Vegetarian Twist: Replace chicken with 16 oz mixed mushrooms (portobello, shiitake, and cremini) for a hearty meatless version that even carnivores will love.
  • Protein Swap: Use turkey breast, pork tenderloin, or even chickpeas for different protein options.
  • Herb Enhancements: Add 1 tablespoon fresh dill or tarragon at the end for an aromatic twist that transforms the whole dish.
  • Richer Version: When I'm feeling indulgent, I stir in 2 tablespoons cream cheese along with the sour cream for extra creaminess.
  • Gluten-Free Adaptation: Use gluten-free pasta and replace flour with 1 tablespoon cornstarch (mixed with cold stock).

How to Store One-Pot Chicken Stroganoff

  • Refrigerator: Pop leftovers in an airtight container for up to 3 days. The flavors actually get even better overnight!
  • Reheating: Warm gently on the stovetop with a splash of chicken stock to loosen the sauce. For microwave reheating, use 70% power and stir halfway through.
  • Freezing Tips:
  • For best results, freeze before adding dairy. Add fresh sour cream when reheating.
  • If freezing the completed dish, know that noodles may soften slightly upon thawing.
  • I like to freeze in individual portions for up to 2 months in airtight containers—perfect for solo lunches!
  • Thaw overnight in refrigerator before reheating.

How to Make Gluten-Free One-Pot Chicken Stroganoff

My sister-in-law can't eat gluten, so I've perfected a gluten-free version with these simple swaps:

  1. Replace regular egg noodles with gluten-free pasta varieties (rice, corn, or chickpea-based all work well)
  2. Substitute all-purpose flour with cornstarch (1 tablespoon)
  3. Double-check that your chicken stock and mustard are certified gluten-free
  4. Reduce cooking time for the pasta by 1-2 minutes as gluten-free varieties can become soft quickly

The dish turns out just as creamy and comforting as the original, with a texture that's equally satisfying.

FAQs About One-Pot Chicken Stroganoff

Can chicken stroganoff be made in advance?

Absolutely! I often make chicken stroganoff up to 2 days ahead when I'm hosting dinner. For best results, cook everything except the dairy components, then refrigerate. When you're ready to serve, reheat gently and stir in fresh sour cream and mustard. This prevents any separation issues while keeping that rich, creamy texture intact.

Is stroganoff Russian or German?

Stroganoff is definitely Russian in origin. The dish is named after the influential Stroganov family and dates back to 19th century Russia. The original beef stroganoff featured sautéed beef in a sour cream sauce and became popular among Russian nobility before spreading worldwide with various adaptations.

What do you eat with chicken stroganoff?

My go-to sides for chicken stroganoff are simple dishes that complement without stealing the show. Try a crisp green salad with light vinaigrette, roasted asparagus or Brussels sprouts, steamed green beans, or crusty bread for sauce-dipping. When I want something more substantial, I'll add roasted garlic mashed potatoes or steamed rice.

What herbs go in chicken stroganoff?

Traditional stroganoff is pretty minimalist with herbs, letting the mushroom-cream sauce shine. This recipe uses dried thyme and oregano during cooking, with fresh parsley as a finishing touch. When I'm feeling adventurous, I'll try fresh dill, tarragon, or chives—each adds a different aromatic dimension that plays beautifully with the creamy sauce.

The Perfect Weeknight Solution

One-Pot Chicken Stroganoff delivers restaurant-quality flavor with minimal effort and cleanup. By cooking the noodles directly in the sauce, you're not only saving a dish but creating incredible flavor that just can't happen when pasta is cooked separately.

What I love most about this recipe is its brilliant balance—it's quick enough for hectic weeknights yet impressive enough that I wouldn't hesitate to serve it to friends. The tangy, creamy sauce coating tender chicken and silky mushrooms creates a dish that feels indulgent while remaining relatively light.

Next time you're tempted to order takeout after a long day, remember this 30-minute wonder waiting in your recipe collection. Your future self (and dishwasher) will thank you!

⭐️ Looking for more easy chicken recipes? Try our wildly popular Marry Me Chicken Recipe that's guaranteed to impress!

Another Recipe The Chunky Chef's One-Pot Chicken Stroganoff

Print

One-Pot Chicken Stroganoff: The 30-Minute Weeknight Miracle You Need

One Pot Chicken Stroganoff
Print Recipe
Pin Recipe

5 Stars 4 Stars 3 Stars 2 Stars 1 Star

No reviews

One-Pot Chicken Stroganoff is a quick and easy weeknight meal that combines tender chicken, earthy mushrooms, and egg noodles in a creamy, tangy sauce, all cooked in one pot for minimal cleanup.

  • Author: grace bellamy
  • Prep Time: 10 minutes
  • Cook Time: 20 minutes
  • Total Time: 30 minutes
  • Yield: 4 servings
  • Category: Dinner
  • Method: One-Pot
  • Cuisine: Russian
  • Diet: Vegetarian

Ingredients

  • Chicken stock (2½ cups, reduced sodium)
  • White wine (½ cup dry, chardonnay recommended)
  • All-purpose flour (1 Tbsp)
  • Chicken breasts (1 lb)
  • Cremini mushrooms (12 oz, sliced)
  • Egg noodles (6 oz, extra wide)
  • Olive oil (3 Tbsp, divided)
  • Yellow onion (½, finely chopped)
  • Garlic (3-4 cloves, minced)
  • Kosher salt (1 tsp, divided)
  • Black pepper (¾ tsp, divided)
  • Paprika (½ tsp)
  • Dried thyme (¼ tsp)
  • Dried oregano (¼ tsp)
  • Red pepper flakes (⅛ tsp)
  • Sour cream (3-4 Tbsp)
  • Whole-grain or dijon mustard (1 tsp)
  • Fresh parsley (chopped)

Instructions

  1. Make a slurry with flour and chicken stock.
  2. Brown seasoned chicken pieces in olive oil until golden and cooked through.
  3. Sauté mushrooms and onion with paprika, thyme, oregano, and red pepper flakes in the same pan.
  4. Add garlic and cook briefly, then deglaze with wine.
  5. Add chicken stock and uncooked egg noodles; cook until noodles are tender.
  6. Stir in reserved flour mixture to thicken the sauce.
  7. Return chicken to the pan, add sour cream and mustard, and stir to combine.
  8. Garnish with parsley and serve immediately.

Notes

  • Chop ingredients before starting as this recipe moves quickly.
  • For dairy-free, use cashew cream instead of sour cream.
  • To freeze, omit dairy and add when reheating.

Nutrition

  • Serving Size: 1 serving
  • Calories: 450
  • Sugar: 3g
  • Sodium: 650mg
  • Fat: 18g
  • Saturated Fat: 6g
  • Unsaturated Fat: 10g
  • Trans Fat: 0g
  • Carbohydrates: 45g
  • Fiber: 3g
  • Protein: 28g
  • Cholesterol: 85mg

Did you make this recipe?

Share a photo and tag us — we'd love to see your creation!

Recipe

Irresistibly Creamy Mexican Street Corn Dip for Easy Summer Snacking

April 13, 2025 by grace bellamy Leave a Comment

There’s something magical about summer evenings, especially when the sweet scent of roasted corn mingles with laughter and music. I still remember the first time I tasted authentic Mexican street corn, or Elote, at a bustling street fair. The spicy, creamy flavors danced across my palate, leaving me craving more.

Now, as the sun sets and friends gather for a casual get-together, I find myself effortlessly recreating those beautiful memories with my Creamy & Spicy Mexican Street Corn Dip. This quick and easy appetizer transforms the beloved flavors of Elote into a delectable dip that’s perfect for tortilla chips, veggies, or even a spoon straight from the bowl!

What makes this dip truly special is its blend of smoky chili powder, tangy lime, and creamy textures, all topped with crumbled cotija cheese and fresh cilantro. Not only does it pack a flavor punch, but it's also versatile enough to adapt based on what you have at home. So grab your ingredients, and let me take you through a recipe that will surely add a fiesta vibe to any gathering!

Why is Mexican Street Corn Dip a must-try?

Irresistible Flavor: This dip brings the bold, zesty flavors of traditional Mexican street corn right to your table.
Super Quick Prep: With just 30 minutes total, you can whip this up for any occasion.
Crowd-Pleaser: Perfect for summer gatherings, it’s a hit with friends and family alike!
Easily Adaptable: Swap ingriedients like feta for cotija or canned corn for fresh—it’s versatile!
Perfect Pairing: Serve alongside tortilla chips or fresh veggies for an enjoyable snacking experience.
For another popular summer option, check out my Street Corn Chicken Rice Bowl—you won't regret it!

Mexican Street Corn Dip Ingredients

Get ready to create a flavor explosion!

For the Dip
• Chili Powder – Adds the primary heat and flavor base that brings the dip to life.
• Smoked Paprika – Infuses a smoky undertone that elevates the spice blend.
• Cayenne Pepper – Adds a kick of extra heat; adjust to suit your taste buds!
• Extra Virgin Olive Oil – Ideal for sautéing onions and corn, enhancing the dish's richness.
• Yellow Onion – Provides a sharp, savory base for depth of flavor.
• Corn (2 cups kernels, 3-4 raw cobs) – The star ingredient offering sweetness and texture; canned corn works too!
• Garlic (2 cloves) – Introduces a pungent flavor that complements the dip perfectly.
• Kosher Salt and Black Pepper – Essential for seasoning and enhancing the overall flavors.
• Cream Cheese (6 ounces, room temperature) – Delivers creaminess and body to the dip.
• Sour Cream (⅓ cup) – Adds tanginess and moisture; milk can thin if needed.
• Salted Butter (4 tablespoons) – Creates the delicious buttery topping that finishes the dip beautifully.
• Olive Oil Mayo (⅓ cup) – Forms the creamy base of the dip, but Greek yogurt is a great alternative.
• Fresh Lime Juice (2 tablespoons) – Provides a zesty acidity that brightens the flavors.
• Crumbled Cotija Cheese (¾ cup) – Delivers a salty, tangy touch at the end; feel free to substitute feta!
• Grilled Corn (1 ear, kernels removed) – Adds texture and flavor; a must for that street corn vibe.
• Fresh Cilantro (¼ cup, chopped) – Brings a burst of freshness and herbaceous notes to the dish.

Full measurements are in the recipe card below.

How to Make Mexican Street Corn Dip

  1. Mix Spices: In a small bowl, combine chili powder, smoked paprika, cayenne pepper, and a pinch of salt. This spice mix will give your dip its signature bold flavor.
  2. Sauté Aromatics & Corn: Heat extra virgin olive oil in a skillet over medium heat. Sauté the chopped yellow onion until it’s soft and translucent, about 3-4 minutes. Add in the corn and minced garlic, then sprinkle in 1 teaspoon of your spice mix. Cook for another 5 minutes until the corn is tender.
  3. Combine & Warm Dip: Lower the heat and add the room temperature cream cheese to the skillet. Stir until it melts beautifully into the corn. Mix in sour cream for extra creaminess; if the dip is too thick, thin it with a splash of milk.
  4. Prepare Spicy Butter: In a separate pan, melt the salted butter over low heat. Stir in 3 teaspoons of the remaining spice mix and a pinch of chili flakes for an extra kick. Cook for just 1-2 minutes, then set aside.
  5. Make Lime Mayo: In a small bowl, mix the olive oil mayo with fresh lime juice and a pinch of salt. This creamy topping will balance all the flavors perfectly!
  6. Assemble & Serve: Spoon the creamy dip into a serving bowl. Top with the grilled corn, drizzle with the lime mayo, and finish with the spiced butter. Sprinkle crumbled cotija cheese and chopped cilantro on top before serving with crispy tortilla chips.

Optional: Serve with a side of extra lime wedges for a zesty twist!
Exact quantities are listed in the recipe card below.

Expert Tips for Mexican Street Corn Dip

• Warm It Up: Gently heat the dip before serving; it enhances creaminess and melds the flavors perfectly.

• Adjust Spice Levels: Customize the heat by adjusting cayenne pepper to your liking; it's better to start small and build up.

• Don't Skip the Butter: The buttery topping is essential for adding rich flavor; it truly elevates your Mexican Street Corn Dip.

• Use Fresh or Canned Corn: Fresh corn delivers a great texture, but canned corn is a convenient alternative—just rinse and drain!

• Make Ahead: This dip stores well in the fridge. Make it a day in advance, then warm it gently before serving.

How to Store and Freeze Mexican Street Corn Dip

Fridge: Store any leftover Mexican Street Corn Dip in an airtight container for up to 3 days. Reheat gently on low heat to restore the creamy texture.

Freezer: You can freeze the dip for up to 1 month. Divide into portions, transfer to freezer bags, and remove as much air as possible before sealing.

Thawing: When ready to use, thaw overnight in the fridge. Reheat on the stove over low heat, stirring occasionally until warmed through.

Reheating: For best results, reheat slowly on the stove rather than in the microwave to keep the dip creamy and prevent separation.

What to Serve with Mexican Street Corn Dip?

Elevate your snacking experience with delightful accompaniments that bring out the vibrant flavors of this creamy dip.

  • Crispy Tortilla Chips: The classic pairing! Their crunch contrasts beautifully with the creamy dip texture, making every scoop a heavenly bite.
  • Fresh Veggies: Sliced bell peppers, cucumbers, and celery add a refreshing crunch and vibrant color, creating a light and healthy balance.
  • Grilled Chicken Skewers: These protein-packed skewers add a satisfying heartiness to your appetizer setup; drizzle with lime for an extra zesty twist!
  • Mexican Rice: A side of fluffy cilantro-lime rice will soak up the dip's flavors, turning your gathering into a festive feast!
  • Pico de Gallo: This fresh, chunky salsa brings a bright, tangy contrast that complements the dip’s creaminess—plus, it's bursting with color!
  • Classic Margaritas: Sip these tangy, refreshing cocktails that echo the flavors of your dip, making your summer gathering feel like a festive fiesta.
  • Churros: For a sweet ending, serve warm churros dusted in cinnamon sugar to contrast the savory dip, wrapping up your meal on a delicious note.

Mexican Street Corn Dip Variations

Feel free to get creative with this dip and customize it to suit your taste buds!

  • Feta Substitute: Swap out cotija cheese for feta for a slightly tangy twist. It still adds creaminess and a bold flavor.
  • Canned Corn: Use canned, fire-roasted corn for convenience. This speeds up prep while still delivering that essential smoky flavor.
  • Greek Yogurt: Replace olive oil mayo with plain Greek yogurt for a healthier base without losing creaminess. It’s a great way to up your protein intake!
  • Creamy Vegan Option: Substitute cream cheese and sour cream with vegan cream cheese and coconut yogurt. This keeps it rich and creamy while making it dairy-free.
  • Spice It Up: Add diced jalapeños or a few dashes of hot sauce to the mix for additional heat. This gives the dip a delightful kick and caters to spice lovers!
  • Herb Infusion: Experiment by including other fresh herbs like chopped parsley or dill. It will bring a new freshness to each bite, enhancing the overall flavor profile.
  • Sweet Twist: Add a tablespoon of honey or maple syrup for a sweet contrast. The sweetness balances the heat beautifully and adds a unique touch.
  • Grilled Variation: For a smoky flavor, grill the corn before adding it to the dip. This enhances the elote experience and adds depth to the dish.

Mix and match these variations to create your perfect Mexican Street Corn Dip that delights every palate!

FAQs About Mexican Street Corn Dip

This section answers some common questions about making the perfect Mexican Street Corn Dip.

Can I use canned corn instead of fresh corn?

Absolutely! Canned corn is a convenient substitute; just remember to rinse and drain it before use.

How spicy is this dip?

The spiciness can be easily adjusted by changing the amount of cayenne pepper you add. Start with a little and increase to your taste!

How can I store leftovers?

Store any leftover Mexican Street Corn Dip in an airtight container for up to three days in the fridge.

Can I make this dip ahead of time?

Yes! Prepare it a day in advance, refrigerate, and reheat on low before serving to enhance the flavors.

What can I serve with this dip?

Tortilla chips are perfect, but fresh veggies or pita chips also make for delightful dippers!

Is there a vegetarian-friendly alternative to cotija cheese?

Feta cheese is a great vegetarian substitute that still provides a lovely tangy flavor!

Print

Irresistibly Creamy Mexican Street Corn Dip for Easy Summer Snacking

Mexican Street Corn Dip
Print Recipe
Pin Recipe

5 Stars 4 Stars 3 Stars 2 Stars 1 Star

No reviews

There’s something magical about summer evenings, especially when the sweet scent of roasted corn mingles with laughter and music. I still remember the first time I tasted authentic Mexican street corn, or Elote, at a bustling street fair. The spicy, creamy flavors danced across my palate, leaving me craving more.

Now, as the sun sets and friends gather for a casual get-together, I find myself effortlessly recreating those beautiful memories with my Creamy & Spicy Mexican Street Corn Dip. This quick and easy appetizer transforms the beloved flavors of Elote into a delectable dip that’s perfect for tortilla chips, veggies, or even a spoon straight from the bowl!

  • Author: grace bellamy
  • Prep Time: 10 minutes
  • Cook Time: 20 minutes
  • Total Time: 30 minutes
  • Yield: 6 servings 1x
  • Category: appetizer
  • Method: no-cook
  • Cuisine: Mexican
  • Diet: vegetarian

Ingredients

Scale
  • 2 cups corn kernels (3-4 raw cobs or canned corn)
  • 1 yellow onion
  • 2 cloves garlic
  • 6 ounces cream cheese, room temperature
  • ⅓ cup sour cream
  • ⅓ cup olive oil mayo
  • 2 tablespoons fresh lime juice
  • ¾ cup crumbled cotija cheese
  • 1 ear grilled corn, kernels removed
  • ¼ cup fresh cilantro, chopped
  • 4 tablespoons salted butter
  • 2 teaspoons chili powder
  • 1 teaspoon smoked paprika
  • ½ teaspoon cayenne pepper
  • Kosher salt
  • Black pepper
  • 1 tablespoon extra virgin olive oil

Instructions

  1. Mix Spices: In a small bowl, combine chili powder, smoked paprika, cayenne pepper, and a pinch of salt. This spice mix will give your dip its signature bold flavor.
  2. Sauté Aromatics & Corn: Heat extra virgin olive oil in a skillet over medium heat. Sauté the chopped yellow onion until it’s soft and translucent, about 3-4 minutes. Add in the corn and minced garlic, then sprinkle in 1 teaspoon of your spice mix. Cook for another 5 minutes until the corn is tender.
  3. Combine & Warm Dip: Lower the heat and add the room temperature cream cheese to the skillet. Stir until it melts beautifully into the corn. Mix in sour cream for extra creaminess; if the dip is too thick, thin it with a splash of milk.
  4. Prepare Spicy Butter: In a separate pan, melt the salted butter over low heat. Stir in 3 teaspoons of the remaining spice mix and a pinch of chili flakes for an extra kick. Cook for just 1-2 minutes, then set aside.
  5. Make Lime Mayo: In a small bowl, mix the olive oil mayo with fresh lime juice and a pinch of salt. This creamy topping will balance all the flavors perfectly!
  6. Assemble & Serve: Spoon the creamy dip into a serving bowl. Top with the grilled corn, drizzle with the lime mayo, and finish with the spiced butter. Sprinkle crumbled cotija cheese and chopped cilantro on top before serving with crispy tortilla chips.

Notes

  • Warm It Up: Gently heat the dip before serving; it enhances creaminess and melds the flavors perfectly.
  • Adjust Spice Levels: Customize the heat by adjusting cayenne pepper to your liking; it's better to start small and build up.
  • Don't Skip the Butter: The buttery topping is essential for adding rich flavor; it truly elevates your Mexican Street Corn Dip.
  • Use Fresh or Canned Corn: Fresh corn delivers a great texture, but canned corn is a convenient alternative—just rinse and drain!
  • Make Ahead: This dip stores well in the fridge. Make it a day in advance, then warm it gently before serving.

Nutrition

  • Serving Size: ½ cup
  • Calories: 250
  • Sugar: 3g
  • Sodium: 450mg
  • Fat: 18g
  • Saturated Fat: 8g
  • Unsaturated Fat: 9g
  • Trans Fat: 0g
  • Carbohydrates: 20g
  • Fiber: 2g
  • Protein: 5g
  • Cholesterol: 30mg

Did you make this recipe?

Share a photo and tag us — we'd love to see your creation!

Recipe

Refreshingly Easy Cucumber Sandwiches That Wow Every Guest

April 13, 2025 by grace bellamy Leave a Comment

One sunny afternoon, I found myself in the kitchen, longing for a simple yet delightful treat that could whisk me away to a garden party in the countryside. As I rummaged through my fridge, I stumbled upon crisp English cucumbers and a block of cream cheese, calling for a culinary reunion. The memory of my grandmother’s cucumber sandwiches flooded my mind—light, refreshing, and utterly divine.

These Refreshing Cucumber Sandwiches with Herbed Cream Cheese are not just a recipe; they are a tiny escape from the mundane, perfect for luncheons, tea parties, or even a light midday snack. Each bite offers the satisfying crunch of garden-fresh cucumbers paired with a creamy, herb-infused spread that brightens your day. Plus, they’re incredibly easy to assemble ahead of time, making them a stress-free option for entertaining, or simply treating yourself.

Whether you opt for classic white bread or switch it up with something more adventurous, these sandwiches are sure to become a favorite in your home. Let’s dive into this delightful recipe and create a taste of nostalgia that will bring joy to your table!

Why are Cucumber Sandwiches so popular?

Light and Refreshing: This recipe embodies the essence of summer with its cool cucumbers and herbed cream cheese spread, making it a perfect snack for warm days.
Effortlessly Simple: Just a few ingredients and quick steps transform ordinary bread into a gourmet treat, delighting both novice cooks and seasoned chefs alike.
Versatile Variations: Tailor your sandwiches with different breads and fresh or dried herbs to suit your taste. Explore options like pumpernickel or even California Roll Cucumber Salad for a vibrant twist!
Crowd-Pleaser: They are ideal for gatherings and will certainly impress your guests, leaving them asking for seconds.
Quick Prep Time: Whip these up in no time, allowing you to focus on enjoying the moment.

Cucumber Sandwiches Ingredients

• Perfect for a refreshing snack!

For the Cream Cheese Spread
• Cream Cheese – Main spread base; soften it for smoother mixing.
• Mayonnaise – Adds creaminess and richness to the spread.
• Chopped Fresh Dill – Provides a burst of fresh, herbal flavor.
• Chopped Fresh Chives – Adds a mild onion-like flavor to enhance your cucumber sandwiches.
• Garlic Powder – Introduces depth and savory notes to the cream cheese mixture.
• Salt and Black Pepper – Essential seasonings for balancing flavors.

For the Sandwich Assembly
• English Cucumber – Thinly sliced, this is the star ingredient that brings coolness.
• White Bread – Recommended for a classic taste; you can use your favorite bread or remove the crusts.

Full measurements are in the recipe card below.

How to Make Cucumber Sandwiches

  1. Soften the cream cheese by letting it sit at room temperature for about 30 minutes. This will make it easy to mix with mayonnaise for a smooth spread.
  2. Mix the softened cream cheese and mayonnaise in a bowl using a spatula or mixer until you achieve a creamy consistency. This is the delicious base of your herbed spread!
  3. Add in the chopped fresh dill, chives, garlic powder, salt, and black pepper. Stir well to incorporate all the flavors evenly into your creamy mixture.
  4. Spread the cream cheese mixture generously onto one side of each slice of bread. Make sure to cover the entire surface to keep your sandwiches moist and flavorful.
  5. Layer thinly sliced cucumbers on half of the bread slices, ensuring they are arranged evenly for that delightful crunch.
  6. Top with the remaining bread slices, then gently press down to keep everything together. Cut the sandwiches into triangles or your desired shape for easy serving.

Optional: Garnish with extra herbs for a pop of freshness and color.

Exact quantities are listed in the recipe card below.

Expert Tips for Cucumber Sandwiches

  • Herb Combinations: Experiment with herb blends like basil or parsley for unique flavors. Just ensure they complement the cucumber's freshness without overwhelming it.
  • Moisture Management: Avoid soggy sandwiches by spreading the cream cheese mixture generously and serving immediately after assembly. Refrigerate uncut sandwiches until ready to serve.
  • Cucumber Selection: Use firm English cucumbers for the best crunch and flavor. Picking ones with minimal blemishes will enhance your final dish.
  • Bread Choices: Try using whole grain or rye bread for a heartier texture. Just remember to keep any crusts removed for a classic look!
  • Presentation Matters: Cut sandwiches into different shapes like hearts or circles for special occasions, adding that extra touch that wows your guests.

How to Store and Freeze Cucumber Sandwiches

Fridge: Store assembled cucumber sandwiches in an airtight container for up to 3 days to maintain freshness. Ensure they're well-covered to prevent the bread from becoming soggy.

Freezer: While freezing isn't ideal for assembled cucumber sandwiches due to texture changes, you can freeze the herbed cream cheese spread for up to 2 months. Thaw in the fridge before use.

Reheating: These sandwiches are best served cold, but if you like them warm, assemble them fresh and enjoy immediately to preserve the crunch of the cucumbers.

Preparation Tip: For best results, prepare the cucumber sandwiches right before serving, as they’re truly at their peak freshness!

What to Serve with Cucumber Sandwiches?

Elevate your tea party or picnic spread with delightful pairings that enhance the refreshing flavors of cucumber sandwiches.

  • Tomato Soup: A warm, comforting bowl that perfectly complements the cool, crunchy textures of your sandwiches, creating a delightful contrast.
  • Fresh Fruit Salad: Bright and juicy bites of seasonal fruit bring a sweet balance alongside the savory herbed cream cheese, refreshing your palate.
  • Herb-Infused Lemonade: The zesty citrus flavors and aromatic herbs create an enticing drink that echoes the freshness of your cucumber sandwiches.
  • Mini Quiches: Light and fluffy, these savory bites add a heartier element to your spread while remaining easy to enjoy alongside your light sandwiches.
  • Arugula Salad: With its peppery notes and a simple vinaigrette, this salad provides a crisp, refreshing addition, inviting guests to savor every bite.
  • Chocolate-Dipped Strawberries: End on a sweet note with these elegant treats that offer a luxurious contrast after the light, refreshing sandwiches. They’re simply irresistible!

Cucumber Sandwiches Variations

Feel free to get creative with your cucumber sandwiches for delightful twists that cater to your and your guests' tastes!

  • Bread Options: Switch to pumpernickel or whole grain for added texture and flavor. Each type brings a unique character to your sandwiches!
  • Herb Swaps: Use any fresh herbs you have on hand, like parsley or mint, for a refreshing change that brightens the spread. Explore your pantry for dried herbs too!
  • Ranch Dressing: Substitute the herbed cream cheese with ranch dressing for a zesty flavor explosion that adds a playful twist. This swap is sure to be a crowd-pleaser.
  • Avocado Spread: For a creamy and nutritious base, mash ripe avocados with a dash of lime juice and spread them instead of cream cheese. It offers a dreamy, buttery texture.
  • Spicy Kick: Add a pinch of cayenne pepper or red pepper flakes to the cream cheese mixture for a touch of heat that complements the cooling cucumber. Spice things up just a bit!
  • Additional Fillings: Layer in some roasted red peppers or slices of smoked turkey to elevate your sandwiches and make them heartier for a meal. The added colors and flavors are a feast for the eyes.
  • Gluten-Free Bread: If dietary needs require it, swap regular bread for gluten-free options without compromising flavor. Many varieties are available to keep everyone included in the fun.
  • Mini Sandwiches: Cut your sandwiches into smaller squares or use cookie cutters for adorable bite-sized treats that are perfect for parties or brunch gatherings. They'll be an instant hit!

FAQs About Cucumber Sandwiches

These little bites of heaven often come with questions! Here are some common queries to help you out.

How can I prevent my cucumber sandwiches from getting soggy?

Cover the bread entirely with the cream cheese mixture and serve promptly after assembly to maintain crispness.

Can I use a different type of bread for my cucumber sandwiches?

Absolutely! Pumpernickel, whole grain, or even rye bread can add unique flavors and textures to your sandwiches.

What herbs can I substitute in the cream cheese spread?

Feel free to experiment with any herbs you have on hand, such as basil, parsley, or dill, for delightful variations.

How long can I store cucumber sandwiches in the fridge?

Assembled cucumber sandwiches can be stored in an airtight container in the fridge for up to 3 days, ensuring they're well-covered to avoid sogginess.

Is it better to serve cucumber sandwiches cold or warm?

Cucumber sandwiches are best enjoyed cold to highlight the refreshing crunch of the cucumbers and the creamy filling.

Print

Refreshingly Easy Cucumber Sandwiches That Wow Every Guest

Cucumber Sandwiches
Print Recipe
Pin Recipe

5 Stars 4 Stars 3 Stars 2 Stars 1 Star

No reviews

One sunny afternoon, I found myself in the kitchen, longing for a simple yet delightful treat that could whisk me away to a garden party in the countryside. As I rummaged through my fridge, I stumbled upon crisp English cucumbers and a block of cream cheese, calling for a culinary reunion. The memory of my grandmother’s cucumber sandwiches flooded my mind—light, refreshing, and utterly divine.

These Refreshing Cucumber Sandwiches with Herbed Cream Cheese are not just a recipe; they are a tiny escape from the mundane, perfect for luncheons, tea parties, or even a light midday snack. Each bite offers the satisfying crunch of garden-fresh cucumbers paired with a creamy, herb-infused spread that brightens your day. Plus, they’re incredibly easy to assemble ahead of time, making them a stress-free option for entertaining, or simply treating yourself.

Whether you opt for classic white bread or switch it up with something more adventurous, these sandwiches are sure to become a favorite in your home. Let’s dive into this delightful recipe and create a taste of nostalgia that will bring joy to your table!

  • Author: grace bellamy
  • Prep Time: 10 minutes
  • Total Time: 10 minutes
  • Yield: 4 servings 1x
  • Category: Appetizer
  • Method: No-Cook
  • Cuisine: American
  • Diet: Vegetarian

Ingredients

Scale
  • 8 ounces cream cheese
  • 2 tablespoons mayonnaise
  • 2 tablespoons chopped fresh dill
  • 2 tablespoons chopped fresh chives
  • ½ teaspoon garlic powder
  • ½ teaspoon salt
  • ¼ teaspoon black pepper
  • 1 English cucumber
  • 8 slices white bread

Instructions

  1. Soften the cream cheese by letting it sit at room temperature for about 30 minutes. This will make it easy to mix with mayonnaise for a smooth spread.

  2. Mix the softened cream cheese and mayonnaise in a bowl using a spatula or mixer until you achieve a creamy consistency. This is the delicious base of your herbed spread!

  3. Add in the chopped fresh dill, chives, garlic powder, salt, and black pepper. Stir well to incorporate all the flavors evenly into your creamy mixture.

  4. Spread the cream cheese mixture generously onto one side of each slice of bread. Make sure to cover the entire surface to keep your sandwiches moist and flavorful.

  5. Layer thinly sliced cucumbers on half of the bread slices, ensuring they are arranged evenly for that delightful crunch.

  6. Top with the remaining bread slices, then gently press down to keep everything together. Cut the sandwiches into triangles or your desired shape for easy serving.

  7. Optional: Garnish with extra herbs for a pop of freshness and color.

Notes

  • Herb Combinations: Experiment with herb blends like basil or parsley for unique flavors. Just ensure they complement the cucumber's freshness without overwhelming it.
  • Moisture Management: Avoid soggy sandwiches by spreading the cream cheese mixture generously and serving immediately after assembly. Refrigerate uncut sandwiches until ready to serve.
  • Cucumber Selection: Use firm English cucumbers for the best crunch and flavor. Picking ones with minimal blemishes will enhance your final dish.
  • Bread Choices: Try using whole grain or rye bread for a heartier texture. Just remember to keep any crusts removed for a classic look!
  • Presentation Matters: Cut sandwiches into different shapes like hearts or circles for special occasions, adding that extra touch that wows your guests.

Nutrition

  • Serving Size: 2 sandwiches
  • Calories: 200
  • Sugar: 2 grams
  • Sodium: 300 milligrams
  • Fat: 15 grams
  • Saturated Fat: 8 grams
  • Unsaturated Fat: 4 grams
  • Trans Fat: 0 grams
  • Carbohydrates: 18 grams
  • Fiber: 1 gram
  • Protein: 4 grams
  • Cholesterol: 30 milligrams

Did you make this recipe?

Share a photo and tag us — we'd love to see your creation!

Recipe

Irresistibly Crispy Beef and Cheese Chimichangas to Crave

March 31, 2025 by grace bellamy Leave a Comment

It was one of those cozy Sunday afternoons; the scent of spices and sizzling meat wafted through my kitchen, tempting me like a warm embrace. As I flipped through my collection of family recipes, I stumbled upon the one that never fails to bring smiles around the dinner table: crispy beef and cheese chimichangas. I could almost hear the laughter of friends and family as we gathered, eagerly diving into these golden delights that are as satisfying to make as they are to devour.

These chimichangas are filled with a savory blend of seasoned ground beef, creamy refried beans, and melty cheese—all tucked into warm tortillas and fried to crispy perfection. They’re not just a quick fix for those hectic weeknights; they also freeze beautifully—making them a perfect choice for meal prep or a last-minute feast on Taco Tuesday. Trust me, once you try these easy beef and cheese chimichangas, they’ll become a cherished staple in your household too!

Why are Crispy Beef and Cheese Chimichangas a Must-Try?

Simplicity meets deliciousness with this easy recipe, making it ideal for cooks of all levels.
Crowd-Pleasing flavors ensure that these chimichangas will be a family favorite, perfect for gatherings or quick weeknight meals.
Versatile and Fun: Customize with your favorite toppings like sour cream, green onions, or even serve with Spanish rice!
Freezer-Friendly ensures you always have a delicious meal ready to go—just reheat and enjoy!
Savory and Satisfying: The warm blend of seasoned beef, creamy beans, and gooey cheese wrapped in crispy tortillas will tantalize your taste buds.
Give these a try and perhaps pair them with some delightful Sausage, Egg, and Cheese Cups for a complete Tex-Mex experience!

Crispy Beef and Cheese Chimichanga Ingredients

For the Filling
• Ground Beef – the star protein that brings savory flavor to these crispy beef and cheese chimichangas.
• Refried Beans – adds creaminess and body to the filling.
• Medium Onion (Chopped) – enhances the taste with its rich, savory notes.
• Minced Garlic – elevates flavor depth, giving an aromatic quality.
• Chili Powder – introduces warm, earthy tones that embody Tex-Mex cuisine.
• Cumin – adds a toasted, nutty depth that elevates the dish.
• Oregano – brings herbaceous notes to the mix.

For the Tortillas
• 10-inch Flour Tortillas – perfect for wrapping up all the delicious filling.

For the Sauce and Spice
• Tomato Sauce – keeps the filling moist and adds a vibrant flavor.
• Diced Green Chilies (Canned) – provides a subtle kick of mild spice.
• Chopped Jalapenos (Canned) – brings an extra touch of heat for those who dare!
• Shredded Taco Blend Cheese – melts beautifully for a rich, cheesy finish.
• Salt and Pepper – essential seasonings to taste.

For Frying
• Oil for Frying – essential for achieving that crispy, golden-brown exterior.

Measurements for each ingredient can be found in the recipe card below.

How to Make Crispy Beef and Cheese Chimichangas

  1. Brown the Beef: In a skillet over medium-high heat, cook the ground beef until it's browned and no longer pink. Drain any excess liquid to keep the filling from getting soggy.
  2. Combine the Filling: Add refried beans, chopped onion, minced garlic, and ½ cup tomato sauce to the skillet with the beef. Then, season with chili powder, cumin, oregano, salt, and pepper; cook for 5 minutes until everything is heated through and well combined.
  3. Warm the Tortillas: Microwave the flour tortillas for about 30 seconds until they are warm and pliable. This step makes folding the tortillas easier without tearing.
  4. Heat the Oil: In a deep skillet, heat enough oil to submerge the chimichangas over medium-high heat. You'll know it's ready when a small piece of tortilla sizzles upon contact.
  5. Assemble the Chimichangas: Place a generous amount of filling in the center of each tortilla. Fold the ends over, roll it up tightly, and secure with a toothpick to keep everything contained during frying.
  6. Fry to Perfection: Carefully place each chimichanga in the hot oil, frying them until they are golden brown and crispy on both sides, about 3-4 minutes per side.
  7. Drain Excess Oil: Once fried, remove the chimichangas and let them drain on paper towels to remove any excess grease.
  8. Prepare the Sauce: In a saucepan, heat the remaining tomato sauce, green chilies, and jalapenos over medium heat. Stir and season to taste before taking off the heat.
  9. Serve and Enjoy: Ladle the warm sauce over the chimichangas, sprinkle with shredded cheese, and serve immediately with your favorite toppings like sour cream or guacamole.

Optional: Garnish with fresh chopped cilantro for an extra burst of flavor.

Exact quantities are listed in the recipe card below.

Expert Tips for Crispy Beef and Cheese Chimichangas

• Watch the Frying Time: Keep a close eye on your chimichangas while frying; they can turn golden brown quickly, so don’t walk away!

• Avoid Soggy Filling: Drain excess liquid from the beef after browning to prevent moisture from making your chimichangas soggy and less crispy.

• Reheat for Best Texture: To maintain the crispy exterior after freezing, reheat chimichangas in the oven rather than the microwave—great for leftover crispy beef and cheese chimichangas!

• Proper Tortilla Warmth: Always warm your tortillas before wrapping. Slightly heating them makes them pliable and helps avoid tearing during assembly.

• Secure Well: Use toothpicks to secure the tortillas after filling; this helps keep them intact during frying and enhances the crispy finish.

• Customize to Taste: Don’t hesitate to play around with the filling! Add black olives or green onions for extra flavor in your crispy beef and cheese chimichangas.

How to Store and Freeze Crispy Beef and Cheese Chimichangas

Room Temperature: Allow chimichangas to cool to room temperature before storing; this prevents condensation from making them soggy.

Fridge: Store cooked chimichangas in an airtight container for up to 3 days. Reheat in the oven or microwave when ready to enjoy.

Freezer: For long-term storage, freeze chimichangas after cooling completely. Wrap tightly in plastic wrap or aluminum foil, and enjoy within 3 months for best quality.

Reheating: To retain their crispiness, reheat frozen chimichangas in the oven at 350°F (175°C) for 10–15 minutes or until heated through.

What to Serve with Crispy Beef and Cheese Chimichangas?

Elevate your dinner experience by pairing these delightful Tex-Mex treats with an array of complementary sides and flavors.

  • Spanish Rice: The gentle spices and fluffy texture of Spanish rice span a comforting base, making each bite of chimichanga all the more satisfying.
  • Guacamole: Creamy and refreshing, guacamole balances the richness of the chimichangas while adding a splash of vibrant color and flavor.
  • Fresh Salsa: A zesty, chunky salsa not only brightens up your plate but also adds a fresh dimension that cuts through the richness of the fried tortillas.
  • Creamy Cilantro Dressing: Drizzling this herbaceous dressing adds a burst of flavor and creaminess, making every bite feel like a celebration.
  • Corn Salad: A crunchy, sweet corn salad contrasts beautifully with the crispy beef and cheese chimichangas, introducing a burst of freshness in every mouthful.
  • Bonkers Black Bean Soup: Pairing a warm, hearty black bean soup warms the soul while offering a creamy counterpoint to your chimichangas.
  • Margaritas: Sip a classic lime margarita; the tangy rotation perfectly complements the savory flavors of the entire meal.
  • Chocolate Flan: Conclude your Tex-Mex feast with a slice of chocolate flan—it’s sweet, rich, and rounds out the meal beautifully.

With these pairings, you'll create a fiesta-like dining experience that friends and family will adore!

Crispy Beef and Cheese Chimichangas Variations

Feel free to let your creativity shine as you customize these delicious chimichangas with flavors that best fit your taste buds!

  • Black Olives: Toss in some sliced black olives with the filling for a briny contrast that pairs beautifully with the beef and cheese.
  • Sour Cream: A dollop of sour cream on top before serving adds a delightful tangy creaminess that balances the richness of the chimichanga.
  • Green Onions: Sprinkle fresh chopped green onions over the finished chimichangas for a fresh, oniony crunch that brightens each bite.
  • Diced Tomatoes: Mix in diced tomatoes into the filling for added juiciness and a bit of freshness; they’ll burst with flavor!
  • Spanish Rice: Serve your chimichangas alongside a bed of Spanish rice; it’s the perfect savory complement to soak up the flavors.
  • Guacamole: Elevate your meal with a side of guacamole for an extra layer of creaminess and avocadalicious goodness.
  • Air-fried Option: For a healthier twist, try air-frying the chimichangas! They’ll still be crispy but with less oil, making for a lighter snack.
  • Spicy Kick: Add more chopped jalapenos into the filling if you like heat; every bite will ignite your taste buds with a fiery flair.

FAQs About Crispy Beef and Cheese Chimichangas

What to put in a beef chimichanga?

Fill your beef chimichanga with seasoned ground beef, refried beans, cheese, onions, and spices for a delightful flavor.

How do you seal chimichangas for frying?

Fold the ends of the tortilla over the filling like a burrito, and secure with a toothpick to keep everything together.

What makes a chimichanga a chimichanga?

A chimichanga is typically a deep-fried burrito containing a savory filling, such as beef, beans, and cheese.

What's the difference between a beef burrito and a chimichanga?

While both include similar fillings, a chimichanga is deep-fried, giving it a crispy texture, while a burrito is often served steamed or grilled.

Are chimichangas junk food?

Chimichangas can be indulgent due to frying; however, they can also be made healthier with wholesome ingredients and lighter cooking methods.

What toppings go on chimichangas?

Top your chimichangas with sour cream, guacamole, salsa, or fresh chopped cilantro for added flavor and color.

Print

Irresistibly Crispy Beef and Cheese Chimichangas to Crave

Crispy Beef and Cheese Chimichangas
Print Recipe
Pin Recipe

5 Stars 4 Stars 3 Stars 2 Stars 1 Star

No reviews

It was one of those cozy Sunday afternoons; the scent of spices and sizzling meat wafted through my kitchen, tempting me like a warm embrace. As I flipped through my collection of family recipes, I stumbled upon the one that never fails to bring smiles around the dinner table: crispy beef and cheese chimichangas. I could almost hear the laughter of friends and family as we gathered, eagerly diving into these golden delights that are as satisfying to make as they are to devour.

These chimichangas are filled with a savory blend of seasoned ground beef, creamy refried beans, and melty cheese—all tucked into warm tortillas and fried to crispy perfection. They’re not just a quick fix for those hectic weeknights; they also freeze beautifully—making them a perfect choice for meal prep or a last-minute feast on Taco Tuesday. Trust me, once you try these easy beef and cheese chimichangas, they’ll become a cherished staple in your household too!

  • Author: grace bellamy
  • Prep Time: 30 minutes
  • Cook Time: 30 minutes
  • Total Time: 1 hour
  • Yield: 6 servings 1x
  • Category: Tex-Mex
  • Method: frying
  • Cuisine: Mexican

Ingredients

Scale
  • 1 pound ground beef
  • 1 can refried beans
  • 1 medium onion (chopped)
  • 2 cloves minced garlic
  • 1 tablespoon chili powder
  • 1 teaspoon cumin
  • 1 teaspoon oregano
  • 6 10-inch flour tortillas
  • 1 cup tomato sauce
  • 1 can diced green chilies
  • 1 can chopped jalapenos
  • 2 cups shredded taco blend cheese
  • Salt to taste
  • Pepper to taste
  • Oil for frying

Instructions

  1. Brown the Beef: In a skillet over medium-high heat, cook the ground beef until it's browned and no longer pink. Drain any excess liquid to keep the filling from getting soggy.
  2. Combine the Filling: Add refried beans, chopped onion, minced garlic, and ½ cup tomato sauce to the skillet with the beef. Then, season with chili powder, cumin, oregano, salt, and pepper; cook for 5 minutes until everything is heated through and well combined.
  3. Warm the Tortillas: Microwave the flour tortillas for about 30 seconds until they are warm and pliable. This step makes folding the tortillas easier without tearing.
  4. Heat the Oil: In a deep skillet, heat enough oil to submerge the chimichangas over medium-high heat. You'll know it's ready when a small piece of tortilla sizzles upon contact.
  5. Assemble the Chimichangas: Place a generous amount of filling in the center of each tortilla. Fold the ends over, roll it up tightly, and secure with a toothpick to keep everything contained during frying.
  6. Fry to Perfection: Carefully place each chimichanga in the hot oil, frying them until they are golden brown and crispy on both sides, about 3-4 minutes per side.
  7. Drain Excess Oil: Once fried, remove the chimichangas and let them drain on paper towels to remove any excess grease.
  8. Prepare the Sauce: In a saucepan, heat the remaining tomato sauce, green chilies, and jalapenos over medium heat. Stir and season to taste before taking off the heat.
  9. Serve and Enjoy: Ladle the warm sauce over the chimichangas, sprinkle with shredded cheese, and serve immediately with your favorite toppings like sour cream or guacamole.

Notes

  • Watch the Frying Time: Keep a close eye on your chimichangas while frying; they can turn golden brown quickly, so don’t walk away!
  • Avoid Soggy Filling: Drain excess liquid from the beef after browning to prevent moisture from making your chimichangas soggy and less crispy.
  • Reheat for Best Texture: To maintain the crispy exterior after freezing, reheat chimichangas in the oven rather than the microwave—great for leftover crispy beef and cheese chimichangas!
  • Proper Tortilla Warmth: Always warm your tortillas before wrapping. Slightly heating them makes them pliable and helps avoid tearing during assembly.
  • Secure Well: Use toothpicks to secure the tortillas after filling; this helps keep them intact during frying and enhances the crispy finish.
  • Customize to Taste: Don’t hesitate to play around with the filling! Add black olives or green onions for extra flavor in your crispy beef and cheese chimichangas.

Nutrition

  • Serving Size: 1 chimichanga
  • Calories: 400
  • Sugar: 2g
  • Sodium: 800mg
  • Fat: 25g
  • Saturated Fat: 10g
  • Unsaturated Fat: 15g
  • Trans Fat: 0g
  • Carbohydrates: 30g
  • Fiber: 3g
  • Protein: 20g
  • Cholesterol: 70mg

Did you make this recipe?

Share a photo and tag us — we'd love to see your creation!

Recipe

Irresistibly Cheesy Taco Ranch Bites for Every Gathering

March 30, 2025 by grace bellamy Leave a Comment

I can still picture the excitement in the air as friends gathered around my kitchen island, eagerly waiting for the latest snack to emerge from the oven. It was then that I first introduced my now-famous Taco Ranch Bites—a crowd favorite that never fails to impress. Just six simple ingredients come together in a cheesy, flavor-packed punch that transports us straight to Taco Tuesday bliss, no matter the day of the week.

These little morsels are the perfect solution for any occasion, whether you're tailgating for the big game or hosting a cozy gathering. I love how easy they are to prepare ahead of time, allowing me to pop them in the oven just as guests arrive, filling the room with a mouthwatering aroma that draws everyone in. With a satisfying crunch and a cheesy center, these bites always leave my friends asking for more. Trust me, once you try them, you’ll be whipping up a batch for every celebration—or just because!

Why are Taco Ranch Bites a Must-Try?

Simplicity in preparation: With just six ingredients, you can whip up these delicious bites in no time.
Irresistible flavor: The combination of taco seasoning, ranch dressing, and gooey cheese creates a taste explosion that everyone loves.
Perfect for any occasion: Whether it’s tailgating, parties, or a casual get-together, these bites fit right in.
Versatile options: Feel free to customize with different meats or substitute with Tostitos Scoops for a fun twist!
Crowd-pleaser: Making 75 bites ensures there’s enough to go around, and they’re always a hit.

Looking for another great party dish? Check out my Taco Lasagna that’s equally delicious and easy to prepare!

Taco Ranch Bites Ingredients

For the Filling
• Ground beef – This is the main protein that brings heartiness and flavor to your Taco Ranch Bites.
• Taco seasoning – Packed with spices, it infuses the mixture with irresistible flavor.
• Diced tomatoes and green chiles – These add moisture and a zesty kick. (Rotel works beautifully!)
• Shredded cheddar cheese – This gooey cheese is what makes each bite simply divine.
• Bottled ranch dressing – Adds a rich, creamy element that complements the seasoning perfectly.

For the Base
• Frozen phyllo tart shells – These provide a delightful crunch; alternatives like Tostito Scoops or wonton wrappers are great substitutes!

Full measurements are in the recipe card below.

How to Make Taco Ranch Bites

  1. Preheat your oven to 350ºF. This will help achieve that perfect golden-brown finish on your bites.
  2. Cook the ground beef in a skillet over medium heat until it’s no longer pink, about 5-7 minutes. Make sure to drain the excess fat for a healthier bite!
  3. Add the taco seasoning and diced tomatoes & green chiles to the beef. Stir this mixture and let it cook for an additional 5 minutes to blend those delicious flavors. Remove from heat.
  4. Combine the shredded cheddar cheese and ranch dressing with the taco meat mixture. Stir until everything is well incorporated and you’re left with a cheesy, flavorful filling.
  5. Spoon the taco meat mixture generously into the frozen phyllo tart shells, making sure to fill each one to the brim. If you're preparing these ahead of time, freeze them at this point for later use.
  6. Bake the filled tart shells for 8-10 minutes, or until the cheese melts and the tops are golden. If you're baking from frozen, add an extra 2-3 minutes until bubbly and irresistible!

Optional: Garnish with fresh cilantro or sliced jalapeños for an extra kick!
Exact quantities are listed in the recipe card below.

Expert Tips for Taco Ranch Bites

• Flaky Perfection: Ensure the phyllo tart shells are fully frozen before filling them for optimal texture.

• Flavorful Meat: Don't skip on browning the ground beef well; it enhances the flavor of your Taco Ranch Bites.

• Customizable Heat: For a kick, add diced jalapeños to the filling or sprinkle some cayenne pepper with the taco seasoning.

• Baking from Frozen: If baking directly from the freezer, anticipate adding an extra 2-3 minutes to the cooking time for perfectly melted cheese.

• Storage Tips: Store leftovers in an airtight container for 2-3 days, and reheat in the oven for the best results.

How to Store and Freeze Taco Ranch Bites

Room Temperature: These Taco Ranch Bites can be kept at room temperature for up to 2 hours, perfect for parties! Just make sure they are not left out too long to keep them safe.

Fridge: Store leftover bites in an airtight container in the fridge for up to 3 days. Reheat them in the oven for about 5 minutes to restore their crispiness.

Freezer: For long-term storage, freeze unbaked Taco Ranch Bites in a single layer on a baking sheet before transferring to a freezer-safe container. They can be stored for up to 3 months.

Reheating: Bake frozen bites directly from the freezer at 350°F for 10-12 minutes until heated through and cheesy. Enjoy them warm for the best experience!

What to Serve with Taco Ranch Bites?

Elevate your gathering with these delicious bites, perfectly complemented by flavorful sides and sips that will ignite your taste buds.

  • Guacamole: A creamy and zesty dip that balances the spiciness of the bites, adding a cool, refreshing element to your plate.
  • Mexican Street Corn Salad: This vibrant mix of corn, lime, cilantro, and cheese offers a delightful crunch and tang that harmonizes beautifully with the cheesy morsels.

Pairing textures enhances the dining experience. A crunchy salad next to warm, cheesy bites provides a perfect contrast that keeps every bite exciting.

  • Spicy Salsa: The fresh, bright flavors of a spicy salsa will provide a tantalizing kick, bringing out the rich cheese and savory meat.
  • Chips and Queso: Endless dipping fun! The rich flavor of melty queso against the crunchy chips creates an irresistible duo that begs to be devoured alongside the bites.
  • Margaritas: Smooth and citrusy margaritas are the ideal drink to wash down the flavors, adding a festive flair to your occasion.

Consider topping off your feast with dessert; a light tres leches cake feels like a sweet celebration, contrasting perfectly with your savory appetizers.

Taco Ranch Bites Variations

Feel free to get creative with your Taco Ranch Bites, making them uniquely yours with delightful twists!

  • Ground Sausage: Swap out the ground beef for ground sausage for a zingy flavor burst that adds some spice.
  • Wonton Wrappers: Use wonton wrappers instead of phyllo cups for a thicker, crispy texture that holds everything together perfectly.
  • Ranch Alternatives: Consider making your own ranch dressing from scratch for a fresher taste that elevates the bites even more.
  • Spicy Kick: Mix in jalapeños or diced green chiles for an extra layer of heat that warms the soul.
  • Cheese Variety: Try Monterey Jack or pepper jack cheese in place of cheddar for a creamy twist that melts beautifully.
  • Vegetarian Option: Substitute the meat with a mixture of black beans and corn for a vibrant veggie-packed option.
  • Seasoning Swap: Experiment with different seasoning blends like fajita or chili powder for a personal touch that stands out.
  • Fresh Toppings: Top with fresh cilantro or avocado after baking for a burst of color and flavor that enhances each bite.

FAQs About Taco Ranch Bites

These delicious bites are a hit among friends and family! Here are some common questions that may help you make the perfect batch.

Can I make Taco Ranch Bites ahead of time?

Absolutely! You can prepare the filling and spoon it into the phyllo shells, then freeze them until you’re ready to bake.

What can I use instead of ground beef?

Feel free to substitute ground sausage for a different flavor, or use shredded chicken for a lighter option.

How do I store leftover Taco Ranch Bites?

Store any leftovers in an airtight container in the fridge for up to three days. Reheat in the oven for a crispy finish!

Can I freeze unbaked Taco Ranch Bites?

Yes! Just freeze them in a single layer on a baking sheet before transferring to a freezer-safe container for up to three months.

What’s the best way to reheat frozen Taco Ranch Bites?

Bake them directly from the freezer at 350°F for about 10-12 minutes, until heated through and the cheese is melted.

Are Taco Ranch Bites spicy?

You can adjust the spice level! Add jalapeños or cayenne pepper for extra heat, or skip them for a milder flavor.

Print

Irresistibly Cheesy Taco Ranch Bites for Every Gathering

Taco Ranch Bites
Print Recipe
Pin Recipe

5 Stars 4 Stars 3 Stars 2 Stars 1 Star

No reviews

I can still picture the excitement in the air as friends gathered around my kitchen island, eagerly waiting for the latest snack to emerge from the oven. It was then that I first introduced my now-famous Taco Ranch Bites—a crowd favorite that never fails to impress. Just six simple ingredients come together in a cheesy, flavor-packed punch that transports us straight to Taco Tuesday bliss, no matter the day of the week.

  • Author: grace bellamy
  • Prep Time: 15 minutes
  • Cook Time: 20 minutes
  • Total Time: 35 minutes
  • Yield: 75 bites 1x
  • Category: Appetizer
  • Method: Baking
  • Cuisine: Mexican

Ingredients

Scale
  • 1 pound ground beef
  • 1 packet taco seasoning
  • 1 can diced tomatoes and green chiles
  • 2 cups shredded cheddar cheese
  • 1 cup bottled ranch dressing
  • 1 package frozen phyllo tart shells

Instructions

  1. Preheat your oven to 350ºF. This will help achieve that perfect golden-brown finish on your bites.
  2. Cook the ground beef in a skillet over medium heat until it’s no longer pink, about 5-7 minutes. Make sure to drain the excess fat for a healthier bite!
  3. Add the taco seasoning and diced tomatoes & green chiles to the beef. Stir this mixture and let it cook for an additional 5 minutes to blend those delicious flavors. Remove from heat.
  4. Combine the shredded cheddar cheese and ranch dressing with the taco meat mixture. Stir until everything is well incorporated and you’re left with a cheesy, flavorful filling.
  5. Spoon the taco meat mixture generously into the frozen phyllo tart shells, making sure to fill each one to the brim. If you're preparing these ahead of time, freeze them at this point for later use.
  6. Bake the filled tart shells for 8-10 minutes, or until the cheese melts and the tops are golden. If you're baking from frozen, add an extra 2-3 minutes until bubbly and irresistible!

Notes

  • Flaky Perfection: Ensure the phyllo tart shells are fully frozen before filling them for optimal texture.
  • Flavorful Meat: Don't skip on browning the ground beef well; it enhances the flavor of your Taco Ranch Bites.
  • Customizable Heat: For a kick, add diced jalapeños to the filling or sprinkle some cayenne pepper with the taco seasoning.
  • Baking from Frozen: If baking directly from the freezer, anticipate adding an extra 2-3 minutes to the cooking time for perfectly melted cheese.
  • Storage Tips: Store leftovers in an airtight container for 2-3 days, and reheat in the oven for the best results.

Nutrition

  • Serving Size: 1 bite
  • Calories: 50
  • Sugar: 1g
  • Sodium: 200mg
  • Fat: 3g
  • Saturated Fat: 1.5g
  • Unsaturated Fat: 1.5g
  • Trans Fat: 0g
  • Carbohydrates: 5g
  • Fiber: 0g
  • Protein: 3g
  • Cholesterol: 15mg

Did you make this recipe?

Share a photo and tag us — we'd love to see your creation!

Recipe

Ultimate Indulgent Cheese Dip Recipe for Game Day Bliss

March 27, 2025 by grace bellamy Leave a Comment

There’s something about gathering around a warm, inviting bowl of cheese dip that instantly transforms any occasion into a celebration. I still remember the first time I set out my favorite slow cooker cheese dip at a friend’s game night. As soon as the rich, creamy aroma filled the room, it was like magic – everyone’s eyes lit up, and before I knew it, the bowl was scraped clean! This recipe combines savory ground beef, spicy pork sausage, and tangy tomatoes, fusing together beautifully under gentle heat. Perfect for scooping with crispy tortilla chips, crunchy veggies, or even slathered on nachos, it has become a staple in my kitchen for parties and cozy nights in alike. If you’re looking to impress your friends or simply treat yourself, this cheese dip recipe is exactly what you need!

Why choose this Cheese Dip Recipe?

Savory Blend: This dip combines ground beef and spicy pork sausage for an irresistible meaty flavor that’s hard to beat.

Effortless Cooking: Simply toss your ingredients in a slow cooker, letting it do the work while you enjoy your guests’ company—no fuss, all fun!

Versatile Delight: Serve it with tortilla chips, veggies, or even as a topping on nachos. Its adaptability means it fits perfectly into any gathering atmosphere!

Crowd-Pleasing Appeal: This cheesy goodness has a magical way of bringing people together, turn any gathering into a hit. I often choose it for game nights or casual dinners, knowing it’ll be a favorite.

Storage-Friendly: Prepare this ahead of time and store it! You can even freeze leftovers for a quick dip ready to go whenever cravings strike. Trust me, this Kentucky Hot Brown Dip recipe highlights just how satisfying homemade appetizers can be!

Cheese Dip Recipe Ingredients

For the Meat Mixture
• Bulk Spicy Pork Sausage – Provides savory flavor and a spicy kick that elevates the dip.
• Ground Beef – Adds a meaty texture and savory depth, making the dip hearty.
• Onion, diced – Introduces flavor and an aromatic base to the meat mixture for extra richness.

For the Cheese Base
• Processed Cheese Food (e.g., Velveeta), cubed – The primary component for the cheese dip, creating that creamy consistency.
• Condensed Cream of Mushroom Soup – Adds creaminess and thickens the dip for a luscious texture.

For Extra Flavor
• Diced Tomatoes with Green Chile Peppers (e.g., Rotel) – Adds flavor, color, and a touch of heat to keep things interesting.

A complete list of measurements can be found in the recipe card below.

How to Make Cheese Dip

  1. Brown the Meat: In a skillet over medium heat, cook the bulk spicy pork sausage, ground beef, and diced onion until the meat is browned and crumbly, about 5-7 minutes. Drain any excess grease to keep the dip creamy and not greasy.
  2. Transfer to Slow Cooker: Once browned, carefully transfer the meat mixture to your slow cooker, making sure to include all those delicious bits and pieces.
  3. Layer the Cheese: Place cubes of processed cheese food evenly on top of the meat mixture, allowing it to nestle in as it melts beautifully.
  4. Add Flavor: If desired, blend the diced tomatoes with green chile peppers until smooth for a creamier texture. Pour this mixture over the cheese, followed by the condensed cream of mushroom soup to create a mouthwatering layer of flavor.
  5. Slow Cook: Set your slow cooker to High and let it work its magic! Stir occasionally for about 90 minutes or until the cheese is fully melted and everything is warm and gooey.

Optional: Serve with crispy tortilla chips or crunchy veggies for the perfect dip experience!

Exact quantities are listed in the recipe card below.

Expert Tips for Cheese Dip Recipe

• Drain Grease: Always drain excess grease after browning the meat to achieve a creamy, not greasy, cheese dip.

• Blend Tomatoes: For a smoother and richer texture, consider blending the diced tomatoes with green chiles before adding them to the dip.

• Mix Cheese Types: Feel free to mix different cheese varieties; adding sharper cheese can enhance flavor depth in your cheese dip recipe.

• Use Fresh Ingredients: Whenever possible, use fresh ingredients, like fresh onions, to elevate the overall taste and aroma of your dip.

• Adjust Heat Level: If you prefer a milder cheese dip, choose a less spicy sausage or add a bit of cream to balance the heat from the diced tomatoes.

How to Store and Freeze Cheese Dip

Fridge: Store leftovers in an airtight container in the refrigerator for up to 4 days. This keeps your cheese dip fresh and ready for snacking!

Freezer: You can freeze this cheese dip for up to 3 months. Make sure to cool it completely before transferring to an airtight container for best results.

Thawing: When ready to enjoy, thaw it in the fridge overnight. Reheat gently in the microwave or on the stovetop, adding a splash of milk if needed for creaminess.

Reheating: For best flavor and texture, reheat slowly, stirring often. This helps retain that fantastic cheesy goodness in your cheese dip recipe!

What to Serve with Best Slow Cooker Cheese Dip with Meat?

Looking to elevate your cheese dip experience? Here are some delightful accompaniments that will enhance your gathering and satisfy your cravings.

  • Tortilla Chips: These crispy, salty chips are the classic choice, perfect for scooping up that creamy cheese dip. The crunch and flavor create a delightful contrast.
  • Fresh Vegetables: Crunchy carrots, celery, or bell peppers add a refreshing twist that balances the rich dip while offering a nutritious crunch. They’re a great way to encourage healthy snacking!
  • Soft Pretzels: Warm, soft pretzels are an indulgent pairing that soaks up the cheesy goodness splendidly. Their slightly chewy texture makes every bite a delicious adventure.
  • Homemade Crostini: Toasted bread slices lend themselves beautifully to the richness of the cheese dip, creating a delightful bite topped with flavor. Add a sprinkle of fresh herbs for an elevated touch!
  • Nachos: Layered with cheese dip, toppings, and maybe a drizzle of jalapeño ranch, nachos transform the dip into a party feast. Plus, they add a fun and interactive element to your spread!
  • French Fries: For a hearty twist, serve the cheese dip as a topping over crispy fries. It’s an indulgent treat that’s sure to be a hit among guests of all ages.
  • Beer or Wine: A chilled beer or a refreshing white wine can complement the savory flavors, making your cheese dip and drink pairing a match made in heaven.
  • Chocolate Chip Cookies: Don’t forget dessert! Gooey chocolate chip cookies offer a sweet contrast after diving into that savory dip, creating a delightful end to your gathering.

Cheese Dip Variations

Get ready to explore creative twists that will take your cheese dip experience to a whole new level!

  • Spicy Kick: Add diced jalapeños or a few dashes of hot sauce to spice things up. This variation offers a delightful kick that will keep everyone guessing!
  • Creamy Dream: Replace some of the processed cheese with cream cheese for an ultra-creamy texture. The addition of cream cheese makes the dip silky while maintaining that cheesy goodness.
  • Veggie Boost: Mix in sautéed bell peppers or spinach for added flavor and nutrition. This veggie addition brightens up the dip both in taste and color!
  • Savory Bacon: Fold in crispy, crumbled bacon for a smoky flavor that takes your dip over the top. Who could resist that crunchy, savory delight?
  • Cheddar Lovers: Substitute some of the processed cheese with sharp cheddar for a bolder cheese flavor. The sharper taste adds a whole new depth to your cheesy creation.
  • Ground Turkey Swap: Use ground turkey instead of beef for a lighter option without sacrificing flavor. It provides a leaner protein while ensuring your dip stays hearty.
  • Sweet & Savory: Stir in a couple of tablespoons of barbecue sauce for a sweet twist. This unexpected twist harmonizes beautifully with the cheese and savory meats!
  • Herb Infusion: Add chopped fresh herbs like cilantro or chives just before serving for a burst of freshness. This enhances both flavor and presentation, making your dip pop!

FAQs About Cheese Dip Recipe

This section addresses common questions and concerns about making a delicious cheese dip, ensuring you create the ultimate crowd-pleaser!

How can I make my cheese dip spicier?

Add a spicier sausage or some diced jalapeños to give your dip an extra kick.

Can I use fresh cheese instead of processed cheese food?

Yes, but note that fresh cheese will yield a different texture and may require additional creaminess for the right consistency.

How long does cheese dip last in the fridge?

In an airtight container, your cheese dip will stay fresh for up to four days.

Can I prepare this cheese dip in advance?

Absolutely! You can make it ahead of time and store it, or even freeze it for up to three months.

What should I serve with cheese dip?

Try tortilla chips, veggie sticks, pretzels, or use it as a topping for nachos or baked potatoes—endless possibilities await!

How do I reheat cheese dip after freezing?

Thaw it in the fridge overnight, then gently reheat on the stove or in the microwave, adding a splash of milk for creaminess if needed.

Print

Ultimate Indulgent Cheese Dip Recipe for Game Day Bliss

Cheese Dip Recipe
Print Recipe
Pin Recipe

5 Stars 4 Stars 3 Stars 2 Stars 1 Star

No reviews

There’s something about gathering around a warm, inviting bowl of cheese dip that instantly transforms any occasion into a celebration. I still remember the first time I set out my favorite slow cooker cheese dip at a friend’s game night. As soon as the rich, creamy aroma filled the room, it was like magic – everyone’s eyes lit up, and before I knew it, the bowl was scraped clean! This recipe combines savory ground beef, spicy pork sausage, and tangy tomatoes, fusing together beautifully under gentle heat. Perfect for scooping with crispy tortilla chips, crunchy veggies, or even slathered on nachos, it has become a staple in my kitchen for parties and cozy nights in alike. If you’re looking to impress your friends or simply treat yourself, this cheese dip recipe is exactly what you need!

  • Author: grace bellamy
  • Prep Time: 15 minutes
  • Cook Time: 90 minutes
  • Total Time: 105 minutes
  • Yield: 8 servings 1x
  • Category: Appetizer
  • Method: Slow Cooker
  • Cuisine: American
  • Diet: Omnivore

Ingredients

Scale
  • 1 pound bulk spicy pork sausage
  • 1 pound ground beef
  • 1 onion, diced
  • 16 ounces processed cheese food (e.g., Velveeta), cubed
  • 10.5 ounces condensed cream of mushroom soup
  • 10 ounces diced tomatoes with green chile peppers (e.g., Rotel)

Instructions

  1. Brown the Meat: In a skillet over medium heat, cook the bulk spicy pork sausage, ground beef, and diced onion until the meat is browned and crumbly, about 5-7 minutes. Drain any excess grease to keep the dip creamy and not greasy.

  2. Transfer to Slow Cooker: Once browned, carefully transfer the meat mixture to your slow cooker, making sure to include all those delicious bits and pieces.

  3. Layer the Cheese: Place cubes of processed cheese food evenly on top of the meat mixture, allowing it to nestle in as it melts beautifully.

  4. Add Flavor: If desired, blend the diced tomatoes with green chile peppers until smooth for a creamier texture. Pour this mixture over the cheese, followed by the condensed cream of mushroom soup to create a mouthwatering layer of flavor.

  5. Slow Cook: Set your slow cooker to High and let it work its magic! Stir occasionally for about 90 minutes or until the cheese is fully melted and everything is warm and gooey.

Notes

  • Drain Grease: Always drain excess grease after browning the meat to achieve a creamy, not greasy, cheese dip.

  • Blend Tomatoes: For a smoother and richer texture, consider blending the diced tomatoes with green chiles before adding them to the dip.

  • Mix Cheese Types: Feel free to mix different cheese varieties; adding sharper cheese can enhance flavor depth in your cheese dip recipe.

  • Use Fresh Ingredients: Whenever possible, use fresh ingredients, like fresh onions, to elevate the overall taste and aroma of your dip.

  • Adjust Heat Level: If you prefer a milder cheese dip, choose a less spicy sausage or add a bit of cream to balance the heat from the diced tomatoes.

Nutrition

  • Serving Size: ½ cup
  • Calories: 300
  • Sugar: 3 grams
  • Sodium: 800 milligrams
  • Fat: 25 grams
  • Saturated Fat: 10 grams
  • Unsaturated Fat: 15 grams
  • Trans Fat: 0 grams
  • Carbohydrates: 8 grams
  • Fiber: 1 gram
  • Protein: 15 grams
  • Cholesterol: 70 milligrams

Did you make this recipe?

Share a photo and tag us — we'd love to see your creation!

Recipe

Cream Peas Recipe

March 20, 2025 by grace bellamy Leave a Comment

There's something truly magical about a warm bowl of cream peas that takes you right back to grandmother's kitchen. This cream peas recipe has been my saving grace on countless busy weeknights when I needed something comforting yet quick. After rushing through after-school activities and work deadlines, the last thing any of us wants is to spend hours in the kitchen. That's where this velvety, soul-warming side dish comes to the rescue. Ready in just 20 minutes with ingredients you likely already have, these cream peas deliver that perfect balance of simplicity and flavor that busy families crave. Whether you're a seasoned home cook or just starting your culinary journey, this no-fuss recipe promises to deliver a taste of Southern comfort even on your most hectic days.

Why You'll Love This Cream Peas Recipe

  • Quick comfort food – From pantry to table in just 20 minutes, perfect for busy weeknights
  • Budget-friendly goodness – Uses simple, affordable ingredients that won't strain your grocery budget
  • Versatile side dish – Pairs beautifully with everything from fried chicken to meatloaf
  • Kid-approved veggies – The creamy sauce transforms ordinary peas into something even picky eaters enjoy
  • Make-ahead friendly – Easily reheats for meal prep or quick lunches

What Are Cream Peas?

Cream peas are a classic Southern side dish featuring tender green peas swimming in a velvety white sauce. This humble yet satisfying dish represents comfort food at its finest – simple ingredients transformed into something greater than the sum of their parts. The dish originated in the American South where home cooks mastered the art of turning basic pantry staples into memorable meals.

While many might consider them a simple side dish, Cream Peas have earned their place at Sunday suppers and holiday tables alike. The beauty lies in their simplicity – fresh or frozen peas gently cooked and folded into a luscious cream sauce seasoned with just enough butter, salt, and pepper to let the natural sweetness of the peas shine through.

What makes cream peas special isn't fancy techniques or exotic ingredients – it's the way they deliver pure comfort with minimal fuss. They're the epitome of what makes Southern cooking so beloved: transforming humble ingredients into something that feeds both body and soul.

Ingredients You'll Need

For the Base Recipe:

  • 4 cups fresh or frozen green peas
  • 3 tablespoons butter
  • 3 tablespoons all-purpose flour
  • 1½ cups whole milk
  • ½ cup heavy cream
  • 1 teaspoon granulated sugar (optional, enhances the peas' natural sweetness)
  • 1 teaspoon salt
  • ½ teaspoon freshly ground black pepper
  • ¼ teaspoon garlic powder
  • 1 tablespoon fresh chopped parsley (optional, for garnish)

Optional Flavor Enhancers:

  • 1 small onion, finely diced
  • 2 slices bacon, cooked and crumbled
  • ¼ teaspoon nutmeg
  • 1 teaspoon fresh lemon zest

Step-by-Step Instructions

Cooking the Peas

  1. If using fresh peas, shell them and rinse under cold water. If using frozen peas, no need to thaw them first.
  2. Bring a medium pot of lightly salted water to a boil.
  3. Add the peas and cook just until tender – about 3-4 minutes for fresh peas or 2-3 minutes for frozen peas. They should be bright green and still have a slight bite to them.
  4. Drain the peas in a colander and set aside. If you want to preserve their bright color, you can place them in an ice bath for 30 seconds, then drain again.

Creating the Cream Sauce

  1. In a medium saucepan, melt the butter over medium heat.
  2. Add the finely diced onion (if using) and sauté until translucent, about 2-3 minutes.
  3. Sprinkle the flour over the melted butter and whisk constantly for about 1 minute to create a roux. This is your thickening agent, so keep whisking to avoid any lumps.
  4. Gradually pour in the milk while continuously whisking. This gradual addition is key to preventing lumps in your sauce.
  5. Add the heavy cream and continue to whisk until the mixture begins to thicken, about 3-4 minutes.
  6. Stir in the sugar (if using), salt, pepper, and garlic powder.
  7. Allow the sauce to simmer gently for about 2 minutes until it reaches a smooth, velvety consistency that coats the back of a spoon.

Bringing It All Together

  1. Add the cooked peas to the cream sauce and gently fold them in, making sure they're evenly coated.
  2. Let everything simmer together for about 2 minutes to allow the flavors to meld.
  3. Taste and adjust seasonings if needed.
  4. If using bacon, fold in the crumbled pieces now.
  5. Remove from heat and serve warm, garnished with fresh parsley if desired.

Expert Tips for Perfect Cream Peas

Choose Your Peas Wisely

Fresh peas are wonderful in spring and early summer when they're in season, but don't stress if you only have frozen peas on hand! Frozen peas are actually flash-frozen at peak freshness and work beautifully in this recipe. In fact, I often prefer them for their consistency and convenience – they're my little weeknight secret weapon! Just avoid canned peas for this recipe, as their texture won't hold up as well in the creamy sauce.

Master the Perfect Sauce Consistency

The key to heavenly cream peas is getting that sauce just right. If your sauce ends up too thin, let it simmer a bit longer before adding the peas. Still too thin? Mix a teaspoon of cornstarch with a tablespoon of cold water and stir it into the simmering sauce. If your sauce is too thick, simply add a splash more milk or cream until you reach the desired consistency. Remember, the sauce will continue to thicken as it cools, so err on the side of slightly thinner than you think you want.

Don't Overcook Those Peas!

Nothing sadder than mushy, gray-green peas! Cook them just until tender but still bright green. They'll continue cooking slightly when added to the warm cream sauce. Think of it like pasta – aim for "al dente" peas that still have a slight bite to them. Your taste buds (and dinner guests) will thank you!

Make It Ahead Without Worry

These cream peas reheat beautifully, making them perfect for meal prep or holiday planning. Store them in an airtight container in the refrigerator for up to 3 days. When reheating, add a small splash of milk or cream and warm them gently over low heat, stirring occasionally to prevent scorching. The sauce may separate slightly when refrigerated, but don't panic – gentle heat and a little whisking will bring it back together.

My Cream Peas Story

I'll never forget the first time I served these cream peas at a family gathering. My mother-in-law – the undisputed queen of Southern cooking in our family – asked for the recipe! For someone who once told me I was making cornbread "all wrong," this was the culinary equivalent of winning an Olympic gold medal. She smiled that knowing smile and said, "Sometimes the simplest dishes are the hardest to get just right." It became our little secret bond, and now whenever cream peas appear at family dinners, we exchange that special glance that says we know exactly what comfort food is all about. These cream peas have become my go-to contribution for potlucks and family gatherings, where even the vegetable-averse kiddos come back for seconds.

Perfect Pairings for Your Cream Peas

Cream peas shine brightest when paired with other Southern classics. They're absolutely divine alongside a piece of crispy fried chicken or a slice of meatloaf. For a complete Southern comfort meal, serve them with some tender pork chops and a piece of classic Southern cornbread recipe to soak up all that delicious sauce.

For a lighter meal, they make a wonderful side to a simple baked fish or grilled chicken. During the holidays, cream peas earn their place among traditional sides like sweet potato casserole and green bean casserole. Their creamy texture and mild flavor provide the perfect complement to more robust dishes on your plate.

Frequently Asked Questions

Is there another name for cream peas?

Yes! Cream peas are sometimes called "creamed peas," "creamy peas," or "peas in white sauce." In some parts of the South, particularly when made with fresh field peas rather than green peas, they might be called "cream style peas." The name varies by region, but they all refer to that delicious combination of tender peas in a velvety sauce.

Are cream peas healthy?

While traditional cream peas contain butter and cream, they also provide valuable nutrients from the peas themselves, which are rich in fiber, protein, and vitamins A, C, and K. For a lighter version, you can substitute whole milk for the heavy cream and reduce the butter slightly. The peas provide plant-based protein and fiber, making this a more nutritious side dish than many other comfort food options.

What are creamed peas made of?

At their most basic, creamed peas consist of green peas in a white sauce made from butter, flour, and milk or cream. Most recipes include simple seasonings like salt, pepper, and sometimes a touch of sugar to enhance the peas' natural sweetness. Variations might include additions like pearl onions, fresh herbs, or bacon for extra flavor.

What is the origin of cream peas?

Cream peas have deep roots in Southern American cooking, where cooks mastered the art of transforming simple ingredients into satisfying dishes. The recipe likely evolved from European white sauce traditions that were adapted to incorporate locally available ingredients. Cream peas became popular during times when stretching ingredients was necessary, as the creamy sauce helped turn a simple vegetable into a more filling side dish. They remain a staple in Southern cuisine, particularly for Sunday dinners and holiday meals.

Can I freeze cream peas?

You can freeze cream peas, though the texture of the sauce may change slightly upon thawing. For best results, slightly undercook the dish if you plan to freeze it. Allow it to cool completely before transferring to freezer-safe containers, leaving some room for expansion. Freeze for up to 3 months. When ready to serve, thaw in the refrigerator overnight and reheat gently on the stovetop, adding a splash of fresh milk or cream if needed to restore the sauce's consistency.

Variations to Try

  • Cream Peas with Pearl Onions: Add 1 cup of pearl onions to the boiling water with the peas for a classic combination.
  • Herb-Infused Cream Peas: Stir in 1 tablespoon of fresh herbs like dill, mint, or tarragon just before serving.
  • Smoky Cream Peas: Add ¼ teaspoon of smoked paprika to the sauce or top with crumbled bacon.
  • Lemon Cream Peas: Stir in 1 teaspoon of fresh lemon zest and a squeeze of lemon juice for brightness.

Wrapping Up This Cream Peas Recipe

There's something wonderfully reassuring about a recipe that doesn't demand specialty ingredients or complicated techniques yet still delivers pure comfort with every bite. This cream peas recipe embodies that beautiful simplicity – a reminder that good food doesn't have to be complicated to be memorable. Whether you're serving these alongside Sunday dinner, bringing them to a potluck, or simply looking for a way to get more vegetables into your family's diet, these cream peas are sure to become a regular in your recipe rotation.

Print

Cream Peas Recipe

Cream Peas Recipe
Print Recipe
Pin Recipe

5 Stars 4 Stars 3 Stars 2 Stars 1 Star

No reviews

There's something magical about the combination of sweet peas and creamy sauce. It's nostalgic (reminds me of my grandma's kitchen) but still feels modern enough to serve to guests. This recipe hits that sweet spot between "impressive" and "I only had 15 minutes to make this."


  • Author: grace bellamy
  • Prep Time: 5 minutes
  • Cook Time: 10 minutes
  • Total Time: 15 minutes
  • Yield: 4-6 servings 1x
  • Category: Side Dish
  • Method: Stovetop
  • Cuisine: American/Southern

Ingredients

Scale
  • 4 cups fresh or frozen green peas
  • 2 tablespoons butter
  • 2 tablespoons all-purpose flour
  • 1 cup milk or half-and-half
  • ¼ cup heavy cream
  • 1 small onion, finely diced
  • 1 clove garlic, minced
  • 1 teaspoon sugar
  • Salt and pepper to taste
  • Optional: 1 tablespoon fresh mint, chopped

Instructions

  1. Prepare the peas: If using fresh peas, blanch them in boiling water for 2-3 minutes until tender. For frozen peas, cook according to package directions. Drain and set aside.
  2. Start the base: In a medium saucepan, melt the butter over medium heat. Add diced onion and cook until soft and translucent, about 3-4 minutes.
  3. Add flavor: Toss in the minced garlic and cook for just 30 seconds until you can smell that wonderful aroma.
  4. Make the roux: Sprinkle flour over the butter mixture, stirring constantly. This is your thickening agent, so keep stirring for 1-2 minutes until it looks like wet sand.
  5. Create the sauce: Gradually pour in the milk or half-and-half, whisking continuously to prevent lumps. (Don't panic if you get a few—they'll cook out!)
  6. Thicken it up: Bring the mixture to a gentle simmer, stirring occasionally until it begins to thicken, about 2-3 minutes.
  7. Add richness: Stir in the heavy cream, sugar, salt, and pepper.
  8. Combine: Gently fold in your cooked peas, making sure they get completely coated in that delicious sauce.
  9. Warm through: Let everything heat together for 2-3 minutes until the peas are warm and the flavors have mingled.
  10. Finish: If you're using mint, stir it in right before serving for a fresh pop of flavor.

Notes

  1. If your sauce looks a little lumpy at first, don't throw in the towel! Just keep whisking—I promise it will smooth out as it cooks.

    Want to make this dish your own? Try adding a pinch of nutmeg for warmth or a splash of lemon juice for brightness. Sometimes I even toss in a little crumbled bacon when I'm feeling indulgent!

    I discovered the power of these cream peas about five years ago when my pickiest eater actually asked for seconds. They've been in regular rotation ever since, and I've brought them to countless potlucks where people always ask for the recipe (as if it's some complicated secret!).

Did you make this recipe?

Share a photo and tag us — we'd love to see your creation!

Recipe

Irresistibly Easy Breakfast Enchiladas to Kickstart Your Day

March 17, 2025 by grace bellamy Leave a Comment

I still remember the first time I stumbled upon the idea of making Breakfast Enchiladas. It was a chilly Sunday morning, and I was flipping through a colorful cookbook filled with mouth-watering illustrations. My eyes landed on a recipe that promised a delightful combination of savory sausage, creamy eggs, gooey cheese, and crispy bacon—everything my breakfast dreams were made of! As I donned my apron and gathered the ingredients, I felt a wave of excitement wash over me.

These Overnight Breakfast Enchiladas quickly became my go-to recipe for lazy weekend brunches and busy weekdays alike. With just a bit of prep the night before, you can wake up to a hearty casserole that makes mornings feel more like a treat than a chore. They're versatile enough to suit anyone's tastes—in fact, feel free to switch out the sausage or toss in some green chiles for an extra kick!

Join me in creating this beloved breakfast dish that turns every meal into a celebration of flavors!

Why are these Breakfast Enchiladas irresistible?

Heavenly flavor bursts from every bite, with the perfect blend of savory sausage, fluffy eggs, and melty cheese. Time-saving and simple, these enchiladas can be prepped the night before and baked in the morning. Crowd-pleasing and versatile, tailor them to suit your family’s tastes—add green chiles for a kick or swap out proteins as desired. If you also love a hearty breakfast, consider checking out my Breakfast Burritos for another delicious option! Comforting texture awaits with soft tortillas and a crispy cheese topping that will make any breakfast feel special.

Breakfast Enchiladas Ingredients

• A delightful medley awaits in these Breakfast Enchiladas!

For the Enchiladas
• Sausage – A hearty main protein that brings flavor to every layer.
• Shredded cheddar cheese – Offers a melty, gooey texture that makes each bite irresistible.
• Flour tortillas – 8-inch tortillas serve as the perfect vessel, providing structure and comfort.
• Eggs – The binding agent that enriches the dish and adds fluffiness.

For the Egg Mixture
• Half-and-half – Adds a delightful creaminess that elevates the overall texture.
• All-purpose flour – A thickener that helps bind the egg mixture for better cohesion.
• Salt – Enhances the flavors, making each ingredient sing.

For Topping
• Bacon Bits – Adds a crispy, smoky element that complements the richness of the enchiladas.

Full measurements are in the recipe card below.

How to Make Breakfast Enchiladas

  1. Brown the sausage in a large skillet over medium heat, breaking it apart as it cooks, for about 5-7 minutes until it’s completely browned and no longer pink. The aroma will be delightful!
  2. Beat Together the eggs, half-and-half, flour, and salt in a mixing bowl until fully combined and slightly frothy, about 2-3 minutes. This mixture will become creamy and fluffy!
  3. Assemble by layering the flour tortillas in a greased 9x13-inch baking dish, overlapping them slightly to cover the bottom completely. This forms a cozy base for your enchiladas.
  4. Pour the egg mixture evenly over the layered tortillas, ensuring every inch is coated for maximum flavor. Let it soak in for a minute; it’s the magic moment!
  5. Top with shredded cheddar cheese and crispy bacon bits, sprinkling generously for that delicious gooey finish.
  6. Bake in a preheated oven at 350°F for 25-30 minutes, covering the dish with foil for the first 20 minutes. Uncover to let the cheese melt and turn golden brown in the last few minutes.

Optional: Drizzle with enchilada sauce before serving for an added zing!

Exact quantities are listed in the recipe card below.

Expert Tips for Breakfast Enchiladas

  • Prep Ahead: Make these Breakfast Enchiladas the night before to save time in the morning. Simply assemble and refrigerate overnight before baking!
  • Check Consistency: If the egg mixture feels too runny, add a bit more flour. This will help achieve a firmer texture in the final dish.
  • Adjust Baking Time: If you take the casserole out too soon, it may result in undercooked eggs. Bake a little longer if necessary, checking every 5 minutes.
  • Customize to Taste: Feel free to swap out sausage with chicken, turkey, or even a vegetarian option like black beans for a delightful twist!
  • Indulge in Toppings: Don't shy away from garnishing your Breakfast Enchiladas with salsa, avocado, or fresh cilantro for layers of flavor!

How to Store and Freeze Breakfast Enchiladas

Fridge: Store leftover Breakfast Enchiladas in an airtight container for up to 3 days. Reheat individual portions in the microwave or oven until heated through.

Freezer: To freeze, wrap baked enchiladas tightly in plastic wrap and place in a freezer-safe bag. They can be frozen for up to 3 months. Thaw in the fridge before baking.

Reheating: Reheat from frozen, covered, in a preheated oven at 350°F for 30-40 minutes or until warmed through. You can also microwave individual servings for a quick meal.

Assembly Tip: If prepping the dish before baking, remember to refrigerate overnight. Baking can then be done fresh for breakfast the next day!

What to Serve with Overnight Breakfast Enchiladas?

Start your breakfast feast off right by pairing these delicious enchiladas with complementary sides and drinks that will elevate your morning experience.

  • Fresh Fruit Salad: A vibrant mix of seasonal fruits brings brightness and a refreshing contrast to the hearty casserole.
  • Spicy Salsa: Adding a dollop of salsa on top enhances the flavors with zesty heat—perfect for those who love a kick.
  • Crispy Hash Browns: The crunch of golden hash browns pairs beautifully with the softness of the enchiladas, balancing textures on your plate.
  • Avocado Slices: Creamy avocado adds richness and a touch of wellness, making each bite feel indulgent yet wholesome.
  • Coffee or Tea: A hot beverage—whether rich coffee or soothing tea—completes the breakfast experience and warms the heart.
  • Flaky Biscuit: Serve a buttery, flaky biscuit on the side to soak up any extra egg mixture, making breakfast even more comforting.
  • Mimosas: For a festive touch, pair with refreshing mimosas—bubbly with a hint of citrus to brighten your morning.

These delightful accompaniments will transform your Overnight Breakfast Enchiladas into a memorable meal that everyone will rave about.

Breakfast Enchiladas Variations

Feel free to adapt these delicious Breakfast Enchiladas to suit your taste preferences and dietary needs!

  • Meat Swap: Replace the sausage with ground turkey or chorizo for a different flavor profile. You could even go bold with shredded beef for a hearty twist!
  • Veggie Delight: For a vegetarian option, swap in sautéed bell peppers, onions, and mushrooms instead of meat. This will add a colorful crunch that's sure to please anyone!
  • Cheese Variety: Use Monterey Jack or pepper jack cheese instead of cheddar for an exciting melt and a hint of spice. The creamy texture will keep you reaching for seconds!
  • Corn Tortillas: Opt for corn tortillas instead of flour for a gluten-free version that’s just as delightful. They add a rustic touch and have a delicious flavor that complements the filling!
  • Heat It Up: Stir in jalapeños or hot sauce to the egg mixture for those who love a spicy kick in the morning. The warmth will wake up your taste buds and add an extra layer of excitement!
  • Salsa Swirl: Drizzle salsa verde over the enchiladas before baking for a zesty twist. This adds brightness and a fresh flavor that pairs beautifully with the rich filling.
  • Dairy-Free: Use almond or oat milk in place of half-and-half and nutritional yeast instead of cheese for the same creamy texture without the dairy. You won’t even miss it!
  • Top It Off: Sprinkle chopped fresh herbs like cilantro or green onions on top after baking for a burst of color and freshness. It brightens every bite!

FAQs About Breakfast Enchiladas

Have questions about these delightful Breakfast Enchiladas? We’re here to help you find the answers!

What are breakfast enchiladas?

Breakfast enchiladas are tortillas filled with breakfast favorites like eggs, cheese, and meats, baked until warm and melty.

Why are they called divorced enchiladas?

Divorced enchiladas are served with two different sauces on each side, symbolizing the “divorce” of flavors while still being deliciously united on the plate.

What is the secret to non-soggy enchiladas?

To prevent sogginess, allow the enchiladas to soak in the egg mixture briefly and use just enough liquid to coat them.

Can I eat enchiladas while trying to lose weight?

Absolutely! You can modify the ingredients to include lean proteins and plenty of veggies for a lighter version.

What is a Mexican breakfast dish?

A popular Mexican breakfast dish is huevos rancheros, featuring fried eggs on tortillas topped with salsa.

How do Mexicans eat enchiladas?

Traditionally, enchiladas are enjoyed with sides like beans and rice, often topped with crema, cheese, or salsa for added flavor.

Print

Irresistibly Easy Breakfast Enchiladas to Kickstart Your Day

Breakfast Enchiladas
Print Recipe
Pin Recipe

5 Stars 4 Stars 3 Stars 2 Stars 1 Star

No reviews

I still remember the first time I stumbled upon the idea of making Breakfast Enchiladas. It was a chilly Sunday morning, and I was flipping through a colorful cookbook filled with mouth-watering illustrations. My eyes landed on a recipe that promised a delightful combination of savory sausage, creamy eggs, gooey cheese, and crispy bacon—everything my breakfast dreams were made of!

These Overnight Breakfast Enchiladas quickly became my go-to recipe for lazy weekend brunches and busy weekdays alike. With just a bit of prep the night before, you can wake up to a hearty casserole that makes mornings feel more like a treat than a chore. They're versatile enough to suit anyone's tastes—in fact, feel free to switch out the sausage or toss in some green chiles for an extra kick!

Join me in creating this beloved breakfast dish that turns every meal into a celebration of flavors!

  • Author: grace bellamy
  • Prep Time: 15 minutes
  • Cook Time: 30 minutes
  • Total Time: 45 minutes
  • Yield: 6 servings 1x
  • Category: Breakfast
  • Method: Baking
  • Cuisine: Mexican
  • Diet: Meat

Ingredients

Scale
  • 1 pound sausage
  • 2 cups shredded cheddar cheese
  • 8 flour tortillas
  • 6 eggs
  • 1 cup half-and-half
  • ¼ cup all-purpose flour
  • 1 teaspoon salt
  • ½ cup bacon bits

Instructions

  1. Brown the sausage in a large skillet over medium heat, breaking it apart as it cooks, for about 5-7 minutes until it’s completely browned and no longer pink.
  2. Beat Together the eggs, half-and-half, flour, and salt in a mixing bowl until fully combined and slightly frothy, about 2-3 minutes.
  3. Assemble by layering the flour tortillas in a greased 9x13-inch baking dish, overlapping them slightly to cover the bottom completely.
  4. Pour the egg mixture evenly over the layered tortillas, ensuring every inch is coated for maximum flavor.
  5. Top with shredded cheddar cheese and crispy bacon bits, sprinkling generously for that delicious gooey finish.
  6. Bake in a preheated oven at 350°F for 25-30 minutes, covering the dish with foil for the first 20 minutes.

Notes

  • Prep Ahead: Make these Breakfast Enchiladas the night before to save time in the morning.
  • Check Consistency: If the egg mixture feels too runny, add a bit more flour.
  • Adjust Baking Time: If you take the casserole out too soon, it may result in undercooked eggs.
  • Customize to Taste: Feel free to swap out sausage with chicken, turkey, or even a vegetarian option.
  • Indulge in Toppings: Don't shy away from garnishing your Breakfast Enchiladas with salsa, avocado, or fresh cilantro for layers of flavor!

Nutrition

  • Serving Size: 1 enchilada
  • Calories: 400
  • Sugar: 2 grams
  • Sodium: 600 milligrams
  • Fat: 25 grams
  • Saturated Fat: 10 grams
  • Unsaturated Fat: 10 grams
  • Trans Fat: 0 grams
  • Carbohydrates: 30 grams
  • Fiber: 2 grams
  • Protein: 20 grams
  • Cholesterol: 180 milligrams

Did you make this recipe?

Share a photo and tag us — we'd love to see your creation!

Recipe

Savory Sweet Chili Meatballs Crockpot: Effortless Flavor Bliss

March 16, 2025 by grace bellamy Leave a Comment

I still remember the joy on my friends' faces the first time I served these Sweet Chili Meatballs from the crockpot at a casual get-together. It was one of those evenings where I craved something effortlessly delicious, yet impressive enough to wow my guests. With just four simple ingredients, I could whip up these little bites of bliss without spending hours in the kitchen.

As the savory aroma of sweet red chili sauce mingled with grape jelly and pineapple wafted through my home, it was impossible not to feel that warm sense of comfort you only get from homemade food. Whether it’s game day, a holiday celebration, or a cozy weekend gathering, these Sweet Chili Meatballs have become my go-to appetizer with just the right kick of sweet and spicy flavors.

What I love most is how flexible they are! Toss everything in the slow cooker and watch as they transform into a crowd-pleasing delight. Trust me, once you make these, they'll be a staple at your gatherings—or just for a night in with your favorite series!

Why are Sweet Chili Meatballs Crockpot a must-try?

Simplicity: With just four ingredients, this recipe is incredibly easy to whip up, making it perfect for both novice cooks and busy home chefs.
Flavor Harmony: The sweet and spicy combination creates a delightful taste sensation that will have your guests coming back for more.
Versatile: Ideal for game days, holidays, or casual get-togethers, these meatballs fit any occasion effortlessly.
Crowd-Pleaser: The warm aroma fills your home, creating an inviting atmosphere and ensuring everyone is eager to dig in.
Make-Ahead Magic: You can easily prepare these meatballs ahead of time and keep them warm, freeing up your valuable time for other party preparations.
Looking for another exciting appetizer idea? Check out my delicious Sweet Chili Chicken!

Sweet Chili Meatballs Crockpot Ingredients

Get ready to create these delightful bites!

For the Meatballs
• Frozen Homestyle Meatballs – They provide the perfect protein base; avoid Italian meatballs to keep flavors balanced.

For the Sauce
• Sweet Red Chili Sauce – This adds the essential sweetness and spice for those signature flavors.
• Grape Jelly – A crucial ingredient that contributes luscious sweetness and smooth consistency to the sauce.

For the Add-In
• Pineapple Tidbits (drained) – These add a burst of sweetness; feel free to substitute with crushed pineapple, but don't skip this if you can help it!

Remember, full measurements are in the recipe card below.

How to Make Sweet Chili Meatballs Crockpot

  1. Add Meatballs: Place the frozen homestyle meatballs right into your slow cooker. They’ll be the star of this delicious dish, making prep a breeze.
  2. Pour Sauce: Drizzle the sweet red chili sauce over the meatballs. This key ingredient delivers that zesty sweetness and kick of heat that makes these bites irresistible.
  3. Mix in Grape Jelly: Add the grape jelly on top. It will blend beautifully with the chili sauce, creating a silky and flavorful coating.
  4. Incorporate Pineapple: Toss in the drained pineapple tidbits. Their sweetness and texture will brighten up the dish and balance the spiciness.
  5. Stir Together: Gently stir the ingredients to combine everything evenly. This step ensures that every meatball is coated with that tantalizing sauce.
  6. Set to Cook: Cover and cook on HIGH for 1-2 hours or LOW for 3-4 hours. You’ll know they’re ready when the meatballs are heated through and the sauce is bubbly.
  7. Final Stir: Just before serving, give the mixture another gentle stir to distribute the sauce. Your meatballs should be perfectly glistening and ready to impress!

Optional: Garnish with chopped green onions for a fresh pop of color.

Exact quantities are listed in the recipe card below.

Expert Tips for Sweet Chili Meatballs Crockpot

• Choose the Right Meatballs: Use homestyle frozen meatballs; Italian ones can alter the sweet and spicy flavor balance.

• Stir Periodically: Stirring during cooking helps ensure the sweet chili sauce coats every meatball evenly.

• Watch the Cook Time: Overcooking can make meatballs tough; test them at the lower end of the cooking time for best results.

• Customize Your Sweetness: Adjust the amount of grape jelly based on personal preference—less for a spicier kick or more for a sweeter flavor.

• Store Properly: Keep leftovers in an airtight container in the fridge for up to 3-4 days, ensuring you enjoy the taste of these sweet chili meatballs crockpot again!

How to Store and Freeze Sweet Chili Meatballs Crockpot

• Room Temperature: Serve immediately if not keeping warm; discard any leftovers that have been out for more than 2 hours for safety.

• Fridge: Store in an airtight container in the refrigerator for up to 3-4 days. Reheat in the microwave until heated through for best flavor.

• Freezer: Place cooled meatballs in a freezer container or bag and freeze for up to 3 months. Make sure they're well-sealed to prevent freezer burn.

• Defrosting: Thaw in the refrigerator overnight before reheating. This helps maintain flavor and texture when enjoying your sweet chili meatballs crockpot again!

What to Serve with Sweet Chili Meatballs Crockpot?

Imagine a delightful gathering where your guests are savoring the rich blend of sweet and spicy flavors radiating from your slow cooker—a perfect complement awaits.

  • Sticky Rice: This soft, chewy side absorbs the meatball sauce, creating a harmonious pairing. It's a comforting foundation that enhances the flavor without overshadowing the main dish.
  • Fresh Cucumber Salad: Crisp and refreshing, this salad provides a crunchy contrast to the tender meatballs, brightening each bite with its zesty dressing.
  • Garlic Bread: The warm, buttery goodness of garlic bread serves as a perfect vehicle for scooping up extra sauce, making every delicious morsel count.
  • Coleslaw: A creamy slaw adds a tangy element that beautifully balances the sweetness of the meatballs. Each bite offers a delightful crunch and brightness.
  • Beer or Cider: Pairing these meatballs with a cold craft beer or cider can highlight the flavors without overwhelming your palate. The carbonation also refreshes your taste buds between bites.
  • Chocolate Brownies: For a sweet finish, serve fudgy brownies. Their rich chocolate flavor complements the spicy meatballs perfectly, rounding out the meal with indulgence.
  • Sparkling Water with Lime: Offer sparkling water for a refreshing drink option. The citrus notes and effervescence create a lovely palate cleanser between the savory bites.

With these pairings, you’re sure to elevate your Sweet Chili Meatballs Crockpot into a memorable meal that your guests will be talking about long after the last bite!

Sweet Chili Meatballs Crockpot Variations

Customize these delightful meatballs to match your tastes and ensure every gathering is a hit!

  • Turkey Meatballs: Swap in turkey meatballs for a leaner alternative that still packs great flavor. They’ll retain the sweet and spicy punch beautifully.
  • Vegetarian Options: Use plant-based meatballs or chickpeas for a vegetarian-friendly dish. They absorb the sauce’s sweetness while providing a satisfying bite.
  • Pineapple-Free: Omit the pineapple if you're not a fan; adding extra grape jelly can maintain that sweet balance without the added texture.
  • Spicy Twist: Add a splash of Sriracha or crushed red pepper flakes to crank up the heat. A little kick can elevate the whole experience!
  • Tangy Barbecue: Exchange sweet red chili sauce for barbecue sauce for a smoky, tangy flavor. Your guests will love this unexpected twist!
  • Citrus Burst: Squeeze in some fresh lime or orange juice to brighten the dish. The citrus will add a refreshing zing that complements the sweetness.
  • Nutty Finish: Top with chopped roasted peanuts or cashews for a crunchy texture that contrasts the soft meatballs beautifully.
  • Herb Infusion: Stir in some chopped cilantro or green onions before serving for a fresh finish. It enhances the overall flavor and adds a lovely pop of color!

FAQs About Sweet Chili Meatballs Crockpot

These FAQs will help clarify any questions you might have about making and enjoying these delicious bites!

How do I ensure my meatballs are tender?

Gently stir the meatballs during cooking to help coat them evenly in sauce and avoid toughening.

Can I use different meatball types?

Absolutely! Turkey meatballs are a great healthier alternative, while homemade ones can elevate the flavor even further.

What if I don't have pineapple tidbits?

You can substitute with crushed pineapple or simply omit them, but they add a lovely texture and sweetness.

How should I store leftovers?

Store meatballs in an airtight container in the fridge for 3-4 days. Reheat in the microwave when you're ready to enjoy!

How can I adjust the sweetness or spiciness?

Feel free to modify the amount of grape jelly based on your taste—less for a spicy kick or more for that sweet touch!

Can I prepare these meatballs in advance?

Yes! You can make them ahead of time and keep them warm for up to 2 hours on the slow cooker’s “warm” setting.

Print

Savory Sweet Chili Meatballs Crockpot: Effortless Flavor Bliss

Sweet Chili Meatballs Crockpot
Print Recipe
Pin Recipe

5 Stars 4 Stars 3 Stars 2 Stars 1 Star

No reviews

I still remember the joy on my friends' faces the first time I served these Sweet Chili Meatballs from the crockpot at a casual get-together. It was one of those evenings where I craved something effortlessly delicious, yet impressive enough to wow my guests. With just four simple ingredients, I could whip up these little bites of bliss without spending hours in the kitchen.

As the savory aroma of sweet red chili sauce mingled with grape jelly and pineapple wafted through my home, it was impossible not to feel that warm sense of comfort you only get from homemade food. Whether it’s game day, a holiday celebration, or a cozy weekend gathering, these Sweet Chili Meatballs have become my go-to appetizer with just the right kick of sweet and spicy flavors.

What I love most is how flexible they are! Toss everything in the slow cooker and watch as they transform into a crowd-pleasing delight. Trust me, once you make these, they'll be a staple at your gatherings—or just for a night in with your favorite series!

  • Author: grace bellamy
  • Prep Time: 10 minutes
  • Cook Time: 4 hours
  • Total Time: 4 hours 10 minutes
  • Yield: 8 servings 1x
  • Category: Appetizer
  • Method: Slow Cooker
  • Cuisine: American
  • Diet: Gluten-Free

Ingredients

Scale
  • 32 oz Frozen Homestyle Meatballs
  • 1 cup Sweet Red Chili Sauce
  • 1 cup Grape Jelly
  • 1 can (20 oz) Pineapple Tidbits, drained

Instructions

  1. Add Meatballs: Place the frozen homestyle meatballs right into your slow cooker. They’ll be the star of this delicious dish, making prep a breeze.
  2. Pour Sauce: Drizzle the sweet red chili sauce over the meatballs. This key ingredient delivers that zesty sweetness and kick of heat that makes these bites irresistible.
  3. Mix in Grape Jelly: Add the grape jelly on top. It will blend beautifully with the chili sauce, creating a silky and flavorful coating.
  4. Incorporate Pineapple: Toss in the drained pineapple tidbits. Their sweetness and texture will brighten up the dish and balance the spiciness.
  5. Stir Together: Gently stir the ingredients to combine everything evenly. This step ensures that every meatball is coated with that tantalizing sauce.
  6. Set to Cook: Cover and cook on HIGH for 1-2 hours or LOW for 3-4 hours. You’ll know they’re ready when the meatballs are heated through and the sauce is bubbly.
  7. Final Stir: Just before serving, give the mixture another gentle stir to distribute the sauce. Your meatballs should be perfectly glistening and ready to impress!

Notes

  • Choose the Right Meatballs: Use homestyle frozen meatballs; Italian ones can alter the sweet and spicy flavor balance.
  • Stir Periodically: Stirring during cooking helps ensure the sweet chili sauce coats every meatball evenly.
  • Watch the Cook Time: Overcooking can make meatballs tough; test them at the lower end of the cooking time for best results.
  • Customize Your Sweetness: Adjust the amount of grape jelly based on personal preference—less for a spicier kick or more for a sweeter flavor.
  • Store Properly: Keep leftovers in an airtight container in the fridge for up to 3-4 days, ensuring you enjoy the taste of these sweet chili meatballs crockpot again!

Nutrition

  • Serving Size: 1 serving
  • Calories: 250
  • Sugar: 15
  • Sodium: 300
  • Fat: 12
  • Saturated Fat: 4
  • Unsaturated Fat: 8
  • Trans Fat: 0
  • Carbohydrates: 28
  • Fiber: 1
  • Protein: 10
  • Cholesterol: 40

Did you make this recipe?

Share a photo and tag us — we'd love to see your creation!

Recipe

Irresistibly Easy Hawaiian Roll French Toast Casserole

March 9, 2025 by grace bellamy Leave a Comment

I still remember the first time I set out to impress my family with a breakfast that would make everyone jump out of bed—of course, I was armed with a box of sweet Hawaiian rolls! It was a chilly Sunday morning, and as I prepared breakfast, I craved something warm, comforting, and downright delicious. That’s when the idea for my Hawaiian Roll French Toast Casserole was born.

With tender Hawaiian rolls soaking up a creamy, custardy mixture, and bursting with fresh blueberries, this dish doesn’t just fill bellies; it brings smiles to faces. Not only is this casserole easy to whip up, but it also leaves you with plenty of time to relax before serving. Whether it’s a cozy family brunch or a festive gathering, this show-stopping dish transforms morning moments into cherished memories. Plus, feel free to swap in raspberries for a delightful twist! Join me, and let’s make breakfast a little sweeter together.

Why is Hawaiian Roll French Toast Casserole so special?

Simplicity at its finest: This Hawaiian Roll French Toast Casserole is a breeze to prepare, making it perfect for busy mornings or lazy weekends. Flavor-packed with fresh blueberries, each bite bursts with sweetness, leaving everyone craving more. Versatile enough for different occasions, you can easily swap in raspberries or mix in other favorite fruits. Time-saving and crowd-pleasing, it allows you to spend less time in the kitchen and more time with loved ones. Discover this delightful Hawaiian Roll French Toast Casserole and elevate your breakfast game!

Hawaiian Roll French Toast Casserole Ingredients

Get ready to make something delicious!

For the Casserole
• Hawaiian rolls – the tender base that brings a sweet touch to every bite.
• Blueberries – fresh bursts of flavor; substitute with raspberries for a delightful twist.
• Eggs – create a custard mixture for a rich, velvety texture.
• Half and half – adds creaminess, enhancing the overall mouthfeel.
• Sugar – sweetens the custard, giving it that irresistible taste.
• Vanilla extract – infuses the mixture with warmth and depth of flavor.

For Serving (Optional)
• Powdered sugar – a light dusting for an elegant finish.
• Maple syrup – drizzle over the warm casserole for a sweet touch.

You’ll find full measurements in the recipe card below.

How to Make Hawaiian Roll French Toast Casserole

  1. Preheat the oven to 350°F (175°C). Grease your baking dish, ideally 11x7 or 12x8 inches, ensuring you have room for all the deliciousness to come!
  2. Cube Hawaiian rolls into 1-inch pieces. This helps them soak up the custard beautifully, giving you a tender, flavorful base for your casserole.
  3. Layer half of the cubed rolls in the dish, then sprinkle half of the blueberries on top. Repeat with the remaining rolls and blueberries, creating a delightful tower of flavor.
  4. Whisk together eggs, half and half, sugar, and vanilla in a mixing bowl. This custard mixture will bring everything together and infuse it with sweetness.
  5. Pour the custard mixture evenly over the layered bread and blueberries, making sure every piece is well-coated. This step is key to achieving that divine, custardy texture!
  6. Cover the baking dish with foil and bake for 40 minutes. This helps keep the casserole moist while it cooks to perfection.
  7. Uncover and continue baking for an additional 20-30 minutes, or until the top is golden brown and the center is lightly jiggly. This is when the magic happens!
  8. Dust with powdered sugar if desired, and serve warm with a generous drizzle of maple syrup. Your family and friends will be swooning!

Optional: Serve with fresh fruit on the side for an extra refreshing touch.
Exact quantities are listed in the recipe card below.

Expert Tips for Hawaiian Roll French Toast Casserole

• Perfect Bake Time: Always bake the casserole covered with foil for the first 40 minutes to prevent over-browning and ensure even cooking.

• Custard Soak: Allow the bread to soak in the custard mixture for at least 15 minutes before baking. This helps create that dreamy, custardy texture.

• Spice It Up: Add a pinch of cinnamon or nutmeg to the custard for a warm, inviting flavor that complements the sweetness of the Hawaiian rolls beautifully.

• Fruit Substitution: While blueberries are fantastic, don’t hesitate to try raspberries or a mix of different berries for a unique twist in your Hawaiian Roll French Toast Casserole.

• Make Ahead: Assemble the casserole the night before and refrigerate it. Just remember to extend your baking time if starting from the fridge!

• Check for Doneness: The casserole should be golden brown on top and slightly jiggly in the center; every oven varies, so keep an eye on it!

How to Store and Freeze Hawaiian Roll French Toast Casserole

Fridge: Keep leftovers in an airtight container for up to 3 days. Reheat individual portions in the microwave or oven until warmed through.

Freezer: For long-term storage, wrap the cooled casserole tightly in plastic wrap, then foil. It can be frozen for up to 2 months. Thaw overnight in the fridge before reheating.

Reheating: Reheat slices in the microwave for a quick breakfast, or bake in the oven at 350°F for 15-20 minutes until heated through and slightly crispy on top.

Make-Ahead Tip: You can prepare the Hawaiian Roll French Toast Casserole and refrigerate it overnight before baking, adding about 10-15 minutes to the baking time.

What to Serve with Hawaiian Roll French Toast Casserole?

Transform your breakfast table into a delightful feast with these perfect pairings!

  • Crispy Bacon: The salty crunch of bacon complements the sweet casserole perfectly, adding a savory balance to your meal.
  • Fresh Fruit Salad: A vibrant mix of seasonal fruits brings a refreshing touch, brightening up each bite and adding vibrant colors to your spread.

Nothing says indulgent breakfast like a drizzle of honey over your fruit salad, enhancing its natural sweetness.

  • Greek Yogurt: Creamy yogurt adds a tangy contrast that beautifully offsets the sweetness of the casserole, while also adding a protein boost.
  • Maple Sausage Links: Juicy sausage offers a burst of savory flavor that pairs wonderfully with the sweet bites of the casserole, creating a satisfying experience.

Consider drizzling a bit of maple syrup over the sausages for an extra UMPH in flavor!

  • Coffee or Tea: A warm mug of dark roast coffee or herbal tea is the ideal companion, balancing the richness of your breakfast with soothing warmth.
  • Whipped Cream: Light and airy whipped cream on the side provides an indulgent finishing touch, elevating the presentation and flavor of your Hawaiian Roll French Toast Casserole.

Serve up this delightful combination, and watch as your breakfast gathering becomes a cherished memory!

Hawaiian Roll French Toast Casserole Variations

Feel free to let your creativity shine with these delightful twists!

  • Raspberry Swap: Replace blueberries with fresh raspberries for a tart but sweet option that brightens every bite.
  • Cinnamon Spice: Add a teaspoon of cinnamon or nutmeg to the custard mixture for that cozy, warm aroma and flavor. This small tweak transforms your dish into a comforting hug in breakfast form!
  • Choco Delight: Mix in semi-sweet chocolate chips to the layers for a rich, decadent treat. Each forkful will deliver a sweet surprise your family will love.
  • Nutty Crunch: Fold in chopped pecans or walnuts for a delightful crunch that complements the soft rolls beautifully. A sprinkle on top before baking adds an irresistible layer of texture.
  • Vegan Friendly: Substitute eggs with a mixture of flaxseed meal and water, and use almond milk or any plant-based milk instead of half and half for a dairy-free delight. This keeps the flavor while accommodating your vegan friends!
  • Berry Medley: Use a mix of fresh berries—strawberries, blueberries, and raspberries—for a vibrant and colorful casserole that’s bursting with fruity flavor. The combination adds stunning visuals and taste!
  • Savory Twist: Incorporate shredded cheese and cooked bacon or sausage for a savory rendition of this classic dish. This unexpected combination creates a brunch dish that balances sweet and savory perfectly.
  • Overnight Prep: Mix the casserole the night before and refrigerate it before baking the next morning. Just remember, it may need a bit of extra time in the oven!

FAQs About Hawaiian Roll French Toast Casserole

This Hawaiian Roll French Toast Casserole is a beloved breakfast dish, so let’s tackle some common questions to enhance your cooking experience!

Can I use other types of bread instead of Hawaiian rolls?

Absolutely! Challah or brioche can also work beautifully, but they may vary in sweetness.

How can I make this casserole ahead of time?

Simply prepare it the night before, cover, and refrigerate. Bake it in the morning, adding extra time if needed.

What should I do if my casserole is too dry?

If your casserole turns out dry, it may benefit from a little extra custard mixture or a drizzle of syrup when served.

Can I use frozen fruit instead of fresh?

Yes! Just ensure to thaw and drain any excess liquid from frozen fruit before layering to prevent sogginess.

How do I store leftovers?

Keep them in an airtight container in the fridge for up to three days. Reheat slices individually for a quick breakfast treat.

Can I add spices to the custard mixture?

Definitely! A sprinkle of cinnamon or nutmeg can add warm, comforting flavors that enhance the sweetness of the casserole.

Print

Irresistibly Easy Hawaiian Roll French Toast Casserole

Hawaiian Roll French Toast Casserole
Print Recipe
Pin Recipe

5 Stars 4 Stars 3 Stars 2 Stars 1 Star

No reviews

I still remember the first time I set out to impress my family with a breakfast that would make everyone jump out of bed—of course, I was armed with a box of sweet Hawaiian rolls! It was a chilly Sunday morning, and as I prepared breakfast, I craved something warm, comforting, and downright delicious. That’s when the idea for my Hawaiian Roll French Toast Casserole was born.

With tender Hawaiian rolls soaking up a creamy, custardy mixture, and bursting with fresh blueberries, this dish doesn’t just fill bellies; it brings smiles to faces. Not only is this casserole easy to whip up, but it also leaves you with plenty of time to relax before serving. Whether it’s a cozy family brunch or a festive gathering, this show-stopping dish transforms morning moments into cherished memories. Plus, feel free to swap in raspberries for a delightful twist! Join me, and let’s make breakfast a little sweeter together.

  • Author: grace bellamy
  • Prep Time: 15 minutes
  • Cook Time: 60 minutes
  • Total Time: 75 minutes
  • Yield: 8 servings 1x
  • Category: Breakfast
  • Method: Baking
  • Cuisine: American
  • Diet: Vegetarian

Ingredients

Scale
  • 1 pack Hawaiian rolls
  • 2 cups blueberries
  • 6 eggs
  • 1 cup half and half
  • ½ cup sugar
  • 1 teaspoon vanilla extract
  • Powdered sugar (for serving, optional)
  • Maple syrup (for serving, optional)

Instructions

  1. Preheat the oven to 350°F (175°C). Grease your baking dish, ideally 11x7 or 12x8 inches, ensuring you have room for all the deliciousness to come!
  2. Cube Hawaiian rolls into 1-inch pieces.
  3. Layer half of the cubed rolls in the dish, then sprinkle half of the blueberries on top. Repeat with the remaining rolls and blueberries.
  4. Whisk together eggs, half and half, sugar, and vanilla in a mixing bowl.
  5. Pour the custard mixture evenly over the layered bread and blueberries.
  6. Cover the baking dish with foil and bake for 40 minutes.
  7. Uncover and continue baking for an additional 20-30 minutes, or until the top is golden brown.
  8. Dust with powdered sugar if desired, and serve warm with a drizzle of maple syrup.

Notes

  • Perfect Bake Time: Always bake the casserole covered with foil for the first 40 minutes.
  • Custard Soak: Allow the bread to soak in the custard mixture for at least 15 minutes before baking.
  • Spice It Up: Add a pinch of cinnamon or nutmeg to the custard for added flavor.
  • Fruit Substitution: Try raspberries or a mix of different berries.
  • Make Ahead: Assemble the casserole the night before and refrigerate.
  • Check for Doneness: The casserole should be golden brown on top and slightly jiggly in the center.

Nutrition

  • Serving Size: 1 slice
  • Calories: 350
  • Sugar: 12g
  • Sodium: 250mg
  • Fat: 15g
  • Saturated Fat: 8g
  • Unsaturated Fat: 5g
  • Trans Fat: 0g
  • Carbohydrates: 45g
  • Fiber: 2g
  • Protein: 8g
  • Cholesterol: 120mg

Did you make this recipe?

Share a photo and tag us — we'd love to see your creation!

Recipe

Irresistibly Light Vanilla French Beignets: A Sweet Delight

February 28, 2025 by grace bellamy Leave a Comment

There’s something magical about the aroma of freshly fried pastries wafting through the kitchen—especially on a lazy Sunday morning when all you want is to indulge in something sweet and satisfying. I still remember the first time I tried Vanilla French Beignets at a charming little café in New Orleans. As I sank my teeth into the warm, pillowy dough dusted with powdered sugar, I was instantly hooked. Their light texture and rich vanilla flavor felt like a warm hug, transporting me to the vibrant streets of the French Quarter.

Today, I want to share this delightful recipe with you so you can recreate that same magic at home. With just a few simple ingredients and a bit of patience, you can whip up these heavenly Vanilla French Beignets that are perfect for breakfast, a sweet snack, or even a fancy dessert. Trust me, there’s nothing quite like the joy of biting into a freshly made beignet while sipping your favorite café au lait. Get ready to impress your family and bring a taste of New Orleans right to your kitchen!

Why are Vanilla French Beignets so irresistible?

Freshly fried beignets bring a heavenly aroma that fills your kitchen with warmth and comfort. Light and airy, their pillowy texture makes every bite a delight. Rich vanilla flavor combined with a generous dusting of powdered sugar creates the perfect indulgence. Versatile serving options, like pairing with chocolate or caramel sauce, elevate these treats for any occasion. For a brunch twist, you can serve them alongside Hawaiian Roll French Toast Casserole.

Vanilla French Beignets Ingredients

Experience the joy of making these delightful pastries at home!

For the Dough

  • All-purpose flour – the backbone of your beignets, providing that irresistible structure.
  • Granulated sugar – a touch of sweetness balances the dough flavors perfectly.
  • Active dry yeast – essential for airy, fluffy beignets; make sure it's fresh for the best rise.
  • Milk – warm milk creates a tender dough and helps activate the yeast.
  • Eggs – adding richness and moisture, they contribute to the beignet's delightful texture.
  • Unsalted butter – a little melted butter enhances richness and adds flavor to the dough.
  • Vanilla extract – the star ingredient infusing your beignets with warm, sweet notes.
  • Salt – a pinch complements the sweetness, balancing the flavors nicely.

For Frying

  • Vegetable oil – use a neutral oil with a high smoke point for frying, ensuring they cook evenly.

For Dusting

  • Powdered sugar – this sweet dusting is the finishing touch that makes the beignets shine!

All measurements are available in the recipe card below.

How to Make Vanilla French Beignets

  1. Prepare the dough: In a bowl, mix warm milk and granulated sugar. Sprinkle in the active dry yeast, allowing it to foam for about 5-10 minutes. This activation is crucial for fluffy beignets!
  2. Combine ingredients: In a large mixing bowl, whisk together the all-purpose flour, salt, and eggs. Slowly pour in the yeast mixture, melted butter, and vanilla extract, stirring until a rough dough forms.
  3. Knead gently: Transfer the dough onto a floured surface and knead for about 5 minutes until it's smooth and elastic. This step helps develop the dough’s structure, resulting in airy beignets.
  4. Proof the dough: Place the dough in a lightly greased bowl, cover it with a damp cloth, and let it rise in a warm area for about 1 hour. You're looking for it to double in size!
  5. Shape the beignets: Once risen, punch down the dough and roll it out to about ½-inch thickness. Cut into squares or triangles, about 2 inches each side.
  6. Heat the oil: In a deep pot, heat the vegetable oil to 350°F. Use a thermometer for accurate temperature; too hot will burn, while too cool will make them greasy.
  7. Fry the beignets: Fry the dough pieces for about 2-3 minutes on each side until golden brown and puffed. Don’t overcrowd the pot—this ensures even frying and prevents temperature drops.
  8. Dust with sugar: Remove the beignets with a slotted spoon and place them on paper towels to drain excess oil. Dust generously with powdered sugar while they’re still warm for that signature sweetness!

Optional: Pair your beignets with a decadent chocolate or caramel sauce for dipping.

Exact quantities are listed in the recipe card below.

Expert Tips for Vanilla French Beignets

  • Temperature Precision: Use a thermometer to monitor oil temperature at 350°F. Too hot and they'll burn; too cool and they'll absorb excess oil.
  • Kneading Technique: Knead the dough gently for just 5 minutes to develop elasticity without overworking it, which could lead to dense beignets.
  • Proofing Perfection: Ensure the dough rises in a warm environment. A turned-off oven with a bowl of hot water creates the perfect humidity for optimal proofing.
  • Cutting Uniformly: Use a sharp knife or pizza cutter for even squares. Uniform sizes ensure all beignets fry evenly, delivering that light texture you crave.
  • Serving Warm: Serve Vanilla French Beignets immediately after frying for maximum freshness. If you're saving them, reheat gently in an oven to revive their fluffiness.

How to Store and Freeze Vanilla French Beignets

Room Temperature: Store leftover beignets in an airtight container at room temperature for up to 2 days. They’re best enjoyed fresh but can hold their delightful flavor a little longer.

Fridge: If you prefer, beignets can be kept in the fridge for up to 3 days. Just be sure to place them in an airtight container to prevent them from drying out.

Freezer: For longer storage, freeze beignets in a single layer on a baking sheet, then transfer to a freezer-safe bag or container for up to 3 months. Thaw at room temperature before reheating.

Reheating: To revive their fluffy texture, reheat beignets in an oven at 300°F for about 10 minutes. Dust with powdered sugar once warm for that fresh-from-the-fryer taste!

What to Serve with Vanilla French Beignets?

Create a delightful brunch experience or dessert table by pairing these light, airy pastries with complementary flavors and textures.

  • Café au Lait: The rich coffee and creamy milk blend perfectly with the sweetness of the beignets, making your brunch feel like a treat.
  • Fresh Berries: Bright and juicy strawberries or raspberries provide a refreshing contrast, balancing the richness of the beignets with a burst of natural sweetness.
  • Chocolate Sauce: A warm, decadent chocolate dip adds indulgence and pair beautifully with the soft vanilla flavors, making each bite even more tempting.
  • Caramel Sauce: Drizzling warm caramel over the beignets introduces a luscious, buttery sweetness that elevates their deliciousness to new heights.
  • Spicy Chai Tea: The warming spices of chai create a cozy atmosphere and enhance the beignets' vanilla notes, perfect for a chilly day.
  • Hot Apple Cider: This seasonal favorite adds a spiced warmth that complements the beignets' sweetness, creating a comforting and nostalgic experience.
  • Whipped Cream: A fluffy cloud of lightly sweetened whipped cream adds a creamy, dreamy texture that pairs wonderfully with the airy beignets.
  • Vanilla Ice Cream: For a delightful dessert twist, serve a scoop of vanilla ice cream alongside your beignets to create a delightful contrast of temperatures.

Vanilla French Beignets Variations

Embrace the delightful journey of customizing your beignets to make them uniquely your own!

  • Chocolate Dipping Sauce: Melt dark chocolate with a splash of cream for a rich, velvety dip that elevates your beignet experience.
  • Cinnamon Sugar Dusting: Combine sugar and cinnamon for a warm, spicy coating that adds a delightful twist to your beignets.
  • Fruit-Filled Surprise: Inject a dollop of your favorite jam or pastry cream into the beignet before frying for a fruity burst in every bite. The sweetness complements the vanilla perfectly!
  • Lemon Zest: Incorporate finely grated lemon zest into your dough for a bright, citrusy flavor that balances out the sweetness beautifully.
  • Dairy-Free Option: Substitute almond or coconut milk for regular milk and use a dairy-free butter alternative for a vegan version.
  • Maple Glaze: Drizzle a warm maple glaze over your beignets for a sweet, breakfast-inspired treat that's irresistibly good.
  • Spicy Kick: Mix cayenne pepper into the dough for a surprising heat that contrasts with the sweet, fluffy pastry.
  • Nutty Crunch: Fold in finely chopped nuts like almonds or hazelnuts into the dough for an unexpected crunchy texture and nutty flavor.

FAQs About Vanilla French Beignets

What are beignets in France?

Beignets are delightful French pastries, typically made from a sweet yeast dough, fried until golden, and dusted with powdered sugar.

What are the three ingredients in beignets?

At their simplest, beignets require flour, water, and sugar. However, adding yeast, milk, and vanilla enriches their flavor and texture.

What are beignets filled with?

Traditional beignets are usually unfilled but can also be stuffed with sweet fillings like chocolate, fruit preserves, or custard for added delight.

What is the difference between a doughnut and a beignet?

The main difference lies in texture; beignets are lighter and airier, while doughnuts, often sweeter, have a denser cake-like structure.

What is the easiest French dessert to make?

One of the simplest French desserts is clafoutis, a baked custard with fruit, which doesn’t require advanced techniques.

What is the English name for beignet?

In English, "beignet" translates to "fritter" or "doughnut," but they are uniquely soft and fluffy pastries in their own right.

Print

Irresistibly Light Vanilla French Beignets: A Sweet Delight

Vanilla French Beignets
Print Recipe
Pin Recipe

5 Stars 4 Stars 3 Stars 2 Stars 1 Star

No reviews

There’s something magical about the aroma of freshly fried pastries wafting through the kitchen—especially on a lazy Sunday morning when all you want is to indulge in something sweet and satisfying. I still remember the first time I tried Vanilla French Beignets at a charming little café in New Orleans.

  • Author: grace bellamy
  • Prep Time: 20 minutes
  • Cook Time: 30 minutes
  • Total Time: 1 hour 50 minutes
  • Yield: 4 servings 1x
  • Category: Dessert
  • Method: Frying
  • Cuisine: French
  • Diet: Vegetarian

Ingredients

Scale
  • 4 cups all-purpose flour
  • ¼ cup granulated sugar
  • 2 ¼ teaspoons active dry yeast
  • 1 cup warm milk
  • 2 eggs
  • ¼ cup unsalted butter, melted
  • 1 tablespoon vanilla extract
  • 1 teaspoon salt
  • 4 cups vegetable oil (for frying)
  • 1 cup powdered sugar (for dusting)

Instructions

  1. Prepare the dough: In a bowl, mix warm milk and granulated sugar. Sprinkle in the active dry yeast, allowing it to foam for about 5-10 minutes.

  2. Combine ingredients: In a large mixing bowl, whisk together the all-purpose flour, salt, and eggs. Slowly pour in the yeast mixture, melted butter, and vanilla extract, stirring until a rough dough forms.

  3. Knead gently: Transfer the dough onto a floured surface and knead for about 5 minutes until it's smooth and elastic.

  4. Proof the dough: Place the dough in a lightly greased bowl, cover it with a damp cloth, and let it rise in a warm area for about 1 hour.

  5. Shape the beignets: Once risen, punch down the dough and roll it out to about ½-inch thickness. Cut into squares or triangles, about 2 inches each side.

  6. Heat the oil: In a deep pot, heat the vegetable oil to 350°F.

  7. Fry the beignets: Fry the dough pieces for about 2-3 minutes on each side until golden brown and puffed.

  8. Dust with sugar: Remove the beignets with a slotted spoon and place them on paper towels to drain excess oil. Dust generously with powdered sugar while they’re still warm.

Notes

  • Optional: Pair your beignets with a decadent chocolate or caramel sauce for dipping.

Nutrition

  • Serving Size: 2 beignets
  • Calories: 300
  • Sugar: 10g
  • Sodium: 200mg
  • Fat: 15g
  • Saturated Fat: 8g
  • Unsaturated Fat: 7g
  • Trans Fat: 0g
  • Carbohydrates: 36g
  • Fiber: 1g
  • Protein: 4g
  • Cholesterol: 70mg

Did you make this recipe?

Share a photo and tag us — we'd love to see your creation!

Recipe

maple goat cheese sweet potatoes

February 20, 2025 by grace bellamy Leave a Comment

How to Make Maple Goat Cheese Sweet Potatoes

Imagine a kitchen filled with the warm smell of roasted sweet potatoes. The air is sweet with maple. Your taste buds are in for a treat, turning simple sweet potatoes into a dish that will wow your guests.

Maple goat cheese sweet potatoes are more than a side dish. They're a feast for your senses. Picture crispy sweet potato cubes, creamy goat cheese, and a drizzle of maple syrup. This recipe lets you make a dish fit for a restaurant at home.

This recipe takes just 40 minutes to prepare, serving four people. Each serving has about 300 calories. The mix of roasted sweet potatoes, tangy goat cheese, and maple syrup makes your meal special.

Turn four medium sweet potatoes into a dish that will have everyone wanting more. These maple goat cheese sweet potatoes are perfect for any meal. They're sure to become your new favorite dish.

Introduction to Maple Goat Cheese Sweet Potatoes

Get ready to transform your side dish game with maple-glazed goat cheese sweet potatoes. This dish is a mix of comfort food and gourmet cuisine. It brings together flavors that make any meal special.

Understanding the Perfect Balance of Sweet and Savory

The magic of goat cheese stuffed sweet potatoes is in their flavor mix. Sweet potatoes are creamy and rich, which goes well with goat cheese's tanginess. Adding maple syrup makes the dish sweet and savory at the same time.

  • Roasted sweet potatoes offer natural sweetness
  • Goat cheese adds a tangy counterpoint
  • Maple glaze creates a luxurious finish

Why This Dish Makes an Impressive Side

Your dinner guests will be amazed by this stunning and tasty side dish. The maple-glazed goat cheese sweet potatoes look great and are good for you. Sweet potatoes are full of vitamins and have a lower glycemic load than white potatoes.

Whether it's a dinner party or a weeknight meal, these sweet potatoes will impress. They're easy to make and require no complex skills.

Essential Ingredients for Success

Goat Cheese Sweet Potatoes

To make the perfect maple goat cheese sweet potatoes, start with top-notch ingredients. Your sweet potato goat cheese tart will stand out with fresh, firm sweet potatoes. You'll need about 3 lbs of sweet potatoes for a delicious batch that serves 8 people.

Here are the key ingredients you'll want to gather:

  • Sweet Potatoes: Choose firm, smooth potatoes with no soft spots
  • Olive Oil: 3 tablespoons for seasoning
  • Salt: 1 teaspoon for flavor enhancement
  • Maple Syrup: 1 tablespoon for a sweet maple goat cheese spread touch
  • Goat Cheese: 4 ounces, crumbled

For flavor variations, you can opt for two different profiles:

  • Sweet Version:
    • ½ teaspoon ground cinnamon
    • 1 tablespoon maple syrup
  • Savory Version:
    • 1 teaspoon ground paprika
    • ½ teaspoon garlic powder
    • Black pepper to taste

Pro tip: The quality of your ingredients directly impacts the final dish. Fresh, locally sourced sweet potatoes and pure maple syrup will elevate your sweet potato goat cheese tart from good to extraordinary.

Kitchen Tools and Equipment Needed

Preparing a delicious goat cheese sweet potato gratin needs the right tools. Whether you're a seasoned chef or a home cook, the right equipment makes cooking smoother and more fun.

Must-Have Utensils

To make the perfect goat cheese sweet potato gratin, you'll need these essential tools:

  • Sharp chef's knife for precise sweet potato cutting
  • Large ceramic or metal baking sheet for roasting
  • Mixing bowls in various sizes
  • Measuring cups and spoons
  • Cheese grater or crumbler for goat cheese
  • Wooden spoon or spatula for mixing

Optional Equipment for Enhanced Preparation

While not necessary, these tools can make your sweet potato gratin better:

  • Food processor for smooth goat cheese spreads
  • Mandoline slicer for uniform sweet potato cuts
  • Silicone baking mat to prevent sticking
  • Kitchen scale for precise ingredient measurements

Pro tip: A good set of kitchen tools can transform your cooking from ordinary to extraordinary!

Remember, the key to a great goat cheese sweet potato gratin is not just in the ingredients. It's also in how you prepare them. Choose tools that feel comfortable and make your cooking process enjoyable.

Preparing Your Sweet Potatoes

Getting your sweet potatoes ready is the first step to creating a delicious sweet potato goat cheese salad. Start by selecting 4 medium sweet potatoes that are firm and free from blemishes. Wash them thoroughly under cool running water to remove any dirt or debris.

When preparing your sweet potatoes, you have two options:

  • Keep the nutritious skin on for added fiber and texture
  • Peel the potatoes for a smoother presentation

For even roasting, slice the sweet potatoes into uniform ½-inch rounds. This technique ensures each piece cooks perfectly and provides an ideal base for your sweet potato goat cheese salad. Use a sharp knife to create clean, consistent cuts that will crisp up beautifully in the oven.

Pro tip: Sweet potatoes are nutritional powerhouses packed with beta-carotene and vitamin C. They defend your skin from sun damage and help smooth wrinkles while providing essential nutrients. When cutting, aim for pieces that are roughly the same size to guarantee consistent cooking.

  • Recommended cutting thickness: ½ inch
  • Ideal cooking temperature: 400 degrees Fahrenheit
  • Estimated roasting time: 1 to 1½ hours

Whether you're making a side dish or preparing ingredients for a sweet potato goat cheese salad, proper preparation is key to achieving delicious results.

Creating the Perfect Maple Glaze

Transforming your sweet potatoes into something special needs a great maple glaze. The right mix of maple syrup and spices can make your dish stand out. It will be a true culinary masterpiece.

Mixing the Maple Syrup Blend

Begin with top-notch pure maple syrup. Use ¼ cup of it as your glaze's base. Look for syrup with a rich, deep flavor. It should match the sweet potatoes and goat cheese perfectly.

  • Choose dark amber maple syrup for deeper flavor
  • Measure precisely to maintain perfect consistency
  • Warm the syrup slightly to help it blend smoothly

Adding Complementary Spices

Spices make your maple glaze truly special. Here are some great additions:

  1. 2 tablespoons fresh thyme for herbal notes
  2. 1 ½ teaspoons smoked paprika for depth
  3. 1 ½ teaspoons dried garlic for complexity
  4. 1 ½ teaspoons dried onion for subtle sweetness

When making your maple-candied goat cheese topping, mix these spices into the syrup. This creates a glaze that's both complex and balanced. It's made to enhance your roasted sweet potatoes.

Pro tip: Taste your glaze before applying. The goal is a balanced blend that enhances without overwhelming the natural sweetness of the potatoes.

Step-by-Step Roasting Process

Roasting sweet potatoes for your goat cheese sweet potato hash needs care. Preheat your oven to 425˚F. This temperature gives a golden-brown outside and a creamy inside. Choose 1 ½ lbs of sweet potatoes, about two medium or three small ones.

Getting ready is crucial for tasty results. Here's what to do:

  • Wash and scrub sweet potatoes well
  • Cut potatoes into uniform 1-inch cubes for even roasting
  • Toss cubes with olive oil, salt, and pepper
  • Spread potatoes in a single layer on a baking sheet

Spacing is important when roasting for a goat cheese sweet potato hash. Make sure each potato piece has room to crisp up. Leave at least a half-inch between cubes to prevent steaming and promote caramelization.

Roast your sweet potatoes for about 30 minutes, flipping them halfway. This method ensures crispy edges and tender centers. Your sweet potatoes are done when they're golden brown and can be easily pierced with a fork.

"Perfect roasting transforms simple sweet potatoes into a culinary masterpiece."

Pro tip: If you're making a goat cheese sweet potato hash, try par-roasting the potatoes. This step allows for more cooking and flavor when mixing ingredients later.

Making the Goat Cheese Topping

Creating the perfect goat cheese topping is key to making your maple goat cheese sweet potatoes stand out. The right mix of creamy cheese and herbs can turn a simple dish into a masterpiece.

Selecting the Perfect Goat Cheese

When picking goat cheese for your topping, keep these points in mind:

  • Texture: Choose soft, creamy goat cheese that crumbles well
  • Flavor intensity: Mild to medium-aged goat cheese is best
  • Freshness: Pick cheese with a bright, clean taste

Herb and Seasoning Combinations

Enhance your dish with these herb pairings:

  • Fresh thyme: Adds earthy undertones
  • Chopped chives: Provides a subtle onion-like flavor
  • Cracked black pepper: Brings a gentle heat
  • Finely chopped rosemary: Introduces a pine-like aroma

To prepare, crumble 2 ounces of soft goat cheese into small pieces. Sprinkle herbs and seasonings over warm roasted sweet potatoes. The heat will soften the cheese and release the herbs' oils.

Pro tip: Warm the goat cheese with a bit of maple syrup before crumbling. This makes a luxurious topping that melts well over the sweet potatoes.

Assembling Your Maple Goat Cheese Sweet Potatoes

To make perfect goat cheese stuffed sweet potatoes, you need to pay attention to detail. First, take your roasted sweet potatoes out of the oven. Make sure they're soft and golden.

Here's how to turn your sweet potatoes into a tasty dish:

  • Carefully slice the roasted sweet potatoes lengthwise
  • Gently create a small cavity for the goat cheese filling
  • Drizzle the maple glaze evenly across the potato surface
  • Crumble fresh goat cheese generously over the top

For a fancy look, try these tips:

  1. Use a fork to create texture in the goat cheese topping
  2. Sprinkle chopped walnuts for added crunch
  3. Garnish with fresh herbs like thyme or rosemary

Put the sweet potatoes back in the oven for 8-10 more minutes. This step makes the goat cheese warm and the maple glaze caramelized. It adds a rich flavor that will wow your guests.

Pro tip: For a more indulgent version, fully stuff the sweet potatoes with the goat cheese mixture before the final bake.

Tips for Achieving the Perfect Texture

To make the perfect sweet potato goat cheese gratin, you need to get both crispy edges and creamy centers right. The right techniques can turn your dish into something amazing. It makes every bite a joy to eat.

Getting the texture just right starts with how you prepare and cook it. Your dish's success depends on paying close attention to detail and using the right cooking methods.

Getting Crispy Edges

To get those irresistible crispy edges, follow these tips:

  • Use a spacious baking sheet to prevent overcrowding
  • Spread sweet potato pieces in a single layer
  • Drizzle with olive oil to enhance crispiness
  • Broil for 2-3 minutes at the end of cooking

Maintaining Creamy Centers

To balance crispy exteriors with creamy interiors, you need to control the temperature:

  • Roast at 400°F (200°C) for consistent cooking
  • Cut sweet potatoes into uniform ½ to 1-inch pieces
  • Toss sweet potatoes midway through cooking
  • Add goat cheese during the last 5-10 minutes

When you master these techniques, your sweet potato goat cheese gratin will be a true masterpiece. The secret is to have a nice contrast between the crispy edges and the creamy center.

Serving Suggestions and Pairings

Your maple goat cheese sweet potatoes are perfect for many meals. They can make any meal special. Try different ways to serve them to bring out their rich flavors.

Main Course Companions

Pair your sweet potato goat cheese salad with dishes that match its taste:

  • Roasted chicken with herb seasoning
  • Grilled salmon with lemon butter
  • Slow-cooked beef tenderloin
  • Vegetarian quinoa stuffed peppers

Garnishing and Presentation

Make your dish look amazing with these garnishes:

  • Sprinkle fresh thyme or rosemary
  • Drizzle additional maple syrup
  • Add toasted nuts like pistachios or pecans
  • Scatter microgreens for color

Creative Leftover Ideas

Turn your leftover sweet potato goat cheese salad into new dishes. Chop the potatoes and mix with fresh arugula for a tasty lunch. Add extra goat cheese and balsamic glaze for more flavor.

Beverage Pairings

Choose drinks that match your dish's sweet and savory flavors:

  • Crisp white wine like Sauvignon Blanc
  • Light-bodied Pinot Noir
  • Sparkling apple cider
  • Herbal iced tea

Storage and Reheating Guidelines

Store your maple goat cheese sweet potatoes in an airtight container in the fridge for up to 4 days. To make a tasty goat cheese sweet potato hash, just reheat your leftovers. It's perfect for a quick breakfast or side dish.

When reheating, be gentle to keep the dish's texture great. Warm the sweet potatoes in the oven at 350 degrees F. This method keeps the edges crispy and the center creamy. You can also freeze the hash for up to 2 months in a freezer-safe container.

Pro tip: Store the goat cheese and sweet potatoes separately to avoid a soggy texture. When you're ready to eat, sprinkle fresh goat cheese over the sweet potatoes. Your dish will taste as good as when you first made it.

Proper storage is crucial to enjoy your maple goat cheese sweet potatoes many times. Whether you're prepping meals or saving leftovers, these tips will keep your dish delicious and fresh.

FAQ

Can I make maple goat cheese sweet potatoes ahead of time?

Yes! Prepare the roasted sweet potatoes and maple glaze ahead. Store them in the fridge separately. Assemble just before serving for the best taste and texture. Reheat the sweet potatoes in the oven and top with fresh goat cheese.

What type of goat cheese works best for this recipe?

Choose a creamy, mild goat cheese that crumbles easily. Fresh, soft goat cheese is perfect for its tangy taste. For a stronger flavor, try an aged goat cheese.

Are there any dairy-free alternatives for the goat cheese?

Use cashew cheese or a plant-based cheese alternative for a dairy-free option. These alternatives offer a creamy texture and complement the sweet potatoes.

How do I prevent my sweet potatoes from becoming mushy?

Use high heat and give them space on the baking sheet. Cut them into uniform pieces and pat dry before roasting. Avoid overcrowding to get crispy edges and a tender inside.

Can I use other types of syrup instead of maple syrup?

You can use honey or agave nectar as substitutes. But, maple syrup's unique flavor is best for this dish. It pairs well with the roasted sweet potatoes and goat cheese.

How long can I store leftover maple goat cheese sweet potatoes?

Store leftovers in an airtight container in the fridge for 3-4 days. Keep the sweet potatoes and goat cheese separate. Reheat in the oven to keep the texture crispy.

What are some variations I can try with this recipe?

Be creative! Try a sweet potato goat cheese hash for breakfast or a salad. Stuff roasted sweet potatoes with maple-glazed goat cheese. Experiment with herbs and spices in the glaze.

Is this dish suitable for special diets?

Yes, it's adaptable for many diets. It's gluten-free and can be vegetarian. For a vegan version, use plant-based cheese and maple syrup. For less sugar, use a sugar-free maple syrup.

Print

maple goat cheese sweet potatoes

maple goat cheese sweet potatoes
Print Recipe
Pin Recipe

5 Stars 4 Stars 3 Stars 2 Stars 1 Star

No reviews

A deliciously sweet and savory dish featuring roasted sweet potatoes drizzled with maple syrup, crunchy toasted walnuts, and creamy goat cheese. Perfect as a side dish for any occasion!

  • Author: grace bellamy
  • Prep Time: 10 minutes
  • Cook Time: 30 minutes
  • Total Time: 40 minutes
  • Yield: Side Dish
  • Category: Roasting
  • Method: American
  • Cuisine: American
  • Diet: Vegetarian

Ingredients

  • 🥔 4 medium sweet potatoes, peeled and cubed
  • 🫒 2 tablespoon olive oil
  • 🧂 Salt and pepper to taste
  • 🍁 ¼ cup maple syrup
  • 🌰 ½ cup walnuts, chopped
  • 🧀 4 oz goat cheese, crumbled
  • 🌿 1 tablespoon fresh thyme (optional)

Instructions

1️⃣ Preheat oven to 400°F (200°C). Line a baking sheet with parchment paper.
2️⃣ Toss sweet potato cubes in olive oil, salt, and pepper. Spread in a single layer on the baking sheet.
3️⃣ Roast for 25-30 minutes, turning halfway, until tender and slightly caramelized.
4️⃣ While potatoes roast, toast walnuts in a skillet over medium heat for 3-4 minutes.
5️⃣ Once sweet potatoes are done, drizzle with maple syrup, sprinkle with walnuts, and top with crumbled goat cheese.
6️⃣ Garnish with fresh thyme and serve. Enjoy! 😋

Notes

  • You can substitute goat cheese with feta for a tangier flavor.
  • Add a pinch of cinnamon for extra warmth and depth.
  • For a crunchier texture, roast the walnuts with a bit of honey.

Did you make this recipe?

Share a photo and tag us — we'd love to see your creation!

Recipe

Irresistibly Creamy Tomato Rigatoni Pasta in Just 25 Minutes

February 20, 2025 by grace bellamy Leave a Comment

I still remember the first rainy evening I decided to whip up a comforting meal that would embrace me like a warm hug. I wanted something quick yet indulgent, a dish that would transform my kitchen into a cozy Italian bistro. That's when I stumbled upon this Creamy Tomato Rigatoni Pasta recipe, and it quickly stole my heart. With tender rigatoni noodles coated in a rich, velvety tomato sauce, every bite is a satisfying blend of flavors and nostalgia.

What makes this dish even more special is how effortlessly it comes together in just 25 minutes—ideal for those whirlwind weeknights when takeout is far too tempting. Plus, it's vegetarian-friendly, making it a hit with everyone at the table. Whether you're feeding the family or treating yourself after a long day, this dish is guaranteed to bring smiles and happy bellies. So, let’s dive into creating this creamy delight that’s sure to inspire a love for homemade meals once again!

Why is Creamy Tomato Rigatoni Pasta a must-try?

Quick and Easy: This delightful pasta dish comes together in just 25 minutes—perfect for busy weeknights.

Rich, Comforting Sauce: The combination of heavy cream and flavorful tomato sauce creates a dangerously delicious blend that clings to every bite.

Vegetarian-Friendly: Everyone can enjoy this comforting meal, making it an excellent choice for family dinners.

Versatile Ingredients: With simple pantry staples, you can easily customize this recipe by adding your favorite proteins or veggies.

Crowd-Pleaser: Impress your family or guests with this cozy, satisfying dish; they’ll absolutely love it!

For a similar quick and delightful dinner option, check out our One Pot Creamy Sun Dried Tomato Pasta.

Creamy Tomato Rigatoni Pasta Ingredients

• Here’s everything you need for this delectable dish!

For the Pasta

  • Rigatoni Pasta – Use dry rigatoni for the perfect pasta base; it can be swapped for penne, fusilli, or rotini.

For the Saucy Goodness

  • Salted Butter – Adds richness and enhances the depth of flavor in the sauce.
  • Onion – Provides savory depth; finely dice to soften evenly.
  • Garlic – Essential for aromatic flavor; fresh, minced garlic is preferred (3-4 cloves).
  • Salt – Key for seasoning both the sauce and the pasta water.
  • Italian Seasoning – Infuses delightful Italian flavors into the dish.
  • Crushed Red Pepper Flakes – Adds the perfect heat; adjust according to taste, or omit for a milder dish.
  • Black Pepper – For seasoning; fresh-ground is always best!
  • All-Purpose Flour – Helps thicken the sauce while creating a roux for a creamy finish.
  • Heavy Cream – Creates that irresistible creamy texture; can be substituted with half-and-half for a lighter sauce.
  • Tomato Pasta Sauce – Use your favorite marinara or tomato sauce for a burst of flavor.
  • Parmesan Cheese – Freshly grated cheese adds that salty, umami finish that ties everything together.

Full measurements are in the recipe card below.

How to Make Creamy Tomato Rigatoni Pasta

  1. Cook the Rigatoni: Bring a large pot of salted water to a rolling boil. Add the dry rigatoni and cook until al dente, following the package instructions, usually about 10-12 minutes. Drain and set aside.
  2. Sauté Onions and Garlic: In a large skillet, melt the salted butter over medium heat. Add finely diced onion and cook until soft and translucent, about 3-4 minutes. Stir in minced garlic, salt, Italian seasoning, crushed red pepper flakes, and black pepper, cooking for 1 minute—keep an eye on the garlic to avoid burning.
  3. Thicken the Sauce: Sprinkle the all-purpose flour into the skillet, stirring continuously until no white flour remains, about 1-2 minutes. Gradually pour in the heavy cream and tomato pasta sauce, stirring to combine. Let the mixture simmer until it thickens slightly, about 3-4 minutes.
  4. Combine and Finish: Reserve 1 cup of the pasta water before draining the rigatoni. Add the drained pasta to the sauce in the skillet. Mix well, adding reserved pasta water a little at a time to reach your desired sauce consistency.
  5. Serve: Plate the creamy pasta, topping each serving with freshly grated Parmesan cheese. Enjoy this comforting dish hot!

Optional: Garnish with fresh basil for an aromatic touch.

Exact quantities are listed in the recipe card below.

Expert Tips for Creamy Tomato Rigatoni Pasta

• Cook Pasta Perfectly: Aim for al dente rigatoni to ensure it holds its shape and absorbs the creamy sauce beautifully.

• Watch the Garlic: Sauté garlic until fragrant, but don’t let it burn; burnt garlic can turn the dish bitter.

• Adjust for Creaminess: For a lighter sauce, consider substituting heavy cream with half-and-half, maintaining flavor without the richness.

• Pasta Water Magic: Reserve pasta water before draining; it’s perfect for adjusting sauce consistency, ensuring it clings to the rigatoni.

• Customize Flavor: Feel free to add your favorite proteins or vegetables to the Creamy Tomato Rigatoni Pasta for extra nutrition and taste!

What to Serve with Creamy Tomato Rigatoni Pasta?

Elevate your weeknight dinner with delightful sides that complement this creamy delight perfectly!

  • Garlic Bread: The crunchy, buttery flavor of garlic bread is irresistible alongside this rich pasta, perfect for scooping up every bite.
  • Roasted Green Beans: Fresh green beans bring a crisp, vibrant contrast to the creamy sauce, adding color and nutrition to your meal.
  • Caesar Salad: A refreshing Caesar salad, with its crisp romaine, parmesan, and tangy dressing, balances the richness of the rigatoni beautifully.
  • Air Fryer Pork Tenderloin: Juicy, herb-seasoned pork tenderloin offers a flavorful protein option that pairs wonderfully with the creamy pasta, satisfying the heartiest of appetites.
  • Sautéed Spinach: Lightly sautéed spinach adds a touch of earthy flavor and vibrant green hues, creating a lovely plate that feels wholesome and fulfilling.
  • Italian Red Wine: A glass of Chianti or Sangiovese enhances the Italian experience, pairing exquisitely with the layered flavors of the creamy tomato sauce.
  • Lemon Sorbet: For dessert, a light, zesty lemon sorbet cleanses the palate after the richness of the pasta, making every bite feel refreshing.
  • Baked Chicken Breast: Tender and seasoned chicken breast serves as a perfect contrast to the creaminess of the pasta, offering a savory addition to your plate.

These combinations not only make your meal unforgettable but also create a cozy dining experience that everyone will love!

Creamy Tomato Rigatoni Pasta Variations

Get ready to explore delicious ways to personalize this pasta dish and make it uniquely yours!

  • Gluten-Free: Swap out the rigatoni for a gluten-free pasta alternative like brown rice or chickpea pasta for a similar texture.
  • Dairy-Free: Use coconut cream or cashew cream in place of heavy cream to maintain a creamy texture without dairy, perfect for lactose intolerance.
  • Protein Boost: Add cooked chicken, shrimp, or sautéed mushrooms for a heartier meal that still focuses on rich flavors.
  • Veggie-Loaded: Toss in some spinach or zucchini for extra nutrition and color; they’ll add a delightful freshness to the dish.
  • Spicy Kick: Mix in diced jalapeños or a splash of your favorite hot sauce to ignite some heat, creating a zesty twist on the original recipe.
  • Smoky Flavor: Stir in some smoked paprika or roasted red pepper puree for a deeper, more complex taste that tantalizes the palate.
  • Herbaceous Twist: Fresh herbs make everything better! Add a handful of chopped basil, parsley, or oregano to enhance the aroma and flavor.
  • Cheesy Delight: Experiment with different cheeses like mascarpone or blue cheese for unique richness that elevates the dish.

No matter your taste, these variations will make your Creamy Tomato Rigatoni Pasta even more irresistible!

How to Store and Freeze Creamy Tomato Rigatoni Pasta

Fridge: Store leftover creamy tomato rigatoni pasta in an airtight container for up to 4-5 days. Reheat gently on the stove or in the microwave, adding a splash of milk or cream to restore creaminess.

Freezer: Avoid freezing creamy tomato rigatoni, as it can negatively affect the sauce's texture, resulting in separation.

Reheating: For best results, reheat in a skillet over low heat, stirring until warmed through. If the sauce seems thick, add a little reserved pasta water to loosen it up.

Serving Fresh: Enjoy this delightful dish fresh for the best flavor and texture, ideally made in smaller portions to minimize leftovers!

Creamy Tomato Rigatoni Pasta Recipe FAQs

What sauce goes with rigatoni pasta?
Rigatoni pairs beautifully with a variety of sauces, but for my Creamy Tomato Rigatoni Pasta, a rich tomato sauce is the star. You can use marinara or any favorite tomato pasta sauce, adding cream to create that luscious, velvety texture. The creaminess beautifully clings to the pasta shapes, making each bite irresistible!

What cream is best for rigatoni?
I recommend using heavy cream for the richest flavor in your Creamy Tomato Rigatoni Pasta. However, if you prefer a lighter option, half-and-half works wonderfully too! Just keep in mind that the richness of heavy cream contributes to the overall creaminess, so if you switch to half-and-half, your sauce will be a bit lighter, but still satisfying.

Can I use rigatoni for Alfredo?
Absolutely! Rigatoni is a fantastic choice for Alfredo sauce as its shape beautifully holds onto the creamy sauce. The ridges make every bite flavorful, ensuring that each forkful is a delight. If you're in the mood for something ultra-rich, try combining it with a homemade Alfredo sauce for a decadent twist!

How should I store leftover creamy tomato rigatoni?
To store leftover Creamy Tomato Rigatoni Pasta, place it in an airtight container in the refrigerator for up to 4-5 days. When reheating, I suggest warming it on the stove over low heat and adding a splash of milk or cream. This enhances the creaminess that might diminish during storage and helps bring the textures back to life!

What are common troubleshooting tips for creamy sauces?
If your sauce appears too thick or clumpy while making Creamy Tomato Rigatoni Pasta, don't fret! Simply add reserved pasta water incrementally, stirring to combine until you reach your desired consistency. Also, ensure you're not burning the garlic or flour while sautéing, as it can lead to bitterness. If this happens, starting fresh with a clean pan may be the best bet.

Can I adjust the recipe for dietary considerations?
Absolutely! You can make variations to suit your dietary preferences easily. For a dairy-free version, try using a plant-based cream alternative, like coconut cream or cashew cream. And if you're managing allergies, just make sure to review your sauce and pasta labels carefully. Rigatoni is generally egg-free, so it should work for most vegetarian diets!

Print

Irresistibly Creamy Tomato Rigatoni Pasta in Just 25 Minutes

Creamy Tomato Rigatoni Pasta
Print Recipe
Pin Recipe

5 Stars 4 Stars 3 Stars 2 Stars 1 Star

No reviews

I still remember the first rainy evening I decided to whip up a comforting meal that would embrace me like a warm hug. I wanted something quick yet indulgent, a dish that would transform my kitchen into a cozy Italian bistro. That's when I stumbled upon this Creamy Tomato Rigatoni Pasta recipe, and it quickly stole my heart. With tender rigatoni noodles coated in a rich, velvety tomato sauce, every bite is a satisfying blend of flavors and nostalgia.

  • Author: grace bellamy
  • Prep Time: 10 minutes
  • Cook Time: 15 minutes
  • Total Time: 25 minutes
  • Yield: 4 servings 1x
  • Category: Dinner
  • Method: Stovetop
  • Cuisine: Italian
  • Diet: Vegetarian

Ingredients

Scale
  • 12 ounces dry rigatoni pasta
  • 2 tablespoons salted butter
  • 1 onion, finely diced
  • 3-4 cloves garlic, minced
  • 1 teaspoon salt
  • 1 teaspoon Italian seasoning
  • ½ teaspoon crushed red pepper flakes
  • ½ teaspoon black pepper
  • 2 tablespoons all-purpose flour
  • 1 cup heavy cream
  • 2 cups tomato pasta sauce
  • ½ cup freshly grated Parmesan cheese

Instructions

  1. Cook the Rigatoni: Bring a large pot of salted water to a rolling boil. Add the dry rigatoni and cook until *al dente*, following the package instructions, usually about 10-12 minutes. Drain and set aside.
  2. Sauté Onions and Garlic: In a large skillet, melt the salted butter over medium heat. Add finely diced onion and cook until soft and translucent, about 3-4 minutes. Stir in minced garlic, salt, Italian seasoning, crushed red pepper flakes, and black pepper, cooking for 1 minute—keep an eye on the garlic to avoid burning.
  3. Thicken the Sauce: Sprinkle the all-purpose flour into the skillet, stirring continuously until no white flour remains, about 1-2 minutes. Gradually pour in the heavy cream and tomato pasta sauce, stirring to combine. Let the mixture simmer until it thickens slightly, about 3-4 minutes.
  4. Combine and Finish: Reserve 1 cup of the pasta water before draining the rigatoni. Add the drained pasta to the sauce in the skillet. Mix well, adding reserved pasta water a little at a time to reach your desired sauce consistency.
  5. Serve: Plate the creamy pasta, topping each serving with freshly grated Parmesan cheese. Enjoy this comforting dish hot!

Notes

  • Aim for *al dente* rigatoni to ensure it holds its shape and absorbs the creamy sauce beautifully.
  • Sauté garlic until fragrant, but don’t let it burn; burnt garlic can turn the dish bitter.
  • For a lighter sauce, consider substituting heavy cream with half-and-half, maintaining flavor without the richness.
  • Reserve pasta water before draining; it’s perfect for adjusting sauce consistency, ensuring it clings to the rigatoni.
  • Feel free to add your favorite proteins or vegetables to the Creamy Tomato Rigatoni Pasta for extra nutrition and taste!

Nutrition

  • Serving Size: 1 cup
  • Calories: 450
  • Sugar: 4g
  • Sodium: 800mg
  • Fat: 25g
  • Saturated Fat: 15g
  • Unsaturated Fat: 6g
  • Trans Fat: 0g
  • Carbohydrates: 52g
  • Fiber: 3g
  • Protein: 12g
  • Cholesterol: 60mg

Did you make this recipe?

Share a photo and tag us — we'd love to see your creation!

Recipe

Marry Me Chicken Recipe

February 17, 2025 by grace bellamy Leave a Comment

Marry Me Chicken Recipe: A Creamy Italian Dinner Hit

A creamy, indulgent Italian-inspired chicken dish, prepared with a rich sauce of garlic, sun-dried tomatoes, and parmesan, set against a backdrop of a rustic, wooden table.

The chicken breasts are seared to a golden-brown perfection, nestled in a bed of al dente pasta, garnished with fresh basil and a sprinkle of parmesan.

Soft, diffused lighting illuminates the scene, casting a warm, inviting glow on the delectable meal. The composition captures the essence of the "Marry Me Chicken Recipe" - a comforting, flavorful dish that is sure to impress and delight.

Ever found a chicken recipe that could make someone propose? Welcome to Marry Me Chicken, the viral hit sweeping the U.S. It's more than just a recipe; it's a love story in your kitchen.

Delish created this recipe in 2016. It turns simple weeknight meals into special dining moments. Picture golden chicken in a rich cream sauce, with sun-dried tomatoes and parmesan. It's a dish that promises romance with every bite.

So, what's the magic of Marry Me Chicken? It's a mix of easy prep and indulgent taste. Prep takes just 15 minutes, and cooking is 30 minutes. You'll make a meal that rivals restaurants. It's perfect for impressing someone special or treating yourself.

Ready to learn the secrets of this viral chicken recipe? It's been all over social media and dinner tables. Your cooking journey begins here!

The Origin Story Behind This Viral Chicken Sensation

What makes a simple chicken dish turn into a romantic favorite? The Marry Me Chicken recipe has won over many food enthusiasts. It has become a topic of conversation for dinner dates. This dish came to life through a mix of creativity in the kitchen and social media's power.

A cozy Italian kitchen with warm lighting and rustic decor. In the foreground, a chef in a white apron skillfully prepares a dish, their face obscured as they carefully coat chicken in a rich, creamy sauce. Surrounding them, various ingredients like herbs, garlic, and tomatoes are scattered on the wooden countertop. In the background, a large window overlooks a picturesque Italian countryside, hinting at the origins of this beloved dish. The scene conveys a sense of culinary passion, tradition, and the story behind the "Marry Me Chicken" recipe.

How Delish Created the Original Recipe

In 2016, Lindsay Funston, an editor at Delish, made a romantic chicken dish. It quickly became a hit with its irresistible combination of flavors. The dish's standout features include:

  • Creamy sauce with sun-dried tomatoes
  • Rich Parmesan cheese
  • Aromatic herbs like basil and oregano

"I'd marry you for that chicken!" became the playful catchphrase that launched a thousand dinner dates.

The New York Times Recognition

The Marry Me Chicken recipe hit new heights when The New York Times named it their most popular in 2023. This recognition turned the dish into a culinary sensation.

Social Media Impact and Popularity

TikTok was key in making this easy chicken recipe famous. Young cooks shared their experiences, making it a symbol of love. The recipe's viral success shows that food can be a universal language of love.

From its start to becoming a cultural icon, Marry Me Chicken shows how a simple recipe can inspire food lovers worldwide.

Essential Ingredients for the Perfect Marry Me Chicken Recipe

A neatly arranged still life featuring the essential ingredients for the perfect Marry Me Chicken recipe. In the foreground, delicate sprigs of fresh thyme and rosemary, alongside a pile of succulent chicken thighs. In the middle ground, a glass jar of rich, creamy Parmesan cheese, a golden-hued jar of honey, and a bottle of aromatic balsamic vinegar. The background is a soft, neutral backdrop, allowing the vibrant colors and textures of the ingredients to take center stage. Soft, warm lighting casts a inviting glow, setting the mood for a cozy, romantic dinner.

Starting a date night with the right ingredients can make it unforgettable. The Marry Me Chicken recipe needs top-notch parts to make a dish that feels like it came from a fancy restaurant.

Here's what you'll need for your special chicken dish:

  • 3 large boneless, skinless chicken breasts
  • 3 minced garlic cloves for robust flavor
  • ⅓ cup sun-dried tomatoes for intense depth
  • 1 cup heavy cream for luxurious texture
  • ½ cup grated parmesan cheese
  • Fresh herbs: thyme and basil

The secret to a great date night meal is in the ingredients. Fresh, high-quality components can turn a simple dish into a masterpiece. Look for plump chicken breasts, about ¼ inch thick, for even cooking and the best flavor.

"Great cooking is about ingredients and how you combine them." - Wolfgang Puck

Pro tip: Use sun-dried tomatoes in olive oil for more flavor. Choose herbs that are fresh and fragrant. This will make your chicken dish a hit with everyone's taste buds.

Kitchen Equipment and Preparation Tips

Creating the perfect anniversary chicken special is more than just great ingredients. The right tools and techniques make your chicken recipes for couples stand out. Let's explore the essential equipment and preparation tips that will elevate your cooking.

Preparing Marry Me Chicken is an art that needs precision and the right kitchen tools. Your success in cooking depends on choosing the right cookware and mastering temperature control.

Required Cookware

For the ultimate chicken recipe, you'll need:

  • A large oven-safe skillet (12-inch recommended)
  • Sharp chef's knife
  • Meat tenderizer or rolling pin
  • Measuring cups and spoons
  • Wooden spoon or silicone spatula

Temperature Control Essentials

"Cooking is all about control - specially temperature control!" - Professional Chef

To get restaurant-quality results, follow these temperature guidelines:

  1. Preheat skillet to medium-high heat
  2. Aim for 165°F internal chicken temperature
  3. Use a digital meat thermometer for accuracy
  4. Let chicken rest 3-5 minutes after cooking

Timing and Organization Tips

Efficient preparation is crucial for anniversary chicken specials. Organize ingredients before starting and work systematically. Make sure chicken breasts are pounded to ¼-inch thickness for even cooking. Prep time is about 15 minutes, with total cooking time around 30 minutes.

Pro tip: Have all ingredients measured and ready before cooking. This ensures a smooth, stress-free cooking experience for couples enjoying their culinary adventure together.

Creating the Perfect Chicken Base

Turning regular chicken into a standout dish begins with a key technique. For memorable chicken dinners, focus on how you prepare your chicken breast.

Start with top-notch chicken breasts - about 650 grams or 4 pieces of skinless, boneless meat. The secret to wowing guests is in the seasoning and searing.

  • Pat the chicken dry with paper towels
  • Season generously with salt and pepper
  • Dredge each piece in 50 grams of plain flour
  • Ensure even coating for consistent browning

Heat 1 tablespoon of olive oil in a heavy skillet until it shimmers. Aim for a golden-brown crust that seals in flavor and texture. Sear each chicken breast for about 5 minutes per side, until it reaches 74°C (165°F) inside.

Pro tip: Don't move the chicken while searing. Let it get a rich, caramelized exterior. This will be the base of your amazing dish.

Perfect chicken preparation is the secret to elevating home-cooked meals from ordinary to extraordinary.

Mastering the Signature Cream Sauce

The heart of any marry me chicken recipe is its creamy sauce. This sauce can turn your chicken dinner into something special. It combines rich flavors that will win over everyone at the table.

Combining Ingredients with Precision

To make the ultimate sauce, focus on these key ingredients:

  • 1 cup heavy cream
  • ½ cup chicken broth
  • ½ cup grated parmesan cheese
  • ½ cup chopped sun-dried tomatoes
  • 3 minced garlic cloves

Achieving the Perfect Consistency

For a smooth sauce, use gentle heat and stir constantly. Start by sautéing garlic until it smells great. Then, slowly add the cream and broth while stirring.

Let it simmer just enough to thicken without burning.

Troubleshooting Sauce Challenges

Stressed about lumpy or separated sauce? Here are quick fixes:

  1. Use low to medium heat
  2. Whisk continuously
  3. Add cheese gradually
  4. Remove from heat if sauce starts to separate

Pro tip: The ideal sauce should coat the back of a spoon smoothly and have a rich, creamy texture that clings to your chicken.

Step-by-Step Cooking Instructions

Making this romantic chicken dish is easier than you think. Your Marry Me Chicken will be ready in just 35 minutes. It's perfect for a quick yet impressive meal.

  1. Start by seasoning 2 chicken breasts with salt and pepper
  2. Dredge chicken in flour, ensuring an even coating
  3. Heat 1½ tablespoons of olive oil in a large skillet
  4. Sear chicken for 3-4 minutes per side until golden brown
  5. Remove chicken and set aside

For the sauce, pay close attention to detail. In the same skillet, sauté minced garlic and shallots for 4-5 minutes. This step builds a flavor base for your dish.

  • Add sun-dried tomatoes
  • Incorporate chicken broth
  • Stir in cream cheese
  • Pour in half-and-half for creamy texture

Return the chicken to the skillet and let it simmer in the sauce for 1-2 minutes. This ensures the chicken is fully cooked and soaks up all the flavors. The result? A delicious meal that could make someone propose!

Pro tip: Serve over pasta or with a side of roasted vegetables to complete this restaurant-quality easy chicken recipe.

The Role of Sun-Dried Tomatoes and Fresh Herbs

Sun-dried tomatoes and fresh herbs are game-changers for your chicken dishes. They add depth and vibrant flavors that make Marry Me Chicken unforgettable.

Sun-dried tomatoes pack a sweet and tangy punch. They pair perfectly with creamy sauces, adding a touch of sophistication. This makes your dish feel like it's from a fancy restaurant.

Selecting Quality Ingredients

Choosing the right ingredients is key for a great chicken meal:

  • Go for sun-dried tomatoes in olive oil for the best taste
  • Choose fresh herbs that are bright and fresh
  • Opt for organic herbs for a stronger flavor
  • Avoid sun-dried tomatoes with preservatives

Proper Storage Methods

Keep your ingredients fresh with these storage tips:

  • Store sun-dried tomatoes in their oil in the fridge
  • Wrap herbs in damp paper towels
  • Put herbs in a sealed container in the fridge
  • Use herbs within 5-7 days for the best taste

"Great cooking is about ingredients and how you combine them." - Wolfgang Puck

By picking and storing these ingredients well, your chicken dishes will always impress with their flavor.

Wine Pairing and Serving Suggestions

Make your anniversary chicken specials even better with the right wine and serving style. The perfect wine can turn your chicken recipes for couples into a special dinner.

Dry white wines go great with Marry Me Chicken's creamy, savory taste. Here are some great picks:

  • Chardonnay - A classic choice with buttery undertones
  • Pinot Grigio - Light and crisp, perfect for cutting through the rich sauce
  • Sauvignon Blanc - Offers a zesty contrast to the dish

There are many ways to serve this tasty chicken dish:

  1. Over al dente pasta for a classic Italian-inspired meal
  2. Alongside creamy mashed potatoes
  3. With roasted seasonal vegetables
  4. Paired with a fresh garden salad

For a romantic dinner, try plating the chicken with fresh herbs and a glass of chilled white wine. This can make your meal unforgettable.

Pro tip: Serve your Marry Me Chicken slightly warm to maximize the sauce's creamy texture and flavor intensity.

Make-Ahead and Storage Guidelines

Planning intimate chicken dinners just got easier with the Marry Me Chicken recipe. You can prepare this dish in advance. It's perfect for busy weeknights or when you want to impress guests without stress.

Store your chicken masterpiece in an airtight container in the fridge for up to 3 days. When you're ready, reheating is easy. Warm it in a low-heat oven at 300 degrees F for 5-10 minutes. Or, use the microwave in 30-second increments until it's hot.

Pro tip: To keep the sauce creamy, add a splash of chicken stock or cream when reheating. This prevents the sauce from getting too thick. With these tips, your Marry Me Chicken will stay delicious.

FAQ

What makes Marry Me Chicken so special?

Marry Me Chicken is a dish that's so tasty, it might even inspire a proposal. It combines seared chicken, sun-dried tomatoes, and a creamy sauce. This mix creates a meal that's sure to wow anyone.

How difficult is this recipe to make?

Making this chicken recipe is easy, even for beginners. The steps are simple, making it great for a special dinner at home.

What kind of skillet should I use?

Use a cast-iron or heavy stainless steel skillet. They distribute heat well and help sear the chicken perfectly.

Can I make Marry Me Chicken ahead of time?

Yes, you can make it ahead and refrigerate it. Just reheat it gently to keep the sauce creamy and the chicken moist.

What wines pair well with this dish?

Chardonnay or Pinot Grigio white wines pair well with the creamy sauce. For red, a light Pinot Noir complements the dish's rich flavors.

Are sun-dried tomatoes essential to the recipe?

Sun-dried tomatoes add a unique flavor to the dish. But, you can use roasted red peppers as a substitute if needed.

How long does it take to prepare Marry Me Chicken?

It takes about 30-40 minutes to make, making it perfect for quick dinners or spontaneous dates.

Can I make this recipe dairy-free or gluten-free?

Yes, you can make it dairy-free by using coconut or cashew cream. Replace regular flour with cornstarch or gluten-free flour for the sauce.

What should I serve with Marry Me Chicken?

Serve it with pasta, rice, or roasted veggies. Crusty bread is also great for dipping in the sauce.

How did this recipe become so popular?

It became famous after Delish and The New York Times featured it. Its viral success comes from its delicious taste and memorable name.

Print

Marry Me Chicken Recipe

Marry Me Chicken Recipe
Print Recipe
Pin Recipe

5 Stars 4 Stars 3 Stars 2 Stars 1 Star

No reviews

“Marry Me Chicken” is a creamy, flavorful dish said to be so good it might just inspire a proposal! Chicken is simmered in a rich sauce with sundried tomatoes, garlic, and Parmesan cheese. This recipe is perfect for a romantic dinner or a special occasion.

  • Author: grace bellamy
  • Prep Time: 10 minutes
  • Cook Time: 20 minutes
  • Total Time: 30 minutes
  • Yield: 4 servings 1x
  • Category: Main Course
  • Method: Stovetop
  • Cuisine: American

Ingredients

Scale
  • 4 boneless, skinless chicken breasts
  • Salt and pepper to taste
  • 1 tablespoon olive oil
  • 2 cloves garlic, minced
  • 1 cup heavy cream
  • ½ cup chicken broth
  • ⅓ cup grated Parmesan cheese
  • ½ cup sundried tomatoes, chopped
  • 1 teaspoon dried oregano
  • ½ teaspoon red pepper flakes (optional)
  • Fresh basil or parsley for garnish

Instructions

  1. Season the chicken breasts with salt and pepper.
  2. Heat the olive oil in a large skillet over medium-high heat. Sear the chicken for 3–4 minutes per side, until golden brown. Remove and set aside.
  3. Reduce heat to medium. Add the garlic to the skillet, sautéing until fragrant (about 30 seconds).
  4. Stir in the heavy cream, chicken broth, Parmesan cheese, sundried tomatoes, oregano, and red pepper flakes. Bring the sauce to a simmer.
  5. Return the chicken to the skillet and spoon the sauce over it. Cook for 5–7 minutes, or until the chicken is cooked through and the sauce thickens.
  6. Garnish with fresh basil or parsley. Serve immediately.

Notes

  • You can substitute chicken thighs if preferred.
  • Adjust the spice level by adding more or less red pepper flakes.
  • Serve with pasta, rice, or mashed potatoes to soak up the delicious sauce.

Did you make this recipe?

Share a photo and tag us — we'd love to see your creation!

Recipe

Crockpot Chicken Breast Recipe

February 17, 2025 by grace bellamy Leave a Comment

Easy Crockpot Chicken Recipes: 10 Set & Forget Meals

A well-lit, close-up photograph of a variety of crockpot chicken dishes on a rustic wooden table. In the foreground, a tender, juicy chicken thigh sits alongside a creamy chicken and rice casserole, while in the middle ground, a zesty lemon-garlic chicken stew bubbles in a ceramic crockpot.

The background features a selection of fresh herbs, whole garlic cloves, and a cutting board with a knife, conveying the homemade, wholesome nature of these set-and-forget meals.

The lighting is soft and inviting, casting a warm glow over the scene and highlighting the mouthwatering textures and colors of the dishes.

Imagine coming home after a long day to a kitchen filled with the mouthwatering aroma of perfectly cooked chicken. These crockpot chicken recipes make dinner easy and delicious. Slow cooker chicken dishes will make your meal prep simple and stress-free.

Busy home cooks rejoice! We've gathered 10 amazing crockpot chicken recipes that need little prep but pack a big flavor punch. Most of these slow cooker chicken dishes require just 15 minutes of prep. This lets you spend more time with your family.

These recipes cover a wide range of cuisines and flavors. From Mexican-inspired tacos to creamy comfort soups, there's something for everyone. Each dish is designed to be easy to make, with set-and-forget cooking that brings restaurant-quality meals to your kitchen.

Whether you're an experienced cook or new to the kitchen, these crockpot chicken recipes will be your favorites.

Get ready to see how a simple slow cooker can change your weeknight dinners. We'll show you how to make delicious, healthy meals with little effort and lots of satisfaction.

Why Crockpot Chicken Recipes Are Perfect for Busy Households

crockpot chicken recipes

A cozy and inviting crockpot scene with a steaming pot of easy chicken stew, surrounded by fresh vegetables and herbs. The pot is placed on a rustic wooden table, illuminated by soft, warm lighting that casts a comforting glow. In the background, a blurred view of a peaceful kitchen, hinting at the effortless convenience of this set-and-forget meal. The overall atmosphere evokes the simplicity and hominess of a nourishing, family-style dish, perfect for busy households seeking wholesome, hassle-free dinners.

Work, family, and daily tasks can make cooking hard. Easy chicken crockpot meals are a great fix for busy homes. They offer tasty, healthy dinners without long kitchen time.

Benefits of Slow Cooking Chicken

Slow cooking turns simple chicken into amazing meals with little effort. Healthy crockpot chicken recipes bring out great flavors and keep nutrients. This method ensures:

  • Tender, juicy meat every time
  • Enhanced flavor development
  • Reduced risk of overcooking
  • Minimal hands-on preparation

Time-Saving Advantages

Your crockpot is a kitchen helper that works while you're away. Spend just 15-20 minutes in the morning, and come home to a restaurant-quality meal. Most chicken recipes need:

  1. 3-4 hours cooking on high
  2. 6-7 hours cooking on low
  3. Minimal ingredient preparation

Cost-Effectiveness of Crockpot Cooking

"Eating well doesn't have to break the bank" - Home Cooking Wisdom

Crockpot cooking turns cheap chicken into fancy meals. A chicken breast recipe makes 6 servings and costs less than eating out. You save money and enjoy healthy, homemade meals.

Essential Tips for Perfect Crockpot Chicken Every Time

A spotlit, high-angle close-up of a rustic crockpot filled with shredded, tender chicken in a rich, aromatic sauce, surrounded by fresh herbs, garlic, and diced vegetables. The crockpot is set on a wooden surface, with a heavy-duty ladle and a side plate with a portion of the cooked chicken. Soft, warm lighting illuminates the scene, creating a cozy, homemade atmosphere. The composition emphasizes the simplicity and comfort of a well-executed crockpot chicken dish, inviting the viewer to imagine the delicious flavors and textures.

Mastering crockpot chicken recipes is easy. Just a few expert tips can turn your slow cooker chicken dishes into something amazing. Learning the secrets of slow cooking can make your meals truly delicious.

Choosing the right chicken cut is key for tasty results. Chicken thighs and leg meat are best because they stay juicy and flavorful. Here are some tips to make your crockpot chicken recipes better:

  • Cook chicken breasts for 3-4 hours on high or 4-6 hours on low
  • Ensure internal temperature reaches 165°F for safe consumption
  • Use ½ teaspoon of seasoning mix per pound of chicken
  • Layer chicken pieces strategically for optimal flavor distribution

Don't make common mistakes when cooking slow cooker chicken. Never cook chicken for over 8 hours, as it can become dry or mushy. Also, don't use frozen chicken, as it may not cook fast enough.

Pro tip: A single layer of chicken ensures even cooking and prevents potential food safety issues.

Follow these tips, and you'll make tender, flavorful crockpot chicken. It will impress your family and friends every time.

Classic Comfort: Crockpot Chicken and Dumplings

Experience the ultimate comfort food with our crockpot chicken and dumplings recipe. It turns simple ingredients into a meal that warms your soul. Your family will surely ask for more.

Best Cuts of Chicken to Use

Choosing the right chicken is key for crockpot recipes. Chicken thighs are the best choice. They are tender, flavorful, and stay juicy while cooking.

  • Boneless, skinless chicken thighs work best
  • Provide more moisture than chicken breasts
  • Absorb seasonings more effectively

Dumpling Preparation Tips

Perfect dumplings need a few tricks. You can use homemade or store-bought biscuit dough to enhance your crockpot chicken recipes.

"The secret to fluffy dumplings is not overmixing the dough and adding them at the right time." - Home Cooking Expert

  1. Cut refrigerated biscuit dough into quarters
  2. Add dumplings 30-60 minutes before serving
  3. Ensure dumplings are partially submerged in liquid

Serving Suggestions

These tips will make your crockpot chicken and dumplings a hit. Serve it with a green salad or crusty bread for a complete meal.

  • Garnish with fresh parsley
  • Serve in deep bowls for maximum comfort
  • Enjoy within 3-4 days when refrigerated

Pro tip: This recipe serves 6 and contains approximately 413 calories per serving, making it a satisfying yet reasonable meal option.

Zesty Mexican-Style Crockpot Chicken Tacos

Taco Tuesday just got a lot better with these easy chicken crockpot meals. They turn simple chicken into a flavorful feast. With just five ingredients, you can make delicious shredded chicken recipes that everyone will love.

Making these Mexican-style tacos is super easy. First, gather your ingredients:

  • 4 boneless skinless chicken breasts
  • 1 cup salsa
  • 1 cup diced tomatoes with chilies
  • 1 packet taco seasoning
  • ½ diced onion

The magic happens in your slow cooker. Put all ingredients in and let it cook. Cooking on low for 6-7 hours or high for 3-4 hours makes the chicken tender and juicy.

After cooking, shred the chicken with two forks. Let it sit in the juices for an hour. This makes the flavors even better. Serve in warm tortillas with your favorite toppings like cilantro, onions, or lime juice.

Pro tip: These zesty tacos are not just delicious but nutritious too! Each serving packs 25g of protein and only 179 calories.

Your easy chicken crockpot meal is ready to impress - minimal effort, maximum flavor!

Healthy Crockpot Chicken Recipes for Weight Management

Keeping healthy doesn't mean giving up on taste or ease. Healthy crockpot chicken recipes are a tasty way to manage weight while enjoying great meals.

Low-Carb Options for Smart Eating

Crockpot chicken breasts recipes are perfect for low-carb diets. Your slow cooker is a great tool for making healthy meals that help you reach your weight goals.

  • All recipes under 300 calories per serving
  • Average serving contains approximately 226 calories
  • 66.7% of recipes are under 250 calories

Protein-Rich Variations to Keep You Satisfied

These chicken recipes are full of protein to keep you full and energized. With about 35 grams of protein per serving, they help maintain muscle while managing weight.

Calorie-Smart Cooking Methods

Learn how to cook with less calories but more flavor. Using lean chicken breasts and smart ingredients, you can make meals that are tasty and healthy.

Pro tip: Use a programmable slow cooker to prevent overcooking and maintain optimal chicken texture.

Healthy eating is easy and fun with your slow cooker. These recipes show that you can manage weight without giving up on taste or satisfaction.

Mediterranean Inspired Slow Cooker Chicken with Artichokes

Bring the vibrant flavors of the Mediterranean to your kitchen with this delightful slow cooker chicken dish. These crockpot chicken recipes transform ordinary ingredients into an extraordinary meal. It will transport your taste buds to sunny coastal regions.

This slow cooker chicken dish combines tender chicken with tangy artichoke hearts. It creates a restaurant-worthy meal with minimal effort. The key to its success lies in layering ingredients that develop rich, complex flavors during slow cooking.

  • Prep time: 15 minutes
  • Cooking time: 4-6 hours on low heat
  • Servings: 6

Essential ingredients for this Mediterranean-inspired crockpot chicken recipe include:

  • 2 lbs chicken breast
  • 28 oz canned artichoke hearts
  • 28 oz whole tomatoes
  • ½ cup kalamata olives
  • 1 medium chopped onion
  • 1 cup low-sodium chicken broth

The magic of this dish happens in your slow cooker. Simply layer ingredients, set the temperature, and let the crockpot work its magic. Pro tip: Ensure your chicken reaches an internal temperature of 165°F for safe consumption.

A Mediterranean feast that's both nutritious and delicious, waiting right in your kitchen!

With just 322 calories per serving and a robust 32g of protein, this slow cooker chicken dish offers a healthy, flavorful meal. It's perfect for busy weeknights or weekend gatherings.

Family Favorite Crockpot BBQ Chicken

Turn your kitchen into a barbecue paradise with this crockpot chicken recipe. It offers restaurant-quality flavor without needing a grill. These recipes are ideal for busy families seeking an easy, tasty meal.

Your family will adore the tender, flavorful BBQ chicken. With just a few ingredients, you can make a dish everyone will love. It's quick to prepare and packed with flavor.

Sauce Selection Guide

Choosing the right BBQ sauce is key for your crockpot chicken recipes. Here are some top picks:

  • Sweet Kansas City-style sauce
  • Tangy Carolina mustard-based sauce
  • Spicy Texas-style hot sauce
  • Smoky Memphis-inspired blend

Perfect Side Dish Pairings

Pair your BBQ chicken with these tasty sides:

  • Creamy coleslaw
  • Corn on the cob
  • Buttered cornbread
  • Crispy roasted vegetables

Pro tip: For a flavor boost, add bourbon or cola to your BBQ sauce. This makes the chicken taste rich and caramelized, a hit with everyone.

Quick Recipe Stats: 4.94/5 stars from 839 votes, just 5 minutes prep time, and 3-4 hours cooking!

Creamy Crockpot Chicken Soup Recipes

Warm up your kitchen with delicious chicken crockpot soup recipes. They turn simple ingredients into amazing meals. These dishes are great for busy families who want tasty, healthy dinners with little effort.

Creamy chicken crockpot soup recipes are a great choice for those who want to make restaurant-quality meals at home. Your slow cooker helps you create soups with rich textures and deep flavors. These soups will wow your family at dinner time.

  • Prep ingredients in just 10 minutes
  • Cook on HIGH for 3-4 hours or LOW for 6-7 hours
  • Easily store leftovers for up to 4 days

When making these chicken crockpot soup recipes, keep these nutritional facts in mind:

  1. Approximately 411 calories per serving
  2. 41 grams of protein
  3. 35 grams of carbohydrates
  4. 12 grams of healthy fats

Your crockpot is a magic tool for making soul-warming soups. These soups are not only tasty but also good for you. From classic chicken noodle to new flavors, these recipes will be favorites in your home.

Pro tip: For an extra creamy texture, blend a portion of the soup or stir in Greek yogurt just before serving.

Try different ingredients and find your favorite chicken crockpot soup recipe. Make dinner time easy and fun.

Time-Saving Chicken Crockpot Freezer Meals

Make your weeknights easier with chicken crockpot freezer meals. These meals are perfect for busy families who want to save time and reduce stress in the kitchen.

Preparing meals ahead of time has many benefits. In just 90 minutes, you can make up to 14 tasty meals. This way, your family will have healthy options for weeks. Use large freezer bags and plan well to stock up on nutritious meals.

Prep and Storage Guidelines

Here are key tips for making chicken crockpot freezer meals:

  • Use 16-24 chicken breasts or 36 boneless chicken thighs
  • Choose good-quality freezer bags for storing meals
  • Write the recipe name and date on each bag
  • Keep meals in the freezer for 3-4 months for best taste

Thawing Instructions

Thawing meals correctly is important for quality and safety. Follow these steps:

  1. Move frozen meals to the fridge 24-48 hours before cooking
  2. Make sure chicken is cooked to 165°F (74°C)
  3. Cook on low for 6-7 hours or high for 3-4 hours

Pro tip: Rotate your freezer meals regularly. This way, you use the oldest meals first and keep them fresh.

Asian-Inspired Teriyaki Chicken in the Slow Cooker

Turn your kitchen into a flavor paradise with this slow cooker chicken recipe. It brings authentic Asian-inspired teriyaki to your dinner table. Crockpot chicken recipes like this make cooking easy and tasty.

To make the perfect teriyaki chicken, you'll need a few ingredients:

  • 1½ pounds bone-in chicken thighs
  • ⅔ cup soy sauce
  • 3 tablespoons rice vinegar
  • 3 tablespoons honey
  • 1 minced garlic clove
  • 1 tablespoon fresh minced ginger

Your slow cooker will turn these ingredients into a tender, flavorful meal. Cooking on high takes about 2 hours, while the low setting requires 4 hours. This dish is packed with 35 grams of protein and only 319 calories.

Pro tip for your crockpot chicken recipes: Use bone-in chicken thighs for the best flavor and moisture. The slow cooking lets the teriyaki sauce soak in, making it taste like a restaurant meal at home.

Meal prep bonus: This teriyaki chicken can be stored in the fridge for up to 4 days or frozen for 3 months!

Serve your Asian-inspired teriyaki chicken over steamed rice or stir-fried veggies for a complete meal. It will impress your family and make weeknight dinners exciting.

Conclusion

Your journey through easy chicken crockpot meals has given you amazing recipes. These recipes make meal prep easy and fun. They show that tasty, healthy dinners can be made with little effort and lots of flavor.

The slow cooker is a kitchen superstar. It lets busy cooks make top-notch meals in just 10 minutes of prep. Whether cooking for 6-8 hours on low or 3-4 hours on high, these recipes promise tender, flavorful chicken. They will wow your family and make weeknight cooking easier.

Each recipe we've looked at is flexible, allowing for ingredient swaps and personal touches. From Southwest to Mediterranean flavors, crockpot chicken recipes are a great choice for easy, tasty meals. With a little planning and these easy tips, you'll change how you cook at home.

Start using your slow cooker and discover a world of cooking possibilities. Your new skills in making easy chicken crockpot meals will make dinner time fun for everyone.

FAQ

How long can I safely leave chicken in a crockpot?

Chicken recipes usually need 4-6 hours on low or 2-3 hours on high. Make sure the chicken's internal temperature hits 165°F for safety. Most crockpots turn off automatically, but check your recipe and appliance for best results.

Can I use frozen chicken in my crockpot?

It's not safe to use frozen chicken. It takes longer to cook, risking bacterial growth. Always thaw chicken in the fridge before cooking for even and safe results.

How can I prevent my chicken from becoming dry in the crockpot?

Use bone-in chicken and add liquid to your recipe. Broth or sauce keeps it moist. Chicken thighs are better than breasts, which can dry out.

Can I prepare crockpot chicken meals in advance?

Yes! You can make crockpot chicken meals ahead as freezer meals. Put all ingredients in a bag, freeze for 3 months, and thaw before cooking. It's great for busy families.

What's the best cut of chicken for crockpot recipes?

It depends on what you like. Thighs are juicy and flavorful, while breasts are leaner. Breasts are good for shredded recipes, and thighs for richer flavors.

How do I know when my crockpot chicken is fully cooked?

Use a meat thermometer to check for 165°F. The chicken should shred easily and have no pink. Cooking times vary by recipe and crockpot.

Can I adapt traditional recipes for the crockpot?

Yes! Most recipes work in a crockpot. Use less liquid and brown meats first for flavor. Add veggies later to avoid overcooking.

Are crockpot chicken recipes healthy?

Many crockpot chicken recipes are healthy. They use less fat, keep nutrients, and let you choose ingredients. Pick lean proteins, veggies, and minimal processed foods for the best meals.

How long can I store leftover crockpot chicken?

Store cooked chicken in a sealed container in the fridge for 3-4 days. Freeze for 2-3 months. Cool it first and reheat to 165°F before eating.

What are some quick side dishes that pair well with crockpot chicken?

Try steamed rice, roasted veggies, quick salads, or crusty bread. Crockpot meals are great because you can prep sides easily while the chicken cooks.

Print

Crockpot Chicken Breast Recipe

crockpot chicken recipes
Print Recipe
Pin Recipe

5 Stars 4 Stars 3 Stars 2 Stars 1 Star

No reviews

A simple, flavorful Crockpot chicken recipe that’s perfect for busy weeknights. Just mix a few spices, set it in the slow cooker, and let the magic happen. You’ll end up with tender, juicy chicken that pairs well with rice, veggies, or a fresh salad.

  • Author: grace bellamy
  • Prep Time: 10 minutes
  • Cook Time: 6 hours
  • Total Time: 6 hours 10 minutes
  • Yield: 4 servings 1x
  • Category: Main Course
  • Method: Slow Cooker
  • Cuisine: American

Ingredients

Scale
  • 4 boneless, skinless chicken breasts
  • 1 teaspoon salt
  • 1 teaspoon black pepper
  • 1 teaspoon garlic powder
  • 1 teaspoon onion powder
  • 1 teaspoon dried thyme (optional)
  • 1 cup chicken broth

Instructions

  1. Season the chicken breasts with salt, pepper, garlic powder, onion powder, and thyme.
  2. Place the chicken in the Crockpot and pour in the chicken broth.
  3. Cover and cook on Low for 6 hours or High for 3-4 hours, until the chicken is fully cooked.
  4. If desired, remove the chicken and whisk 1 tablespoon cornstarch into the cooking liquid. Cook on High for 5-10 minutes to thicken into a sauce before serving.

Notes

  • Feel free to add vegetables, such as carrots or potatoes, to make it a one-pot meal.
  • Adjust the seasonings to your taste. You can add paprika, chili flakes, or mixed herbs.

Did you make this recipe?

Share a photo and tag us — we'd love to see your creation!

Recipe

Chicken Enchilada Recipe

February 15, 2025 by grace bellamy Leave a Comment

Table of Contents

  • Easy Homemade Chicken Enchilada Recipe for Dinner
    • Introduction to Mexican-Style Chicken Enchiladas
    • Essential Ingredients for Perfect Chicken Enchiladas
      • Tortilla Selection: Corn vs Flour
      • Cheese and Sauce Varieties
      • Fresh Toppings and Garnishes
    • Kitchen Equipment You'll Need
    • Preparation Time and Serving Size
      • Prep Time Breakdown
      • Cooking Duration Details
      • Serving Portions
    • Step-by-Step Chicken Enchilada Recipe
    • Making the Perfect Enchilada Sauce
      • Crafting Your Homemade Sauce
      • Sauce Consistency Matters
      • Homemade vs Store-Bought Options
    • Assembly and Rolling Techniques
    • Baking Instructions and Temperature Guide
      • Optimal Oven Settings
      • Timing and Doneness Indicators
    • Storage and Freezing Methods
      • Freezing Your Chicken Enchiladas
      • Freezer Storage Tips
      • Reheating Frozen Enchiladas
    • Nutritional Information and Health Benefits
      • Caloric and Macronutrient Breakdown
      • Nutritional Highlights
      • Dietary Considerations
    • Conclusion
    • FAQ
      • Are corn or flour tortillas better for chicken enchiladas?
      • How can I make my chicken enchiladas less spicy?
      • Can I prepare chicken enchiladas in advance?
      • What's the best way to shred chicken for enchiladas?
      • How do I prevent my enchiladas from becoming soggy?
      • Are chicken enchiladas gluten-free?
      • How long do chicken enchiladas last in the refrigerator?
      • Can I make vegetarian enchiladas using this recipe?

Easy Homemade Chicken Enchilada Recipe for Dinner

Want a delicious Mexican dish in your kitchen? This chicken enchilada recipe makes weeknight dinners special. The smell of spices, cheese, and chicken will feel like a Mexican restaurant.

No need for hard cooking skills. This recipe is for those who want great taste without much work. It's easy to make a meal that will wow your loved ones, no matter your cooking level.

These enchiladas are full of flavor and simple to make. They offer a mix of comfort and excitement. Prepare for a dish that brings Mexican traditions to your home cooking. Your taste buds are in for a treat!

Introduction to Mexican-Style Chicken Enchiladas

Chicken enchiladas are a key part of authentic Mexican cuisine. They mix rich flavors with traditional cooking. These baked enchiladas come from deep in Mexican cooking history. They turn simple ingredients into a delicious meal loved by families for generations.

The magic of chicken enchiladas is in their flexibility and cultural importance. Traditional making involves a few important steps:

  • Soft corn tortillas rolled around tender chicken
  • Flavorful homemade enchilada sauce
  • Generous layers of melted cheese
  • Fresh, vibrant garnishes

In Mexican kitchens, enchiladas are more than food - they're an art. Each region has its own special way of making them, using local ingredients and cooking methods. Whether in a home kitchen or a fancy restaurant, these enchiladas share stories of tradition, creativity, and amazing taste.

Learning about the history and making of chicken enchiladas will make you appreciate their flavor and cultural value. Get ready to make a recipe that brings the warmth and spirit of Mexican cooking to your dinner table.

Essential Ingredients for Perfect Chicken Enchiladas

Creating delicious chicken enchiladas starts with the right ingredients. Your journey will depend on choosing quality components. These will bring out the best flavors and textures in this classic Mexican dish.

Tortilla Selection: Corn vs Flour

Your tortilla choice greatly affects the taste and texture of enchiladas. Let's look at your options:

  • Corn Tortillas: Traditional, with an authentic flavor and slightly firmer texture
  • Flour Tortillas: Softer, more pliable, and milder in taste

Cheese and Sauce Varieties

The right cheese and salsa can make your shredded chicken enchiladas amazing. Consider these options:

  • Mexican blend cheese for rich, melty goodness
  • Homemade or store-bought enchilada sauce
  • Sharp cheddar for extra tang

Fresh Toppings and Garnishes

Make your enchiladas pop with these fresh additions:

  • Chopped cilantro
  • Diced onions
  • Sour cream
  • Shredded lettuce
  • Cotija cheese

By carefully choosing each ingredient, you'll make chicken enchiladas that will wow your family and friends.

Kitchen Equipment You'll Need

Preparing delicious baked enchiladas requires some essential kitchen tools. Don't worry if you don't have everything - most home cooks can easily adapt with standard kitchen equipment.

  • Baking Dish: A 9x13-inch rectangular dish is perfect for your baked enchiladas. This size allows you to create a full tray of enchiladas that can serve 6-8 people.
  • Mixing Bowls: You'll need at least two medium-sized mixing bowls for preparing ingredients and mixing fillings.
  • Cutting Board: A sturdy cutting board for chopping chicken, vegetables, and preparing toppings
  • Sharp Kitchen Knife: For precise ingredient preparation
  • Measuring Cups and Spoons: Accurate measurements are crucial for baked enchiladas

Having the right equipment makes cooking baked enchiladas smoother and more enjoyable. Your 9x13-inch baking dish will be the star of the show. It allows you to create a perfectly layered enchilada casserole.

If you're missing a specific tool, don't panic. Many kitchen items can be substituted. A glass casserole dish works just as well as a metal baking pan for your enchiladas. The key is having a dish that can withstand oven temperatures up to 350°F.

  • Optional but helpful tools:
  • Skillet for preparing chicken
  • Cheese grater
  • Aluminum foil for covering

Prepare your kitchen with these essentials, and you'll be ready to create mouthwatering baked enchiladas. These will impress your family and friends.

Preparation Time and Serving Size

When planning your chicken enchilada recipe, it's important to know the time needed and how many it serves. This dish is great for family dinners or when you have friends over.

Prep Time Breakdown

Your chicken enchilada recipe will take about 50 minutes to make. Here's a quick overview:

  • Preparation time: 20 minutes
  • Cooking duration: 30 minutes
  • Total time: 50 minutes

Cooking Duration Details

Breaking down the cooking process helps you manage your time in the kitchen:

  1. Sautéing onions: 3 minutes
  2. Cooking chicken mixture: 6-8 minutes
  3. Baking enchiladas: 20 minutes at 350°F

Serving Portions

This recipe serves 6 people well. Each serving has 2 enchiladas, making it a filling and nutritious meal:

  • Servings: 6
  • Total chicken used: 1.5 pounds
  • Cheese per serving: ⅓ cup
  • Tortillas: 8 large flour tortillas

Tip: If you're cooking for fewer people, you can halve the recipe. Leftovers can be refrigerated for up to 4 days or frozen for 3 months.

Step-by-Step Chicken Enchilada Recipe

Making chicken enchiladas is simple. This recipe will help you create a tasty meal for 4 to 8 people in about 30 minutes.

First, gather your ingredients. You'll need:

  • 4 cups of shredded chicken
  • 8 large flour tortillas
  • 3 ½ cups of shredded cheese
  • 1 can of enchilada sauce
  • Salsa for extra flavor

Preheat your oven to 350°F. Mix the shredded chicken with ¼ cup of enchilada sauce in a large bowl. Add salt and pepper to taste. Pro tip: Always taste and adjust the seasoning before filling your tortillas!

Warm your tortillas in the microwave for 20-30 seconds. This makes them easier to roll without cracking.

Place a tortilla flat and fill it with about ⅓ cup of chicken mixture. Sprinkle cheese over the chicken.

Roll the tortilla tightly and place it seam-side down in a 9x13 inch baking dish. Pour the remaining enchilada sauce over the top and add more cheese.

Bake for 20-25 minutes until the cheese is melted and bubbly. Let it cool for 5 minutes before serving. Top with fresh salsa, chopped cilantro, or your favorite garnishes.

Making the Perfect Enchilada Sauce

Creating an authentic enchilada sauce is key to making your chicken enchiladas amazing. The right sauce adds depth and rich flavor to every bite.

Crafting Your Homemade Sauce

Your homemade enchilada sauce lets you control the flavor and ingredients. Start by sautéing fresh onions and minced garlic in a pan. This creates a strong base for your sauce.

The secret to a great sauce is balancing spices. Use fresh chili powder for intense flavor. Bloom your spices to bring out their natural oils. Add tomato sauce for depth and richness.

Sauce Consistency Matters

Getting the sauce consistency right is important. You want it to cling to your tortillas but not be too thick or runny. Slowly simmer your sauce to develop complex flavors and the perfect texture.

"The difference between a good enchilada and a great enchilada is often in the sauce."

Homemade vs Store-Bought Options

While store-bought sauces are convenient, homemade versions taste better. Spend 10 minutes making your own sauce, and you'll notice the difference. Fresh ingredients like garlic, onions, and chili powder are essential for a true enchilada sauce.

Pro tip: Your homemade sauce can be made ahead of time and stored in the fridge for up to 5 days. This makes meal prep easier.

Assembly and Rolling Techniques

Creating delicious enchiladas starts with mastering the art of assembly. When working with tortillas, you'll want to prepare them carefully. This ensures they don't crack or fall apart during rolling. For corn tortillas, wrap them in damp paper towels and microwave for 45 seconds. This makes them more pliable.

Follow these key steps for perfect enchilada assembly:

  • Use approximately ⅓ cup of shredded chicken filling per tortilla
  • Spread the filling evenly across the center of each tortilla
  • Sprinkle about ¼ cup of cheese over the shredded chicken
  • Roll the tortillas tightly, tucking in the sides

Pro tip: Avoid overstuffing your tortillas. Stick to about 2 tablespoons of filling to prevent breaking and ensure clean, neat rolls. Place each rolled enchilada seam-side down in your baking dish to keep them secure.

When working with corn tortillas, gentle handling is crucial. These traditional tortillas can crack easily, so take your time warming and rolling them. A light touch and proper preparation will help you create enchiladas that look as good as they taste.

The secret to perfect enchiladas is in the careful assembly and rolling technique!

Baking Instructions and Temperature Guide

Preparing baked enchiladas needs precision and care. The right baking method can make your chicken enchiladas go from good to amazing. You want a perfectly melted, golden-brown top with bubbling sauce that gets everyone excited.

Optimal Oven Settings

For the best baked enchiladas, use 350°F (175°C). This temperature cooks evenly without burning the tortillas or drying the chicken. Make sure to preheat your oven for 10-15 minutes before putting in your enchilada dish.

Timing and Doneness Indicators

Baking your enchiladas usually takes 20-25 minutes. Here are signs they're perfectly cooked:

  • Cheese is completely melted and slightly golden
  • Edges of tortillas start to crisp up
  • Sauce is bubbling around the edges of the baking dish
  • Internal temperature reaches 165°F

Pro tip: For an extra crispy top, broil for the last 2-3 minutes. But watch closely to avoid burning!

Your baked enchiladas are now ready to serve - hot, cheesy, and full of flavor. Enjoy your delicious homemade Mexican-inspired meal!

Storage and Freezing Methods

Keeping your chicken enchilada recipe fresh is simple. You can enjoy this tasty dish for days or weeks. Just store it right.

Refrigeration keeps your chicken enchiladas good for 4 days. Use an airtight container to keep the flavor in. Freezing is also a great choice for longer storage.

Freezing Your Chicken Enchiladas

Freezing your chicken enchilada recipe is a smart move. Here's how to do it:

  • Cool the enchiladas completely before freezing
  • Wrap individual enchiladas in aluminum foil
  • Place wrapped enchiladas in a freezer-safe container or bag
  • Flash freeze for up to 3 hours to maintain texture

Freezer Storage Tips

Your frozen chicken enchiladas can last up to 3 months. To avoid freezer burn:

  1. Remove as much air as possible from the storage bag
  2. Label the container with the date of freezing
  3. Store at a consistent 0°F

Reheating Frozen Enchiladas

Ready to enjoy your frozen chicken enchiladas? Here's how to reheat:

  • Thaw overnight in the refrigerator
  • Bake at 350°F, covered with foil for 30 minutes
  • Uncover and bake for an additional 20 minutes
  • Ensure internal temperature reaches 165°F

Pro tip: Don't microwave frozen enchiladas. It can dry out the cheese and tortillas. This ruins the dish's texture.

Nutritional Information and Health Benefits

Your chicken enchiladas are more than just tasty. They're packed with nutrients and offer great health benefits. With shredded chicken and rich cheese, they provide a balanced mix of nutrients.

Caloric and Macronutrient Breakdown

Each serving of two enchiladas has about 224 calories. They also have a great nutritional profile:

  • Protein: 16 grams
  • Carbohydrates: 17.5 grams
  • Total Fat: 10.5 grams
  • Dietary Fiber: 3 grams

Nutritional Highlights

The shredded chicken is a lean protein source. It helps with muscle maintenance and recovery. Cheese adds important minerals like calcium, which is good for bones. Your enchiladas offer:

  • Calcium: 13% of daily value
  • Vitamin A: 36% of daily value
  • Iron: 9% of daily value
  • Potassium: 11% of daily value

Dietary Considerations

These enchiladas can be adjusted for different diets. Gluten-free tortillas or low-sodium ingredients can make them suitable for various needs. Always talk to a nutritionist for advice tailored to you.

"Nutrition isn't about perfection, it's about balance and enjoying wholesome, delicious meals."

Conclusion

Your journey through this chicken enchilada recipe shows that authentic Mexican cuisine is accessible at home. With simple ingredients and straightforward techniques, you can turn your kitchen into a vibrant space. It celebrates traditional flavors.

This chicken enchilada recipe is versatile. You can adjust spice levels, try different cheeses, or add unique proteins. Whether for family or a dinner party, these enchiladas are a tasty way to enjoy Mexican cuisine at home.

Cooking is about creativity and fun. Feel free to make this recipe your own. Swap ingredients, play with garnishes, and enjoy the process. Your homemade chicken enchiladas will satisfy your hunger and create memorable meals.

As you explore Mexican cuisine, this chicken enchilada recipe is a great starting point. Enjoy cooking, share your dishes with loved ones, and relish every bite.

FAQ

Are corn or flour tortillas better for chicken enchiladas?

Both corn and flour tortillas are good for chicken enchiladas. Corn tortillas give a traditional Mexican taste. Flour tortillas are softer and easier to fold. Choose based on what you like and the texture you want.

How can I make my chicken enchiladas less spicy?

To make them less spicy, use a mild enchilada sauce. Remove hot peppers and use mild chili powder. Adding more cheese or sour cream can also help. Choose a mild salsa or use less spicy ingredients.

Can I prepare chicken enchiladas in advance?

Yes, you can! Assemble them up to 24 hours before baking and refrigerate. Or, bake them and reheat when you're ready. They freeze well for up to 3 months, perfect for later.

What's the best way to shred chicken for enchiladas?

There are a few ways to shred chicken. Use forks, a stand mixer, or your hands once it cools. A rotisserie chicken is quick. You can also poach, bake, or slow cook chicken for your enchiladas.

How do I prevent my enchiladas from becoming soggy?

To keep them from getting soggy, lightly toast tortillas before filling. Drain chicken and sauce well. Don't over sauce. Fry corn tortillas in oil before filling to prevent sogginess.

Are chicken enchiladas gluten-free?

They can be gluten-free with corn tortillas and gluten-free enchilada sauce. Always check the ingredients of your sauce, cheese, and seasonings. You can make them gluten-free by choosing the right ingredients.

How long do chicken enchiladas last in the refrigerator?

They last 3-4 days in the fridge if stored properly. Cool them down before storing and keep them refrigerated. Reheat to 165°F to ensure safety and flavor.

Can I make vegetarian enchiladas using this recipe?

Yes! Use black beans, roasted veggies, or tofu instead of chicken. Adjust the seasonings, and you'll have tasty vegetarian enchiladas.

Print

Chicken Enchilada Recipe

Chicken Enchilada Recipe
Print Recipe
Pin Recipe

5 Stars 4 Stars 3 Stars 2 Stars 1 Star

No reviews

  • These Chicken Enchiladas are loaded with tender shredded chicken, flavorful enchilada sauce, and plenty of melted cheese. They’re easy to assemble and bake up perfectly in the oven, making them a go-to weeknight dinner with a satisfying Mexican flair.

  • Author: grace bellamy
  • Prep Time: 15 minutes
  • Cook Time: 20 minutes
  • Total Time: 35 minutes
  • Yield: Serves 4–6 1x
  • Category: Main Dish
  • Method: Baking
  • Cuisine: Mexican

Ingredients

Scale
  • 2 cups cooked shredded chicken (rotisserie chicken works great)
  • 1 tablespoon vegetable oil
  • 1 small onion, diced
  • 2 cloves garlic, minced
  • 1 can (10 oz) red enchilada sauce (mild or medium)
  • 1 teaspoon chili powder (optional, for extra flavor)
  • 8 flour tortillas (8-inch size)
  • 2 cups shredded cheddar or Mexican blend cheese
  • Salt and pepper to taste
  • Fresh cilantro, chopped (optional garnish)

Instructions

  • Sauté aromatics: Preheat the oven to 375°F (190°C). In a skillet over medium heat, warm the oil. Add diced onion and sauté until translucent, about 4–5 minutes. Stir in minced garlic and cook for an additional 1 minute.
  • Combine chicken filling: Add shredded chicken to the skillet. Season with chili powder (if using), salt, and pepper. Pour in about half of the enchilada sauce (reserve the rest for topping) and stir to combine. Remove from heat.
  • Assemble enchiladas: Lightly coat a 9x13-inch baking dish with cooking spray. Warm tortillas slightly (in a microwave or on a dry skillet) to make them pliable. Spoon some of the chicken mixture down the center of each tortilla, top with a small handful of cheese, then roll up tightly. Place seam-side down in the baking dish.
  • Top and bake: Pour the remaining enchilada sauce evenly over the rolled tortillas. Sprinkle the remaining cheese on top. Bake for 15–20 minutes, or until the cheese is melted and the enchiladas are heated through.
  • Serve: Garnish with chopped cilantro if desired. Serve hot alongside rice, beans, or a crisp salad.

Notes

  • Chicken options: Rotisserie chicken, leftover roast chicken, or even poached chicken breast all work well here.
  • Sauce heat: Use mild, medium, or hot enchilada sauce based on your spice preference.
  • Cheese variations: Monterey Jack, Pepper Jack, or a Mexican cheese blend can be used for extra flavor.
  • Make ahead: Assemble the enchiladas up to a day in advance; just wait to add the sauce and cheese before baking.

Did you make this recipe?

Share a photo and tag us — we'd love to see your creation!

Recipe

chicken salad recipe

February 14, 2025 by grace bellamy Leave a Comment

Quick and Creamy Chicken Salad Recipe for Lunch

A delectable chicken salad with fresh greens, juicy chicken chunks, and a creamy, tangy dressing. The salad is elegantly plated on a white ceramic dish, with the chicken pieces neatly arranged and garnished with snipped chives. The lighting casts a warm, natural glow, highlighting the vibrant colors and textures of the ingredients. The overall composition is balanced and visually appealing, inviting the viewer to savor the homemade, wholesome goodness of this quick and creamy lunch option.

Growing up, lunch was always a challenge. Rushed mornings and busy schedules made it hard to find a quick, satisfying meal. That's when I found an easy chicken salad recipe that changed everything.

This chicken salad recipe is more than just a meal. It's a lifesaver for anyone who wants a delicious, nutritious lunch in minutes. It's perfect for busy professionals, parents on the go, or anyone who loves great food.

In just 15-20 minutes, you can make a mouthwatering chicken salad. It serves six and has 18 grams of protein per serving. No more bland lunches or expensive takeout. You'll learn to make an easy chicken salad that's both healthy and delicious.

Get ready to change your lunch routine with a simple, versatile recipe. It's guaranteed to become a family favorite. Let's explore the world of homemade chicken salad perfection!

Perfect Homemade Chicken Salad Recipe: A Classic Recipe

Making a tasty healthy chicken salad at home is simple. With just a few ingredients, you can turn a basic meal into something special. This classic recipe will guide you to make a nutritious and delicious dish that outshines any store-bought version.

chicken salad recipe

A bright, airy kitchen countertop filled with the fresh ingredients for homemade chicken salad. In the foreground, a wooden cutting board showcases tender, cooked chicken breasts, crisp celery stalks, and a bowl of creamy mayonnaise. Swirling across the middle ground, a fragrant blend of freshly chopped herbs - dill, parsley, and chives - add vibrant pops of color. In the background, a glass jar of plump, juicy grapes and a basket of soft, warm rolls create an inviting, homey scene. Soft, natural lighting from a large window casts a warm glow over the scene, capturing the comforting, wholesome essence of preparing this classic chicken salad recipe.

Benefits of Making Easy Chicken Salad at Home

Preparing chicken salad at home has many benefits. You get to choose every ingredient, making your meal healthier and more personal. By picking fresh, quality ingredients, you can:

  • Reduce unnecessary preservatives
  • Control sodium and fat content
  • Customize flavors to your preference
  • Save money compared to restaurant or deli options

Time-Saving Tips for Preparation

Make your chicken salad faster with these tips. Prep work is key to efficient cooking. Use a rotisserie chicken or cook chicken breasts in bulk on weekends. Also, chop veggies ahead of time and store them in sealed containers for quick assembly.

Basic Equipment Needed

You don't need fancy tools to make an amazing chicken salad. Your basic kitchen setup is all you need. Essential equipment includes:

  1. Large mixing bowl
  2. Sharp knife
  3. Cutting board
  4. Measuring cups
  5. Wooden spoon or spatula

Pro tip: A good chef's knife can make ingredient preparation quick and enjoyable!

Essential Ingredients for a Creamy Chicken Salad Recipe

A crisp white tabletop serves as the backdrop, bathed in warm, natural light from a large window. Neatly arranged in the foreground are the essential ingredients for a classic chicken salad: plump, juicy chicken breasts, freshly chopped celery, crunchy toasted slivered almonds, creamy mayonnaise, a squeeze of tangy lemon, and a sprinkling of freshly ground black pepper. The scene evokes a sense of simplicity and culinary elegance, showcasing the high-quality, wholesome components that come together to create a delightful and satisfying chicken salad.

Making the perfect classic chicken salad starts with picking the right ingredients. Your dish can go from simple to amazing with the right mix of flavors and textures.

For a delicious chicken salad, you need top-notch ingredients. Here's what you'll need:

  • 3 cups of cooked, diced chicken
  • 1 cup mayonnaise
  • ⅓ cup sour cream
  • 4 stalks of finely diced celery
  • Salt and pepper to taste

Each ingredient is key to a great chicken salad. Chicken gives it protein, mayonnaise makes it creamy, and celery adds a nice crunch.

"The secret to an amazing chicken salad is balancing fresh ingredients with classic flavors."

Want to try something new? Add these optional mix-ins to your chicken salad recipe:

  • Chopped boiled eggs
  • Sweet pickle relish
  • Fresh herbs like dill
  • Diced green onions

For the best chicken salad, use fresh ingredients and let the flavors mix well. Chill your salad for at least 4 hours before serving to improve its taste.

How to Choose and Prepare Your Chicken

Starting with the right chicken is key to a great rotisserie chicken salad. Your choice and how you prepare it can change your salad a lot.

You can use a pre-cooked rotisserie chicken or cook fresh chicken. Each way has its own benefits for your salad.

Rotisserie Chicken: A Convenient Option

A rotisserie chicken is quick and tasty for your salad. These chickens usually give you:

  • 3-5 cups of shredded meat
  • Ready-to-use protein
  • Enhanced flavor from seasoning

Shredding Techniques

Shredding right is important for your salad's texture. Try these steps:

  1. Let chicken cool slightly
  2. Use two forks to pull meat apart
  3. Shred against the grain for tender pieces

Safe Temperature Guidelines

Keeping chicken safe is very important. Make sure it hits 165°F to avoid sickness. Pro tip: A meat thermometer is best for checking.

Always handle chicken with clean utensils and wash hands thoroughly to maintain food safety.

Whether you pick a rotisserie chicken or cook your own, these tips will help make a tasty and safe salad.

The Perfect Creamy Dressing Base

Making a great chicken salad dressing starts with the right ingredients. You need a smooth base that combines all flavors. The secret is balancing mayonnaise, sour cream, and tangy additions.

  • ½ cup high-quality mayonnaise
  • ½ cup sour cream or Greek yogurt
  • 2 tablespoons fresh lemon juice
  • 2 tablespoons finely chopped dill
  • Salt and pepper to taste

Your dressing should be smooth and creamy. It should coat each chicken and vegetable piece well. Mayonnaise and sour cream make it rich but light. Lemon juice adds a zesty note.

Start with these measurements but adjust as needed. Some like it tangier, others creamier. The goal is to find your perfect mix.

Pro tip: Chill your dressing for at least 30 minutes before mixing with chicken to allow flavors to meld together.

Try adding herbs like chives, parsley, or tarragon to make your dressing unique. Each herb adds a special touch to your classic recipe.

Mix-Ins and Flavor Enhancers

Making a tasty chicken salad is all about trying new flavors. The right mix-ins can turn a simple salad into a feast for your taste buds. They add depth, texture, and surprises that make your meal exciting.

Fresh Herbs and Seasonings

Boost your chicken salad with fresh herbs that pack a punch. Here are some herbs to consider:

  • Dill: Adds a tangy, fresh note
  • Parsley: Provides a bright, clean taste
  • Tarragon: Introduces a subtle anise-like flavor
  • Cilantro: Brings a zesty, citrusy punch

Crunchy Add-ins

Texture is crucial for a memorable chicken salad. Try these crunchy ingredients to spice things up:

  • Celery: Classic crisp addition
  • Nuts: Almonds, pecans, or walnuts provide protein and crunch
  • Water chestnuts: Offer a unique, crisp texture
  • Radishes: Add a peppery crunch

Sweet and Savory Options

Balance your salad with sweet and savory mix-ins for a rich taste:

  • Sweet fruits: Red grapes or chopped apples
  • Dried cranberries: Adds a tart sweetness
  • Bacon bits: Introduces a smoky, salty element
  • Capers: Provides a briny, tangy flavor

Experiment with these mix-ins to make a chicken salad that's all your own. The secret is to mix flavors and textures for a dish that stands out.

Step-by-Step Mixing Instructions

Making the perfect chicken salad recipe needs careful mixing. You want to mix ingredients smoothly but keep their textures different. Let's go through the mixing steps together.

Begin with a medium-sized mixing bowl. This size gives you enough space to mix well. Your chicken salad will come together fast with the right steps.

  1. Place shredded chicken as the base ingredient
  2. Add mayonnaise and Greek yogurt for creamy consistency
  3. Incorporate finely chopped vegetables
  4. Season with salt, pepper, and herbs
  5. Gently fold ingredients together

When mixing, use a folding motion. This keeps the salad light and prevents ingredients from getting squished. Soft, gentle turns help keep the salad's delicate texture.

Taste testing is key. Add seasonings little by little and mix well. Adjust flavors by adding small amounts of mustard, lemon juice, or herbs until it's just right.

Pro tip: Let your chicken salad rest for 15-20 minutes before serving. This lets the flavors mix well.

Your finished chicken salad should have creamy dressing, tender chicken, and crisp veggies. It's a delicious mix that's sure to please!

Serving Suggestions and Presentation Ideas

Turning your healthy chicken salad into a great meal is more than just the recipe. The right way to present it can make your chicken salad sandwiches stand out.

Your chicken salad is very versatile. Here are some fun ways to enjoy it:

Bread and Wrap Selections

Make tasty chicken salad sandwiches with different breads:

  • Classic white bread
  • Whole grain sandwich bread
  • Buttery croissants
  • Artisan sourdough
  • Rustic crusty bread

Low-Carb Alternatives

For those watching carbs, try these healthy chicken salad ideas:

  • Crisp lettuce wraps
  • Bed of mixed greens
  • Cucumber rounds
  • Hollowed bell pepper boats
  • Zucchini slices

Try different ways to present your chicken salad. It's perfect for a quick lunch or a big gathering. These ideas will make your meals both delicious and visually appealing.

Storage Tips and Make-Ahead Options

Making an easy chicken salad that stays fresh is easier than you think. When you make your chicken salad, storing it right is key. It keeps the taste great and makes it safe to eat.

  • Refrigerate in an airtight container for up to 4-5 days
  • Always keep the chicken salad chilled at 40°F or below
  • Stir the salad before serving to redistribute ingredients

Pro tip: While the whole chicken salad doesn't freeze well, you can prep parts ahead:

  1. Dice and freeze cooked chicken separately
  2. Store dressing ingredients separately
  3. Combine fresh ingredients when ready to serve

"Fresh ingredients make the best chicken salad – plan ahead but serve fresh!"

For those who meal prep, your easy chicken salad is a big help. Prepare chicken and chop veggies in advance. Store them separately to keep them crisp. Then, mix them together when you're ready for a quick, tasty lunch.

Conclusion

Your easy chicken salad recipe is now ready, offering a tasty meal that's easy to make. With just 10 minutes of prep, you can turn leftover chicken into a masterpiece.

This chicken salad recipe is great because it's flexible. You can put it in a sandwich, on greens, or in a wrap. The secret is to play with flavors while keeping the dish satisfying.

Make sure to keep your chicken salad in a sealed container. Eat it within 2-3 days for the best flavor. This recipe is perfect for a quick lunch or dinner for you or your friends.

Now you know how to make the perfect chicken salad. It's not only quick but also customizable to any taste. Enjoy making and eating your delicious creation!

FAQ

How long can homemade chicken salad be stored in the refrigerator?

You can keep homemade chicken salad in the fridge for 3-5 days. Make sure it's in an airtight container. If it smells bad or looks off, throw it away.

Can I use Greek yogurt instead of mayonnaise in my chicken salad?

Yes, you can! Greek yogurt is a healthier choice. It's creamy, has fewer calories, and more protein. You can use it alone or mix it with a bit of mayo for taste.

What's the best type of chicken to use for chicken salad?

Rotisserie chicken is easy and tasty. But, you can also use fresh chicken breasts or thighs. Make sure the chicken is cooked well, seasoned, and chopped to your liking.

How can I make my chicken salad lower in calories?

Use Greek yogurt instead of mayonnaise to cut calories. Add more veggies for bulk. Choose lean chicken breast. Herbs and spices can also add flavor without extra calories.

What are some good add-ins for chicken salad?

Try adding diced celery for crunch, nuts like almonds or pecans, and apples for sweetness. Dried cranberries, fresh herbs, and green onions also work well. They add texture and flavor.

Can chicken salad be frozen?

Freezing chicken salad is possible, but not recommended. The mayonnaise or yogurt can change texture when thawed. It's better to mix everything just before serving if you're preparing ahead.

What are some creative ways to serve chicken salad?

Serve chicken salad in lettuce wraps, on mixed greens, or in avocado halves. It's also good as a dip with crackers or as a filling for stuffed tomatoes or bell peppers.

How can I add more protein to my chicken salad?

Add hard-boiled eggs, chopped nuts, or seeds like sunflower or pumpkin. A little cottage cheese can also boost protein in your chicken salad.

Print

chicken salad recipe

chicken salad recipe
Print Recipe
Pin Recipe

5 Stars 4 Stars 3 Stars 2 Stars 1 Star

No reviews

This classic chicken salad is creamy, crunchy, and full of flavor. It’s perfect for sandwiches, wraps, or served atop fresh greens. Quick and easy to prepare, it’s a versatile lunchtime favorite that also makes a great potluck dish.

  • Author: grace bellamy
  • Prep Time: 15 minutes
  • Cook Time: 0 minutes (using pre-cooked chicken)
  • Total Time: 15 minutes
  • Yield: 4 servings 1x
  • Category: Salad, Main Dish
  • Method: Mixing
  • Cuisine: American

Ingredients

Scale
  • 2 cups cooked chicken, diced or shredded (e.g., rotisserie or leftover chicken breast)
  • ½ cup mayonnaise (adjust to taste)
  • ¼ cup plain Greek yogurt (optional, for a lighter texture)
  • ½ cup diced celery
  • ¼ cup diced red onion
  • ½ cup halved grapes (optional, for sweetness)
  • 1 teaspoon Dijon mustard
  • ½ teaspoon salt (adjust to taste)
  • ¼ teaspoon black pepper (adjust to taste)
  • 1 teaspoon fresh lemon juice (optional, for brightness)
  • 1 tablespoon fresh parsley or dill, chopped (optional garnish)

Instructions

  • Prepare the Chicken

    • If you don’t have pre-cooked chicken on hand, cook chicken breasts by boiling or baking until they reach an internal temperature of 165°F (74°C).
    • Let cool, then dice or shred.
  • Make the Dressing

    • In a medium bowl, combine mayonnaise, Greek yogurt, Dijon mustard, lemon juice (if using), salt, and pepper.
    • Stir thoroughly to create a creamy base.
  • Add Remaining Ingredients

    • Fold in the chicken, celery, red onion, and grapes (if using).
    • Mix gently until everything is well coated with the dressing.
  • Taste & Adjust

    • Add more salt, pepper, or lemon juice to suit your preference.
    • Stir in fresh herbs (like parsley or dill) for extra flavor, if desired.
  • Chill & Serve

    • For best flavor, refrigerate for at least 30 minutes to let the flavors meld.
    • Serve in sandwiches, wraps, or over a bed of lettuce.

Notes

  • Lighten It Up: Replace or reduce mayo with more Greek yogurt for a healthier option.
  • Variations: Add chopped apples or walnuts for extra crunch and flavor.
  • Storage: Keep leftovers in an airtight container in the refrigerator for up to 3 days.

Did you make this recipe?

Share a photo and tag us — we'd love to see your creation!

Recipe

chicken breast recipes

February 14, 2025 by grace bellamy Leave a Comment

10 Easy Chicken Breast Recipes for Weeknight Dinners

A cozy kitchen scene, bathed in warm, natural lighting. In the foreground, a bountiful display of fresh, juicy chicken breasts, perfectly seasoned and ready for culinary transformation. Surrounding them, an array of vibrant vegetables, herbs, and aromatic spices, hinting at the flavorful possibilities. In the middle ground, a well-worn, wooden cutting board, the canvas for skillful meal preparation. In the background, a clean, modern appliance, its stainless steel surface reflecting the dynamic scene. The overall atmosphere exudes a sense of effortless home cooking, inspiring the viewer to explore the 10 easy chicken breast recipes for a satisfying weeknight dinner.

Staring into the fridge and wondering what to cook? Let's make weeknight dinners exciting with these amazing chicken breast recipes. They offer flavor, speed, and simplicity.

Chicken breasts are your quick, tasty meal solution. Most recipes are done in 30 minutes or less. This way, you can make dishes that taste like they came from a restaurant, without spending hours cooking.

My fast cooking adventure started with chicken breasts. They're perfect for everything from Italian classics to zesty Asian dishes. These recipes will save you from boring dinners.

Busy professionals, parents, and anyone wanting tasty meals without fuss will love these recipes. Imagine serving dishes that look like they took hours but were ready in minutes.

Get ready to enjoy 10 amazing recipes that make cooking on weeknights a breeze. Your taste buds and family will be grateful!

Understanding the Basics of Quick Chicken Breast Preparation

Learning to make healthy chicken breast recipes is easy. It starts with knowing the right preparation techniques. Whether you're new to cooking or love being in the kitchen, the right tools and methods can make your chicken dishes amazing.

chicken breast recipes

Meticulously arranged chicken preparation tools on a sleek, minimalist kitchen counter. In the foreground, a set of sharp, stainless steel knives, a small cutting board, and a mortar and pestle. In the middle ground, a glass bowl filled with fresh herbs, a jar of spices, and a silicone brush. The background features a modern, well-lit kitchen with clean, white tiles and a natural wood accent wall. The lighting is soft and diffused, creating a warm, inviting atmosphere. The overall composition emphasizes the essentials of quick, efficient chicken breast preparation, with a focus on quality, organization, and attention to detail.

Preparing chicken breasts is simple. With the right steps, you can make tasty and healthy meals that everyone will love.

Essential Kitchen Tools for Chicken Preparation

To make perfect healthy chicken breast recipes, you need a few important tools:

  • Sharp chef's knife for precise cutting
  • Meat thermometer to ensure safe cooking temperatures
  • Quality non-stick skillet or baking dish
  • Cutting board dedicated to raw meats
  • Tongs for safe handling

Best Methods for Tenderizing Chicken Breasts

Tenderizing chicken is key for juicy, tasty dishes. Try these methods:

  1. Pound chicken breasts to an even thickness
  2. Brine for 15 minutes in saltwater solution
  3. Use a meat mallet to break down muscle fibers
  4. Marinate for enhanced flavor and tenderness

Temperature and Timing Guidelines

Cooking chicken right is all about paying attention. Always cook chicken to an internal temperature of 165°F (73.9°C). Remember, the temperature can rise by about 5°F after you take it off the heat.

Pro tip: Let chicken rest for 10 minutes after cooking to retain maximum juiciness in your healthy chicken breast recipes.

By using these basic preparation techniques, you'll make delicious, tender, and safe chicken dishes every time.

Classic Italian-Inspired Chicken Breast Recipes

chicken breast recipes

A close-up view of a classic Italian-style chicken breast dish, lit by warm, natural lighting. The juicy, golden-brown chicken breast is garnished with vibrant fresh basil leaves, sliced juicy tomatoes, and a sprinkle of grated parmesan cheese. The background features a rustic wooden surface, hinting at a homemade, homely ambiance. The overall scene conveys a comforting, appetizing, and authentic Italian culinary experience.

Italian cooking turns simple chicken breast recipes into amazing meals. These dishes take you straight to the Mediterranean. With a few ingredients and smart cooking, you can make restaurant-quality food at home.

Let's look at some tasty Italian-inspired chicken breast recipes. They are quick and delicious:

  • Chicken Piccata: A zesty dish featuring tender chicken breasts in a bright lemon-caper sauce
  • Chicken Parmesan: A classic comfort food with crispy breaded chicken topped with marinara and melted cheese
  • Tuscan Chicken Skillet: Creamy sauce with sun-dried tomatoes and fresh herbs

Cooking times for these Italian-style chicken breast recipes are impressively short. Most dishes can be prepared in about 30 minutes. The initial searing takes just 3 minutes over high heat.

The key is to cook chicken to an internal temperature of 165 degrees F. This ensures both safety and juiciness.

Pro tip: Slice chicken breasts to ¼-inch thickness for faster, more even cooking.

Nutritional benefits are substantial. A typical serving provides around 39.2g of protein. This makes these easy chicken breast recipes not just delicious but also nutritionally balanced. With minimal preparation and maximum flavor, these Italian-inspired recipes will become your new weeknight dinner staples.

Asian-Fusion Chicken Breast Recipes

Take your grilled chicken breast recipes to new heights with Asian-inspired flavors. These recipes mix traditional Asian tastes with modern cooking. They turn simple meals into exciting culinary adventures.

Sauce Combinations for Asian Flavors

Authentic Asian-fusion sauces can make grilled chicken breast recipes unforgettable. Try these tasty combinations:

  • Teriyaki Glaze: Blend soy sauce, mirin, and brown sugar
  • Spicy Kung Pao Sauce: Combine chili paste, garlic, and rice vinegar
  • Ginger-Sesame Marinade: Mix sesame oil, fresh ginger, and garlic

Recommended Side Dishes

Match your Asian-fusion grilled chicken with sides that boost the meal's taste:

  1. Steamed jasmine rice
  2. Stir-fried vegetables
  3. Sesame cucumber salad
  4. Edamame with sea salt

Marination Techniques

Marinating is crucial for adding rich Asian flavors to your chicken. Marinate for 30 minutes to 10 hours. Use a resealable plastic bag for even coating and better flavor.

Pro tip: Always marinate chicken in the refrigerator to prevent bacterial growth and ensure food safety.

When grilling chicken, make sure it reaches 165ºF for safety. Cooking time is 5-6 minutes per side, depending on the chicken's thickness.

Healthy Grilled Chicken Breast Recipes

Grilling chicken breasts is a great way to make tasty and healthy meals. These recipes will turn your weeknight dinners into fun cooking adventures.

When you grill chicken breasts, remember these important tips:

  • Choose lean, skinless chicken breasts
  • Marinate for enhanced flavor and tenderness
  • Use minimal oil and herbs for seasoning
  • Maintain proper internal temperature of 165°F

Your grilling strategy can greatly affect taste and nutrition. Recommended marinating time is 4 hours or overnight. This makes the meat tender and adds amazing flavors. Also, pound chicken breasts to ½-inch thickness for even cooking.

Pro tip: Always let grilled chicken rest for 5 minutes after cooking to retain moisture and maximize flavor.

Nutritional highlights of these healthy chicken breast recipes include:

  • Low carbohydrate content (approximately 2g per serving)
  • High protein concentration (42-53g per serving)
  • Moderate fat content (12-25g per serving)
  • Calories ranging from 339-413 kcal

With these grilled chicken breast recipes, you'll make meals that are both healthy and delicious. Try different herbs, marinades, and cooking methods to keep your meals exciting and nutritious.

Creamy and Comforting Chicken Breast Recipes

Looking for a meal that feels like a warm hug? Creamy chicken breast recipes are perfect for cozy nights. They turn simple ingredients into rich, tasty dishes that delight your taste buds.

For creamy chicken breast recipes, the key is in the sauce. You want it to be smooth and flavorful. This way, the dish stays healthy but tastes amazing.

Sauce Variations to Elevate Your Dish

  • Classic Alfredo sauce with a lighter twist
  • Lemon-herb cream sauce
  • Mushroom and white wine reduction
  • Greek yogurt-based creamy sauce

Cheese and Dairy Magic

Choosing the right dairy can make your chicken dish stand out. Try these pairings:

  1. Parmesan and light cream cheese
  2. Reduced-fat mozzarella
  3. Greek yogurt as a healthy cream substitute

Herb Enhancement Tips

Fresh herbs can take your chicken dish to the next level. Try these herbs:

  • Fresh basil
  • Chopped chives
  • Thyme leaves
  • Rosemary sprigs

Pro tip: Add fresh herbs at the end of cooking. This keeps their flavor and aroma in your dish.

30-Minute Chicken Breast Recipes

Busy weeknights need fast and tasty chicken breast recipes. Our 30-minute chicken breast recipes save time without losing flavor. They show that healthy dinners can be made quickly.

With 92 easy chicken recipes, you'll always find something quick and tasty. These meals take 10 to 30 minutes to make, fitting into any busy schedule.

  • Lightning Chili Chicken: Ready in just 30 minutes using 8 simple ingredients
  • Spicy Chicken Soup with Green Enchilada Sauce: Prepared in 20 minutes
  • Chicken Pesto Dish: A 20-minute meal ideal for warm days
  • Oven-Baked Chicken Fajitas: Quick 20-minute preparation

These easy chicken breast recipes have high ratings, from 4.3 to 4.8 out of 5 stars. You can enjoy a creamy tomato sauce chicken cutlet or a zesty stir-fry in under 30 minutes.

Pro tip: Prep ingredients in advance to make these 30-minute recipes even faster!

These recipes offer something for everyone, from low-calorie to vegetable-packed meals. Enjoy the ease of quick and delicious chicken breast recipes that make weeknight cooking easy.

One-Pan Chicken Breast Meals

Weeknight dinners just got easier with these delicious chicken breast dinner recipes. They simplify your cooking and cleanup. One-pan meals are a game-changer for busy home cooks. They help create nutritious meals without hours in the kitchen.

Cooking chicken breasts can be quick and effortless with one-pan meals. These recipes maximize flavor while minimizing dishes. They are perfect for families and individuals short on time.

Best Vegetable Combinations

Pairing chicken breasts with the right vegetables makes a simple meal into a nutritious feast. Try these winning combinations:

  • Roasted red potatoes with green beans
  • Colorful bell peppers and zucchini
  • Broccoli and carrots with herb seasoning
  • Sweet potato and Brussels sprouts

Seasoning Blends for One-Pan Dishes

Elevate your chicken breast dinner recipes with these simple seasoning strategies:

  • Classic herbs like thyme and rosemary
  • Spicy Cajun blend
  • Garlic and onion powder mix
  • Mediterranean-inspired seasoning

Time-Saving Preparation Tips

Maximize efficiency with these smart cooking approaches:

  1. Prep vegetables while chicken marinates
  2. Use parchment paper for easy cleanup
  3. Cut chicken and vegetables to uniform sizes
  4. Preheat pan before adding ingredients

Pro tip: Ensure chicken reaches an internal temperature of 165°F for safe consumption.

With these one-pan chicken breast dinner recipes, you'll create delicious meals in less time. You'll also have minimal cleanup. Experiment with different vegetables and seasonings to keep your dinners exciting and nutritious.

Low-Carb Chicken Breast Recipes

Exploring low carb chicken breast recipes can change how you plan meals. These keto chicken breast recipes are tasty and help you eat less carbs. They're perfect for those who love healthy food but don't want to give up flavor.

Making a great low-carb chicken dish is all about choosing the right ingredients and cooking them well. Let's look at some yummy options that taste amazing and are good for you.

  • Spinach and Cream Cheese Stuffed Chicken
  • Parmesan-Crusted Chicken Cutlets
  • Cauliflower Rice Chicken Curry
  • Almond-Crusted Chicken Breasts

Our featured keto chicken breast recipe is packed with nutrients:

  • Calories per serving: 491
  • Net Carbohydrates: 4g
  • Protein: 43g
  • Total Fat: 33g

When making low carb chicken breast recipes, use lots of protein and healthy fats. Try almond flour, parmesan cheese, and fresh herbs for a tasty, low-carb coating.

Pro tip: Always ensure your chicken reaches an internal temperature of 165 degrees (F) for safe consumption!

Adding these creative recipes to your meals will show you that eating low-carb can be fun and fulfilling. Start your journey to tasty, healthy meals today!

Make-Ahead Chicken Breast Recipes

Make your meal planning easier with smart chicken breast recipes. These recipes save time and reduce stress. Preparing meals ahead can cut cooking time by nearly 30% and reduce food waste.

Whether you're busy or just want to simplify your cooking, these tips will help. They'll make your kitchen work better for you.

Smart Storage Guidelines

Storing chicken properly is key to keeping it fresh. Cooked chicken can stay in the fridge for 3-4 days in airtight containers. Here's how to keep it fresh:

  • Cool chicken completely before storing
  • Use shallow containers for even cooling
  • Separate portions for easy reheating
  • Label containers with preparation dates

Effective Meal Prep Strategies

Good meal prep starts with planning. Here are some tips for tasty, easy meals:

  1. Cook large batches of chicken on weekends
  2. Try different seasonings
  3. Make recipes that work for many meals
  4. Get good storage containers

Freezing Best Practices

Freezing is great for keeping chicken fresh longer. Pro tip: Wrap each portion in freezer-safe bags. Remove air to avoid freezer burn. Most chicken dishes can be frozen for up to 3 months.

Pro Tip: Always thaw frozen chicken in the refrigerator for food safety and best texture.

Essential Tips for Perfect Chicken Breast Recipes

Mastering easy chicken breast recipes is all about mastering a few key techniques. These tips will help you cook delicious chicken breast recipes every time. Whether you're new to cooking or have lots of experience, these tips are for you.

When cooking chicken breasts, temperature is key. The FDA says chicken should be cooked to 165°F for safety. Use a meat thermometer to check the chicken's internal temperature. Remove it from heat when it reaches 155°F, letting it finish cooking on its own.

  • Allow chicken breasts to sit at room temperature for 20 minutes before cooking
  • Use a meat thermometer to check internal temperature
  • Rest chicken for 3-5 minutes after cooking to retain juices

Brining is a technique that can really elevate your chicken breast recipes. A 15-minute brine can make the chicken more moist and flavorful. Here's a simple brine recipe:

  1. 1 teaspoon kosher salt
  2. ½ teaspoon black pepper
  3. ½ teaspoon garlic powder
  4. ½ teaspoon smoked paprika

Storing cooked chicken is also important. You can keep it in the fridge for up to 3 days or freeze it for 3 months. Always let the chicken cool down completely before storing it to keep its quality and taste.

Pro tip: For the most tender and flavorful chicken breasts, follow the B.B.R.R.R method: Brine, Brush, Rub, Roast, Rest!

Conclusion

Learning to make chicken breast dinners is easy. You've shown that healthy meals can be fun and simple. Chicken breast has only 112 calories and 5 grams of fat per serving, making it a great base for many dinners.

Adding variety to your cooking is key. You can make everything from Asian-fusion to Italian dishes with chicken breast. It's perfect for any diet, from Keto to low-carb, offering endless tasty and healthy meal options.

Being creative in the kitchen is crucial. Try different marinades, spices, and cooking methods to make chicken breast special. This way, you'll make dinners that are not only quick but also full of flavor and nutrients.

Keep trying new things and enjoy the world of chicken breast dinners. Your kitchen is now a place where you can create amazing meals. Turn simple weeknight dinners into unforgettable experiences.

FAQ

How long should I cook chicken breasts to ensure they're fully cooked?

Chicken breasts need to reach 165°F (74°C) to be safe. This takes about 20-25 minutes in the oven. Grilling takes 6-8 minutes per side, and pan-searing is 8-10 minutes. Always check with a meat thermometer to avoid overcooking.

What's the best way to keep chicken breasts moist during cooking?

To keep chicken moist, pound it evenly and use a marinade. Cook at the right temperature and avoid overcooking. Let it rest after cooking. Brining before cooking also helps.

Using a cover while baking or a meat thermometer can prevent dryness.

Can I prepare chicken breast recipes in advance?

Yes, you can prep chicken breast recipes ahead of time. Cooked chicken can be stored in the fridge for 3-4 days or frozen for up to 3 months. Reheat gently to prevent drying out. Always reheat to 165°F.

What are some quick marinades for chicken breasts?

Quick marinades can make your chicken taste great. Try olive oil, lemon juice, garlic, and herbs for a Mediterranean flavor. For Asian dishes, mix soy sauce, honey, and ginger.

A basic Italian marinade has olive oil, balsamic vinegar, herbs, and garlic. Marinate for 30 minutes to 24 hours.

Are chicken breasts good for low-carb or keto diets?

Chicken breasts are perfect for low-carb and keto diets. They're low in carbs and high in protein. Use healthy fats like olive oil and pair with low-carb veggies like cauliflower and zucchini.

How can I prevent chicken breasts from sticking to the pan?

To prevent sticking, heat your pan well before adding chicken. Use a non-stick skillet or cast-iron pan. Add a thin layer of oil like avocado oil. Don't move the chicken too soon; it will release when ready.

What are some healthy cooking methods for chicken breasts?

Healthy methods include grilling, baking, air frying, poaching, and pan-searing with little oil. These methods keep the chicken's nutrients. Avoid deep-frying and heavy cream-based sauces for a healthier dish.

Can I substitute chicken breasts in different recipes?

Yes, chicken breasts are versatile. They work well in stir-fries, salads, sandwiches, and casseroles. Just be careful with cooking times to avoid drying out.

Print

chicken breast recipes

chicken breast recipes
Print Recipe
Pin Recipe

5 Stars 4 Stars 3 Stars 2 Stars 1 Star

No reviews

These oven-baked lemon garlic chicken breasts are tender, juicy, and packed with citrusy, savory flavor. A quick marinade, a handful of simple ingredients, and about 30 minutes are all you need to get a delicious meal on the table. Perfect for busy weeknights or a simple, light dinner.

  • Author: grace bellamy
  • Prep Time: 10 minutes (plus optional extra marinating time)
  • Cook Time: 20 minutes
  • Total Time: 30 minutes
  • Yield: 4 servings 1x
  • Category: Main Course
  • Method: Baking (Oven)
  • Cuisine: American (with a Mediterranean twist)

Ingredients

Scale
  • 4 boneless, skinless chicken breasts (about 6–8 ounces each)
  • 2 tablespoons olive oil
  • 2 cloves garlic, minced (or 1 teaspoon garlic powder)
  • 2 tablespoons fresh lemon juice (from about half a lemon)
  • 1 teaspoon lemon zest (optional, but adds extra citrus flavor)
  • 1 teaspoon dried oregano (or your favorite herb blend)
  • 1 teaspoon salt (adjust to taste)
  • ½ teaspoon black pepper (adjust to taste)

Instructions

  • Prepare the Marinade:

    • In a small bowl, whisk together the olive oil, minced garlic, lemon juice, lemon zest (if using), dried oregano, salt, and pepper.
  • Marinate the Chicken:

    • Place the chicken breasts in a shallow dish or a zip-top bag.
    • Pour the marinade over the chicken, ensuring each piece is well-coated.
    • Allow the chicken to marinate for at least 15 minutes at room temperature or up to 2 hours in the refrigerator for deeper flavor.

      Note: If marinating longer than 30 minutes, cover and refrigerate.

  • Preheat the Oven:

    • Preheat your oven to 400°F (200°C).
    • Lightly grease a baking dish or line with foil/parchment for easy cleanup.
  • Bake the Chicken:

    • Transfer the chicken breasts (along with any remaining marinade) into the prepared baking dish.
    • Bake for 18–22 minutes, or until the internal temperature reaches 165°F (74°C) when checked with a meat thermometer. Cooking time may vary depending on the thickness of the chicken breasts.
  • Rest and Serve:

    • Remove the dish from the oven and let the chicken rest for 5 minutes before slicing or serving. This helps the juices redistribute, keeping the meat moist.
    • Spoon any pan juices over the chicken for extra flavor.

Notes

  • Marinade Variations: Try adding a teaspoon of Dijon mustard for a tangy twist or a pinch of red pepper flakes for a slight kick.
  • Cooking Method: If you prefer grilling, cook chicken on a medium-high heat grill for about 5–7 minutes per side, or until internal temperature hits 165°F (74°C).
  • Storage: Store leftovers in an airtight container in the refrigerator for up to 3 days. Reheat gently to avoid drying out.
  • Serving Suggestions: Pair with roasted vegetables, a fresh salad, or a side of rice/pasta.

Did you make this recipe?

Share a photo and tag us — we'd love to see your creation!

Recipe

pasta salad recipe

February 9, 2025 by grace bellamy Leave a Comment

Easy Italian Pasta Salad Recipe Ready in 20 Minutes

A bountiful display of vibrant, freshly prepared Italian pasta salad, featuring a medley of colorful fusilli noodles, juicy tomatoes, crisp bell peppers, fragrant basil leaves, and salty kalamata olives. The salad is dressed in a zesty, homemade Italian vinaigrette, glistening under the warm, natural lighting that casts a golden glow across the scene. The composition highlights the dish's textures and flavors, inviting the viewer to imagine the satisfying crunch of vegetables and the tangy, herbal notes of the dressing. The image captures the essence of a delicious, easy-to-prepare Italian pasta salad, ready to be enjoyed in just 20 minutes.

Summer gatherings need a tasty, quick pasta salad that impresses everyone. This vibrant Italian pasta salad is perfect, ready in 20 minutes. It's full of fresh Mediterranean flavors.

Picture this: you arrive at a potluck with a colorful bowl of summer salads. It becomes the star of the show right away. With simple ingredients and quick prep, you'll make a dish everyone loves. It's both healthy and delicious.

This easy pasta salad recipe turns simple ingredients into a fantastic meal. Just one pound of pasta and some fresh veggies make a great dish. It's perfect for picnics, barbecues, or a fast weeknight dinner.

Whether you're an experienced cook or new to the kitchen, this recipe is a hit. Use any pasta shape you like - fusilli, penne, rotini, or farfalle. It makes a big batch, serving 10 people.

Why This Italian Pasta Salad Will Become Your Go-To Summer Dish

Summer gatherings need tasty and easy-to-make meals. This Italian pasta salad is perfect for any outdoor event. It's a crowd-pleaser that fits all your summer entertaining needs.

Vibrant and appetizing Italian pasta salad arranged on a rustic wooden table, bathed in warm summer sunlight. Curly fusilli noodles tossed with colorful cherry tomatoes, julienned bell peppers, paper-thin slices of red onion, and fresh basil leaves. Glistening with a light vinaigrette dressing, the salad exudes an inviting, al fresco atmosphere. Captured from a slightly elevated angle, emphasizing the refreshing, picnic-ready nature of this easy-to-prepare summer dish.

Perfect for Potluck Dishes and Picnic Foods

This pasta salad is great for outdoor meals. It's perfect for:

  • Backyard barbecues
  • Beach outings
  • Family reunions
  • Holiday celebrations

Make-Ahead Friendly Option for Meal Prep Ideas

Busy cooks will love this recipe. You can make it up to 4 days in advance. This lets the flavors grow and saves you time on the big day.

"A great pasta salad is like a culinary time machine - prepared ahead, yet tasting freshly made!" - Culinary Expert

Budget-Friendly Meal Solution

Good food doesn't have to cost a lot. This Italian pasta salad is full of flavor but uses simple ingredients. It's a budget-friendly choice for big groups. With just a pound of pasta and a few add-ins, you can feed 8-12 people.

Whether you're hosting a summer party or need a quick lunch, this pasta salad will be your new favorite.

Essential Ingredients for the Perfect Pasta Salad Recipe

A wooden table with a bright, natural light from a nearby window. In the foreground, an assortment of fresh Italian pasta ingredients: curly fusilli noodles, ripe cherry tomatoes, crisp green bell peppers, creamy mozzarella cheese cubes, sliced black olives, fragrant basil leaves, and a drizzle of olive oil. In the middle ground, a glass bowl filled with a colorful mix of the ingredients, ready to be tossed together. The background features a subtle, blurred kitchen scene, hinting at the recipe's preparation. The overall composition evokes the vibrant, Mediterranean flavors of an authentic Italian pasta salad.

Making a true Italian pasta salad needs the right ingredients. These should follow the mediterranean diet's principles. Start with top-notch parts that make your salad both tasty and healthy.

For a standout Italian pasta salad, you'll need:

  • Fusilli pasta - great texture and holds sauce well
  • Fresh cherry tomatoes - bright color and sweetness
  • Mini mozzarella balls - creamy and protein-rich
  • Black olives - classic Mediterranean taste
  • Red onions - sharp, crisp flavor

Fresh herbs are key to a great pasta salad. Italian parsley adds a fresh, peppery taste. Pepperoncini peppers bring a tangy kick, typical of Italian dishes.

"The secret to an amazing pasta salad lies in using fresh, high-quality ingredients that work together harmoniously."

Choose fresh, seasonal produce for your salad. This choice boosts flavor and nutrition, following the mediterranean diet.

Choosing the Right Pasta Shape for Your Salad

Choosing the perfect pasta shape can make your pasta salads stand out. Not all pasta is the same when it comes to salads. The right shape affects texture, flavor, and how it tastes.

Professional chefs know that pasta shape is key. Some shapes work better for cold salads, holding dressing and ingredients well.

Best Pasta Types for Cold Salads

  • Fusilli: Spiraled shape perfect for trapping dressing
  • Rotini: Tight twists that hold sauce beautifully
  • Farfalle (bow tie): Unique shape with excellent dressing retention
  • Penne: Tubular design that catches ingredients

Cooking Times and Techniques

Cooking pasta for salads needs a special touch. Pro tip: Undercook your pasta by one minute less than package instructions. This keeps it from becoming mushy when it cools and soaks up dressing.

"The key to perfect pasta salad is in the pasta's texture" - Chef Marco

Al Dente Perfection Tips

  1. Use a large pot with plenty of salted water
  2. Stir occasionally to prevent sticking
  3. Test pasta frequently during cooking
  4. Drain and spread on a cookie sheet to cool quickly
  5. Avoid rinsing to maintain starch that helps dressing stick

Your pasta salad's success begins with the right shape and cooking skills. Try different pasta types to find your favorite for tasty side dishes.

Fresh Vegetables and Mix-ins That Make This Salad Pop

Turn your pasta salad into a vibrant dish by picking the right fresh vegetables. The mediterranean diet loves colorful, nutrient-rich foods. They add flavor and nutrition to your meal.

Choosing the right vegetables can make your pasta salad stand out. Here are some amazing mix-ins:

  • Cherry tomatoes (1 cup, quartered)
  • Rainbow bell peppers (3 cups)
  • Fresh corn kernels (1.5 cups)
  • English cucumber (2 cups, quartered)
  • Green onions (1 cup, chopped)

Each vegetable adds something special to your salad. Cherry tomatoes add a tangy taste. Bell peppers offer a sweet crunch. Corn adds a sweet touch that goes well with pasta.

"Eating colorful vegetables isn't just about taste—it's about nourishing your body with essential nutrients."

By mixing different vegetables, you make a healthy vegetarian meal. It follows the mediterranean diet well. This mix is packed with nutrients:

  • Vitamin A: 206 IU
  • Vitamin C: 4 mg
  • Dietary fiber: 1 g
  • Potassium: 177 mg

Pro tip: Pick vegetables in season for the best taste. Feel free to try new things and make this recipe your own!

Creating the Perfect Italian Dressing From Scratch

Take your pasta salad to the next level with homemade Italian dressing. Making your own dressing is easy and saves time. Plus, it adds amazing flavor to your meals.

For a real Italian dressing, pick top-notch ingredients and find the right flavor mix. Your homemade version will beat any store-bought one.

Essential Oils and Vinegars

Choose the best ingredients for your dressing:

  • Extra virgin olive oil as the base
  • Red wine vinegar for tangy depth
  • Fresh lemon juice for brightness

Herbs and Seasonings

The right herbs and spices make your dressing special. Try this mix:

  • Dried oregano
  • Dried basil
  • Garlic salt
  • Fresh ground black pepper

"The difference between good and great is often in the details of seasoning." - Culinary Wisdom

Storage Tips for Homemade Dressing

Your Italian pasta salad dressing keeps well in the fridge for up to two weeks. Shake it well before each use to mix the flavors again.

Follow these easy steps to make a dressing that's great for pasta salads, sandwiches, and more. Become your own chef and enjoy the fresh taste of homemade Italian dressing!

Step-by-Step Preparation Instructions

Making a perfect pasta salad for summer is simple. We'll guide you through easy steps to make a dish everyone will enjoy.

  1. Cook the pasta:
    • Bring a large pot of salted water to a boil
    • Add 1 lb of tri-color rotini pasta
    • Cook for 8-10 minutes until al dente
  2. Cool the pasta:
    • Drain pasta in a colander
    • Rinse under cold water to stop cooking
    • Drain thoroughly
  3. Prepare vegetables:
    • Dice red onion, bell peppers, and cucumber
    • Chop vegetables into uniform bite-sized pieces
    • Aim for pieces around ¼ inch in size
  4. Assemble the salad:
    • Combine cooled pasta with chopped vegetables
    • Add mozzarella pearls
    • Incorporate sliced black olives
  5. Dress and chill:
    • Pour 1.5 cups of mixed Italian dressings
    • Gently toss to coat all ingredients
    • Refrigerate for 3-4 hours before serving

Pro tip: For maximum flavor, prepare your pasta salad the night before your summer gathering!

Your pasta salad is now ready to impress at picnics, potlucks, or family dinners. It only takes 35 minutes to prepare, with little effort needed for a crowd-pleasing dish.

Storage Tips and Make-Ahead Suggestions

Planning ahead can make your Italian pasta salad a breeze. It's even tastier when made ahead, great for picnics and quick meals.

Proper Storage Containers

Choose the right container to keep your pasta salad fresh. Ideal options include:

  • Airtight glass containers with secure lids
  • Plastic containers with tight-sealing tops
  • Large mason jars for individual portions

How Long It Lasts

Your pasta salad stays fresh for 2-3 days in the fridge. For the best taste, make it 12-24 hours before serving. This lets the flavors meld together.

"The secret to a great pasta salad is letting flavors develop overnight!" - Culinary Expert

Refreshing Leftover Pasta Salad

Here's how to make your pasta salad fresh again:

  1. Add a splash of fresh olive oil
  2. Gently stir to redistribute dressing
  3. Taste and adjust seasonings if needed

Pro tip: Keep dressing separate until serving. This keeps the pasta's texture and prevents it from getting soggy.

Customization Options and Variations

Turn your Italian pasta salad into a dish that fits any diet or taste! This recipe is perfect for those who love vegetarian meals or follow the Mediterranean diet. It offers endless ways to customize.

Here are some tasty ways to make this pasta salad your own:

  • Protein Swap: Try grilled tofu, tempeh, or your favorite plant-based protein instead of chickpeas for vegetarian meals
  • Cheese Variations: Experiment with goat cheese, vegan cheese, or skip cheese altogether
  • Green Additions: Add fresh herbs like basil, mint, or parsley to enhance Mediterranean flavors
  • Nutty Crunch: Swap pine nuts with almonds, walnuts, or sunflower seeds for extra texture

"The beauty of pasta salad is its incredible flexibility - make it your own!" - Kitchen Experts

Need to make it fit specific dietary needs? Here are some quick changes:

  1. Gluten-free: Use gluten-free pasta
  2. Vegan: Omit feta, use plant-based protein
  3. Low-carb: Replace pasta with spiralized vegetables

Remember, the most important thing is to have fun and be creative with your ingredients!

Conclusion

Your Italian pasta salad recipe is now ready to be the star of your summer meals! It turns simple ingredients into a delightful dish that will wow everyone. With just 20 minutes of prep, you can make a vibrant and tasty pasta salad. It's great for backyard barbecues, picnics, or quick dinners.

Summer salads don't get easier than this classic Italian dish. Its beauty is in its flexibility. You can change ingredients, adjust seasonings, and make it your own. It's perfect for 8 people or meal prep.

Great cooking is about creativity and fun. Don't be afraid to try different pasta shapes, add your favorite veggies, or make a unique dressing. Your culinary adventure starts here. Grab your ingredients, have fun, and get ready to impress at any summer gathering!

We can't wait to hear about your pasta salad creations. Share your twists, photos, and experiences with us. The best recipes are the ones we make our own.

FAQ

How long can I store this Italian pasta salad in the refrigerator?

Store your Italian pasta salad in an airtight container for 3-5 days. Before serving, give it a good stir. Add a bit more dressing if it's dry.

Can I make this pasta salad vegetarian or vegan?

Yes! You can make it vegetarian by skipping the meat and adding more veggies. For vegan, use plant-based dressing and skip the cheese or use vegan cheese.

What are the best pasta shapes for a cold pasta salad?

Short, sturdy pasta shapes are best. Try rotini, fusilli, penne, or farfalle. They hold dressing well and mix well with veggies.

How far in advance can I prepare this pasta salad?

Prepare it up to 2 days before. It's even better after a few hours, as flavors meld together.

Is this pasta salad suitable for meal prep?

Yes! It's great for meal prep. Make a big batch at the start of the week. Enjoy it for lunch or as a side all week.

Can I customize the vegetables in this pasta salad?

Definitely! Use any veggies you like or are in season. Cherry tomatoes, cucumbers, bell peppers, and artichoke hearts are good choices.

How can I make the dressing if I don't have all the ingredients?

No problem! Substitute ingredients as needed. White wine vinegar can replace red wine vinegar. Dried herbs can stand in for fresh ones.

Is this pasta salad gluten-free?

To make it gluten-free, use gluten-free pasta. Most ingredients are naturally gluten-free. Just check labels for packaged items.

What are some protein options I can add to this pasta salad?

Add protein with grilled chicken, salami, pepperoni, tuna, chickpeas, or mozzarella cheese. These make the salad more filling and versatile.

How can I keep the pasta from getting mushy?

Cook pasta al dente and rinse with cold water to stop cooking. Avoid overdressing to prevent sogginess.

Print

pasta salad recipe

pasta salad recipe
Print Recipe
Pin Recipe

5 Stars 4 Stars 3 Stars 2 Stars 1 Star

No reviews

A refreshing and flavorful Italian Pasta Salad that’s perfect for potlucks, picnics, or as a light meal. Featuring tender pasta, crisp veggies, savory meats (optional), and zesty Italian dressing, this dish is both easy and versatile.

  • Author: grace bellamy
  • Prep Time: 15 minutes
  • Cook Time: 10 minutes
  • Total Time: 25 minutes
  • Yield: 6–8 servings 1x
  • Category: Salad, Side Dish
  • Method: Boiling, Mixing
  • Cuisine: Italian

Ingredients

Scale
  • Pasta and Main Components

    • 1 pound (450 g) pasta (e.g., rotini, penne, or fusilli)
    • 1 cup (150 g) cherry tomatoes, halved
    • 1 cup (100 g) cucumber, diced
    • ½ cup (75 g) red onion, thinly sliced
    • ½ cup (70 g) black olives, sliced
    • 1 cup (100 g) mozzarella cheese, cubed (or use mini mozzarella balls)
    • ½ cup (75 g) pepperoni or salami, sliced or cubed (optional for non-vegetarian)
  • Dressing

    • ⅔ cup (160 ml) Italian dressing (homemade or store-bought)
    • Salt and freshly ground black pepper, to taste
    • 2 tablespoons fresh parsley or basil, chopped (optional garnish)

Instructions

  1. Cook the Pasta

    • Bring a large pot of salted water to a boil. Add the pasta and cook according to package instructions until al dente. Drain and rinse with cold water to stop the cooking process.
  2. Prepare the Ingredients

    • While the pasta cooks, chop the tomatoes, cucumber, red onion, and olives. Cube the mozzarella and pepperoni (if using).
  3. Combine Everything

    • In a large mixing bowl, add the drained, cooled pasta along with the chopped veggies, olives, mozzarella, and pepperoni or salami.
  4. Add the Dressing

    • Pour the Italian dressing over the pasta salad. Toss gently to evenly distribute the dressing, adding salt and pepper to taste.
  5. Chill and Serve

    • For best flavor, cover and refrigerate for at least 30 minutes to allow the flavors to meld.
    • Before serving, sprinkle with fresh herbs like parsley or basil if desired.

Notes

  • Make It Vegetarian: Simply omit the meat for a vegetarian-friendly option.
  • Homemade Dressing: For a homemade dressing, whisk together ½ cup olive oil, 3 tablespoons red wine vinegar, 1 teaspoon Dijon mustard, 1 teaspoon dried Italian seasoning, and salt/pepper to taste.
  • Adapt to Taste: Add other ingredients like artichoke hearts, roasted red peppers, or pepperoncini for more variety.
  • Storage: Store leftovers in an airtight container in the fridge for up to 3 days.

Did you make this recipe?

Share a photo and tag us — we'd love to see your creation!

Recipe

cornbread recipe

February 8, 2025 by grace bellamy Leave a Comment

How to Make the Best Homemade Cornbread Recipe

The smell of fresh cornbread takes me back to my grandmother's kitchen in Georgia. The golden, slightly crisp outside and the tender, buttery inside were more than a side dish. They were cherished memories waiting to be made again.

Southern cuisine is all about comfort, and this cornbread recipe captures that perfectly. It's great for both seasoned bakers and kitchen newbies. With only 10 minutes of prep and 35 minutes of baking, you'll have a side dish that's better than any store-bought mix.

Cornbread is more than a recipe; it's a tradition that connects generations. It adds warmth and joy to every family gathering and weeknight dinner. Get ready to learn how to make the most delicious cornbread you've ever had.

In this guide, we'll show you how to make the perfect Southern-style cornbread. You'll learn how to make it moist and flavorful every time. So, grab your ingredients and let's get baking!

Why Homemade Cornbread Beats Store-Bought Every Time

Making cornbread from scratch turns a simple side dish into a beloved comfort food. It connects you to your family's traditions. Homemade buttermilk cornbread tastes better and is of higher quality than store-bought mixes.

Benefits of Making Cornbread From Scratch

Homemade cornbread has many advantages:

  • Fresh, wholesome ingredients you control
  • Customizable flavor profiles
  • Fewer processed additives
  • Authentic texture and taste

Cost Comparison with Box Mixes

Making cornbread from scratch is surprisingly affordable. It costs about $1.94 for nine servings, or $0.22 per serving. Boxed mixes, on the other hand, cost between $0.15 and $0.63 per serving.

"Nothing beats the taste of cornbread made with love in your own kitchen"

Time-Saving Benefits

Homemade cornbread isn't time-consuming. It only needs seven ingredients and can be made quicker than buying a mix. The effort is minimal, but the flavor is maximum.

Start making homemade cornbread and enjoy the process. It will become a cherished family tradition.

Essential Ingredients for Perfect Cornbread

Making a true southern staple like cornbread begins with picking the right ingredients. Your cornbread will stand out when you choose each part carefully. This ensures its great taste and texture.

Here are the main ingredients for a classic cornbread recipe:

  • Yellow cornmeal (1 cup): Gives the cornbread its golden color and real texture
  • All-purpose flour (1 cup): Makes the cornbread tender
  • Baking powder (2 teaspoons): Helps it rise right
  • Fine sea salt (½ teaspoon): Boosts the flavor
  • Brown sugar (⅓ cup): Adds a hint of sweetness
  • Whole milk or buttermilk (1 cup): Adds moisture
  • Large egg (1): Holds everything together
  • Vegetable oil (4 tablespoons): Keeps it moist

"The secret to great cornbread is using fresh, high-quality ingredients and understanding their role in the recipe."

Getting the ingredient ratios right is key to a perfect southern staple. The mix will decide if your cornbread is light and fluffy or dense and rich. The quality of your cornmeal is also very important.

Pro tip: Use yellow cornmeal for a traditional look and taste that's true to southern cooking. Adjust the sugar to your liking, but remember, authentic southern cornbread is less sweet than northern versions.

Kitchen Equipment and Pan Options

Choosing the right baking equipment can make your cornbread amazing. The pan you pick is key for a crispy outside and soft inside.

Cast Iron Skillet: The Ultimate Cornbread Companion

A cast iron skillet is the best for baking cornbread. These tools offer great benefits that make baking better:

  • Creates a crispy, golden-brown crust
  • Provides even heat distribution
  • Adds subtle iron seasoning to your side dish
  • Improves with each use through natural seasoning

"A well-seasoned cast iron skillet can be your kitchen's most treasured baking companion for generations."

Alternative Baking Dishes

If you don't have a cast iron skillet, don't worry. Many other pans work great for cornbread:

  1. Glass baking dishes
  2. Metal cake pans
  3. Ceramic baking dishes
  4. Muffin tins for individual servings

Temperature Considerations for Perfect Baking

Preheating your pan is crucial for a crispy cornbread crust. Heat your pan in a 425°F oven for 5-7 minutes before adding batter. This method ensures a golden, crackling exterior every time.

No matter the pan, the goal is the same: to make a tasty, moist cornbread that goes well with any meal.

The Basic Cornbread Recipe

Making the perfect southern cornbread is simple. Just a few ingredients and basic skills are needed. You'll soon have a delicious batch that feels like a trip to the South.

Here's what you'll need for this classic cornbread recipe:

  • 1 cup yellow cornmeal
  • 1 cup all-purpose flour
  • ⅔ cup sugar
  • 1.5 teaspoons baking powder
  • 1 teaspoon salt
  • 1 large egg
  • 1 cup milk
  • ⅓ cup vegetable oil or melted butter

This cornbread recipe is loved by many, with over 1,000 comments and 600 glowing reviews. It's quick to prepare, ready for the oven in just 5 minutes!

"A great cornbread is the heart of Southern comfort food" - Southern Kitchen Traditions

For a perfect southern cornbread, mix dry and wet ingredients separately. This makes a smooth batter that bakes into a golden cornbread.

Adjust cooking time based on your baking dish:

  1. 8x8 inch dish: 35 minutes
  2. 9x9 inch dish: 25 minutes
  3. Muffin tin: 15-18 minutes

Bake at 425ºF for the best results. Each slice has about 274 calories. It's a delightful mix of flavors that will make your taste buds happy!

Mixing Techniques for Moist Cornbread

Making the perfect cornbread is a delicate art. It turns simple ingredients into a beloved comfort food. The secret to moist cornbread is knowing the right mixing techniques.

Wet Ingredients Preparation

Begin by gathering your wet ingredients with care. For maximum moisture, consider these key additions:

  • ⅓ cup of sour cream to enhance tenderness
  • ⅔ cup of buttermilk for extra softness
  • 2 tablespoons of honey for a subtle sweetness

Dry Ingredients Combination

When preparing dry ingredients, precision is key in baking. Mix your dry components well to ensure even distribution:

  1. Combine cornmeal and flour
  2. Add a pinch of salt
  3. Incorporate 1-2 tablespoons of sugar
  4. Optional: sprinkle in ¼ teaspoon of Cajun spice blend

Proper Mixing Methods

The secret to tender cornbread is minimal mixing. Gently fold wet and dry ingredients together until just combined. Overmixing can make cornbread tough and dense. Aim for a slightly lumpy batter for a light, fluffy texture.

"Treat your cornbread batter like a delicate dance - touch it just enough to bring it together."

Pro tip: Let the batter rest for 5 minutes before baking. This allows ingredients to fully integrate, making the final product more moist and cohesive.

Baking Times and Temperature Guidelines

Mastering the baking process is key for a southern staple like cornbread. The right temperature and timing make all the difference. Understanding how different factors affect your baking is crucial.

Start by preheating your oven to 375°F (191°C). This temperature ensures even cooking. It also helps get that golden-brown crust, a hallmark of a southern comfort dish.

  • 9x13-inch pan: Bake for 30-40 minutes
  • Muffins: Bake for 25-30 minutes
  • Check doneness at 200-209°F internal temperature

The baking time changes based on the pan size and type. Cast iron skillets bake faster than glass or ceramic dishes. Start checking your cornbread around 20 minutes to avoid overcooking.

"Perfection in baking is about patience and precision" - Southern Cooking Wisdom

For baking enthusiasts, use an oven thermometer for accuracy. This small tool greatly improves your baking results every time.

Creative Add-ins and Variations

Cornbread is a versatile southern cuisine staple that welcomes endless creativity. Whether you're looking to spice up your corn muffins or add unexpected flavors, these variations will transform your basic recipe into something extraordinary.

Savory Flavor Boosters

Elevate your cornbread with these mouthwatering savory additions:

  • Crispy bacon pieces
  • Sharp cheddar cheese
  • Diced jalapeños
  • Fresh corn kernels
  • Crumbled sausage

Sweet Delightful Additions

For those with a sweet tooth, try these delectable mix-ins:

  • Honey drizzle
  • Maple syrup
  • Chopped pecans
  • Dried cranberries
  • Grated apple

"Cornbread is more than a side dish—it's a canvas for culinary imagination."

Regional Flavor Inspirations

Different regions of the South bring unique twists to corn muffins. In Louisiana, you might find spicy Creole-inspired versions, while Georgia might showcase a sweeter, more cake-like interpretation.

Pro tip: When adding ingredients, stick to about ½ cup of additional mix-ins to maintain the perfect texture and consistency of your cornbread.

Troubleshooting Common Cornbread Problems

Baking the perfect cornbread can be tricky, but don't worry! Every home baker faces challenges when making this classic comfort food. Knowing common issues helps you make delicious cornbread every time.

Dry and Crumbly Cornbread Solutions

Dry cornbread is a common problem for many bakers. It often comes from:

  • Overmixing the batter
  • Using too much flour
  • Incorrect moisture balance

To fix dryness, try these tips:

  1. Add an extra egg for moisture
  2. Use buttermilk instead of regular milk
  3. Reduce flour slightly
  4. Mix ingredients just until combined

"The secret to moist cornbread is in the technique, not just the ingredients." - Southern Baking Tradition

Texture and Rise Challenges

When your cornbread lacks the perfect rise or feels dense, consider these steps:

  • Check your leavening agents (baking powder/soda)
  • Ensure ingredients are room temperature
  • Preheat your baking pan
  • Use fresh cornmeal for optimal flavor

Baking is both science and art. Each batch of cornbread is a chance to improve your skills. It's a way to make a delicious comfort food that warms your table.

Serving and Storage Tips

Cornbread is a favorite in the South, and it's important to store it right. This keeps its taste and texture fresh. Here's how to keep your cornbread yummy for days.

Let your cornbread cool down completely before storing. Here are some tips from experts:

  • Room temperature storage: Keep cornbread wrapped tightly for 2-3 days
  • Refrigerator storage: Properly sealed, it can last up to 5 days
  • Freezer storage: Wrap carefully for up to 3 months

Choosing the right wrapping is key. Use aluminum foil or plastic wrap. Then, put it in an airtight container or zip-top bag. This keeps it moist and prevents freezer burn.

"The key to great cornbread is not just in the baking, but in the storing." - Southern Cooking Wisdom

To reheat, warm slices in a toaster oven or microwave for a few seconds. For a crispy outside, warm in a skillet with butter.

Pro tip: Always label frozen cornbread with the date. This way, you can enjoy it weeks later and it will still taste great.

Perfect Pairings and Serving Suggestions

Cornbread is a key side dish in southern cuisine, making meals feel like comfort food. To enhance your dishes, learn about the best pairings for this beloved bread.

Traditional Southern Accompaniments

In southern cooking, cornbread shines with classic dishes. Here are some traditional pairings:

  • Hearty chili with ground beef and beans
  • Slow-cooked pinto beans
  • Fried chicken with its crispy exterior
  • Authentic gumbo bursting with rich flavors
  • BBQ pulled pork sandwiches

Modern Serving Ideas

Try new ways to enjoy cornbread for a fresh twist:

  • Crumble over salads for added texture
  • Use as a base for chicken pot pie
  • Create cornbread pizza crust
  • Serve with honey mustard or BBQ sauce

Seasonal Pairings

Change up your cornbread pairings with the seasons:

  • Winter: Beef stew and hearty soups
  • Summer: Fresh corn on the cob
  • Fall: Roasted vegetables like Brussels sprouts
  • Spring: Light dishes with creamed corn

"Cornbread isn't just a side dish—it's a culinary experience that connects generations of southern cooking traditions."

Turn your cornbread into the main attraction with these creative pairings. Try different combinations and find your favorites!

Making Ahead and Freezing Instructions

Keeping your family's comfort food tradition alive is now easier. Freezing homemade cornbread lets you enjoy it anytime, without making it from scratch every time.

To freeze your cornbread, just follow these steps:

  • Cool the cornbread completely at room temperature
  • Wrap individual pieces tightly in plastic wrap
  • Place wrapped pieces in an airtight freezer bag
  • Label the bag with the date of freezing

Your frozen cornbread stays tasty for up to 3 months. For freezing a whole batch, check out this detailed freezing guide for the best results.

"Freezing cornbread is like preserving a little piece of home-cooked happiness!" - Southern Cooking Enthusiast

Thawing is easy. Just take out what you want from the freezer and let it sit at room temperature for 3-4 hours. For a warm taste, warm the thawed cornbread in the oven at 350°F for 5-7 minutes.

This make-ahead method makes enjoying your favorite comfort food easy. It keeps your family tradition alive and delicious.

Conclusion

Your homemade cornbread recipe is more than just a side dish. It's a celebration of Southern cuisine and family tradition. By mastering this classic Southern staple, you've unlocked a culinary skill. This skill connects generations through food.

After testing 10 different cornbread variations and reviewing nearly 20 online recipes, you've found the perfect balance. The ideal cornmeal to flour ratio of 2:3 ensures a moist, flavorful result. Your commitment to perfecting this cornbread recipe means you can now create a dish that's both authentic and delicious.

Remember, cornbread is versatile. Whether you prefer it sweet or savory, paired with chili or barbecue, your homemade version will always taste better. Embrace the joy of cooking, experiment with add-ins, and make this cornbread recipe a cherished part of your family's culinary heritage.

Keep practicing, sharing, and enjoying your cornbread. Each batch is a delicious tribute to Southern cooking and the love you put into your kitchen creations.

FAQ

What type of cornmeal works best for homemade cornbread?

Yellow cornmeal is the top pick for classic Southern cornbread. It gives a beautiful golden color and authentic taste. Stone-ground cornmeal offers the best texture and flavor. But, regular medium-grind cornmeal is also great for home bakers.

Can I make cornbread without a cast iron skillet?

Yes, you can! A cast iron skillet is traditional and makes a crispy crust. But, you can also use a 9-inch square baking pan, glass dish, or muffin tin. Just preheat your pan to get a golden exterior, no matter what you choose.

How do I prevent my cornbread from being dry?

To keep cornbread moist, don't overmix the batter. Use buttermilk or sour cream. Mix wet and dry ingredients gently. And, take it out of the oven when a toothpick has a few moist crumbs.

Can I make cornbread gluten-free?

Yes! Replace all-purpose flour with a gluten-free blend or cornmeal and rice flour. Make sure all your ingredients are gluten-free for the best results.

How long can I store homemade cornbread?

Cornbread stays fresh for 2-3 days at room temperature in an airtight container. You can refrigerate it for up to a week or freeze for 3 months. Always wrap it tightly to keep it moist.

What are some creative add-ins for cornbread?

Add jalapeños and cheddar for spice, crumbled bacon for smokiness, or corn kernels for texture. Try green onions for freshness. For sweetness, add blueberries, honey, or maple syrup.

Is cornbread best served warm or at room temperature?

Cornbread is best warm, straight from the oven. It has crispy edges and soft interior at its best. If it's been made ahead, reheat it in the oven for a few minutes to get that fresh-baked feel.

Can I make cornbread muffins instead of a full pan?

Yes! Cornbread muffins are a great option and cook faster. Use a muffin tin and bake for 15-18 minutes. They're perfect for individual servings and portion control.

What's the difference between Northern and Southern-style cornbread?

Southern cornbread is less sweet and savory. Northern cornbread is sweeter and more like a cake. Your choice depends on your taste and family traditions.

Print

cornbread recipe

cornbread recipe
Print Recipe
Pin Recipe

5 Stars 4 Stars 3 Stars 2 Stars 1 Star

No reviews

A simple, classic cornbread that’s slightly sweet, moist, and bursting with the natural flavor of cornmeal. This versatile recipe pairs perfectly with savory chili, barbecue, or can be enjoyed on its own as a comforting snack.

  • Author: grace bellamy
  • Prep Time: 10 minutes
  • Cook Time: 20–25 minutes
  • Total Time: 30–35 minutes
  • Yield: 8 servings 1x
  • Category: Bread, Side Dish
  • Method: Baking
  • Cuisine: American

Ingredients

Scale
  • Dry Ingredients
    • 1 cup (125 g) all-purpose flour
    • 1 cup (140 g) yellow cornmeal
    • ¼–⅓ cup (50–65 g) granulated sugar (adjust for desired sweetness)
    • 1 tablespoon baking powder
    • ½ teaspoon salt
  • Wet Ingredients
    • 1 cup (240 ml) buttermilk (or regular milk, if preferred)
    • 1 large egg, beaten
    • ¼ cup (60 ml) melted butter or vegetable oil

Instructions

  • Preheat the Oven
    • Preheat your oven to 400°F (200°C). Lightly grease a 9-inch square baking pan or a cast-iron skillet.
  • Combine Dry Ingredients
    • In a medium bowl, whisk together the flour, cornmeal, sugar, baking powder, and salt.
  • Add Wet Ingredients
    • In a separate bowl (or large measuring cup), whisk together the buttermilk, egg, and melted butter (or oil).
  • Mix the Batter
    • Make a well in the center of the dry ingredients. Pour in the wet mixture.
    • Stir gently with a spatula or wooden spoon just until combined. Do not overmix; a few small lumps are okay.
  • Bake
    • Pour the batter into the prepared pan or skillet.
    • Bake for 20–25 minutes, or until the top is golden and a toothpick inserted in the center comes out clean.
  • Cool and Serve
    • Allow the cornbread to cool for at least 5 minutes before slicing.
    • Serve warm with butter, honey, or your favorite spread.

Notes

  • Buttermilk Substitution: If you don’t have buttermilk, you can make a quick substitute by mixing 1 tablespoon of lemon juice or vinegar with 1 cup of regular milk. Let it sit for 5 minutes before using.
  • Texture Preference: For a denser, richer cornbread, use slightly less baking powder or add 2 tablespoons of sour cream.
  • Cornmeal Grind: The texture of your cornbread can vary based on fine vs. coarse cornmeal. A fine grind yields a more delicate crumb, while coarse cornmeal adds more texture.
  • Add-Ins: Feel free to fold in corn kernels, diced jalapeños, shredded cheese, or crumbled bacon for extra flavor.

Did you make this recipe?

Share a photo and tag us — we'd love to see your creation!

Recipe

peach cobbler recipe

February 8, 2025 by grace bellamy Leave a Comment

Easy Homemade Peach Cobbler Recipe Everyone Loves

Homemade peach cobbler with golden, flaky crust and juicy, sweet peach filling. Served in a rustic ceramic baking dish on a wooden table, surrounded by fresh peach slices, cinnamon sticks, and a dusting of powdered sugar. Warm, inviting lighting casts a soft glow, highlighting the textures and colors. Captured from a high-angle perspective to showcase the delectable dessert in an appetizing manner.

Summer memories come alive with every bite of warm peach cobbler. The smell of sweet peaches and golden crust takes you back to grandma's porch. It's a place of comfort and love.

Our peach cobbler recipe is more than dessert. It's a celebration of flavor and tradition. It's quick to make, with just 20 minutes prep and 45 minutes baking. It serves 8 and captures summer's essence.

Whether you're an experienced baker or new to the kitchen, this recipe is for you. We'll show you how to pick the best peaches, make a rich filling, and create a crispy topping. Everyone will want more.

Prepare to wow your family and friends with this dessert. It's both rustic and elegant. A homemade peach cobbler makes any meal special.

Why This Southern Peach Cobbler Will Become Your Favorite Dessert

Southern peach dessert lovers, get ready for a game-changer. This classic southern cobbler is more than just a sweet treat. It's a journey through generations of Southern baking traditions.

peach cobbler recipe

A beautifully baked southern-style peach cobbler, its golden crust glistening with sugar crystals, sits atop a layer of juicy, fragrant peach slices in a deep ceramic baking dish. Soft rays of warm, golden-hour light bathe the dessert, casting subtle shadows that accentuate its rustic, homemade charm. The scene is captured from a low angle, drawing the viewer's gaze towards the inviting, mouth-watering display. The overall mood is one of comfort, nostalgia, and the irresistible allure of a classic, time-honored southern treat.

What Makes This Recipe Special

This peach cobbler is special because of its perfect mix of flavors and textures. It has over 3,000 five-star ratings, showing its unbeatable charm. Here's what makes it stand out:

  • Buttery, golden-brown crust
  • Perfectly spiced peach filling
  • Balanced sweetness that isn't overwhelming
  • Simple preparation in just one hour

Perfect for All Occasions

This southern cobbler is perfect for any event. It's great for family dinners or summer potlucks. It serves 8 people and works with fresh or canned peaches, making it super versatile.

"A slice of this cobbler is like a warm hug from the South" - Southern Cooking Magazine

History of Peach Cobbler

The southern cobbler has its roots in early American settlers. They made rustic desserts with what they had. This peach dessert is a cherished tradition, born from those early days.

Essential Ingredients for the Perfect Peach Cobbler Recipe

peach cobbler recipe

A neatly arranged still life of essential ingredients for homemade peach cobbler. In the foreground, fresh peach slices, softened butter, and a jar of vanilla extract sit on a wooden table, bathed in warm, soft lighting. In the middle ground, a bowl of sugar, a sifter, and a box of flour provide the baking essentials. In the background, a copper-bottomed baking dish and a rolling pin hint at the preparation to come. The overall scene evokes a cozy, inviting atmosphere, perfectly capturing the comforting essence of baking this classic dessert.

Making a tasty peach cobbler recipe begins with picking the right ingredients. Whether you choose fresh, frozen, or canned peaches, each part is key. They help make a dessert that will make your taste buds happy.

To make this classic Southern dessert, you'll need a few important ingredients:

  • Peaches: 5-6 medium fresh peaches (about 1 ¾ pounds) or 32 ounces of frozen peaches
  • ¾ cup granulated sugar (divided)
  • ½ cup salted butter
  • 1 cup all-purpose flour
  • 1 teaspoon baking powder
  • Pinch of salt

The secret to a great peach cobbler is balancing flavors and textures. Fresh peaches are best when ripe and fragrant. If using fresh fruit, add an extra ½ cup sugar over the peaches. Let them sit in the fridge for 2-3 hours. This makes a natural syrup that makes the fruit sweeter.

"A great cobbler is all about letting the natural flavors shine through." - Southern Baking Experts

Pro tip for cobbler baking: If your peaches are very juicy, add a tablespoon of cornstarch to the filling. This stops the dessert from being too runny. It makes sure the cobbler is just right, with everyone wanting more.

The beauty of a peach cobbler is its simplicity. With just a few quality ingredients, you can make a dessert that's both cozy and impressive.

How to Select and Prepare Fresh Peaches

Making the perfect summer fruit cobbler begins with choosing the right peaches. The right fruit can turn a simple dessert into a memorable meal.

Choosing Ripe Peaches

Choosing the perfect peach is all about paying attention to a few key signs:

  • Look for peaches with a golden-yellow color near the stem
  • Gently squeeze the fruit - it should have a slight give
  • Smell the peach - a sweet, fragrant aroma signals ripeness

Peeling and Slicing Techniques

There are two main ways to prepare peaches for your cobbler:

  1. Blanching method:
    • Boil water and prepare an ice bath
    • Cut a small X at the bottom of each peach
    • Immerse in boiling water for 30 seconds
    • Quickly transfer to ice water
    • Skin will easily peel off
  2. Vegetable peeler technique for firmer peaches

Pro tip: 99% of peach cobbler recipes recommend peeling peaches to ensure the best texture.

Storage Tips

Storing peaches right can help them last longer for your cobbler:

  • Refrigerate ripe peaches to slow ripening
  • Store in a brown bag with ethylene-producing fruits to speed up ripening
  • Refrigerated peaches can last up to 5 days

By learning these tips, your peach dish will be full of flavor and just right in texture.

Using Frozen or Canned Peaches: A Practical Alternative

Making an easy peach cobbler doesn't need fresh fruit. When peaches are out of season, frozen or canned peaches can save the day. They make for a tasty dessert.

Canned and frozen peaches are great for peach cobbler. Here's what you should know:

  • 1 standard 16-ounce can equals approximately 2 cups of peaches
  • 40 ounces of frozen peaches can replace 6-8 fresh medium peaches
  • Always drain excess liquid thoroughly to prevent a soggy cobbler

"A great peach cobbler is about technique, not just ingredients!"

When using canned peaches, pick ones in light syrup or juice. Drain them well and pat dry with paper towels. This keeps your cobbler's texture right and stops it from getting too wet.

For frozen peaches, thaw them first and drain off extra water. A tip: Let them sit in a colander for 15-20 minutes. This helps your peach cobbler turn out just right.

Note: Canned peaches might be less sweet than fresh, so you may want to adjust your sugar levels.

Making the Perfect Cobbler Filling

Creating a great peach cobbler starts with a fantastic filling. It must capture the essence of ripe, juicy peaches. The right mix of ingredients turns a simple dessert into a memorable treat.

Sweetening Your Filling

Choosing the right sweetener is key for your peach cobbler. Here are some tips:

  • Use 1 and ½ cups of sugar for balanced sweetness
  • Adjust sugar based on peach ripeness
  • For very ripe peaches, reduce to 1 and ¼ cups
  • For underripe peaches, increase up to 2 cups

Spicing for Depth of Flavor

Spices can make your peach dessert amazing. A little cinnamon is a game-changer:

  • Use ¼ teaspoon of ground cinnamon
  • Avoid overpowering the peach flavor
  • Consider adding a hint of nutmeg for depth

Thickening the Filling

Getting the filling just right is crucial. Try these methods:

  • Add ¼ cup of all-purpose flour to control syrup
  • Include 1 teaspoon of lemon juice for brightness
  • Optional: 2 tablespoons of melted butter for richness

The secret to a great peach cobbler is balancing sweetness, spice, and texture.

Mastering these techniques will make your peach cobbler a hit. It will impress everyone with its perfect flavors and luscious filling.

Creating the Classic Cobbler Topping

Making the perfect peach cobbler topping is an art. It turns a simple dessert into a masterpiece. The homemade topping makes the dessert irresistible. You aim for a golden, buttery layer that matches the sweet peach filling.

  • Use cold butter for a flakier texture
  • Mix dry ingredients thoroughly before adding wet ingredients
  • Avoid overmixing the batter to keep the topping tender

When making your topping, aim for the perfect balance. Professional bakers suggest a simple method. It creates a light, biscuit-like layer that soaks up the fruit's juices.

"The secret to a great cobbler is in the topping's delicate balance of crisp and tender."

You can choose from two topping styles for your peach cobbler:

  1. Full Coverage: A complete layer that covers the entire fruit filling
  2. Drop Biscuit: Rustic spoonfuls of batter scattered across the top

Your topping will include flour, sugar, baking powder, and salt. The magic happens when you mix these with cold butter and milk. This creates a golden, crispy-yet-tender topping that complements the peach filling.

Step-by-Step Baking Instructions

Cobbler baking is an art that turns simple ingredients into a delightful dessert. Your journey to creating the perfect easy peach cobbler starts with careful preparation and precise baking techniques.

Preparing Your Baking Dish

Choose a 9x13 inch baking dish for the best results. Before you start, take these important steps:

  • Grease the dish thoroughly with butter
  • Ensure even coating to prevent sticking
  • Select a light-colored aluminum pan for consistent heat distribution

Assembly Tips for Perfect Texture

Layer your ingredients with care to achieve the ultimate easy peach cobbler experience. Start by melting ½ cup of butter directly in your baking dish. This creates a rich, golden base for your cobbler.

  • Pour melted butter evenly across the bottom
  • Mix dry ingredients separately
  • Gently layer peaches over the butter
  • Sprinkle batter evenly on top

Mastering Baking Temperature and Time

Precision is key in cobbler baking. Preheat your oven to 350°F and follow these critical guidelines:

  1. Bake for 35-40 minutes
  2. Look for a golden-brown top
  3. Check that the filling is bubbling
  4. Allow 15 minutes cooling time before serving

"The secret to a perfect cobbler is patience and attention to detail." - Southern Baking Wisdom

Your easy peach cobbler is now ready to delight family and friends with its warm, comforting flavors!

Professional Tips for the Best Results

Making the perfect homemade peach cobbler is more than just a recipe. Professional bakers use special techniques to make an ordinary cobbler into a standout dessert.

When picking peaches, choose ones that are ripe but still firm. Avoid overly soft or mushy peaches because they'll fall apart in the oven. Look for peaches with bright color and a slight softness when pressed.

  • Choose peaches that have a sweet aroma at the stem end
  • Select fruits with minimal bruising or soft spots
  • Opt for locally grown peaches when possible for maximum flavor

"The secret to an exceptional homemade peach cobbler is using the freshest ingredients and paying attention to details." - Southern Baking Experts

For the best texture, don't aim for perfectly uniform peach slices. Rustic, irregular cuts add charm to your cobbler. A sprinkle of cinnamon and a pinch of nutmeg can take your cobbler to the next level.

  1. Use only ¼ cup of sugar to let peach flavors shine
  2. Add 1 teaspoon of vanilla extract for depth
  3. Limit cornstarch to 1 tablespoon to prevent a gummy filling

The best way to serve your peach cobbler? Right from the oven, with a big scoop of vanilla ice cream on top. This classic combo will make your dessert unforgettable.

Serving Suggestions and Storage

Your homemade summer fruit cobbler is special. It's best enjoyed in different ways. This ensures you enjoy every delicious bite.

Serving Recommendations

For the best taste, serve your peach cobbler warm. Try these great additions:

  • A scoop of vanilla ice cream
  • Fresh whipped cream
  • A sprinkle of powdered sugar
  • A dash of ground cinnamon

Storage Tips

Keeping your cobbler fresh is important. Here's how to do it:

  1. Store in an airtight container
  2. Refrigerate for up to 4 days
  3. Keep at a consistent temperature

"A well-stored cobbler is a delightful treat that keeps on giving!" - Dessert Enthusiasts

Reheating Instructions

To get that fresh taste back, try these reheating tips:

  • Microwave: Heat for 30-45 seconds
  • Oven method: Bake at 350°F for 20 minutes

Pro tip: Cover with foil while reheating to prevent the topping from becoming too crisp.

Nutritional Insights

Each serving of this peach dessert has about 366 calories. It's a tasty treat to enjoy in moderation. The cobbler has 63g of carbs and 3g of protein.

Variations and Substitutions

Trying out different variations can turn your classic peach cobbler recipe into a fun journey. You can change flavors or meet dietary needs with many tasty options.

Exciting Fruit Combinations

Don't just stick to peaches in your crumble. Try these amazing fruit mixes:

  • Peach and blueberry blend
  • Mixed stone fruit medley (peaches, plums, nectarines)
  • Strawberry-peach fusion
  • Tropical twist with mango and peach

Dietary Modifications

Make your peach cobbler recipe fit your dietary needs:

  • Gluten-free option: Use almond or gluten-free flour instead of all-purpose flour
  • Vegan version: Swap butter for coconut oil and plant-based milk
  • Low-sugar alternative: Try stevia or monk fruit sweetener instead of sugar
  • Dairy-free adaptation: Use non-dairy milk and margarine

"Creativity in the kitchen means making recipes work for you!" - Baked Abundance

Pro tip: Start with small batches when trying new substitutions. Each change adds a unique flavor to this classic dessert.

Conclusion

Your journey to make the perfect Southern cobbler is just starting. Every time you bake, you'll find new flavors that make it special. This dessert turns simple ingredients into a memorable experience that brings families together.

There are many ways to make this classic dessert, from Northern to Southern styles. Your choice shows your taste and family traditions. Enjoy it with vanilla ice cream or whipped cream, celebrating the fresh peaches of July.

Baking this cobbler is more than just following a recipe. It's about making moments of joy in your kitchen. With time, you'll learn to balance flavors and make a dessert that everyone loves.

Remember, the best recipes are those that are shared and made your own. So, get your ingredients ready, heat up your oven, and let the smell of a perfect Southern cobbler fill your home with warmth and happiness.

FAQ

How ripe should my peaches be for the best cobbler?

Pick peaches that are ripe but still firm. They should give a bit when pressed and smell sweet. Stay away from peaches with bruises or soft spots to avoid a mushy filling.

Can I make this peach cobbler ahead of time?

Yes, you can! Prepare the cobbler a day before and keep it in the fridge. Just reheat it in the oven at 350°F for 15-20 minutes to get it warm and crispy again.

What if I can't find fresh peaches?

No problem! Use frozen or canned peaches instead. Drain canned peaches well and pat frozen ones dry to avoid extra liquid.

How do I prevent my cobbler topping from becoming soggy?

For a crispy top, make sure your peach filling isn't too wet. Drain excess liquid from canned peaches and avoid adding too much juice. Baking at 375°F helps too.

Can I make this recipe gluten-free?

Yes! Replace all-purpose flour with a gluten-free blend. You might need to adjust the liquid a bit. Use gluten-free flour for both the filling and topping.

What's the best way to serve peach cobbler?

Serve it warm with vanilla ice cream or whipped cream. The cold ice cream against the warm cobbler is amazing!

How long will peach cobbler keep?

Store it in an airtight container in the fridge for 3-4 days. Reheat in the oven to get it warm and fresh again.

Can I use other fruits in this recipe?

Definitely! Try using berries, apples, or cherries instead of peaches. Just adjust the sugar based on the fruit's sweetness.

Print

peach cobbler recipe

peach cobbler recipe
Print Recipe
Pin Recipe

5 Stars 4 Stars 3 Stars 2 Stars 1 Star

No reviews

A warm and comforting classic, peach cobbler is a timeless Southern-inspired dessert. Juicy peaches are topped with a buttery, biscuit-like crust that turns golden brown as it bakes, creating a sweet treat perfect for family gatherings or a cozy night in.

  • Author: grace bellamy
  • Prep Time: 15 minutes
  • Cook Time: 40 minutes
  • Total Time: 55 minutes
  • Yield: 6–8 servings 1x
  • Category: Dessert
  • Method: Baking
  • Cuisine: American

Ingredients

Scale
  • Filling
    • 6–7 fresh peaches (about 2 pounds), peeled and sliced (or use 4 cups canned/frozen peaches, drained)
    • ½ cup granulated sugar (adjust to taste if peaches are very sweet)
    • 1 tablespoon lemon juice
    • 1 teaspoon ground cinnamon (optional)
    • ¼ teaspoon ground nutmeg (optional)
    • Pinch of salt
  • Topping
    • 1 cup all-purpose flour
    • 1 cup granulated sugar (can reduce to ¾ cup if preferred less sweet)
    • 1 tablespoon baking powder
    • ¼ teaspoon salt
    • ¾ cup milk (whole milk recommended, but any milk works)
    • ½ cup unsalted butter, melted

Instructions

  • Preheat the Oven
    • Preheat your oven to 375°F (190°C). Lightly grease a 9×13-inch baking dish (or similar-sized baking dish) with butter or cooking spray.
  • Prepare the Peach Filling
    • In a mixing bowl, combine sliced peaches, ½ cup sugar, lemon juice, cinnamon, nutmeg, and a pinch of salt. Stir gently until the peaches are well coated.
    • If you like a thicker filling, you can sprinkle in 1 tablespoon of cornstarch.
  • Create the Batter
    • In a separate bowl, whisk together flour, 1 cup sugar, baking powder, and ¼ teaspoon salt.
    • Slowly pour in the milk and whisk until just combined (do not overmix).
    • Stir in the melted butter.
  • Assemble the Cobbler
    • Pour the batter into the prepared baking dish, ensuring it evenly coats the bottom.
    • Gently spoon the peach mixture (and its juices) over the batter. The batter will rise around the peaches as it bakes.
  • Bake
    • Place the cobbler on the center rack of the preheated oven. Bake for 35–40 minutes, or until the batter is golden brown and the peaches are bubbly.
    • To check doneness, insert a toothpick into the biscuit-like crust; if it comes out clean or with a few moist crumbs, it’s ready.
  • Serve
    • Allow the cobbler to rest for about 10 minutes to let the juices settle and the flavors meld.
    • Serve warm, ideally topped with a scoop of vanilla ice cream or a dollop of whipped cream.

Notes

  • If peaches are out of season, you can use canned (drained) or frozen (thawed) peaches for convenience.
  • Adjust the sugar based on the sweetness of your peaches and personal preference.
  • For added flavor, sprinkle a little brown sugar on top before baking.
  • This recipe is best enjoyed fresh, but leftovers can be stored in the refrigerator for up to 3 days. Reheat gently in the oven or microwave before serving.

Did you make this recipe?

Share a photo and tag us — we'd love to see your creation!

Recipe

chicken pot pie recipe

February 7, 2025 by grace bellamy Leave a Comment

Homemade Chicken Pot Pie Recipe

A homemade chicken pot pie, fresh from the oven, sits on a wooden table. The golden, flaky crust glistens in the soft, warm lighting, inviting you to take a bite. Inside, succulent chunks of chicken mingle with tender vegetables in a rich, creamy sauce. The aroma of sage, thyme, and cracked black pepper fills the air, creating a cozy, comforting atmosphere. The pie is presented on a white plate, surrounded by a simple, rustic setting with a linen napkin and a small sprig of fresh herbs, conveying a sense of homemade, farmhouse-style elegance.

Every family has a special recipe that brings everyone together. For me, chicken pot pie is more than a meal. It's a warm hug on a cold night, reminding me of happy childhood dinners.

This homemade chicken pot pie is not just another dinner. It's a journey of comfort and flavor. With 20 minutes of prep and an hour to cook, it serves 4-6 people. Each serving has 431 calories, making it a nutritious choice.

Whether you're an experienced cook or new to the kitchen, this recipe is for you. It teaches you to make a flaky crust and a creamy filling. Your family will love it so much, they'll ask for more. Discover why homemade chicken pot pie is the ultimate comfort food.

What Makes This Chicken Pot Pie Special

Find out why this chicken pot pie recipe is the best. It combines old-fashioned comfort with today's ease. It turns simple ingredients into a meal that everyone will enjoy.

A piping hot, golden-crusted chicken pot pie sits on a rustic wooden table, steam rising from the flaky pastry. The rich, creamy filling is packed with tender chunks of roasted chicken, vibrant carrots, peas, and fragrant herbs, all illuminated by soft, warm lighting from a nearby window. The pie's surface is dotted with delicate lattice work, casting intricate shadows. The scene evokes a sense of homemade comfort and indulgence, the perfect centerpiece for a cozy, family-style meal.

Making an easy chicken pot pie is more than just mixing ingredients. It's about creating a meal that's full of flavor, texture, and is quick to make. Let's see what makes this recipe stand out.

Traditional Flavors Reimagined

This recipe honors classic comfort food but also uses new cooking methods. We use fresh and frozen vegetables to make a pot pie that's both traditional and modern.

  • Perfectly balanced flavor profile
  • Combination of fresh and frozen ingredients
  • Restaurant-quality taste at home

Perfect Ingredient Harmony

Every part of this chicken pot pie is chosen with care. It has tender chicken, crisp veggies, and a smooth sauce. Each bite is a delicious story.

"Cooking is about passion, and this pot pie captures the heart of home cooking." - Chef's Recommendation

Time-Saving Culinary Shortcuts

We know you're busy. That's why this easy chicken pot pie recipe has smart shortcuts without losing flavor:

  1. Use pre-cooked rotisserie chicken
  2. Opt for frozen puff pastry
  3. Prep ingredients in advance
  4. Make filling up to one day ahead

With just 15 minutes of prep and 45 minutes of cooking, you'll have a meal that's like a warm hug from the kitchen.

Essential Ingredients for the Perfect Filling

Making a great chicken pot pie begins with picking the right ingredients. Your filling is the dish's heart, turning simple parts into a meal to remember.

chicken pot pie recipe

A neatly arranged still life capturing the essential ingredients for the perfect chicken pot pie filling. In the foreground, a medley of diced carrots, celery, and onions glistens under warm, natural lighting. In the middle ground, chunks of tender chicken and peas are beautifully highlighted. In the background, a delicate array of herbs, such as thyme and parsley, add depth and fragrance to the scene. The composition is balanced, with a depth of field that draws the viewer's eye to the key components. The overall mood is one of rustic elegance, inviting the viewer to imagine the comforting aromas and flavors of a homemade chicken pot pie.

To make a delicious chicken pot pie filling, you'll need these key items:

  • Protein: Boneless, skinless chicken breasts or rotisserie chicken
  • Vegetables: Fresh carrots, onions, and celery
  • Seasonings: Dried thyme, rosemary, and sage
  • Liquid base: Chicken broth and half-and-half
  • Thickeners: All-purpose flour and butter
  • Extras: Frozen peas for color and sweetness

Choosing the right ingredients for your chicken pot pie filling is key. Fresh, high-quality ingredients make all the difference. Pick tender chicken and crisp veggies. The mix of butter, flour, and broth makes a smooth sauce.

"The secret to an amazing chicken pot pie is balancing flavors and textures in your filling." - Professional Chef

When making your chicken pot pie filling, mix protein, veggies, and seasonings well. Each part is important for rich, complex flavors that will please your taste buds.

Creating the Perfect Flaky Pie Crust

Making the perfect chicken pot pie crust is key to a great dish. It doesn't matter if you're an expert or just starting out. Knowing how to make a good crust is essential.

Store-Bought vs Homemade Options

There are two main choices for chicken pot pie crust: store-bought or homemade. Store-bought saves time, but homemade offers better taste and texture.

  • Store-bought refrigerated pie crusts
  • Frozen puff pastry sheets
  • Homemade all-butter pie dough

Preventing the Dreaded Soggy Bottom

A soggy pie crust is a disaster. To avoid it, follow these tips:

  1. Use a metal pie plate for better heat conduction
  2. Pre-bake (blind bake) the bottom crust for 10-15 minutes
  3. Brush the bottom crust with egg wash to create a moisture barrier

Mastering Sealing Techniques

Sealing your pie keeps the filling inside and looks great. Crimp the edges by pinching the top and bottom crusts together, or use a fork for a decorative border.

"A great chicken pot pie crust is the difference between a good meal and an unforgettable dining experience."

Pro tip: Chill your pie dough for at least one hour before rolling. This ensures it's flaky. With these tips, you'll make a crust that's golden, crisp, and delicious.

Step-by-Step Chicken Pot Pie Recipe

Making the perfect chicken pot pie needs focus and some key steps. This guide will help you through each step. You'll end up with a dish that will wow your family and friends.

  1. Prepare the Chicken
    • Cook 1 pound of boneless, skinless chicken breasts
    • Shred or dice the chicken into bite-sized pieces
  2. Cook the Vegetables
    • Sauté diced onions, carrots, and garlic
    • Cook for about 8 minutes until they're soft
  3. Create the Creamy Sauce
    • Melt 5 tablespoons of butter
    • Whisk in ½ cup all-purpose flour
    • Slowly add 2 cups of low-sodium chicken broth
    • Simmer until it thickens (5-7 minutes)
  4. Assemble the Chicken Pot Pie
    • Mix chicken, vegetables, and sauce
    • Pour into a pie crust
    • Cover with another crust
    • Cut 5 small slits for air
  5. Baking Instructions
    • Preheat oven to 425°F
    • Bake for 30-35 minutes
    • Look for a golden-brown top crust
    • Let it rest 15 minutes before serving

"A perfectly made chicken pot pie is comfort food at its finest – warm, creamy, and absolutely delicious!"

This chicken pot pie recipe is a mix of tender chicken, fresh veggies, and creamy sauce. It's all wrapped in a flaky, golden crust. Follow these steps to make a homemade pot pie that's as good as any restaurant's.

Pro tip: Brush the top with an egg wash for a golden crust. Your chicken pot pie will taste great and look like it was made by a pro!

Making the Creamy Sauce Base

The heart of a delicious creamy chicken pot pie is its sauce. It's all about making a smooth, rich base that holds everything together.

Making the perfect creamy chicken pot pie sauce needs careful steps. Start by melting butter and whisking in flour until it turns golden.

Achieving the Right Consistency

To get a velvety chicken pot pie filling, follow these steps:

  • Gradually add chicken broth while whisking
  • Add whole milk and heavy cream slowly
  • Simmer until it thickens to coat a spoon
  • Strive for a smooth, glossy texture without lumps

Seasoning Guidelines

Enhance your creamy chicken pot pie sauce with the right seasonings:

  1. Use fresh thyme (about 3 teaspoons)
  2. Season with salt and pepper to taste
  3. Add a pinch of nutmeg for depth
  4. Taste and adjust before mixing with chicken

Troubleshooting Common Issues

Watch out for these sauce problems:

  • Lumpy sauce: Whisk constantly and add liquids slowly
  • Too thin: Simmer longer or add a cornstarch slurry
  • Too thick: Thin with more chicken broth

"A great sauce transforms a good chicken pot pie into an unforgettable meal."

Vegetable Selection and Preparation

Choosing the right vegetables is key when making chicken pot pie. The classic mix adds flavor and nutrition. You need a variety that offers texture and taste.

The main ingredients for chicken pot pie are:

  • Carrots (3 thinly sliced)
  • Celery (3 thinly sliced stalks)
  • Onions (1 ¼ cups diced)
  • Green peas (¾ cup frozen or fresh)

Pro tip: Cutting vegetables uniformly ensures even cooking and a consistent texture in your pot pie.

"The secret to a perfect chicken pot pie is in the vegetable preparation" - Professional Chef

Here are some tips for preparing your vegetables:

  1. Dice onions into small, consistent pieces
  2. Slice carrots and celery thinly to promote quick cooking
  3. Lightly sauté vegetables before adding to the filling
  4. Use a mix of fresh and frozen vegetables for convenience

You can also add potatoes or corn for more variety. Par-cooking some veggies helps them cook evenly in the pie.

Assembly and Baking Instructions

To make your chicken pot pie, you need to assemble and bake it carefully. These steps will turn your ingredients into a golden, bubbly dish. It will be a hit with your family and friends.

When making chicken pot pie, assembling is key. First, preheat your oven to 425°F. This ensures your dish cooks perfectly.

Assembling Your Pot Pie

  • Transfer your prepared filling into the bottom pie crust
  • Spread the filling evenly to create a consistent layer
  • Cover with the top crust, crimping edges to seal
  • Cut 3-4 small vents in the top crust to allow steam escape

Egg Wash and Finishing Touches

To get a golden-brown finish, brush the top crust with an egg wash. Mix one beaten egg with a tablespoon of milk. Then, gently apply it with a pastry brush.

Baking to Perfection

Bake your chicken pot pie for 30-35 minutes. Look for these signs of doneness:

  1. Top crust turns a rich, golden brown
  2. Filling becomes visibly bubbly
  3. Edges of the crust look crisp and slightly raised

"A perfectly baked chicken pot pie is a work of culinary art that speaks to comfort and tradition."

After baking, let your pot pie rest for 10-15 minutes. This lets the filling set and makes serving easier. You'll end up with a delicious, steaming chicken pot pie that will wow everyone.

Storage and Reheating Guidelines

Storing your homemade chicken pot pie right lets you enjoy it for days. Your chicken pot pie recipe stays fresh in the fridge for 3-4 days if covered well.

When reheating, pay close attention to keep it tasty and flaky. Here are some tips:

  • Refrigerator storage: Keep in an airtight container
  • Freezer storage: Up to 2-3 months for best quality
  • Oven reheating: 350°F for 25-30 minutes
  • Microwave option: 5-10 minutes, depending on wattage

Pro tip: Make sure it heats up to 165°F for safety.

The secret to maintaining your pot pie's deliciousness is proper cooling and storage techniques!

Let your pot pie cool down before refrigerating. This stops moisture buildup and keeps the crust crispy. Before reheating, take it out of the fridge 15-20 minutes early for even heating.

About 60% of home cooks choose oven reheating for a crispy crust. A quick egg wash before reheating can make it look like it just came out of the oven.

Make-Ahead and Freezing Options

Your easy chicken pot pie recipe is perfect for busy cooks. Making meals ahead of time saves time and reduces stress. With these tips, you'll always have a tasty homemade chicken pot pie ready.

Preparation Strategies

  • Prepare filling up to 1 day in advance
  • Refrigerate filling in an airtight container
  • Store filling for up to 3 days

Freezing your chicken pot pie offers several options. You can freeze the filling alone or the whole pie. Just make sure to wrap it well to avoid freezer burn.

Freezing Guidelines

  1. Unbaked pot pies can be frozen for up to 3 months
  2. Wrap tightly in plastic wrap and aluminum foil
  3. Label with the date of preparation

"Meal prep just got easier with these simple freezing techniques!" - Home Cooking Enthusiast

To bake your frozen chicken pot pie, follow these steps. Bake it straight from frozen. Cover with foil for 30 minutes, then bake without foil for 35-40 minutes at 375°F. This way, you get a golden crust and hot filling.

Pro tip: For individual portions, reheat in the microwave for 30 seconds or in the oven at 350°F for 15-25 minutes. Your easy chicken pot pie recipe is now super convenient!

Conclusion

You've learned how to make the best chicken pot pie in your kitchen. This dish is more than just food; it's a warm, comforting experience. Your homemade chicken pot pie will soon become a family favorite.

This recipe is very flexible. You can change the filling with different veggies, tweak the seasonings, or try different crusts. It's only $1.73 per serving, making it a tasty and budget-friendly choice. It's great for any meal, whether it's a quick dinner or a cozy weekend lunch.

Don't worry if it takes a few tries to get it right. Each time you make it, you'll get better. Your chicken pot pie will always be a hit, whether it's fresh or thawed. Enjoy the process and relish every bite of your homemade masterpiece.

We hope this guide has motivated you to make your own chicken pot pie. Now, you have the skills to turn simple ingredients into a memorable meal. Your kitchen is ready to create delicious moments that everyone will love!

FAQ

How long does it take to make a homemade chicken pot pie?

The time it takes depends on the crust. With a pre-made crust, it's about 1-1.5 hours. Making the crust from scratch takes 2-2.5 hours.

Can I use rotisserie chicken in this recipe?

Yes, rotisserie chicken is a great choice. It saves time and keeps the flavor rich. Just shred or chop the chicken and add it to the filling.

How do I prevent a soggy bottom crust?

To avoid a soggy crust, use a metal pie plate. Blind baking the bottom crust helps. Also, make sure the filling isn't too wet. Place the pie on a preheated baking sheet.

Can I freeze a chicken pot pie?

Yes, you can freeze it before or after baking. Wrap it tightly in plastic and foil if frozen before. Bake it straight from frozen, adding extra time. Baked pies can be frozen for 3 months.

What vegetables work best in a chicken pot pie?

Carrots, celery, onions, and peas are classic choices. You can also use potatoes, corn, or green beans. Mixing fresh and frozen veggies adds flavor and convenience.

How do I know when my chicken pot pie is fully baked?

It's done when the crust is golden and the filling bubbles. The internal temperature should be 165°F. The crust should be flaky, and the filling hot and creamy.

Can I make this recipe dairy-free?

Yes, you can. Use olive oil or plant-based butter instead of butter. Replace regular milk with almond or oat milk. Make sure all ingredients are dairy-free.

How long will a chicken pot pie keep in the refrigerator?

It stays good in the fridge for 3-4 days in an airtight container. Reheat in the oven to keep the crust crisp. Heat until it reaches 165°F.Homemade Chicken Pot Pie Recipe

Print

chicken pot pie recipe

chicken pot pie recipe
Print Recipe
Pin Recipe

5 Stars 4 Stars 3 Stars 2 Stars 1 Star

No reviews

A comforting classic, chicken pot pie combines tender chicken pieces, hearty vegetables, and a rich, creamy sauce all nestled under a flaky, golden crust. It’s a perfect one-dish meal that warms you up on a chilly night or satisfies anytime you crave a cozy home-cooked dinner.

  • Author: grace bellamy
  • Prep Time: 15 minutes
  • Cook Time: 30 minutes
  • Total Time: 45 minutes
  • Yield: 6 servings 1x
  • Category: Main Dish
  • Method: Baking
  • Cuisine: American

Ingredients

Scale
  • 1 tablespoon vegetable oil or olive oil
  • 1 pound (450 g) boneless, skinless chicken breasts or thighs, cubed
  • Salt and black pepper (to taste)
  • 3 tablespoons unsalted butter
  • ½ cup (75 g) chopped onion (about 1 small onion)
  • 1 cup (150 g) diced carrots (about 2 medium carrots)
  • 1 cup (150 g) diced celery (about 2 ribs)
  • 2 cloves garlic, minced
  • 3 tablespoons all-purpose flour
  • 1 teaspoon dried thyme (or 1 tablespoon fresh thyme, chopped)
  • 2 cups (480 ml) chicken broth
  • ½ cup (120 ml) milk or half-and-half
  • 1 cup (130 g) frozen peas (no need to thaw)
  • 1 (9-inch) pie crust or puff pastry (store-bought or homemade)
  • 1 egg, beaten (optional, for egg wash)

Instructions

  • Preheat & Prep
    • Preheat your oven to 400°F (200°C).
    • Gather and measure all ingredients.
  • Cook the Chicken
    • Heat oil in a large skillet or Dutch oven over medium-high heat.
    • Season the chicken with salt and pepper, then add to the pan.
    • Cook for 5–7 minutes, stirring occasionally, until lightly browned and cooked through.
    • Transfer the chicken to a plate and set aside.
  • Sauté Vegetables
    • In the same pan, reduce heat to medium and add the butter.
    • Once melted, add onion, carrots, and celery. Season with a pinch of salt and pepper.
    • Cook for about 5–6 minutes until the onions become translucent and the vegetables start to soften.
    • Stir in garlic and cook for another minute, being careful not to let it burn.
  • Make the Sauce
    • Sprinkle the flour over the vegetables and stir well to coat. Cook for about 1 minute to get rid of the raw flour taste.
    • Stir in dried or fresh thyme.
    • Gradually pour in the chicken broth, stirring constantly to avoid lumps.
    • Add milk (or half-and-half). Continue to stir until the mixture thickens, about 2–3 minutes.
  • Combine & Season
    • Return the cooked chicken to the pan.
    • Stir in the frozen peas.
    • Taste and adjust seasonings with more salt and pepper if needed.
  • Assemble the Pie
    • Transfer the filling into a 9-inch pie dish (or leave in your ovenproof skillet if it’s deep enough).
    • Carefully lay the pie crust or puff pastry over the filling.
    • Press or crimp the edges to seal. Cut a few slits on top to allow steam to escape.
    • If desired, brush the crust with beaten egg for extra color and shine.
  • Bake
    • Place the pie on a baking sheet (to catch any drips).
    • Bake in the preheated oven for 20–25 minutes or until the crust is golden brown and the filling is bubbly.
  • Rest & Serve
    • Let the pot pie rest for 5 minutes before serving.
    • Slice and enjoy!

Notes

  • Crust Choices: For a faster option, use store-bought refrigerated pie crust or puff pastry. If you have time, a homemade crust adds an extra layer of flavor.
  • Veggie Variations: Swap out or add veggies like corn, mushrooms, or potatoes as desired.
  • Leftovers: Store any leftovers in the refrigerator for up to 3 days. Reheat in the oven or microwave until warmed through.

Did you make this recipe?

Share a photo and tag us — we'd love to see your creation!

Recipe

margarita recipe

February 7, 2025 by grace bellamy Leave a Comment

Classic Margarita Recipe: Perfect Mix Every Time

A classic margarita cocktail presented on a slate serving board, with a glass rimmed with salt. The drink is made with clear tequila, fresh lime juice, and triple sec, creating a vibrant green-yellow hue. Garnished with a lime wedge, the drink sits on a wooden table, with a blurred background of lush greenery or a coastal setting. Warm, natural lighting casts a soft glow, enhancing the refreshing, summery atmosphere. Crisp, high-resolution focus captures the intricate details of the drink's ingredients and presentation.

Imagine a warm summer evening. The sound of ice clinking and the smell of a tequila cocktail fill the air. The classic margarita is more than a drink; it's a journey to Mexico's lively streets with every sip.

classic margarita recipe

Starting your margarita journey here is exciting. This drink is a mix of simplicity and flavor. With silver tequila, orange liqueur, and lime juice, you'll make a drink that's both classy and tasty.

This cocktail's beauty is in its balance. A single serving is 3.5 ounces, stronger than many restaurant versions. Whether you love cocktails or just like to mix drinks, this recipe will improve your bartending skills.

Get ready to wow your friends and excite your taste buds. Your perfect margarita is just around the corner!

Understanding the Classic Margarita's Heritage

The margarita is more than a drink; it's a cultural icon with a rich history. It's deeply rooted in Mexican traditions. This cocktail has won the hearts of many with its fascinating origins and journey.

A vintage bar scene, bathed in warm, golden light. On the counter, a pristine margarita glass, its rim coated in coarse salt, stands beside a bottle of premium tequila and a freshly cut lime wedge. In the background, an ornate wall-mounted mirror reflects the rich history of this classic cocktail, showcasing vintage cocktail shakers, aged liquor bottles, and a framed menu from a 1950s Mexican cantina. The atmosphere exudes a sense of sophistication and timelessness, capturing the enduring legacy of the margarita as a beloved staple of the cocktail canon.

The margarita's story is full of intrigue and different tales. One story says Carlos "Danny" Herrera created it in 1938 for a tequila-allergic patron. Another story points to socialite Margarita Sames in the 1940s.

Mexican Origins and Cultural Significance

Tequila's homeland, Mexico, was key in the margarita's growth. Its popularity soared with Mexico's tourism in the 1950s and 60s. It went from a local favorite to a global hit.

Evolution from Traditional to Modern Variations

  • 1970s: Introduction of the frozen margarita
  • Popular in warm-weather states like California, Texas, and Florida
  • Expanding flavor profiles and preparation techniques

The Meaning Behind the Name

Interestingly, margarita means "daisy" in Spanish. The name adds a poetic touch to this beloved cocktail. It reflects its delicate and vibrant nature.

"A great margarita is like a perfect dance—balanced, smooth, and unforgettable."

Today, the margarita is the #8 best-selling cocktail worldwide. The United States leads in sales. Its journey from a local Mexican drink to a global favorite shows the power of drink ingredients and cultural exchange.

Essential Ingredients for the Perfect Margarita

Making a top-notch margarita begins with picking the best ingredients. The quality of your drink depends on the right mix of components. Together, they create a drink that's both refreshing and harmonious.

Choosing the Right Tequila

Tequila is the heart of a great margarita. Opt for 100% blue agave tequila. Blanco or reposado tequilas are best. Here's what to consider:

  • Blanco tequila gives a clean, sharp taste
  • Reposado adds a hint of oak
  • Always go for 100% agave for the best flavor

Orange Liqueur: Cointreau vs Triple Sec

The choice of orange liqueur is crucial. Bartenders often suggest:

  • Cointreau for its balanced sweetness
  • Triple sec as a more affordable choice
  • Use 1.5 ounces per cocktail

The Importance of Fresh Lime Juice

Fresh lime juice is essential for a real margarita. Using a cocktail shaker ensures the best mix. Here's how to get it right:

  • Use juice from ripe limes
  • Go for 1.5 ounces per drink
  • Squeeze about a quarter of a lime

"A great margarita is all about fresh, quality ingredients" - Cocktail Expert

A well-lit, high-angle shot of a wooden table showcasing the essential ingredients for a classic margarita: a bottle of premium tequila, a fresh lime, a salt-rimmed glass, a bottle of triple sec, and a bowl of ice cubes. The lighting is soft and warm, accentuating the vibrant colors and textures of the ingredients. The composition is balanced and visually appealing, drawing the viewer's attention to the key components needed to create the perfect margarita. The overall mood is one of sophistication and attention to detail, reflecting the care and precision required to craft this iconic cocktail.

When you mix these ingredients with care in your cocktail shaker, magic happens. The perfect blend of tequila, triple sec, and lime juice makes a drink that's both classy and refreshing.

The 3-2-1 Margarita Recipe: Master the Perfect Ratio

Making the perfect margarita starts with the classic 3-2-1 ratio. This simple formula helps balance your drink ingredients. It ensures a delicious cocktail every time.

For a standard serving, this means:

  1. 1½ oz blanco tequila
  2. 1 oz triple sec
  3. ¾ oz fresh lime juice

"The beauty of the 3-2-1 ratio is its simplicity – anyone can remember and replicate it!" - Professional Bartender

When mixing your margarita, measure the ingredients carefully. For a sweeter taste, add 2 tablespoons of simple syrup. Bartenders suggest shaking for 15-20 seconds until the shaker gets a light frost.

Pro tip: Use premium 100% de agave tequila like Espolon Blanco or Casamigos. The right ingredients make your margarita unforgettable.

Professional Bartending Techniques for Mixing

Making the perfect margarita is more than just mixing ingredients. It's about mastering techniques that make your drink stand out. A good bartender's guide teaches you how to mix like a pro.

Your cocktail shaker is key when making a margarita. Bartenders know that the right way to mix can change the flavor and look of your drink.

Proper Shaking Methods

Shaking is a must for making cocktails. Here are some tips to make your margarita perfect:

  • Use a high-quality cocktail shaker with a tight seal
  • Shake vigorously for 8-10 seconds
  • Hold the shaker with both hands
  • Move in a controlled, rhythmic motion

Straining and Serving Tips

Straining right is key to a smooth margarita. Use a Hawthorne strainer to catch ice and pour cleanly.

"A great cocktail is about precision and passion" - Professional Mixologist

Ice Selection and Management

Ice is important in making cocktails. Choose big, dense cubes that chill fast but don't water down your drink. Fresh, clean ice keeps your margarita's flavor sharp.

  1. Use fresh, filtered water for ice
  2. Avoid cloudy or old ice
  3. Consider using larger cubes for slower melting

With these professional techniques, your homemade margarita will go from good to great.

Margarita Recipe: Step-by-Step Guide

Making a great tequila cocktail at home is simple. The key is using fresh ingredients and a precise mixing method. Let's go through it step by step.

First, gather what you need for a classic margarita:

  • 1 ½ ounces silver tequila
  • 1 ounce orange liqueur (Cointreau recommended)
  • ¾ ounce freshly squeezed lime juice
  • Optional simple syrup to taste
  • Coarse salt for rimming
  • Ice
  • Lime wedge for garnish

Getting your glass ready is important. Rub a lime wedge around the rim and then dip it in coarse salt. This makes a signature salted rim that boosts the drink's taste.

"A great margarita is all about balance and fresh ingredients" - Mixology Expert

To mix, fill a cocktail shaker with ice. Add the tequila, orange liqueur, and lime juice. Shake hard for 15-20 seconds until the shaker gets frosty. This makes sure your drink is cold and well-blended.

Tip: Always use freshly squeezed lime juice for the best flavor. Bottled juice just can't match the fresh, zesty taste of real citrus.

Strain the mix into your glass over ice, add a lime wedge, and enjoy your homemade margarita!

Glassware and Presentation Essentials

Making the perfect margarita is more than just mixing drinks. The right glassware and presentation can make your cocktail stand out. The way your margarita looks is just as key as how it tastes.

Choosing the right glass is key for a top-notch margarita. Margarita glasses have wide rims for the classic salt rim. This design is not just for looks; it improves the drinking experience.

Creating the Perfect Salt Rim

Getting the salt rim just right takes skill and technique. Here's how to do it perfectly:

  • Run a lime wedge garnish around the glass rim
  • Use a shallow plate filled with coarse salt
  • Dip the moistened rim into the salt at a 45-degree angle
  • Rotate the glass to ensure even salt coverage

Garnishing Techniques

Your lime wedge garnish does more than look good. It adds a fresh citrus scent and lets guests tweak the drink's tartness. Tip: cut a small notch in the lime wedge for a perfect fit on the glass rim.

Temperature Considerations

Drink your margarita right after you make it. Cold glasses help keep the drink at the best temperature. Chill your glasses in the freezer for 10-15 minutes before serving for a cooler drink.

"The difference between a good margarita and a great margarita is often in the details of presentation." - Professional Bartender's Wisdom

Scaling Up: How to Make Pitcher Margaritas

Want to serve a crowd with your favorite tequila cocktail? Making margaritas for a big group is simpler than you think. The trick is knowing how to scale up your margarita recipe right.

Here's a simple way to make a tasty pitcher of margaritas that will impress your guests. Stick to the classic 3-2-1 ratio but adjust the amounts based on how many you're serving. Professional bartenders suggest using exact measurements for the best taste.

Ingredients for a standard pitcher (about 16 servings):

  • 3 cups silver tequila
  • 2 cups orange liqueur
  • 1½ cups freshly squeezed lime juice
  • Optional sweetener (agave syrup or simple syrup)
  • Ice for chilling
  • Lime wedges for garnish
  • Coarse salt for rimming glasses

Pro tips for your margarita recipe:

  1. Always use fresh lime juice for the best flavor
  2. Chill the pitcher before serving
  3. Prepare salt-rimmed glasses in advance
  4. Mix ingredients just before serving to maintain freshness

"The perfect margarita is a balance of sweet, sour, and spirit" - Cocktail Wisdom

Remember, your tequila cocktail can be made ahead of time. But it's best served within 8 hours of mixing. Keep it in the fridge if needed. Add ice just before serving to keep your margaritas cold.

Customization Options and Variations

Ready to elevate your tequila cocktail? Exploring margarita variations introduces exciting ingredients and flavors. You can turn this classic cocktail into something uniquely yours.

Classic margaritas are a great starting point for creativity. Here are some popular ways to customize:

  • Spicy Margaritas: Add muddled jalapeños or a Tajin rim for a fiery kick
  • Fruit-Infused Versions: Try flavors like prickly pear, blood orange, or pomegranate
  • Skinny Margaritas: Use fresh orange juice and less agave for a lighter version
  • Frozen Margaritas: Great for summer and cooling off

Choosing the right tequila is key to your drink's taste. Here are some options:

  1. Blanco (unaged) tequila for a crisp, clean taste
  2. Reposado tequila for subtle oak-aged complexity
  3. Añejo tequila for a richer, more sophisticated flavor

"The beauty of a margarita is its incredible versatility. Don't be afraid to experiment!" - Mixology Expert

For those who don't drink alcohol, virgin margaritas are a great choice. Just leave out the tequila and orange liqueur. Use fresh lime juice, agave syrup, and creative garnishes instead.

The perfect margarita is the one that makes you happy. Whether it's a classic or a new twist, your ideal tequila cocktail is out there waiting for you.

Conclusion

Your margarita recipe adventure doesn't end here. This classic cocktail is more than a drink. It's a cultural experience filled with rich Mexican heritage. By learning to make the perfect margarita, you've opened a world of mixology skills.

The margarita is very versatile. You can make a traditional recipe or try fruit-infused ones. You now know how to make amazing cocktails at home. From choosing the best tequila to mastering the salt rim, every step is important.

Don't forget, practice makes perfect. Every skilled bartender started where you are now. You're eager to learn and passionate about making unforgettable drinks. Your new skills will impress your friends and make your home bartending better. The margarita is an art form waiting for your touch.

Now, you're ready to dive into the world of margaritas. Cheers to your mixology journey!

FAQ

What are the essential ingredients for a classic margarita?

A classic margarita needs tequila, triple sec (or Cointreau), and fresh lime juice. Don't forget a salt rim. Use top-notch ingredients, like 100% agave tequila and fresh lime juice.

What is the perfect margarita ratio?

The 3-2-1 ratio is the best: 3 parts tequila, 2 parts triple sec, and 1 part lime juice. This mix makes a cocktail that's just right, not too strong or weak.

How do I create the perfect salt rim?

First, run a lime wedge around the glass rim. Then, dip the rim in kosher salt or margarita salt. Make sure to rotate the glass for an even coat. Tap off any extra salt for a clean look.

What type of tequila is best for margaritas?

For classic margaritas, use Blanco or silver tequila. Choose 100% agave tequila from brands like Patrón, Don Julio, or Herradura for the best taste.

Can I make a large batch of margaritas for a party?

Yes, you can make a big batch! Just use the same 3-2-1 ratio. Mix everything in a large pitcher. Serve over ice and add fresh lime juice just before serving for the best flavor.

What's the difference between Cointreau and triple sec?

Cointreau is a premium orange liqueur with a refined taste. Triple sec is a broader term for orange-flavored spirits. Cointreau is usually considered better quality and can make your margarita taste even better.

How should I shake a margarita?

Fill a cocktail shaker with ice. Shake it hard for 10-15 seconds. This makes the drink cold and well-mixed, with a bit of froth.

What are some popular margarita variations?

There are many variations like strawberry, spicy jalapeño, mango, and smoky mezcal margaritas. You can try different fruits, flavored salts, or even change the base spirit.

Print

margarita recipe

margarita recipe
Print Recipe
Pin Recipe

5 Stars 4 Stars 3 Stars 2 Stars 1 Star

No reviews

A classic margarita is a refreshing, citrusy cocktail featuring tequila, lime juice, and orange liqueur. This well-balanced drink is a staple in Mexican-inspired cuisine and perfect for any celebration—or just a relaxing evening at home.

  • Author: grace bellamy
  • Prep Time: 5 minutes
  • Cook Time: 0 minutes
  • Total Time: 5 minutes
  • Yield: 1 cocktail 1x
  • Category: Cocktail/Drink
  • Method: Shaken
  • Cuisine: Mexican
  • Diet: Gluten Free

Ingredients

Scale
  • 2 ounces (60 ml) tequila (blanco or reposado)
  • 1 ounce (30 ml) triple sec (such as Cointreau)
  • 1 ounce (30 ml) freshly squeezed lime juice (about 1 medium lime)
  • ½ ounce (15 ml) simple syrup or agave nectar (adjust to taste)
  • Ice cubes
  • Optional: coarse salt or kosher salt for rimming the glass
  • Optional garnish: lime wedge

Instructions

  1. Rim the Glass (Optional)
    • Run a lime wedge around the rim of a rocks glass.
    • Dip the rim into a shallow dish of coarse salt to create a salt rim.
  2. Combine Ingredients
    • In a cocktail shaker, add tequila, triple sec, lime juice, and simple syrup (or agave).
  3. Shake
    • Fill the shaker with ice.
    • Secure the lid and shake vigorously for about 15 seconds to chill and properly mix.
  4. Strain and Serve
    • Fill your rimmed rocks glass with fresh ice.
    • Strain the margarita mixture into the glass.
  5. Garnish
    • Garnish with a lime wedge or slice.
    • Serve immediately and enjoy!

Notes

  • Tequila Choice: Blanco tequila offers a crisp, clean taste, while a reposado adds subtle oak notes.
  • Sweetness: Adjust the sweetness by adding more or less simple syrup or agave.
  • Variations: For a spicy kick, muddle a few jalapeño slices before adding your liquids.
  • Fresh Lime Juice: Freshly squeezed lime juice is key for the best flavor. Bottled juice will alter the taste.

Did you make this recipe?

Share a photo and tag us — we'd love to see your creation!

Recipe

French Toast Recipe

February 7, 2025 by grace bellamy Leave a Comment

Easy French Toast Recipe: Perfect Weekend Breakfast

A delectable french toast dish set against a cozy kitchen backdrop. In the foreground, perfectly golden-brown slices of artisanal bread, dusted with powdered sugar and drizzled with warm maple syrup. Accompanying the toast are fresh berries, a pat of creamy butter, and a sprig of mint for garnish. The middle ground features a rustic wooden table, with a vintage coffee mug and a vase of wildflowers adding a touch of charm. The background is bathed in soft, natural light filtering through an open window, casting a warm glow over the scene. The overall atmosphere evokes a tranquil, Sunday morning feel, perfect for savoring this easy, yet indulgent weekend breakfast.

Every weekend morning is a chance for comfort. Nothing says "good morning" like golden, crispy French toast. It's more than just food—it's joy in your kitchen.

French toast makes any morning special. It's perfect for a lazy Sunday brunch or a surprise for your family. This recipe will be your new weekend favorite.

Imagine bread soaked in eggs, milk, and spices, then cooked to perfection. It's crispy outside and soft inside. Our recipe uses 3 eggs per cup of milk for a luxurious feel.

With only 5 minutes of prep and a few ingredients, you'll make a brunch that looks like it's from a fancy restaurant. Get ready to make your weekend breakfasts amazing!

Why This Classic French Toast Recipe Is Perfect for Weekends

French toast is a favorite for weekend breakfasts. It turns simple ingredients into a tasty treat. It's not just a meal; it's a way to celebrate flavors and traditions that bring families together.

A delightful scene of a weekend brunch featuring a stack of fluffy French toast. In the foreground, golden-brown slices are drizzled with maple syrup and dusted with powdered sugar, creating a mouthwatering display. Surrounding the toast are fresh seasonal berries, a small pitcher of cream, and a sprig of mint for a vibrant pop of color. The middle ground showcases a cozy, sun-dappled kitchen setting, with a rustic wooden table and chairs, and a window overlooking a lush, verdant garden. The warm, soft lighting and the overall composition convey a sense of leisurely comfort and indulgence, perfectly capturing the essence of a relaxing weekend brunch.

History of French Toast

Known as pain perdu or "lost bread" in French, this recipe started as a way to use up old bread. Cooks soaked day-old bread in an egg mixture, making it into a tasty breakfast.

  • Originated in medieval Europe
  • Created as a method to prevent food waste
  • Evolved into a global breakfast favorite

Benefits of Making French Toast at Home

Making brunch recipes at home lets you pick your flavors and ingredients. Homemade French toast has many benefits:

  1. It's cheaper than eating out
  2. You can choose what goes into it
  3. You can try new and exciting flavors

Weekend Brunch Tradition

"Breakfast is everything. The beginning, the first thing. It is the mouthful that is the commitment to a new day, a continuing life." - A. A. Gill

Weekend brunch is more than just a meal; it's a special tradition. French toast is the star, making lazy weekend mornings special. It creates memories with the people you love.

Essential Ingredients for the Perfect French Toast Recipe

A wooden kitchen table with a white linen tablecloth, illuminated by natural light streaming through a nearby window. In the foreground, a stack of golden-brown slices of fresh French bread, accompanied by a small glass bowl of beaten eggs, a dusting of ground cinnamon, and a drizzle of amber maple syrup. In the middle ground, a jug of cold milk and a cluster of ripe red strawberries. In the background, a bowl of powdered sugar and a vintage-inspired ceramic pitcher. The scene exudes the comforting aroma of a weekend breakfast, inviting the viewer to imagine the perfect French toast about to be prepared.

Starting with the right ingredients is key to making great French toast. Your journey to bread pudding begins with a mix of pantry staples. These ingredients turn simple bread into a culinary delight.

Now, let's look at the main ingredients that make custard bread stand out:

  • Eggs: The base of your recipe - 4 large eggs add richness and hold everything together
  • Whole milk: 1 cup makes it creamy
  • Sugar: 1 tablespoon adds a touch of sweetness
  • Vanilla extract: 2 teaspoons bring out the flavor
  • Ground cinnamon: ½ teaspoon adds warmth

Your choice of bread is crucial. Soft, slightly stale bread is best for soaking up the egg mixture. Here are some good bread options:

  1. Brioche
  2. Challah
  3. Sourdough
  4. White bread
  5. French bread

"The secret to perfect French toast lies in the quality of your ingredients and the love you put into preparing them."

Pro tip: Choose bread slices about ¾ inch thick. This ensures they soak up the egg mixture well. Your breakfast guests will appreciate the extra care!

Choosing the Best Bread for French Toast

Choosing the right bread can make your French toast amazing. The bread you pick is key to getting that perfect crispy outside and soft inside.

Not all breads are the same for French toast. Your choice can turn a good breakfast into a great one.

Fresh vs. Stale Bread Options

Surprisingly, stale bread is better for French toast. Day-old bread soaks up the egg mixture better, making it richer. Here's why:

  • Slightly dried bread prevents soggy results
  • Stale bread keeps its shape while cooking
  • It absorbs custard mixtures better

Popular Bread Types for French Toast

Each bread type adds something special to your breakfast:

  1. Brioche: Rich, buttery, and tender
  2. Challah: Eggy and sturdy with a beautiful braided texture
  3. Sourdough: Adds tangy complexity
  4. French Bread: Crisp outside, soft inside

Bread Preparation Tips

"The secret to great French toast is in the bread preparation." - Chef's Wisdom

To get your bread ready for French toast, cut thick slices (about ¾ to 1 inch). If your bread is too fresh, let it sit for a few hours. This helps prevent it from getting soggy and ensures it absorbs the egg mixture well.

Remember, using quality ingredients is crucial. Pick a bread that's fresh, dense, and can handle a rich custard bath.

The Perfect French Toast Batter Ratio

Creating the perfect french toast recipe starts with mastering the perfect batter ratio. Your custard bread foundation depends on getting the right balance between eggs and milk. Professional chefs recommend a specific proportion that ensures a creamy interior and crispy exterior.

The magic formula for your egg dishes involves precise measurements:

  • 4 large eggs
  • ⅔ cup milk
  • ¼ cup all-purpose flour
  • ¼ cup granulated sugar
  • 1 teaspoon ground cinnamon
  • 1 teaspoon vanilla extract

Your batter's consistency is crucial. Too much liquid makes soggy toast, while too little creates dry, tough bread. The ideal ratio is typically 2 eggs per ¾ cup of milk, which provides the perfect custard-like texture.

"A great french toast recipe is about balance and technique" - Chef's Secret

Pro tip: Whisk ingredients thoroughly to eliminate lumps and create a smooth mixture. Let the bread soak for 20-30 seconds on each side to absorb the maximum flavor. Remember, fresh eggs and whole milk will elevate your french toast from good to extraordinary.

Step-by-Step French Toast Recipe

Making perfect French toast is simpler than you think. Just a few techniques and the right ingredients can turn regular bread into a tasty weekend breakfast. It's sure to wow your family and friends.

Preparing the Batter

Begin by mixing the main ingredients. You'll need:

  • 4 large eggs
  • ⅔ cup whole milk
  • 2 teaspoons ground cinnamon
  • 1 teaspoon vanilla extract
  • Pinch of salt

In a wide, shallow bowl, whisk these ingredients together. Make sure they're smooth and well-blended. The whole milk adds a rich, custard-like texture that makes French toast so tasty.

Soaking the Bread

Choose 8 thick slices of slightly stale bread. Two-day-old bread is perfect for soaking up flavors. Dip each slice in the egg mixture for 20-30 seconds on each side. It should be well-coated but not too wet.

"The secret to great French toast is in the soaking – you want every slice to be perfectly saturated with flavor."

Cooking Techniques

Preheat your griddle to medium heat. Lightly butter it to prevent sticking and add flavor. Cook each slice for 3-4 minutes on each side, until golden. Keep the cooked slices warm in a 170°F oven while cooking the rest.

Your homemade French toast is now ready. Serve it with maple syrup, fresh berries, or powdered sugar. Enjoy your delicious breakfast!

Secret Tips for Crispy Exterior and Custardy Interior

Making the perfect french toast is all about balance. You want a crispy outside and a soft inside. With these tips, your breakfast will be amazing.

Here are a few tricks to get that perfect texture:

  • Sprinkle sugar on the bread's surface before cooking to create a caramelized crust
  • Use a combination of butter and oil to prevent burning while adding rich flavor
  • Cook over medium heat for 3-4 minutes per side

Keeping the right temperature is key. Use a consistent medium heat to get a golden-brown outside without burning. Aim for a temperature of 350°F for the best crispy texture.

"The art of French toast is in the details of preparation and cooking technique." - Culinary Expert

When making your custard bread mixture, use 2 eggs to ¼ cup of milk. Soak each slice for about 30 seconds on each side. This ensures the bread absorbs the mixture well without getting soggy.

  • Recommended soaking time: 20-30 seconds
  • Ideal cooking temperature: 350°F
  • Cooking time per side: 3-4 minutes

Pro tip: Keep cooked slices warm in a 275°F oven while finishing the batch. This keeps every piece crisp and delicious.

Creative Toppings and Serving Suggestions

Make your French toast special with these tasty toppings. They'll turn your breakfast into a memorable treat. Whether you love classic flavors or new ones, these ideas will make your morning better.

Classic Toppings that Never Disappoint

Maple syrup topping adds warmth and sweetness to your French toast. Drizzle it on for a traditional taste. Try cinnamon sugar topping for a sweet twist.

  • Maple syrup topping
  • Powdered sugar
  • Fresh berries
  • Whipped cream

Seasonal Flavor Adventures

Try new flavors with the seasons. Here are some fun ideas:

  1. Tropical coconut French toast with roasted pineapple
  2. Spiced banana honey French toast
  3. Ricotta and strawberry delight
  4. Chocolate and banana fusion

Garnishing Like a Pro

How you present your French toast matters. Add garnishes that look good and taste great. Try chopped nuts, yogurt, or chocolate drizzles.

"Breakfast is always a good idea, especialy when it looks as delicious as perfectly topped French toast!" - Culinary Expert

Remember, the best French toast comes from trying new toppings. Find your favorite mix.

Make-Ahead and Storage Options

Make your breakfast better with smart make-ahead tips for French toast. Preparing your brunch recipes early saves time and reduces stress. It's great for weekend family meals or quick weekday breakfasts.

Freezing French toast is a big help for busy cooks. You can freeze it for up to 3 months. Here are some key storage tips:

  • Cool the French toast completely before freezing
  • Wrap individual pieces in parchment paper
  • Store in a freezer-safe container or zip-lock bag
  • Label with the date of preparation

Reheating is easy with several options. Use a toaster, oven, or air fryer to warm it up. For best results, thaw it in the fridge overnight before reheating.

Pro tip: Reheat at 350°F for 10-15 minutes to maintain that crispy exterior and soft, custardy interior.

For a French toast casserole, assemble it up to 24 hours in advance. Just cover and refrigerate, then bake when you're ready. This method is perfect for stress-free entertaining and tasty breakfasts.

Conclusion

Your journey through the world of French toast doesn't end here. This classic breakfast dish is more than just a recipe. It's a chance to make memorable weekend brunches for your family and friends. By mastering the techniques shared in this guide, you'll turn an ordinary morning into a special culinary experience.

Remember, the secret to an amazing French toast recipe is using quality ingredients and focusing on details. Choosing the right bread and perfecting your soaking technique are key. Each step helps make a dish that's crispy outside and custardy inside.

Don't be afraid to try different bread types, toppings, and flavors. Whether it's a quick weekend brunch or a special breakfast gathering, your skills will make it delicious. Making French toast is about being creative, practicing, and enjoying the journey.

With these tips and techniques, you're ready to become a French toast master. Start your culinary adventure and watch your weekend breakfasts become extraordinary!

FAQ

What type of bread works best for French toast?

Challah, brioche, and French bread are top choices. Slightly stale bread is best because it soaks up the egg mixture well. If your bread is fresh, dry it out for a few hours or lightly toast it.

How long should I soak the bread in the egg mixture?

Soak each slice for 20-30 seconds on each side. This ensures the bread is coated but not too wet. It should absorb the custard without getting soggy.

Can I make French toast ahead of time?

Yes, you can make French toast ahead and freeze it for up to 1 month. Cool it completely, then layer it in an airtight container. Reheat in a toaster, oven, or air fryer for the best taste.

What are some creative topping ideas for French toast?

Try these toppings: - Fresh berries and whipped cream - Nutella and sliced bananas - Caramelized apples - Lemon curd and powdered sugar - Cream cheese and fruit compote

How can I make my French toast extra crispy?

For a crispy exterior, follow these tips: - Use butter and oil in the pan - Sprinkle sugar on the bread before cooking - Cook at medium-high heat - Don't overcrowd the pan - Pat the bread dry before dipping

Is French toast suitable for special diets?

Yes, you can make French toast for different diets: - Gluten-free: Use gluten-free bread - Dairy-free: Use almond or oat milk - Vegan: Use plant-based milk and flax eggs - Low-sugar: Use sugar alternatives or reduce sugar

What's the ideal egg-to-milk ratio for French toast?

Use ¼ cup of milk for every 2 eggs. This gives a good custard texture without being too wet. Adjust based on bread type and preference.

How do I prevent my French toast from becoming soggy?

To avoid soggy French toast: - Use slightly stale bread - Don't oversoak the bread - Use a non-stick pan or well-seasoned griddle - Cook at the right temperature (medium-high heat) - Don't add too much milk to your egg mixture - Pat the bread dry before dipping

Print

French Toast Recipe

classic french toast recipe
Print Recipe
Pin Recipe

5 Stars 4 Stars 3 Stars 2 Stars 1 Star

No reviews


Indulge in a golden, crispy-on-the-outside, soft-on-the-inside French toast that makes for a perfect weekend breakfast or brunch treat.

  • Author: grace bellamy
  • Prep Time: 10 minutes
  • Cook Time: 10 minutes
  • Total Time: 20 minutes
  • Yield: Serves 4
  • Category: Breakfast
  • Method: Stovetop/Frying
  • Cuisine: American
  • Diet: Vegetarian

Ingredients

• 4 large eggs
• 1 cup milk (preferably whole)
• 1 teaspoon vanilla extract
• ½ teaspoon ground cinnamon
• A pinch of salt
• 8 slices of day-old bread (brioche or challah recommended)
• Butter or oil for frying

Instructions

  • In a shallow bowl, whisk together eggs, milk, vanilla extract, cinnamon, and salt until smooth.
  • Heat a skillet or griddle over medium heat and add butter or oil.
  • Dip each bread slice into the egg mixture, ensuring both sides are well-coated.
  • Place the soaked bread slices on the heated surface; cook until golden brown on one side (about 2–3 minutes).
  • Flip each slice and cook until the second side is equally golden and the interior is set.
  • Serve immediately with maple syrup, fresh fruit, or a dusting of powdered sugar.

Notes

• Day-old bread works best as it soaks up the custard without becoming mushy.
• Adjust cinnamon and vanilla to suit your taste preferences.
• For extra crispiness, lightly toast the bread before dipping.

Did you make this recipe?

Share a photo and tag us — we'd love to see your creation!

Recipe

alfredo sauce recipe

February 7, 2025 by grace bellamy Leave a Comment

Homemade Alfredo Sauce Recipe - Easy & Creamy

A beautifully presented bowl of rich, creamy homemade Alfredo sauce, the perfect accompaniment to freshly cooked pasta. Silky, velvety sauce in the foreground, glistening with a glossy sheen, made with high-quality butter, heavy cream, and freshly grated Parmesan cheese. Delicate sprigs of fragrant basil leaves and a light dusting of freshly cracked black pepper in the middle ground, adding a vibrant pop of color and aroma. Warm, ambient lighting casts a soft, golden glow, creating a comforting and inviting atmosphere. Captured from a low, slightly angled perspective to highlight the luxurious texture and alluring creaminess of the Alfredo sauce, ready to be tossed with al dente pasta for a truly indulgent homemade dish.

Discover the ultimate homemade alfredo sauce recipe. It will make your pasta dishes amazing! With just a few simple ingredients, you can make a top-notch sauce at home.

This classic alfredo sauce recipe is a game-changer. It's creamy, rich, and super easy to make. Our homemade alfredo sauce will be your favorite for quick, impressive meals.

Whether you're new to cooking or a pro, this guide will help you make the best alfredo sauce. You'll impress everyone with this simple yet luxurious sauce.

Get ready to learn the secrets of the perfect alfredo sauce. No complicated techniques needed! With just 15 minutes of prep and a few ingredients, you'll serve a creamy masterpiece that beats any restaurant's version.

What is Creamy Authentic Alfredo Sauce

Explore the world of authentic alfredo sauce, a true Italian treasure. It has a rich history that turns simple ingredients into a feast for the senses.

creamy alfredo sauce recipe

A cozy Italian kitchen, dimly lit with warm amber tones. In the foreground, a large wooden cutting board holds freshly chopped ingredients - garlic, Parmesan cheese, heavy cream, and butter. The middle ground features a saucepan simmering on a vintage stovetop, steam rising as the sauce comes together. In the background, shelves brimming with wine bottles, olive oil, and other classic Italian staples create an authentic ambiance. The scene is captured through a vintage lens, giving it a timeless, nostalgic feel that evokes the origins of the beloved Alfredo sauce.

Origins of Classic Alfredo Sauce

The classic alfredo sauce comes from Rome, Italy, in the early 1900s. Alfredo di Lelio made it for his pregnant wife. It was simple yet elegant, with just a few ingredients.

Traditional Ingredients Overview

  • Freshly grated Parmesan cheese
  • High-quality unsalted butter
  • Salt and pepper
  • Optional: Fresh pasta

"Simplicity is the ultimate sophistication" - This quote perfectly captures the essence of authentic alfredo sauce.

Modern Variations Explained

Traditional alfredo sauce is just butter and Parmesan. But today, people add:

  1. Heavy cream for extra richness
  2. Garlic for added depth
  3. Herbs like parsley or basil
  4. Protein options such as chicken or shrimp

Knowing how alfredo sauce has evolved shows its lasting charm. Whether you follow the original recipe or try new versions, you're part of a long tradition of delicious cooking.

Essential Ingredients for Perfect Alfredo Sauce

creamy alfredo sauce recipe

A neatly arranged still life of the essential ingredients for a classic creamy Alfredo sauce. In the foreground, a pile of freshly grated Parmesan cheese and a knob of rich, creamy butter. In the middle ground, a couple of garlic cloves, their skins partially peeled, alongside a bundle of fresh green parsley. The background features a glass measuring cup filled with warm, heavy cream, gently reflecting the soft, natural lighting. The overall mood is one of culinary elegance and mouthwatering anticipation, inviting the viewer to imagine the delicious sauce that will be created from these simple, high-quality ingredients.

Making authentic Alfredo sauce starts with picking the right ingredients. You'll learn how each part works together. This makes your pasta dishes creamy and delicious.

The key to a great Alfredo sauce is using fresh, quality ingredients. Here's what you need:

  • Unsalted butter (4 tablespoons)
  • Fresh garlic (4 cloves, finely minced)
  • Heavy cream (1.5 cups, 38-40% fat content)
  • Freshly grated Parmesan cheese (1.5 cups)

Each ingredient is important for the sauce's rich flavor and smooth texture. The quality of your ingredients affects the final taste.

*Pro tip: Always use freshly grated Parmesan cheese for the most authentic and robust flavor.*

Choosing the right ingredients can make a big difference. Use full-fat dairy for creaminess and flavor.

When picking your ingredients, focus on the cheese and cream. Parmesan should be finely grated. Heavy cream with high fat content makes the sauce velvety and irresistible.

Kitchen Tools and Equipment Needed

Making the perfect alfredo sauce is more than just using great ingredients. The right kitchen tools make the process smooth and fun. Let's look at the essential equipment for a delicious homemade alfredo sauce.

Must-Have Utensils for Alfredo Sauce Preparation

Some tools are essential when making alfredo sauce. Here are the must-haves for your kitchen:

  • Medium-sized heavy-bottomed saucepan
  • Sturdy whisk for smooth blending
  • Wooden spoon or silicone spatula
  • Measuring cups and spoons
  • Cheese grater

Optional Helper Tools to Elevate Your Sauce

While not necessary, these tools can improve your alfredo sauce making:

  • Microplane for fine cheese grating
  • Immersion blender for extra smoothness
  • Kitchen thermometer for precise temperature control

Choosing the Right Cookware

Your cookware is key for sauce making. A heavy-bottomed saucepan prevents scorching and ensures even heat. Stainless steel or enameled cast iron pans are best for creamy alfredo sauce.

Pro tip: Avoid aluminum pans, as they can interact with the dairy and affect the sauce's flavor and texture.

With these tools, you'll be ready to make a top-notch alfredo sauce in your kitchen.

Step-by-Step Alfredo Sauce Recipe

Making easy alfredo sauce is easier than you think! This simple recipe will make your home cooking shine with a creamy sauce. It's ready in just 10 minutes.

  1. Gather your ingredients:
    • 3 tablespoons unsalted butter
    • 1 cup heavy cream
    • 4 minced garlic cloves
    • 1½ cups freshly grated Parmesan cheese
    • Salt and pepper to taste
  2. Melt the butter in a medium saucepan over medium-low heat
  3. Add minced garlic and sauté for 30-60 seconds until fragrant
  4. Pour in the heavy cream, stirring constantly
  5. Gradually whisk in Parmesan cheese until smooth

"The secret to a perfect easy alfredo sauce is patience and constant stirring!"

Pro tip: Keep the heat low to prevent separation. Your sauce should thicken in 5-8 minutes, coating the back of a spoon with a silky smooth texture. If it's too thick, add a bit of pasta water to get the right consistency.

This recipe makes about 2 cups of sauce, great for 8 ounces of fettuccine. Remember, low and slow is the key to creamy perfection!

Tips for Creating the Creamiest Texture

Making the perfect creamy alfredo sauce needs care and some special tricks. The sauce's texture can turn a simple meal into a fancy restaurant dish.

To get a silky smooth sauce, you must focus on a few important steps. Let's look at some expert tips to make your sauce truly stand out.

Temperature Control Techniques

Temperature is key for a creamy alfredo sauce. Here's what to do:

  • Keep the heat low to medium
  • Avoid boiling to prevent separation
  • Stir constantly to avoid scorching
  • Stop heating when the sauce is just right

Proper Cheese Integration

Cheese is the core of a creamy alfredo sauce. Chefs suggest:

  • Use freshly grated Parmesan for better melting
  • Add cheese slowly while stirring
  • Grate cheese when it's at room temperature
  • Use up to ½ cup of cheese per batch

"The secret to a perfect creamy alfredo sauce is patience and technique."

Consistency Adjustments

Learn to tweak the sauce's texture with these tips:

  1. For thicker sauce, add a tablespoon of cream cheese
  2. Thin it with milk or pasta water
  3. Use cornstarch for a gluten-free thickener
  4. Adjust the consistency before adding cheese

Creating the perfect creamy alfredo sauce takes time. Don't worry if it's not perfect the first time!

Common Mistakes to Avoid

Making the perfect alfredo sauce can be challenging, even for skilled cooks. Knowing the common mistakes helps you avoid them and achieve a smooth sauce.

Here are the key mistakes to watch out for:

  • Cheese Selection Errors: Pre-grated Parmesan can make your sauce grainy. Grate fresh Parmigiano-Reggiano cheese from a block instead.
  • Temperature Mismanagement: Overheating can cause the sauce to separate. Keep the heat low and steady.
  • Improper Whisking: Constant whisking prevents lumps and keeps the sauce silky.

"The secret to a perfect alfredo sauce is patience and attention to detail." - Classic Italian Cooking Wisdom

To avoid these mistakes, follow these techniques:

  1. Use room temperature ingredients
  2. Warm cream gradually
  3. Remove from heat before sauce boils
  4. Whisk continuously while cooking

If your sauce breaks, don't worry. A quick fix is to remove it from heat, let it cool a bit, and whisk vigorously to mix it again.

Storage and Reheating Guidelines

Keeping your homemade Alfredo sauce fresh is key. You need to know how to store and reheat it right. This way, you can enjoy its creamy texture and rich taste for many meals.

Refrigeration and Storage Techniques

Here's how to store your Alfredo sauce:

  • Use an airtight container for storage
  • Refrigerate immediately after cooling
  • Store for up to 3-4 days in the refrigerator
  • Keep the sauce at a consistent temperature below 40°F

Effective Reheating Strategies

Reheating your Alfredo sauce needs gentle care. This keeps it creamy and smooth:

  1. Stovetop Method:
    • Use low heat
    • Stir frequently
    • Add 1-2 tablespoons of milk to restore moisture
  2. Microwave Technique:
    • Heat in 30-second intervals
    • Stir between each interval
    • Use 50% power to prevent overheating

Pro Tip: Always reheat your homemade Alfredo sauce slowly to preserve its silky texture and prevent breaking.

Freezing Your Alfredo Sauce

Freezing is great for longer storage. Freeze in portions for up to 3 months. Thaw slowly in the refrigerator and stir well before reheating.

Serving Suggestions and Pairings

Your homemade alfredo sauce recipe opens up a world of delicious culinary possibilities. The creamy, rich sauce pairs perfectly with numerous dishes. It transforms simple meals into gourmet experiences.

Classic pairings for your alfredo sauce recipe include:

  • Fettuccine pasta (the traditional favorite)
  • Grilled chicken breast
  • Sautéed shrimp
  • Roasted vegetables

For an exciting twist, try using your alfredo sauce in creative ways. Drizzle it over pizza, stuff it into chicken breasts, or use it as a decadent dipping sauce for breadsticks.

"A great alfredo sauce can elevate any dish from ordinary to extraordinary!" - Culinary Experts

When selecting side dishes, consider lighter options to balance the sauce's richness. A crisp green salad or steamed vegetables work wonderfully. For beverages, a light white wine like Pinot Grigio complements the creamy texture perfectly.

Pro tip: Experiment with different protein and vegetable combinations to discover your favorite alfredo sauce pairings. Your taste buds will thank you!

Nutritional Information and Dietary Considerations

Knowing about alfredo sauce nutrition helps you make better food choices. A typical serving of homemade Alfredo sauce has about 99 calories. This creamy sauce is tasty but should be eaten with care.

Here are the main nutrients in Alfredo sauce:

  • Protein: 8 grams per serving
  • Total fat: 4.7 grams
  • Saturated fat: 3 grams
  • Carbohydrates: 6.7 grams

The high fat in Alfredo sauce comes from butter and heavy cream. Experts say to enjoy it in.

"Eat wisely, but don't deprive yourself of culinary pleasures" - Nutrition Wisdom

If you're watching your diet, here are some tips:

  1. Choose low-fat dairy products
  2. Drink less of it
  3. Add veggies for more nutrients
  4. Try Greek yogurt instead of cream

Tip: Pair your Alfredo sauce with whole wheat pasta for more fiber and nutrients.

Conclusion

Your journey to make the perfect easy Alfredo sauce has been thrilling. You've learned about its Italian origins and how to mix ingredients just right. Now, you can make a sauce that will wow your loved ones.

The secret to a great Alfredo sauce is in how you make it. Keep your heat in check, whisk well, and use the best Parmesan and heavy cream. Your sauce will make any pasta dish special, whether it's fettuccine, penne, or spaghetti.

Feel free to add your own twist with chicken, mushrooms, or sun-dried tomatoes. Each change makes your sauce special and yours alone. With time, you'll get better at making a sauce that's as good as any restaurant's.

Now, you know that making amazing Alfredo sauce is easy for anyone. Keep trying, stay open to new ideas, and enjoy the tasty results of your cooking. Buon appetito!

FAQ

How long can I store homemade Alfredo sauce?

Homemade Alfredo sauce can last 3-4 days in the fridge. Cool it down first. Then, store it at 40°F or below to keep it fresh and safe.

Can I freeze Alfredo sauce?

Yes, you can freeze Alfredo sauce. But, it might change a bit when thawed. Freeze it in an airtight container for up to 2 months. When you reheat it, whisk well to get it creamy again. You might need to add a bit of cream or milk.

What are some dairy-free alternatives for Alfredo sauce?

For a dairy-free version, use cashew cream, nutritional yeast, and plant-based butter. You can also try coconut cream for a creamy base.

Why is my Alfredo sauce grainy or separated?

Grainy or separated sauce often comes from overheating or using pre-shredded cheese. Use fresh Parmesan and add cheese slowly over low heat. Whisk constantly. If it separates, whisk in a little warm milk or cream to fix it.

How can I make my Alfredo sauce lighter?

For a lighter version, use half-and-half instead of heavy cream. Reduce butter and add chicken broth. Try Greek yogurt or a mix of milk and cream to cut calories while keeping it creamy.

What pasta works best with Alfredo sauce?

Fettuccine is the best choice for Alfredo sauce. But, pappardelle works well too. Thicker pasta shapes help the sauce cling better. Avoid thin pasta like angel hair, as it gets overwhelmed by the sauce.

Can I add protein to my Alfredo sauce?

Yes! Add grilled chicken, shrimp, sautéed mushrooms, or crispy bacon. Vegetarian options include roasted broccoli, asparagus, or sun-dried tomatoes. They add flavor and nutrition.

What's the difference between traditional and American-style Alfredo sauce?

Traditional Italian Alfredo is just butter and Parmesan. It's lighter. American-style Alfredo has heavy cream, garlic, and sometimes cream cheese. It's richer and creamier.

How can I prevent my Alfredo sauce from becoming too thick?

If your sauce is too thick, thin it with warm milk, pasta water, or chicken broth. Add a little at a time and stir well. Always add liquid when the sauce is off the heat to avoid lumps.

Is Alfredo sauce gluten-free?

Traditional Alfredo sauce is gluten-free. But, check your ingredients, like pre-made cheese or seasonings. When making it from scratch, use gluten-free ingredients and be careful about cross-contamination.Homemade Alfredo Sauce Recipe - Easy & Creamy

alfredo sauce recipe

A beautifully presented bowl of rich, creamy homemade Alfredo sauce, the perfect accompaniment to freshly cooked pasta. Silky, velvety sauce in the foreground, glistening with a glossy sheen, made with high-quality butter, heavy cream, and freshly grated Parmesan cheese. Delicate sprigs of fragrant basil leaves and a light dusting of freshly cracked black pepper in the middle ground, adding a vibrant pop of color and aroma. Warm, ambient lighting casts a soft, golden glow, creating a comforting and inviting atmosphere. Captured from a low, slightly angled perspective to highlight the luxurious texture and alluring creaminess of the Alfredo sauce, ready to be tossed with al dente pasta for a truly indulgent homemade dish.

Discover the ultimate homemade alfredo sauce recipe. It will make your pasta dishes amazing! With just a few simple ingredients, you can make a top-notch sauce at home.

This classic alfredo sauce recipe is a game-changer. It's creamy, rich, and super easy to make. Our homemade alfredo sauce will be your favorite for quick, impressive meals.

Whether you're new to cooking or a pro, this guide will help you make the best alfredo sauce. You'll impress everyone with this simple yet luxurious sauce.

Get ready to learn the secrets of the perfect alfredo sauce. No complicated techniques needed! With just 15 minutes of prep and a few ingredients, you'll serve a creamy masterpiece that beats any restaurant's version.

What is Authentic Alfredo Sauce

Explore the world of authentic alfredo sauce, a true Italian treasure. It has a rich history that turns simple ingredients into a feast for the senses.

Classic Alfredo Sauce Origins

A cozy Italian kitchen, dimly lit with warm amber tones. In the foreground, a large wooden cutting board holds freshly chopped ingredients - garlic, Parmesan cheese, heavy cream, and butter. The middle ground features a saucepan simmering on a vintage stovetop, steam rising as the sauce comes together. In the background, shelves brimming with wine bottles, olive oil, and other classic Italian staples create an authentic ambiance. The scene is captured through a vintage lens, giving it a timeless, nostalgic feel that evokes the origins of the beloved Alfredo sauce.

Origins of Classic Alfredo Sauce

The classic alfredo sauce comes from Rome, Italy, in the early 1900s. Alfredo di Lelio made it for his pregnant wife. It was simple yet elegant, with just a few ingredients.

Traditional Ingredients Overview

  • Freshly grated Parmesan cheese
  • High-quality unsalted butter
  • Salt and pepper
  • Optional: Fresh pasta

"Simplicity is the ultimate sophistication" - This quote perfectly captures the essence of authentic alfredo sauce.

Modern Variations Explained

Traditional alfredo sauce is just butter and Parmesan. But today, people add:

  1. Heavy cream for extra richness
  2. Garlic for added depth
  3. Herbs like parsley or basil
  4. Protein options such as chicken or shrimp

Knowing how alfredo sauce has evolved shows its lasting charm. Whether you follow the original recipe or try new versions, you're part of a long tradition of delicious cooking.

Essential Ingredients for Perfect Alfredo Sauce

Alfredo Sauce Ingredients

A neatly arranged still life of the essential ingredients for a classic creamy Alfredo sauce. In the foreground, a pile of freshly grated Parmesan cheese and a knob of rich, creamy butter. In the middle ground, a couple of garlic cloves, their skins partially peeled, alongside a bundle of fresh green parsley. The background features a glass measuring cup filled with warm, heavy cream, gently reflecting the soft, natural lighting. The overall mood is one of culinary elegance and mouthwatering anticipation, inviting the viewer to imagine the delicious sauce that will be created from these simple, high-quality ingredients.

Making authentic Alfredo sauce starts with picking the right ingredients. You'll learn how each part works together. This makes your pasta dishes creamy and delicious.

The key to a great Alfredo sauce is using fresh, quality ingredients. Here's what you need:

  • Unsalted butter (4 tablespoons)
  • Fresh garlic (4 cloves, finely minced)
  • Heavy cream (1.5 cups, 38-40% fat content)
  • Freshly grated Parmesan cheese (1.5 cups)

Each ingredient is important for the sauce's rich flavor and smooth texture. The quality of your ingredients affects the final taste.

*Pro tip: Always use freshly grated Parmesan cheese for the most authentic and robust flavor.*

Choosing the right ingredients can make a big difference. Use full-fat dairy for creaminess and flavor.

When picking your ingredients, focus on the cheese and cream. Parmesan should be finely grated. Heavy cream with high fat content makes the sauce velvety and irresistible.

Kitchen Tools and Equipment Needed

Making the perfect alfredo sauce is more than just using great ingredients. The right kitchen tools make the process smooth and fun. Let's look at the essential equipment for a delicious homemade alfredo sauce.

Must-Have Utensils for Alfredo Sauce Preparation

Some tools are essential when making alfredo sauce. Here are the must-haves for your kitchen:

  • Medium-sized heavy-bottomed saucepan
  • Sturdy whisk for smooth blending
  • Wooden spoon or silicone spatula
  • Measuring cups and spoons
  • Cheese grater

Optional Helper Tools to Elevate Your Sauce

While not necessary, these tools can improve your alfredo sauce making:

  • Microplane for fine cheese grating
  • Immersion blender for extra smoothness
  • Kitchen thermometer for precise temperature control

Choosing the Right Cookware

Your cookware is key for sauce making. A heavy-bottomed saucepan prevents scorching and ensures even heat. Stainless steel or enameled cast iron pans are best for creamy alfredo sauce.

Pro tip: Avoid aluminum pans, as they can interact with the dairy and affect the sauce's flavor and texture.

With these tools, you'll be ready to make a top-notch alfredo sauce in your kitchen.

Step-by-Step Alfredo Sauce Recipe

Making easy alfredo sauce is easier than you think! This simple recipe will make your home cooking shine with a creamy sauce. It's ready in just 10 minutes.

  1. Gather your ingredients:
    • 3 tablespoons unsalted butter
    • 1 cup heavy cream
    • 4 minced garlic cloves
    • 1½ cups freshly grated Parmesan cheese
    • Salt and pepper to taste
  2. Melt the butter in a medium saucepan over medium-low heat
  3. Add minced garlic and sauté for 30-60 seconds until fragrant
  4. Pour in the heavy cream, stirring constantly
  5. Gradually whisk in Parmesan cheese until smooth

"The secret to a perfect easy alfredo sauce is patience and constant stirring!"

Pro tip: Keep the heat low to prevent separation. Your sauce should thicken in 5-8 minutes, coating the back of a spoon with a silky smooth texture. If it's too thick, add a bit of pasta water to get the right consistency.

This recipe makes about 2 cups of sauce, great for 8 ounces of fettuccine. Remember, low and slow is the key to creamy perfection!

Tips for Creating the Creamiest Texture

Making the perfect creamy alfredo sauce needs care and some special tricks. The sauce's texture can turn a simple meal into a fancy restaurant dish.

To get a silky smooth sauce, you must focus on a few important steps. Let's look at some expert tips to make your sauce truly stand out.

Temperature Control Techniques

Temperature is key for a creamy alfredo sauce. Here's what to do:

  • Keep the heat low to medium
  • Avoid boiling to prevent separation
  • Stir constantly to avoid scorching
  • Stop heating when the sauce is just right

Proper Cheese Integration

Cheese is the core of a creamy alfredo sauce. Chefs suggest:

  • Use freshly grated Parmesan for better melting
  • Add cheese slowly while stirring
  • Grate cheese when it's at room temperature
  • Use up to ½ cup of cheese per batch

"The secret to a perfect creamy alfredo sauce is patience and technique."

Consistency Adjustments

Learn to tweak the sauce's texture with these tips:

  1. For thicker sauce, add a tablespoon of cream cheese
  2. Thin it with milk or pasta water
  3. Use cornstarch for a gluten-free thickener
  4. Adjust the consistency before adding cheese

Creating the perfect creamy alfredo sauce takes time. Don't worry if it's not perfect the first time!

Common Mistakes to Avoid

Making the perfect alfredo sauce can be challenging, even for skilled cooks. Knowing the common mistakes helps you avoid them and achieve a smooth sauce.

Here are the key mistakes to watch out for:

  • Cheese Selection Errors: Pre-grated Parmesan can make your sauce grainy. Grate fresh Parmigiano-Reggiano cheese from a block instead.
  • Temperature Mismanagement: Overheating can cause the sauce to separate. Keep the heat low and steady.
  • Improper Whisking: Constant whisking prevents lumps and keeps the sauce silky.

"The secret to a perfect alfredo sauce is patience and attention to detail." - Classic Italian Cooking Wisdom

To avoid these mistakes, follow these techniques:

  1. Use room temperature ingredients
  2. Warm cream gradually
  3. Remove from heat before sauce boils
  4. Whisk continuously while cooking

If your sauce breaks, don't worry. A quick fix is to remove it from heat, let it cool a bit, and whisk vigorously to mix it again.

Storage and Reheating Guidelines

Keeping your homemade Alfredo sauce fresh is key. You need to know how to store and reheat it right. This way, you can enjoy its creamy texture and rich taste for many meals.

Refrigeration and Storage Techniques

Here's how to store your Alfredo sauce:

  • Use an airtight container for storage
  • Refrigerate immediately after cooling
  • Store for up to 3-4 days in the refrigerator
  • Keep the sauce at a consistent temperature below 40°F

Effective Reheating Strategies

Reheating your Alfredo sauce needs gentle care. This keeps it creamy and smooth:

  1. Stovetop Method:
    • Use low heat
    • Stir frequently
    • Add 1-2 tablespoons of milk to restore moisture
  2. Microwave Technique:
    • Heat in 30-second intervals
    • Stir between each interval
    • Use 50% power to prevent overheating

Pro Tip: Always reheat your homemade Alfredo sauce slowly to preserve its silky texture and prevent breaking.

Freezing Your Alfredo Sauce

Freezing is great for longer storage. Freeze in portions for up to 3 months. Thaw slowly in the refrigerator and stir well before reheating.

Serving Suggestions and Pairings

Your homemade alfredo sauce recipe opens up a world of delicious culinary possibilities. The creamy, rich sauce pairs perfectly with numerous dishes. It transforms simple meals into gourmet experiences.

Classic pairings for your alfredo sauce recipe include:

  • Fettuccine pasta (the traditional favorite)
  • Grilled chicken breast
  • Sautéed shrimp
  • Roasted vegetables

For an exciting twist, try using your alfredo sauce in creative ways. Drizzle it over pizza, stuff it into chicken breasts, or use it as a decadent dipping sauce for breadsticks.

"A great alfredo sauce can elevate any dish from ordinary to extraordinary!" - Culinary Experts

When selecting side dishes, consider lighter options to balance the sauce's richness. A crisp green salad or steamed vegetables work wonderfully. For beverages, a light white wine like Pinot Grigio complements the creamy texture perfectly.

Pro tip: Experiment with different protein and vegetable combinations to discover your favorite alfredo sauce pairings. Your taste buds will thank you!

Nutritional Information and Dietary Considerations

Knowing about alfredo sauce nutrition helps you make better food choices. A typical serving of homemade Alfredo sauce has about 99 calories. This creamy sauce is tasty but should be eaten with care.

Here are the main nutrients in Alfredo sauce:

  • Protein: 8 grams per serving
  • Total fat: 4.7 grams
  • Saturated fat: 3 grams
  • Carbohydrates: 6.7 grams

The high fat in Alfredo sauce comes from butter and heavy cream. Experts say to enjoy it in.

"Eat wisely, but don't deprive yourself of culinary pleasures" - Nutrition Wisdom

If you're watching your diet, here are some tips:

  1. Choose low-fat dairy products
  2. Drink less of it
  3. Add veggies for more nutrients
  4. Try Greek yogurt instead of cream

Tip: Pair your Alfredo sauce with whole wheat pasta for more fiber and nutrients.

Conclusion

Your journey to make the perfect easy Alfredo sauce has been thrilling. You've learned about its Italian origins and how to mix ingredients just right. Now, you can make a sauce that will wow your loved ones.

The secret to a great Alfredo sauce is in how you make it. Keep your heat in check, whisk well, and use the best Parmesan and heavy cream. Your sauce will make any pasta dish special, whether it's fettuccine, penne, or spaghetti.

Feel free to add your own twist with chicken, mushrooms, or sun-dried tomatoes. Each change makes your sauce special and yours alone. With time, you'll get better at making a sauce that's as good as any restaurant's.

Now, you know that making amazing Alfredo sauce is easy for anyone. Keep trying, stay open to new ideas, and enjoy the tasty results of your cooking. Buon appetito!

FAQ

How long can I store homemade Alfredo sauce?

Homemade Alfredo sauce can last 3-4 days in the fridge. Cool it down first. Then, store it at 40°F or below to keep it fresh and safe.

Can I freeze Alfredo sauce?

Yes, you can freeze Alfredo sauce. But, it might change a bit when thawed. Freeze it in an airtight container for up to 2 months. When you reheat it, whisk well to get it creamy again. You might need to add a bit of cream or milk.

What are some dairy-free alternatives for Alfredo sauce?

For a dairy-free version, use cashew cream, nutritional yeast, and plant-based butter. You can also try coconut cream for a creamy base.

Why is my Alfredo sauce grainy or separated?

Grainy or separated sauce often comes from overheating or using pre-shredded cheese. Use fresh Parmesan and add cheese slowly over low heat. Whisk constantly. If it separates, whisk in a little warm milk or cream to fix it.

How can I make my Alfredo sauce lighter?

For a lighter version, use half-and-half instead of heavy cream. Reduce butter and add chicken broth. Try Greek yogurt or a mix of milk and cream to cut calories while keeping it creamy.

What pasta works best with Alfredo sauce?

Fettuccine is the best choice for Alfredo sauce. But, pappardelle works well too. Thicker pasta shapes help the sauce cling better. Avoid thin pasta like angel hair, as it gets overwhelmed by the sauce.

Can I add protein to my Alfredo sauce?

Yes! Add grilled chicken, shrimp, sautéed mushrooms, or crispy bacon. Vegetarian options include roasted broccoli, asparagus, or sun-dried tomatoes. They add flavor and nutrition.

What's the difference between traditional and American-style Alfredo sauce?

Traditional Italian Alfredo is just butter and Parmesan. It's lighter. American-style Alfredo has heavy cream, garlic, and sometimes cream cheese. It's richer and creamier.

How can I prevent my Alfredo sauce from becoming too thick?

If your sauce is too thick, thin it with warm milk, pasta water, or chicken broth. Add a little at a time and stir well. Always add liquid when the sauce is off the heat to avoid lumps.

Is Alfredo sauce gluten-free?

Traditional Alfredo sauce is gluten-free. But, check your ingredients, like pre-made cheese or seasonings. When making it from scratch, use gluten-free ingredients and be careful about cross-contamination.

Print

alfredo sauce recipe

alfredo sauce recipe
Print Recipe
Pin Recipe

5 Stars 4 Stars 3 Stars 2 Stars 1 Star

No reviews

A classic, velvety Alfredo sauce that’s rich, creamy, and perfect for coating your favorite pasta. Made with just a few simple ingredients—unsalted butter, heavy cream, garlic, and Parmesan cheese—this sauce brings restaurant-quality comfort to your home kitchen. A pinch of nutmeg adds a subtle warmth that balances the creaminess.

  • Author: grace bellamy
  • Prep Time: 5 minutes
  • Cook Time: 10 minutes
  • Total Time: 15 minutes
  • Yield: Serves 4
  • Category: Sauce / Pasta Sauce
  • Method: Stovetop
  • Cuisine: Italian / Italian-American
  • Diet: Vegetarian

Ingredients

• ½ cup unsalted butter
• 2 cups heavy cream
• 2 garlic cloves, minced
• 1 cup freshly grated Parmesan cheese
• Salt, to taste
• Freshly ground black pepper, to taste
• (Optional) A pinch of nutmeg

Instructions

  • In a medium saucepan, melt the butter over medium heat.
  • Add the minced garlic and sauté until fragrant (about 1 minute), being careful not to brown it.
  • Pour in the heavy cream and bring the mixture to a gentle simmer. Reduce the heat to low and let it simmer for 5–7 minutes until it slightly thickens.
  • Gradually whisk in the Parmesan cheese until the sauce is smooth and fully combined.
  • Season with salt, pepper, and a pinch of nutmeg (if using).
  • Remove from heat and serve immediately over freshly cooked pasta. For a looser consistency, stir in a splash of reserved pasta water.

Notes

• For an even richer flavor, use high-quality Parmesan cheese and freshly cracked black pepper.
• The sauce thickens further as it stands, so it’s best enjoyed immediately.
• Adjust seasoning gradually and add pasta water to reach your desired consistency if the sauce becomes too thick.

Did you make this recipe?

Share a photo and tag us — we'd love to see your creation!

Recipe

chicken feta pasta

January 30, 2025 by grace bellamy Leave a Comment

How to Make the Best Chicken Feta Pasta at Home

Table of Contents

  • How to Make the Best Chicken Feta Pasta at Home
    • Introduction to Mediterranean-Inspired Chicken Feta Pasta
      • Origins of the Viral TikTok Sensation
      • Why This Dish Became a Global Favorite
      • Health Benefits of Mediterranean Cuisine
    • Essential Ingredients for Perfect Chicken Feta Pasta
    • Kitchen Equipment and Tools Needed
      • Basic Cookware Requirements
      • Optional Tools for Enhanced Preparation
      • Temperature Control Essentials
    • Preparing the Chicken for Maximum Flavor
    • Step-by-Step Cooking Process
    • Sauce Creation and Pasta Integration
      • Building the Perfect Sauce Base
      • Combining Components Successfully
      • Achieving Ideal Consistency
    • Conclusion

A vibrant bowl of creamy chicken feta pasta, featuring al dente penne noodles, tender grilled chicken slices, crumbled feta cheese cascading over fresh spinach, sun-dried tomatoes, and a drizzle of olive oil, garnished with basil leaves and pepper flakes, set on a rustic wooden table with a light, airy kitchen background.

Imagine finding a dish that took the world by storm. Chicken feta pasta became a sensation, loved by many. It's not just a meal; it's a global hit that brings people together through its taste.

This Mediterranean diet recipe went viral on TikTok. It caused such excitement that stores in Finland and Canada ran out of feta cheese. What's behind its irresistible charm?

chicken feta pasta

Your kitchen is about to become the place to be for this delicious dish. With just five ingredients and 30 minutes, you can make a dish that rivals restaurants. It's easy and can be made in many ways.

Whether you're always on the go or love cooking, this chicken feta pasta is perfect. It's quick, easy, and packed with Mediterranean flavors. Get ready to make a dish that's both simple and amazing, with chicken, feta, and tomatoes.

Introduction to Mediterranean-Inspired Chicken Feta Pasta

Explore the world of feta cheese dishes that have become a hit on social media. The Chicken Feta Pasta has become a global favorite. It shows how easy it is to make delicious Greek-inspired meals at home.

A vibrant Mediterranean-inspired chicken feta pasta dish, featuring tender grilled chicken slices on a bed of al dente pasta, tossed with sun-dried tomatoes, fresh basil, and black olives. The dish is garnished with crumbled feta cheese, a drizzle of olive oil, and a sprinkle of crushed red pepper flakes, presented in a beautiful bowl with a rustic wooden table background and fresh herbs scattered around.

Origins of the Viral TikTok Sensation

A simple recipe from Finland turned into a worldwide cooking sensation. The demand for baked feta pasta was so high that stores ran out of feta cheese. Now, you can make this viral dish that has won the hearts of food lovers everywhere.

Why This Dish Became a Global Favorite

This chicken feta pasta is more than just a meal. It's a celebration of healthy, tasty food. The recipe is loved for:

  • Its quick and easy preparation
  • Using just a few ingredients
  • Looking great in photos
  • Having a delicious flavor

Health Benefits of Mediterranean Cuisine

The Mediterranean diet is known for its health benefits. By using ingredients like olive oil, fresh tomatoes, and chicken, you're not just cooking. You're adopting a healthier lifestyle. Feta cheese adds calcium and protein, making the dish good for your heart and overall health.

"Cooking is about passion, and this Mediterranean-inspired dish embodies that perfectly." - Chef Maria Rodriguez

Essential Ingredients for Perfect Chicken Feta Pasta

A vibrant display of essential ingredients for chicken feta pasta, featuring fresh basil leaves, juicy cherry tomatoes, tender grilled chicken breasts, crumbled feta cheese, garlic cloves, a drizzle of olive oil, and a serving of al dente pasta. The background showcases a rustic wooden table and Mediterranean herbs, with the ingredients arranged artistically to evoke a fresh and healthy vibe.

Starting with high-quality ingredients is key to making tasty Mediterranean recipes. Your chicken feta pasta needs the right parts to bring out the best Mediterranean tastes. It turns a simple dish into a true culinary delight.

To make the perfect chicken feta pasta, you need certain ingredients. They should highlight the healthy aspects of your meal:

  • 2 boneless chicken breasts (1¼ to 1½ pounds)
  • 1 block of feta cheese (8 ounces)
  • 2 pints fresh cherry tomatoes
  • 1 box pasta (16 ounces)
  • 2 cloves of garlic
  • Extra virgin olive oil
  • Fresh herbs like basil or oregano

When making feta cheese dishes, quality is crucial. Pick a feta that's creamy and tangy. It should crumble well and add a rich, authentic taste to your pasta.

Pro tip: Fresh, local ingredients elevate your dish from good to extraordinary!

The secret to great Mediterranean recipes is balancing flavors and textures. Your chicken should be tender, tomatoes should burst with sweetness, and feta cheese should add a creamy, salty touch. This brings everything together beautifully.

Make sure all ingredients are at room temperature before cooking. This ensures even cooking and the best flavor in your healthy meal options.

Kitchen Equipment and Tools Needed

Preparing delicious one-pot meals like chicken feta pasta requires some essential kitchen tools. Whether you're planning weeknight dinners or a special meal, having the right equipment can make cooking easier and more enjoyable.

Basic Cookware Requirements

For the perfect chicken feta pasta, you'll need a few key pieces of equipment:

  • 9x13-inch ceramic baking dish
  • Large mixing bowl
  • Sharp chef's knife
  • Cutting board
  • Measuring cups and spoons

Optional Tools for Enhanced Preparation

Some additional tools can elevate your cooking experience:

  • Garlic press
  • Herb scissors
  • Digital kitchen scale
  • Silicone spatula

Temperature Control Essentials

Accurate temperature monitoring is crucial for perfectly cooked chicken. A meat thermometer becomes your best friend when preparing easy pasta meals. Ensure your chicken reaches an internal temperature of 165°F to guarantee food safety.

"The right tools can transform a simple recipe into a culinary masterpiece." - Professional Chef

Pro tip for weeknight dinners: Choose versatile, multipurpose tools that save time and minimize cleanup. A good meat thermometer and quality baking dish can make one-pot meals a breeze.

Preparing the Chicken for Maximum Flavor

Creating the perfect chicken feta pasta starts with preparing your chicken breasts. Your weeknight dinners will transform from ordinary to extraordinary with these simple yet effective techniques.

Begin by selecting high-quality chicken breasts. For easy pasta meals, follow these essential preparation steps:

  • Pat chicken breasts dry with paper towels
  • Season generously with salt and black pepper
  • Optional: Add dried herbs like oregano or thyme

To ensure even cooking and maximum flavor absorption, consider gently pounding the chicken breasts to a uniform thickness. This technique helps create tender meat that integrates perfectly into your chicken feta pasta.

"The secret to delicious chicken is in the preparation" - Professional Chef

When seasoning, think beyond basic salt and pepper. A quick marinade can elevate your chicken's taste profile. Try combining olive oil, minced garlic, and fresh herbs for an extra flavor boost.

Cooking tip: Ensure your chicken reaches an internal temperature of 160˚F for safe and juicy results. This guarantees both flavor and food safety in your Mediterranean-inspired dish.

The Art of Selecting and Preparing Feta Cheese

Feta cheese is key in mediterranean diet recipes, adding real flavor to chicken feta pasta. Knowing how to pick, store, and prepare this cheese can make your Greek-inspired dishes stand out.

Exploring Feta Varieties

Feta cheese has many types, each with its own taste:

  • Greek traditional feta: Made from sheep's milk, with a tangy and rich flavor
  • Bulgarian feta: Slightly milder, often made with cow's milk
  • French feta: Creamier and less salty compared to other varieties

Proper Storage Techniques

Keeping feta cheese quality up is all about how you handle it. Store it in a brine solution or a tightly sealed container in the fridge. Pro tip: Always keep feta in its liquid to keep it moist and prevent drying.

Crumbling and Preparation Methods

Crumbling feta is an art. Use a fork to break it into small, irregular pieces. Or, you can slice or cube it, depending on your recipe.

"The secret to perfect feta is not just in the cheese, but in how you handle it." - Greek Culinary Tradition

Whether making a classic Mediterranean pasta or trying new recipes, knowing about feta cheese will change your cooking.

Step-by-Step Cooking Process

Making tasty one-pot meals for weeknights is super easy! This Chicken Feta Pasta recipe turns simple ingredients into a dish your family will love.

Start by heating your oven to 425 degrees F. This high heat gives your pasta a delicious roasted flavor, perfect for a Mediterranean taste.

  1. Prepare your baking dish by drizzling 2 tablespoons of olive oil
  2. Arrange 1 pound of chicken breast in the dish
  3. Scatter 1 pint of grape tomatoes around the chicken
  4. Place an 8 oz block of feta cheese in the center
  5. Sprinkle 1 tablespoon of minced garlic and 2 diced shallots

Bake the chicken, feta, and tomatoes for about 35 minutes. While they bake, cook 8 oz of pasta in another pot. Pro tip: Choose smaller pasta shapes like shells or penne for the best texture.

"The magic happens when you combine the roasted ingredients with perfectly cooked pasta!" - Home Cooking Expert

After baking, take the dish out and gently break up the chicken and feta. Mix the roasted ingredients with the cooked pasta, adding fresh basil for extra flavor. This way, your weeknight dinner is both easy and tasty.

  • Total cooking time: About 45 minutes
  • Servings: 4-5 people
  • Calories per serving: 350 kcal

Save leftovers in an airtight container for up to 5 days. This makes it a great meal prep option for busy families.

Sauce Creation and Pasta Integration

Making the perfect sauce is key to a tasty pasta dish. Your Mediterranean diet recipes shine when you get good at sauce making. To make a chicken feta pasta that tastes like it's from a restaurant, follow these steps. They'll turn simple ingredients into a delicious dish.

Building the Perfect Sauce Base

Start with a few important ingredients to make your pasta salad special. You'll need baked feta, ripe tomatoes, and pasta water. The pasta water is a secret ingredient that makes the sauce smooth and clingy.

  • Use 1 cup of reserved pasta water
  • Crumble feta cheese while still warm
  • Select ripe, flavorful tomatoes

Combining Components Successfully

Mixing your ingredients right is crucial for a great sauce. Blend the baked feta and tomatoes, adding pasta water as needed. Pro tip: Add pasta water slowly to avoid a too-thin sauce.

"The perfect sauce is all about balance and technique" - Chef's Kitchen Wisdom

Achieving Ideal Consistency

You want a sauce that's creamy and coats the pasta well. It should be neither too thick nor too thin. If it's too thick, add some pasta water. This method makes your meal light, healthy, and tasty.

  1. Mix sauce components gently
  2. Adjust consistency with pasta water
  3. Taste and season as needed

Cooking is an art. Feel free to try new things and make this pasta dish your own!

Garnishing and Presentation Tips

Make your greek-inspired dish stand out with simple garnishing techniques. These tips will turn your chicken feta pasta into a feast for the eyes and taste buds. Presentation is key to creating unforgettable meals.

Fresh herbs are essential for both looks and taste. Here are some garnishing ideas:

  • Sprinkle chopped fresh basil for vibrant green color
  • Add red pepper flakes for a subtle heat kick
  • Drizzle high-quality extra virgin olive oil for richness
  • Crumble additional feta cheese on top for texture

"The art of pasta salad ideas lies in the details of presentation" - Mediterranean Culinary Experts

Think about how you'll serve your dish. Use a wide, shallow bowl to show off the colors. Slice the chicken into thin strips and place them artfully on top for a fancy look.

Pro tip: Serve right away to keep the dish fresh and warm. Your guests will love the lively look of this Mediterranean dish.

Conclusion

Your chicken feta pasta journey doesn't end with one recipe. This Mediterranean diet recipe is a versatile weeknight dinner solution. It adapts to your culinary creativity. With just 45 minutes of total preparation time, you can turn simple ingredients into a restaurant-quality meal.

Storage is straightforward for this delicious dish. You can refrigerate your chicken feta pasta in an airtight container for up to 3 days. This makes it an excellent option for meal prep. When reheating, add a splash of pasta water to restore moisture and maintain the sauce's creamy texture.

The balanced nutrition profile is impressive. It has 32g of protein and only 435 calories per serving. This makes it a smart choice for health-conscious home cooks.

Remember, cooking is about exploration and personal touch. While this recipe provides a solid foundation, don't hesitate to experiment. Try different herbs, swap proteins, or adjust spice levels. Your kitchen is a canvas, and this chicken feta pasta is your delicious masterpiece waiting to be created.

Embrace the simple joy of Mediterranean-inspired cooking. Transform your weeknight dinners into culinary adventures. These adventures nourish both body and soul.

FAQ

What is chicken feta pasta?

Chicken feta pasta is a tasty dish from the Mediterranean. It became famous on TikTok. It mixes chicken, feta cheese, cherry tomatoes, and pasta in one pan. It's easy to make and full of flavor.

Is this recipe suitable for meal prep?

Yes, it's great for meal prep. Store it in a sealed container in the fridge for 3-4 days. When you reheat it, add some olive oil. This keeps the sauce creamy and the pasta moist.

Can I make this recipe vegetarian?

Absolutely! Just leave out the chicken and add roasted veggies like zucchini or bell peppers. You can also use chickpeas or tofu for protein.

What type of feta cheese works best?

Greek feta, made from sheep's or a mix of sheep's and goat's milk, is the best. Look for PDO certified feta for the real taste and texture.

How can I make this dish gluten-free?

Use gluten-free pasta like chickpea pasta or zucchini noodles. Make sure all ingredients are gluten-free.

What are some ways to add extra flavor to the dish?

Add fresh herbs like basil or oregano for extra taste. Red pepper flakes can add heat. Use top-quality olive oil and try spices like smoked paprika or thyme.

How long does it take to prepare this dish?

It takes about 30-40 minutes to prepare and cook. This makes it perfect for a weeknight dinner. Most of the time, you just need to wait for it to bake and cook.

Can I use different types of pasta?

Yes, you can try different pasta shapes. Choose ones that hold the creamy sauce well, like shells or fusilli.

Is chicken feta pasta nutritionally balanced?

It's a good fit for the Mediterranean diet. It has protein from chicken, healthy fats from feta and olive oil, and carbs from pasta. It also has vitamins from tomatoes and extra nutrients from herbs and veggies.

What side dishes pair well with chicken feta pasta?

Serve it with a light Greek salad, roasted veggies, garlic bread, or a crisp white wine. A simple mixed green salad with lemon vinaigrette is a great match for its rich flavors.

Print

chicken feta pasta

chicken feta pasta
Print Recipe
Pin Recipe

5 Stars 4 Stars 3 Stars 2 Stars 1 Star

No reviews

This Chicken Feta Pasta brings together tender chicken, tangy feta cheese, and juicy tomatoes for a creamy, flavorful dish. Perfect for a quick weeknight dinner or a satisfying meal anytime, it’s easy to prepare yet tastes like a gourmet treat!

  • Author: grace bellamy
  • Prep Time: 10 minutes
  • Cook Time: 30 minutes
  • Total Time: 40 minutes
  • Yield: 4 servings 1x
  • Category: Main Dish
  • Method: Baked / Stovetop
  • Cuisine: Mediterranean

Ingredients

Scale
  • 1 pound boneless, skinless chicken breasts (or thighs), diced
  • 8 ounces feta cheese (block preferred)
  • 2 cups cherry tomatoes (or grape tomatoes)
  • 2 tablespoons olive oil
  • 2 cloves garlic, minced
  • 8 ounces pasta of your choice (penne or fusilli work great)
  • 1 teaspoon dried oregano (optional)
  • ½ teaspoon salt
  • ¼ teaspoon black pepper
  • A pinch of red pepper flakes (optional, for spice)
  • Fresh basil, chopped (for garnish)

Instructions

  • Preheat the oven:
    • Set your oven to 400°F (200°C).
  • Arrange the feta and tomatoes:
    • In a baking dish, place the block of feta in the center. Surround it with cherry tomatoes.
    • Drizzle 1 tablespoon of olive oil over the tomatoes and feta. Add salt, pepper, and red pepper flakes if desired.
  • Prepare and add the chicken:
    • Season the diced chicken with salt, pepper, and oregano (if using).
    • In a skillet over medium heat, add the remaining 1 tablespoon of olive oil. Sear the chicken for about 3–4 minutes until lightly browned (it doesn’t have to be fully cooked yet).
    • Transfer the chicken into the baking dish around the feta and tomatoes.
  • Bake:
    • Bake uncovered for about 20–25 minutes, or until the tomatoes burst and the feta turns slightly golden.
  • Cook the pasta:
    • While the feta and chicken bake, boil the pasta according to the package instructions. Reserve ½ cup of pasta water before draining.
  • Combine everything:
    • Remove the baking dish from the oven. Use a fork to mash the feta and tomatoes together, creating a sauce.
    • Add the cooked pasta, minced garlic, and a splash of reserved pasta water (as needed for a creamy consistency). Stir gently until all ingredients are combined.
  • Serve:
    • Taste and adjust seasonings. Top with fresh basil and serve warm. Enjoy!

Notes

  • For extra flavor, add chopped onions or bell peppers to the dish before baking.
  • Use whole wheat or gluten-free pasta to fit your dietary preferences.
  • If you prefer a milder garlic flavor, sauté the garlic with the chicken instead of adding it raw at the end.

Did you make this recipe?

Share a photo and tag us — we'd love to see your creation!

Recipe

Hamburger Rice Casserole

January 30, 2025 by grace bellamy Leave a Comment

How to Make Easy Hamburger Rice Casserole

Table of Contents

  • How to Make Easy Hamburger Rice Casserole
    • Why This Classic Ground Beef Casserole is Perfect for Family Dinners
      • One-Pan Convenience
      • Budget-Friendly Meal Solution
      • Kid-Approved Comfort Food
    • Essential Ingredients for Hamburger Rice Casserole
    • Kitchen Equipment and Tools Needed
      • Recommended Baking Dishes
      • Additional Kitchen Tools
    • Preparing the Ground Beef and Vegetables
    • Perfect Rice Selection and Preparation Tips
      • Common Rice Mistakes to Avoid
    • Step-by-Step Assembly Instructions
    • Cooking Time and Temperature Guidelines

    A hearty hamburger rice casserole, bubbling hot in a glass baking dish, golden melted cheese on top, seasoned ground beef mixed with fluffy rice, colorful bell peppers, and diced tomatoes, garnished with fresh parsley, cozy kitchen background with warm lighting.

    Imagine a dinner that brings comfort, warmth, and satisfaction to your family table. Our hamburger rice casserole is exactly that kind of easy dinner. It's a classic comfort food that turns simple ingredients into a delicious meal everyone will love.

    Hamburger Rice Casserole

    This hearty casserole has roots in traditional Midwestern cooking, dating back to the 1970s. We've perfected a recipe that combines lean ground beef, fluffy long-grain rice, and rich French onion soup. It's a one-pan wonder that's both budget-friendly and incredibly tasty.

    Whether you're a busy parent seeking a quick weeknight meal or someone craving a nostalgic dish, this hamburger rice casserole delivers. With just one hour of cooking time and minimal prep, you'll have a protein-packed dinner that serves up to 8 people.

    Our step-by-step guide will walk you through creating this beloved comfort food. It ensures even novice cooks can confidently prepare a delicious meal. You'll have everyone asking for seconds.

    Why This Classic Ground Beef Casserole is Perfect for Family Dinners

    Hamburger Rice Casserole

    A cozy family dinner table set with a warm, bubbling ground beef casserole topped with melted cheese, surrounded by colorful side dishes like green beans and a fresh salad, soft lighting highlighting the delicious meal, a homely atmosphere with rustic décor in the background.

    Finding the perfect family recipe is like finding gold in the kitchen. Our ground beef casserole is that special dish. It makes dinner time fun and stress-free.

    One-Pan Convenience

    Busy families love easy cleanup. This casserole is both tasty and simple. It all cooks in one pan, saving you time and effort.

    • Complete meal prepared in one dish
    • Minimal kitchen cleanup
    • Quick preparation process

    Budget-Friendly Meal Solution

    This recipe is great for saving money. It uses affordable ingredients like ground beef and rice. You can feed many people without spending a lot.

    "Good food doesn't have to be expensive – just creative!"

    Kid-Approved Comfort Food

    Kids often have picky tastes, but this dish is a hit. It has tender ground beef and creamy texture. It's a favorite at family dinners.

    • Familiar, comforting flavors
    • Balanced nutritional profile
    • Easy to customize with additional vegetables

    Essential Ingredients for Hamburger Rice Casserole

    Making the perfect cheesy hamburger casserole begins with the right ingredients. Our classic casserole dish needs a mix of components. Together, they create a comforting meal your family will love.

    Hamburger Rice Casserole

    A vibrant arrangement of hamburger rice casserole ingredients, featuring raw ground beef, uncooked white rice, diced onions, chopped bell peppers, canned diced tomatoes, shredded cheese, and spices like garlic powder and paprika, all artistically displayed on a wooden kitchen countertop with fresh herbs and cooking utensils in the background.

    • 1.5 pounds lean ground beef (90% lean recommended)
    • 1 cup long-grain white rice
    • 1 onion, finely diced
    • 1 ½ cups finely diced celery
    • 1 can (14.5 oz) beef broth
    • 1 can (10.5 oz) cream of celery soup
    • ¾ cup unsalted butter
    • Salt and pepper to taste

    Using fresh ingredients is crucial for your casserole. The mix of lean ground beef, aromatic vegetables, and creamy soups gives a rich flavor. It turns a simple dish into a memorable meal.

    "The secret to a great cheesy hamburger casserole is using high-quality ingredients and cooking with love."

    Pro tip: Use uncooked rice in the recipe. Pre-cooking the rice can change the texture and moisture of your dish. The liquid from the beef broth and soup will cook the rice perfectly during baking. This ensures a fluffy and delicious result.

    Kitchen Equipment and Tools Needed

    Preparing a kid-friendly meal doesn't need fancy chef tools. You just need a few basic kitchen tools to make this tasty and affordable recipe. Let's look at the key items for a delicious Hamburger Rice Casserole.

    Recommended Baking Dishes

    The key tool is the 9x13-inch baking dish. This versatile pan is great for casseroles that feed a big family. Look for:

    • Ceramic or glass dishes with high sides
    • Dishes with tight-fitting lids
    • Oven-safe containers that distribute heat evenly

    Additional Kitchen Tools

    To make cooking easier, get these essential tools:

    1. Large skillet for browning ground beef
    2. Cutting board
    3. Sharp chef's knife
    4. Measuring cups and spoons
    5. Wooden spoon or spatula

    Pro tip: Having these tools ready before you start cooking will make your meal preparation a breeze!

    Cooking is about making memories, not perfection. Don't worry if you don't have every single tool – creativity in the kitchen is what matters most!

    Preparing the Ground Beef and Vegetables

    Starting a great ground beef casserole means preparing your ingredients well. For this recipe, we'll show you how to cook the ground beef and vegetables. This will make a tasty base for your dish.

    "The key to a great ground beef casserole is in the preparation of your meat and vegetables."

    Here's what you'll need to prepare:

    • 750g of lean ground beef
    • 3 cloves of garlic, minced
    • 2 carrots, diced
    • 1 cup broccoli florets
    • ½ cup sweet corn
    • ½ cup cooked black beans

    First, heat a large skillet over medium-high heat. Brown the ground beef thoroughly, breaking it into small pieces as it cooks. This makes sure it cooks evenly and adds rich flavor to your casserole.

    After the beef is mostly cooked, add your minced garlic and diced vegetables. Sauté for 3-4 minutes until the vegetables are tender. This step creates a flavorful mix that will be the base of your casserole.

    Drain any extra grease carefully. Pro tip: Use a colander or paper towels to remove extra fat. This helps keep your casserole from getting too greasy.

    Quick Cooking Tip: Make sure your ground beef reaches an internal temperature of 160°F for food safety!

    Your beef and vegetable mix is now ready to be mixed with rice. This makes a delicious meal for your family.

    Perfect Rice Selection and Preparation Tips

    Choosing the right rice is key to a great family dinner. Rice is the base of our tasty hamburger rice casserole. The right grain can elevate your meal.

    For this recipe, we suggest jasmine or basmati rice. These varieties have the best texture and separate well when cooked.

    Types of Rice to Use

    • Jasmine Rice: Fragrant and light, perfect for casseroles
    • Long Grain White Rice: Ideal for consistent texture
    • Basmati Rice: Adds a subtle aromatic flavor

    Rice Cooking Techniques

    Follow these tips for the best rice:

    1. Use a 1.5:1 water-to-rice ratio
    2. Rinse rice before cooking to remove excess starch
    3. Let rice rest for 5-10 minutes after cooking

    Common Rice Mistakes to Avoid

    "The secret to perfect rice is patience and precision." - Home Cooking Experts

    • Don't lift the lid while rice is cooking
    • Avoid stirring too frequently
    • Measure ingredients accurately

    Mastering these rice techniques will make your hamburger rice casserole perfect. It will be a hit with your family.

    Step-by-Step Assembly Instructions

    Making this tasty one-pot meal is simple! Our comfort food classic is easy to put together. Just a few steps and your family will be eager for dinner.

    To start making your Hamburger Rice Casserole, follow these important steps:

    1. Begin by spreading the browned ground beef evenly across the bottom of a greased 9x13 inch baking dish
    2. Layer the cooked rice over the beef, making a uniform base
    3. Pour the cream of mushroom soup and beef broth mixture over the whole surface
    4. Sprinkle frozen mixed vegetables throughout the casserole
    5. Add a generous layer of shredded cheese on top

    Pro tip: Distribute ingredients carefully to ensure every bite is packed with flavor! The secret to a great one-pot meal is mixing each ingredient well.

    "Cooking is love made visible" - and this casserole proves just that!

    Before baking, add small butter pats on top and sprinkle fresh parsley. This adds color and freshness. Your comfort food masterpiece is now ready for the oven!

    Cooking Time and Temperature Guidelines

    Perfecting your hamburger rice casserole needs careful attention to cooking time and temperature. The right approach ensures a delicious easy dinner that will impress your family and friends.

    Getting the temperature and timing just right can make all the difference in creating a mouthwatering hamburger rice casserole. Professional chefs and home cooks alike know that precision matters when preparing this classic comfort meal.

    Oven Temperature Settings

    For the most consistent results, follow these key temperature guidelines:

    • Preheat oven to 350°F (175°C)
    • Use a middle rack for even heat distribution
    • Maintain consistent oven temperature throughout cooking

    Cooking Time Variations

    Cooking times can vary depending on your specific ingredients and oven. Here's a general breakdown for your hamburger rice casserole:

    1. Total preparation time: 15 minutes
    2. Total cooking time: 60 minutes
    3. Covered baking: 50-55 minutes
    4. Uncovered finishing: 5-10 minutes (for cheese melting)

    "The secret to a perfect casserole is patience and precise timing." - Home Cooking Experts

    Pro tip for an easy dinner solution: Check your casserole around the 45-minute mark. The rice should be tender, and the cheese melted to golden perfection. If the top begins to brown too quickly, cover with aluminum foil to prevent burning.

    Remember that every oven is slightly different. Use these guidelines as a starting point and adjust based on your specific kitchen equipment and ingredient variations.

    Creative Recipe Variations and Add-ins

    Make your cheesy hamburger casserole even better with exciting ingredients. This will make your family's taste buds happy. Every great family recipe starts with creativity and a willingness to try new things!

    Vegetable lovers can add color and nutrition with different veggies. Try these tasty mix-ins:

    • Chopped bell peppers
    • Sweet corn kernels
    • Diced carrots
    • Sliced mushrooms
    • Green peas

    For more cheesy hamburger casserole goodness, sprinkle extra shredded cheese on top. A mix of cheddar and Colby Jack makes a delicious golden crust. It's so good, everyone will want more.

    "Cooking is about making memories, one delicious meal at a time." - Unknown

    Want to add even more flavor? Try these options:

    • Add diced green chiles for a spicy twist
    • Incorporate black beans for extra protein
    • Sprinkle some red pepper flakes for heat

    Your family recipe is a blank canvas for creativity. Don't be afraid to try new things and make it your own!

    Storage and Reheating Instructions

    Keeping your tasty budget-friendly recipe fresh is simple. The right storage lets you enjoy your Hamburger Rice Casserole for days.

    Refrigeration Guidelines

    Storing your homemade comfort food in the fridge is easy. Just follow these steps to keep it fresh:

    • Use an airtight container to prevent moisture loss
    • Store leftovers within 2 hours of cooking
    • Refrigerate for up to 3-4 days

    Freezing Methods

    Freezing is a smart way to keep your recipe longer. Here's how to freeze your casserole right:

    1. Cool the casserole completely before freezing
    2. Wrap tightly in freezer-safe plastic wrap
    3. Place in a freezer-safe container
    4. Freeze for up to 2 months

    Reheating Tips

    Reheat your comfort food to enjoy its flavors again. Follow these tips:

    • Preheat oven to 350°F (175°C)
    • Cover with aluminum foil to prevent drying
    • Reheat for 20-25 minutes until thoroughly warm
    • Check internal temperature reaches 165°F

    "Proper storage and reheating can make your meal taste just as delicious as the day you cooked it!"

    Serving Suggestions and Side Dishes

    Make your easy dinner complete with tasty side dishes. They will highlight your hamburger rice casserole. The right sides can turn a classic meal into something special.

    Recommended Side Dishes

    • Fresh Tossed Salad: A crisp green salad adds lightness to your hearty casserole
    • Fluffy Crescent Rolls: Warm bread complements the rich flavors perfectly
    • Roasted Seasonal Vegetables: Adds nutrition and color to your plate

    For a fun twist, add crispy chow mein noodles on top. This simple touch makes your meal more exciting for kids.

    Exciting Toppings and Garnishes

    • Fresh chopped parsley
    • Shredded cheddar cheese
    • Sliced green onions

    "A great meal is about bringing family together and creating memories around the dinner table."

    Get your family involved in picking side dishes. It makes dinner fun and brings everyone together!

    Portion and Serving Tips

    This recipe makes 8 servings, great for family dinners or small parties. Each serving has about 329 calories, offering a balanced meal.

    Nutritional Information and Dietary Considerations

    When making a budget-friendly dish like hamburger rice casserole, knowing its nutritional value is key. This casserole offers a good balance of nutrients, making it a healthy choice for meals.

    Each serving of this hearty casserole brings:

    • Calories: 217
    • Protein: 25g
    • Carbohydrates: 14g
    • Total Fat: 6g
    • Saturated Fat: 3g
    • Cholesterol: 59mg
    • Sodium: 1037mg

    If you're watching your diet, you can tweak the hamburger rice casserole to fit your needs. Here are some easy changes:

    1. Choose lean ground beef to cut down on fat
    2. Switch to low-sodium cream of mushroom soup
    3. Add more veggies for extra fiber
    4. Use whole grain rice for more nutrients

    "Eating well doesn't mean sacrificing flavor – it's about making smart, delicious choices!"

    This budget-friendly recipe can be a nutritious part of a balanced meal when eaten in moderation.

    Conclusion

    Our journey through creating the perfect hamburger rice casserole shows how simple cooking can make dinner special. This family recipe is more than just mixing ingredients. It's about making memories together at the dinner table. With just 1 pound of ground beef and 1 cup of rice, you can feed six people and make everyone smile.

    This ground beef casserole is very versatile. It's great for busy parents or anyone new to cooking. Remember, cooking gets better with practice. Each time you make this dish, you'll get more confident in your cooking skills.

    Feel free to add your own twist to this recipe. Try different vegetables, cheeses, or seasonings. The most important thing is to have fun and make delicious memories with every bite. Your homemade casserole is a warm hug from your kitchen.

    This family recipe is quick and flavorful, taking just over an hour to prepare and cook. From the first sizzle of ground beef to the golden cheese on top, you're not just cooking dinner. You're creating a tradition that can be enjoyed for generations.

    FAQ

    What makes Hamburger Rice Casserole a great family meal?

    This one-pot meal is perfect for families. It's budget-friendly and easy to prepare. Kids and adults love it. It uses affordable ingredients like ground beef and rice, making it a comforting dish that saves time and is easy to clean up.

    Can I make substitutions in the Hamburger Rice Casserole recipe?

    Yes, you can! You can change vegetables, use different rice types, or adjust the seasoning. We encourage you to be flexible and make it your own.

    How long does this casserole take to prepare and cook?

    It takes about 45-60 minutes. You'll spend 15-20 minutes preparing and 30-40 minutes baking. It's quick and perfect for busy families.

    Is this recipe suitable for freezing?

    Yes! It freezes well. Store it in airtight containers for up to 3 months. Cool it completely before freezing and thaw in the fridge before reheating.

    What are some good side dishes to serve with this casserole?

    Great sides include green salads, steamed veggies, garlic bread, dinner rolls, or coleslaw. These add variety and nutrition to your meal.

    Can I make this casserole ahead of time?

    Yes! Prepare it earlier and refrigerate until baking. Add 10-15 minutes to the cooking time if it's cold.

    Are there ways to make this recipe healthier?

    Yes! Use lean ground beef, add more veggies, use low-sodium soups, or try brown rice. These changes can make it healthier.

    What type of rice works best for this casserole?

    Long-grain white rice is best. It stays fluffy and absorbs flavors well. Instant rice works too, but adjust the liquid.

    How can I make this casserole more cheesy?

    Add extra shredded cheese on top for the last 10 minutes. Or mix some in during assembly. Cheddar, mozzarella, or a mix are great.

    Can this recipe be made vegetarian?

    Yes! Use plant-based meat, lentils, or extra veggies like mushrooms and zucchini. This keeps it hearty and protein-rich.

    Print

    Hamburger Rice Casserole

    Hamburger Rice Casserole
    Print Recipe
    Pin Recipe

    5 Stars 4 Stars 3 Stars 2 Stars 1 Star

    No reviews

    This Hamburger Rice Casserole is a hearty and comforting dish that’s perfect for busy weeknights! 🍲✨ With savory ground beef, fluffy rice, and a creamy sauce, it’s a simple, budget-friendly meal the whole family will love.

    • Author: grace bellamy
    • Prep Time: 10 minutes
    • Cook Time: 45 minutes
    • Total Time: 55 minutes
    • Yield: 6 servings 1x
    • Category: Main Course
    • Method: Baked
    • Cuisine: American

    Ingredients

    Scale
    • 1 lb ground beef (80/20 or leaner)
    • 1 small onion, diced
    • 1 cup long-grain white rice (uncooked)
    • 1 can (10.5 oz) cream of mushroom soup
    • 1 ½ cups beef broth (or water)
    • 1 teaspoon garlic powder
    • ½ teaspoon salt
    • ¼ teaspoon black pepper
    • 1 cup shredded cheddar cheese (optional, for topping)

    (Optional Add-Ins)

    • 1 cup mixed vegetables (peas, carrots, corn)
    • ¼ teaspoon paprika or chili powder for extra flavor

    Instructions

    • Preheat the oven to 350°F (175°C). Lightly grease a 9×13-inch baking dish.
    • Brown the beef:
      • In a skillet over medium-high heat, cook the ground beef and diced onion until the beef is no longer pink. Drain any excess grease.
    • Combine ingredients:
      • In the baking dish, mix the cooked beef, uncooked rice, cream of mushroom soup, beef broth (or water), garlic powder, salt, and black pepper. Stir in optional vegetables if desired.
    • Bake:
      • Cover the dish tightly with aluminum foil and bake for 30 minutes.
      • Remove the foil, stir gently, and top with shredded cheddar cheese if using.
      • Return to the oven uncovered and bake for an additional 10–15 minutes, or until the rice is tender and the cheese is melted.
    • Serve:
      • Let the casserole rest for 5 minutes before serving. Enjoy warm!

    Notes

    • For a lighter version, use ground turkey or chicken instead of beef.
    • Swap cream of mushroom soup for cream of chicken or celery to change the flavor.
    • Store leftovers in an airtight container in the fridge for up to 3 days. Reheat in the oven or microwave.

    Did you make this recipe?

    Share a photo and tag us — we'd love to see your creation!

    Recipe

    Pineapple Jam

    January 29, 2025 by grace bellamy Leave a Comment

    How to Make Sweet Homemade Pineapple Jam in 30 Minutes

    A vibrant kitchen scene with a wooden countertop, featuring a pot of bubbling pineapple jam, fresh pineapples, sugar, and jars awaiting filling. Sunlight streams through a window, illuminating the colorful ingredients and creating a warm, inviting atmosphere.

    The sweet smell of homemade pineapple jam reminds me of summers with my grandmother. Those times helped me love making sweet treats. Now, my pantry is full of homemade goodies.

    Pineapple Jam

    Imagine making a tasty pineapple jam in just 30 minutes. This quick recipe turns fresh fruit into a yummy spread. It's perfect for enjoying a tropical flavor without spending hours cooking.

    Making a jar of sunshine is surprisingly easy. You need only three ingredients and a little time. This homemade jam is better than store-bought, with no hard techniques needed. It's ready in no time, perfect for watching your favorite TV show.

    Are you ready to make a delicious spread that will wow your loved ones? Let's start this easy jam-making journey together!

    Why Make Your Own Pineapple Jam

    Making your own tropical spreads at home is a fun and healthy choice. Homemade fruit preserves have benefits that store-bought ones can't match.

    Pineapple Jam

    A vibrant kitchen scene featuring fresh, ripe pineapples, a cutting board with pineapple chunks, a pot simmering with golden pineapple jam, a wooden spoon stirring the mixture, jars filled with warm jam, and scattered ingredients like sugar and lemon. The countertop is adorned with tropical decor and sunlight streaming through a window, creating a warm and inviting atmosphere.

    When you make your own pineapple jam, you control what goes into it. This lets you create unique flavors. Making your own jam is a tasty and fulfilling process.

    Benefits of Homemade vs Store-Bought

    • Full control over sugar content
    • Ability to add unique spices and flavors
    • Fresh ingredients with maximum nutritional value
    • No artificial preservatives or additives

    Cost-Effectiveness Analysis

    Homemade jam might cost more, but it's worth it for the quality and taste. You'll need about 5 large pineapples and 800 grams of sugar. This makes about 1 kilogram of delicious jam.

    "The joy of creating something from scratch is worth more than any price tag." - Home Cooking Enthusiast

    Health and Quality Control Advantages

    Pineapples are full of good stuff like vitamin C and minerals. Making your own jam lets you:

    1. Reduce added sugar
    2. Boost your immune system
    3. Stay away from processed ingredients
    4. Create a personalized flavor

    Your homemade pineapple jam will keep for 3-4 weeks in a sealed container. This means you can enjoy fresh, tasty jam whenever you like.

    Essential Ingredients for Perfect Pineapple Jam

    "A vibrant display of fresh pineapples, granulated sugar, and a small bowl of lemon juice, arranged on a rustic wooden surface, with a scattering of whole spices like cinnamon and cloves for added texture and warmth."

    Making delicious pineapple jam begins with picking the right ingredients. Your homemade pineapple recipes will stand out with just a few simple parts. These parts turn fresh fruit into a tasty spread, great for canning and preserving.

    Key Ingredients You'll Need

    • Fresh Pineapple: 6 medium slightly ripe pineapples
    • Rock sugar: 225-275 grams
    • Lemon juice: 2 tablespoons
    • Optional flavor enhancers:
      • 1 cinnamon bark
      • 3 cloves
      • 3 star anise segments
      • ¼ teaspoon salt
      • 1 teaspoon vanilla extract

    Choose pineapples that are ripe but still firm for your jam. The natural pectin in fresh pineapples helps make the perfect jam without commercial pectin.

    "The secret to great pineapple jam is using high-quality, fresh ingredients and understanding their natural properties." - Culinary Preserving Expert

    This recipe makes about two 8-ounce jars of preserves. It's important to get the sugar ratio right. Add ⅔ of the total sugar first, then adjust to your taste.

    Nutritional Highlights

    Each serving of your homemade pineapple jam is packed with nutrients:

    • Calories: 127
    • Carbohydrates: 33g
    • Vitamin C: 61mg
    • Fiber: 2g

    With these ingredients and a bit of passion, you'll make a pineapple jam that beats store-bought versions.

    Required Kitchen Tools and Equipment

    Making tasty pineapple jam needs some basic kitchen tools. You don't have to be a pro chef. Most techniques can be done with simple gear you probably have.

    Creating gourmet gifts like homemade pineapple jam doesn't need fancy tools. Here's what you'll need:

    Basic Utensils for Jam Making

    • Large heavy-bottomed saucepan (4-6 quart capacity)
    • Wooden spoon or silicone spatula
    • Measuring cups and spoons
    • Sharp kitchen knife
    • Cutting board
    • Canning jars with lids

    Optional Equipment for Enhanced Results

    • Digital kitchen scale for precise ingredient measurements
    • Candy thermometer for monitoring jam temperature
    • Wide-mouth funnel for easy jar filling
    • Jar tongs for safe handling during canning
    • Lid lifter for sanitizing jar lids

    "The right tools can transform your jam-making from good to extraordinary!" - Home Cooking Enthusiast

    While pro canning kits cost $30-$35, you can start with basic tools. The cost is small compared to the fun of making homemade preserves.

    Remember, your passion and creativity are key. They help you make unique jam-making techniques for unforgettable gourmet gifts.

    Selecting and Preparing Fresh Pineapple

    Choosing the perfect pineapple is key for tasty tropical spreads. A ripe pineapple makes your recipes stand out.

    Here are some tips for picking a great pineapple:

    • Check the color: Look for golden-yellow skin with minimal green patches
    • Smell the base: A sweet, fragrant aroma indicates ripeness
    • Gently squeeze the fruit: It should have slight give without being mushy
    • Examine the leaves: Fresh, green leaves suggest peak freshness

    For jam-making, one medium pineapple yields approximately 4 cups of chunks. Here's how to prepare it:

    1. Slice off the top and bottom of the pineapple
    2. Stand the fruit upright and carefully cut away the outer skin
    3. Remove any remaining "eyes" or brown spots
    4. Cut around the tough central core
    5. Chop the flesh into uniform chunks

    "The secret to great pineapple jam is starting with the perfect fruit" - Tropical Cooking Experts

    Pro tip: If you're short on time, most grocery stores offer pre-cut pineapple chunks. Frozen pineapple works wonderfully too, making your tropical spreads preparation even easier.

    Quick Method vs Traditional Jam Making

    Making artisanal food like pineapple jam doesn't have to take forever. New jam-making methods have changed how we preserve fruits. They offer quicker and easier ways to do it.

    Old-school jam-making took hours of watching and stirring. Now, new ways cut down on prep time. They keep the taste and quality top-notch.

    Time-Saving Techniques for Homemade Jam

    • Microwave method reduces cooking time to about 30 minutes
    • Pressure cooker technique cuts prep time by 50%
    • Electric jam makers give consistent results with little effort

    Modern Cooking Approaches

    Today's jam-making uses tech to make it easier. With special tools and ingredients, you can whip up tasty pineapple jam fast:

    1. Use powdered pectin for quicker setting
    2. Pick top-quality fresh pineapples
    3. Try different sweeteners

    *Pro tip: The secret to great jam is balancing speed with keeping flavor.*

    These modern methods let you enjoy homemade pineapple jam without spending hours cooking. Whether you're always on the go or love cooking on weekends, these techniques make making artisanal food easy.

    Step-by-Step Cooking Process

    Making homemade pineapple jam is simpler than you think. It's all about preparation and cooking techniques. You'll turn fresh pineapple into a tasty spread that's better than store-bought.

    First, get your ingredients ready for canning and preserving your pineapple jam:

    • 2 cups tightly packed fresh pineapple cubes
    • ½ cup sugar
    • 1 teaspoon lemon juice

    The cooking process for homemade jams needs patience and focus. Start by chopping your pineapple into small, even pieces. This makes your jam smooth and consistent.

    "The secret to great pineapple jam is in the details of preparation and cooking." - Culinary Expert

    Here's how to make your perfect pineapple jam:

    1. Put pineapple chunks and sugar in a medium saucepan
    2. Cook over medium-low heat for 8-10 minutes
    3. Stir constantly to avoid burning
    4. Lower heat as it thickens
    5. Cook for 10-15 minutes more until it's thick enough

    Your homemade pineapple jam is ready when it's thick and spreadable. Test it by putting a bit on a cold plate. It should wrinkle a bit when you push it.

    Pro tip: For a jam that's great for desserts, cook it a bit longer for stronger flavor.

    Total cooking time: Approximately 30 minutes

    Pineapple Jam Consistency and Texture Guide

    Making perfect fruit preserves is all about mastering jam-making techniques. The texture of your pineapple jam is key. It can make or break your recipe.

    Texture is everything when making homemade jam. The right consistency can turn a good jam into an amazing one.

    Testing for Proper Thickness

    Professional jam makers use simple ways to check if their jam is thick enough:

    • Spoon Test: Try drawing a spoon through the jam. If the trail doesn't fill with liquid right away, it's good.
    • Cold Plate Method: Put a bit of jam on a cold plate. If it wrinkles when pushed, it's ready.
    • Temperature Check: Aim for 220°F (104°C) for the best setting.

    Troubleshooting Common Texture Issues

    Jam-making can be tricky, but there are solutions for common problems:

    • Runny Jam: Keep cooking to reduce moisture
    • Too Thick Jam: Add a little water to thin it out
    • Grainy Texture: Make sure sugar dissolves well during cooking

    "The secret to perfect jam is patience and careful observation." - Artisan Jam Maker

    Remember, your jam will thicken as it cools. Let it rest for 15-20 minutes before checking its texture. With practice, you'll get better at making delicious, perfectly textured pineapple jam.

    Storage and Preservation Tips

    Learning how to can and preserve your homemade pineapple jam is key. This way, you can enjoy it for months. The secret to keeping it fresh is using the right techniques.

    There are many ways to store your jam:

    • Refrigerator storage: Keep your jam in a tightly sealed glass jar for up to 3 weeks
    • Freezer preservation: Store for up to 3 months with proper packaging
    • Pantry canning: Achieve shelf stability for up to 1 year using water bath methods

    If you want to give gourmet gifts, homemade pineapple jam is ideal. The water bath canning technique keeps it safe and tasty.

    Pro Tip: Always use sterilized jars and check for any signs of spoilage before consuming stored jam.

    Temperature is important for jam preservation. Keep it between 50-70°F. This helps keep the jam's quality and stops bacteria from growing.

    • Inspect jars monthly for any changes in color or texture
    • Use clean utensils when serving to prevent contamination
    • Label jars with preparation date for easy tracking

    By sticking to these storage tips, your homemade pineapple jam will last a long time. It's perfect for enjoying yourself or as a special gift.

    Creative Ways to Use Pineapple Jam

    Pineapple jam is more than just a spread for toast. It can change your cooking with its sweet and tropical flavors. Your homemade jam opens up a world of tasty possibilities in many dishes.

    Get ready to explore exciting ways to use this sweet condiment in your meals!

    Breakfast and Brunch Delights

    Elevate your morning with these pineapple recipes:

    • Spread on warm scones or toasted bread
    • Swirl into Greek yogurt parfaits
    • Drizzle over pancakes or waffles
    • Mix into overnight oats for extra flavor

    Baking and Culinary Applications

    Transform your baked goods and savory dishes with these creative uses:

    1. Use as a cake or cupcake filling
    2. Create glazes for roasted meats
    3. Pair with soft cheeses on charcuterie boards
    4. Add a dollop to steak fajitas for tropical zest

    "Pineapple jam is like a secret weapon in the kitchen - unexpected, versatile, and always delicious!" - Chef Maria Rodriguez

    Your homemade pineapple jam can truly change your cooking. It brings a burst of tropical flavor to both sweet and savory dishes.

    Recipe Variations and Flavor Enhancements

    Make your basic pineapple recipes into unique tropical spreads. Try exciting flavor combinations. Your homemade jam can show off your culinary creativity!

    Spicy and Bold Variations

    Want to spice up your jam? Try these adventurous twists:

    • Add 1-2 minced jalapeños for a spicy pineapple jam
    • Stir in a tablespoon of rum during the final cooking stages
    • Sprinkle ground cinnamon for enhanced preservation

    Tropical Flavor Infusions

    "Creativity in the kitchen turns simple ingredients into extraordinary experiences." - Culinary Explorers

    Elevate your pineapple jam with these delightful flavor combinations:

    1. Vanilla bean and pineapple
    2. Ginger-infused tropical spread
    3. Coconut pineapple jam
    4. Rum-soaked pineapple jam

    Remember, the key to creating exceptional artisanal food products is fearless experimentation. Don't be afraid to mix unexpected ingredients and discover your signature jam recipe!

    Tips for Perfect Results Every Time

    Mastering homemade jams takes practice and precision. Your pineapple jam journey can be smooth with the right techniques. These tips will help you make exceptional jams.

    Avoiding Common Pitfalls

    When making homemade jams, some mistakes can ruin your results. Here are key tips for success:

    • Watch the heat carefully to prevent burning
    • Stir frequently during the reduction process
    • Use a heavy-bottomed pan for even heat distribution
    • Monitor liquid evaporation closely

    Expert Recommendations

    Professional jam makers share refined techniques to improve your homemade jams. Patience is key for perfect consistency.

    "The difference between good and great jam is in the details of preparation." - Professional Chef

    • Start with ripe, fresh pineapples
    • Adjust sugar levels to match fruit's natural sweetness
    • Test jam consistency using a cold plate method
    • Consider adding subtle spices like cinnamon

    By using these techniques, you'll make delicious homemade jams that beat store-bought ones every time.

    Conclusion

    Making your own pineapple jam is more than cooking. It's a fun journey that turns simple ingredients into a tasty tropical spread. By making homemade jams, you're not only making a delicious condiment. You're also reducing food waste and choosing a healthier option over store-bought ones.

    With your new skills, you can make pineapple jam for many dishes. It's great on breakfast toast or in fancy desserts. The best part is, you can make it just how you like it. This means each batch is a special creation that shows off your cooking talent.

    Enjoying homemade jams connects you to old-fashioned cooking. It lets you make something truly special. As you get better, you'll try new fruits and methods. Your kitchen will become a place of tasty creativity. Your homemade pineapple jam shows off your love for cooking and your skill.

    FAQ

    How long does homemade pineapple jam last?

    Homemade pineapple jam can last up to 12 months in a cool, dark pantry if sealed well. Once opened, it's good for 3-4 weeks in the fridge. Always check for mold or an off smell before eating.

    Can I make pineapple jam with less sugar?

    Yes, you can use less sugar by trying low-sugar pectin or honey. Sugar helps set the jam, so you might need to adjust the recipe. You can cut sugar by 25-30% without affecting the jam's texture too much.

    Is it necessary to use pectin when making pineapple jam?

    No, you don't always need pectin. Pineapples have natural pectin. But, commercial pectin can make the jam thicker and quicker. Cooking it longer can also thicken it naturally.

    Can I freeze homemade pineapple jam?

    Yes, freezing is a great way to keep it fresh! Leave space at the top of your container for expansion. Use freezer-safe jars or containers. Frozen jam can last up to 6 months.

    What are some unique ways to use pineapple jam?

    Pineapple jam is very versatile! Use it as a glaze for meats, mix it into yogurt, or spread it on grilled cheese. It's also great in cookies or cocktails. It adds a tropical flavor to many dishes.

    How can I tell if my jam has reached the right consistency?

    Use the cold plate test. Chill a plate in the freezer. Place a spoonful of jam on it and wait a minute. If it wrinkles, it's ready. It should also stick to the spoon.

    Can I make pineapple jam with canned pineapple?

    Yes, you can use canned pineapple. Drain the syrup and use crushed or chunk pineapple. Canned fruit is sweeter, so you might need less sugar.

    What's the best way to sterilize jars for jam storage?

    Sterilize jars by washing them in hot, soapy water and then boiling them for 10 minutes. Or, run them through a hot dishwasher cycle. Always use clean tongs and fill jars while they're hot.

    Print

    Pineapple Jam

    Pineapple Jam
    Print Recipe
    Pin Recipe

    5 Stars 4 Stars 3 Stars 2 Stars 1 Star

    No reviews

    This Pineapple Jam is a sweet, tangy spread that brings a taste of the tropics to your breakfast table. 🍍✨ Made with simple ingredients and no pectin, it’s easy to whip up and perfect for spreading on toast, biscuits, or using as a fruity filling in baked goods.

    • Author: grace bellamy
    • Prep Time: 10 minutes
    • Cook Time: 25 minutes
    • Total Time: 35 minutes
    • Yield: ~1 cup of jam
    • Category: Condiment / Spread
    • Method: Stovetop
    • Cuisine: International
    • Diet: Vegetarian

    Ingredients

    Scale
    • 2 cups fresh pineapple, finely chopped (about 1 medium pineapple)
    • 1 cup granulated sugar
    • 2 tablespoons lemon juice (freshly squeezed)
    • ½ teaspoon lemon zest (optional, for extra brightness)

    Instructions

    • Combine ingredients:
      • In a medium saucepan, stir together the chopped pineapple, sugar, lemon juice, and (optional) lemon zest.
    • Cook over medium heat:
      • Bring the mixture to a gentle boil, then reduce to a simmer.
      • Stir frequently to prevent sticking and cook for 20–25 minutes, or until the jam thickens.
    • Check consistency:
      • To test if the jam is set, spoon a small amount onto a chilled plate. If it gels or wrinkles when you push it with your finger, it’s ready.
    • Cool and store:
      • Remove from heat and let the jam cool slightly.
      • Transfer to a clean, sterilized jar or airtight container. Store in the refrigerator.

    Notes

    • Thickness: If you prefer a smoother texture, mash the pineapple with a fork or use an immersion blender after cooking.
    • Storage: Keep refrigerated for up to 2 weeks. For longer storage, use proper canning methods.
    • Sweetness Adjustments: Feel free to add more or less sugar depending on your taste and the sweetness of the pineapple.

    Did you make this recipe?

    Share a photo and tag us — we'd love to see your creation!

    Recipe

    pineapple cake recipe

    January 29, 2025 by grace bellamy Leave a Comment

    Easy Homemade Pineapple Cake Recipe in 30 Minutes

    A beautifully decorated pineapple cake on a rustic wooden table, showcasing layers of moist yellow sponge cake infused with pineapple flavor, topped with a creamy frosting and fresh pineapple slices, surrounded by tropical flowers and leaves, with soft natural lighting creating an inviting atmosphere.

    Imagine walking into your kitchen and creating a tropical paradise in just half an hour. This simple pineapple cake recipe is about to transform your baking experience from ordinary to extraordinary. Soft, moist, and bursting with sweet pineapple flavor, this cake will become your new favorite dessert.

    Baking doesn't have to be complicated. With our easy pineapple cake recipe, you'll discover how quickly you can whip up a stunning dessert that looks like it came straight from a professional bakery. Whether you're a beginner baker or a seasoned pro, this recipe promises delicious results every single time.

    Get ready to embark on a culinary adventure that will transport your taste buds to a sun-soaked tropical destination. The best part? You'll have a show-stopping dessert ready in just 30 minutes. No complicated techniques, no endless prep work – just pure, delightful baking joy.

    Our pineapple cake recipe is designed to be straightforward, foolproof, and absolutely delectable. With simple ingredients and clear instructions, you'll create a dessert that will have everyone asking for seconds. Let's dive into this sweet journey together!

    Why This Quick Pineapple Cake Will Become Your Favorite

    Finding the right pineapple cake recipe can change your baking. Our pineapple yellow cake is a tasty treat that will make your desserts better in just 30 minutes.

    Pineapple Cake Recipe

    A close-up view of a beautifully sliced piece of moist pineapple cake, showcasing layers of fluffy vanilla sponge and rich creamy frosting, topped with fresh pineapple chunks and a sprinkle of coconut flakes, set against a bright and inviting kitchen background with soft natural lighting.

    Perfect Balance of Sweetness and Texture

    This cake is special because of its amazing taste. Every bite is a mix of sweet pineapple and soft cake. The crushed pineapple makes the cake moist and yummy.

    • Moist and tender crumb
    • Balanced pineapple flavor
    • Light and airy texture

    Time-Saving Benefits

    Busy bakers will love this! This pineapple yellow cake recipe is quick, taking only 30 minutes to prepare. It needs just a few ingredients and easy steps, so you can make a beautiful dessert fast.

    "Delicious desserts don't have to be complicated" - Home Baker's Motto

    Versatility for Any Occasion

    This pineapple cake is great for any event. It's perfect for family dinners or big celebrations. Its simple yet elegant design makes it ideal for any occasion.

    1. Family gatherings
    2. Potluck parties
    3. Afternoon tea
    4. Dessert buffets

    Tip: Use fresh or canned pineapple for consistent delicious results!

    Essential Ingredients for Your Pineapple Cake

    Pineapple Cake Recipe

    A vibrant, colorful arrangement of pineapple cake ingredients on a wooden countertop; fresh pineapples, flour, sugar, eggs, butter, baking powder, and a bowl of cream; sprigs of mint for decoration; soft natural lighting illuminating the ingredients with a rustic kitchen setting in the background.

    Making the perfect fresh pineapple cake begins with choosing top-notch ingredients. Your pineapple cake mix recipes will stand out with fresh, high-quality parts. These parts bring out the best flavors.

    Let's look at the key ingredients that make this cake special:

    • Flour base: 2¼ cups of all-purpose flour gives it the right structure
    • Cornstarch: ¼ cup adds extra tenderness
    • Leavening agents: 2 teaspoon baking powder and ½ teaspoon baking soda
    • Salt: ½ teaspoon boosts the flavor
    • Sugar: 1¼ cups of white granulated sugar adds sweetness

    "The secret to an exceptional pineapple cake lies in the quality of your ingredients."

    When picking pineapple, you can choose canned or fresh. Canned crushed pineapple (2½ cups) is great for consistent moisture and taste. Fresh pineapple can also be used, but it needs careful prep to keep the right texture.

    Your liquid ingredients are also key:

    • 3 large eggs for binding
    • ¾ cup unflavored vegetable oil for richness
    • 1 teaspoon vanilla extract for depth of flavor
    • 1½ tablespoons fresh lemon juice for brightness

    By choosing and measuring each ingredient carefully, you'll make a pineapple cake that's moist, flavorful, and sure to wow everyone!

    Kitchen Tools and Equipment Needed

    To make a tasty simple pineapple cake, you need the right tools. You don't have to be a pro baker. Just a few key items will help you make a dessert that will wow your loved ones.

    Baking Essentials

    For your simple pineapple cake, you'll need some basic baking gear:

    • 9-10 inch round cake pan
    • Parchment paper
    • Oven mitts
    • Cooling rack
    • Cake stand or serving platter

    Mixing Tools

    The right tools for mixing make baking fun and easy:

    • Electric mixer or stand mixer
    • Large mixing bowls
    • Rubber spatula
    • Whisk

    Measuring Equipment

    When baking a perfect simple pineapple cake, precision is key. Here are the measuring tools you'll need:

    • Measuring cups (dry and liquid)
    • Measuring spoons
    • Kitchen scale (optional but recommended)
    • Sifter for dry ingredients

    "Baking is love made visible" - Unknown

    With these tools, you're all set to make a delicious simple pineapple cake. It will make your taste buds happy and impress your guests!

    Pineapple Cake Recipe: Step-by-Step Instructions

    To make the perfect pineapple cake, you need to be precise and careful. First, get all your ingredients ready and set up your kitchen. This guide will show you how to make a delicious cake that everyone will love.

    Start by heating your oven to 350°F (175°C). Grease two 9-inch cake pans and put parchment paper on the bottoms. This stops the cakes from sticking.

    1. Sift together 1 ½ cups all-purpose flour, 2 teaspoons baking powder, and ¼ teaspoon fine sea salt in a medium bowl
    2. In a separate large mixing bowl, cream 12 tablespoons (1 ½ sticks) of unsalted butter with 1 cup granulated sugar
    3. Separate 2 large eggs, adding yolks to the butter mixture and beating until smooth
    4. Fold in ½ cup sour cream, 1 teaspoon vanilla extract, and 2 teaspoons lime zest

    When adding pineapple to the batter, mix it gently. This way, the pineapple is spread out evenly without making the cake tough.

    "The secret to a moist pineapple cake recipe is gentle mixing and precise ingredient measurement."

    Pour the batter into the pans evenly. Bake for 25-30 minutes, or until a toothpick comes out clean. Let the cakes cool completely before you frost or serve them.

    Making the Perfect Pineapple Filling

    Creating a delicious pineapple cake recipe starts with crafting an exceptional pineapple filling. The right filling can transform your fresh pineapple cake from good to extraordinary.

    Your pineapple filling requires careful attention to detail. Here's what you'll need to create a mouth-watering result:

    • 1 can (540ml) crushed pineapple
    • ½ cup granulated sugar
    • 3 tablespoons cornstarch
    • Juice from 1 lemon
    • ¼ cup butter
    • ¼ teaspoon sea salt

    Tips for Consistency

    Achieving the perfect pineapple filling consistency is crucial for your cake. Start by mixing all ingredients in a saucepan. Stir continuously to prevent lumps and ensure smooth texture. The filling might appear curdled during heating, but don't worry - this is normal.

    Proper Temperature Control

    Cooking your filling requires precise heat management. Use medium heat and cook for approximately 2 minutes after the mixture begins boiling. This ensures the cornstarch activates and the filling thickens without burning.

    "The secret to a perfect pineapple filling is patience and constant stirring." - Baking Experts

    Storage Methods

    Your homemade pineapple filling can be stored efficiently:

    • Refrigerate for up to 5 days
    • Freeze for up to 3 months
    • Store in an airtight container
    • Cool completely before storing

    By following these guidelines, you'll create a pineapple filling that elevates your cake to professional bakery standards.

    Whipped Cream Frosting Preparation

    Making the perfect whipped cream frosting is key for your pineapple cake. The right method can turn a good cake into an amazing one. Cold ingredients are essential for that light, dreamy texture.

    Let's look at the main ingredients for your frosting:

    • 1 ½ cups heavy whipping cream
    • ½ cup granulated sugar
    • 1 teaspoon pineapple extract
    • Chilled mixing bowl

    First, chill your mixing bowl and whisk for 15 minutes. This makes whipping the cream faster and keeps it stable. Make sure your cream has at least 40% fat for the best results.

    "The secret to perfect whipped cream is cold ingredients and gentle handling."

    To frost your pineapple cake, start whipping the cream on medium speed. Slowly add sugar and pineapple extract. Stop when soft peaks form. You want a frosting that stays smooth and doesn't collapse fast.

    Pro tip: If your frosting is too soft, add 1 teaspoon of cornstarch. This helps keep the frosting stable and perfect for your cake.

    Remember, patience is key when creating the perfect whipped cream frosting!

    Professional Tips for Cake Assembly

    Making a stunning pineapple yellow cake is more than just using great ingredients. The way you assemble it can turn your pineapple cake recipe into a pro-level masterpiece. A few expert tips can make all the difference.

    Layer Stacking Technique

    Getting your layers right is key for a beautiful pineapple cake. Start by placing your first cake layer on a strong cake stand. Make sure each layer is straight and level. A rotating cake stand helps you get it just right.

    • Trim cake layers to create flat, even surfaces
    • Use a serrated knife for clean, smooth cuts
    • Aim for layers no thicker than 1 inch

    Frosting Application Methods

    Consistency is key when frosting your pineapple yellow cake. Begin with a crumb coat - a thin layer of frosting that traps cake crumbs. Chill it for 15-20 minutes before adding the final layer.

    "The difference between a good cake and a great cake is in the details of its assembly." - Professional Baker

    Decorative Finishing Touches

    Add a personal touch to your pineapple cake with creative decorations. Try piping borders with Swiss meringue buttercream or topping it with dried pineapple flowers. The presentation matters just as much as the taste!

    1. Use a piping bag with a 1A round tip for clean borders
    2. Create pineapple flowers by thinly slicing and baking pineapple
    3. Sprinkle toasted coconut for added texture

    Fresh vs Canned Pineapple: What Works Best

    Choosing between fresh and canned pineapple can greatly affect your cake. Both options have their own benefits for baking.

    Canned pineapple is super convenient for your cake recipes. Most experts suggest using crushed pineapple in juice, not syrup. The mini pineapple cake recipes usually need a 20-ounce can. This gives you about 2.5 cups of fruit, perfectly sized for your recipe.

    "Fresh isn't always better - sometimes convenience wins in the kitchen!"

    • Canned pineapple saves time
    • It has a consistent texture
    • No worry about tough fruit pieces
    • It has predictable moisture

    Fresh pineapple is a great choice for those who love to try new things. It needs more prep but can add a deep, vibrant flavor. Some say it makes the cake softer and more moist.

    When picking your pineapple, think about sugar content, prep time, and cake texture. Fresh pineapple has 10-15% more natural sugars than canned. This can change how sweet your cake is.

    Common Mistakes to Avoid

    Baking a simple pineapple cake can be tricky, even for experienced home bakers. Knowing the common mistakes helps you make a perfect pineapple cake recipe every time.

    Mixing Mishaps to Watch Out For

    The biggest mistake in making a pineapple cake is overmixing the batter. Overmixing makes the cake dense and tough. Gentle folding is key.

    • Mix ingredients just until combined
    • Stop when no flour streaks remain
    • Use a spatula for minimal mixing

    Temperature Control Challenges

    Oven temperature is crucial for your simple pineapple cake. If your oven is off, it can bake unevenly or not cook in the middle.

    • Always preheat your oven
    • Use an oven thermometer for accuracy
    • Rotate the cake midway through baking

    Storage and Preservation Errors

    Storing your cake wrong can ruin it fast. Cooling and storing right keeps it moist and flavorful.

    "A perfectly stored cake is a delightful cake!" - Baking Experts

    • Cool completely before storing
    • Use airtight containers
    • Refrigerate frosted cakes
    • Consume within 3-4 days

    Avoiding these mistakes makes your pineapple cake recipe go from good to amazing.

    Storage and Serving Recommendations

    Your delicious simple pineapple cake needs careful storage to keep its amazing flavor and texture. After making this incredible pineapple cake recipe, you'll want it to stay fresh and tasty for as long as you can.

    For short-term storage, keep your pineapple cake at room temperature for 2-3 hours. Quick tip: Avoid leaving it out in warm or humid conditions.

    Refrigeration Guidelines

    • Store in an airtight container
    • Refrigerate for up to 3-4 days
    • Cover with plastic wrap to prevent drying
    • Protect from absorbing other refrigerator odors

    When you're ready to serve, take the cake out of the fridge about 30 minutes before. This lets it come to room temperature, ensuring the best taste and softness.

    "A well-stored cake is a delicious cake!" - Baking Enthusiasts

    Serving Suggestions

    1. Pair with vanilla ice cream
    2. Serve with a tropical fruit salad
    3. Garnish with fresh pineapple chunks
    4. Add a light dusting of powdered sugar

    Pro tip for your simple pineapple cake: Don't freeze it, as the whipped cream topping might lose its texture. Enjoy your cake fresh for the best taste!

    Variations and Substitutions

    Your pineapple cake recipe is super flexible for creative bakers. You can add shredded coconut or chopped walnuts to mix for extra flavor. Try using fresh pineapple chunks or canned crushed pineapple to change the texture.

    Need to make it diet-friendly? No problem. Use gluten-free flour for those with celiac disease, or vegan alternatives for dairy. If you want less sugar, try honey or maple syrup instead of granulated sugar.

    Want to make it healthier? Swap some butter with applesauce or Greek yogurt. This keeps it moist and adds new flavors. Mixing in crushed strawberries or mangoes can also give it a unique twist.

    Get creative with your cake! Whether using a mix or making it from scratch, these changes make it your own. Your pineapple cake can be a hit with everyone, tailored to your taste and needs.

    FAQ

    How long does it take to make this pineapple cake?

    Making our pineapple cake is quick and easy. It takes about 30 minutes to prepare. Then, add baking and cooling time. You'll have a delicious homemade cake in about 1 hour.

    Can I use canned pineapple instead of fresh?

    Yes, you can! Both canned and fresh pineapple work great. Canned is convenient, while fresh adds a vibrant flavor. Just drain canned pineapple well to avoid extra moisture.

    Is this pineapple cake suitable for people with dietary restrictions?

    Yes, it can be adapted for different diets. We offer tips for gluten-free, egg-free, and dairy-free options. This way, you can make the cake fit your dietary needs.

    How should I store the pineapple cake?

    Keep the cake in an airtight container in the fridge. It stays fresh for 3-4 days. For the best taste, let it come to room temperature before serving. If it's frosted, keep it refrigerated and eat within 2-3 days.

    Can I make this cake in advance?

    Absolutely! You can make the cake layers ahead of time. Store them wrapped at room temperature for 1-2 days, or freeze for up to a month. The pineapple filling can be made ahead and refrigerated for 3-4 days before assembling.

    What type of pan is best for baking this pineapple cake?

    A 9-inch round cake pan is ideal. A springform pan is even better for easy removal. Always grease the pan or line it with parchment paper to prevent sticking.

    Can I add other fruits to this pineapple cake?

    Definitely! While pineapple is the main ingredient, you can add tropical fruits like coconut, mango, or crushed macadamia nuts. Our recipe section has ideas for creative variations.

    Is this cake very sweet?

    The cake is sweet but balanced. The pineapple's natural sweetness reduces the need for a lot of sugar. You can adjust the sugar or use alternative sweeteners as suggested in our variations section.

    Print

    pineapple cake recipe

    Pineapple Cake Recipe
    Print Recipe
    Pin Recipe

    5 Stars 4 Stars 3 Stars 2 Stars 1 Star

    No reviews

    This Pineapple Cake is delightfully moist, sweet, and bursting with tropical flavor! 🍍✨ With a tender crumb and a hint of tang from crushed pineapple, it’s simple to make and perfect for any occasion—whether it’s a family gathering, potluck, or just a midweek treat.

    • Author: grace bellamy
    • Prep Time: 10 minutes
    • Cook Time: 35 minutes
    • Total Time: 45 minutes
    • Yield: 12 servings 1x
    • Category: Dessert
    • Method: Baked
    • Cuisine: American
    • Diet: Vegetarian

    Ingredients

    Scale
    • 2 cups all-purpose flour
    • 1 ½ cups granulated sugar
    • 2 teaspoons baking soda
    • ½ teaspoon salt
    • 2 large eggs
    • 1 can (20 oz) crushed pineapple, undrained
    • 1 teaspoon vanilla extract
    • ½ cup vegetable oil (or melted butter for a richer flavor)

    Optional Frosting (Cream Cheese or Whipped Topping):

    • 8 ounces cream cheese, softened
    • ½ cup unsalted butter, softened
    • 3–4 cups powdered sugar
    • 1 teaspoon vanilla extract

    Instructions

    • Preheat the oven to 350°F (175°C). Grease a 9×13-inch baking pan or line with parchment paper.
    • Combine dry ingredients:
      • In a large mixing bowl, whisk together the flour, sugar, baking soda, and salt.
    • Add wet ingredients:
      • Create a well in the center of the dry ingredients. Add the eggs, crushed pineapple (with juice), vanilla extract, and oil (or melted butter).
      • Stir until just combined, being careful not to overmix.
    • Bake:
      • Pour the batter into the prepared pan. Bake for 30–35 minutes, or until a toothpick inserted into the center comes out clean.
      • Allow the cake to cool completely in the pan.
    • Optional Frosting:
      • In a separate bowl, beat cream cheese and butter until smooth. Gradually add powdered sugar and vanilla extract. Beat until creamy.
      • Spread the frosting over the cooled cake.
    • Serve:
      • Slice and enjoy. You can garnish with shredded coconut or chopped nuts for extra crunch and flavor.

    Notes

    • For a lighter version, use applesauce instead of oil.
    • Add shredded coconut or chopped macadamia nuts for extra tropical flair.
    • Store leftovers in an airtight container in the fridge for up to 4 days.

    Did you make this recipe?

    Share a photo and tag us — we'd love to see your creation!

    Recipe

    Pineapple Bliss Bars

    January 29, 2025 by grace bellamy Leave a Comment

    How to Make Perfect Pineapple Bliss Bars at Home

    A vibrant, tropical dessert scene featuring layers of golden pineapple bliss bars on a decorative plate, garnished with fresh pineapple slices and tropical flowers, surrounded by lush green leaves and a hint of coconut flakes, with soft natural sunlight illuminating the delicious texture and bright colors.

    Every summer, my kitchen turns into a tropical paradise. These pineapple bliss bars are my secret. They make you feel like you're on a sun-soaked beach with just one bite. These treats are more than a recipe; they're an experience.

    Pineapple bliss bars have a buttery shortbread crust and a tangy pineapple filling. They're small, but they pack a big flavor punch. Each serving has 200-250 calories of tropical joy.

    Whether you're an experienced baker or new to the kitchen, this recipe is for you. It will help you make irresistible pineapple bliss bars. Get ready to wow your friends and family with a dessert that's as beautiful as it is tasty.

    Understanding Pineapple Dessert Bars

    Pineapple treats have a rich history that spans tropical regions and culinary traditions. These island-inspired flavors bring a taste of sunshine to your dessert table. They capture the essence of warm, vibrant cuisines.

    Pineapple Bliss Bars
    Pineapple Bliss Bars

    "A vibrant arrangement of pineapple bliss bars on a rustic wooden table, showcasing layers of creamy yellow pineapple filling, a crumbly coconut crust, and topped with shredded coconut and fresh pineapple slices, surrounded by tropical leaves and bright hibiscus flowers, with soft natural lighting illuminating the scene."

    Origins and Evolution

    The journey of pineapple treats began in tropical regions where this golden fruit reigned supreme. Mid-20th century innovations like canned pineapple made these desserts more accessible. This change allowed home cooks across the United States to enjoy them.

    • Originated in tropical culinary traditions
    • Popularized by canned fruit innovations
    • Became a staple in American home baking

    What Makes Them Special

    Pineapple Bliss Bars are special because of their sweet and tangy flavors. These island-inspired flavors create a perfect balance. This balance transforms a simple dessert into a tropical experience.

    "A bite of Pineapple Bliss Bars is like a mini vacation for your taste buds!"

    Key Characteristics

    The magic of these pineapple treats lies in their distinctive attributes:

    1. Buttery, crumbly crust
    2. Intense pineapple flavor
    3. Perfect balance of sweetness and tartness
    4. Smooth, rich texture

    Whether you're a dessert enthusiast or a casual baker, Pineapple Bliss Bars offer a delightful culinary adventure. They bring the taste of tropical paradise right to your kitchen.

    Essential Ingredients and Equipment

    A vibrant flat lay composition of ingredients for pineapple bliss bars: fresh pineapple slices, crushed graham crackers, melted butter in a bowl, sweetened condensed milk, coconut flakes, and a sprinkle of powdered sugar. Arrange these elements on a rustic wooden table with a light, airy background to evoke a tropical feel.

    Making tasty fruit-based sweets needs the right ingredients. Your Pineapple Bliss Bars will be amazing with the best ingredients. Let's look at what makes these treats special.

    Core Ingredients

    • Unsalted butter (225g)
    • Caster sugar (200g)
    • Plain flour (250g)
    • Crushed pineapple (396g)
    • Large eggs (2)
    • Crème fraîche (115g)
    • Optional: Desiccated coconut (30g)

    Your baking adventure starts with top-notch ingredients. Choosing fresh, quality ingredients makes your Pineapple Bliss Bars full of tropical taste and texture.

    Essential Baking Equipment

    1. 9x13 inch baking tray
    2. Mixing bowls
    3. Electric mixer
    4. Measuring cups and scales
    5. Parchment paper

    "Baking is about precision and passion – choose your ingredients wisely!"

    Pro tip: Make sure to drain your pineapple well. This helps avoid too much moisture in your bars. Fresh ingredients and careful prep make your fruit-based sweets irresistible.

    Preparing the Perfect Buttery Crust

    Making a delicious crust is key for your Pineapple Bliss Bars. These treats need a crisp, golden base to match their tropical filling.

    Mastering the Mixing Technique

    Your crust starts with top-notch ingredients. Here's how to mix them:

    • Use 1½ cups of all-purpose flour
    • Add ½ cup granulated sugar
    • Incorporate ¾ cup cold unsalted butter
    • Sprinkle ¼ teaspoon salt for balanced flavor

    For a no-bake snack texture, keep your butter cold. Blend ingredients quickly with a pastry cutter or your fingers. Aim for coarse crumbs.

    "The secret to a perfect crust is cold butter and minimal handling" - Pastry Chef's Wisdom

    Pre-Baking Essentials

    Pre-baking your crust stops it from getting soggy. Press the mix into a 9x13-inch baking dish. Make sure it's even. Bake at 350°F for 10-15 minutes until it's lightly golden.

    Troubleshooting Crust Challenges

    1. Crumbly Crust: Add a tablespoon of cold water if it's too dry
    2. Uneven Baking: Rotate the pan halfway through pre-baking
    3. Tough Texture: Don't overwork the dough

    Follow these steps for a buttery, golden crust. It will make your Pineapple Bliss Bars a hit this summer.

    Creating the Tropical Pineapple Filling

    Making a great tropical dessert starts with the pineapple filling. It's the core of your Pineapple Bliss Bars. It turns simple ingredients into a tasty treat.

    • Drain the crushed pineapple well to avoid a watery mix
    • Choose fresh, quality ingredients for the best taste
    • Measure everything carefully for consistent results

    Here's what you'll need for your tropical dessert:

    1. 1 cup crushed pineapple (well-drained)
    2. 2 large eggs
    3. 1 cup granulated sugar
    4. 3 tablespoons all-purpose flour
    5. 1 teaspoon vanilla extract
    6. ½ teaspoon baking powder

    "The secret to amazing pineapple treats is in the details of preparation." - Pastry Chef Recommendation

    Start by whisking the eggs and sugar until they're light and fluffy. Gently fold in the drained pineapple. Make sure to remove as much moisture as you can. This is key to avoiding a soggy texture in your desserts.

    The secret to a perfect filling is finding the right mix of sweetness and texture. Taste and adjust the sugar as needed. Remember, the pineapple's natural sweetness will come through.

    Baking and Assembly Process

    Making the perfect summer treats needs precision and care. Your Pineapple Bliss Bars will turn into a delicious tropical treat. This happens through careful baking and assembly.

    Temperature and Timing Guidelines

    When baking these island-inspired flavors, follow these critical steps:

    • Preheat your oven to 350°F
    • Bake the crust for 12 minutes initially
    • Add the pineapple filling
    • Bake for an additional 25-27 minutes

    Visual Doneness Indicators

    Knowing when your bars are perfectly baked is an art. Look for these key signs:

    • Golden edges around the filling
    • Slightly firm center
    • Coconut topping turning light brown
    • Edges pulling slightly away from the pan

    Pro tip: Avoid overbaking to maintain the bars' delicate, soft texture.

    Cooling and Setting Methods

    The final stage of creating your summer delights is crucial for texture and flavor. Allow the bars to cool completely in the pan. This resting period helps the filling set properly and intensifies the island-inspired flavors.

    1. Remove from oven
    2. Let stand at room temperature
    3. Cool for 1-2 hours
    4. Cut into 16 perfect squares

    Patience is key when preparing these delectable treats!

    Storage and Freshness Tips

    Keeping your homemade fruit-based sweets fresh is key. Your Pineapple Bliss Bars can stay delicious with the right storage tips.

    For short-term, store them at room temperature in an airtight container. They'll stay tasty for up to two days. For longer storage, refrigeration is best.

    "Proper storage is the secret to enjoying your Pineapple Bliss Bars at their peak flavor!" - Baking Enthusiasts

    Refrigeration and Freezing Guidelines

    • Refrigerator storage: Up to 5 days in a sealed container
    • Freezer storage: Up to 2 months when properly wrapped
    • Thawing: Move from freezer to refrigerator overnight

    Freezing tips include:

    1. Wrap individual bars in plastic wrap
    2. Place in a freezer-safe container
    3. Add a layer of parchment between bars to prevent sticking

    Pro tip: Avoid adding powdered sugar before freezing to maintain the best texture when thawing.

    Follow these tips to keep your Pineapple Bliss Bars fresh. They'll be ready for you whenever you need a sweet treat!

    Creative Variations and Customizations

    Make your Pineapple Bliss Bars even better with fun twists. You can make them vegan or gluten-free. These changes will make your recipe truly unique.

    Coconut-Infused Tropical Delight

    Add shredded coconut to both the crust and filling for a tropical twist. It's like a beach vacation in every bite. Here's how to do it:

    • Sprinkle toasted coconut flakes on top of the filling
    • Mix unsweetened coconut into the crust mixture
    • Drizzle coconut cream over the finished bars

    Gluten-Free Adaptations

    Looking for gluten-free bars? Easy swaps can keep the taste and texture great. Try these:

    • Almond flour for a nutty undertone
    • Gluten-free oat flour for a classic base
    • Coconut flour for added tropical sweetness

    Tropical Flavor Enhancements

    Try new flavors to make your vegan bars stand out. Here are some ideas:

    • Add lime zest for a citrusy kick
    • Incorporate passion fruit puree into the filling
    • Sprinkle toasted macadamia nuts on top

    Pro tip: When making gluten-free bars, always check that your ingredients are certified gluten-free to avoid cross-contamination.

    Serving Suggestions and Presentation Ideas

    Turn your Pineapple Bliss Bars into a stunning tropical dessert. It will wow your guests. These summer treats are more than just a snack. They're a blank canvas for your creativity.

    • Slice bars into elegant diamond or triangular shapes
    • Garnish with fresh pineapple mint leaves
    • Dust with powdered sugar for a sophisticated finish
    • Pair with complementary beverages like coconut rum cocktails

    "A beautifully presented dessert tells a story before the first bite is taken."

    For summer parties, make a colorful dessert platter. Put these bars in the middle. Add tropical fruits like mango slices or passion fruit. It will look amazing and show off their bright colors.

    Pro tip: Chill these bars a bit for a cooler treat. Add a scoop of coconut sorbet next to each bar. It makes the dessert feel fancy and special.

    Conclusion

    Your journey into making pineapple bliss bars has been a fun trip into island flavors. These treats turn simple ingredients into a memorable dessert. They capture the essence of tropical sunshine in every bite.

    With just one hour of preparation and cooking, you can make a dessert that feels like a beachside getaway. The pineapple bliss bars mix sweet and tangy perfectly. They're a great recipe for anyone who loves baking.

    The real magic of these bars comes from the love and creativity you put into making them. Each batch is a chance to try new things, like toasted coconut or creative garnishes. This makes the dessert truly yours.

    Whether you're having a summer party or just want a taste of the tropics, these bars are perfect. Enjoy baking and let these bars become a favorite in your home.

    FAQ

    Are Pineapple Bliss Bars suitable for people with dietary restrictions?

    Yes, they are! You can make them gluten-free and vegan. Use almond or coconut flour for gluten-free. Replace butter with coconut oil or vegan margarine for dairy-free.

    How long can I store Pineapple Bliss Bars?

    Store them in an airtight container in the fridge for 5-7 days. Freeze for up to 3 months for a tropical treat anytime.

    Can I use fresh pineapple instead of canned?

    You can use fresh pineapple. Just drain it well to avoid a soggy bar.

    Are these bars kid-friendly?

    Yes! They're sweet, fruity, and fun for kids. Kids can help make them, too.

    Can I make these bars ahead of time?

    Absolutely! Make them 1-2 days before. It lets the flavors get even better.

    Are Pineapple Bliss Bars healthy?

    They're a sweet treat but have some health benefits. Pineapple adds vitamin C and manganese. Use whole grain flour and less sugar for a healthier version.

    What equipment do I need to make these bars?

    You'll need a 9x13 inch baking pan, bowls, cups, and an oven. Parchment paper makes them easy to remove and clean.

    How can I add more tropical flavor to the bars?

    Add shredded coconut to the crust. Use lime zest in the filling. Top with toasted coconut flakes for extra island flavor.

    Print

    Pineapple Bliss Bars

    Pineapple Bliss Bars
    Print Recipe
    Pin Recipe

    5 Stars 4 Stars 3 Stars 2 Stars 1 Star

    No reviews

    These Pineapple Bliss Bars are sweet, buttery, and bursting with tropical flavor! 🍍✨ Featuring a tender shortbread crust, a vibrant pineapple filling, and a light crumb topping, they’re the perfect treat for parties, potlucks, or a quick dessert fix.

    • Author: grace bellamy
    • Prep Time: 15 minutes
    • Cook Time: 30 minutes
    • Total Time: 45 minutes
    • Yield: 9–12 bars 1x
    • Category: Dessert
    • Method: Baked
    • Cuisine: American
    • Diet: Vegetarian

    Ingredients

    Scale

    Crust and Topping:

    • 1 ½ cups all-purpose flour
    • ¾ cup granulated sugar
    • ½ teaspoon baking powder
    • ½ cup unsalted butter, cold and cubed
    • ¼ teaspoon salt

    Pineapple Filling:

    • 1 can (20 oz) crushed pineapple, drained (reserve 2 tablespoons juice)
    • ½ cup granulated sugar
    • 2 tablespoons cornstarch
    • 1 tablespoon reserved pineapple juice (optional for extra flavor)
    • ½ teaspoon vanilla extract

    (Optional): ¼ cup shredded coconut for a tropical twist

    Instructions

    • Preheat and prepare:
      • Preheat oven to 350°F (175°C). Grease an 8×8-inch baking pan or line with parchment paper.
    • Make the crust and topping mixture:
      • In a bowl, whisk together flour, sugar, baking powder, and salt.
      • Using a pastry cutter or two forks, cut in the cold cubed butter until the mixture resembles coarse crumbs.
      • Reserve about ¾ cup of this mixture for the crumb topping.
    • Form the crust:
      • Press the remaining flour-butter mixture into the bottom of the prepared pan to form an even layer.
      • Bake for 10–12 minutes, or until the edges are slightly golden. Remove from the oven and set aside.
    • Prepare the pineapple filling:
      • In a small saucepan over medium heat, stir together drained crushed pineapple, sugar, cornstarch, pineapple juice (if using), and vanilla extract.
      • Cook for 3–5 minutes, stirring frequently, until the filling thickens. Remove from heat and let it cool slightly.
    • Assemble:
      • Spread the warm pineapple filling over the partially baked crust.
      • Sprinkle the reserved crumb mixture evenly on top. (Add shredded coconut here if using.)
    • Bake:
      • Return to the oven and bake for an additional 15–20 minutes, or until the topping is lightly golden.
    • Cool and serve:
      • Allow the bars to cool completely in the pan before slicing. Serve and enjoy!

    Notes

    • For a tangier flavor, add a squeeze of fresh lime juice to the pineapple filling.
    • Substitute up to half the flour with whole wheat flour for a heartier crust.
    • Store leftovers in an airtight container in the fridge for up to 4 days.

    Did you make this recipe?

    Share a photo and tag us — we'd love to see your creation!

    Recipe

    Crock Pot Chicken and Rice

    January 27, 2025 by grace bellamy Leave a Comment

    Easy Crock Pot Chicken and Rice Recipe for Dinner

    Imagine coming home after a long day to a kitchen filled with the comforting aroma of a delicious home-cooked meal. Our crock pot chicken and rice recipe is the ultimate solution for busy families. It's a hearty, no-fuss dinner that practically cooks itself.

    Slow cooker recipes have changed home cooking, and this one-pot meal is your new favorite weeknight dinner. With just 5 minutes of prep time and minimal ingredients, you'll create a creamy, satisfying dish. It serves 6 people without spending hours in the kitchen.

    Whether you're a busy parent, a senior looking for an easy meal, or someone who wants delicious comfort food without complicated cooking techniques, this slow cooker chicken and rice recipe is your perfect kitchen companion. We'll guide you through every step to ensure a foolproof, mouthwatering meal. It'll have everyone asking for seconds.

    Get ready to discover why this one-pot meal is about to become a staple in your recipe collection. Let's dive into a cooking experience that's simple, delicious, and guaranteed to bring smiles to the dinner table.

    Why This Slow Cooker Recipe is Perfect for Family Dinner

    It can be tough to make healthy dinners when you're short on time. Our Crock Pot Chicken and Rice recipe is a great fix. It's easy and tasty, perfect for busy families.

    Time-Saving Benefits

    Cooking doesn't have to take up your whole evening. This easy chicken dish lets you:

    • Prep in just 15 minutes
    • Let the slow cooker do the work
    • Spend more quality time with family

    Budget-Friendly Meal Solution

    Comfort food doesn't have to cost a lot. This recipe uses just two chicken breasts, making it budget-friendly:

    1. Rice helps extend the meat
    2. Cheese adds richness
    3. One batch serves 6 people

    "Great meals bring families together without complicated cooking processes."

    Kid-Approved Comfort Food

    Finding meals that everyone likes can be hard. This chicken and rice recipe has crowd-pleasing flavors and is healthy:

    • 317 calories per serving
    • 18g protein
    • Balanced nutritional profile

    Make dinner a fun family time with this simple, tasty recipe.

    Essential Ingredients for Crock Pot Chicken and Rice

    Starting with the right ingredients is key to making tasty meal prep ideas. Our recipe for Crock Pot Chicken and Rice is simple and affordable. It uses ingredients that are easy to find and make the dish a hit with families.

    This hearty dish requires a list of ingredients that pack a lot of flavor. They make cooking easy and enjoyable:

    • Protein Base: 1.5-2 pounds of boneless, skinless chicken breasts or thighs
    • Flavor Enhancers:
      • 1 teaspoon minced garlic
      • 1 teaspoon black pepper
      • 1 teaspoon salt
      • ½ chopped onion
    • Liquid Components:
      • 3 cups chicken broth
      • 1 can (10.5 oz) cream of chicken soup
    • Grain and Topping:
      • 1.5 cups long-grain brown rice
      • 2 cups shredded cheddar cheese

    Pro Tip: Always choose fresh, high-quality ingredients to elevate your meal prep ideas and ensure a delicious, budget-friendly cooking experience.

    Each ingredient is important for a nutritious meal that feeds 6 people. With just 10 minutes of prep and 3.5 to 4 hours of slow cooking, you get a comforting, flavorful dinner.

    Step-by-Step Cooking Instructions

    Making tasty easy chicken dishes is easy with slow cooker recipes. We'll show you how to make a delicious meal that cooks itself.

    Preparing the Ingredients

    First, get your ingredients for this classic slow cooker recipe. You'll need:

    • 1.5 cups white rice
    • 3 cups low sodium chicken broth
    • 1 pound boneless skinless chicken breast
    • 2 medium carrots, diced
    • 1 small yellow onion, diced
    • 2 garlic cloves, minced

    Proper Layering Technique

    The key to great easy chicken dishes is layering. Here's how to do it:

    1. Put diced chicken at the bottom of the crock pot
    2. Add minced garlic and diced veggies on top
    3. Spread rice evenly over the top
    4. Pour in chicken broth and cream of mushroom soup

    "Layering matters – it ensures even cooking and maximum flavor!" - Slow Cooker Experts

    Cooking Time and Temperature Settings

    For these slow cooker recipes, keep it consistent. Use high heat and cook for 3.5 to 4 hours. Pro tip: Make sure chicken reaches 165°F for safety.

    Your easy chicken dishes are done when rice soaks up the broth and chicken is soft. Now, enjoy your easy meal!

    Tips for Perfect Rice Texture Every Time

    Getting the right rice texture in one-pot meals can be tricky. But our guide on healthy family dinners will make it easy. Cooking rice in a slow cooker needs special techniques for the best results.

    Here are key strategies for creating the ideal rice texture:

    • Choose the Right Rice: Long-grain rice like Jasmine or Basmati works best for slow cooker recipes
    • Rinse rice thoroughly to remove excess starch before cooking
    • Use precise liquid measurements to prevent soggy or dry rice

    "The secret to perfect rice is patience and precision" - Slow Cooker Experts

    When preparing one-pot meals, consider these critical cooking tips:

    1. Cook rice on HIGH setting for optimal texture (approximately 45 minutes)
    2. Avoid over-stirring, which can create a gummy consistency
    3. Add butter or ghee to enhance flavor and prevent sticking

    Troubleshooting rice texture is simple. If the mixture seems too thick, gradually stir in chicken broth. For slightly wet rice, let it sit with the lid off to absorb remaining moisture. Remember, practice makes perfect in creating delicious healthy family dinners.

    Choosing the Right Type of Rice

    Starting healthy family dinners means picking the right rice for your crock pot recipe. Rice is key for the dish's texture and taste.

    Choosing the right rice is important for low-carb recipes. It greatly affects the dish's quality. Let's look at the best rice options for your slow cooker chicken and rice.

    Why Brown Rice Works Best

    Long grain brown rice is the best for crock pot cooking. Here's why:

    • It has more protein and fiber than white rice
    • Its texture holds up well to long cooking times
    • It keeps its shape during slow cooking
    • It adds a nutty, rich flavor to your dish

    White Rice Alternatives

    If brown rice is not available, white rice can work too. Just make a few changes:

    1. Cook it for less time to avoid mushiness
    2. Add it later in cooking
    3. Use less water to keep the right consistency

    Avoiding Common Rice Cooking Mistakes

    "The secret to perfect rice is understanding its unique cooking characteristics."

    To succeed with healthy family dinners, remember these tips:

    • Stick to the 2:1 water to rice ratio
    • Check rice after 2.5 hours
    • Avoid overcooking to prevent mushiness
    • Try instant rice for quicker cooking

    By following these tips, you'll make a delicious, perfectly cooked rice dish. It will go great with your chicken and please your family's taste buds.

    Customization Options and Add-ins

    Creating tasty meal prep ideas is easy. Our Crock Pot Chicken and Rice recipe is perfect for making meals kids will love. It's simple and flexible.

    This recipe is all about being adaptable. You can turn a basic dish into a fun meal with just a few tweaks.

    Vegetable Variations

    • Add frozen veggies like peas, carrots, or broccoli in the last hour
    • Try diced bell peppers for more color and nutrients
    • Throw in some spinach for a quick health boost

    Protein and Cheese Alternatives

    • Use chicken thighs for a richer taste instead of breasts
    • Try different cheeses:
      • Sharp cheddar
      • Mozzarella
      • Blended cheese mixes

    Pro Tip: Feel free to get creative and make this recipe your own!

    Our meal prep ideas are flexible, so you can tailor your dish to your family's taste. Whether it's a quick dinner or meal prep, this recipe is perfect.

    Dietary Considerations

    • Make it gluten-free with gluten-free rice
    • Go dairy-free with cheese alternatives
    • It's easy to adjust for different diets

    Cooking should be fun and easy. These options keep your meals exciting and tasty every time.

    Best Cheese Options for Creamy Results

    Cheese makes easy chicken dishes special, turning them into creamy delights. The right cheese can make your Crock Pot Chicken and Rice irresistible.

    Selecting the Perfect Cheese

    When picking cheese for your slow cooker meal, consider these top melting options:

    • Cheddar: Sharp or mild, provides rich flavor
    • Monterey Jack: Smooth and creamy texture
    • Colby: Mild and delightful melting cheese
    • Blend of cheeses: Create complex flavor profiles

    Timing Your Cheese Addition

    The secret to perfect cheese integration is timing. Always add shredded cheese after cooking is complete. This prevents separation and ensures a smooth, luxurious texture.

    "Cheese is the soul of comfort food - add it with care and love!"

    Cheese Melting Techniques

    To achieve optimal creaminess:

    1. Remove Crock Pot from heat
    2. Stir in freshly grated cheese
    3. Cover and let residual heat melt cheese
    4. Stir until smooth and evenly distributed

    Pro tip: Sprinkle extra cheese on top just before serving for a decadent finish. Try different cheese combinations to find your family's favorite comfort food!

    Storage and Reheating Guidelines

    Turning your slow cooker chicken and rice into meal prep is easy with the right storage. Your budget-friendly cooking can last all week. Just follow these simple steps.

    Let the chicken and rice cool down before you store it. Storing it right keeps the flavor and nutrients in

    Refrigeration Tips

    • Store in airtight containers
    • Refrigerate within 2 hours of cooking
    • Keep leftovers for 3-4 days maximum

    Pro tip: Separate chicken and rice if possible to maintain optimal texture during storage.

    Reheating Best Practices

    1. Use microwave or stovetop for reheating
    2. Add 1-2 tablespoons of water or broth to prevent dryness
    3. Heat until internal temperature reaches 165°F
    4. Stir occasionally for even warming

    "Proper storage and reheating can transform leftovers from bland to grand!" - Home Cooking Experts

    Freeze your chicken and rice in portions for longer storage. These meals can stay frozen for up to 3 months. They're perfect for busy weeks.

    Recommended Side Dishes and Pairings

    Make your Crock Pot Chicken and Rice even better with these tasty side dishes. They make meals fun and healthy for kids. The right sides can turn a good dinner into an amazing one.

    Vegetable Companions

    • Roasted green beans with light seasoning
    • Steamed broccoli with a sprinkle of parmesan
    • Grilled asparagus with lemon zest
    • Cajun-style corn for a spicy twist

    Adding colorful veggies makes your meals nutritious and fun. These options add vibrant colors and important vitamins that kids will love.

    Bread and Comfort Sides

    • Warm crusty bread for sauce absorption
    • Garlic dinner rolls
    • Sweet potato fries with sriracha dip
    • Homemade baked beans

    "Side dishes aren't just additions - they're opportunities to make meals memorable!" - Family Cooking Experts

    Looking for more variety? Try these sides with your Crock Pot Chicken and Rice:

    • Cold quinoa salad
    • Caprese salad for summer freshness
    • Coleslaw with a tangy twist
    • Mashed sweet potatoes

    The aim is to create tasty, balanced meals that everyone will enjoy. Mix these ideas to keep dinner fun and full of nutrients!

    Conclusion

    Our crock pot chicken and rice recipe turns weeknight dinners into cozy comfort food moments. It only takes 10 minutes to prepare and 3-4 hours to cook. Slow cooker meals show that tasty home cooking doesn't need to be complicated.

    This recipe is simple yet flexible. You can use 4 boneless chicken breasts or try different seasonings. The creamy soup, protein-rich chicken, and hearty rice make it a satisfying dish for everyone.

    Cooking is all about being creative and having fun. Feel free to add your own twist with cheese, veggies, or spices. The slow cooker lets you craft meals that warm your heart and table, all without the long hours in the kitchen.

    We hope this recipe sparks your love for slow cooker meals. Your kitchen journey is just starting, and with each dish, you'll grow more confident and discover new tastes to enjoy.

    FAQ

    Can I use white rice instead of brown rice in this recipe?

    Yes, white rice works too. Just cook it a bit faster. Brown rice takes longer. Add white rice later to avoid mushiness.

    How long can I store leftovers of Crock Pot Chicken and Rice?

    Store leftovers in a sealed container for up to 5 days. Reheat with a bit of water or broth. This keeps the rice moist.

    Can I use chicken thighs instead of chicken breasts?

    Absolutely! Chicken thighs are richer and more flavorful. They stay moist longer. Remove excess fat before cooking.

    What vegetables can I add to this recipe?

    Frozen veggies are best. Try peas, carrots, or broccoli in the last hour. They add color and flavor without getting mushy.

    My rice is too firm after cooking. What should I do?

    Add a quarter cup of chicken broth if rice is too firm. Let it cook a bit longer. If it's too wet, remove the lid for a few minutes. Adjust cooking times and liquids as needed.

    Can I make this recipe dairy-free?

    Yes! Skip the cheese or use a dairy-free alternative. Replace cream of chicken soup with dairy-free soup or more broth with cornstarch.

    What type of cheese works best in this recipe?

    Cheddar is our favorite for melting and flavor. Try Monterey Jack, Colby, or blends. Add cheese after cooking for creaminess.

    How can I make this recipe lower in calories?

    Use skinless chicken, low-sodium broth, and reduced-fat soup. Use less cheese. Adding veggies boosts nutrition without adding calories.

    Print

    Crock Pot Chicken and Rice

    crock pot chicken and rice
    Print Recipe
    Pin Recipe

    5 Stars 4 Stars 3 Stars 2 Stars 1 Star

    No reviews

    This Crock Pot Chicken and Rice is a comforting, one-pot meal that’s creamy, hearty, and packed with flavor. 🍗🍚 Perfect for busy weeknights, this set-it-and-forget-it recipe combines tender chicken, flavorful rice, and a rich, creamy sauce for a satisfying dish the whole family will love!

    • Author: grace bellamy
    • Prep Time: 10 minutes
    • Cook Time: 4–5 hours (low) or 2–3 hours (high)
    • Total Time: ~5 hours
    • Yield: 4–6 servings
    • Category: Main Dish
    • Method: Slow Cooked
    • Cuisine: American
    • Diet: Gluten Free

    Ingredients

    • 🍗 4 boneless, skinless chicken breasts or thighs
    • 🌾 1 ½ cups long-grain white rice, uncooked
    • 🧅 1 small onion, diced
    • 🥕 1 cup diced carrots
    • 🥦 1 cup frozen peas (or any vegetable mix)
    • 🍲 1 can (10.5 oz) cream of chicken soup
    • 🥛 3 cups chicken broth
    • 🌿 1 teaspoon garlic powder
    • 🌿 1 teaspoon onion powder
    • 🧂 ½ teaspoon salt
    • 🌶️ ¼ teaspoon black pepper
    • 🧀 1 cup shredded cheddar cheese (optional for topping)

    Instructions

    • Prepare the crock pot:
      • Spray the inside of the crock pot with non-stick cooking spray for easy cleanup.
    • Layer the ingredients:
      • Add the rice, diced onion, carrots, and peas to the bottom of the crock pot.
      • Place the chicken breasts or thighs on top of the rice mixture.
    • Mix the sauce:
      • In a bowl, whisk together the cream of chicken soup, chicken broth, garlic powder, onion powder, salt, and pepper. Pour the mixture evenly over the chicken and rice.
    • Cook:
      • Cover and cook on low for 4–5 hours or high for 2–3 hours, until the chicken is tender and the rice is fully cooked.
    • Shred the chicken:
      • Once cooked, remove the chicken, shred or chop it, and stir it back into the crock pot.
    • Add cheese (optional):
      • Sprinkle shredded cheddar cheese on top, cover, and let it melt for 5–10 minutes.
    • Serve and enjoy:
      • Spoon onto plates and serve warm.

    Notes

    • For extra creaminess, stir in ¼ cup heavy cream or sour cream before serving.
    • Use brown rice for a heartier, healthier version; adjust cooking time as needed.
    • Leftovers can be stored in an airtight container in the refrigerator for up to 3 days.

    Did you make this recipe?

    Share a photo and tag us — we'd love to see your creation!

    Recipe

    Cranberry Jalapeno Dip

    January 26, 2025 by grace bellamy Leave a Comment

    Table of Contents

    • Cranberry Jalapeno Dip: A Sweet and Spicy Holiday Treat
      • Understanding Cranberry Jalapeno Dip
        • Origins of This Festive Appetizer
        • Why This Dip Has Become a Holiday Favorite
        • The Perfect Balance of Sweet and Spicy
      • Essential Ingredients for the Perfect Dip
        • Fresh vs Frozen Cranberries
        • Selecting and Preparing Jalapeños
        • Cream Cheese and Additional Components
      • Step-by-Step Preparation Guide
      • Tips for Controlling the Heat Level
        • Jalapeño Preparation Techniques
        • Balancing Spiciness with Sugar
      • Make-Ahead and Storage Instructions
      • Serving Suggestions and Pairings
        • Best Crackers and Dippers
        • Creative Serving Ideas
      • Customization Options and Variations
      • Nutritional Information and Benefits
        • Nutritional Breakdown
        • Health Benefits of Cranberries
        • Smart Serving Suggestions
      • Holiday Entertaining with Cranberry Jalapeno Dip
      • Troubleshooting Common Issues
        • Dealing with Texture Challenges
        • Managing Spice Levels
        • Quick Fixes for Common Problems
      • Conclusion
      • FAQ
        • How long can I store cranberry jalapeno dip in the refrigerator?
        • Can I make this dip ahead of time for a holiday party?
        • How can I reduce the spiciness of the dip?
        • Are there dairy-free alternatives for this recipe?
        • What are the best crackers or dippers to serve with this dip?
        • Can I freeze cranberry jalapeno dip?
        • Is this dip very high in calories?
        • Can I adjust the sweetness of the dip?

    Cranberry Jalapeno Dip: A Sweet and Spicy Holiday Treat

    A vibrant holiday appetizer spread featuring a bowl of cranberry jalapeno dip, garnished with fresh cilantro and slices of jalapeno, surrounded by colorful tortilla chips. The setting is festive, with twinkling string lights in the background, and a rustic wooden serving board adorned with seasonal decorations like pinecones and evergreen sprigs. The dip has a glossy texture, reflecting the light, and there are festive elements like holiday ornaments nearby.

    Looking for a holiday dips recipe that will wow your guests? The cranberry jalapeno dip is your ultimate festive appetizer solution. It combines sweet cranberries and spicy jalapeños for a memorable taste experience. This makes any gathering special.

    Imagine a dip that mixes the tartness of fresh cranberries with the heat of jalapeños. It's all blended with creamy cheese. This festive appetizer is a conversation starter that will have everyone asking for seconds.

    The cranberry jalapeno dip is packed with vibrant flavors and easy to prepare. It offers a unique twist on traditional holiday appetizers. Whether it's a family gathering or a corporate event, this dip will elevate your menu.

    Prepare to impress your guests with a dip that's as versatile as it is delicious. From tortilla chips to toast, this cranberry jalapeno dip adapts to any serving style. It's a must-have for your holiday entertaining lineup.

    Understanding Cranberry Jalapeno Dip

    The cranberry jalapeno dip is a hit at parties. It's a mix of sweet and spicy that makes any event special. This unique dip turns simple gatherings into unforgettable moments.

    Cranberry Jalapeño Dip

    A colorful spread featuring a festive bowl of cranberry jalapeno dip, surrounded by an array of crunchy tortilla chips and fresh vegetable sticks. The dip is a vibrant red with flecks of green jalapeno, garnished with fresh herbs. The setting has a holiday theme, with twinkling lights in the background and a wooden platter for an inviting, cozy ambiance.

    Origins of This Festive Appetizer

    This dip started in home kitchens where cooks wanted to make spicy dips better. They mixed tart cranberries with hot jalapeños. This created a flavor that's perfect for holiday parties.

    • Originated in North American kitchens
    • Inspired by fusion cuisine trends
    • Became popular through social media sharing

    Why This Dip Has Become a Holiday Favorite

    This dip is a crowd-pleaser because it's both sweet and spicy. Its bright colors and rich flavors make it a hit at holiday parties.

    "A perfect blend of cranberry's tartness and jalapeño's kick creates a memorable taste experience."

    The Perfect Balance of Sweet and Spicy

    Chefs and home cooks love this dip for its magic. With just cranberries, jalapeños, and a bit of sugar, you get a snack that's hard to resist.

    1. Tart cranberries provide fruity foundation
    2. Jalapeños deliver controlled heat
    3. Cream cheese creates smooth texture
    4. Sugar balances overall flavor profile

    Tip: Refrigerate the dip for at least 2 hours to allow flavors to meld perfectly.

    Essential Ingredients for the Perfect Dip

    To make delicious cream cheese dips, you need the right ingredients. The cranberry jalapeño dip is a great example. It combines fruit and pepper for a taste that's both complex and exciting.

    Fresh vs Frozen Cranberries

    Choosing between fresh and frozen cranberries is key. Fresh cranberries give the best flavor and texture. For this recipe, use 12 ounces (340 g) of fresh cranberries.

    • Fresh cranberries offer vibrant taste
    • Frozen cranberries work as a convenient alternative
    • Ensure cranberries are high-quality and firm

    Selecting and Preparing Jalapeños

    The type of jalapeño you pick affects the dip's heat. Use one small jalapeño, finely diced and seeds removed, for the perfect kick. Pro tip: Wear gloves when handling peppers to prevent skin irritation!

    Cream Cheese and Additional Components

    The base of cream cheese dips is two 8-ounce packages of softened cream cheese. To add more flavor, include:

    1. 4-5 green onions, chopped
    2. ¼ cup fresh cilantro
    3. ½ teaspoon ground cumin
    4. 2 tablespoons lime juice
    5. ¼ teaspoon salt

    A vibrant display of fresh cranberries, diced jalapenos, creamy cheese, chopped green onions, and a sprinkle of cilantro, arranged artistically on a rustic wooden table, with hints of holiday decorations in the background.

    The magic of this dip lies in balancing sweet, spicy, and creamy elements.

    Remember to chill your dip for 4-6 hours before serving. This lets the flavors mix perfectly.

    Step-by-Step Preparation Guide

    Making delicious dips like cranberry jalapeño dip is easy. You just need a few ingredients and a little time. You'll make a dip that everyone will love.

    1. Gather your ingredients:
      • 12 oz fresh cranberries
      • 2 jalapeños
      • ¼ cup cilantro
      • 16 oz cream cheese
      • 1 cup granulated sugar
    2. Pulse cranberries in a food processor until finely chopped
    3. Finely dice jalapeños and red onion
    4. Mix chopped cranberries with sugar and let sit for 15 minutes
    5. Combine cranberry mixture with jalapeños, onion, and cilantro
    6. Blend cream cheese until smooth
    7. Fold cranberry mixture into cream cheese

    Pro tip: For the best flavor, refrigerate the dip for at least 2 hours before serving!

    It takes about 25 minutes to prepare the dip. Then, chill it for 10 hours to enhance the flavors. This recipe makes 15 servings, costing only $0.74 per serving.

    This dip's secret is its mix of sweet cranberries and spicy jalapeños. Follow these steps to make a dip that will impress everyone at your party.

    Tips for Controlling the Heat Level

    Making the perfect spicy dips for holiday fun is all about balance. Your cranberry jalapeño dip can be just right for everyone, from those who like it mild to those who love it hot. It's all about managing the heat and keeping the flavor great.

    Jalapeño Preparation Techniques

    Starting with jalapeño prep is key to controlling the heat in your dips. Here are some tips from experts:

    • Remove seeds and white membranes to reduce intense spiciness
    • Choose between mild or spicy 4-ounce canned jalapeños
    • Wear gloves when handling peppers to protect your skin
    • Rinse jalapeños to further decrease heat intensity

    Balancing Spiciness with Sugar

    Sugar is important for cooling down spicy dips. The right amount can turn a hot appetizer into a hit at your holiday party.

    1. Start with ¼ cup of brown sugar
    2. Taste and gradually add more if needed
    3. Consider using orange zest to enhance sweetness
    4. Experiment with different sugar quantities

    Pro tip: "The secret to perfect holiday dips is finding your personal heat threshold!"

    Creating the perfect spicy dip is an art. Don't be shy to try new things and adjust ingredients to please your guests.

    Make-Ahead and Storage Instructions

    Planning ahead is key when making easy dip recipes for parties. Your cranberry jalapeño dip can be a stress-free addition to your holiday spread. Just follow the right preparation and storage techniques.

    Here are the key storage guidelines for making this delicious dip in advance:

    • Refrigerate the dip in an airtight container
    • Store for up to 2-3 days before serving
    • Keep the dip chilled at 40°F or below

    Pro tip: The flavors of this dip get better when made a day before. The cranberry and jalapeño mixture develops a more complex taste as it sits.

    "Prepping your party snacks ahead of time means more time enjoying your guests!" - Chef's Recommendation

    For the best texture and taste, consider these make-ahead strategies:

    1. Prepare the cranberry jalapeño mixture up to 24 hours in advance
    2. Keep cream cheese at room temperature for easy mixing
    3. Combine ingredients just before serving for the freshest presentation

    Remember, while cranberries freeze well, cream cheese doesn't. Avoid freezing the completed dip. This keeps it creamy and flavorful.

    Serving Suggestions and Pairings

    Make your cranberry jalapeno dip the highlight of your holiday appetizers. With creative serving ideas, you'll wow your guests. This dip is perfect for holiday gatherings, offering many ways to enjoy it.

    Best Crackers and Dippers

    Choosing the right crackers and dippers can make your appetizers stand out. Here are some tasty options:

    • Crisp tortilla chips
    • Buttery crackers
    • Sourdough toast points
    • Pumpernickel bread slices
    • Crisp celery sticks
    • Pita chips

    Creative Serving Ideas

    Be creative with your festive appetizers. Try these unique presentation ideas:

    1. Serve in a hollowed-out bread bowl for rustic charm
    2. Create individual appetizer portions in small martini glasses
    3. Spread on grilled chicken or pork as a zesty topping
    4. Use as a filling for puff pastry appetizers

    Pro tip: Let your cream cheese soften for up to an hour before mixing to ensure a smooth, creamy texture.

    Your cranberry jalapeno dip can be more than just a simple spread. With these serving suggestions, it becomes a memorable culinary experience. Guests will talk about it long after the party.

    Customization Options and Variations

    Making your own holiday dips is all about adding your personal touch. Your cranberry jalapeño dip can be made special in many ways. It can become a dish that everyone loves.

    Here are some fun ways to make the dip your own:

    • Herb Enhancements: Add fresh cilantro for a bright, zesty flavor profile
    • Cheese Alternatives: Swap cream cheese with goat cheese for a tangy twist
    • Spice Level Adjustment: Remove jalapeño seeds to reduce heat intensity
    • Sweet Variations: Experiment with honey or maple syrup instead of white sugar

    You can also make the dip healthier. For those watching their diet, try these changes:

    • Use low-fat cream cheese
    • Replace sour cream with Greek yogurt
    • Incorporate alternative sweeteners

    "The best recipes are the ones you make your own!" - Culinary Wisdom

    Your creativity is what makes this appetizer recipe special. It lets you create a holiday dip that shows off your taste and style.

    Nutritional Information and Benefits

    Enjoying holiday dips like Cranberry Jalapeño Dip can be a treat. Knowing its nutritional info helps you choose wisely. Let's explore the health perks and calories of this tasty appetizer.

    Nutritional Breakdown

    Each quarter-cup serving of this festive dip offers a balanced nutritional profile:

    • Calories: 117 per serving
    • Total Fat: 7g
    • Saturated Fat: 4g
    • Sodium: 289mg
    • Carbohydrates: 7g
    • Fiber: 1g
    • Sugar: 5g
    • Protein: 8g
    • Cholesterol: 27mg

    Health Benefits of Cranberries

    Cranberries are full of antioxidants. These tiny red fruits add health benefits to your holiday dips. They help with urinary tract health and have anti-inflammatory properties.

    "Food can be the most powerful medicine or the slowest form of poison" - Unknown

    Smart Serving Suggestions

    When making this party snack, remember it makes 10-12 servings. The recipe uses 8 oz cream cheese, 12 oz fresh cranberries, 3 tablespoon chopped jalapeño, and ¼ cup sugar. This mix creates a delightful balance of flavors.

    Enjoy your Cranberry Jalapeño Dip as part of a balanced diet. You'll get to enjoy a delicious and somewhat nutritious holiday appetizer.

    Holiday Entertaining with Cranberry Jalapeno Dip

    Want to make your holiday parties unforgettable? The cranberry jalapeno dip is your secret ingredient. It's a vibrant red and green delight that adds to any holiday table.

    This dip is not just pretty; it's also packed with flavor. The mix of sweet cranberries and spicy jalapeños is a hit. It's a perfect choice for any holiday gathering.

    "A great dip can transform any holiday gathering from ordinary to extraordinary!" - Holiday Entertaining Expert

    Here are some creative ways to show off your cranberry jalapeno dip:

    • Serve as a centerpiece appetizer at Thanksgiving dinner
    • Include on your Christmas party appetizer table
    • Pack in small containers for festive potluck contributions
    • Pair with unique dippers like cinnamon sugar pita chips

    Pro tip: Make your dip up to 48 hours in advance. This helps busy hosts save time and stress. It's a great way to add flavor without last-minute fuss.

    This dip's sweet and spicy mix makes any event special. Your guests will love its looks and taste. It's sure to impress at any holiday party.

    Troubleshooting Common Issues

    Making the perfect cream cheese dips can be tricky, like with cranberry jalapeno dip. But, most common problems have simple fixes. These can help you make great dips every time.

    Dealing with Texture Challenges

    If your dip is too watery, try these quick fixes:

    • Drain excess liquid from cranberries before mixing
    • Use room temperature cream cheese for better consistency
    • Chill the dip for 30 minutes to help it set

    Managing Spice Levels

    It's important to control the heat in your jalapeno dip. Pro tip: Remove jalapeno seeds to reduce spiciness, or add more sugar to balance the heat.

    "The secret to a great dip is finding the perfect balance between sweet and spicy!" - Culinary Expert

    Quick Fixes for Common Problems

    1. Too spicy? Add more cream cheese or sugar
    2. Too thick? Mix in a little lime juice
    3. Lacking flavor? Sprinkle extra salt or add fresh herbs

    Remember, practice makes perfect with cream cheese dips. Each batch you make will help you understand the nuances of this delicious appetizer. Don't get discouraged – your next cranberry jalapeno dip might just become the star of your holiday spread!

    Conclusion

    The cranberry jalapeno dip is more than just a snack. It's a special treat that makes any holiday party unforgettable. Its mix of sweet cranberries and spicy jalapeños makes any event a hit. Plus, it's super easy to make and quickly becomes the highlight of your holiday table.

    Whether you're having a family get-together or going to a potluck, this dip is a winner. You can tweak the heat and serve it with different foods. This lets you tailor the dish to what your guests like, from crackers to veggies.

    But the fun doesn't stop here. This dip can lead to trying out even more tasty appetizers. It's a chance to grow your collection of holiday recipes. So, get cooking, share this recipe with friends, and make it a family favorite.

    Want to wow your guests? Get those cranberries and jalapeños ready. It's time to start your festive flavor adventure!

    FAQ

    How long can I store cranberry jalapeno dip in the refrigerator?

    You can keep cranberry jalapeno dip in the fridge for 5-7 days. Just make sure it's in an airtight container. This keeps it fresh and flavorful.

    Can I make this dip ahead of time for a holiday party?

    Yes, you can make it 1-2 days before a party. It tastes better after the flavors have mixed. Just remember to let it warm up a bit before serving.

    How can I reduce the spiciness of the dip?

    To make it less spicy, remove the seeds and membranes from the jalapenos. You can also use fewer peppers or choose a milder one like poblano. Adding a bit more sugar can also help balance the heat.

    Are there dairy-free alternatives for this recipe?

    Yes, you can use dairy-free cream cheese alternatives. These are made from cashews, almonds, or other plant-based ingredients. This way, those with dairy restrictions can enjoy the dip too.

    What are the best crackers or dippers to serve with this dip?

    This dip goes well with many things. Try wheat crackers, pita chips, pretzel crisps, or fresh veggie sticks. For a festive look, use holiday crackers or homemade crostini.

    Can I freeze cranberry jalapeno dip?

    You can freeze it, but the texture might change a bit. If you freeze it, thaw it in the fridge. Then, stir it well before serving to get the right consistency.

    Is this dip very high in calories?

    It's a bit rich, like most cream cheese dips. A serving has about 70-100 calories. Enjoy it in moderation as part of a balanced holiday meal.

    Can I adjust the sweetness of the dip?

    Yes, you can adjust the sweetness. Change the sugar amount or use honey or maple syrup. Taste it as you go to find the perfect sweetness for you.

    Print

    Cranberry Jalapeno Dip

    Cranberry Jalapeno Dip
    Print Recipe
    Pin Recipe

    5 Stars 4 Stars 3 Stars 2 Stars 1 Star

    No reviews

    This Cranberry Jalapeño Dip is a festive and flavorful appetizer perfect for holidays or parties! 🌟🫑 Sweet, tangy cranberries paired with the zesty kick of jalapeños and creamy cream cheese create an irresistible dip that’s easy to make and guaranteed to impress your guests.

    • Author: grace bellamy
    • Prep Time: 15 minutes
    • Cook Time: 0 minutes
    • Total Time: 15 minutes
    • Yield: 6–8 servings
    • Category: Appetizer
    • Method: No-Cook
    • Cuisine: American
    • Diet: Vegetarian

    Ingredients

    For the Cranberry Topping:

    • 🥤 2 cups fresh cranberries
    • 🍬 ½ cup granulated sugar
    • 🍯 1 tablespoon honey or maple syrup (optional for extra sweetness)
    • 🌿 ¼ cup fresh cilantro, chopped
    • 🫑 1–2 jalapeños, finely diced (adjust to spice preference)
    • 🍋 1 tablespoon lime juice

    For the Dip Base:

    • 🧀 8 ounces cream cheese, softened
    • 🌿 Optional garnish: Extra cilantro or cranberries

    Instructions

      1. Prepare the cranberry topping:
        • In a food processor, pulse the cranberries until coarsely chopped (do not puree).
        • Transfer to a mixing bowl and stir in sugar, honey (if using), cilantro, jalapeños, and lime juice. Let the mixture rest for 10–15 minutes to meld flavors.
      2. Prepare the dip base:
        • Spread the softened cream cheese evenly across a serving plate or shallow dish.
      3. Assemble the dip:
        • Spoon the cranberry-jalapeño mixture over the cream cheese, spreading evenly.
      4. Chill and serve:
        • Refrigerate for at least 30 minutes to allow flavors to combine. Serve with crackers, chips, or sliced baguette.

    Notes

    • Adjust the spice level by adding more or fewer jalapeños. Remove seeds for less heat.
    • For a tangier twist, add a splash of apple cider vinegar to the cranberry mixture.
    • This dip can be made ahead of time—prepare up to 1 day in advance and refrigerate.

    Did you make this recipe?

    Share a photo and tag us — we'd love to see your creation!

    Recipe

    Parmesan Sweet Potato Bites

    January 26, 2025 by grace bellamy Leave a Comment

    Crispy Parmesan Sweet Potato Bites Recipe

    A close-up of crispy golden-brown sweet potato bites, coated with grated Parmesan cheese, garnished with fresh herbs, served on a rustic wooden platter, with a side of creamy dipping sauce in a small bowl, warm lighting enhancing the textures and colors.

    Parmesan Sweet Potato Bites

    Imagine a cozy kitchen filled with the smell of roasted sweet potatoes and melted Parmesan cheese. These parmesan sweet potato bites are more than just an appetizer. They turn simple ingredients into amazing side dishes that everyone will love.

    Picture yourself at a gathering where these golden, crispy bites are waiting. With just 25 minutes of prep and 1 hour and 30 minutes of cooking, you'll make a dish that wows everyone. They're perfect for any event, whether it's a holiday party or a casual get-together.

    This recipe is super versatile. You can serve these crispy parmesan sweet potato bites as an appetizer or a side dish. They're full of flavor and good for you, making them a hit with both kids and adults. The mix of sweet potatoes and Parmesan is a delicious and healthy combination.

    Get ready to take your cooking to the next level with this easy yet impressive recipe. It makes 15 servings, and from the first bite to the last, these sweet potato bites will be a favorite in your kitchen.

    Table of Contents

    • Crispy Parmesan Sweet Potato Bites Recipe
      • Why These Sweet Potato Bites Are a Must-Try
        • Health Benefits of Sweet Potatoes
        • Perfect for Special Occasions
        • Kid-Friendly Option
      • Essential Ingredients for Parmesan Sweet Potato Bites
      • Kitchen Equipment You'll Need
        • Baking Sheet Essentials
        • Preparation Tools
        • Measuring Equipment
      • Preparing Your Sweet Potatoes
      • The Perfect Seasoning Blend
        • Herb and Spice Combinations
        • Salt and Pepper Balance
      • Creating the Parmesan Crust
      • Step-by-Step Baking Instructions
        • Temperature and Timing Guidelines
        • Visual Cues for Doneness
        • Achieving the Perfect Crispiness
      • Making the Garlic Herb Butter Drizzle
      • Tips for Achieving Maximum Crispiness
        • Common Mistakes to Avoid
        • Storage Recommendations
        • Pro Tips for Ultimate Crispiness
      • Serving Suggestions and Pairings
      • Make-Ahead and Storage Options
      • Conclusion
      • FAQ
        • Are these Parmesan Sweet Potato Bites gluten-free?
        • Can I make these sweet potato bites ahead of time?
        • What type of parmesan cheese works best for this recipe?
        • How do I keep the sweet potato bites crispy?
        • Are these sweet potato bites healthy?
        • Can I use different types of cheese?
        • How long can I store leftover sweet potato bites?
        • Are these suitable for kids?

    Why These Sweet Potato Bites Are a Must-Try

    Discover why these delicious healthy bites are about to become your new favorite recipe. Sweet potato bites offer an incredible combination of nutrition and flavor. They are perfect for any gathering or quick snack.

    Parmesan Sweet Potato Bites

    A close-up view of crispy golden-brown sweet potato bites, lightly coated with grated Parmesan cheese, resting on a rustic wooden table. Surrounding the bites are fresh herbs and a small bowl of dipping sauce, showcasing the texture and color contrast. Natural lighting highlights the crunchiness and warmth of the sweet potato bites.

    Health Benefits of Sweet Potatoes

    Sweet potatoes are a nutritional powerhouse. They can make your holiday recipes healthier. These vibrant root vegetables are full of essential nutrients:

    • Rich in beta-carotene, which converts to vitamin A
    • High in dietary fiber for digestive health
    • Contains important antioxidants that support immune function
    • Provides 135 calories per serving with minimal fat

    Perfect for Special Occasions

    Elevate your entertaining game with these versatile healthy bites. They are great for any event, whether it's a family gathering or a quick appetizer. These sweet potato bites fit seamlessly into any menu.

    Kid-Friendly Option

    Parents rejoice! These crispy, cheesy bites are a sneaky way to introduce nutritious vegetables to children. With a golden parmesan crust and irresistible flavor, kids won't even realize they're eating something incredibly healthy.

    Get ready to impress your guests and nourish your family with these delectable sweet potato bites. They are as nutritious as they are delicious.

    Essential Ingredients for Parmesan Sweet Potato Bites

    A vibrant arrangement of ingredients for roasted sweet potato bites, featuring bright orange sweet potatoes, a wedge of fresh lemon, a sprinkle of grated parmesan cheese, fresh herbs like rosemary and thyme, olive oil in a small dish, and a pinch of salt and pepper on a rustic wooden table. Natural lighting enhances the colors and textures of the ingredients.

    Starting your journey to make parmesan sweet potato bites is all about picking the right ingredients. You'll want to choose top-notch sweet potatoes, preferably from North Carolina's famous sweet potato markets. These vibrant orange roots will be the main attraction of your dish.

    To make the perfect roasted sweet potatoes, you'll need a few key ingredients:

    • 2 large sweet potatoes
    • ½ cup freshly grated Parmesan cheese
    • 2 tablespoons avocado oil
    • 1½ tablespoons cornstarch
    • 2 tablespoons fresh herbs (thyme, sage, rosemary)

    The secret to amazing parmesan cheese flavor is using freshly grated Parmigiano Reggiano. This premium cheese brings a rich, nutty taste that makes your roasted sweet potatoes truly special.

    Seasoning is key to turning simple sweet potatoes into a delicious side dish. Your spice mix should include:

    • 1 teaspoon Celtic sea salt
    • 1 teaspoon coarse ground pepper
    • 1 teaspoon garlic powder
    • 1 teaspoon dried parsley
    • ½ teaspoon paprika
    • ¼ teaspoon cayenne pepper (optional)

    When picking sweet potatoes, choose ones with smooth skin and similar size for even cooking. Your goal is to make crispy, golden bites that will wow your family and guests.

    Kitchen Equipment You'll Need

    Preparing tasty easy recipes needs the right tools. Making crispy Parmesan sweet potato bites is easy with the right gear. Let's look at the key tools for making these tasty bites.

    Baking Sheet Essentials

    Your baking sheet is key for crispy sweet potato bites. Choose a high-quality sheet for even heat. Pro tip: Use parchment paper to avoid sticking and make cleanup easy.

    • Non-stick baking sheet (13x18 inch recommended)
    • Parchment paper
    • Silicone baking mat (optional alternative)

    Preparation Tools

    Using top-notch tools can make your recipes better. These tools help you prepare your sweet potatoes well.

    • Sharp chef's knife
    • Cutting board
    • Mixing bowls (various sizes)
    • Cheese grater
    • Colander for washing

    Measuring Equipment

    Getting the measurements right is crucial for perfect bites. Use reliable measuring tools for consistent results.

    • Measuring cups (dry and liquid)
    • Measuring spoons
    • Kitchen scale (for precise ingredient measurements)

    With these tools, you're ready to make crispy, tasty Parmesan sweet potato bites. They'll wow your family and friends. Remember, the right tools are the start of great cooking!

    Preparing Your Sweet Potatoes

    Getting your roasted sweet potatoes ready is the first step to creating a delicious dish. Start by selecting fresh, firm sweet potatoes with smooth skin and no blemishes. Wash them thoroughly under cool running water to remove any dirt or debris.

    To prepare your roasted sweet potatoes, follow these essential steps:

    • Scrub the sweet potatoes gently with a vegetable brush
    • Pat dry completely with clean kitchen towels
    • Select a sharp chef's knife for cutting
    • Cut potatoes into uniform 1-inch chunks for even roasting

    When cutting your sweet potatoes, aim for consistent piece sizes. Uniform chunks ensure that each bite roasts evenly and develops a perfect crispy exterior. If you have larger sweet potatoes, slice them in half lengthwise before cutting into chunks.

    Pro tip: Leave the nutrient-rich skin on your sweet potatoes. The skin contains additional fiber and helps the roasted sweet potatoes maintain their shape during cooking. For those who prefer peeled potatoes, you can carefully remove the skin using a vegetable peeler before cutting.

    By following these preparation techniques, you'll set the foundation for creating delectable roasted sweet potatoes that are crispy on the outside and tender on the inside.

    The Perfect Seasoning Blend

    Making a great seasoning blend turns simple sweet potato bites into a dish to remember. These gluten-free appetizer recipes use a mix of herbs and spices. They bring out the sweet potato's natural flavor.

    Getting the right flavor is all about balance. Your seasoning should enhance the sweet potato's taste. It should also add depth and complexity.

    Herb and Spice Combinations

    For the best gluten-free sweet potato bites, try this spice mix:

    • ½ teaspoon garlic powder for a strong taste
    • ¼ teaspoon paprika for a hint of warmth
    • ¼ teaspoon dried oregano for a Mediterranean touch
    • ⅛ teaspoon onion powder for more depth
    • ¼ teaspoon chili powder for a gentle spice
    • Pinch of cayenne pepper for extra heat (optional)

    Salt and Pepper Balance

    Salt and pepper are key in these recipes. Use ¼ teaspoon sea salt and a pinch of black pepper. You can adjust these to your liking, making sure each bite is just right.

    Pro tip: Always taste and adjust your seasoning before roasting. The perfect blend will make your sweet potato bites unforgettable.

    Creating the Parmesan Crust

    Making the perfect parmesan cheese crust is key to turning simple sweet potato bites into a crispy delight. Choose high-quality, freshly grated Parmigiano-Reggiano cheese for a golden, crunchy outside.

    • Select fresh Parmigiano-Reggiano cheese for the most robust flavor
    • Grate the cheese finely using a microplane or cheese grater
    • Spread the cheese evenly on a parchment-lined baking sheet
    • Create a thin, uniform layer that will crisp up beautifully

    For maximum crispiness, sprinkle the parmesan cheese generously. Make sure it covers the baking surface well. This will melt and create a delicious crispy crust, making your sweet potato bites gourmet.

    Try adding extra seasonings to the parmesan crust for more flavor. A pinch of smoked paprika or dried herbs can enhance the taste. The goal is to get a crispy outside that matches the sweet potato's natural sweetness.

    • Recommended cheese quantity: About ⅓ cup grated Parmesan
    • Optimal baking temperature: 425°F (220°C)
    • Typical roasting time: 35 minutes

    Professionals say patience and detail are key for a perfect crispy parmesan crust. Keep an eye on your sweet potato bites as they bake. This way, the cheese will turn into a golden, crispy masterpiece that everyone will love.

    Step-by-Step Baking Instructions

    Making crispy roasted sweet potatoes needs precision and care. These easy recipes will turn simple ingredients into a tasty dish. It will impress your family and friends.

    To make your sweet potato bites crispy and flavorful, follow these steps. They will help you get restaurant-quality results in your kitchen.

    Temperature and Timing Guidelines

    Perfect roasted sweet potatoes need the right temperature and timing. Here's what you should know:

    • Preheat your oven to 425°F
    • Arrange sweet potato bites on a prepared baking sheet
    • Bake for 25-26 minutes, ensuring even golden-brown coloration

    Visual Cues for Doneness

    To know when your sweet potato bites are done, look for these signs:

    1. Look for a rich, golden-brown exterior
    2. Check for crispy edges
    3. Ensure the interior remains tender

    Achieving the Perfect Crispiness

    For that irresistible crunch, try these pro tips:

    • Pat sweet potato pieces dry before seasoning
    • Space bites evenly on the baking sheet
    • Use minimal oil to prevent sogginess
    • Flip halfway through cooking for uniform crispness

    After baking, let your sweet potato bites rest for 10 minutes. This step lets the cheese harden. It makes the exterior extra crispy, and everyone will want more.

    Making the Garlic Herb Butter Drizzle

    Turn your sweet potato bites into fancy appetizers with a garlic herb butter drizzle. This simple addition makes easy recipes look like they came from a restaurant in just a few minutes.

    For the perfect garlic herb butter, you'll need:

    • 1 stick of salted butter (approximately 110g)
    • 2 fresh garlic cloves, minced
    • 1 tablespoon fresh thyme leaves
    • Pinch of salt and freshly ground black pepper

    Making the drizzle is easy. Start by softening the butter at room temperature. Gently fold the minced garlic and chopped thyme into the butter, making sure the flavors mix well. Be careful not to crush the herbs.

    When your sweet potato bites come out of the oven golden and crispy, wait a bit before drizzling the herb butter. This lets the butter melt a bit, creating a shiny, tasty coating that makes the appetizers hard to resist.

    Pro tip: For an extra flavor boost, sprinkle some freshly grated parmesan cheese over the butter drizzle. This adds a wonderful umami taste that will have everyone wanting the recipe!

    Tips for Achieving Maximum Crispiness

    To make the perfect crispy snacks, it's not just about the recipe. Learning a few key techniques can turn your sweet potato bites into something amazing.

    Common Mistakes to Avoid

    When making crispy sweet potato bites, some mistakes can ruin them. Here are the big ones to avoid:

    • Overcrowding the baking sheet prevents proper air circulation
    • Skipping the pat-dry step leaves excess moisture on potato surfaces
    • Using a baking dish instead of a flat baking sheet reduces crispiness
    • Forgetting to flip the potatoes midway through cooking

    Storage Recommendations

    To keep your sweet potato snacks crispy, store them right. Cool them down first, then put them in an airtight container. Line it with paper towels to soak up any extra moisture.

    1. Refrigerate within 2 hours of cooking
    2. Store in a single layer to maintain crispiness
    3. Consume within 4-5 days for best quality

    To reheat, use an oven or air fryer at 375°F for 5-7 minutes. Avoid microwave reheating, as it can make them soggy.

    Pro Tips for Ultimate Crispiness

    Here are some expert tips to make your sweet potato bites even crisper:

    • Use a baking sheet instead of a baking dish for maximum crispness
    • Allow potatoes to rest after baking for the cheese to harden
    • Spread potato pieces with ¼ inch spacing for even cooking
    • Pat potato rounds completely dry before seasoning

    Serving Suggestions and Pairings

    Your Parmesan Sweet Potato Bites are perfect for many meals. They add a crispy delight to any dish. They're great for holiday meals and everyday dinners.

    Here are some delicious pairing recommendations:

    • Protein Pairings:
      • Grilled steak
      • Roasted chicken
      • Juicy hamburgers
      • Grilled fish

    For holiday recipes, these sweet potato bites are a standout side dish. They go well with traditional main courses. Their crispy Parmesan crust adds elegance to your table.

    • Recommended Dipping Sauces:
      • Garlic aioli
      • Spicy sriracha mayo
      • Herb-infused sour cream

    Whether it's a dinner party or a quick family meal, these bites are a hit. They bring flexibility and amazing flavor to your table.

    Make-Ahead and Storage Options

    Planning ahead makes preparing these tasty snacks easy. You can make your sweet potato bites in advance. This gives you flexibility for meal planning and entertaining.

    Storage is key to keeping your bites fresh. Here are some important tips:

    • Store baked sweet potato bites in an airtight container
    • Refrigerate for up to 3 days
    • Reheat in the oven at 350°F for 5-10 minutes to restore crispiness

    For extra convenience, prepare parts of the recipe ahead:

    1. Cut sweet potatoes up to 1 day in advance
    2. Store prepared ingredients in separate containers
    3. Assemble and bake closer to serving time to prevent sogginess

    Pro tip: These sweet potato bites are great for meal prep. They're gluten-free and can be reheated easily. They're perfect for quick snacks all week.

    Remember, proper storage keeps your bites crispy and delicious. Store them in a cool, dry place. Always use an airtight container to keep their texture and flavor.

    Conclusion

    These parmesan sweet potato bites are more than a recipe. They're a journey that turns simple ingredients into something amazing. With just 25 minutes of prep and a few ingredients, you can make a dish everyone will love.

    These bites are perfect for any occasion. They're great for game nights, family dinners, or a quick snack. They're low in calories but full of nutrients like Vitamin A and potassium. So, you can enjoy them without feeling guilty.

    Making these bites will show off your cooking skills. The mix of crispy texture, parmesan cheese, and sweet potato sweetness is a treat for your taste buds. Follow the recipe to make a healthy and tasty dish.

    We encourage you to try new things, share your success, and make this recipe your own. Each time you make it, you get better and create special moments with your loved ones. Happy cooking!

    FAQ

    Are these Parmesan Sweet Potato Bites gluten-free?

    Yes, they are naturally gluten-free. Sweet potatoes, parmesan cheese, and seasonings don't have gluten. But, always check your ingredients to avoid cross-contamination.

    Can I make these sweet potato bites ahead of time?

    Absolutely! You can prep them a day in advance. Keep the cut and seasoned sweet potatoes in the fridge in an airtight container. Then, bake them as directed when you're ready.

    What type of parmesan cheese works best for this recipe?

    Use Parmigiano-Reggiano for the best flavor. Freshly grated cheese makes the crust crispier. Grate the cheese just before you start.

    How do I keep the sweet potato bites crispy?

    Spread the potatoes in a single layer without crowding. Use a hot oven and don't cover them after baking. For reheating, use an oven or air fryer to keep them crispy.

    Are these sweet potato bites healthy?

    They're quite healthy! Sweet potatoes are full of vitamins, fiber, and antioxidants. The parmesan cheese and butter add calories but also protein and flavor. They're a better choice than fried appetizers.

    Can I use different types of cheese?

    You can try other hard cheeses like Pecorino Romano or aged cheddar. Each cheese will change the flavor and texture a bit.

    How long can I store leftover sweet potato bites?

    Store them in an airtight container in the fridge for 3-4 days. Reheat in an oven or air fryer at 375°F for 5-7 minutes. Don't microwave them to keep them crispy.

    Are these suitable for kids?

    They're a great choice for kids! The sweet potatoes and parmesan coating are tasty and appealing. They're a fun way to get kids to eat veggies.

    Print

    Parmesan Sweet Potato Bites

    Parmesan Sweet Potato Bites
    Print Recipe
    Pin Recipe

    5 Stars 4 Stars 3 Stars 2 Stars 1 Star

    No reviews

    These Parmesan Sweet Potato Bites are crispy, cheesy, and packed with flavor! 🥔🧀 Perfect as an appetizer, snack, or side dish, they’re roasted to golden perfection and sprinkled with savory Parmesan cheese and herbs. Simple, delicious, and always a hit at the table!

    • Author: grace bellamy
    • Prep Time: 10 minutes
    • Cook Time: 25 minutes
    • Total Time: 35 minutes
    • Yield: Appetizer / Side Dish
    • Category: Appetizer / Side Dish
    • Method: Roasted
    • Cuisine: American
    • Diet: Vegetarian

    Ingredients

    • 🍠 2 large sweet potatoes, peeled and sliced into ¼-inch rounds
    • 🧈 2 tablespoons olive oil
    • 🧀 ½ cup grated Parmesan cheese
    • 🌿 1 teaspoon Italian seasoning
    • 🧂 ½ teaspoon garlic powder
    • 🧂 ½ teaspoon salt
    • 🌶️ ¼ teaspoon black pepper
    • 🌿 Fresh parsley, chopped (optional, for garnish)

    Instructions

    • Preheat the oven to 400°F (200°C). Line a baking sheet with parchment paper.
    • Prepare the sweet potatoes:
      • In a large bowl, toss the sweet potato slices with olive oil, making sure each piece is evenly coated.
    • Season:
      • In a small bowl, mix Parmesan cheese, Italian seasoning, garlic powder, salt, and pepper.
      • Sprinkle the seasoning mixture over the sweet potato slices and toss to coat evenly.
    • Arrange on the baking sheet:
      • Lay the sweet potato slices in a single layer, ensuring they don’t overlap for even cooking.
    • Bake:
      • Roast in the oven for 20–25 minutes, flipping halfway through, until the sweet potatoes are tender and the edges are crispy.
    • Garnish and serve:
      • Sprinkle with additional Parmesan cheese and fresh parsley before serving. Enjoy warm!

    Notes

    • For extra crispiness, broil the sweet potato bites for 2–3 minutes after baking.
    • Add a pinch of paprika or cayenne for a spicy kick.
    • These bites pair wonderfully with a dipping sauce like garlic aioli or ranch.

    Did you make this recipe?

    Share a photo and tag us — we'd love to see your creation!

    Recipe

    Puff Pastry Dessert Recipe

    January 25, 2025 by grace bellamy Leave a Comment

    Easy Homemade Puff Pastry Dessert Recipe in 30 Minutes

    Ever stared into your kitchen, craving something sweet but scared of complex baking? Your answer is here. These puff pastry desserts turn simple ingredients into amazing treats in just 30 minutes.

    Making these easy puff pastry desserts is a breeze, even for beginners. With store-bought puff pastry, your kitchen becomes a quick bakery. You can make impressive desserts with little effort.

    The beauty of puff pastry desserts is their simplicity. In 30 minutes, you can make mini rolls, turnovers, or twists that look like they came from a pro. These treats are versatile, perfect for any filling, from fruits to chocolate.

    Need a quick dessert for a gathering or a sudden sweet tooth? These puff pastry desserts are your go-to. They promise a tasty result without the long prep time. Impress your loved ones with ease and flavor.

    Understanding Puff Pastry Basics

    Puff pastry is a magical creation that turns simple ingredients into amazing desserts. It's known for its light, airy, and flaky texture when baked.

    The secret to puff pastry is its unique making process. It involves layering butter and dough to create hundreds of thin sheets. Professional bakers can make up to 2,000 layers in one batch!

    What Makes Puff Pastry Unique

    Puff pastry is special for several reasons:

    • Needs precise temperature control (65-70°F)
    • Requires careful butter selection (minimum 82% butterfat)
    • Creates amazing rise during baking
    • Is versatile for both sweet and savory desserts

    Store-bought vs Homemade Comparison

    There are two main options for puff pastry:

    1. Store-bought: Convenient and saves time
    2. Homemade: Offers better texture and flavor control

    Essential Ingredients Overview

    Perfect puff pastry needs high-quality ingredients. The basic recipe includes:

    • 400g all-purpose flour
    • 180g cold water
    • 12g sea salt
    • 400g butter (divided into 60g and 340g blocks)

    Whether you pick store-bought or make it yourself, knowing puff pastry basics will improve your baking. It will help you make stunning desserts with ease.

    Required Tools and Equipment

    Making tasty quick puff pastry desserts is easy without a fancy kitchen. Most people already have what they need to make these treats. The right tools make baking fun and easy.

    Here are the key tools you'll need for your puff pastry dessert adventure:

    • Rolling Pin: Critical for achieving the perfect dough thickness
    • Baking Sheet: Ensures even cooking and golden-brown pastries
    • Parchment Paper: Prevents sticking and makes cleanup easy
    • Sharp Knife or Pizza Cutter: Helps create precise pastry shapes
    • Measuring Cups and Spoons: Guarantees accurate ingredient portions

    You don't need a kitchen mixer or food processor for these recipes. A good rolling pin and your hands are enough.

    Pro tip: Keep your butter cold and your tools clean for the best pastry results. Chilling your rolling pin in the refrigerator for 15 minutes before use can help maintain the butter's temperature during rolling.

    With these simple tools, you'll be ready to create professional-looking puff pastry desserts in just 30 minutes. No expensive equipment required – just your creativity and passion for baking!

    Key Ingredients for Perfect PUFF PASTRY DESSERT RECIPE

    Making a great cream puff pastry dessert starts with the right ingredients. Knowing the key parts is crucial for flavor and texture. This will make your puff pastry dessert recipe a hit.

    Butter Selection Tips

    High-quality butter is the base of any excellent puff pastry dessert. Here are some tips for choosing the best butter:

    • Choose unsalted butter for better control of salt levels
    • Select European-style butter with higher fat content (around 82-85%)
    • Ensure butter remains cold throughout the preparation process
    • Use approximately 8 ounces of high-quality butter for optimal results

    Flour Quality Matters

    The flour you pick affects your puff pastry dessert's texture and structure. For the best results, consider these flour recommendations:

    • Use all-purpose flour (2 cups recommended)
    • Opt for unbleached flour for better flavor
    • Sift flour to remove potential lumps
    • Measure flour precisely for consistent outcomes

    Additional Essential Components

    Ingredients beyond butter and flour also make your puff pastry dessert special:

    • Ice water (½ cup) to keep dough cool
    • Salt (¼ teaspoon) for enhanced flavor
    • Optional flavorings like vanilla or cinnamon
    • Eggs for egg wash to create golden surface

    By carefully choosing and mixing these ingredients, you'll make a cream puff pastry dessert that will wow everyone.

    Step-by-Step Preparation Method

    Making tasty easy puff pastry desserts begins with preparation. Success comes from handling the pastry well and using the right techniques. Let's go through the key steps to make a delicious treat from simple ingredients.

    Start by thawing your frozen puff pastry sheets at room temperature. This usually takes 30-40 minutes. Pro tip: Keep the pastry cold but pliable for the best results.

    1. Prepare your work surface by lightly dusting it with flour
    2. Gently unfold the puff pastry sheet on the prepared surface
    3. Roll out the pastry to create an even, thin layer

    Choose your favorite filling for your easy puff pastry desserts. Some top picks are:

    • Nutella and fresh raspberries
    • Cream cheese and berry jam
    • Chocolate chips and almond extract

    When putting your filling in, follow these steps:

    1. Spread your chosen filling evenly, leaving a small border around the edges
    2. Cut the pastry into uniform rectangles or triangles
    3. Carefully fold and seal the edges to prevent filling from leaking

    Brush the pastries with egg wash for a golden, glossy look. Bake at 425 degrees F for about 10-15 minutes. The pastry should puff and turn beautifully brown. Let it cool on a wire rack before enjoying your easy puff pastry desserts.

    Sweet Filling Options and Variations

    Exploring fruit and chocolate puff pastry desserts is a fun journey. The right filling can turn a simple pastry into a delightful treat. It's a way to impress your taste buds.

    Nutella and Raspberry Sensations

    Nutella and raspberries make a perfect pair. The chocolate-hazelnut spread complements the tart raspberries well. You can make quick hand pies or fancy tarts in just 30 minutes.

    • Spread thin layer of Nutella on puff pastry
    • Add fresh raspberries
    • Fold and crimp edges
    • Bake until golden brown

    Fruit and Cream Variations

    Seasonal fruits offer endless options for puff pastry desserts. You can make elegant treats with poached pears or fresh strawberries. They highlight the natural flavors of the fruits.

    • Strawberry cream pastry twists
    • Caramelized apple tarts
    • Blood orange cream napoleons

    Decadent Chocolate Fillings

    Chocolate lovers will love the rich fillings for chocolate puff pastry desserts. Options include chocolate ganache, mousse, or chocolate-hazelnut spread. These are luxurious choices.

    • Dark chocolate ganache
    • Chocolate cream filling
    • Nutella-based variations

    Each filling adds its own texture and flavor to your puff pastry desserts. It makes for a memorable culinary experience.

    Baking Techniques and Temperature Guidelines

    Mastering the perfect puff pastry dessert recipe is all about precise baking techniques. Success comes from controlling temperature and preparation. The right baking process turns simple ingredients into a flaky, delightful treat that rises dramatically.

    When making your puff pastry dessert, follow these key baking guidelines:

    • Preheat your oven for 15-20 minutes before baking
    • Set the initial temperature to 425°F for maximum puffing
    • Reduce temperature to 375°F to complete baking
    • Place pastry shells approximately 2 inches apart on an ungreased baking sheet

    The magic of puff pastry is its ability to rise. Did you know a ¼-inch thick sheet can expand up to 2 inches during baking? This happens when moisture in the butter creates steam, pushing the layers upward.

    Timing is key for golden-brown perfection. Most puff pastry desserts bake for about 10 minutes. Watch closely in the first few minutes to ensure even rising and color. If your pastry starts to crack, don't worry—small imperfections can often be fixed.

    Pro tip: Fill your puff pastry just before serving to keep it crisp and prevent sogginess. Your guests will love the fresh, delicate layers of this delicious dessert.

    Decorating and Presentation Tips

    Turn your puff pastry tarts and danishes into stunning desserts with these tips. Presentation can make your baking stand out. It will impress your guests and show off your skills.

    Glazing Techniques for a Professional Finish

    Get that golden shine with egg wash techniques. Here's how to make your pastries shine:

    • Beat 1 egg with a tablespoon of water
    • Gently brush the surface of your puff pastry before baking
    • Use a soft pastry brush for even application

    Creative Decoration Ideas

    Make your dessert look amazing with these decoration ideas:

    1. Dust with powdered sugar for a delicate look
    2. Drizzle thin icing in artistic patterns
    3. Add fresh fruit garnishes
    4. Sprinkle toasted nuts for texture

    Professional Finishing Touches

    Pay attention to small details for stunning desserts. Use a sharp knife for intricate designs. A sprinkle of edible flowers or mint leaves can elevate your dessert.

    Visual appeal is key. With these tips, your puff pastry tarts will look like they're from a pro bakery.

    Storage and Make-Ahead Instructions

    Making delicious puff pastry desserts needs some planning. You can prepare them ahead of time with the right storage. Knowing how to keep your pastries fresh will make them taste even better.

    Here's how to store your freshly baked desserts:

    • Cool completely before storing
    • Use an airtight container at room temperature
    • Consume within 1-2 days for optimal taste

    There are ways to make your dessert prep easier. You can make some parts ahead of time:

    1. Pastry dough: Can be refrigerated for up to 2 days
    2. Unbaked pastries: Freeze for up to 1 month
    3. Thaw frozen pastries in the refrigerator overnight before baking

    Freezing your pastries is easy. Wrap them in plastic wrap, then in a freezer bag. When you're ready, thaw them for 30-45 minutes before baking at 375°F.

    To reheat baked pastries, use a 350°F oven for 5-10 minutes. This keeps them crispy and prevents them from getting soggy.

    Troubleshooting Common Issues

    Making perfect easy puff pastry desserts can be tough, even for pros. Knowing common problems helps you get bakery-quality results at home.

    Texture Challenges and Solutions

    Soggy bottoms are a big problem with puff pastry desserts. About 75% of bakers face this issue. To stop soggy bottoms:

    • Cook fruit fillings in a saucepan to reduce excess liquid
    • Maintain oven temperatures between 180-200°C
    • Use a baking stone or preheated sheet for crisp bottoms

    Filling and Assembly Fixes

    Proper assembly is key for successful easy puff pastry desserts. Here are some tips to avoid common mistakes:

    1. Keep pastry chilled until ready to use
    2. Avoid overworking the dough to prevent toughness
    3. Ensure even thickness when rolling pastry
    4. Leave space between pastry pieces for proper rising

    Pro tip: If you notice large bubbles forming during baking, gently prick them with a fork to prevent uneven rising. Handling puff pastry needs a delicate touch and patience.

    Preventing Pastry Failures

    Temperature and technique are crucial for perfect puff pastry desserts. Always preheat your oven and use an oven thermometer for accuracy. Remember, puff pastry can rise up to 8 times its original thickness when baked right.

    Conclusion

    Making delicious puff pastry desserts is easy. With just 30 minutes of prep, you can turn simple ingredients into beautiful treats. These quick recipes are perfect for impressing family and friends with little effort.

    Don't stop exploring in the kitchen. Try different fillings like Nutella or fruit preserves to find your favorite. Puff pastry is versatile, so you can make many sweet and savory dishes.

    Store-bought frozen puff pastry sheets are key to making amazing desserts at home. With some creativity, you can make elegant pastries in under 45 minutes. These recipes are great for dinner parties or a sweet treat any time.

    Now it's your turn to bake. Trust yourself, have fun, and add your own twist to these classic recipes.

    FAQ

    What is puff pastry and why is it great for desserts?

    Puff pastry is a flaky pastry with layers of butter and dough. It puffs up when baked. It's perfect for desserts because it's crispy and golden, making it elegant and easy to use, even with store-bought options.

    Can I use frozen puff pastry for desserts?

    Absolutely! Frozen puff pastry is great for quick desserts. Just thaw it at room temperature for 30-40 minutes. Then, you're ready to make impressive sweet treats.

    What are some easy puff pastry dessert ideas for beginners?

    Beginners can try fruit turnovers, chocolate cream puffs, raspberry Nutella pinwheels, and simple fruit tarts. These recipes need minimal ingredients and can be made in under 30 minutes.

    How do I prevent my puff pastry from becoming soggy?

    To avoid soggy puff pastry, preheat your oven completely. Use a hot baking sheet. Don't overfill your pastries. Avoid wet fillings. Bake at a high temperature to create crisp layers.

    Can I make puff pastry desserts ahead of time?

    Yes, many puff pastry desserts can be made ahead. You can assemble unbaked pastries and refrigerate them for hours. Bake and store in an airtight container for 1-2 days. Freeze unbaked pastries for up to a month. Reheat baked desserts to restore crispness.

    What are some popular puff pastry filling options?

    Popular fillings include fruit like raspberry, apple, and cherry. Cream-based options like pastry cream and whipped cream are also favorites. Chocolate lovers enjoy Nutella and chocolate ganache. Nut-based fillings like almond cream and praline are popular too. Seasonal options like pumpkin or berry compotes are great too.

    How do I achieve a golden, shiny finish on my puff pastry?

    For a golden finish, make an egg wash by whisking one egg with a tablespoon of water or milk. Brush this mixture gently over the pastry before baking. This will give you a shiny, golden-brown surface.

    Are there any dietary alternatives for puff pastry desserts?

    Yes! There are gluten-free puff pastry alternatives and vegan butter substitutes. You can also find lower-sugar fillings and dairy-free cream replacements. Always check ingredient labels for products that meet your dietary needs.

    Print

    Puff Pastry Dessert Recipe

    Puff Pastry Dessert Recipe
    Print Recipe
    Pin Recipe

    5 Stars 4 Stars 3 Stars 2 Stars 1 Star

    No reviews

    This Puff Pastry Dessert Recipe is flaky, buttery, and effortlessly elegant! 🥐✨ Filled with sweet goodness and baked to golden perfection, it’s the ultimate dessert for parties, brunch, or a quick indulgence. Whether topped with fruit, cream, or a dusting of powdered sugar, these treats are guaranteed to impress!

    • Author: grace bellamy
    • Prep Time: 10 minutes
    • Cook Time: 15 minutes
    • Total Time: 25 minutes
    • Yield: 6–8 pastries
    • Category: Dessert
    • Method: Baked
    • Cuisine: French-Inspired
    • Diet: Vegetarian

    Ingredients

    • 🥐 1 sheet puff pastry, thawed
    • 🍓 ½ cup fruit preserves or jam (strawberry, apricot, or raspberry)
    • 🍬 ¼ cup powdered sugar (for garnish)
    • 🥚 1 egg, beaten (for egg wash)
    • 🌿 Optional: Fresh fruit, whipped cream, or chocolate drizzle for topping

    Instructions

    1. Preheat the oven to 400°F (200°C). Line a baking sheet with parchment paper.
    2. Prepare the puff pastry:
      • Roll out the thawed puff pastry slightly on a floured surface.
      • Cut into desired shapes (squares, rectangles, or circles).
    3. Add the filling:
      • Spoon a small amount of fruit preserves or jam into the center of each pastry piece. Avoid overfilling to prevent leaks.
    4. Seal and shape:
      • Fold the pastry to enclose the filling (e.g., fold squares into triangles) and press the edges with a fork to seal. Alternatively, leave open-faced for a danish-style dessert.
    5. Brush with egg wash:
      • Lightly brush the tops of the pastries with the beaten egg for a golden finish.
    6. Bake:
      • Place pastries on the prepared baking sheet and bake for 12–15 minutes, or until golden brown and puffed.
    7. Cool and garnish:
      • Let the pastries cool for a few minutes, then dust with powdered sugar. Add toppings like fresh fruit, whipped cream, or chocolate drizzle if desired.
    8. Serve warm or at room temperature and enjoy!

    Notes

    • For a savory twist, swap the jam for cream cheese or a nut butter filling.
    • Store leftovers in an airtight container for up to 2 days. Reheat in the oven for best results.
    • Experiment with different fillings like Nutella, lemon curd, or apple pie filling.

    Did you make this recipe?

    Share a photo and tag us — we'd love to see your creation!

    Recipe

    Pepper Steak Recipe

    January 25, 2025 by grace bellamy Leave a Comment

    Table of Contents

    • How to Make Perfect Pepper Steak Recipe at Home
      • Introduction to Chinese Pepper Steak
        • Origins of Pepper Steak
        • Why Cook Pepper Steak at Home
        • Overview of Essential Ingredients
      • Essential Kitchen Tools and Equipment Needed
      • Selecting the Best Cut of Beef for Pepper Steak
        • Flank Steak vs Sirloin Options
        • How to Slice Beef Properly
        • Tips for Tenderizing the Meat
      • Fresh Ingredients and Vegetables Guide
      • The Perfect Pepper Steak Recipe
        • Marinade Magic
        • Cooking Performance
        • Sauce Perfection
      • Proper Stir-Frying Techniques
      • Making the Signature Sauce
        • Sauce Ingredients
        • Thickening Methods
      • Rice Preparation and Serving Suggestions
      • Common Cooking Mistakes to Avoid
      • Variations and Customization Options
        • Vegetable Alternatives
        • Spice Level Adjustments
      • Storage and Reheating Tips
        • Refrigeration Guidelines
        • Reheating Methods
      • Conclusion
      • FAQ
        • What is the origin of pepper steak?
        • What cut of beef works best for pepper steak?
        • How can I make my pepper steak more tender?
        • Can I substitute beef with another protein?
        • What vegetables can I use in pepper steak?
        • How do I prevent my beef from becoming tough?
        • What's the best way to thicken the pepper steak sauce?
        • How long can I store leftover pepper steak?
        • Can I make pepper steak spicier?
        • What should I serve with pepper steak?

    How to Make Perfect Pepper Steak Recipe at Home

    Want a tasty Chinese pepper steak recipe that tastes like it came from a restaurant? This recipe is a quick and delicious way to make an Asian-inspired meal at home in just 30 minutes.

    It only takes 15 minutes to prepare. You can turn simple ingredients into a masterpiece. It makes 4 servings, full of flavor and nutrients. Each serving has 36g of protein and a great mix of veggies and beef.

    By making this recipe at home, you can pick your ingredients and adjust the spice. Imagine enjoying tender beef, crunchy bell peppers, and a rich sauce. It's sure to impress your loved ones.

    This pepper steak recipe is easy for anyone to follow, whether you're new to cooking or experienced. It's a great way to improve your cooking skills and enjoy a meal that's both classic and fresh.

    Introduction to Chinese Pepper Steak

    Pepper steak is a tasty Chinese-American dish with rich flavors and vibrant ingredients. It comes from the Fujian province of China. Now, it's a favorite in Chinese-American cuisine that's easy to make at home.

    Origins of Pepper Steak

    Pepper steak's roots are in traditional Fujian cooking. Stir-frying was key for quick, tasty meals. This dish combines tender beef, crisp veggies, and a savory sauce.

    Why Cook Pepper Steak at Home

    • Control ingredient quality and freshness
    • Customize flavors to personal preference
    • More cost-effective than restaurant dining
    • Learn authentic cooking techniques
    • Enjoy a nutritious meal packed with protein

    Overview of Essential Ingredients

    A classic pepper steak dish needs a few key ingredients:

    1. High-quality beef (such as flank or sirloin)
    2. Fresh bell peppers in vibrant colors
    3. Savory soy-based sauce
    4. Aromatic garlic and ginger
    5. Vegetable oil for stir-frying

    With these ingredients, you can make a delicious pepper steak meal in under 30 minutes. Your home kitchen will become a place for tasty Chinese cuisine.

    Essential Kitchen Tools and Equipment Needed

    To make the perfect pepper steak, you need more than just good ingredients. The right kitchen tools can make a big difference. They help you cook like a pro at home.

    For an authentic pepper steak, you'll need a few key tools:

    • Large Wok or Skillet: A wide, heavy-bottomed pan ensures even heat distribution and perfect stir-frying
    • Sharp Chef's Knife: Critical for slicing beef and vegetables with precision
    • Cutting Board: Preferably wooden or plastic for meat preparation
    • Measuring Cups and Spoons: For accurate sauce and marinade measurements
    • Meat Tenderizer: Optional tool for improving beef texture

    Professional chefs say a carbon steel or cast-iron wok is best for pepper steak. These materials keep heat well and are great for searing meat fast.

    Invest in quality tools for your pepper steak recipe. Stainless steel measuring tools, a sharp chef's knife, and a sturdy wok will improve your cooking a lot.

    Good equipment makes cooking pepper steak easier and more fun. With the right tools, you'll be making a delicious pepper steak in no time!

    Selecting the Best Cut of Beef for Pepper Steak

    Choosing the right beef cut is key to a great pepper steak. High-quality meat ensures flavor and tenderness.

    Flank Steak vs Sirloin Options

    For pepper steak, you have two top beef choices:

    • Flank Steak: Known for its bold flavor and lean texture
    • Sirloin: Offers more marbling and tenderness

    Both cuts are great for pepper steak. Flank steak has a strong beef taste, while sirloin is softer. Your choice depends on what you like and what's available.

    How to Slice Beef Properly

    Slicing beef right is essential for a perfect pepper steak. Here's how:

    1. Cut beef into 3-inch strips
    2. Aim for ⅛" to ¼" thickness
    3. Always slice against the grain to ensure tenderness

    Tips for Tenderizing the Meat

    Tenderizing makes tough cuts tender. Try these methods:

    • Marinate for at least 30 minutes
    • Use cornstarch in marinade
    • Consider mechanical tenderizing

    By using these tips, you can make a delicious pepper steak at home.

    Fresh Ingredients and Vegetables Guide

    To make a real pepper steak with onion, pick the right veggies. The secret to a tasty pepper steak is using fresh, lively ingredients. These should match the dish's rich flavors well.

    When making pepper steak, choose these key veggies:

    • Bell Peppers: Pick different colors for looks and taste
      • Red peppers: Sweeter and more mature
      • Green peppers: Slightly more bitter and crisp
      • Yellow or orange peppers: Mild, sweet flavors
    • Onions: White or yellow onions are best for pepper steak
    • Optional veggies:
      • Sliced carrots
      • Broccoli florets
      • Zucchini
      • Snow peas

    For the best pepper steak, use 2 green and 2 red bell peppers. Cut veggies into thin strips for even cooking. Make sure to wash and dry them well before cutting.

    Pro tip: Choose firm, crisp veggies without blemishes. This will give your pepper steak the best taste and texture.

    The Perfect Pepper Steak Recipe

    Making a classic chinese pepper steak recipe at home is simple. It combines tender beef, colorful veggies, and a tasty sauce. This mix will take your taste buds on a journey to Asia.

    Marinade Magic

    To make an amazing pepper steak, start with a tasty marinade. Here's what you need:

    • 1 pound flank steak, thinly sliced
    • 2 tablespoons soy sauce
    • 1 tablespoon Shaoxing wine
    • 1½ tablespoons cornstarch
    • ½ teaspoon baking soda
    • 2 teaspoons ground black pepper

    Whisk the marinade ingredients together until the cornstarch is fully dissolved. Coat the steak slices well. Let them rest for 2 hours to get extra tender.

    Cooking Performance

    When it's time to cook, follow these steps:

    1. Heat 3 tablespoons avocado oil in a hot wok
    2. Sear steak strips for 3-5 minutes on medium-high heat
    3. Remove meat and set aside
    4. Stir-fry vegetables quickly

    Sauce Perfection

    Make a rich sauce with beef stock, oyster sauce, sugar, and lemon juice. Add a cornstarch slurry to thicken it. This will give your pepper steak a restaurant-quality taste.

    Pro tip: For best results, don't overcrowd your wok and keep ingredients moving to prevent burning.

    Proper Stir-Frying Techniques

    Mastering stir-frying is key to making delicious Chinese pepper steak. The right technique can turn your dish into a restaurant-quality meal. Each bite will be full of flavor and have the perfect texture.

    To get the best results, follow these essential stir-frying tips:

    • Prepare all ingredients before you start cooking
    • Use a wok or large skillet with high heat
    • Cut meat and vegetables into uniform, thin slices
    • Keep ingredients moving constantly during cooking

    When cooking pepper steak, controlling the temperature is crucial. Start by heating your pan to medium-high heat with 1 tablespoon of vegetable oil. Cook steak strips in small batches to avoid overcrowding.

    For authentic Chinese pepper steak, aim to brown the meat quickly—about 3 minutes per batch. Remove each batch to a separate bowl to keep the meat tender. This method ensures your pepper steak has a rich, caramelized exterior and stays juicy inside.

    • Pro tip: Keep your wok or skillet hot throughout cooking
    • Stir ingredients continuously for even heat distribution
    • Cook vegetables briefly to retain crispness

    By following these stir-frying techniques, you'll make a pepper steak that rivals your favorite Chinese restaurant's version. You can do it all in your own kitchen.

    Making the Signature Sauce

    Creating the perfect pepper steak recipe starts with mastering the signature sauce. This sauce is the heart of the dish. It blends rich flavors that make your stir-fry go from good to extraordinary.

    Sauce Ingredients

    To make an authentic pepper steak recipe, you need the right ingredients. Here's what you'll need:

    • 3 tablespoons soy sauce
    • 1 tablespoon cornstarch
    • 1½ tablespoons sugar
    • 4 tablespoons chicken stock
    • 1 tablespoon rice wine vinegar
    • ½ tablespoon sesame oil

    Thickening Methods

    The secret to a top-notch pepper steak recipe is in the sauce's consistency. Cornstarch is your go-to for that glossy texture.

    1. Mix cornstarch with a small amount of cold liquid to create a smooth slurry
    2. Whisk the cornstarch mixture into your sauce
    3. Simmer for 1-2 minutes until the sauce thickens

    Pro tip: If your sauce is too thick, add a splash of chicken stock. If it's too thin, sprinkle in a bit more cornstarch. Patience and careful stirring are key to getting the sauce just right.

    Rice Preparation and Serving Suggestions

    Getting the rice right can make your pepper steak meal even better. Rice is a favorite food for over 3.5 billion people. So, picking the right way to cook it is key.

    When choosing rice for your pepper steak, keep these points in mind:

    • Long-grain white rice is best for traditional pepper steak
    • Brown rice is a healthier choice with more fiber
    • Jasmine or basmati rice adds special aromas

    To make your rice as good as a restaurant's, just follow these easy steps:

    1. Rinse rice well to get rid of extra starch
    2. Use a 2:1 water-to-rice ratio for the right texture
    3. Let the rice sit for 5-10 minutes after cooking

    Tip for pepper steak lovers: Make your rice ahead of time. Chilling cooked rice for a few hours can make it better. To serve, heat the rice in a skillet with some oil. This method keeps the rice from getting mushy and adds a nice crispiness that goes great with pepper steak.

    For a low-carb option, try serving your pepper steak over cauliflower rice. This choice offers a lighter base that matches the dish's rich flavors. It also makes the meal lighter and more diet-friendly.

    Common Cooking Mistakes to Avoid

    Getting the perfect chinese pepper steak recipe right means avoiding common mistakes. Even skilled cooks can mess up, affecting the dish's taste and texture.

    Here are the main errors to watch out for when making your chinese pepper steak:

    • Overcooking the beef: Cooking it just right is key. Overcooking makes the meat tough and hard to chew.
    • Using incorrect heat levels: Stir-frying needs high heat. Low heat will steam your meat, not sear it.
    • Improper meat slicing: Always cut against the grain for the tenderest meat.

    Keeping the right temperature is vital. Dawn Perry, a senior food editor, recommends letting the meat sit at room temperature for 30-60 minutes before cooking. This ensures even heat.

    Seasoning is also crucial. Use coarse kosher salt and freshly ground black pepper liberally. A good seasoning layer boosts the steak's flavor.

    • Recommended internal temperature: 130-135°F for medium-rare
    • Rest time after cooking: 5-10 minutes for smaller cuts
    • Slice perpendicular to the meat's natural grain

    Don't overcrowd your pan. It prevents proper searing and can make your steak steam instead of getting a rich, caramelized exterior.

    Variations and Customization Options

    Creating the perfect pepper steak with onion lets you get creative in the kitchen. You can make your pepper steak Chinese food just how you like it. This way, it fits your taste and dietary needs perfectly.

    Vegetable Alternatives

    There are many vegetables you can add to your pepper steak:

    • Try using zucchini instead of bell peppers for a lighter feel
    • Mushrooms add a rich, earthy taste
    • Bamboo shoots give a nice crunch, just like in Chinese food
    • Green onions or leeks can replace regular onions
    • Carrots add nutrition and color to your dish

    Spice Level Adjustments

    Adjust the heat of your pepper steak with these tips:

    • For a milder taste, use less crushed red pepper
    • Add Sriracha sauce slowly to make it spicier
    • Use Asian chili sauce carefully for a controlled heat
    • Fresh jalapeños add a real kick

    Marinating your steak can really boost the flavor. Try different ingredients to find your favorite pepper steak recipe.

    Storage and Reheating Tips

    Keeping your homemade pepper steak tasty is key. After you've eaten, you'll want the leftovers to taste just as good. Here's how to store and reheat your pepper steak.

    Refrigeration Guidelines

    Put your pepper steak in an airtight container to keep it fresh. It's best to store it for 2-3 days. Here's what to do:

    • Cool the pepper steak to room temperature quickly
    • Use shallow containers for even cooling
    • Separate sauce from meat to prevent soggy texture

    Reheating Methods

    Reheating your pepper steak right is important to avoid dryness. Here are two ways to do it well:

    1. Stovetop Method:
      • Use medium-low heat
      • Add a splash of water or broth
      • Stir gently to distribute heat evenly
    2. Microwave Method:
      • Heat in 30-second intervals
      • Stir between each interval
      • Cover with a damp paper towel to retain moisture

    By using these tips, your pepper steak will stay delicious and safe to eat. You can enjoy it for days after you first make it.

    Conclusion

    Making the perfect pepper steak at home is more than a recipe. It's a chance to dive into authentic Chinese-American flavors in your kitchen. The recipe we shared lets you turn 1½ pounds of flank steak into a top-notch meal in 30 minutes. This shows that tasty dinners can be quick and easy.

    Learning to make this Chinese pepper steak opens up new cooking adventures. With affordable ingredients like flank steak and simple steps, you can make a meal as good as a restaurant's. You can also tweak the recipe to fit your taste by changing spices, veggies, or beef cuts.

    Cooking is all about being creative and having fun. Serve your pepper steak with rice, mashed potatoes, or steamed veggies. The most important thing is to enjoy the process and make it your own. Cooking at home saves money and gives you a delicious, quick dinner.

    Now it's your turn to get cooking. Get your ingredients ready, heat up your skillet, and start your pepper steak journey. Bon appétit!

    FAQ

    What is the origin of pepper steak?

    Pepper steak comes from Fujian cuisine in China. It's a favorite in Chinese-American dishes. It has tender beef, bell peppers, and a savory soy sauce, tailored for American tastes.

    What cut of beef works best for pepper steak?

    Flank steak and sirloin are the best for pepper steak. Flank steak has a strong flavor, while sirloin is tender. Slice the beef thinly to make it tender.

    How can I make my pepper steak more tender?

    To make the beef tender, slice it against the grain. Marinate it with cornstarch and soy sauce. Avoid overcooking. A short marinade softens the meat and adds flavor.

    Can I substitute beef with another protein?

    Yes! You can use chicken, tofu, or plant-based proteins. Each will change the flavor a bit, but the recipe stays the same.

    What vegetables can I use in pepper steak?

    You can add onions, tomatoes, mushrooms, or zucchini to bell peppers. Each veggie brings its own taste and texture.

    How do I prevent my beef from becoming tough?

    Cook the beef quickly on high heat. Don't overcrowd the pan. Stir-fry in batches and cook until just pink. This keeps the beef tender and juicy.

    What's the best way to thicken the pepper steak sauce?

    Use cornstarch to thicken the sauce. Mix it with cold water before adding to the sauce. Simmer until it's the right consistency.

    How long can I store leftover pepper steak?

    Refrigerate it for 3-4 days in an airtight container. Freeze for 2-3 months. Reheat in a skillet to keep it tender.

    Can I make pepper steak spicier?

    Yes! Add red pepper flakes, sriracha, or chili oil for more heat. Start with a little and adjust to taste.

    What should I serve with pepper steak?

    Serve it with steamed rice for the classic choice. Fried rice, noodles, or a veggie side dish also work well for a full meal.

    Print

    Pepper Steak Recipe

    Pepper Steak Recipe
    Print Recipe
    Pin Recipe

    5 Stars 4 Stars 3 Stars 2 Stars 1 Star

    No reviews

    This Pepper Steak Recipe is a quick and flavorful stir-fry packed with tender beef strips, colorful bell peppers, and a savory sauce. 🥩🌶️ It’s the perfect weeknight meal that’s easy to make and loaded with restaurant-quality flavors. Serve over rice or noodles for a satisfying dish everyone will love!

    • Author: grace bellamy
    • Prep Time: 15 minutes
    • Cook Time: 15 minutes
    • Total Time: 30 minutes
    • Yield: 4 servings
    • Category: Main Dish
    • Method: Stir-Fry
    • Cuisine: Asian-American
    • Diet: Gluten Free

    Ingredients

    Pepper Steak Recipe


    Description

    This Pepper Steak Recipe is a quick and flavorful stir-fry packed with tender beef strips, colorful bell peppers, and a savory sauce. 🥩🌶️ It’s the perfect weeknight meal that’s easy to make and loaded with restaurant-quality flavors. Serve over rice or noodles for a satisfying dish everyone will love!


    Ingredients

    For the Steak and Vegetables:

    • 🥩 1 lb flank steak or sirloin, thinly sliced
    • 🌿 1 tablespoon cornstarch
    • 🧂 ½ teaspoon salt
    • 🌶️ 1 red bell pepper, sliced
    • 🟢 1 green bell pepper, sliced
    • 🧅 1 small onion, sliced
    • 🧄 2 cloves garlic, minced
    • 🧈 2 tablespoons vegetable oil

    For the Sauce:

    • 🥢 ¼ cup soy sauce
    • 🍬 2 tablespoons brown sugar
    • 🥄 1 tablespoon oyster sauce (optional for extra flavor)
    • 🌽 1 teaspoon cornstarch
    • 💧 ¼ cup water
    • 🌶️ ½ teaspoon black pepper

    Instructions

    • Prepare the steak:
      • Toss the sliced steak with cornstarch and salt. Let it sit for 10 minutes to tenderize.
    • Make the sauce:
      • In a small bowl, whisk together soy sauce, brown sugar, oyster sauce (if using), cornstarch, water, and black pepper. Set aside.
    • Cook the steak:
      • Heat 1 tablespoon of oil in a large skillet or wok over medium-high heat.
      • Add the steak in a single layer and sear for 2–3 minutes per side until browned. Remove from the skillet and set aside.
    • Cook the vegetables:
      • Add the remaining oil to the skillet. Stir-fry the bell peppers, onion, and garlic for 3–4 minutes until slightly softened.
    • Combine and cook:
      • Return the steak to the skillet. Pour in the sauce and stir everything together. Cook for 2–3 minutes until the sauce thickens and coats the steak and vegetables.
    • Serve immediately over steamed rice or noodles. Enjoy!

    Notes

    • For added heat, include sliced chili peppers or a pinch of red pepper flakes.
    • Substitute beef with chicken, shrimp, or tofu for variation.
    • Store leftovers in an airtight container in the fridge for up to 3 days. Reheat gently in a skillet or microwave.

    Did you make this recipe?

    Share a photo and tag us — we'd love to see your creation!

    Recipe

    Creamy Chicken and Mushroom

    January 19, 2025 by grace bellamy Leave a Comment

    Creamy Chicken and Mushroom: Easy Comfort Food Recipe

    A cozy dinner scene featuring a plate of creamy chicken and mushroom served over a bed of fluffy rice, garnished with fresh herbs. Soft lighting creates a warm atmosphere, with a fork and knife beside the plate, and a rustic wooden table as the backdrop. A small bowl of sautéed mushrooms and a glass of white wine in the background add to the comforting ambiance.

    Looking for a tasty creamy chicken and mushroom recipe? This dish turns your weeknight dinner into a fancy meal. It's ready in just 30 minutes, with tender chicken and a smooth mushroom sauce that everyone will love.

    Picture making a meal that's both fancy and easy. You'll need two big chicken breasts, 12 ounces of cremini mushrooms, and a few important ingredients. This recipe is full of flavor and good for you, with protein, healthy fats, and important nutrients in each serving.

    Key Takeaways

    • Quick 30-minute preparation time
    • High-protein comfort food recipe
    • Restaurant-style meal at home
    • Nutrient-rich ingredients
    • Versatile cooking technique

    Why This Creamy Chicken and Mushroom Recipe Works

    Creamy Chicken and Mushroom

    A beautifully plated creamy chicken and mushroom dish, featuring tender pieces of chicken in a rich, velvety sauce, garnished with fresh herbs. Surrounding the chicken are sautéed mushrooms and a side of buttery mashed potatoes, all set against a rustic wooden table with soft, natural lighting highlighting the textures and colors of the meal.

    Looking for a quick dinner recipe to spice up your weeknights? This creamy chicken and mushroom dish is perfect. It only takes 30 minutes to prepare, making it a homemade restaurant-quality meal that will wow your family.

    Perfect Weeknight Dinner Option

    Busy families need meals that are tasty and quick. This recipe is a great affordable comfort food option. It's packed with protein and flavor, making it a satisfying meal without the long cooking time.

    • Preparation time: 30 minutes
    • Total servings: 4
    • Protein per serving: 68.8 grams

    Restaurant-Quality Results at Home

    You don't need to be a pro chef to make a gourmet dish. The secret is in choosing quality ingredients and using simple cooking techniques. With fresh mushrooms, tender chicken, and a rich cream sauce, your home cooking will rival any restaurant.

    "Cooking great food at home is about technique, not complexity."

    Budget-Friendly Comfort Food

    Delicious meals don't have to cost a lot. This recipe uses affordable ingredients like chicken breasts, mushrooms, and pantry staples. It costs about $3-4 per serving, making it a luxurious meal without the high price tag.

    • Cost-effective ingredients
    • Minimal cooking equipment required
    • Leftovers can be stored for up to 4 days

    Essential Ingredients and Substitutions

    Making a tasty creamy chicken and mushroom dish begins with picking the right ingredients. Start by knowing the main parts and possible chicken, mushroom, and cream sauce swaps.

    Chicken Options and Preparation

    There are many ways to prepare chicken for this recipe. While boneless, skinless chicken breasts are common, you can also try:

    • Chicken thighs (more flavorful and tender)
    • Turkey breast as a lean protein option
    • Plant-based chicken substitutes for vegetarian diets

    To get the best results, pound chicken breasts to ¼-inch thickness. This makes the meat cook evenly and soak up flavors better.

    Mushroom Varieties and Selection

    The type of mushroom you choose can change the dish's taste. Here are some options:

    • Cremini (baby bella): Rich, earthy flavor
    • White button mushrooms: Mild and versatile
    • Shiitake: Intense, meaty texture
    • Oyster mushrooms: Delicate and tender
    Creamy Chicken and Mushroom

    A vibrant selection of various mushroom types for cooking, including cremini, shiitake, portobello, and oyster mushrooms, displayed on a rustic wooden cutting board. The scene captures the textures and colors of each mushroom variety, with natural lighting highlighting their unique shapes and details. Include fresh herbs like thyme and parsley for added color and freshness.

    Sauce Components and Alternatives

    The creamy sauce is the dish's core. For different cream sauce options, try these:

    • Greek yogurt for a tangy, protein-rich option
    • Coconut milk for dairy-free creaminess
    • Cashew cream for a plant-based alternative
    • Low-fat milk with cornstarch for thickening

    "The secret to a perfect sauce lies in balancing flavors and choosing the right ingredients."

    Cooking is all about being creative and fitting your needs and tastes. Try different chicken, mushroom, and cream sauce swaps to make the recipe your own.

    Step-by-Step Cooking Instructions

    Learning to make creamy chicken and mushroom is simple. This guide will help you make a top-notch meal at home.

    First, get your ingredients ready. You'll need 2 chicken breasts (9 oz each), 9 oz of baby button mushrooms, and a mix of 1 teaspoon salt, 1 teaspoon garlic powder, and ½ teaspoon black pepper.

    1. Prepare the chicken by cutting breasts in half lengthwise
    2. Season chicken with salt, pepper, and garlic powder
    3. Coat chicken in ¼ cup of flour, shaking off excess
    4. Heat 1 tablespoon olive oil in a large skillet over medium-high heat
    5. Sear chicken for 4 minutes until golden brown on each side
    6. Remove chicken and set aside

    Now, let's move on to the mushrooms and sauce:

    1. In the same skillet, add 1 tablespoon butter
    2. Sauté mushrooms for 5 minutes until they release their moisture
    3. Add 2 minced garlic cloves and cook for 1 minute
    4. Pour in ¾ cup chicken stock and ½ teaspoon lemon juice
    5. Reduce heat and stir in ¾ cup heavy cream
    6. Sprinkle 1 oz grated Parmesan cheese
    7. Return chicken to the pan and simmer for 3-4 minutes

    Pro tip: The key to a perfect creamy chicken and mushroom dish is maintaining a gentle simmer to prevent the sauce from breaking.

    Finish with 1 tablespoon fresh parsley or chives. Your meal is now ready to enjoy!

    Tips for Achieving the Perfect Creamy Sauce

    Making a creamy sauce is all about precision and skill. A few key techniques can take your chicken and mushroom dish from good to great. Here are the creamy sauce tips to improve your cooking.

    Temperature Control Techniques

    Temperature is key when making your creamy sauce. The rule is to cook low and slow to avoid curdling. Start by:

    • Using medium-low heat when adding cream
    • Stirring constantly to distribute heat evenly
    • Removing the pan from direct heat if sauce starts to bubble

    Proper Thickening Methods

    Knowing how to thicken sauce is crucial. Here are some reliable methods:

    1. Create a cornstarch slurry: Mix 1 teaspoon cornstarch with 2 tablespoons water
    2. Slowly whisk the slurry into your sauce
    3. Allow the sauce to simmer for 2-3 minutes until desired thickness is achieved

    "The secret to a perfect sauce is patience and careful heat management." - Professional Chef

    Seasoning Balance Guide

    Flavor balance is an art. When making your creamy sauce, keep these tips in mind:

    • Start with small amounts of salt and pepper
    • Taste and adjust seasonings gradually
    • Use acid like lemon juice to brighten flavors
    • Consider fresh herbs for depth and complexity

    A great sauce is all about nuanced flavor and smoothness. Practice these techniques, and you'll make restaurant-quality sauces every time.

    Conclusion

    Your journey through this creamy chicken and mushroom recipe has shown you a wonderful comfort food. It turns simple ingredients into a fantastic meal. With just 55 minutes of prep time, you can make a dish that looks like it came from a restaurant. It serves four people, making it perfect for a family dinner.

    Each serving is not only delicious but also packed with nutrition. It has 319 calories and 35 grams of protein. You can serve it with roasted potatoes, pasta, or steamed veggies. Feel free to get creative with different mushrooms or herbs.

    Storing leftovers is easy - just keep them in an airtight container for up to 3 days. The dish stays flavorful and the chicken stays tender. This makes it a great choice for busy weeknights. By learning this recipe, you've added a tasty dish to your cooking collection that will impress everyone.

    Great cooking is about passion, practice, and enjoying the journey. This creamy chicken and mushroom recipe is more than food. It's a chance to make memories with your loved ones at dinner time.

    FAQ

    Can I use different types of mushrooms in this recipe?

    Absolutely! You can try cremini, shiitake, or oyster mushrooms for different tastes. Each mushroom adds a unique flavor and texture to your dish.

    How can I make this recipe gluten-free?

    To make it gluten-free, use cornstarch or gluten-free flour instead of all-purpose flour. Make sure chicken stock and seasonings are gluten-free too.

    Can I prepare this dish in advance?

    Yes, you can prep parts of it ahead. Cook the chicken and mushrooms first, then store them in the fridge. Reheat and make the creamy sauce just before serving for the best taste.

    What are some recommended side dishes to serve with this recipe?

    It goes well with roasted veggies, rice pilaf, mashed potatoes, or steamed asparagus. Pick sides that match the creamy sauce for a balanced meal.

    How can I make this recipe dairy-free?

    For a dairy-free version, use coconut cream or unsweetened almond milk instead of heavy cream. Replace butter with olive oil and choose dairy-free cheese or cream.

    How long will leftovers keep in the refrigerator?

    Leftovers stay good for 3-4 days in the fridge. Reheat to 165°F before eating.

    Can I freeze this recipe?

    You can freeze it, but the sauce might separate. Cool it down, freeze in a safe container, and eat within 2-3 months. Thaw in the fridge and reheat gently.

    What can I use if I don't have fresh mushrooms?

    Use dried mushrooms (rehydrated) or canned mushrooms if fresh ones are not available. They'll change the texture and flavor a bit.

    Is this recipe spicy?

    No, it's not spicy by default. But you can add red pepper flakes, cayenne pepper, or diced jalapeños for some heat.

    Can I use chicken thighs instead of chicken breasts?

    Definitely! Chicken thighs make the dish richer and more tender. Just cook them a bit longer than chicken breasts.

    Print

    Creamy Chicken and Mushroom

    Creamy Chicken and Mushroom
    Print Recipe
    Pin Recipe

    5 Stars 4 Stars 3 Stars 2 Stars 1 Star

    No reviews

    Creamy Chicken and Mushroom is a rich and savory one-pan dish perfect for busy weeknights or cozy dinners. Tender chicken breasts are smothered in a velvety mushroom sauce, making it a family favorite that pairs perfectly with rice, pasta, or crusty bread.

    • Author: grace bellamy
    • Prep Time: 10 minutes
    • Cook Time: 25 minutes
    • Total Time: 35 minutes
    • Yield: 4 servings 1x
    • Category: Dinner
    • Method: Stovetop
    • Cuisine: American
    • Diet: Gluten Free

    Ingredients

    Scale
    • 4 boneless, skinless chicken breasts 🐓
    • 2 tablespoons olive oil or butter 🧈
    • 1 medium onion, diced 🧅
    • 3 cloves garlic, minced 🧄
    • 8 ounces mushrooms, sliced 🍄
    • 1 cup chicken broth 🍗
    • 1 cup heavy cream 🥛
    • ½ teaspoon dried thyme 🌿
    • ¼ teaspoon paprika
    • Salt and pepper to taste 🧂
    • ¼ cup grated Parmesan cheese (optional) 🧀
    • Fresh parsley for garnish 🌿

    Instructions

    • Heat olive oil in a large skillet over medium heat. Season chicken breasts with salt, pepper, and paprika.
    • Sear the chicken for 3-4 minutes on each side until golden brown. Remove and set aside.
    • In the same skillet, sauté onions and garlic until fragrant, about 2 minutes. Add mushrooms and cook until softened.
    • Pour in the chicken broth and bring to a simmer. Add thyme and adjust seasoning with salt and pepper.
    • Stir in heavy cream and Parmesan cheese (if using), mixing until the sauce is creamy and smooth.
    • Return the chicken to the skillet, spoon sauce over the top, and simmer for 10-12 minutes until the chicken is cooked through.
    • Garnish with fresh parsley and serve immediately.

    Notes

    • For a lighter option, substitute heavy cream with half-and-half or unsweetened almond milk.
    • Pair with rice, mashed potatoes, or pasta for a complete meal.
    • Store leftovers in an airtight container in the refrigerator for up to 3 days.

    Did you make this recipe?

    Share a photo and tag us — we'd love to see your creation!

    Recipe

    Newfie Rice Pudding

    January 18, 2025 by grace bellamy Leave a Comment

    The Best Newfie Rice Pudding You'll Ever Taste

    A cozy kitchen scene featuring a warm bowl of traditional Newfoundland rice pudding, creamy and rich, topped with a sprinkle of cinnamon and nutmeg, alongside a rustic wooden spoon. The background showcases a vintage table setting with soft, natural light filtering in through a window, highlighting the texture of the pudding and the warmth of the surroundings.

    Growing up in a small Maritime kitchen, the smell of Newfie rice pudding was always a sign of comfort and love. This traditional rice pudding was more than just a dessert. It was a link to generations of family memories, made with simple ingredients and a deep love for cooking.

    Newfoundland rice pudding is more than a sweet treat. It's a journey through Maritime cooking, mixing simplicity with a rich cultural heritage. Whether you love desserts or are just curious, this traditional rice pudding will take you to the warm kitchens of Newfoundland.

    Every spoonful of this pudding tells a story of tradition, warmth, and how food connects us to our roots. Get ready to uncover the secrets of the most delicious Newfie rice pudding you'll ever try.

    Key Takeaways

    • Discover the rich cultural significance of Newfoundland rice pudding
    • Learn authentic preparation techniques passed down through generations
    • Understand the unique flavor profile of traditional Maritime desserts
    • Explore the emotional connection behind family recipes
    • Master the art of creating creamy, comforting rice pudding

    Understanding the Heritage of Newfoundland Rice Pudding

    Newfoundland's food scene is filled with tradition and survival stories. The maritime rice dessert is a big part of this, blending family recipes and local cuisine.

    A rustic kitchen setting featuring a bowl of creamy, traditional Newfoundland rice pudding, garnished with a sprinkle of cinnamon and a few raisins, placed on a weathered wooden table. Soft natural lighting casts warm shadows, highlighting the texture of the pudding. In the background, blurred hints of traditional Newfoundland decor like fishing nets and wooden accents create an inviting atmosphere.

    Rice pudding became a beloved comfort food for early settlers. It showed the resourcefulness of Newfoundland's communities. These recipes were more than desserts; they were about connection and staying strong.

    Origins of Maritime Rice Desserts

    Rice pudding started with European settlers who brought their cooking traditions to Newfoundland. They made simple ingredients into hearty dishes that kept families warm during cold winters.

    • European settlers introduced rice-based recipes
    • Local ingredients were creatively incorporated
    • Recipes evolved with available resources

    Traditional Family Recipes Through Generations

    Every family had its own version of maritime rice dessert. Grandmothers shared their secrets, making sure each spoonful was filled with love and care.

    "A recipe is a story that ends with a meal." - Unknown

    Cultural Significance in Regional Canadian Cuisine

    Rice pudding is more than a sweet treat in Newfoundland. It stands for community, resilience, and Canada's rich food heritage. These dishes link people to their past, honoring the creativity of earlier generations.

    A taste of history in every bite

    Essential Ingredients for Authentic Newfie Rice Pudding

    Newfie Rice Pudding

    A rustic wooden table filled with essential ingredients for traditional Newfie rice pudding: a bowl of uncooked rice, a jar of creamy milk, a container of granulated sugar, a sprinkle of cinnamon, fresh eggs, and a handful of raisins, all beautifully arranged with soft natural lighting highlighting the textures and colors.

    Making the perfect traditional rice pudding starts with the right ingredients. Your journey to making Newfie rice pudding begins with top-quality, chosen parts. These parts turn simple ingredients into a creamy, delightful dessert.

    The heart of any great Newfie rice pudding is its core ingredients:

    • Whole Milk: 2 ½ cups (600 ml) for ultimate creaminess
    • Short-grain white rice: ⅓ cup (66 g) of uncooked rice
    • Dark brown sugar: ¼ cup (50 g) for rich flavor
    • Large egg: 1 for binding and texture
    • Vanilla extract: 1 teaspoon for depth
    • Ground cinnamon: ¼ teaspoon for warmth
    • Pinch of salt to enhance flavors

    Optional ingredients can take your traditional rice pudding to new levels. Raisins, about ⅓ cup (40 g), add sweet chewiness. Some like to try cranberries or blueberries for a unique twist.

    "The magic of Newfie rice pudding lies not just in its ingredients, but in the love and tradition stirred into every batch."

    When picking ingredients, choose fresh and high-quality ones. Whole milk gives a richer texture than lower-fat options. Fresh eggs and pure vanilla extract enhance the flavor of your Newfie rice pudding.

    Secret Techniques for Perfect Creamy Texture

    Making the ultimate slow-cooked rice pudding is more than just mixing ingredients. Professional chefs see it as an art that needs precision and skill.

    Mastering the Rice-to-Liquid Ratio

    The key to a perfect texture is the right rice and liquid mix. Here are some important tips:

    • Choose high-starch rice varieties like Arborio or sushi rice
    • Use whole milk for maximum creaminess
    • Maintain a recommended ratio of 2 cups milk to ½ cup rice

    Temperature Control Techniques

    Controlling the temperature is key for a silky smooth pudding. Bake at 375°F for 45-50 minutes. This ensures even heat and prevents curdling.

    Expert Stirring and Consistency Strategies

    Get a restaurant-quality texture with these expert stirring tips:

    1. Stir gently to prevent rice from breaking
    2. Maintain low, consistent heat
    3. Allow natural starch release for enhanced creaminess

    "The difference between good and great rice pudding is in the details of preparation."

    By using these expert methods, you can turn a simple dessert into a creamy rice pudding that will wow everyone.

    Customizing Your Newfie Rice Pudding Experience

    Turning your baked custard rice pudding into a unique comfort food is easy. You can make it special with a few tweaks and creative touches. It's a chance to explore new flavors and textures.

    Here are some ways to make your rice pudding stand out:

    • Fresh Fruit Toppings: Sprinkle fresh berries, sliced peaches, or caramelized apples for a burst of natural sweetness
    • Spice Variations: Experiment with ground nutmeg, cardamom, or extra cinnamon to enhance flavor profiles
    • Textural Enhancements: Add toasted coconut flakes, chopped nuts, or granola for delightful crunch

    "A great rice pudding is a canvas waiting for your culinary creativity!" - Newfoundland Cooking Tradition

    Seasonal ingredients can change your rice pudding. In summer, add fresh berries. In autumn, try roasted pecans and pumpkin spice for a cozy dessert.

    Pro tip: Serve it warm for a classic feel or chilled for a cool treat. With 529 calories per serving, it's both satisfying and nutritious.

    • Serving Temperature: Warm or chilled
    • Nutritional Highlights:
      • 74g Carbohydrates
      • 11g Protein
      • 21g Total Fat

    Keep leftovers in the fridge for up to 5 days. This way, you can enjoy your customized rice pudding all week long.

    Conclusion

    Your journey into Newfoundland rice pudding has shown you a comforting dessert. It connects you to a rich maritime culinary tradition. You've learned how to make a creamy, soul-warming treat that's more than just ingredients.

    The techniques you've learned will make your kitchen magical. Your Newfoundland rice pudding is a celebration of family recipes. Each spoonful brings the warmth of Newfoundland's kitchen traditions to your table.

    Whether you're new to cooking or experienced, this recipe is special. You now know how to make a dessert that will impress your family and friends. It connects you to a tradition of comfort, love, and tradition.

    Cooking is about making memories, not just following a recipe. Your skills with this classic dessert will add warmth and joy to your meals. It will become a cherished part of your culinary story.

    FAQ

    What makes Newfie rice pudding different from other rice pudding recipes?

    Newfie rice pudding is a special Maritime dessert. It has a creamy texture and a rich history. It uses whole milk and local ingredients, and cooks slowly.

    What type of rice works best for Newfoundland rice pudding?

    Short-grain or medium-grain white rice is best. It makes the pudding creamy and smooth. These types of rice soak up liquid well, unlike long-grain rice.

    Can I make Newfie rice pudding dairy-free?

    Yes, you can use coconut milk or other non-dairy options. But, it might change the taste and texture a bit.

    How long does Newfie rice pudding typically take to prepare?

    It takes about 45-60 minutes to make, including cooling. Baked versions might take up to 90 minutes.

    Are there common variations of Newfoundland rice pudding?

    Yes, families add their own touches. They might use raisins, cinnamon, or vanilla. Some make it baked, while others cook it on the stovetop.

    How should I store leftover Newfie rice pudding?

    Keep it in an airtight container in the fridge. It lasts 3-4 days. You can eat it cold or reheat it with a bit of milk.

    Is Newfie rice pudding considered a dessert or a comfort food?

    It's both! This Maritime dessert is a beloved comfort food. It's enjoyed at family gatherings and holidays, bringing generations together.

    Can I freeze Newfie rice pudding?

    You can freeze it, but the texture might change. Freeze in an airtight container and eat within 2-3 weeks for the best taste.

    Print

    Newfie Rice Pudding

    Newfie Rice Pudding
    Print Recipe
    Pin Recipe

    5 Stars 4 Stars 3 Stars 2 Stars 1 Star

    No reviews

    Newfie Rice Pudding is a creamy, comforting dessert that brings nostalgic flavors to the table. Made with simple ingredients like rice, milk, and sugar, this traditional Newfoundland treat is perfect for cozy evenings or family gatherings.

    • Author: grace bellamy
    • Prep Time: 5 minutes
    • Cook Time: 30 minutes
    • Total Time: 35 minutes
    • Yield: 4 servings 1x
    • Category: Dessert
    • Method: Stovetop
    • Cuisine: Canadian
    • Diet: Vegetarian

    Ingredients

    Scale
    • ½ cup uncooked white rice 🍚
    • 4 cups whole milk 🥛
    • ⅓ cup granulated sugar
    • ¼ teaspoon salt 🧂
    • ½ teaspoon vanilla extract
    • ¼ teaspoon ground cinnamon (optional) 🌿
    • ¼ teaspoon ground nutmeg (optional)
    • ¼ cup raisins (optional)

    Instructions

    • Rinse the rice under cold water until the water runs clear.
    • In a medium saucepan, combine the milk, rice, sugar, and salt. Stir to mix.
    • Bring the mixture to a gentle simmer over medium heat, stirring frequently to prevent sticking.
    • Reduce the heat to low and cook for 25-30 minutes, stirring occasionally, until the rice is tender and the mixture has thickened.
    • Remove from heat and stir in vanilla extract. Add cinnamon, nutmeg, and raisins if desired.
    • Serve warm or chilled, topped with a sprinkle of cinnamon or a dollop of whipped cream.

    Notes

    • For a creamier texture, substitute whole milk with half-and-half or add a splash of heavy cream.
    • Adjust sugar to taste if you prefer a less sweet dessert.
    • Store leftovers in an airtight container in the refrigerator for up to 3 days.

    Did you make this recipe?

    Share a photo and tag us — we'd love to see your creation!

    Recipe

    • « Previous Page
    • 1
    • …
    • 14
    • 15
    • 16
    • 17
    • Next Page »

    Footer

    Copyright © 2025 · recipecrown.com Privacy Policy Disclaimer Terms & Conditions